
Working with and exchanging PDF files is common practice within a majority of organizations. Apple has provided APIs within iOS native access to lock and unlock PDF documents making implementing secure practices for this file format much easier. The Securely module exposes these native iOS APIs for your Titanium app to leverage.
This recipe demonstrates how to use the Securely framework to lock and unlock PDF files. Through the use of the PDF Locker sample, we will provide step-by-step instructions on how to protect and work with PDFs on the local device from within your Titanium app.
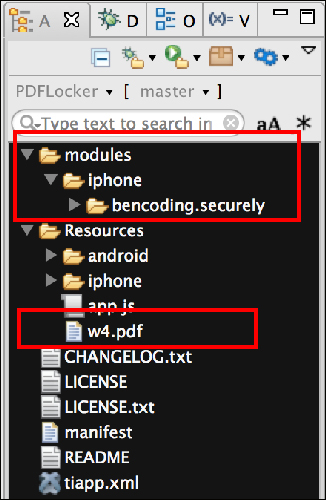
This recipe uses the Securely native module. This module and other code assets can be downloaded from the source provided by the book. Installing these in your project is straightforward. Simply copy the modules folder into your project as shown in the following screenshot. Next copy the w4.pdf file into the Resources folder of your project. This file will be used by the recipe to create the initial encrypted file:
After copying the modules folder, you will need to update the tiapp.xml references as demonstrated in the Getting ready section of the Using secure properties recipe.
Once you have added the module folder and w4.pdf sample file into your project, you need to create your application namespace in the app.js file and use require to import the module into your code as the following code snippet demonstrates:
//Create our application namespace
var my = {
  secure : require('bencoding.securely')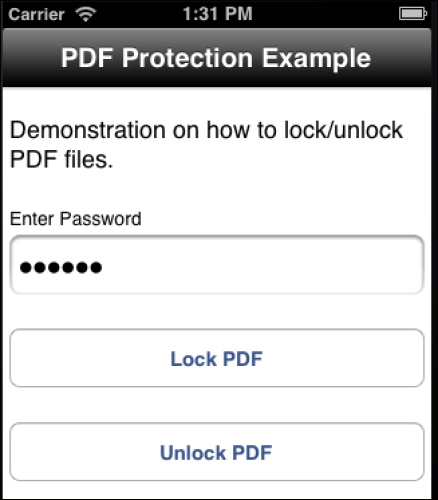
};This recipe walks through how to use the Securely module along with Titanium's Ti.FileSystem namespace to lock or unlock PDF files. The test harness pictured in the following screenshot is used to demonstrate how to perform these secure PDF actions:
Now perform the following steps:
- The first step in creating this test harness is a
Ti.UI.Window, which is created to attach all UI elements.var win = Ti.UI.createWindow({ backgroundColor: '#fff', title: 'PDF Protection Example', barColor:'#000',layout:'vertical' }); - The next step in creating our test harness UI is to add a
Ti.UI.TextFieldnamedtxtPassword. This control is used to obtain the password used during the encryption and decryption operations.var txtPassword = Ti.UI.createTextField({ value:'foo123',hintText:'Enter Password', height:45, left:5, right:5, passwordMask:true }); win.add(txtPassword); - The next step in creating our test harness UI is to add a
Ti.UI.ButtonnamedbtnLock. This control will be used to launch the PDF lock/protection process.var btnLock = Ti.UI.createButton({ title:'Lock PDF', top:25, height:45, left:5, right:5 }); win.add(btnLock); - The next step in creating our test harness UI is to add a
Ti.UI.ButtonnamedbtnUnlock. This control will be used to launch the PDF unlock or password removal process.var btnUnlock = Ti.UI.createButton({ title:'Unlock PDF', top:25, height:45, left:5, right:5 }); win.add(btnUnlock);
The PDF protecting or locking process is demonstrated using the click event of the btnLock Ti.UI.Button. The following section describes how to use the protect method of Securely for PDF locking:
btnLock.addEventListener('click',function(x){- The first step in the file decryption process is to create a callback method to receive the results from the
AESDecryptmethod. The followingonProtectedmethod demonstrates how to check for the different results provided during the callback process.function onProtected(e){ if(e.success){ alert('Protected PDF file created at: ' + e.to); }else{ alert('failed due to: ' + e.message); } }; - Next
Ti.FileSystem.Fileobjects are created for the input and output files.var inputFile = Ti.Filesystem.getFile( Ti.Filesystem.resourcesDirectory, 'w4.pdf'), outputFile = Ti.Filesystem.getFile( Ti.Filesystem.applicationDataDirectory, 'locked.pdf'),
- Then a new instance of the
PDFobject ofSecurelymust be created.var pdf = my.secure.createPDF();
- Finally the
protectmethod is called with the following parameters:userPassword: TheuserPasswordparameter is the user-level password for the PDF. This field is required.ownerPassword: TheownerPasswordparameter is the owner-level password for the PDF. Although this is optional, this value must be set in order to password-protect the document.from: Thefromparameter provides anativePathreference to the PDF file to be protected. Please note that the file itself is not locked, but simply used as the source to generate a protected PDF file at the path provided in thetoparameter.to: Thetoparameter provides thenativePathreference to where the protected PDF file should be generated. The application must be able to write to this file path or an IO exception will be generated.allowCopy: TheallowCopyis a Boolean parameter indicating whether the document allows copying when unlocked with the user password. This parameter defaults totrueand is optional.completed: Thecompletedparameter provides a reference to the callback method to be used upon completion of the execution of theprotectmethod.pdf.protect({ userPassword:txtPassword.value, ownerPassword:txtPassword.value, from:inputFile.nativePath, to:outputFile.nativePath, allowCopy:false, completed:onProtected }); });
The process of unlocking or removing PDF protection from an existing PDF file is demonstrated using the click event of the btnUnlock Ti.UI.Button. The following steps describes how to use the punprotect method of Securely for PDF unlocking:
btnUnlock.addEventListener('click',function(x){- The first step in unlocking a protected PDF file is to create a callback method to receive the results from the
unprotectmethod. The followingonUnlockmethod demonstrates how to check for the different results provided during the callback process.function onUnlock(e){ if(e.success){ alert('Unlocked PDF file created at: ' + e.to); }else{ alert('failed due to: ' + e.message); } }; - Next the
Ti.FileSystem.Fileobjects are created for the input and output files.var protectedFile = Ti.Filesystem.getFile( Ti.Filesystem.applicationDataDirectory, 'locked.pdf'), unlockedFile = Ti.Filesystem.getFile( Ti.Filesystem.applicationDataDirectory, 'unlocked.pdf'),
- Then, a new instance of the
PDFobject ofSecurelymust be created.var pdf = my.secure.createPDF();
- Finally the
unprotectmethod is called with the following parameters:password: The password parameter is the key used to unlock the protected PDF file. This password must match the owner password used in locking the document.from: The from parameter provides a nativePath reference to the protected PDF file. Please note the PDF file itself is not unlocked, but simply used as the source to generate a new unlocked PDF file at the path provided in the to parameter.to: The to parameter provides the nativePath reference to where the unlocked PDF file should be generated. The application must be able to write to this file path or an IO exception will be generated.completed: Thecompletedparameter provides a reference to the callback method to be used upon completion of the execution of theunprotectmethod.pdf.unprotect({ password:txtPassword.value, from:protectedFile.nativePath, to:unlockedFile.nativePath, completed:onUnlock }); });