10
Creating Your Own Arduino Libraries
In this chapter you will
- Learn the components of an Arduino library
- Create a simple library for a repetitive task
- Learn how to install your library in the Arduino IDE
- Create a library that accepts values to perform a function
- Create a library that processes data from a sensor and returns values in an easy-to-use form
Recall Project 22, described in Chapter 7, where you installed an Arduino library that included the functions needed to save data to an SD card. Using the library reduced the amount of time needed to write a sketch, as the library provides the functions related to the card module.
In the future, as you write sketches to solve your own problems and perform your own tasks, you may find yourself repeatedly using certain functions that you have created. At that point, it will be sensible to create your own Arduino library, which you can easily install and use in your sketches.
In this chapter, you will learn how to convert functions into an Arduino library. By following the examples presented here, you’ll learn what you need to know to make your own custom libraries. Let’s do this now.
Creating Your First Arduino Library
For our first example, consider Listing 10-1. It contains two functions, blinkSlow() and blinkFast(), which are used to blink the Arduino’s onboard LED at a slow or fast rate, respectively.
// Listing 10-1
void setup()
{
  pinMode(13, OUTPUT); // using onboard LED
}

void blinkSlow()
{
  for (int i = 0; i < 5; i++)
  {
    digitalWrite(13, HIGH);
    delay(1000);
    digitalWrite(13, LOW);
    delay(1000);
  }
}

void blinkFast()
{
  for (int i = 0; i < 5; i++)
  {
    digitalWrite(13, HIGH);
    delay(250);
    digitalWrite(13, LOW);
    delay(250);
  }
}

void loop()
{
  blinkSlow();
  delay(1000);
  blinkFast();
  delay(1000);
}
Listing 10-1: Blinking the Arduino’s onboard LED
Without a library, every time you wrote a new sketch and wanted to use the blinkSlow() and blinkFast() functions, you would have to enter them manually. On the other hand, if you put the code for your functions in a library, from then on, you’ll be able to call the library using just one line of code at the start of your sketch.
Anatomy of an Arduino Library
An Arduino library consists of three files, as well as some optional example sketches that demonstrate how the library could be used. The three requisite files for every Arduino library are these:
- <library>.h The header file
- <library>.cpp The source file
- KEYWORDS.TXT The keyword definitions
In the first two filenames, you’ll replace <library> with the actual name of your library. For our first example, we will call our Arduino library blinko. Thus, our two files will be blinko.h and blinko.cpp.
The Header File
The blinko.h file is known as a header file, because it contains the definitions of functions, variables, and so on used inside the library. The header file for the blinko library is shown in Listing 10-2.
// Listing 10-2
/*
1 blinko.h - Library for flashing an Arduino's onboard LED connected to D13
*/
2 #ifndef blinko_h
#define blinko_h

3 #include "Arduino.h" // gives library access to standard types and constants
                     // of the Arduino language

4 class blinko // functions and variables used in the library
{
  public:
    blinko();
    void slow();
    void fast();
};
5 #endif
Listing 10-2: The blinko library header file
The header file shares some similarities with a typical Arduino sketch, but there are also some differences. At 1, there’s a useful comment about the purpose of the library. While such comments are not necessary, they should be included to make the library easier for others to use.
At 2, the code checks whether the library has been declared in the host sketch. At 3, the standard Arduino library is included to allow our blinko library access to the standard Arduino sketch functions, types, and constants.
Then, at 4, we create a class. You can think of a class as a collection in one spot of all the variables and functions required for the library, including the name of the library. Within the class, there can be public variables and functions, which can be accessed by the sketch that needs to use the library; there can also be private variables and functions, which can be used only from inside the class. Finally, each class has a constructor with the same name as the class, which is used to create an instance of the class. This may sound complex. However, after reviewing the examples in this chapter and making a few libraries of your own, you’ll be confident in these constructions.
Inside our class, you can see we have the constructor for our library, blinko(), and two functions that will be in the library: slow() and fast(). They follow the public: statement, which means they can be used by anyone (“any member of the public”) who accesses the blinko library.
Finally, at 5, we end the header definition. By wrapping the header definition inside an if statement, we ensure that the header isn’t loaded twice.
The Source File
Next, let’s take a look at the blinko.cpp file. The .cpp file is known as a source file, because it contains the code that will be run when the library is used. The source file for the blinko library is given in Listing 10-3.
// Listing 10-3
/*
1 blinko.cpp - Library for flashing an Arduino's onboard LED connected to D13
*/

2 #include “Arduino.h” // gives library access to standard types and constants
                     // of the Arduino language
#include "blinko.h"

3 blinko::blinko()     // things to do when library is activated
{
	pinMode(13, OUTPUT);
}

4 void blinko::slow()
{
	for (int i=0; i<5; i++)
	{
 		digitalWrite(13, HIGH);
		delay(1000);
		digitalWrite(13, LOW);
		delay(1000);
	}
}

4 void blinko::fast()
{
	for (int i=0; i<5; i++)
	{
		 digitalWrite(13, HIGH);
 		 delay(250);
 		 digitalWrite(13, LOW);
		 delay(250);
	}
}
Listing 10-3: The blinko library source file
The source file contains the functions we’ve written that we’ll want available to reuse. In addition, some new structural elements are required here. At 2, we give our library access to both the standard Arduino functions, types, and constants and our own library header file.
At 3 we have the definition of the constructor function. The constructor contains things that should happen when the library is used. In our example, we have set digital pin 13 as an output, as we are using the Arduino’s onboard LED.
Starting at 4, we list the functions we want to include in this library. They are just like the functions that you would create in a stand-alone sketch, with one important difference: their definition starts with the library class name and two colons. For example, instead of typing void fast(), you type void blinko::fast().
The KEYWORDS.TXT File
Finally, we need to create the KEYWORDS.TXT file. The Arduino IDE uses this file to determine the keywords in the library, then highlights those words in the IDE. Listing 10-4 is the KEYWORDS.TXT file for our blinko library.
// Listing 10-4
blinko		KEYWORD1
slow		KEYWORD2
fast		KEYWORD2
Listing 10-4: The blinko library keywords file
The first line is the name of the library and is referred to as KEYWORD1. The library’s functions are both called KEYWORD2. Note that the space between the keywords and their definitions must be created by pressing tab, not by pressing the spacebar.
At this point, you have the three files needed for a working library. It’s a great idea to also include an example sketch so users can understand what the functions do. Listing 10-5 is our example sketch for the blinko library.
// Listing 10-5, blinkotest.ino
1 #include <blinko.h>

2 blinko ArduinoLED;
void setup() {
}

void loop()
{
3   ArduinoLED.slow();  // blink LED slowly, once every second
  delay(1000);
4   ArduinoLED.fast();  // blink LED rapidly, four times per second
  delay(1000);
}
Listing 10-5: An example sketch for our blinko library
As you can see, the sketch is basic. It just shows the use of both the slow() and fast() functions in our library. All the end user needs to do after installing the library is to include the library 1, create an instance 2, and then call either function when required as shown at 3 and 4.
Installing Your New Arduino Library
Now that you’ve created a new Arduino library, an easy way to store and distribute it is to make a ZIP file. Future users who obtain the ZIP file can easily install the library, as demonstrated earlier in Chapter 7.
Creating a ZIP File Using Windows 7 and Later
To create a ZIP file with Windows, follow these instructions.
First, place the three library files and the example sketch (stored in its own folder, as are all sketches) into one location. Figure 10-1 shows an example.

Figure 10-1: Our Arduino library files in one folder
Select all the files, right-click anywhere over the highlighted files, and select Send To▶Compressed (Zipped) Folder, as shown in Figure 10-2.
A new file will appear in the folder, with a .zip extension and name editing enabled. For our library, change the name to blinko and then press enter, as shown in Figure 10-3.
Now you can move on to “Installing Your New Library” on page 193.

Figure 10-2: Compressing the library files
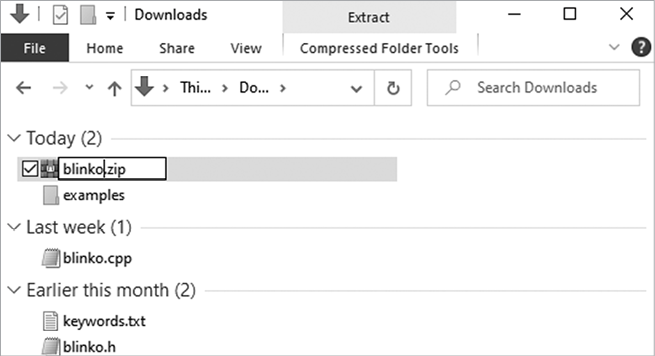
Figure 10-3: Changing the name of the library ZIP file
Creating a ZIP File Using Mac OS X or Later
To create a ZIP file with Mac OS X, gather the three library files and the example sketch (stored in its own folder, as are all sketches) into one location. Figure 10-4 shows an example.

Figure 10-4: Our Arduino library files
Select all the files, right-click anywhere over the files, and select Compress 4 Items, as shown in Figure 10-5.

Figure 10-5: Compressing the library files
After a moment, a new file called Archive.zip will appear in the folder, as shown in Figure 10-6.
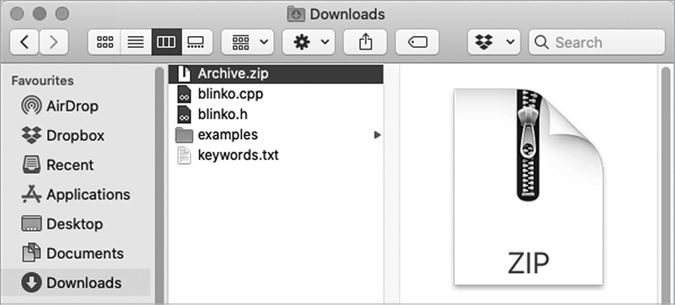
Figure 10-6: The files have been compressed.
Click on the Archive.zip folder and change the name to blinko.zip, as shown in Figure 10-7.

Figure 10-7: Our Arduino library installation ZIP file
You now have a library ZIP file that you can easily distribute to others or install yourself.
Installing Your New Library
At this point you can install your library using the ZIP file method detailed in “Downloading an Arduino Library as a ZIP File” on page 134 in Chapter 7. Once the file has been installed and you have restarted the Arduino IDE, select Sketch▶Include Library to see your library listed, as shown in Figure 10-8.

Figure 10-8: Our Arduino library, now available in the IDE
Furthermore, you can now easily access the example sketch; select File▶Examples▶blinko, as shown in Figure 10-9.
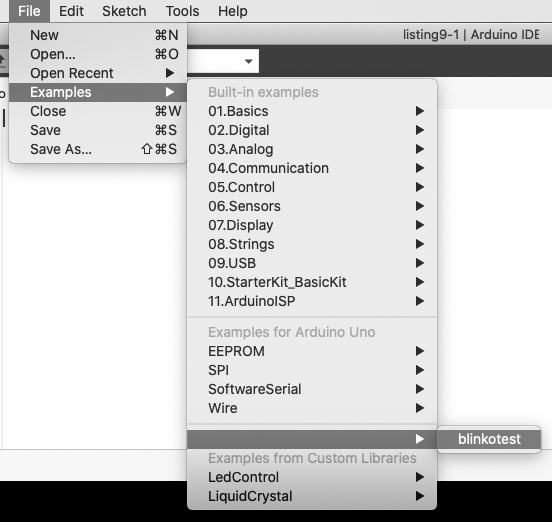
Figure 10-9: Our Arduino library example sketch is installed.
Creating a Library That Accepts Values to Perform a Function
Now that you have the knowledge to create a basic Arduino library, you can move on to the next level: creating a library that can accept values and act on them. Once again, we will look an at example function within a sketch and convert it into a more useful library.
Consider the sketch shown in Listing 10-6. It uses the function void blinkType(), which tells the Arduino how many times to blink its onboard LED and the on/off period.
// Listing 10-6
void setup() {
  pinMode(13, OUTPUT); // use onboard LED
}

void blinkType(int blinks, int duration)
// blinks - number of times to blink the LED
// duration – blink duration in milliseconds
{
  for (int i = 0; i < blinks; i++)
  {
    digitalWrite(13, HIGH);
    delay(duration);
    digitalWrite(13, LOW);
    delay(duration);
  }
}

void loop()
{
  // blink LED 10 times, with 250 ms duration
  blinkType(10, 250);
  delay(1000);
  // blink LED three times, with 1 second duration
  blinkType(3, 1000);
  delay(1000);
}
Listing 10-6: Demonstration sketch for the blinkType() function
As you can see, the function void blinkType() accepts two values and then acts on them. The first value is the number of times to turn the onboard LED on and off, and the second value is the delay time in milliseconds for each blink.
Let’s turn this function into an Arduino library named blinko2. Listing 10-7 shows the header file for this library.
// Listing 10-7
/*
  blinko2.h - Blinking the Arduino's onboard LED on D13
  Accepts number of blinks and on/off delay
*/

#ifndef blinko2_h
#define blinko2_h

#include "Arduino.h"

class blinko2
{
  public:
    blinko2();
    void blinkType(int blinks, int duration);
1   private:
    int blinks;
    int duration;
};
#endif
Listing 10-7: The blinko2 library header file
The header file maintains the same structure as the header file for the original blinko library. However, there is a new section at 1 called private. The variables declared in the private section are for internal use within the library and cannot be used by the greater Arduino sketch. You can see these variables in use within the library source file shown in Listing 10-8.
// Listing 10-8
/*
  blinko2.cpp - Blinking the Arduino's onboard LED on D13
  Accepts number of blinks and on/off delay
*/

#include "Arduino.h"
#include "blinko2.h"

blinko2::blinko2()
{
1   pinMode(13, OUTPUT);
}

2 void blinko2::blinkType(3int blinks, 4int duration)
{
  for (int i=0; i<blinks; i++)
  {
    digitalWrite(13, HIGH);
    delay(duration);
    digitalWrite(13, LOW);
    delay(duration);
  }
}
Listing 10-8: The blinko2 library source file
The source file for blinko2 maintains the same structure as the source file for the original blinko library.
We set digital pin 13 to an output at 1. At 2, we declare the function blinkType(), which accepts the number of times to blink at 3 and the delay time at 4. You can see this in operation via the example sketch for our library in Listing 10-9.
// Listing 10-9
#include <blinko2.h>

blinko2 ArduinoLED;

void setup() {}

void loop()
{
  ArduinoLED.blinkType(3,250);
// blink LED three times, with a duration of 250 ms
  delay(1000);
  ArduinoLED.blinkType(10,1000);
// blink LED 10 times, with a duration of 1 second
  delay(1000);
}
Listing 10-9: An example sketch for our blinko2 library
Next, we need to create the keywords file for our new blinko2 library. Don’t forget to use a tab and not spaces between the words. Here is our KEYWORDS.TXT file:
blinko2          KEYWORD1
blinkType        KEYWORD2
Now create your ZIP file and install the library using the methods described earlier in this chapter. Then open and run the blinko2 example sketch to experience how it works.
Creating a Library That Processes and Displays Sensor Values
For our final example of an Arduino library, we’ll revisit the Analog Devices TMP36 temperature sensor used in several of our earlier projects. Our ArduinoTMP36 example library will take the raw value from the TMP36 and display the temperature in both Celsius and Fahrenheit via the Serial Monitor.
First, connect your TMP36 to the Arduino by following the schematic shown in Figure 10-10.
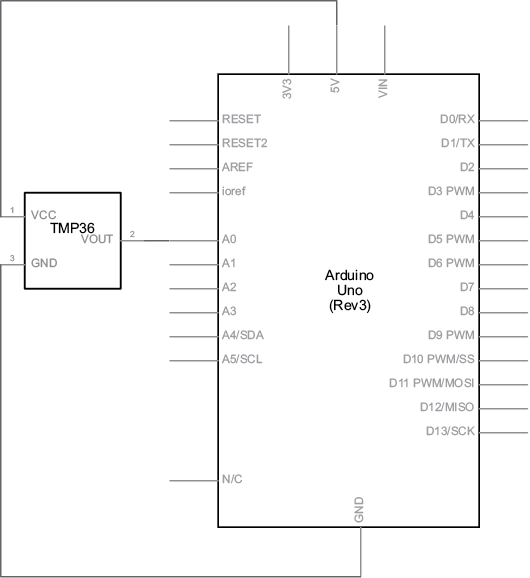
Figure 10-10: Schematic for use with the ArduinoTMP36 library
Listing 10-10 is a sketch that we wish to turn into a library. It uses two functions, readC() and readF(), to take the raw reading from the TMP36 sensor via analog pin 0, convert it to degrees Celsius and Fahrenheit, and return the results.
// Listing 10-10
// display temperature from TMP36 sensor in C and F
float temperature;
float readC()
{
  float tempC;
  tempC = analogRead(0);
  tempC = tempC = (tempC * 5000) / 1024;
  tempC = tempC - 500;
  tempC = tempC / 10;
  return tempC;
}

float readF()
{
  float tempC;
  float tempF;
  tempC = analogRead(0);
  tempC = tempC = (tempC * 5000) / 1024;
  tempC = tempC - 500;
  tempC = tempC / 10;
  tempF = (tempC * 1.8) + 32;
  return tempF;
}
void setup()
{
  Serial.begin(9600);
}
void loop()
{
  Serial.print("Temperature in Celsius is: ");
  temperature = readC();
  Serial.println(temperature);
  Serial.print("Temperature in Fahrenheit is: ");
  temperature = readF();
  Serial.println(temperature);
  delay(1000);
}
Listing 10-10: TMP36 demonstration sketch
The functions for temperature conversion are ideal candidates for inclusion in a library, which we will call ArduinoTMP36. The header file is shown in Listing 10-11.
// Listing 10-11
1 #ifndef ArduinoTMP36_h
#define ArduinoTMP36_h

#include "Arduino.h"

class ArduinoTMP36
{
2   public:
    ArduinoTMP36();
    float readC();
    float readF();
3   private:
    float tempC;
    float tempF;
};

#endif
Listing 10-11: The ArduinoTMP36 library header file
At this point, you probably recognize the structure of the header file. We set up the definitions at 1. Inside the class at 2, we declare the public items, which include the constructor and the readC() and readF() functions. We also declare the private items at 3; these include the two variables used within the library.
Next we have the library source file, shown in Listing 10-12.
// Listing 10-12
#include "Arduino.h"
#include "ArduinoTMP36.h"

ArduinoTMP36::ArduinoTMP36()
{
}

float ArduinoTMP36::readC()
{
     float tempC;
     tempC = analogRead(0);
     tempC = tempC=(tempC*5000)/1024;
     tempC = tempC-500;
     tempC = tempC/10;
     return tempC;
}

float ArduinoTMP36::readF()
{
     float tempC;
     float tempF;
     tempC = analogRead(0);
     tempC = tempC=(tempC*5000)/1024;
     tempC = tempC-500;
     tempC = tempC/10;
     tempF = (tempC*1.8)+32;
     return tempF;
}
Listing 10-12: The ArduinoTMP36 library source file
The source file contains the two functions used to calculate the temperatures. They are defined as float because they return a floating-point value. The temperatures are determined using the same formulas as in Project 8 in Chapter 4.
Finally, we need to create the keywords file for our new ArduinoTMP36 library. Don’t forget to use a tab and not spaces between the words. Our KEYWORDS.TXT file is shown here:
ArduinoTMP36             KEYWORD1
readC                    KEYWORD2
readF                    KEYWORD2
Now create your ZIP file and install the library using the methods described earlier in this chapter. Then open and run the ArduinoTMP36 example sketch, shown in Listing 10-13.
// Listing 10-13
1 #include <ArduinoTMP36.h>
ArduinoTMP36 thermometer;

2 float temperature;

void setup()
{
  Serial.begin(9600);
}

void loop()
{
  Serial.print("Temperature in Celsius is: ");
3   temperature=thermometer.readC();
  Serial.println(temperature);

  Serial.print("Temperature in Fahrenheit is: ");
4   temperature=thermometer.readF();
  Serial.println(temperature);

  delay(1000);
}
Listing 10-13: An example sketch for the ArduinoTMP36 library
Simply include the library and create the instance at 1. Then declare a variable to accept the output from the library at 2. After that, the temperature is requested and returned in Celsius and Fahrenheit at points 3 and 4, respectively.
Open the Serial Monitor window and set the data speed to 9,600 baud, and you should be presented with a scrolling updated list of the current temperature in Celsius and Fahrenheit, like that shown in Figure 10-11.
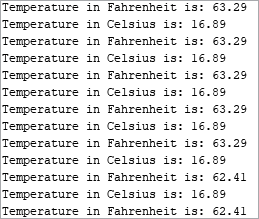
Figure 10-11: Example of output from the ArduinoTMP36 library
Now you can appreciate how much time and sketch size is saved by using a library instead of including the functions every time you create a new sketch.
Looking Ahead
Now that you have experience with writing Arduino libraries, you can create your own. This will help you to gain a deeper understanding of the libraries provided by other sources. You can also practice by creating libraries for the projects in this book you’ve already completed.
In the next chapter, you will learn how to work with user input entered via numeric keypads, so turn the page to get started.