
A system must meet many functional requirements. To support parallel development, you need to keep different concerns about the functional requirements separate. This separation is also needed to ensure that the system is understandable and easily maintained. Since the functional requirements are about what users can do with the system, an effective way to separate them is through use cases—specifically, through application use cases. But separation does not end with requirements; it has to go all the way to code if your developers are to work on different parts of the system separately. Thus, you have to analyze the use cases to determine what is use-case-specific and what is use-case-independent, what is application-specific and what is application-generic, what is domain-specific and what is domain-generic. This provides the basis for you to separate classes into their respective layers, packages, and class extensions and into respective slices and modules. Once you have achieved this separation, developers can design, implement, and test their respective use-case modules in parallel. The value of being able to work like this cannot be overexaggerated. This is the only way you can meet project deadlines.
This chapter deals with a special case of functional requirements that we call peers. Two functional requirements are peers when their realizations touch the same classes. In our Hotel Management System, the Reserve Room use case, the Check In Customer use case, and the Check Out Customer use case are peers to one another. They have no modeled relationship between them, but they share some classes that participate in their realizations. Such overlap becomes apparent when you conduct analysis and design.
In this chapter, we demonstrate how to keep the specifics of a peer application use case separate all the way down to code, using the Reserve Room use case as an example. The essential steps to conduct analysis and design of a use case are as follows:
Consider the use-case specification and update it if necessary.
Analyze the use case by identifying analysis classes that participate in the realization of the use case and allocating the behavior of the use case to these analysis classes).
Organize the classes into layers and packages within the element structure and both classes and class extensions into slices within the use-case structure (see Section 12-2).
Design the use case by mapping the analysis elements to design elements, identifying interfaces and additional design elements (e.g., exception classes and transfer objects, which we discuss shortly), and subsequently refining these elements (see Section 12-3).
We walk through the steps above in this chapter to illustrate how concerns are kept separate. In subsequent chapters, we walk through similar steps of analysis and design. However, since we are dealing with different kinds of use cases, there will be slight variations in the steps listed above. Nevertheless, the approach remains the same.
You may refer back to Part II, if necessary, to review how to identify and specify use cases. For your convenience, we list the specification for the Reserve Room use case in Listing 12-1. Note that Listing 12-1 covers only the basic flow.
Example 12-1. Use-Case Specification: Reserve Room
The use case begins when a customer wants to reserve a room or rooms. The customer selects to reserve a room. The system displays the types of rooms the hotel has and their rates. The customer selects his desired room type and indicates his period of stay. The system computes the cost for the specified period. The customer makes the reservation for the chosen room. The system deducts the number of rooms available for reservation for the specified room type for the specified period. The system creates a new reservation with the given details. The system displays the reservation confirmation number and check in instructions. The use case terminates.
The first step when analyzing a use case is to identify the participating analysis classes. The analysis class stereotypes provide guidance to identify these classes. You can apply the following rules.
For each actor that interacts with the use case, you have one boundary class.
For each use case, you can begin with one control class to coordinate other classes to realize that use case.
From the use-case specification, you identify the entities that are needed.
Based on the rules above, classes participating in the realization of the Reserve Room use case are identified as depicted in Figure 12-1.

If you follow the above rule, there should be only one boundary class (i.e., Reserve Room Form). We added the Customer Main Form to show how the customer actor can invoke the reservation functionality from the main form. We want to demonstrate how to resolve a particular kind of overlap between use-case slices. This is discussed shortly.
Since this is the first use case you are analyzing, there is no structure defined as yet. This means that the classes you have identified have yet to be organized into packages. After identifying the requirements and responsibilities of these classes, you organize them. If, on the other hand, you have already analyzed several use cases, the structure of the system will already have begun to take shape. In this case, you can locate the packages to which the classes belong immediately.
Once you have identified the participating classes, you proceed to the second step, which is to describe how their instances collaborate to realize the use case. This is achieved by walking through the steps of a use-case flow and describing how participating class instances interact (i.e., invoke each other) at each step. You can describe these interactions with UML through a number of means, using the following:
Communication diagrams showing how instances interact and the messages that pass between them.
Interaction diagrams showing the chronological sequence of events that emerge as you step through a use-case flow or a use-case scenario.
Class diagrams showing the responsibilities and relationships between classes.
You must apply some rules when describing the interaction between the class instances. These rules apply whether you are using communication or interaction diagrams.
Actors can interact only with boundary classes. Otherwise, other kinds of classes will be dependent on changes in the environment—user interfaces, external interfaces. and device interfaces.
Instances of entity classes should not send messages to boundary or control classes. Entity classes are part of the domain and should not be dependent on the use of the system or on how the interfaces are designed.
For simple interactions—such as database record create, read, update, and delete—there may be no need for a control class. In such cases, it suffices for the boundary class to interact with the entity class directly.
There are different levels of detail you can use when conducting analysis. How detailed you want analysis to be depends on your tool support. If you have very little tool support and you only want an outline of class and package responsibilities, then a high-level, rough description suffices. If, on the other hand, you have powerful analysis tools that can interpret and execute the analysis model (i.e., executable UML), you must be detailed. If you want to automatically transform the analysis to design, such as through model-driven architecture (MDA), your analysis must be detailed.
A communication diagram in UML 2.0 was previously known as a collaboration diagram. It shows the instances as icons. Instances interact by passing messages to one another, as indicated by the arrows. These messages travel over links denoted by lines joining class instances. These links imply that an instance has a reference to another object. In analysis, the preference is to use communication diagrams, since the primary focus is on finding the requirements and responsibilities on instances and not on finding detailed and chronological sequences of interactions. If you want such details, an interaction diagram, which we describe later, is more appropriate.
Figure 12-2 depicts the communication diagram for the Reserve Room use-case realization. It is derived by stepping through the use-case flow of events. At each step of a use-case flow, you consider what each instance is supposed to do and how it passes control to another instance by sending messages. You frequently find that an actor (Customer) instance will have the initial control. This is passed over to the boundary instance (either the Customer Main Form or the Reserve Room Form) when the actor instance interacts with the system. The boundary instance then gets a control instance (Reserve Room Handler) to handle the actor’s request according to what is described in the use-case flow of events. This normally implies accessing or updating information through some entity instances (Reservation and Room).
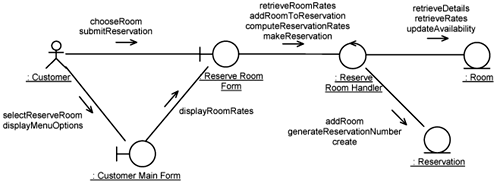
After stepping through the whole use-case flow of events, you have a communication diagram like that shown in Figure 12-2. The name of the message should denote the intent of the calling instance when interacting with the called instance.
If you want to analyze the use case in greater detail, an interaction diagram is usually more appropriate. An interaction diagram shows how instances interact with each other in a chronological sequence from top to bottom. Figure 12-3 describes the chronological sequence of interactions for the Reserve Room use-case realization. To improve readability, we have added the use-case flow description on the left-hand side of Figure 12-3.
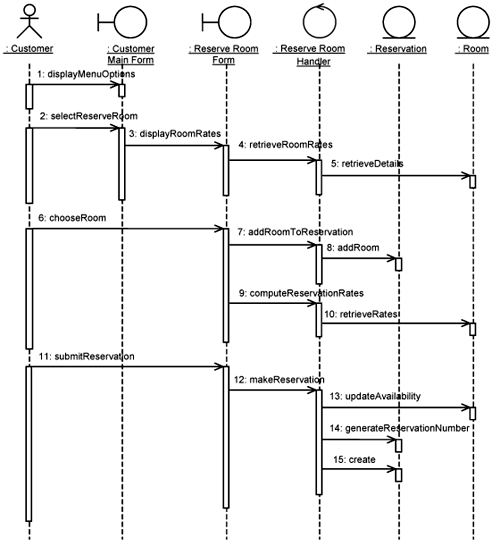
The chronological nature of an interaction diagram is useful when timing details are important for the use case. The chronological nature of interaction diagrams makes it easy for you to identify pointcuts, which we discuss in Chapter 13, “Separating Functional Requirements with Application Extension Use Cases.”
You normally use one interaction diagram to describe one use-case scenario or use-case flow. Now, with enhancements in UML 2.0, you can systematically describe alternate paths in interaction diagrams. Nevertheless, as you describe more paths, interaction diagrams become longer. With communication diagrams, however, you can use one communication diagram for multiple scenarios or flows in the same diagram without lengthening it. This is because you can simply add messages on top of communication diagrams.
After considering the interactions between the participating class instances, you can collate the responsibilities and relationships required for each class in the context of that use case. In essence, each message sent to an instance in a communication diagram or an interaction diagram translates to some responsibility for the corresponding class. You can summarize the result on a class diagram, as shown in Figure 12-4.
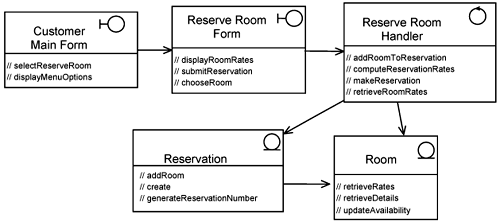
During analysis, the purpose is not to go into details of classes. You should refrain from detailing operations. Instead, focus on identifying key responsibilities of each class. At this point, you should not be focusing on whether you are retrieving a room by customer name, by room type, by availability, and so on. You will be doing that in design and implementation. Our convention is to prefix the name of responsibilities with //.
Note that the classes shown are only partial definitions. Each class will likely have responsibilities and relationships that are identified from other use-case realizations. You have to analyze at least several more use cases before you get a good idea of the complete set of responsibilities for each analysis class. Thereafter, you will have a better idea of which classes or features of classes are reusable. These will be the inputs for the structure of the system in both dimensions—element structure and use-case structure.
What we explained above is really just walking through the analysis of one use case. At the beginning of the project, when you are trying to outline the architecture, you analyze several use cases simultaneously, switching back and forth between different kinds of diagrams, as we discussed above. You basically start by quickly going through a couple of important use-case specifications, then suggest a class diagram like the one in Figure 12-4. You then describe each use case through a collaboration of class instances and consider what messages flow between them. Thereafter, you summarize the responsibilities of classes on class diagrams.
Analysis is about getting a better idea of the requirements for the use case. With that understanding, you can define the structure of the system by putting them into packages, and so on. This structure is platform-independent and is preserved during design. Recall that the analysis model comprises two orthogonal structures: the analysis element structure and the use-case analysis structure.
The analysis element structure defines the namespace for elements in the model. It defines the hierarchical organization. It comprises packages in which classes and their features will eventually reside.
The use-case analysis structure defines how you overlay functionality on top of the analysis element structure. It comprises slices—non-use-case-specific slices or use-case slices—which will overlay the actual classes and class features onto the element structure.
You want your structure to be resilient, and this resilience must be along both structures. Changes are normally made in terms of the problem domain (i.e., abstractions or entity classes) of the system or in terms of use cases. For example, you might want the Reservation class to capture certain details. Such a change concerns an entity. There might be changes to the way a reservation is made. In this case, the change is about the Reserve Room use case. You make the analysis model (and the system) resilient by ensuring that each class performs a clear and cohesive set of responsibilities, and each use case deals with a particular use of the system. By having a clear separation between classes and between use cases (and between use-case slices), you get a resilient structure. This means that if there are changes in requirements, their impact should be localized to a few packages and classes in the element structure. Their impact must also be localized to a few use-case slices. Localized means that there are few changes, and the changes do not propagate to the surrounding elements.
Since the idea of a resilient structure is about localizing changes, you naturally try to put classes that will change together in the same package. So, for instance, you may find that classes that support a particular actor (i.e., the customer) may change together. Thus, you package the Customer Main Form, the Reserve Room Form, and the Reserve Room Handler in a Customer Application package, as shown in Figure 12-5.
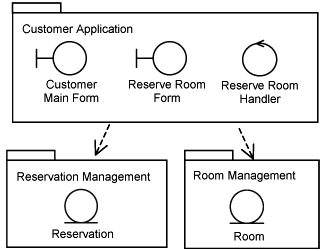
You also try to factor out reusable classes into a package For instance, you find that the Room and Reservation classes are part of the domain and are reusable across many packages in the system. Figure 12-5 places the Reservation and the Room classes in separate packages. This is because the Room class is used in multiple functional areas in the system: it is used in room reservations and perhaps also used to manage the inventory of the hotel. Thus, the Room class is placed in a separate package from the Reservation class.
The purpose of the element structure is to keep concerns about the abstractions or other elements within the system separate. The purpose of the use-case structure is to keep the specifics of each use case separate from one another. The use-case structure comprises both use-case slices and non-use-case-specific slices. Recall that use-case slices are for the purpose of keeping extensions and elements specific to a use-case realization together, and non-use-case-specific slices are to hold parts that are shared.
Figure 12-6 depicts the non-use-case-specific slices that are needed in the realization of the Reserve Room use case. The Room and Reservation classes are fundamental to the system. They represent the domain of the system and will most probably be used in more than one use-case realizations; that is, they are not use-case-specific. Thus, there will be in the Hotel Reservation a non-use-case-specific slice that overlays the Room and Reservation classes into the respective packages within the element structure.
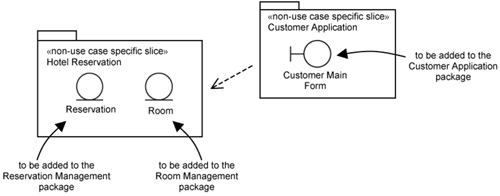
On top of the Hotel Reservation base slice, there is a Customer Application non-use-case-specific slice. It is used to contain common user interfaces for the Customer actor. For simplicity, we show only a main form from which a Customer actor can navigate to other forms to invoke the various use cases to reserve room, check in, check out, and so on.
If you want to extend the domain, for example, to hotel asset management, you will have another non-use-case-specific slice for hotel asset management entities. This introduces new classes to a new package with new classes in the domain-specific layer within the element structure. Normally, as you extend the domain, you also provide more functionality to the end users (i.e., there are additional use cases.) Accordingly, you overlay use-case slices that make use of and extend the classes you have just added through the non-use-case-specific slices.
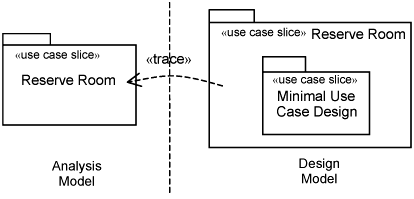
For every use case, there is one use-case slice in the analysis model. The use-case slice for the Reserve Room use case is depicted in Figure 12-7. It is a package containing a collaboration named Reserve Room that describes the realization of the Reserve Room use case in terms of communication diagrams, interaction diagrams, class diagrams, and so on.
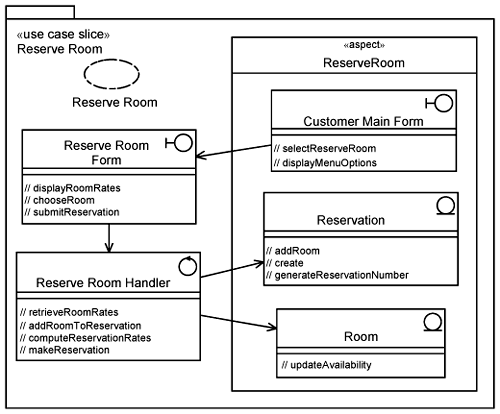
The Reserve Room use-case slice contains classes that are specific to the Reserve Room use-case realization. These are the ReserveRoomForm and ReserveRoomHandler classes.
The Reserve Room use-case slice also contains class extensions that overlay onto existing classes: CustomerMainForm, Reservation, and Room classes. By existing, we mean that these classes have been defined in some non-use-case-specific slices or some other use-case slices that this use-case slice depends on. However, the Reserve Room use-case realization requires some specific responsibilities on these classes. These are added through the ReserveRoom aspect, as depicted in Figure 12-7.
As you can see, the total number of responsibilities in the use-case slice (Figure 12-7) is less than that in the use-case realization (see Figure 12-4). After all, the use-case slice contains only that which is specific to the use case. Thus, the responsibilities retrieveRates and retrieveDetails, which appear in Figure 12-4, do not appear in Figure 12-7.
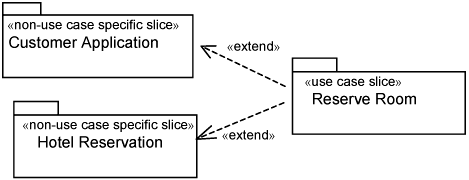
It is useful to describe the context of a use-case slice—that is, what a use-case slice depends on and what depends on it. This is helpful in understanding the use-case structure. It also tells you which use-case slices you will develop together. As an example, the use-case slice context for the Reserve Room use case is depicted in 12-8. Here, you see that the Reserve Room use-case slice has to be overlaid on top of both Customer Application and Hotel Reservation non-use-case-specific slices.
You have now separated the classes in their respective packages and specifics of each use-case realization into use-case slices.
In the preceding section, we showed how to analyze an application use case, how to organize the classes that are involved in the use-case realization into layers and packages, and how to keep the specifics of a use case in use-case slices. What you have now is a high-level structure based on the analyzed use case. In this section, we describe how you proceed to design and implementation.
The basic steps in design are as follows:
We walk through each step in the following sections.
The first step in design involves identifying design elements. These design elements can be derived from analysis elements, or they can be new ones. We look at both cases.
Recall that the design model preserves the structure in the analysis model. Consequently, for each layer in the analysis model, you find a counterpart in the design model, and likewise in the packages. However, the design model must take into account some implementation considerations, such as the naming restrictions imposed by the compiler as well as naming conventions.
We use the Customer Application package in the application layer of the analysis model to illustrate the mapping. This is depicted at the top of Figure 12-9.
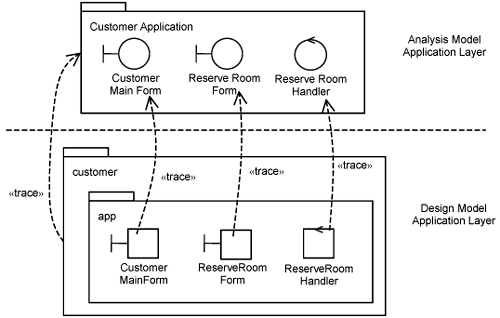
You will find boundary control and entity classes in design, but to distinguish them from their analysis counterparts, we give them different stereotype icons (i.e., squarish in design as opposed to circles in analysis). These are shown in Figure 12-9. The dashed arrows stereotyped «trace» indicates the analysis elements from which the design elements are derived.
During design, you will start to incorporate platform-specific elements into the design element structure. You want to keep these platform-specific elements separate. This is achieved, as shown in Figure 12-9, by putting the design boundary and control classes in an app package. Any change in platform should not affect the contents of this app package. Note that these design classes make use of minimal platform specifics. In Java, they are also known as Plain Old Java Objects (POJOs). In fact, the design elements that we describe in this chapter are all POJOs. We discuss how to incorporate platform specifics in Chapter 15, “Separating Platform Specifics with Platform-Specific Use-Case Slices.”
As shown in Figure 12-9, the Customer Application package in the analysis model is now mapped to the customer package. We use Java as an example. The Java naming convention uses small letters for package names and does not allow spaces. In addition, during implementation, the normal convention is to have package names prefixed by com.<company name>.<project name>. So, for instance, if we take the company name to be aosd and the project name to be hotel, then the fully qualified name for the ReserveRoomForm can be as follows:
com.aosd.hotel.application.customer.app.ReserveRoomForm
The mapping of analysis use-case slices to design use-case slices is the same. Just as the classes in the analysis package are localized into an app package, the contents of the use-case slice in analysis are mapped into the minimum use-case design slice in the use-case design structure. This is illustrated in Figure 12-10.
The reason for having the minimum use-case design slices is precisely to keep the platform specifics separate from the platform-independent, as discussed in the previous chapter.
There will be design elements in addition to those that are mapped from the analysis elements. You will frequently find that you must pass information between boundary, control, and entity classes. Instead of passing small data bits like customer name, customer identifier, and room description, you should pass entire objects. These are known as Transfer Objects. There are also container classes (e.g., Lists) to manage Transfer Objects.
Figure 12-11 depicts examples of Transfer Objects, namely, the RoomTO and the ReservationTO. The ReservationTO class has an association with the RoomTO class, and RoomTO has the role named room in the association.
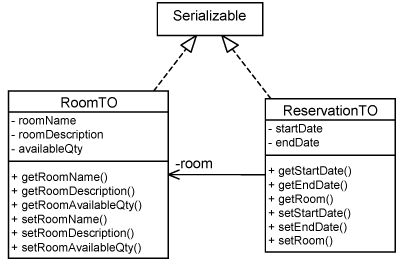
Please note that they are not entity classes. They are just passed between boundary, control, and entity classes. Since the system is potentially distributed, they are made serializable (by implementing the Serializable interface in Java).
You normally have Transfer Objects in the domain layer because they are shared across application-layer classes. So, let’s take a look at how a domain layer package (e.g., Room Management) in the analysis model maps to its counterpart (i.e., the room package) in the design model. The result is depicted in Figure 12-12.
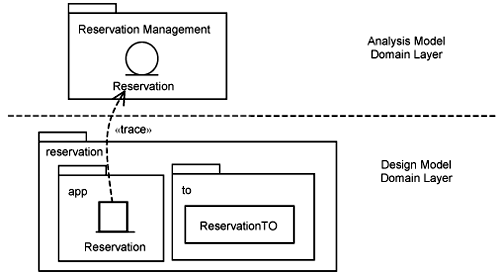
The Reservation design entity is derived from its counterpart in the analysis model. In addition, a Transfer Object (ReservationTO) is located in a nested package within the reservation package.
When you identify boundary, control, and entity classes and packages in analysis, you are taking the first step toward identifying components. Some of these analysis classes individually evolve to become design components. Sometimes groups of these classes evolve into design components. For each of these components, you must identify interfaces so that the components can be developed in parallel and can be easily replaceable.
Figure 12-13 shows the design elements participating in the Reserve Room use-case realization. Figure 12-13 further shows the packaging of these design elements into components. We named the components with the same name as the design elements and the interfaces to these components are named in a similar way but prefixed with an I.
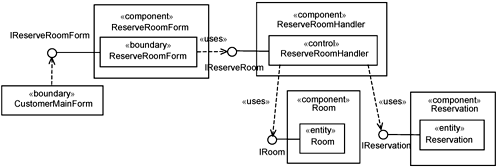
Even though each of the components in Figure 12-13 is depicted as containing only one class, in reality there are several. These additional classes are identified as we refine the design of each component. To facilitate parallel development, you must define the interface operations clearly. The interface operations can be easily found from the analysis use-case realizations. In addition, you must define the return types and parameter types clearly.
Let’s look at the ReserveRoomHandler component in greater detail.
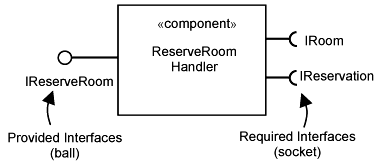
Figure 12-14 depicts the component with the notation specified in UML 2.0. The ReserveRoomHandler component realizes the IReserveRoom interface. This is shown on the right of Figure 12-14. In UML 2.0, this is known as a provided interface—that is, this interface is provided by the component. For the ReserveRoomHandler to execute, it «uses» two interfaces to be realized: IRoom and IReservation. From the perspective of the ReserveRoomHandler component, these are called required interfaces. Provided and required interfaces help us think about a component’s substitutability. To plug a component into a system, the component’s provided and required interfaces must match those defined in the system. In Chapter 13, we discuss how the use of interfaces helps us achieve extensibility.
Note that at this point you are still considering the design of the system from a minimum design perspective, so the interface operation declarations should not have any parameters that use, for example, IP addresses, platform-specific database classes, and so on. If such parameters are included, you will find it extremely difficult to separate the platform specifics later. In short, the interfaces you identify here are from a minimum design perspective. In Chapter 15, we discuss how to incorporate platform specifics. Accordingly, the components will be endowed with platform specifics. It also means that components will have additional platform-specific interfaces.
As you add more behavior into use cases with alternate flows, your classes grow. You will start to see more overlap between classes. One way to resolve the overlap is through use-case slices and aspects. There are other alternatives as well, which we discuss in this section. When exploring alternatives, your knowledge of object orientation and design patterns [Gamma et al. 1995] will come in handy.
Let’s consider the case of the Room class. Assume that during analysis we found that the ReserveRoom class needs two operations: updateAvailability() and retrieveDetails(). Assume that updateAvailability() is specific to the Reserve Room use case and that retrieveDetails() is common across use cases. Figure 12-15 depicts different alternatives to deal with the overlap.
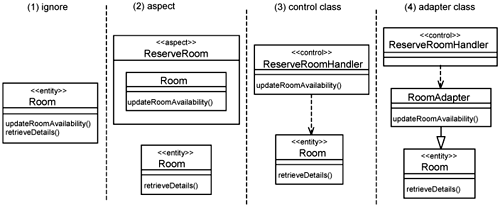
The most obvious way to deal with overlap with object orientation is simply to ignore it. This technique is shown on the left side of Figure 12-15. In this case, the Room class simply collates all responsibilities from different use-case realizations. In the absence of aspect orientation, this is the approach most practitioners take.
The second technique is, of course, to apply aspects to keep the updateRoomAvailability() operation separate within the ReserveRoom aspect. The ReserveRoom aspect has a class extension to the Room class through intertype declarations.
The third technique is to relocate the updateRoomAvailability() operation to the control class, ReserveRoomHandler. Since control classes are mostly specific to some use case, this seems like a good alternative in the absence of aspects. However, the operation updateRoomAvailability() might need frequent access to Room attributes. Since these attributes do not belong to the ReserveRoomHandler, programming will be awkward.
The fourth technique is to create an adapter for the Room class. In Figure 12-15, this is achieved by creating a child of the Room class called RoomAdapter. The control class will now call this RoomAdapter class. For this example, this is a better approach than the previous technique (using the control class) because the RoomAdapter has access to all the Room’s attributes.
Applying aspects and the adapter class are comparative but have subtle differences. They are comparable because, in both cases, you have access to the attributes of the Room class directly. With aspects, however, no subclass is created, and the updateRoomAvailability() operation introduced by the ReserveRoom aspect is available to all instances of the Room class. In the case of adapter technique, updateRoomAvailability() operation is accessible only to instances of RoomAdapter.
In our example, we have only one use-case-specific operation, so it is simpler just to put the updateRoomAvailability() operation within the ReserveRoom aspect. Note that the ReserveRoom aspect may introduce features to other classes as well. Thus, it is certainly more convenient. Moreover, aspects can add operation extensions to existing classes and it is a more generic and preferred solution. However, if the number of use-case-specific operations added to a particular class is large, you may wish to consider using the adapter technique for that class.
Our discussion shows that there is indeed more than one way to solve a problem. Although aspect orientation is a new technique available to us, we have a history of existing techniques as well, and we should not abandon them. Instead, you should always weigh the pros and cons and choose the most appropriate technique for your problem. You may need to apply a combination of techniques.
Overlaps are not limited to complete operations. Sometimes they occur within parts of operations. In particular, we highlight two forms of overlap that appear between peer use-case realizations. We call them summation and selection.
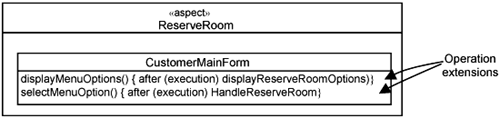
Summation occurs when two use-case slices expect different outcomes from the same operation, and the responsibility of the operation is to provide the union of the two outcomes. Let’s consider the responsibilities in the Customer Main Form to display MenuOptions. Since we are realizing the Reserve Room use case, this will display menu options for reservations. Another use-case slice might need to display its own menu options. The composed result is to display the menu options for both use-case slices. If there are more use-case slices that need to display their menu options, then the composed result is to display menu options for all use-case slices shown in Figure 12-16. The result is a sum of all operation extensions from different use-case slices into the displayMenuOptions() operation.
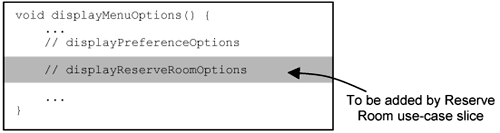
To add the operation extension, you define its declaration as follows for the ReserveRoom use-case slice.
displayMenuOptions(){ after(execution) displayReserveRoomOptions }
Recall that an operation extension declaration comprises three segments:
The structural context indicates which operation you are adding onto. In this case, it is the
displayMenuOptions()operation.The behavioral context indicates when the extension will be executed. In this case, it is just after the execution of the
displayMenuOptions()operation.The final segment indicates the additional behavior, which is simply to
displayReserveRoomOptions.
Selection occurs when use-case slices expect different outcomes from the same operation and the desired composed result is such that only one outcome is possible. In essence, only one is selected. Let’s consider again the Customer Main Form, which allows the user to select a particular menu option. In this case, depending on which menu option the customer (the user) selects, the corresponding outcome is initiated. Without aspect orientation, you get a long list of if-statement blocks or a long list of case statements, as shown in Figure 12-17.
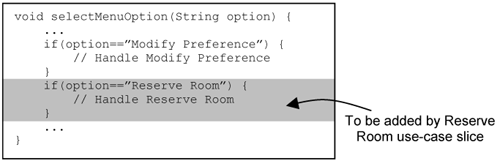
With aspect orientation, you can keep each of the if-statement blocks together with the use-case slice. This is achieved by the Reserve Room use-case slice with the operation extension shown below.
selectMenuOption(option:String){after(execution)handleReserveRoom}
Again, the operation extension has three segments. selectMenuOption(option: String) is the operation being added onto—the structural context of the operation extension. The behavioral context, after (execution), refers to the end of the execution of selectMenuOption(). The additional behavior HandleReserveRoom is added just after the execution of the selectMenuOption() operation.
Figure 12-18 summarizes the resulting ReserveRoom aspect. It contains a CustomerMainForm class extension. This class extension contains two operation extensions, described above.
So far, our discussion has been about modularizing operations and operation extensions into use-case slices and non-use-case-specific slices. We now discuss attributes.
If an attribute of a class is updated by one use-case slice, then there is no contention. It is part of that slice. For example, when reserving a room, you might keep track of the reservation creation date. This is specific to the Reserve Room use-case slice.
If an attribute of a class is updated by multiple use-case slices, then there is contention between use-case slices. Consider the case of the Reservation class, and let’s assume that it has a status attribute. This attribute has many possible values. The value of the status attribute tracks the state of a Reservation instance from the time it is created, submitted, confirmed, cancelled, and even when the customer checks into the hotel. The transition of a reservation instance from one state to another is triggered by different use cases or different use-case flows. Now the attribute must be pushed down to some non-use-case-specific slice, and if you follow the discussion above, this attribute should be in the Hotel Reservation slice as an attribute of the Reservation class. It should not be overlaid by any use-case slice.
Let’s consider the operations that update the Reservation status by looking at how the values of a Reservation instance status evolve. You depict this using a state chart in UML, as shown in Figure 12-19.
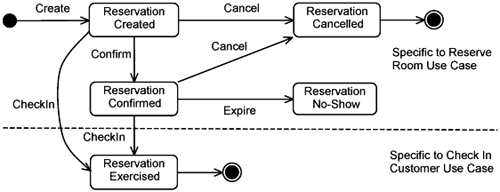
Each rounded rectangular box in Figure 12-19 shows a possible state of a Reservation, in this case, one possible value of the Reservation status. Each arrow is a transition from one state to another and represents an update to the Reservation status. The transitions Create, Confirm, Cancel, and Expire are part of the Reserve Room use-case slice. The CheckIn transition is part of the Check In Customer use-case slice. The dashed line attempts to separate the states that results from the two use cases. This separation is, of course, dependent on your use-case specifications.
The transitions are accompanied by actions such as notifying the customer of the reservation status. Such actions are use-case-specific. Thus, you implement each state transition as either operations or operation extensions in the respective use-case slices.
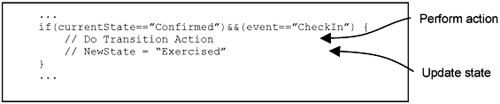
If you choose to lump the transitions into a single updateStatus() in the Reservation class, then you have corresponding operation extensions in the respective use-case slices. Each operation extension is of the form similar to Figure 12-20. Each transition is an if-statement block that checks the current state and identifies the event, and based on these, performs the transition and updates the status attribute.
This follows the same selection pattern we explored in our discussion of what happens when the customer actor selects a menu option.
If you implement the transitions as separate operations, then you have operations like create(), confirm(), cancel(), and expire() in some class (possibly the control class) within the Reserve Room use-case slice. These operations may be in different aspects within the Reserve Room use-case slice because they correspond to behaviors specified in different use-case flows. For example, the operation checkIn() will be in some class within the Check In use-case slice. There might be an alternate flow in the Reserve Room use case to let the customer cancel the reservation, so the cancel operation will be in a ReserveRoomCancellation aspect. But granularity is important, so it is likely that you have a group of related alternate flows implemented as an aspect.
In this chapter, we walked through the steps from use-case analysis to design, keeping the specifics of use cases separate all the way. This represents a technique that is new to most of you, so let’s briefly compare aspect-oriented analysis and design to object-oriented analysis and design.
With aspect-oriented analysis, you have an additional step of identifying use-case slices and separating classes and extensions across slices. This step is very important because you keep concerns between use cases separate early instead of leaving it to programming. You have progressed from aspect-oriented programming to aspect-oriented software development. You get tremendous payback because developers can now implement and test each use-case slice in parallel. Since each use-case slice deals with only one use case, it is much easier to understand and maintain. During design, you make an explicit attempt to keep platform specifics separate from the minimum design. This practice is useful regardless of whether you apply object-oriented analysis and design or aspect-oriented analysis and design. But with aspect orientation, the separation of platform specifics is achieved in a more elegant way. You can subsequently overlay platform specific use-case slices later, which we discuss in Chapter 15. Other than these two key differences, what you already know in object-oriented analysis and design applies.