Next, we will make our second animation, the flying animation. With FlyingDrone selected in Hierarchy:
- In the Animation window, in the upper left there is a clip selected. It presently has the name of the current clip, Idle. Select it and choose Create New Clip...
- Name the animation Fly.
This time the animation is going to be more complicated and we're going to use the record feature in Unity.
- Press the red circle in the upper left of the Animation window to begin recording.
While recording, all the properties that are animated will highlight red in the editor. New keyframes will appear on the frame (red vertical timeline) you select.
This will be a simple animation and we can reduce the number of samples that it has. Let's reduce it down to 10 samples, so every 10 frames will equal one second.
- Enter 10 in the Samples field.
The drone will start (and end) at its origin starting position (0,0,0).
- Position the timeline at frame 0.
- Select the FlyingDrone (in Hierarchy) and make sure its Position in Inspector is (0, 0, 0).
We want the drone to fly up and reach its desired height in one second. We don't want the drone to fly too far up because we want to make sure the image continues to be tracked with the device camera.
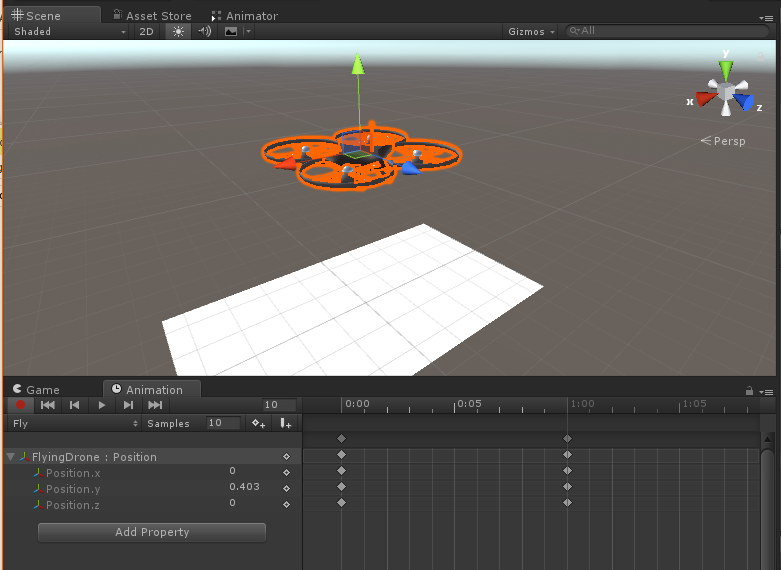
- Set the red timeline at the one-second mark.
- In the Scene view, make sure the position gizmo is selected (showing red, green, blue axis arrows for moving the object).
- And move the Y position to the flying height you want.
The resulting Animation set at the one-second timeline is shown in the following screenshot:

Next, we want it to fly in a small circle. To make this easier, change the Scene view to top-down as follows:
- Click the Y-cone in the upper-right of the Scene window.
- Change the view to orthographic.
The modified Scene view should now look something like this:

Starting at the two-second mark, we will add keyframes every 20 frames, changing the drone position to the center of each edge, sequentially in a circle. Use the following steps to create the flying animation we desire:
- Zoom out the timeline so we can see about five additional seconds.
- Set the red timeline to two seconds (frame 20).
- Move the drone along the x axis so it's positioned at the middle of the left edge.
- Set the red timeline to four seconds (or type 40 in the frames field).
- Move the drone to the middle of the bottom edge.
- Set to six seconds (frame 60).
- Move the drone to the middle of the right edge.
- Set to eight seconds (frame 80).
- Move the drone to the middle of the top edge.
- Set to nine seconds (frame 90).
- Move the drone to the center of the card.
- Set to 10 seconds (frame 100).
- In Inspector, set the Position back to (0, 0, 0).
The Animation dopesheet now looks like this:

- Press the red circle Record button again to stop recording.
- Adjust the Scene view so it's perspective again and change the viewing angle (for example, Alt+left-mouse click).
- Then press the preview play button to preview the animation.
So now the drone flies in a diamond shaped pattern. We could fix this by adding more keyframes. But we will smooth it out using curves.
- Select the Curves view of the Animation from the bottom left of the window.
You may be familiar with curve editing from other applications. Each node point has handles to adjust the incoming and outgoing slope of the curve as it passes through that node. You can play around with the curves to make the transitions appear smoother, in each of the X and Z positions along the circle, and the Y position as the drone goes up and down.
If you need to refine a curve you can add extra keyframes by right-clicking on the curve where you want to insert a new node. For example, in the take-off Y position curve shown in the following screenshot, we added some ease-in ease-out smoothing and acceleration for good effect:

- To make sure the animation does not loop, navigate to the Fly animation in Project Assets, select it, and make sure Loop Time is unchecked.
