
This chapter discusses IP routing principles. It covers the following topics:
This chapter covers IP routing principles, including static and dynamic routing characteristics, classful and classless routing, and manual and automatic route summarization across network boundaries. It explains the difference between distance vector, link-state, and hybrid routing protocols; and includes comparisons of IP routing protocols. Characteristics and configuration of the Routing Information Protocol (RIP) are described.
Note
The online Appendix C, “IPv4 Supplement,” includes job aids and supplementary information related to IPv4 addresses that you should understand before reading the rest of the book. Therefore, you are encouraged to review any of the material in Appendix C that you are not familiar with before reading the rest of this chapter.
Routers forward packets toward destination networks. To forward the packets, routers must know about these remote networks and determine the best way to reach them. This section addresses the ways in which routers learn about networks and how routers can incorporate static and dynamic routes.
Routers must be aware of destination networks to be able to forward packets to them. A router knows about the networks directly attached to its interfaces; it calculates the subnet or network number of an interface by using the address and subnet mask configured on that interface. For networks not directly connected to one of its interfaces, however, the router must rely on outside information. A router can be made aware of remote networks in two ways: An administrator can manually configure the information (static routing), or a router can learn from other routers (dynamic routing). A routing table can contain both static and dynamically recognized routes.
Network administrators can use static routing, dynamic routing, or a combination of both.
This section explains the situations in which static routes are the most appropriate to use.
A static route can be used in the following circumstances:
When it is undesirable to have dynamic routing updates forwarded across slow bandwidth links, such as a dialup link.
When the administrator needs total control over the routes used by the router.
When a backup to a dynamically recognized route is necessary.
When it is necessary to reach a network accessible by only one path (a stub network). For example, in Figure 2-1, there is only one way for router A to reach the 10.2.0.0/16 network on router B. The administrator can configure a static route on router A to reach the 10.2.0.0/16 network via 10.1.1.1.
When a router is underpowered and does not have the CPU or memory resources necessary to handle a dynamic routing protocol.
When a route should appear to the router as a directly connected network.

A perfect use for static routing is a hub-and-spoke design, with all remote sites defaulting back to the central site and the one or two routers at the central site having a static route for all subnets at each remote site. However, without proper design, as the network grows into hundreds of routers, with each router having numerous subnets, the number of static routes on each router also increases. Each time a new subnet or router is added, an administrator must add a static route to the new networks on a number of routers. The administrative burden to maintain this network can become excessive, making dynamic routing a better choice.
Another drawback of static routing is that when a topology change occurs on the internetwork, an administrator might have to reroute traffic by configuring new static routes around the problem area. In contrast, with dynamic routing, the routers must learn the new topology. The routers share information with each other and their routing processes automatically discover whether any alternative routes exist and reroute without administrator intervention. Because the routers mutually develop an independent agreement of what the new topology is, they are said to converge on what the new routes should be. Dynamic routing provides faster convergence.
Key Point: Convergence
A network is converged when routing tables on all routers in the network are synchronized and contain a route to all destination networks. Convergence time is the time it takes for all routers in a network to agree on the new topology.
The following command, explained in Table 2-1, is used to create static routes:
RouterA(config)#ip route prefix mask {address | interface} [distance]
  [permanent] [tag tag]
Table 2-1. ip route Command
ip route Command | Description |
|---|---|
prefix mask | The IP network and subnet mask for the remote network to be entered into the IP routing table. |
address | The IP address of the next hop that can be used to reach the destination network. |
interface | The local router outbound interface to be used to reach the destination network. |
distance | (Optional) The administrative distance to be assigned to this route. |
permanent | (Optional) Specifies that the route will not be removed from the routing table even if the interface associated with the route goes down. |
tag tag | (Optional) A value that can be used as a match value in route maps. |
Note
Use static routes pointing to an interface on point-to-point interfaces only, because on multiaccess interfaces the router will not know the specific address to which to send the information. On point-to-point interfaces, the information is sent to the only other device on the network.
If no dynamic routing protocol is used on a link connecting two routers, such as in Figure 2-1, a static route must be configured on the routers on both sides of the link. Otherwise, the remote router will not know how to return the packet to its originator located on the other network; there will be only one-way communication.
While configuring a static route, you must specify either a next-hop IP address or an exit interface to notify the router which direction to send traffic. Figure 2-1 shows both configurations. Router A recognizes the directly connected networks 172.16.1.0 and 10.1.1.0. It needs a route to the remote network 10.2.0.0. Router B knows about the directly connected networks 10.2.0.0 and 10.1.1.0; it needs a route to the remote network 172.16.1.0. Notice that on router B, the next-hop IP address of the router A serial interface has been used. On router A, however, the ip route command specifies its own Serial 0/0/0 interface as the exit interface. If a next-hop IP address is used, it should be the IP address of the interface of the router on the other end of the link. If an exit interface is used, the local router sends data to the router on the other end of its attached link. When an exit interface is specified, the router considers this a directly connected route.
In some circumstances, a router does not need to recognize the details of remote networks. The router is configured to send all traffic, or all traffic for which there is no entry in the routing table, in a particular direction, known as a default route. Default routes are either dynamically advertised using routing protocols or statically configured.
To create a static default route, use the normal ip route command, but with the destination network (the prefix in the command syntax) and its subnet mask (the mask in the command syntax) both set at 0.0.0.0. This address is a type of wildcard designation; any destination network will match. Because the router tries to match the longest common bit pattern, a network listed in the routing table is used before the default route. If the destination network is not listed in the routing table, the default route is used.
In Figure 2-2, on router A, the static route to the 10.2.0.0 network has been replaced with a static default route pointing to router B. On router B, a static default route has been added, pointing to its Internet service provider (ISP). Traffic from a device on the router A 172.16.1.0 network bound for a network on the Internet is sent to router B. Router B recognizes that the destination network does not match any specific entries in its routing table and sends that traffic to the ISP. It is then the ISP’s responsibility to route that traffic to its destination.

In Figure 2-2, to reach the 172.16.1.0/24 network, router B still needs a static route pointing out its S0/0/0 interface.
Entering the show ip route command on router A in Figure 2-2 returns the information shown in Example 2-1.
Dynamic routing allows the network to adjust to changes in the topology automatically, without administrator involvement. This section describes dynamic routing principles.
A static route cannot respond dynamically to changes in the network. If a link fails, the static route is no longer valid if it is configured to use that failed link, so a new static route must be configured. If a new router or new link is added, that information must also be configured on every router in the network. In a very large or unstable network, these changes can lead to considerable work for network administrators. It can also take a long time for every router in the network to receive the correct information. In situations such as these, it might be better to have the routers receive information about networks and links from each other using a dynamic routing protocol.
When using a dynamic routing protocol, the administrator configures the routing protocol on each router, as shown in Figure 2-3. The routers then exchange information about the reachable networks and the state of each network. Routers exchange information only with other routers running the same routing protocol. When the network topology changes, the new information is dynamically propagated throughout the network, and each router updates its routing table to reflect the changes. The following are some examples of dynamic routing protocols:
RIP
Enhanced Interior Gateway Routing Protocol (EIGRP)
Intermediate System-to-Intermediate System (IS-IS)
Open Shortest Path First (OSPF)
Border Gateway Protocol (BGP)

The information exchanged by routers includes the metric or cost to each destination (this value is sometimes called the distance).
Key Point: Metric
A metric is a value (such as path length) that routing protocols use to measure paths to a destination.
Different routing protocols base their metric on different measurements, including hop count, interface speed, or more-complex metrics. Most routing protocols maintain databases containing all the networks that the routing protocol recognizes and all the paths to each network. If a routing protocol recognizes more than one way to reach a network, it compares the metric for each different path and chooses the path with the lowest metric. If multiple paths have the same metric, a maximum of 16 can be installed in the routing table, and the router can perform load balancing between them. EIGRP can also perform load balancing between unequal-cost paths.
Note
Prior to Cisco IOS Release 12.3(2)T, the maximum number of parallel routes (equal-cost paths) supported by IP routing protocols was 6; in Cisco IOS Release 12.3(2)T that maximum was changed to 16.
To configure an IP dynamic routing protocol, use the router protocol command. Protocols other than RIP also require specification of either an autonomous system or a process number. You also need the network command under the router configuration mode of all routing protocols except IS-IS and BGP.
For RIP, EIGRP, and OSPF, the network command tells the router which interfaces are participating in that routing protocol. Any interface that has an IP address that falls within the range specified in the network statement is considered active for that protocol. In other words, the router sends updates from the specified interfaces and expects to receive updates from the same interfaces. Some protocols look for neighbors by sending hello packets out those interfaces. Thus, because a network statement identifies interfaces on the local router, it is configured only for directly connected networks. A router also originates advertisements for the networks connected to the specified interfaces.
RIP allows only major network numbers (Class A, B, or C network numbers) to be specified in the network command. EIGRP and OSPF permit exact specification of interfaces with a combination of a subnet or interface address and a wildcard mask.
The network statement functions differently in BGP. BGP requires its neighbors to be statically configured. The network statement in BGP tells the router to originate an advertisement for that network. Without a network statement, BGP passes along advertisements it receives from other routers, but it does not originate any network advertisements itself. In BGP, the network listed in the network statement does not have to be directly connected, because it does not identify interfaces on the router as it does in other protocols (this process is explained in detail in Chapter 8, “Configuring the Border Gateway Protocol”).
Integrated IS-IS does not use the network statement. Instead, interfaces participating in the IS-IS routing process are identified under interface configuration mode. (OSPF also permits the interfaces to be specified this way, as an alternative to using the network command.)
Example 2-2 shows the configuration of the routers in Figure 2-3. Both routers A and B are configured with RIP. Router A has two directly attached networks and RIP is used to advertise to neighbors on both of those interfaces. Therefore, network statements are configured for both the 172.16.1.0 network and the 10.1.1.0 network. Router A sends RIP packets out interfaces Fa0/0 and S0/0/0, advertising the networks that are attached to those interfaces.
Router B also has two directly attached networks. However, router B wants only the network it shares with router A to participate in RIP. Therefore, a network statement is configured only for the 10.1.1.0 network. As explained earlier, with RIP, only the major network number is actually used in the network command. Router B also has a static default route pointing toward its ISP to reach other networks. Router B sends RIP packets out its interface S0/0/0, but not out its interface S0/0/1. It does not advertise the 192.168.1.0 network attached to S0/0/1 or the static default route unless specifically configured to do so.
A drawback of static routes is that they must be manually configured and updated when the network topology changes. A drawback of dynamic routing protocols is that they use network bandwidth and router resources. In a hub-and-spoke network with hundreds of spokes, both the configuration needed for static routes and the resource usage of dynamic routing can be considerable.
There is a third option: on-demand routing (ODR). ODR uses the Cisco Discovery Protocol (CDP) to carry network information between spoke (stub) routers and the hub router. ODR provides IP routing information with minimal overhead compared to a dynamic routing protocol and requires less manual configuration than static routes.
ODR is applicable in a hub-and-spoke topology only. In this type of topology, each spoke router is adjacent only to the hub. Another name for a spoke router is stub router. The stub router may have some LAN networks connected to it and typically has a WAN connection to the hub router. The hub router needs to recognize the networks connected to each spoke, but the spokes need only a default route pointing to the hub.
When ODR is configured, the stub routers use CDP to send IP prefix information to the hub router. Stub routers send prefix information for all their directly connected networks. ODR reports the subnet mask, so it allows different subnets within the same major network to have different subnet masks. This is known as variable-length subnet masking (VLSM) and is described in detail in Appendix C.
The hub router, in turn, sends a default route to the spokes that points back to itself. It installs the stub networks reported by ODR in its routing table and can be configured to redistribute these routes into a dynamic routing protocol. For a next-hop address, the hub router uses the IP address of the spoke routers as reported to it by CDP.
ODR is not a true routing protocol because the information exchanged is limited to IP prefixes and a default route. ODR reports no metric information; the hub router uses a hop count of 1 as the metric for all routes reported via ODR. However, by using ODR, routing information for stub networks can be obtained dynamically without the overhead of a dynamic routing protocol, and default routes can be provided to the stub routers without manual configuration.
ODR is configured on the hub router using the router odr global configuration command.
On the stub router, there must be no IP routing protocol configured. In fact, from the standpoint of ODR, a router is automatically considered a stub when no IP routing protocols have been configured. Figure 2-4 shows a hub-and-spoke topology.

ODR can also be tuned with optional commands, including using a distribute list to control the network information that is recognized through ODR, and adjusting the ODR timers with the timers basic router configuration command.
ODR relies on the CDP to carry the information between the hub router and the spoke routers. Therefore, CDP must be enabled on the links between the hub router and spokes. Cisco routers by default have CDP enabled both globally and per interface. However, on some WAN links, such as ATM, CDP must be explicitly enabled.
The CDP updates are sent as multicasts. On WAN links that require mappings, such as dialer links and Frame Relay, it is important to use the broadcast keyword in the mapping statements; allowing broadcasts also allows multicasts across the link. CDP uses Subnetwork Access Protocol (SNAP) frames, so it runs on all media that support SNAP.
CDP updates are sent every 60 seconds by default. This setting might be too infrequent in rapidly changing networks or too often in stable ones. You can adjust the timers with the cdp timer global configuration command. You can verify CDP settings by using the show cdp interface command.
As soon as ODR is configured and running, routes from the stub routers are identified in the hub router’s routing table with an o character, as shown in Example 2-3. Notice in the example that the metric is 1, and the administrative distance for ODR is 160. (Administrative distance is described in the “Administrative Distance” section later in this chapter.) Also, do not confuse the o character of ODR routes with the O character of OSPF routes.
Example 2-3. Routing Table with ODR Routes
RouterB#show ip route
<output omitted>
172.16.0.0/16 is subnetted, 4 subnets
o 172.16.1.0/24 [160/1] via 10.1.1.2, 00:00:23, Serial0/0/1
o 172.16.2.0/24 [160/1] via 10.2.2.2, 00:00:03, Serial0/0/2
o 172.16.3.0/24 [160/1] via 10.3.3.2, 00:00:16, Serial0/0/3
<output omitted>
The routing table for each spoke router contains only its connected networks and a static default route injected by ODR from the hub router.
Routing protocols can be classified into different categories such as distance vector, link-state, or a hybrid of these two. IP routing protocols can also be classified as either classful or classless. These characteristics are explored in this section.
When a network is using a distance vector routing protocol, all the routers send their routing tables (or a portion of their tables) to only their neighboring routers. The routers then use the received information to determine whether any changes need to be made to their own routing table (for example, if a better way to a specific network is now available). This process repeats periodically.
In contrast, when a network is using a link-state routing protocol, each of the routers sends the state of its own interfaces (its links) to all other routers (or to all routers in a part of the network, known as an area) only when there is a change. Each router uses the received information to recalculate the best path to each network and then saves this information in its routing table.
As its name suggests, a hybrid protocol has characteristics of both distance vector and link-state protocols. Hybrid protocols send only changed information (similar to link-state protocols) but only to neighboring routers (similar to distance vector protocols).
IP routing protocols can be categorized as classful or classless.
Key Point: Classless and Classful Routing Protocols
Routing updates sent by a classful routing protocol do not include the subnet mask. RIP Version 1 (RIPv1) is a classful routing protocol.
Routing updates sent by a classless routing protocol include the subnet mask. RIP Version 2 (RIPv2), EIGRP, OSPF, IS-IS, and BGP are classless routing protocols.
When classful protocols were originally developed, networks were very different from those used now. The best modem speed was 300 bps, the largest WAN line was 56 kbps, router memory was less than 640 KB, and processors were running in the kHz range. Routing updates had to be small enough not to monopolize the WAN link bandwidth. In addition, routers did not have the resources to maintain current information about every subnet.
A classful routing protocol does not include subnet mask information in its routing updates. Because no subnet mask information is known, when a classful router sends or receives routing updates, the router makes assumptions about the subnet mask being used by the networks listed in the update, based on IP address class.
Routers send update packets from their interfaces to other connected routers. A router sends the entire subnet address when an update packet involves a subnet of the same classful network as the IP address of the transmitting interface. The receiving router then assumes that the subnet in the update and the interface use the same subnet mask.
If that route is using a different subnet mask, the receiving router will have incorrect information in its routing table. Thus, when using a classful routing protocol, it is important to use the same subnet mask on all subnets belonging to the same classful network.
When a router using a classful routing protocol needs to send an update about a subnet of a network across an interface belonging to a different network, the router assumes that the remote router will use the default subnet mask for that class of IP address. Therefore, when the router sends the update, it does not include the subnet information. The update packet contains only the classful network information. This process is called autosummarization across the network boundary; the router sends a summary of all the subnets in that network by sending only the major network information. Classful routing protocols automatically create a classful summary route at major network boundaries. Classful routing protocols do not allow summarization at other points within the major network address space.
The router that receives the update behaves in a similar fashion. When an update contains information about a different classful network than the one in use on its interface, the router applies the default classful mask to that update. The router must assume what the subnet mask is because the update does not contain subnet mask information.
In Figure 2-5, router A advertises the 10.1.0.0 subnet to router B because the interface connecting them belongs to the same major classful 10.0.0.0 network. When router B receives the update packet, it assumes that the 10.1.0.0 subnet uses the same 16-bit mask as the one used on its 10.2.0.0 subnet.
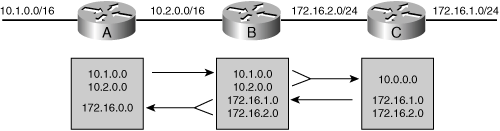
Router C advertises the 172.16.1.0 subnet to router B because the interface connecting them belongs to the same major classful 172.16.0.0 network. Therefore, router B’s routing table has information about all the subnets that are in use in the network.
However, router B summarizes the 172.16.1.0 and 172.16.2.0 subnets to 172.16.0.0 before sending them to router A. Therefore, router A’s routing table contains summary information about only the 172.16.0.0 network.
Similarly, router B summarizes the 10.1.0.0 and 10.2.0.0 subnets to 10.0.0.0 before sending the routing information to router C. This summarization occurs because the update crosses a major network boundary. The update goes from a subnet of network 10.0.0.0, subnet 10.2.0.0, to a subnet of another major network, network 172.16.0.0. Router C’s routing table contains summary information about only the 10.0.0.0 network.
Discontiguous subnets are subnets of the same major network that are separated by a different major network.
Classful protocols summarize automatically at network boundaries, which means that
Subnets are not advertised to a different major network.
Discontiguous subnets are not visible to each other.
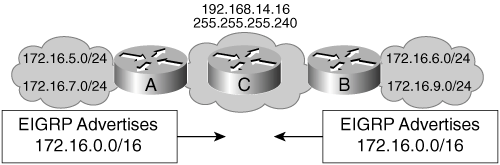
In the example shown in Figure 2-6, routers A and B do not advertise the 172.16.5.0 255.255.255.0 and 172.16.6.0 255.255.255.0 subnets, because RIPv1 cannot advertise subnets across a different major network; both router A and router B advertise 172.16.0.0. This leads to confusion when routing across network 192.168.14.16/28. Router C, for example, receives routes about 172.16.0.0 from two different directions; it therefore might make an incorrect routing decision.

You can resolve this situation by using RIPv2, OSPF, IS-IS, or EIGRP and not using summarization, because the subnet routes will be advertised with their actual subnet masks.
The behavior of a classful routing protocol changes when the ip classless global configuration command is used.
Note
The ip classless command is enabled by default in Release 12.0 and later of the Cisco IOS Software; in earlier releases it is disabled by default.
When running a classful protocol (RIPv1), ip classless must be enabled if you want the router to select a default route when it must route to an unknown subnet of a network for which it knows some subnets. For example, consider a router’s routing table that has entries for subnets 10.5.0.0/16 and 10.6.0.0/16 and a default route of 0.0.0.0. If a packet arrives for a destination on the 10.7.0.0/16 subnet and ip classless is not enabled, the packet is dropped. Classful protocols assume that if they know some of the subnets of network 10.0.0.0, they must know all that network’s existing subnets. Enabling ip classless tells the router that it should follow the best supernet route or the default route for unknown subnets of known networks, and for unknown networks.
Classless routing protocols can be considered second-generation protocols because they are designed to address some of the limitations of the earlier classful routing protocols. One of the most serious limitations in a classful network environment is that the subnet mask is not exchanged during the routing update process, and therefore, the same subnet mask must be used on all subnetworks within the same major network.
With classless routing protocols, different subnets within the same major network can have different subnet masks; in other words, they support VLSM. If more than one entry in the routing table matches a particular destination, the longest prefix match in the routing table is used. For example, if a routing table has different paths to 172.16.0.0/16 and to 172.16.5.0/24, packets addressed to 172.16.5.99 are routed through the 172.16.5.0/24 path, because that address has the longest match with the destination network.
Another limitation of the classful approach is the need to automatically summarize to the classful network boundary at major network boundaries. In a classless environment, the route summarization process can be controlled manually and can usually be invoked at any bit position within the address. Because subnet routes might be propagated throughout the routing domain, manual route summarization might be required to keep the size of the routing tables manageable.
By default, RIPv2 and EIGRP perform automatic network summarization at classful boundaries, just like a classful protocol does. Automatic summarization lets RIPv2 and EIGRP be backward compatible with their predecessors, RIPv1 and Interior Gateway Routing Protocol (IGRP).
The difference between these protocols and their predecessors is that you can manually turn off automatic summarization, using the no auto-summary router configuration command. You do not need this command when you are using OSPF or IS-IS, because neither protocol performs automatic network summarization by default.
The autosummarization behavior can cause problems in a network that has discontiguous subnets or if some of the summarized subnets cannot be reached via the advertising router. If a summarized route indicates that certain subnets can be reached via a router, when in fact those subnets are discontiguous or unreachable via that router, the network might have problems similar to those caused by a classful protocol. For example, in Figure 2-7, both router A and router B are advertising a summarized route to 172.16.0.0/16. Router C therefore receives two routes to 172.16.0.0/16 and cannot identify which subnets are attached to which router.
You can resolve this problem by disabling automatic summarization when running RIPv2 or EIGRP. Classless routers use the longest prefix match when selecting a route from the routing table; therefore, if one of the routers advertises without summarizing, the other routers see subnet routes and the summary route. The other routers can then select the longest prefix match and follow the correct path. For example, in Figure 2-7, if router A continues to summarize to 172.16.0.0/16 and router B is configured not to summarize, router C receives explicit routes for 172.16.6.0/24 and 172.16.9.0/24, along with the summarized route to 172.16.0.0/16. All traffic for router B subnets is sent to router B, and all other traffic for the 172.16.0.0 network is sent to router A.
Another example is shown in Figures 2-8 and 2-9. In the RIPv2 network illustrated in Figure 2-8, notice how router C, which is attached to router B via the 192.168.5.0/24 network, handles routing information about network 172.16.0.0. Router B automatically summarizes the 172.16.1.0/24 and 172.16.2.0/24 subnets to 172.16.0.0/16 before sending the route to router C, because it is sent over an interface in a different network. Instead of using the subnet mask known to router B (/24), router C uses this default classful mask for a Class B address (/16) when it stores the 172.16.0.0 information in its routing table.


In the OSPF network shown in Figure 2-9, router B passes the subnet and subnet mask information to router C, and router C puts the subnet details in its routing table. Router C does not need to use default classful masks for the received routing information because the subnet mask is included in the routing update, and OSPF does not automatically summarize networks.
You can disable automatic summarization for RIPv2 and EIGRP with the no auto-summary router configuration command. When automatic summarization is disabled, RIPv2 and EIGRP forward subnet information, even over interfaces belonging to different major networks. In Figure 2-9, automatic summarization has been disabled. Notice that now the routing table is the same for both the RIPv2 and the OSPF routers.
Note
The BGP auto-summary router configuration command determines how BGP handles redistributed routes; Chapter 8 describes this command in detail.
This section describes the two versions of RIP, RIPv1 and RIPv2, and how to configure them; later chapters in this book detail the other routing protocols.
RIPv1 is described in RFC 1058, Routing Information Protocol. Its key characteristics include the following:
Hop count is used as the metric for path selection.
The maximum allowable hop count is 15.
Routing updates are broadcast every 30 seconds by default. Because it is a distance vector routing protocol, updates are sent even if no change has occurred.
RIP can load balance over as many as 16 equal-cost paths (4 paths by default).
It has no authentication support.
Note
RFCs are available at http://www.rfc-editor.org/rfcsearch.html.
RIPv1 is a classful distance vector routing protocol that does not send the subnet mask in its updates. Therefore, RIPv1 does not support VLSM.
RIPv2 is a classless distance vector routing protocol defined in RFC 1721, RIP Version 2 Protocol Analysis; RFC 1722, RIP Version 2 Protocol Applicability Statement; and RFC 2453, RIP Version 2. The most significant addition to RIPv2 is the inclusion of the mask in the RIPv2 routing update packet, allowing RIPv2 to support VLSM. RIPv2 automatically summarizes routes on classful network boundaries; but as described earlier, you can disable this behavior.
In addition, RIPv2 uses multicast addressing for more-efficient periodic updating on each interface. RIPv2 uses the 224.0.0.9 multicast address to advertise to other RIPv2 routers. This approach is more efficient than RIPv1’s approach. RIPv1 uses a 255.255.255.255 broadcast address, so all devices, including PCs and servers, must process the update packet. They perform the checksum on the Layer 2 packet and pass it up their IP stack. IP sends the packet to the User Datagram Protocol (UDP) process, and UDP checks to see whether RIP port 520 is available. Most PCs and servers do not have any process running on this port and discard the packet. RIP can fit up to 25 networks and subnets in each update, and updates are dispatched every 30 seconds. For example, if the routing table has 1000 subnets, 40 packets are dispatched every 30 seconds (80 packets a minute). With each packet being a broadcast, all devices must look at it; most of the devices discard the packet.
The IP multicast address for RIPv2 has its own multicast MAC address. Devices that can distinguish between a multicast and a broadcast at the MAC layer read the start of the Layer 2 frame and determine that the destination MAC address is not for them. They can then discard all these packets at the interface level and not use CPU resources or buffer memory for these unwanted packets. Even on devices that cannot distinguish between broadcast and multicast at Layer 2, the worst that will happen is that the RIP updates will be discarded at the IP layer instead of being passed to UDP, because those devices are not using the 224.0.0.9 multicast address.
RIPv2 also supports security between RIP routers using message-digest or clear-text authentication. (RIPv2 security features are not covered in this book.)
To activate the RIP process (Version 1 by default), use the following command:
Router(config)#router ripBy default, the Cisco IOS software receives both RIPv1 and RIPv2 packets; however, it sends only Version 1 packets. To configure the software to send and receive packets from only one version, use the version {1 | 2} router configuration command.
To select participating attached networks, use the following command, specifying the major classful network number:
Router(config-router)#network network-number
Regardless of the RIP version, a network command using the classful network number is required under the RIP routing process.
Although the RIP version command controls RIP’s overall default behavior, you might need to control the version of RIP on a per-interface basis. To control the version of RIP on each interface, use the ip rip send version and ip rip receive version interface configuration commands. Version control per interface might be required when you are connecting legacy RIP networks to newer networks. The command syntax is as follows:
Router(config-if)#ip rip {send | receive} version {1 |2 | 1 2}
By default, automatic summarization across network boundaries is activated for all networks in both versions of RIP. Manually summarizing routes in RIPv2 improves scalability and efficiency in large networks because the more-specific routes are not advertised. Only the summary routes are advertised, thus reducing the size of the IP routing table and allowing the router to handle more routes.
Manual summarization is done at the interface. One limitation of RIPv2 is that routes can be summarized only up to the classful network boundary; RIPv2 does not support classless interdomain routing (CIDR)-type summarization to the left of the classful boundary.
Note
CIDR is described in Appendix C.
To summarize RIP routes on nonclassful boundaries, do the following:
Turn off autosummarization using the no auto-summary command under the RIP process.
Use the ip summary-address rip network-number mask interface configuration command to define a network number and mask that meet the particular requirement.
Figure 2-10 illustrates how RIPv1 and RIPv2 may coexist in the same network. Router A is running RIPv2, and router C is running RIPv1. Router B runs both versions of RIP. Notice that the ip rip send version 1 and ip rip receive version 1 commands are required only on interface Serial 0/0/3 of router B, because RIPv2 is configured as the primary version for all interfaces. The Serial 0/0/3 interface has to be manually configured to support RIPv1 so that it can connect correctly with router C.
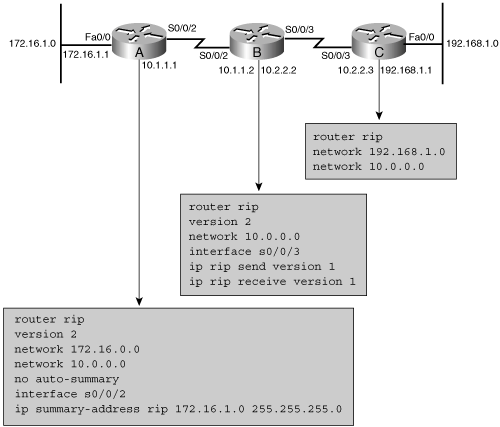
An ip summary-address rip command is configured on router A along with the no auto-summary command. The combination of these two commands allows router A to send the 172.16.1.0 subnet detail to router B. Because router B is in a different network (10.0.0.0), the default behavior for router A is to send only the classful summarization (172.16.0.0) to router B.
Note
In Figure 2-10, the ip summary-address rip 172.16.1.0 255.255.255.0 command is actually unnecessary because the no auto-summary command is also applied. The moment that the no auto-summary command is used, the subnet 172.16.1.0 is advertised as such because it uses a 24-bit mask.
This section compares and contrasts the various IP routing protocols. It also discusses some IP routing protocol characteristics, such as administrative distance, and describes floating static routes.
Most routing protocols have metric structures and algorithms that are incompatible with other protocols. It is critical that a network using multiple routing protocols be able to seamlessly exchange route information and be able to select the best path across multiple protocols. Cisco routers use a value called administrative distance to select the best path when they learn of two or more routes to the same destination from different routing protocols.
Administrative distance rates a routing protocol’s believability. Cisco has assigned a default administrative distance value to each routing protocol supported on its routers. Each routing protocol is prioritized in the order of most to least believable.
Key Point: Administrative Distance
The administrative distance is a value between 0 and 255. The lower the administrative distance value, the higher the protocol’s believability.
Table 2-2 lists the default administrative distance of the protocols supported by Cisco routers.
Table 2-2. Administrative Distance of Routing Protocols
Route Source | Default Distance |
|---|---|
Connected interface | 0 |
Static route out an interface | 0 |
Static route to a next-hop address | 1 |
EIGRP summary route | 5 |
External BGP | 20 |
Internal EIGRP | 90 |
IGRP[1] | 100 |
OSPF | 110 |
IS-IS | 115 |
RIPv1, RIPv2 | 120 |
Exterior Gateway Protocol (EGP) | 140 |
ODR | 160 |
External EIGRP | 170 |
Internal BGP | 200 |
Unknown | 255 |
[1] IGRP is no longer supported, as of Cisco IOS Release 12.3. It is included in this table for completeness. | |
Note
Static routes are configured with the ip route prefix mask {address | interface} [distance] [permanent] [tag tag] global configuration command, described in the “Principles of Static Routing” section earlier in this chapter. If the address parameter is used in this command, specifying the address of the next-hop router to use to reach the destination network, the default administrative distance is 1. If the interface parameter is used instead, specifying the local router outbound interface to use to reach the destination network, the router considers this a directly connected route, and the default administrative distance is 0.
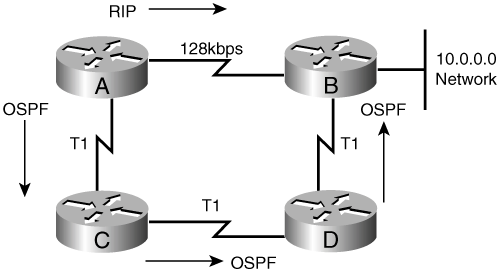
For example, in Figure 2-11, if router A receives a route to network 10.0.0.0 from RIP and also receives a route to the same network from OSPF, the router compares RIP’s administrative distance, 120, with OSPF’s administrative distance, 110, and determines that OSPF is more believable. The router therefore adds the OSPF version of the route to the routing table.
Based on default administrative distances, routers believe static routes over any dynamically learned route. There might be times when this default behavior is not the desired behavior. For example, when you configure a static route as a backup to a dynamically learned route, you do not want the static route to be used as long as the dynamic route is available. In this case, you can manipulate the optional distance parameter in the ip route command to make the static route appear less desirable than another static or dynamic route.
Key Point: Floating Static Route
A static route that appears in the routing table only when the primary route goes away is called a floating static route.
The administrative distance of the static route is configured to be higher than the administrative distance of the primary route and it “floats” above the primary route, until the primary route is no longer available.
In Figure 2-12, routers A and B have two connections: a point-to-point serial connection that is the primary link, and an ISDN link to be used if the other line goes down. Both routers use EIGRP, but do not use a routing protocol on the ISDN 172.16.1.0 network link.

A static route that points to the ISDN interface of the other router has been created on each router. Because EIGRP has an administrative distance of 90, the static route has been given an administrative distance of 100. As long as router A has an EIGRP route to the 10.0.0.0 network, it appears more believable than the static route, and the EIGRP route is used. If the serial link goes down and disables the EIGRP route, router A inserts the static route into the routing table. A similar process happens on router B with its route to the 172.17.0.0 network.
A Cisco router chooses the best route for a specific destination among those presented by routing protocols, manual configuration, and various other means by considering the following four criteria:
Valid next-hop IP address. —As each routing process receives updates and other information, the router first verifies that the route has a valid next-hop IP address.
Metric. —If the next hop is valid, the routing protocol chooses the best path to any given destination based on the lowest metric. The routing protocol offers this path to the routing table. For example, if EIGRP learns of a path to 10.1.1.0/24 and decides that this particular path is the best EIGRP path to this destination, the routing protocol offers the learned path to the routing table.
Administrative distance. —The next consideration is administrative distance. If more than one route exists for the same network (with the same prefix), the router decides which route to install based on the administrative distance of the route’s source. If the routing protocol that is presenting the path to a particular destination has the lowest administrative distance compared to the other ways the router has learned about this network, the router installs the route in the routing table. If that route does not have the best administrative distance, it is rejected.
Prefix. —The router looks at the prefix being advertised. If there is no exact match to that prefix in the routing table, the route is installed. For example, suppose the router has three routing processes running on it, and each process has received the following routes:
RIPv2: 192.168.32.0/26
OSPF: 192.168.32.0/24
EIGRP: 192.168.32.0/19
Because each route has a different prefix length (different subnet mask), the routes are considered different destinations and are all installed in the routing table. As discussed in the “Classless Routing Protocol Concepts” section earlier in this chapter, if more than one entry in the routing table matches a particular destination, the longest prefix match in the routing table is used. Therefore, in this example, if a packet arrives for the address 192.168.32.5, the router will use the 192.168.32.0/26 subnet, advertised by RIPv2, because it is the longest match for this address.
This section provides comparative summaries of routing protocols.
IGRP, EIGRP, and OSPF are transport layer protocols that run directly over IP, whereas RIP and BGP both reside at the application layer. RIP uses UDP as its transport protocol; its updates are sent unreliably with best-effort delivery. BGP uses the Transmission Control Protocol (TCP) as its transport protocol; it takes advantage of TCP’s reliability mechanisms and windowing. Table 2-3 lists the protocol numbers, port numbers, and how reliability is handled for the various routing protocols.
Table 2-3. Protocols, Ports, and Reliability of Routing Protocols
Routing Protocol | Protocol Number | Port Number | Update Reliability |
|---|---|---|---|
IGRP[1] | 9 | — | Best-effort delivery |
EIGRP | 88 | — | 1-to-1 window |
OSPF | 89 | — | 1-to-1 window |
RIP | — | UDP 520 | Best-effort delivery |
BGP | — | TCP 179 | Uses TCP windowing |
[1] IGRP is no longer supported, as of Cisco IOS Release 12.3. It is mentioned in this table for completeness. | |||
Note
IS-IS is a network layer protocol and does not use the services of IP to carry its routing information. IS-IS packets are encapsulated directly into a data link layer frame. Chapter 6, “Configuring the Integrated Intermediate System-to-Intermediate System Protocol,” describes IS-IS in detail.
Table 2-4 compares some of the characteristics of the different routing protocols.
Table 2-4. Routing Protocol Comparison
Characteristic | RIPv2 | EIGRP[1] | IS-IS | OSPF | BGP[2] |
|---|---|---|---|---|---|
Distance vector | ✓ | ✓ | ✓ | ||
Link-state | ✓ | ✓ | |||
Hierarchical topology required | ✓ | ✓ | |||
Automatic route summarization | ✓ | ✓ | ✓ | ||
Manual route summarization | ✓ | ✓ | ✓ | ✓ | ✓ |
VLSM support | ✓ | ✓ | ✓ | ✓ | ✓ |
Classless | ✓ | ✓ | ✓ | ✓ | ✓ |
Metric | Hops | Composite metric | Metric | Cost | Path attributes |
Convergence time | Slow | Very fast | Fast | Fast | Slow |
[1] EIGRP is an advanced distance vector protocol with some characteristics also found in link-state protocols. [2] BGP is a path vector policy-based protocol. | |||||
RIPv2 is described in an earlier section in this chapter. Subsequent chapters in this book detail EIGRP, OSPF, IS-IS, and BGP operation and configuration.
In this chapter, you learned about IP routing principles, including static, default, dynamic, and on-demand routing. Routing protocol characteristics such as distance vector, link-state, hybrid, classful, and classless were explored. Characteristics and configuration of RIP were described, and comparisons between various IP routing protocols were presented.
In this exercise, you give the routers in your pod a basic configuration and set up RIPv2.
Note
Throughout the exercise, the pod number is referred to as x, and the router number is referred to as y. Substitute the appropriate numbers as needed.
The objectives of this exercise are to:
Put a basic configuration on your pod devices and verify connectivity with directly connected devices.
Configure RIPv1 as a routing protocol and explore its shortcomings.
Configure RIPv2 and examine its behavior.
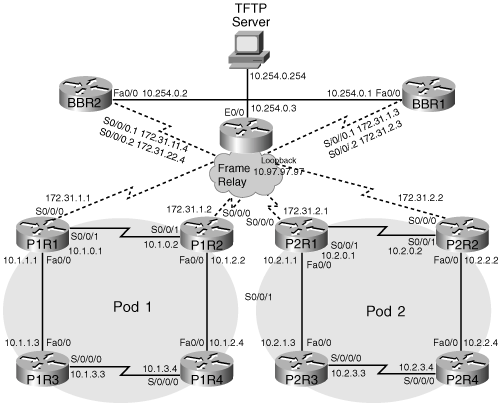
Figure 2-13 illustrates the topology used in this exercise.
Note
Backbone router 2 (BBR2), shown in Figure 2-13, is not used until a later Configuration Exercise.
In this exercise, you use the commands in Table 2-5, listed in logical order. Refer to this list if you need configuration command assistance during the exercise.
Table 2-5. Configuration Exercise Command List
Command | Description |
|---|---|
(config)#hostname PxRy | Assigns a hostname |
(config)#enable secret cisco | Specifies cisco as the secret password |
(config)#line vty 0 4 | Enters configuration mode for vty lines |
(config-line)#login | Specifies that a password is required to log in when telnetting |
(config-line)#password sanfran | Specifies sanfran as the password required to log in when telnetting |
(config)#line con 0 | Enters configuration mode for console port |
(config-line)#logging synchronous | Synchronizes output on the configured line |
(config-line)#exec-timeout 0 0 | Specifies no timeout on the configured line |
(config)#no ip domain lookup | Disables Domain Name System (DNS) lookup |
(config-if)#ip address 10.x.1.y 255.255.255.0 | Assigns an IP address to an interface |
(config-if)#no shutdown | Enables an interface |
(config-if)#encapsulation frame-relay | Enables Frame Relay encapsulation on an interface |
(config-if)#no frame-relay inverse-arp | Turns off Inverse ARP on a Frame Relay interface |
(config-if)#frame-relay map ip 172.31.x.3 1xy broadcast | Maps a next-hop IP address to a permanent virtual circuit (PVC) |
(config-if)#clock rate 64000 | Assigns a clock rate on a data circuit-terminating equipment (DCE) interface |
#ping 10.x.0.y | Pings an address |
#copy run start | Copies the running configuration file (in RAM) into the startup configuration file (in NVRAM) |
(config)#no ip classless | Instructs the router to behave classfully |
(config)#router rip | Turns on RIP |
(config-router)#version 1 | Runs RIPv1 |
(config-router)#network 172.31.0.0 | Specifies a classful network that RIP should run within |
#show ip protocols | Displays information about the IP routing protocols running on the router |
#debug ip rip | Starts the console display of the IP RIP-related events on the router |
#show ip route | Displays the IP routing table |
(config-router)#default-information originate | Advertises the default route through RIP |
(config)#ip classless | Instructs the router to behave classlessly |
(config-router)#version 2 | Runs RIPv2 |
(config-router)#no auto-summary | Instructs the router to not automatically summarize routes at classful boundaries |
Caution
Although the command syntax is shown in this table, the addresses shown are typically for the PxR1 and PxR3 routers. Be careful when addressing your routers! Refer to the exercise instructions and the appropriate visual objective diagram for addressing details.
Note
This book assumes that you are familiar with basic Cisco IOS router configuration commands, some of which are required in this Configuration Exercise but are not explicitly covered in this chapter. If you are not familiar with these commands, you might want to refer to another source, such as the Cisco Press book CCNA Self-Study: Interconnecting Cisco Network Devices (ICND) 640-811, 640-801, 2nd Edition (ISBN: 1587051427).
In this task, you use a terminal utility to establish a console connection to the equipment. You establish connectivity between the edge routers in your pod (PxR1 and PxR2) and the BBR1 router. Complete the following steps:
Connect to each of your pod edge routers (PxR1 and PxR2); they should not have configurations on them. If a router does have a configuration, delete the configuration using the erase start command, and then use the reload command to reboot.
Do not use the initial configuration mode to configure your routers; instead, use the Cisco IOS command line. Configure the hostname of your router (PxR1 and PxR2). Configure the enable secret password to be cisco, and the vty password to be sanfran. Configure the logging synchronous command and the exec-timeout 0 0 command on the console line. What do these two commands do? Configure the no ip domain lookup command; what does this command do?
On PxR1, assign an IP address of 10.x.1.y/24 to the FastEthernet 0/0 interface, where x is your pod number and y is your router number. Enable the interface.
On PxR2, assign an IP address of 10.x.2.y/24 to the FastEthernet 0/0 interface, where x is your pod number and y is your router number. Enable the interface.
Configure the Serial 0/0/0 interface for Frame Relay by turning on Frame Relay encapsulation.
Assign an IP address to your Serial 0/0/0 interface. Your IP address is 172.31.x.y/24, where x is your pod number and y is your router number.
Inverse ARP has been turned off in the core Frame Relay network; turn off inverse arp on your Frame Relay interface. Manually map a data-link connection identifier (DLCI) to BBR1 (172.31.x.3). The DLCI number is in the form 1xy, where x is your pod number, and y is your router number. For instance, P2R1 will use DLCI 121.
Enable the S0/0/0 interface.
Assign an IP address to your Serial 0/0/1 interface. Your IP address is 10.x.0.y/24, where x is your pod number, and y is your router number.
The Serial 0/0/1 interface on your PxR1 router is DCE; configure a clock rate of 64 kbps on this interface.
Enable the S0/0/1 interface.
Solution:
The following shows how to perform the required steps on the P1R1 router:
Router (config)#hostname P1R1
P1R1(config)#enable secret cisco
P1R1(config)#line vty 0 4
P1R1(config-line)#login
% Login disabled on line 322, until 'password' is set
% Login disabled on line 323, until 'password' is set
% Login disabled on line 324, until 'password' is set
% Login disabled on line 325, until 'password' is set
% Login disabled on line 326, until 'password' is set
P1R1(config-line)#password sanfran
P1R1(config-line)#line con 0
P1R1(config-line)#logging synchronous
P1R1(config-line)#exec-timeout 0 0
P1R1(config-line)#no ip domain lookup
P1R1(config)#int fa0/0
P1R1(config-if)#ip address 10.1.1.1 255.255.255.0
P1R1(config-if)#no shutdown
P1R1(config-if)#int s0/0/0
P1R1(config-if)#encapsulation frame-relay
P1R1(config-if)#ip address 172.31.1.1 255.255.255.0
P1R1(config-if)#no frame-relay inverse-arp
P1R1(config-if)#frame map ip 172.31.1.3 111 broadcast
P1R1(config-if)#no shutdown
P1R1(config-if)#int s0/0/1
P1R1(config-if)#ip address 10.1.0.1 255.255.255.0
P1R1(config-if)#clock rate  64000
P1R1(config-if)#no shutdown
The logging synchronous command synchronizes the terminal output on configured line. For example, if you are in the middle of typing a command and the router outputs a message to the terminal, your text will be repeated on the screen when the output is complete.
The exec-timeout 0 0 command specifies no timeout on the configured line, so that the EXEC session will not time out.
The no ip domain lookup command disables DNS lookups; this command proves useful when you do not have a DNS server in your network, such as in a lab environment.
Verify successful connectivity between your PxR1 and PxR2 routers using the ping command.
Verify successful connectivity from your PxR1 and PxR2 routers to the core BBR1 router (172.31.x.3) using the ping command.
Save your configurations to NVRAM.
Solution:
The following shows how to perform the required steps on the P1R1 router:
P1R1#ping 10.1.0.2

Type escape sequence to abort.
Sending 5, 100-byte ICMP Echos to 10.1.0.2, timeout is 2 seconds:
!!!!!
Success rate is 100 percent (5/5), round-trip min/avg/max = 28/28/32 ms
P1R1#ping 172.31.1.3

Type escape sequence to abort.
Sending 5, 100-byte ICMP Echos to 172.31.1.3, timeout is 2 seconds:
!!!!!
Success rate is 100 percent (5/5), round-trip min/avg/max = 28/46/108 ms
P1R1#copy run start
Destination filename [startup-config]?
Building configuration...
[OK]
P1R1#
In this task, you use a terminal utility to establish a console connection to the equipment. You establish connectivity between the internal routers (PxR3 and PxR4) and the edge routers in your pod (PxR1 and PxR2). Complete the following steps:
Connect to each of your pod internal routers (PxR3 and PxR4); they should not have configurations on them. If a router does have a configuration, delete the configuration using the erase start command, and then use the reload command to reboot.
Do not use the initial configuration mode to configure your routers; instead, use the Cisco IOS command line. Configure the hostname of your router (PxR3 and PxR4). Configure the enable secret password to be cisco, and the vty password to be sanfran. Configure the logging synchronous command and the exec-timeout 0 0 command on the console line. Configure the no ip domain lookup command.
On PxR3, assign an IP address of 10.x.1.y/24 to the FastEthernet 0/0 interface, where x is your pod number, and y is your router number. Enable the interface.
On PxR4, assign an IP address of 10.x.2.y/24 to the FastEthernet 0/0 interface, where x is your pod number, and y is your router number. Enable the interface.
Assign an IP address to your Serial 0/0/0 interface. Your IP address is 10.x.3.y/24, where x is your pod number, and y is your router number.
The Serial 0/0/0 interface on your PxR3 router is DCE; configure a clock of 64 kbps on this interface.
Enable the S0/0/0 interface.
Solution:
The following shows how to perform the required steps on the P1R3 router:
Router(config)#hostname P1R3
P1R3(config)#enable secret cisco
P1R3(config)#line vty 0 4
P1R3(config-line)#login
% Login disabled on line 322, until 'password' is set
% Login disabled on line 323, until 'password' is set
% Login disabled on line 324, until 'password' is set
% Login disabled on line 325, until 'password' is set
% Login disabled on line 326, until 'password' is set
P1R3(config-line)#pass sanfran
P1R3(config-line)#line con 0
P1R3(config-line)#logging synchronous
P1R3(config-line)#exec-timeout 0 0
P1R3(config-line)#exit
P1R3(config)#no ip domain-lookup
P1R3(config)#int fa0/0
P1R3(config-if)#ip address 10.1.1.3 255.255.255.0
P1R3(config-if)#no shutdown
P1R3(config-if)#int s0/0/0
P1R3(config-if)#ip address 10.1.3.3 255.255.255.0
P1R3(config-if)#clock rate 64000
P1R3(config-if)#no shutdown
Verify successful connectivity between your PxR3 and PxR4 routers using the ping command.
Verify successful connectivity between your edge routers (PxR1 and PxR2) and your internal routers (PxR3 and PxR4) using the ping command.
Save your configurations to NVRAM.
Solution:
The following shows how to perform the required steps on the P1R3 router:
P1R3#ping 10.1.3.4

Type escape sequence to abort.
Sending 5, 100-byte ICMP Echos to 10.1.3.4, timeout is 2 seconds:
!!!!!
Success rate is 100 percent (5/5), round-trip min/avg/max = 28/28/32 ms
P1R3#ping 10.1.1.1

Type escape sequence to abort.
Sending 5, 100-byte ICMP Echos to 10.1.1.1, timeout is 2 seconds:
.!!!!
Success rate is 80 percent (4/5), round-trip min/avg/max = 1/1/4 ms
P1R3#
P1R3#copy run start
Destination filename [startup-config]?
Building configuration...
[OK]
P1R3#
In this task, you explore classful routing. Follow these steps:
On all the routers within your assigned pod, enter the no ip classless global configuration command.
On all the routers within your assigned pod, configure RIPv1 for the pod network 10.0.0.0. Include the 172.31.0.0 Frame Relay network in the edge routers’ configurations.
By default, RIP sends Version 1 advertisements and can receive Versions 1 and 2. Explicitly specify RIPv1 using the version 1 command.
Solution:
The following configuration is for the pod 1 routers:
P1R1(config)#no ip classless
P1R1(config)#router rip
P1R1(config-router)#version 1
P1R1(config-router)#network 10.0.0.0
P1R1(config-router)#network 172.31.0.0

P1R2(config)#no ip classless
P1R2(config)#router rip
P1R2(config-router)#version 1
P1R2(config-router)#network 10.0.0.0
P1R2(config-router)#network 172.31.0.0

P1R3(config)#no ip classless
P1R3(config)#router rip
P1R3(config-router)#version 1
P1R3(config-router)#network 10.0.0.0

P1R4(config)#no ip classless
P1R4(config)#router rip
P1R4(config-router)#version 1
P1R4(config-router)#network 10.0.0.0
Verify that your routers accept only Version 1 advertisements using the show ip protocols command.
Solution:
The following sample output is from the P1R1 router. Note that under the Recv column, only Version 1 is displayed:
P1R1#show ip protocols
Routing Protocol is "rip"
  Sending updates every 30 seconds, next due in 14 seconds
  Invalid after 180 seconds, hold down 180, flushed after 240
  Outgoing update filter list for all interfaces is not set
  Incoming update filter list for all interfaces is not set
  Redistributing: rip
  Default version control: send version 1, receive version 1
    Interface             Send  Recv  Triggered RIP  Key-chain
    FastEthernet0/0       1     1
    Serial0/0/0           1     1
    Serial0/0/1           1     1
  Automatic network summarization is in effect
  Maximum path: 4
  Routing for Networks:
    10.0.0.0
    172.31.0.0
  Routing Information Sources:
    Gateway         Distance      Last Update
    10.1.1.3             120      00:00:18
    10.1.0.2             120      00:00:15
    172.31.1.3           120      00:00:07
  Distance: (default is 120)
Test connectivity to the Trivial File Transfer Protocol (TFTP) server (10.254.0.254) from the internal routers using the ping command. Do the pings work?
Solution:
The following sample output is from the P1R3 router. The ping did not work:
P1R3#ping 10.254.0.254
Type escape sequence to abort.
Sending 5, 100-byte ICMP Echos to 10.254.0.254, timeout is 2 seconds:
.....
Success rate is 0
percent (0/5) P1R3#
To investigate the results of the previous step, use the debug ip rip and show ip route commands to examine the routers’ behavior.
Can your internal router reach the core router? Why or why not?
Solution:
The internal router cannot reach the core because it does not have a route for the 10.254.0.0 subnet in its routing table. Classful routing protocols such as RIPv1 do not exchange subnet mask information and either assume a constant mask throughout the classful network or advertise the entire classful network. Advertisements between the pod edge routers and BBR1 go across the 172.31.0.0 network. Therefore, all three routers summarize the subnets of network 10.0.0.0 and advertise network 10.0.0.0 to each other. Each router ignores this advertisement, because it already has a route to the 10.0.0.0 network. Classful routing behavior is to look for known routes within the connected classful network (10.0.0.0 in this case) and to not consider less-specific routes. You can verify this behavior with the debug ip rip command and by displaying the routing table on the internal router, looking for a route to the 10.254.0.0 network. The following output is from the P1R1 and P1R3 routers:
P1R1#debug ip rip RIP protocol debugging is on P1R1# *Apr 28 19:19:07 EST: RIP: received v1 update from 10.1.0.2 on Serial0/0/1 *Apr 28 19:19:07 EST: 10.1.2.0 in 1 hops *Apr 28 19:19:07 EST: 10.1.3.0 in 2 hops *Apr 28 19:19:07 EST: 172.31.0.0 in 1 hops P1R1# *Apr 28 19:19:15 EST: RIP: sending v1 update to 255.255.255.255 via FastEthernet0/0 (10.1.1.1) *Apr 28 19:19:15 EST: RIP: build update entries *Apr 28 19:19:15 EST: subnet 10.1.0.0 metric 1 *Apr 28 19:19:15 EST: subnet 10.1.2.0 metric 2 *Apr 28 19:19:15 EST: network 172.31.0.0 metric 1 *Apr 28 19:19:15 EST: RIP: sending v1 update to 255.255.255.255 via Serial0/0/0 (172.31.1.1) *Apr 28 19:19:15 EST: RIP: build update entries *Apr 28 19:19:15 EST: network 10.0.0.0 metric 1 *Apr 28 19:19:15 EST: subnet 172.31.1.0 metric 1 *Apr 28 19:19:15 EST: subnet 172.31.2.0 metric 2 *Apr 28 19:19:15 EST: RIP: sending v1 update to 255.255.255.255 via Serial0/0/1 (10.1.0.1) P1R1# *Apr 28 19:19:15 EST: RIP: build update entries *Apr 28 19:19:15 EST: subnet 10.1.1.0 metric 1 *Apr 28 19:19:15 EST: subnet 10.1.3.0 metric 2 *Apr 28 19:19:15 EST: network 172.31.0.0 metric 1 P1R1# *Apr 28 19:19:19 EST: RIP: received v1 update from 172.31.1.3 on Serial0/0/0 *Apr 28 19:19:19 EST: 10.0.0.0 in 1 hops *Apr 28 19:19:19 EST: 172.31.2.0 in 1 hops *Apr 28 19:19:19 EST: RIP: ignored v2 packet from 172.31.1.3 (illegal version) P1R1#P1R1#show ip route <output omitted> 172.31.0.0/24 is subnetted, 2 subnets R 172.31.2.0 [120/1] via 172.31.1.3, 00:00:26, Serial0/0/0 C 172.31.1.0 is directly connected, Serial0/0/0 10.0.0.0/24 is subnetted, 4 subnets R 10.1.3.0 [120/1] via 10.1.1.3, 00:00:14, FastEthernet0/0 R 10.1.2.0 [120/1] via 10.1.0.2, 00:00:11, Serial0/0/1 C 10.1.1.0 is directly connected, FastEthernet0/0 C 10.1.0.0 is directly connected, Serial0/0/1 P1R1# P1R3# P1R3#show ip route <output omitted> R 172.31.0.0/16 [120/1] via 10.1.1.1, 00:00:16, FastEthernet0/0 10.0.0.0/24 is subnetted, 4 subnets C 10.1.3.0 is directly connected, Serial0/0/0 R 10.1.2.0 [120/1] via 10.1.3.4, 00:00:04, Serial0/0/0 C 10.1.1.0 is directly connected, FastEthernet0/0 R 10.1.0.0 [120/1] via 10.1.1.1, 00:00:16, FastEthernet0/0 P1R3#
To try to allow the internal routers to reach the core, advertise a default route from the edge routers through RIP using the default-information originate router configuration command.
Solution:
The following illustrates how to configure the edge routers in pod 1:
P1R1(config)#router rip
P1R1(config-router)#default-information originate

P1R2(config)#router rip
P1R2(config-router)#default-information originate
Look at the routing table on the internal routers. Is there a path now? Remember that RIP is slow to converge. You might need to wait up to a minute, even in this small network, before the default route appears on the internal router. To force convergence, you can issue the clear ip route * command.
Solution:
The following sample output is from P1R3:
P1R3#show ip route
<output omitted>
Gateway of last resort is 10.1.1.1 to network 0.0.0.0

R    172.31.0.0/16 [120/1] via 10.1.1.1, 00:00:26, FastEthernet0/0
     10.0.0.0/24 is subnetted, 4 subnets
C       10.1.3.0 is directly connected, Serial0/0/0
R       10.1.2.0 [120/1] via 10.1.3.4, 00:00:14, Serial0/0/0
C       10.1.1.0 is directly connected, FastEthernet0/0
R       10.1.0.0 [120/1] via 10.1.1.1, 00:00:26, FastEthernet0/0
R*   0.0.0.0/0 [120/1] via 10.1.1.1, 00:00:26, FastEthernet0/0
The following sample output is from P1R4:
P1R4#show ip route
<output omitted>
Gateway of last resort is 10.1.3.3 to network 0.0.0.0

R    172.31.0.0/16 [120/1] via 10.1.2.2, 00:00:17, FastEthernet0/0
     10.0.0.0/24 is subnetted, 4 subnets
C       10.1.3.0 is directly connected, Serial0/0/0
C       10.1.2.0 is directly connected, FastEthernet0/0
R       10.1.1.0 [120/1] via 10.1.3.3, 00:00:14, Serial0/0/0
R       10.1.0.0 [120/1] via 10.1.2.2, 00:00:17, FastEthernet0/0
R*   0.0.0.0/0 [120/2] via 10.1.3.3, 00:00:14, Serial0/0/0
               [120/2] via 10.1.2.2, 00:00:17, FastEthernet0/0
Notice a default route in the PxR3 and PxR4 routing tables. This default route is the result of the pod’s edge routers, PxR1 and PxR2, advertising themselves as default with the default-information originate command. Notice that only one route to the 0.0.0.0 default route appears in the routing table for P1R3, whereas P1R4 has two equal-cost routes to 0.0.0.0. This is because P1R3 advertises its default route to P1R4 first (because P1R1 was the first to be configured and it sends its route to P1R3); because of split horizon, P1R4 does not advertise the default route back to P1R3. The routing table for P1R2 also has the default route, learned from P1R1; P1R1 does not have the default route from P1R2, again because of split horizon.
Again, test connectivity from the internal routers to the TFTP server using ping. Do the pings work now?
Solution:
The following sample output is from the P1R3 and P1R4 routers. The pings still do not work. (The reasoning behind this is examined in the next task.)
P1R3#ping 10.254.0.254
Type escape sequence to abort.
Sending 5, 100-byte ICMP Echos to 10.254.0.254, timeout is 2 seconds:
.....
Success rate is 0 percent (0/5)

P1R3#
P1R4#ping 10.254.0.254
Type escape sequence to abort.
Sending 5, 100-byte ICMP Echos to 10.254.0.254, timeout is 2 seconds:
.....
Success rate is 0 percent (0/5)
P1R4#
The ping to the TFTP server in the preceding task did not work because the behavior of classful routing is to look for known routes within the connected classful network (10.0.0.0 in this case) and to not consider less-specific routes, such as a default route. Given that classful behavior is the cause of the problem, this task explores classless behavior. Follow these steps:
The TFTP server cannot be reached because the router has been instructed to route classfully with the no ip classless command. Enable classless IP on each router in your pod to explore classless behavior.
Solution:
The following sample configuration is on the P1R1 router:
P1R1(config)#ip classlessTest connectivity from the internal routers to the TFTP server. Do the pings work now?
Solution:
The following outputs are from the P1R3 and P1R4 routers. The pings still do not work:
P1R3#ping 10.254.0.254
Type escape sequence to abort.
Sending 5, 100-byte ICMP Echos to 10.254.0.254, timeout is 2 seconds:
U.U.U
Success rate is 0 percent (0/5)

P1R4#ping 10.254.0.254
Type escape sequence to abort.
Sending 5, 100-byte ICMP Echos to 10.254.0.254, timeout is 2 seconds:
UU.UU
Success rate is 0 percent (0/5)
The U result for the pings indicates that this router has a valid route in its routing table (the default route), but the echo reply still was not received. Although you changed the router behavior, RIPv1 still is a classful routing protocol and still is autosummarizing across the Frame Relay link. The BBR1 router does not have a route back to the 10.x.1.0/24 or 10. x.2.0/24 subnets, so the ping does not work.
To fix the connectivity problem, change to the classless version of RIP, RIPv2, and turn off RIP automatic route summarization on the edge routers.
Solution:
The following sample configuration is on the pod 1 routers:
P1R1(config)#router rip
P1R1(config-router)#version 2
P1R1(config-router)#no auto-summary

P1R2(config)#router rip
P1R2(config-router)#version 2
P1R2(config-router)#no auto-summary

P1R3(config)#router rip
P1R3(config-router)#version 2

P1R4(config)#router rip
P1R4(config-router)#version 2
One more time, test connectivity from the internal routers to the TFTP server. Do the pings work now?
Solution:
The following sample output is from the P1R3 and P1R4 routers. The pings now work:
P1R3#ping 10.254.0.254
Type escape sequence to abort.
Sending 5, 100-byte ICMP Echos to 10.254.0.254, timeout is 2 seconds:
!!!!!
Success rate is 100 percent (5/5), round-trip min/avg/max = 32/33/36 ms
P1R3#

P1R4#ping 10.254.0.254
Type escape sequence to abort.
Sending 5, 100-byte ICMP Echos to 10.254.0.254, timeout is 2 seconds:
!!!!!
Success rate is 100 percent (5/5), round-trip min/avg/max = 36/36/40 ms
P1R4#
As the network grows, large routing tables are inefficient because of the memory required to store them. Any routing event (such as a flapping line) must be propagated throughout the network for each route in the routing table. Summarization limits the update traffic and minimizes the size of the routing tables of all routers. In this task, you configure summarization on your edge routers. Follow these steps:
From an internal router, use Telnet to connect to BBR1 (172.31.x.0); the password is cisco. Notice that all of your pod’s networks are listed in BBR1’s routing table.
Solution:
The following sample output is from the BBR1 router, showing the relevant portion of the routing table:
BBR1>show ip route <output omitted> 10.0.0.0/24 is subnetted, 6 subnets R 10.1.3.0 [120/2] via 172.31.1.2, 00:00:09, Serial0/0.1 [120/2] via 172.31.1.1, 00:00:13, Serial0/0.1 R 10.1.2.0 [120/1] via 172.31.1.2, 00:00:09, Serial0/0.1 R 10.1.1.0 [120/1] via 172.31.1.1, 00:00:13, Serial0/0.1 B 10.97.97.0 [20/0] via 10.254.0.3, 00:00:13 R 10.1.0.0 [120/1] via 172.31.1.2, 00:00:09, Serial0/0.1 [120/1] via 172.31.1.1, 00:00:13, Serial0/0.1 C 10.254.0.0 is directly connected, FastEthernet0/0Configure the edge routers to announce a summary route of 10.x.0.0 255.255.0.0 to BBR1. Where should you place the appropriate command?
Solution:
The following sample configuration is on the P1R1 and P1R2 routers. The summarization commands are placed on the S0/0/0 interfaces that connect to the BBR1 router:
P1R1(config)#int s0/0/0
P1R1(config-if)#ip summary-address rip 10.1.0.0 255.255.0.0

P1R2(config)#int s0/0/0
P1R2(config-if)#ip summary-address rip 10.1.0.0 255.255.0.0
Review the routing table on BBR1 again. What is the difference now? Remember that RIP is slow to converge, so you might need to wait up to a minute, even in this small network, before the summaries appear on BBR1.
Solution:
The following sample output is from the BBR1 router, showing the relevant portion of the routing table:
BBR1>show ip route
<output omitted>
     10.0.0.0/8 is variably subnetted, 3 subnets, 2 masks
B       10.97.97.0/24 [20/0] via 10.254.0.3, 00:00:08
R       10.1.0.0/16 [120/1] via 172.31.1.2, 00:00:08, Serial0/0.1
                    [120/1] via 172.31.1.1, 00:00:00, Serial0/0.1
C       10.254.0.0/24 is directly connected, FastEthernet0/0
Examine the output from the show ip protocols command for details about the operation of RIP.
Solution:
The following sample output is from the P1R2 router. It shows that RIPv2 is running for network 10.0.0.0, that autosummarization is off, and that manual summarization to 10.1.0.0/16 is on Serial 0/0/0:
P1R2#show ip protocols
Routing Protocol is "rip"
  Sending updates every 30 seconds, next due in 16 seconds
  Invalid after 180 seconds, hold down 180, flushed after 240
  Outgoing update filter list for all interfaces is not set
  Incoming update filter list for all interfaces is not set
  Redistributing: rip
  Default version control: send version 2, receive version 2
    Interface             Send  Recv  Triggered RIP  Key-chain
    FastEthernet0/0       2     2
    Serial0/0/0           2     2
    Serial0/0/1           2     2
  Automatic network summarization is not in effect
  Address Summarization:
    10.1.0.0/16 for Serial0/0/0
  Maximum path: 4
  Routing for Networks:
    10.0.0.0
    172.31.0.0
  Routing Information Sources:
    Gateway         Distance      Last Update
    10.1.0.1             120      00:00:22
    10.1.2.4             120      00:00:06
    172.31.1.3           120      00:00:08
  Distance: (default is 120) P1R2#
You have successfully completed this exercise when you achieve the following results:
You have put a basic configuration on your pod devices, and verified connectivity with directly connected devices.
You have configured RIPv1 as a routing protocol and explored its shortcomings.
You have configured RIPv2 and examined its behavior.
Answer the following questions, and then refer to Appendix A, “Answers to Review Questions,” for the answers.