
Creating and Applying Materials
Materials can bring your model to life. Materials can be as simple as paint—matte or glossy or anywhere between. They can be opaque, transparent, reflective, or nonreflective. You can apply representations of realistic, real-world materials like stone, marble, glass, polished metal, fabric … the list is almost endless. AutoCAD 2012 comes with a material library of literally thousands of different material types, and assigning them to objects can be as simple as dragging from a palette and dropping on an object. Or it can be as complex as you care to make it.
Prior to AutoCAD 2011, you created and stored materials in individual drawings, which made them difficult to manage. AutoCAD 2011 introduced the Materials Browser, which makes managing materials much easier. Partnered with the Materials Browser is the new Materials Editor, accessible from a tool button in the Materials Browser.
 The new materials libraries introduced in AutoCAD 2011 took up vast amounts of hard disk space. That was seen as wasteful for people who never did renderings, so in AutoCAD 2012, most of the material libraries are online. The first time you click the Render button in AutoCAD 2012, AutoCAD asks whether you want to go online to install the Medium Material Library. If rendering looks interesting to you, go ahead and install the library.
 Use the MATBROWSER command to display the Materials Browser palette (see Figure 23-6), from which you can create, edit, and manage in the current drawing or material libraries. You add materials to your drawing by using a preconfigured material or creating a custom material.
Follow these steps to create and manage a new material:
- On the Render tab, choose Materials Browser from the Materials panel.
- On the Materials Browser palette that opens, click Create a Material (in the upper-left) and then choose the material template you want to start with. For example, choose Metallic Paint.
The Materials Editor palette is displayed (see Figure 23-6).
 On the Materials Editor palette, click in the Name field located below the preview of the material and enter a name.
- Enter new values in the appropriate attributes for the material.
The attributes that you can edit vary, based upon the type of material template that you choose to start with. When you finish editing the material, you can close or hide the Materials Editor palette. The material is automatically added to the current drawing.
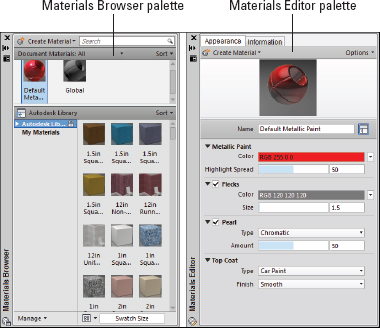
Figure 23-6: Adding color and texture to a 3D model with the Materials Browser palette and the Materials Editor palette.
- (Optional) Save the material in a library to use it in more than one drawing. On the Materials Browser palette, at the bottom, click Manage, then select Create New Library.
The Create Library dialog box is displayed.
- Enter a name and location for the new library. Click Save.
- On the Materials Browser palette, drag the custom material you created onto the name of the new library.
Now you can access the material from any drawing. You can create categories if you want to manage multiple materials within a library. In the Materials Browser, right-click the library name, choose Create Category, and then enter a name for the new category. After the category is created, simply select the material from the right side of the Materials Browser and drag it to the new category.
 You can open the Materials Editor directly from the Ribbon by clicking the Materials panel launcher (the little arrow at the right end of the Materials panel label).
Which materials you use in a model depends on what you're trying to represent. For example, you might choose to make a material semitransparent to communicate an idea rather than a true material selection. After you create a material, you can apply it to the objects in your 3D model. You can apply materials to objects in the following ways:
- By Layer: Globally assign materials to all objects on a particular drawing layer by assigning a material to the layer. To assign materials by layer, open the Materials slideout on the Render tab and choose Attach By Layer.
- By Object: Assign materials to an object by selecting the object, then right-clicking the material you want to assign in the Materials Browser palette. From the right-click menu, choose Assign to Selection. You can also drag and drop a material from the Materials Browser palette onto an object in a drawing or change an object's Material property using the Properties palette.
- By Face: Assign materials to individual faces of a 3D solid. Select a face using Subobject filtering by holding down the Ctrl key and selecting the face you want to apply a material to. Right-click the material you want to assign in the Materials Browser palette and then choose Assign to Selection.