
Chapter 5
Introduction to Animation
Animation is the process of changing values of an object over time by setting keyframes and controlling those values. Keyframing is the process—borrowed from traditional animation—of setting positions and values at particular frames of the animation. The computer interpolates between these keyframes to fill in the other frames to complete a smooth animation.
Animation puts your scene into action and adds life to your characters. It is change over time. Anything in a scene that needs to change from one second to another will need to be animated to do so.
Everyone has their own reflexive sense of how things move. This knowledge is gleaned through years of perception and observation. Therefore, your audience can be more critical of a CG scene’s motion than its lighting, coloring, or anything else. You know when something doesn’t look right. So will your audience.
It’s thrilling to see your hard work on a scene come to life with animation. On the flip side, it can be extremely aggravating to see your creation working improperly. Making mistakes is how you learn things, and your frustrations will ease over time. The results of your first several attempts at animating a scene will not look like Pixar films, but that should not dissuade you from working on more animations and scenes. You will get better with more practice.
The best way to learn how to animate is to jump right in and start animating. By doing so, you’ll get a good look at the Autodesk® 3ds Max® software animation tools so you can start editing animation and developing your timing skills.
In this chapter, you will learn to:
- Animate the ball
- Read animation curves
- Refine the animation
Animating the Ball
A classic exercise for all animators is to create a bouncing ball. It is a straightforward exercise, but there is much you can do with a bouncing ball to show character. Animating a bouncing ball is a good exercise in physics as well as cartoon movement. You’ll first create a rubber ball, and then you’ll add cartoonish movement to accentuate some principles of the animation. Aspiring animators can use this exercise for years and always find something new to learn about bouncing a ball.
Exercise 5.1: Setting Keyframes
In preparation, download the c05_IntroAnimation project from the companion web page at www.sybex.com/go/3dsmax2015essentials to your hard drive. Set your current project by clicking the Application button, choosing Manage ⇒ Set Project Folder, and navigating to the c05_IntroAnimation project that you downloaded.
Open the c05_ex1_ball_start.max scene file from the scenes folder of the c05_IntroAnimation project folder you downloaded. If you receive a Gamma & LUT Settings Mismatch warning, click OK.
Start with the gross animation, or the overall movements. This is also called blocking. First, move the ball up and down to begin its choreography.
Follow these steps to animate the ball:
- Select the ball, and then go to the Hierarchy panel (
 ).
). - Choose Pivot, and under the Adjust Pivot rollout, click the Affect Pivot Only button.
- Zoom in on the ball in the Front viewport, and with the Move tool drag on the Y-axis of the pivot to move to the bottom of the ball.
- Click the Affect Pivot Only button again to deactivate.
- Move the time slider to frame 10. The time slider is at the bottom of the screen below the viewports, as shown in Figure 5-1. It’s used to change your position in time, counted in frames.

Figure 5-1: The time slider is used to change your position in time, counted in frames.
- Click the Auto Key button below the time slider. The Auto Key button, the currently selected viewport, and the time slider all turn red, as shown in Figure 5-2. This means that any movement in the objects in your scene will be recorded as animation.
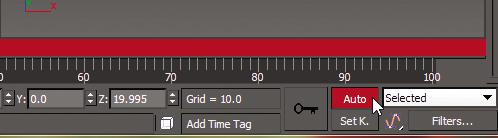
Figure 5-2: The Auto Key button records your animations.
- Using the Camera viewport, select the ball and move it down along the Z-axis to the ground plane, so it is 0 units in the Z-axis Transform Type-In box at the bottom of the interface. You can also just enter the value in the Z-axis Transform Type-In box and press Enter. This will work the same as using the Move tool to transform.
- Save the file, and to check your work you can open file
c05_ex1_ball_end.maxfrom thescenesfolder of thec05_IntroAnimationproject folder from companion web page atwww.sybex.com/go/3dsmax2015essentials.
This exercise has created two keyframes, one at frame 0 for the original position of the ball and one at frame 10 for the position to which you just moved the ball.
Exercise 5.2: Copying Keyframes
Now you want to move the ball up to the same position in the air as it was at frame 0. Instead of trying to estimate where that was, you can just copy the keyframe at frame 0 to frame 20.
You can see the keyframes you created in the timeline; they appear as red boxes. Red keys represent Position keyframes, green keys represent Rotation, and blue keys represent Scale. When a keyframe in the timeline is selected, it turns white. Now let’s copy a keyframe:
- Continue with the project from the previous exercise or open the
c05_ex2_ball_start.maxscene file from thescenesfolder of thec05_Intro to Animationproject folder you downloaded. If you start with the file from thescenesfolder you will need to turn on the Auto Key button. - Select the keyframe at frame 0; it should turn white when it is selected.
- Hold down the Shift key (this is a shortcut for the Clone tool), and click and drag the selected keyframe to copy it to frame 20. This will create a keyframe with the same animation parameters as the keyframe at frame 0, as shown in Figure 5-3.
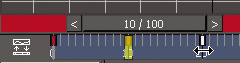
Figure 5-3: Press Shift and drag the keyframe to copy it to frame 20.
- Click and drag the time slider to scrub through the keyframes. You should see the ball start in the up position and then move down and then back up.
- Turn off Auto Key.
- Save the file, and to check your work you can open file
c05_ex2_ball_end.maxfrom thescenesfolder of thec05_IntroAnimationproject folder.
Exercise 5.3: Using the Track View - Curve Editor
Right now the ball is going down and then back up. To continue the animation for the length of the timeline, you could continue to copy and paste keyframes as you did earlier—but that would be very time-consuming, and you still need to do your other homework and clean your room. A better way is to loop, or cycle, through the keyframes you already have. An animation cycle is a segment of animation that is repeatable in a loop. The end state of the animation matches up to the beginning state, so there is no hiccup at the loop point.
In 3ds Max, you use the Parameter Curve Out-of-Range Types feature to cycle animation. This is a fancy way to create loops and cycles with your animations and specify how your object will behave outside the range of the keys you have created. This brings us to Track View, which is an animator’s best friend. You will learn the underlying concepts of the Curve Editor as well as its basic interface throughout this exercise.
Track View is a function of two animation editors, the Curve Editor and the Dope Sheet. The Curve Editor allows you to work with animation depicted as curves on a graph that sets the value of a parameter against time. The Dope Sheet displays keyframes over time on a horizontal graph, without any curves. This graphical display simplifies the process of adjusting animation timing because you can see all the keys at once in a spreadsheet-like format. The Dope Sheet is similar to traditional animation exposure sheets, or X-sheets.
You will use the Track View - Curve Editor (or Curve Editor for short) to loop your animation in the following steps:
- Continue with the project from the previous exercise or open the
c05_ex3_ball_start.maxscene file from thescenesfolder of thec05_IntroAnimationproject folder you downloaded. - With the ball selected, in the menu bar choose Graph Editors ⇒ Track View - Curve Editor. In Figure 5-4, the Curve Editor displays the animation curves of the ball so far.

Figure 5-4: The Curve Editor shows the animation curves of the ball.
- A menu bar runs across the top of the Curve Editor. In the Edit menu, choose Controller ⇒ Out Of Range Types, as shown in Figure 5-5. Doing so opens the Param Curve Out-of-Range Types dialog box, shown in Figure 5-6.
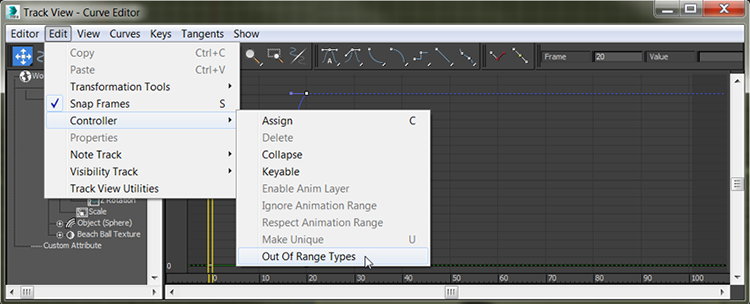
Figure 5-5: Selecting Out Of Range Types

Figure 5-6: Choosing to loop your animation
- Select Loop in this dialog box by clicking its thumbnail. The two little boxes with arrows beneath it will highlight, as shown in Figure 5-6. Click OK. Once you set the curve to Loop, the Curve Editor displays your animation, as shown in Figure 5-7. The out-of-range animation is shown as a dashed line.
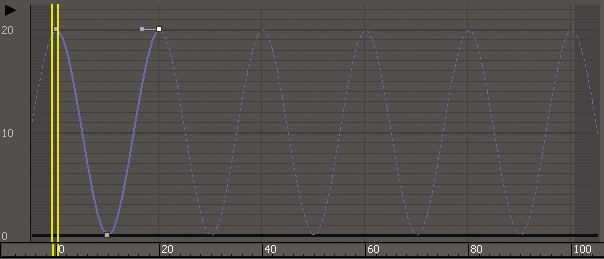
Figure 5-7: The Curve Editor now shows the looped animation curve.
- Scrub your animation in a viewport and see how the ball bounces up and down throughout the timeline range.
- Save the file, and to check your work you can open file
c05_ex3_ball_end.maxfrom thescenesfolder of thec05_IntroAnimationproject folder.
Reading Animation Curves
As you can see, the Curve Editor gives you control over the animation in a graph setting. The Curve Editor’s graph is a representation of an object’s parameters, such as Position (values shown vertically) over time (time shown horizontally). Curves allow you to visualize the interpolation of the motion. Once you are used to reading animation curves, you can judge an object’s direction, speed, acceleration, and timing at a mere glance.
Here is a quick primer on how to read a curve in the Curve Editor.
In Figure 5-8, an object’s Z Position parameter is being animated. At the beginning, the curve quickly begins to move positively (that is, to the right) on the Z-axis. The object shoots up and comes to an ease-in, where it decelerates to a stop, reaching its top height. The ease-in stop is signified by the curving beginning to flatten out at around frame 95.

Figure 5-8: The object quickly accelerates to an ease-in stop.
In Figure 5-9, the object slowly accelerates in an ease-out in the positive Z direction until it hits frame 100, where it suddenly stops.
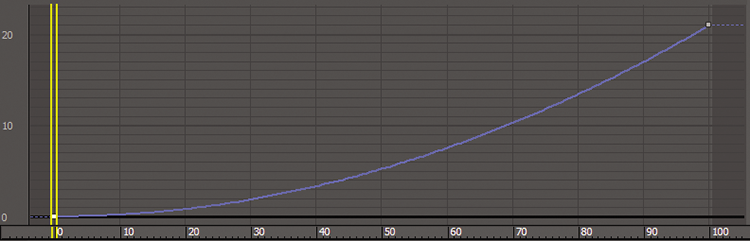
Figure 5-9: The object eases out to acceleration and suddenly stops at its fastest velocity.
In Figure 5-10, the object eases out and travels to an ease-in where it decelerates, starting at around frame 69, to where it slowly stops, at frame 100.
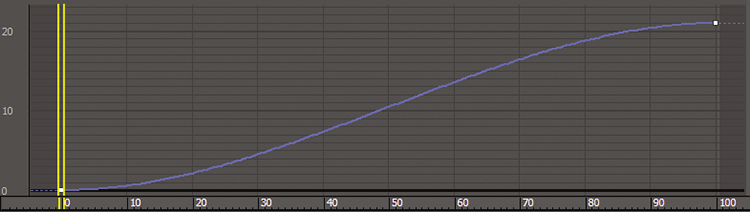
Figure 5-10: Ease-out and ease-in
Finally, in Figure 5-11, to showcase another tangent type, step interpolation holds its position from frame 0 to frame 20 and then makes the object jump from its Z position in frame 20 to its new position in frame 21.
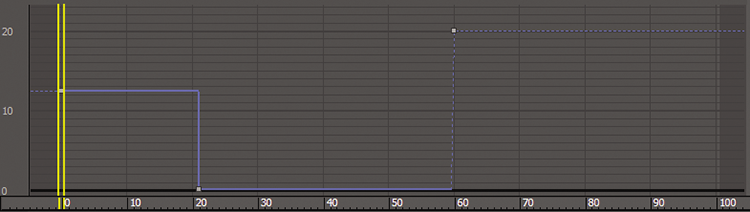
Figure 5-11: Step interpolation makes the object “jump” suddenly from one value to the next.
Figure 5-12 shows the Curve Editor, with its major aspects called out for your information.
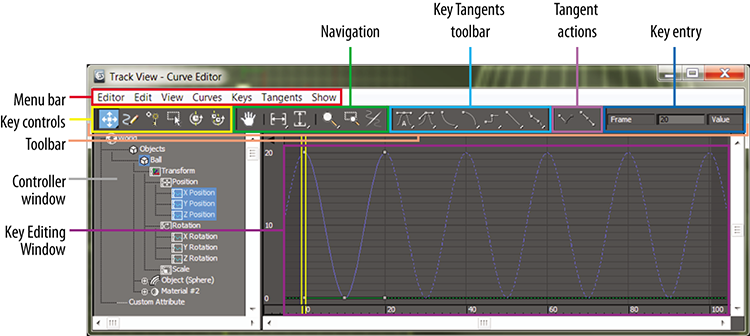
Figure 5-12: The Curve Editor
Refining the Animation
Let’s play the animation now. In the bottom right of the interface, you will see an animation player with the sideways triangle to signify Play Animation. Select the Camera01 viewport and click the Play Animation button. The framework of the movement is getting there. Notice how the speed of the ball is moving in a consistent way. If this were a real ball, it would be dealing with gravity; the ball would speed up as it got closer to the ground and there would be “hang time” when the ball was in the air on its way up as gravity took over to pull it back down.
This means you have to edit the movement that happens between the keyframes. This is done by adjusting how the keyframes shape the curve itself, using tangents. When you select a keyframe, a handle will appear in the user interface (UI), as shown in Figure 5-13.
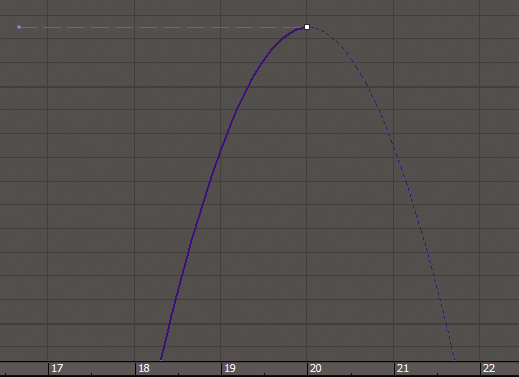
Figure 5-13: The keyframe handle
This handle adjusts the tangency of the keyframe to change the curvature of the animation curve, which in turn changes the animation. There are various types of tangents, depending on how you want to edit the motion. By default the Auto tangent is applied to all new keyframes. This is not what you want for the ball, although it is a perfect default tangent type to have.
Exercise 5.4: Editing Animation Curves
Let’s edit some tangents to better suit your animation. The intent is to speed up the curve as it hits the floor and slow it down as it crests its apex. Instead of opening the Curve Editor through the menu bar, this time you are going to use the shortcut:
- Continue with the project from the previous exercise or open the
c05_ex4_ball_start.maxscene file from thescenesfolder of thec05_IntroAnimationproject folder you downloaded. - Close the large Curve Editor dialog box, unless it is already closed.
- At the bottom-left corner of the interface, click the Open Mini Curve Editor button shown in Figure 5-14.
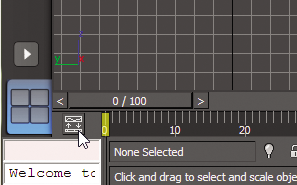
Figure 5-14: Click the Open Mini Curve Editor button.
- With the ball selected, scroll down the Controller window on the left of the Mini Curve Editor by dragging the Pan tool (the hand cursor) to find the Ball object’s position tracks.
- Click the Z Position track. This will bring to the Key Editing window only the curves that you want to edit. The Z Position curve is blue, as is almost everything relating to the Z-axis. The little gray boxes on the curves are keyframes.
- Select the keyframe at frame 10. The key will turn white when selected. You will change this key’s tangency to make the ball fall faster as it hits and bounces off the ground.
- In the Mini Curve Editor toolbar, change the tangent type for the selected keyframe from the Auto default to Fast by clicking the Set Tangents to Fast icon (
 ).When you do this, you will see the animation curve change shape, as shown in Figure 5-15.

Figure 5-15: The effect of the new tangent type
- Select the Camera01 viewport and play the animation. You can easily correlate how the animation works with the curve’s shape when you watch the time slider travel through the Mini Curve Editor as the animation plays.
- Save the file, and to check your work you can open file
c05_ex4_ball_end.maxfrom thescenesfolder of thec05_IntroAnimationproject folder.
Exercise 5.5: Squash and Stretch
The concept of squash and stretch has been an animation staple for as long as there has been animation. It is a way to convey the weight of an object by deforming it to react (usually in an exaggerated way) to gravity, impact, and motion.
You can give your ball a lot of flair by adding squash and stretch to give the object some personality. Follow along with these steps:
- Continue with the project from the previous exercise or open the
c05_ex5_ball_start.maxscene file from thescenesfolder of thec05_IntroAnimationproject folder you downloaded. - Press the N key to activate Auto Key.
- Open the Mini Curve Editor if it isn’t already open, and drag the yellow double-line track bar time slider to frame 10.
- Click and hold the Scale tool to access the flyout.
- Choose the Select And Squash tool (
 ).
). - Select the ball if it isn’t already selected, and center the cursor over the Z-axis of the Scale Transform gizmo in the Camera viewport.
- Click and drag down to squash about 20 percent. Doing so will scale down on the Z-axis and scale up on the X- and Y-axes to compensate and maintain a constant volume, as shown in Figure 5-16.
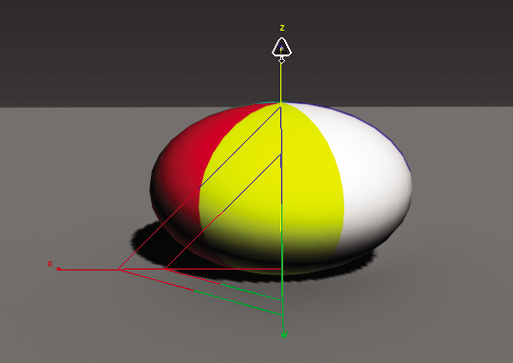
Figure 5-16: Use the Select And Squash tool to squash the ball on impact.
- Move to frame 0, and click and drag up to stretch the ball up about 20 percent, so that the ball’s scale in Z is about 120. When you scrub through the animation, you will see that the ball is stretched at frame 0; then the ball squashes and stays squashed for the rest of the time. You’ll fix that in the next step.
- In the Mini Curve Editor, scroll in the Controller window until you find the Scale track for the ball.
- Highlight it to see the keyframes and animation curves.
- Click and hold the Move Keys tool in the Mini Curve Editor toolbar to roll out and access the Move Keys Horizontal tool (
 )
) - Click and drag a selection marquee around the two keyframes at frame 0 in the Scale track to select them.
- Hold the Shift key and then click and drag the keyframes at frame 0 to frame 20.
- In the Mini Curve Editor’s menu bar, choose Edit ⇒ Controller ⇒ Out Of Range Types. Choose Loop, and then click OK.
- Play the animation. The curves are shown in Figure 5-17.
- Save the file, and to check your work you can open file
c05_ex5_ball_end.maxfrom thescenesfolder of thec05_IntroAnimationproject folder.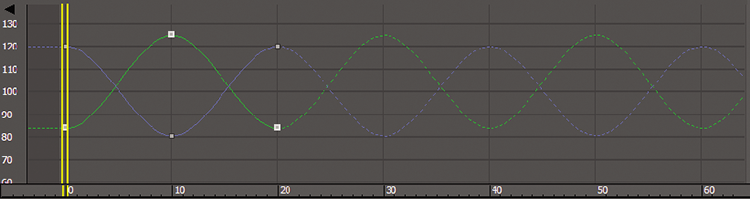
Figure 5-17: The final curves
Exercise 5.6: Setting the Timing
Well, you squashed and stretched the ball, but it still doesn’t look right. That is because the ball should not squash before it hits the ground. It needs to return to 100 percent scale and stay there for a few frames. Immediately before the ball hits the ground, it can squash into the ground plane to heighten the sense of impact. The following steps are easier to perform in the regular Curve Editor than in the Mini Curve Editor. So close the Mini Curve Editor by clicking the Close button on the left side of its toolbar.
- Continue with the project from the previous exercise or open the
c05_ex6_ball_start.maxscene file from thescenesfolder of thec05_IntroAnimationproject folder you downloaded. - Move the time slider to frame 8; turn on Auto Key if it is not still active.
- Select the ball and open the Curve Editor; in the Controller window, select the ball’s Scale track so that only the scale curves appear in the Editing window.
- In the Curve Editor’s toolbar, click the Add Keys icon (
 ). Your cursor will change to an arrow with a white circle at its lower right.
 - Click directly on the Scale curve to add a keyframe on all the Scale curves at frame 8. Because scales X and Y are the same value, you will see only two curves instead of three.
- The keys are white when selected. In the Key Entry toolbar, you will find two text type-in boxes. The box on the left is the frame number, and the box on the right is the selected key’s (or keys’) value. Because more than one key with a different value is selected, there is no number in that type-in box.
- Enter 100 (for 100 percent scale) in the right type-in box, for the scale in X, Y, and Z for the ball at frame 8, as shown in Figure 5-18.

Figure 5-18: Enter a value of 100.
- Move the time slider to frame 12, and do the same thing in the Curve Editor. These settings are bracketing the squash so that it squashes only a couple frames before and a couple frames after the ball hits the ground.
- Press the N key to deactivate Auto Key.
- Save the file, and to check your work you can open file
c05_ex6_ball_end.maxfrom thescenesfolder of thec05_IntroAnimationproject folder.
Once you play back the animation, the ball will begin to look a lot more like a nice cartoonish one, with a little character. Experiment by changing some of the scale amounts to have the ball squash a little more or less, or stretch it more or less to see how that affects the animation. See if it adds a different personality to the ball. If you can master a bouncing ball and evoke all sorts of emotions from your audience, you will be a great animator indeed.
Exercise 5.7: Moving the Ball Forward
Now that you have worked out the bounce, it’s time to add movement to the ball so that it moves across the screen as it bounces. Layering animation in this fashion, where you settle on one movement before moving on to another, is common. That’s not to say you won’t need to go back and forth and make adjustments through the whole process, but it’s generally nicer to work out one layer of the animation before adding another. The following steps will show you how:
- Continue with the project from the previous exercise or open the
c05_ex7_ball_start.maxscene file from thescenesfolder of thec05_IntroAnimationproject folder you downloaded. - Press the N key to activate Auto Key again. Move the time slider to frame 0.
- With the Select And Move tool, and move the ball in the Camera01 viewport to the left so it is still within the camera’s view. That’s about –30 units on the X-axis.
- Move the time slider to frame 100.
- Move the ball to the right about 60 units so that the ball’s X Position value is about 30. Don’t play the animation yet; it isn’t going to look right.
- Go to the Curve Editor, scroll down in the Controller window, and select the X Position track for the ball, as shown in Figure 5-19. There is no keyframe at frame 100; this is because of the loop that you set on the ball earlier; it will be addressed in the following steps.
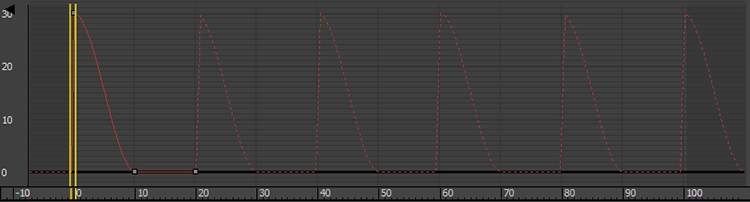
Figure 5-19: The X Position track of the ball does not look right.
- Select the keyframes on the X Position track at frame 10 and frame 20 by dragging a selection box around them, and delete them by pressing the Delete key on your keyboard.
- In the Param Curve Out-of-Range Types dialog (Edit ⇒ Controller ⇒ Out Of Range Types), select Constant. This removes the loop from the X Position track but won’t affect the Z Position track for the ball’s bounce.
- Move the ball to the right so that its X Position value is about 30. This is to create a key at frame 100.
- Play the animation. You can use the / (slash) button as a shortcut to play the animation. Watch the horizontal movement. The ball is slow at the beginning, speeds up in the middle, and then slows again at the end. It eases out and eases in. This is caused by the default tangent, which automatically adds a slowdown as the object goes in and out of the keyframes.
- In the Curve Editor, select both keys for the X Position curve and click the Set Tangents To Linear icon (
 ) to create a straight line of movement so there is no speed change in the ball’s movement from left to right. Figure 5-20 shows the proper curve.
 - Save the file, and to check your work you can open file
c05_ex7_ball_end.maxfrom thescenesfolder of thec05_IntroAnimationproject folder.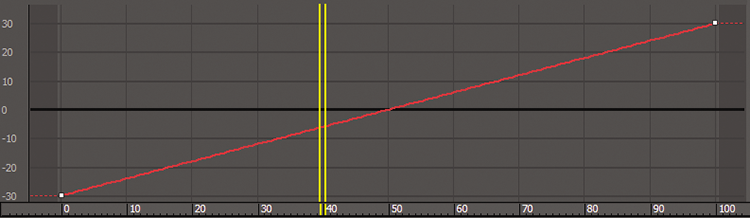
Figure 5-20: The X Position curve for the ball’s movement now has no ease-out or ease-in.
You need to add some rotation, but there are several problems with this. One, you moved the pivot point to the bottom of the ball in the very first step of the exercise. You did that so the squashing would work correctly—that is, it would be at the point of contact with the ground. If you were to rotate the ball with the pivot at the bottom, it would look like Figure 5-21.

Figure 5-21: The ball will not rotate properly because the pivot is at the bottom.
Exercise 5.8: Using the XForm Modifier
You need a pivot point at the center of the ball, but you can’t just move the existing pivot from the bottom to the middle—it would throw off all the squash and stretch animation. Unfortunately, an object can have only one pivot point. To solve the issue, you are going to use a modifier called XForm. This modifier has many uses. You’re going to use it to add another pivot to the ball in the following steps:
- Continue with the project from the previous exercise or open the
c05_ex8_ball_start.maxscene file from thescenesfolder of thec05_IntroAnimationproject folder you downloaded. - Select the ball, and then from the menu bar select Modifiers ⇒ Geometry (Parametric) ⇒ XForm. XForm will be added to the ball in the modifier stack, and an orange bounding box will appear over the ball in the viewport. XForm has no parameters, but it does have sub-objects.
- Expand the modifier stack by clicking the black box with the plus sign next to XForm, and then click Center. In the next step, you will use the Align tool to move the XForm’s center to the center of the ball.
- Click the Align tool (
 ), and then click the ball.
 - In the resulting dialog box, make sure the check boxes for X, Y, and Z Position are checked, which means those axes are active.
- Now click Center under Target Object, and then click OK, as shown in Figure 5-22. The XForm’s center will move.
- Save the file, and to check your work you can open file
c05_ex8_ball_end.maxfrom thescenesfolder of thec05_IntroAnimationproject folder.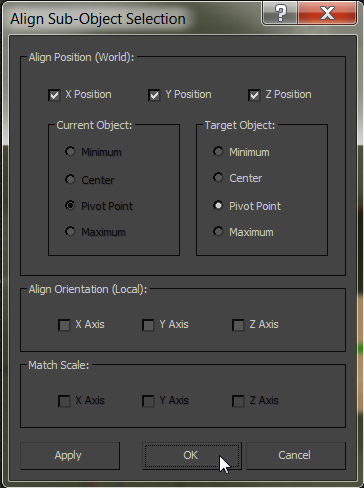
Figure 5-22: Align Sub-Object Selection dialog box
Now to be clear, this isn’t a pivot point. This is the center point on the XForm modifier. If you go to the modifier stack and click Sphere, the pivot point will still be at the bottom.
The XForm modifier allows the ball to rotate without its squashing and stretching getting in the way of the rotation. When the rotation animation for the ball’s roll is separated into the modifier, the animation on the Sphere object is preserved.
Exercise 5.9: Animating the XForm Modifier
To add the ball’s roll to the XForm modifier, follow along with these steps:
- Continue with the project from the previous exercise or open the
c05_ex9_ball_start.maxscene file from thescenesfolder of thec05_IntroAnimationproject folder you downloaded. - Turn on Auto Key and choose the Select And Rotate tool.
- In the modifier stack, click the Gizmo sub-object of XForm. This is a very important step because it tells the modifier to use the XForm’s center instead of using the pivot point of the ball.
- In the Camera01 viewport, move the time slider to frame 100 and rotate the ball 360 degrees on the Y-axis; you can use Angle Snap Toggle (
 ), found in the main toolbar, to make it easier to rotate exactly 360 degrees.
 - Click the XForm modifier to deactivate the sub-object mode.
- Play the animation.
- Save the file, and to check your work you can open file
c05_ex9_ball_end.maxfrom thescenesfolder of thec05_IntroAnimationproject folder.
Exercise 5.10: Correcting Rotation
The ball should be a rubbery cartoon ball at this point in the animation. Just for practice, let’s say you need to go back and edit the keyframes because you rotated in the wrong direction and the ball’s rotation is going backward. Fixing this issue requires you to go back into the Curve Editor as follows:
- Continue with the project from the previous exercise or open the
c05_ex10_ball_start.maxscene file from thescenesfolder of thec05_Intro to Animationproject folder you downloaded. - Open the Curve Editor (mini or regular) and scroll down in the Controller window until you see the Ball tracks. Below the ball’s transform track is a new track called Modified Object.
- Expand the track by clicking the plus sign in the circle next to the name.
- Also expand the XForm track, and then go to the Gizmo track and select the Y Rotation track. You will see the curve in the Key Editing window.
- Select the keyframe at frame 0; it has a value of 0 and the keyframe at frame 100 has a value of 360.
- Select both keyframes and change the tangents to Linear, as shown in Figure 5-23.
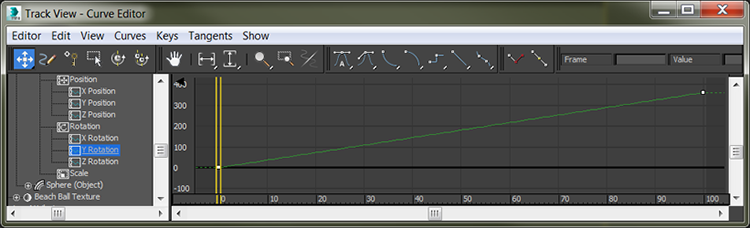
Figure 5-23: The Gizmo track’s Y-axis rotation is selected in the Controller window and Linear tangents are set.
- Close the Curve Editor and play the animation.
- Save the file, and to check your work you can open file
c05_ex10_ball_end.maxfrom thescenesfolder of thec05_Intro to Animationproject folder. - Play the
c05_BallRender.avimovie file located in therenderoutputfolder of theIntro to Animationproject to see a render of the animation.
Now You Know
In this chapter, you began your adventure into animation by learning how to set and manipulate keyframes by animating a ball. Using the Track View - Curve Editor, we looked into how to read and edit animation curves to help you refine motion on the animated ball. This chapter also showed you the animation principle of squash and stretch to give weight to an animated object. Finally, you finished the animation using the XForm modifier as a tool to add an additional pivot point with which to animate.