
Requirements management is important for the success of any project. A proper requirements management tool will help you gather the requirements from various stakeholders and from various perspectives, with an end-to-end traceability to different components of the software development. Azure DevOps provides a set of features to handle the requirements and associated functions. This chapter will deep dive into the requirements management features provided by Azure DevOps.
Process templates define the way the project gets executed and the different requirement categories like task, user story and so on. We discussed various process templates in previous chapters. The rest of this book will focus on scrum-based process templates. Other templates aren’t that different except for the requirements handling.
Work Items
Epic: This captures the high-level business requirements. If the epic is complex, it can be further defined into child epics to track the requirements properly.
Feature: This defines the functional features being released as part of the application. Epics will be mapped to multiple features or product backlog items (PBIs) in a parent-child relationship, which will fulfil the expected business requirements.
Product Backlog Item: This will track the user-specific actions.
Task: This is the implementation work that needs to be accomplished to develop the product.
Bug: This tracks any functional or nonfunctional defects in the implementation.
Impediment: This tracks the challenges in executing the project.
Test Plan: This captures the overall test strategy followed by the team.
Test Suite: This is set of test cases is used for testing a specific feature, release, or module.
Test Case: This is set of steps, that will be executed to validate the correctness of the feature implementations.
The “Work items” section is where you define new work items and associated functions. Let’s explore the different features available in this section.
Work items

New Work Item option
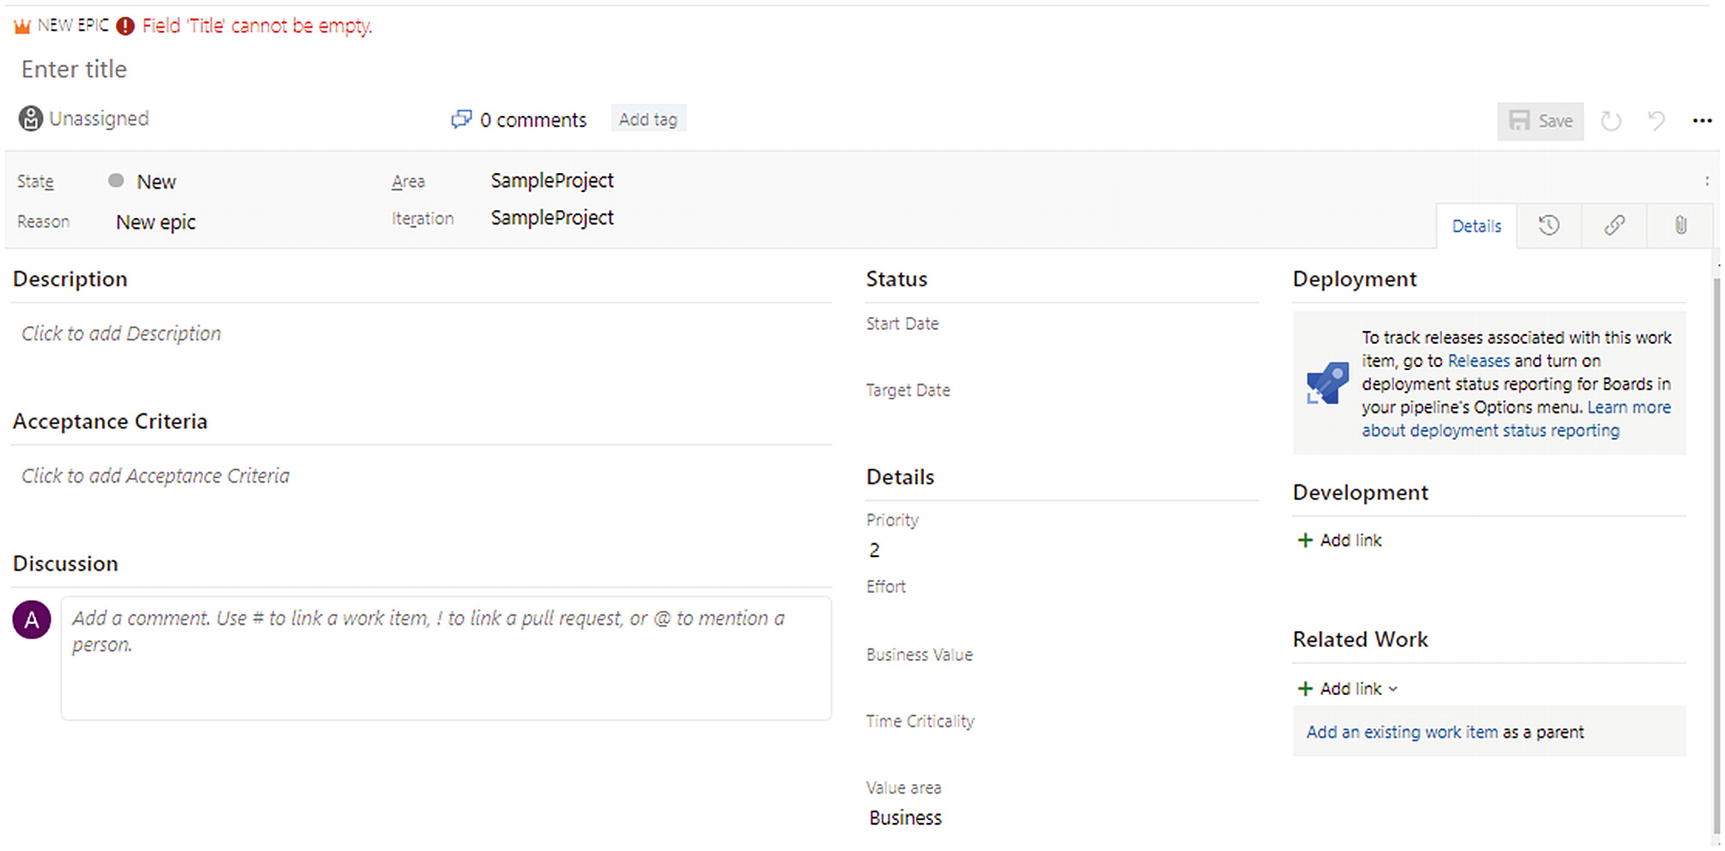
New epic
Work Item Fields: Details Tab
Title: This is a brief description of the requirement. For example, the description “Mobile Experience” means that the business expects the application to run properly on a mobile device.
Assigned To: Once the epic is ready to start working, it can be assigned to a team member to refine it.
Backlog refinement, formerly known as backlog grooming , is the process of consolidating different viewpoints, boundary conditions, risks and mitigations, option validations, and overall aspects of the requirement. Different stakeholders discuss the requirements and capture all the aspects, which helps the implementation team to fulfil the requirement. Another important concept is backlog prioritization , where teams prioritize the product backlog items to sequence the development and deployment of features.
State: This defines the current progress of the work item. The State values for an epic are New, In Progress, Done, and Removed.
Area: This lists the area mapped to the team in Project Settings ➤ Team Configuration.
Iteration: Similarly, an iteration defines the iterations mapped for this team under Project Settings ➤ Team Configuration. If a project-level area or iteration is not visible to the team, then verify it under Project Settings ➤ Team Configuration.
Description: This field explains the requirement in detail, which provides enough details for the implementation team to meet the requirement.
Acceptance Criteria: This defines the verification condition, which verifies the completeness of the work item implementation. For the task level, the acceptance criteria can be the technical implementation of that task. From an epic level, this can describe how you verify the implementation of a business or architectural epic.
Discussion: This field provides an option to collaborate with other team members to discuss various details about the work item, as shown in Figure 3-3. You can ask questions related to the work item to specific people by adding the member name with an @ symbol, you can refer to another work item with the # work item ID, and you can provide feedback about the description or acceptance criteria of the work item.
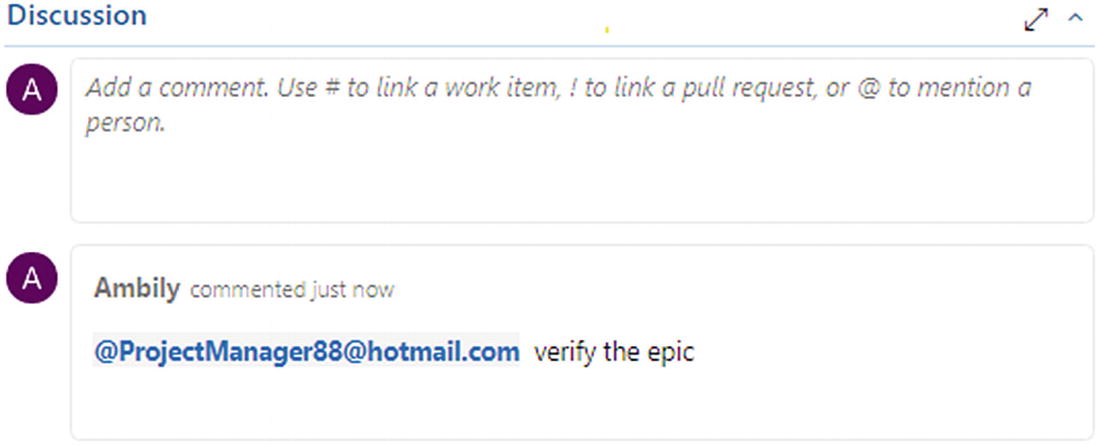
Discussion section
Status: Under Status, there are options to specify the start date and end date of implementing the specific epic. This data will help the implementation team to prioritize and calculate the overall effort for developing the epic.
- Details: Under Details, data is captured for multiple fields.
Priority: This defines the priority of the epic.
Effort: This is the estimated effort for implementing the specified epic. This field helps the team to define the relative efforts for the features, product backlogs, and tasks derived from this epic.
Business Value: Here, you specify a priority that captures the relative value of an epic, feature, or backlog item compared to other items of the same type. The higher the number, the greater the business value. Use this field when you want to capture a priority separate from the changeable backlog stack ranking in Azure Boards.
Time Criticality: This is a subjective unit of measure that captures how the business value decreases over time. Higher values indicate that the epic or feature is inherently more time-critical than those items with lower values.
- Value Area: This is the customer value addressed by the epic, feature, or backlog item. Values include the following:
Architectural: Technical services to implement business features that deliver a solution
Business (Default): Services that fulfill customers or stakeholder needs that directly deliver customer value to support the business
Deployment: This section relates to the release pipeline and shows which release contains the implementation of this epic. This will establish an end-to-end traceability for each of the business requirements. This field will be discussed further in Chapter 6.
- Development: This section links the epic to the branch that holds the implementation, the build that contains the changes, or the commits that capture the implementation. Select the “Add link” option to link to an entity explaining the implementation of the epic. This process can be automated using the repo policies defined in the previous chapter.
- Link Type: This shows the linked item type. This can be as follows:
Build related: This links to the build containing the implementation of the specific epic using the following options: Build, found in build, or Integrated in build.
Code related: This links to the implementation code using the following options: Branch, Changeset, commit, Pull Request, or Versioned Item. In large projects, epics may hold a completely new feature, and the development team may create a new branch to handle the feature development. In such a scenario, the epic will be linked to the corresponding branch to establish the end-to-end traceability. Commits and pull requests are used to link to Git-based version control, whereas Changeset and Versioned Item are used for TFVC.
GitHub: This is the new link type introduced to handle the GitHub integration with Azure DevOps. If your version control is based on GitHub, use this option to link the implementation with an epic. The options available are GitHub Commit and GitHub Pull Request.
The remaining fields change based on the Link Types selection. If this is set to Branch, then the options allow you to select a repository associated with the projects in the organization. Once the repository is selected, it displays all the branches related to that repository for selection. Provide a comment to complete the linking of an epic with the implementation code or build. If Link Type is set to Build, the system provides an option to select one of the build number. Similarly, all other selections will provide respective fields to link to it.
Related Work: Before proceeding to define a related work item, save the current epic. Once the epic is saved and an ID is generated, go to Related Work to define the related work items. There are two options to add an existing item or a new item. Existing Item provides an option to link an existing work item with a relation.
Select New Item to explore more about the related work item.
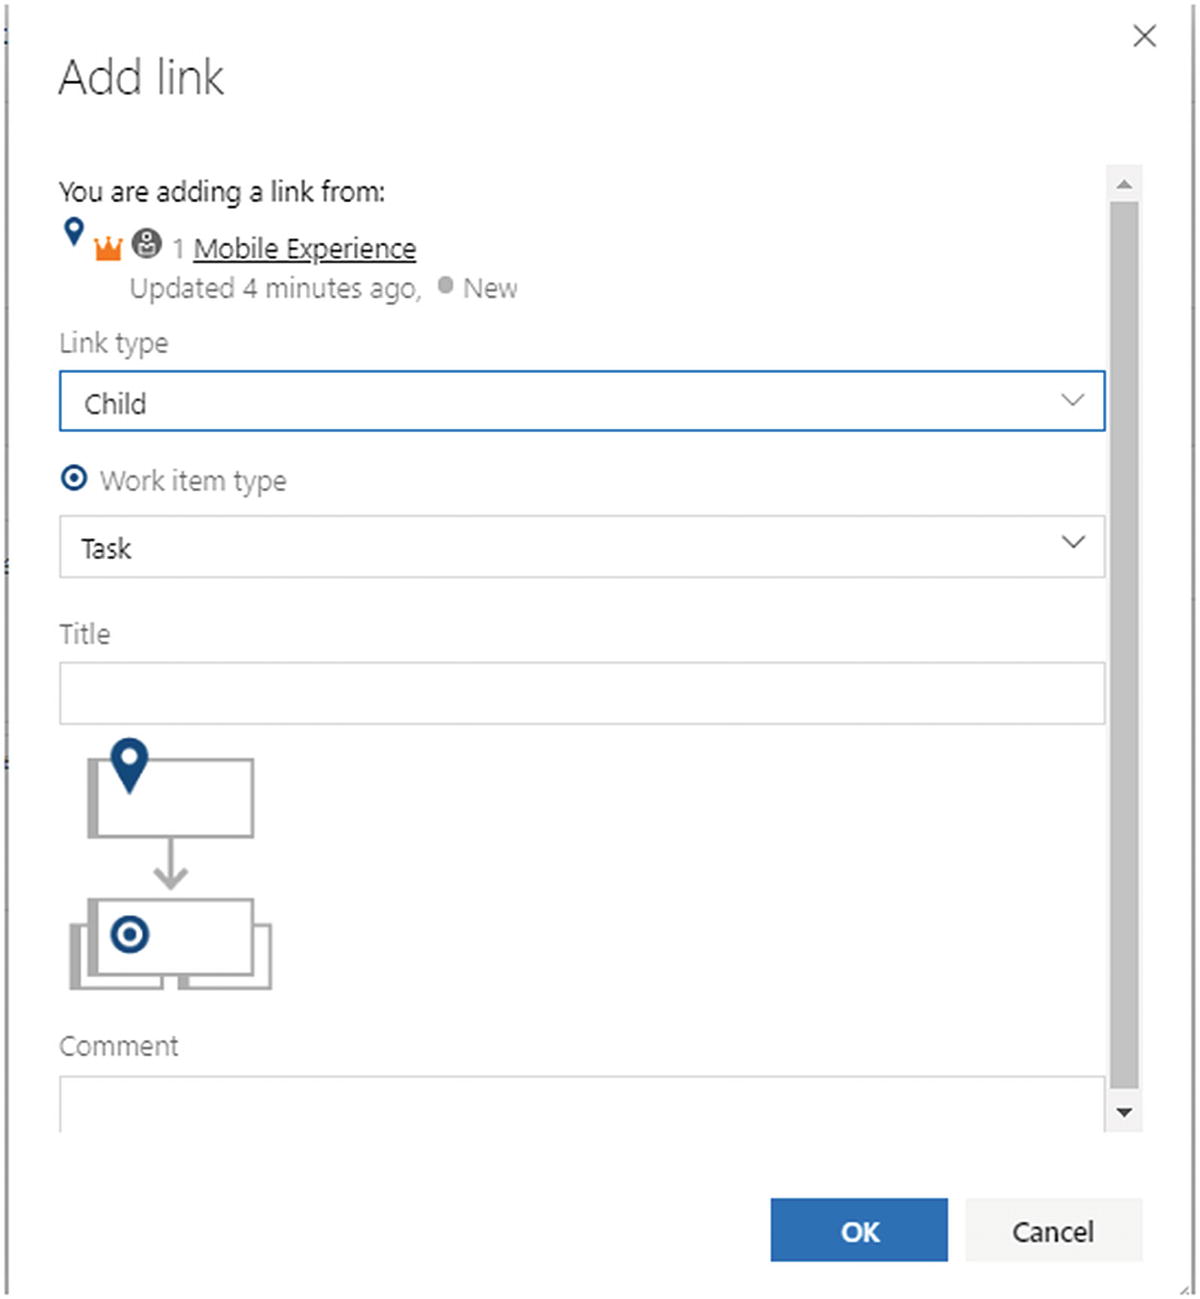
Adding a link
Child: This defines a parent-child relationship. In the case of an epic, it can be further defined into features, product backlogs, tasks, and so on.
Duplicate: This allows you to duplicate the same epic to handle another variation or to add to another project to implement similar feature.
Duplicate Of: This specifies that the current epic is a duplicate of another one defined in the same project or a different project.
Parent: A new item is going to be the parent of the current work item.
Predecessor: This establishes a sequential relationship to execute the dependent requirements in sequence. A new item should be created before implementing the current epic.
Related: Both the items are related, but they may not have any specific relationship like parent-child or sequential execution.
Successor: A new item will be the next item to be implemented.
Tested By: A new item implementation will be tested by the epic description or used for verification.
Tests: A new item consists of the test cases corresponding to the epic, as shown in Figure 3-5.

Link types
Add a child item to proceed. Once you provide the title information and click OK, the system will open the new item in a dialog so you can fill in the required information. Fill in the required details and select Save & Close to navigate back to the epic.
Work Item Fields: History Tab

History
Work Item Fields: Links Tab
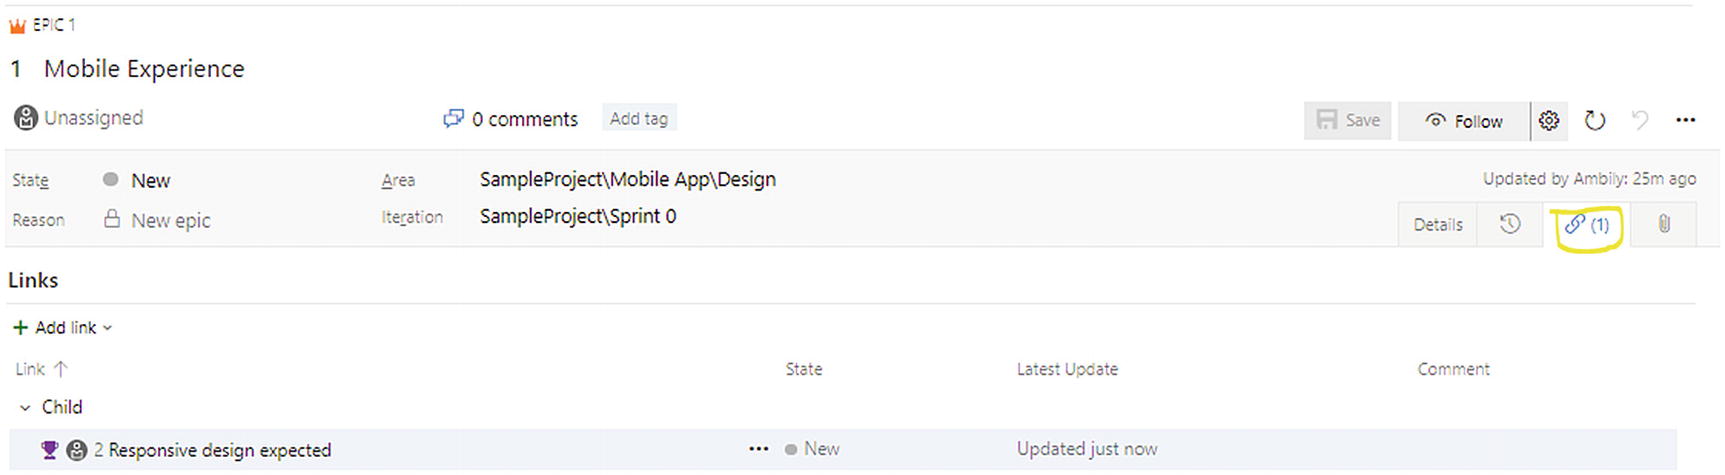
Links tab
Edit comment: You can edit the comment entered as part of linking an item.
Remove link: You can remove the relation or link between two work items.
Work Item Fields: Attachments Tab
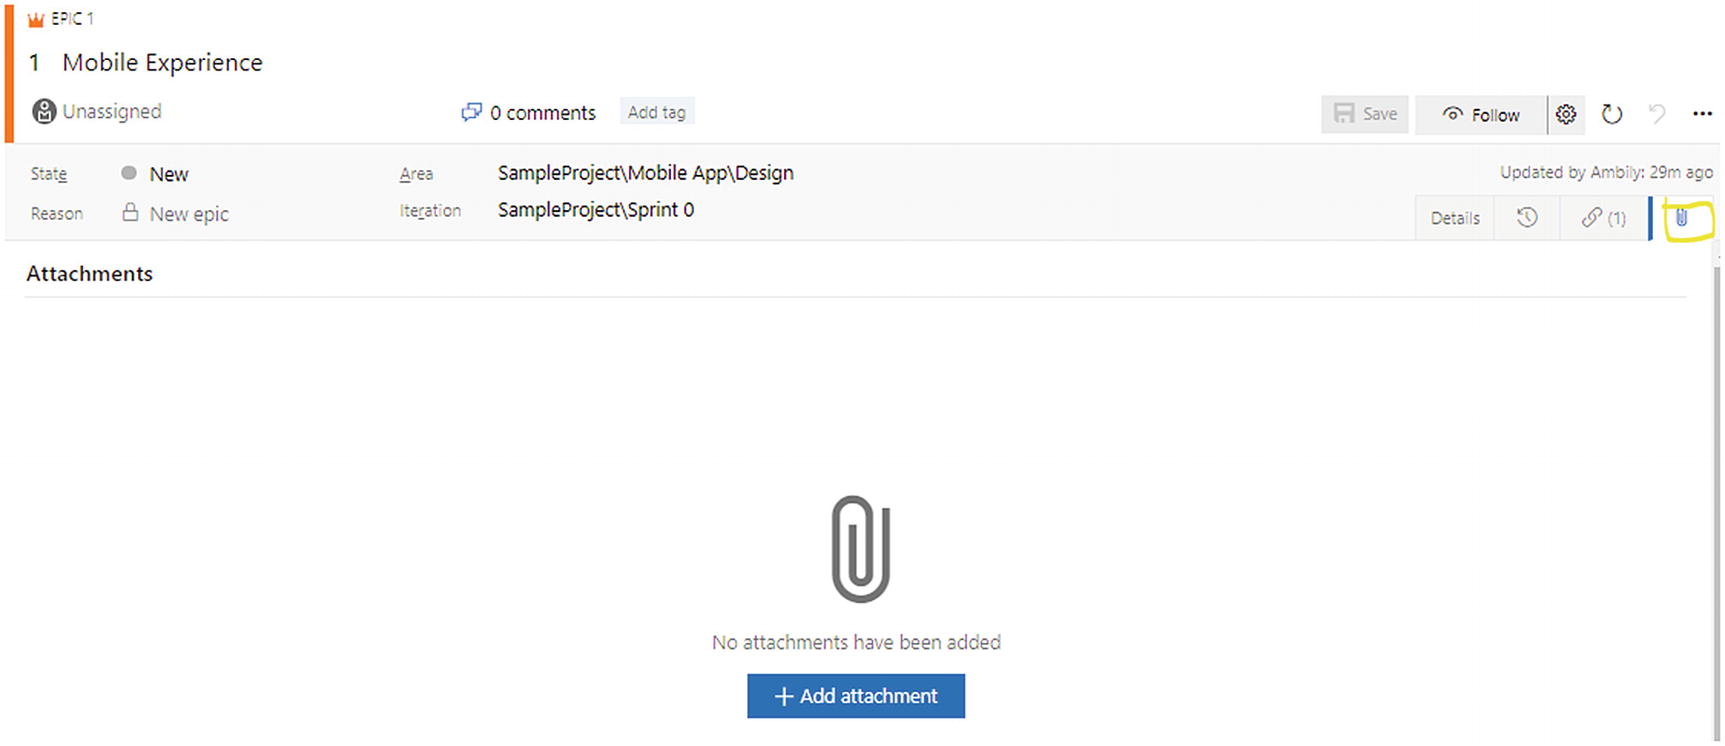
Adding an attachment
Grid View: This lists the attachments in grid format.
Click the ellipsis icon (…) to view the actions available for the added attachments.
Edit comment: This allows you to edit the comments entered as part of the attachment upload.
Preview attachment: This is a preview of the attachment based on its type. If it is an image, it will display a preview. But, if the attachment is a document, it will not show any preview.
Download attachment: This allows you to download the attachment.
Delete attachment: You can delete unwanted or wrongly attached documents.
Thumbnail View: This lists the attachments in card format. Hover your cursor over the top of the card to view the context menu icon (…) and click it to view the menu options.
Work Item Options

Work item options
Follow: This allows you to be notified of the changes made to a work item.
- Settings: This includes notification settings at a work item level. If any of the work items are so important or really impacting your activities or have high business value, you can track them using these settings. The options available are as follows:
Not Subscribed (Default): This is not subscribed at the work item level. But, if the work item will be part of any of the project or organization notification settings, this will be displayed.
Subscribed: You can receive all notifications related to a specific work item.
Custom: This allows you to select specific notification options such as sending a notification only when there is a state change.
Refresh: Refresh the item to reflect the changes made by another user or in another system; for example, a commit linked to the work item will get reflected immediately.
Revert: Revert the unsaved changes. If there are no unsaved changes, then both the Save and Refresh icons are disabled.
- Options (…): This provides additional actions and configurations for a work item. The options available are as follows:
New linked work item: This is another option to add a linked work item.
Change type: Change the type of a work item; for example, you can change an epic to a feature or change a task to the product backlog based on detailed analysis. The “Change work item type” wizard provides an option to select the target type and provide a reason for the change. This information will be tracked as part of the history of the work item and can be audited in the future to understand the reason for the change.
Move to team project: Move the existing work item to another project within the organization. Also, this option allows you to change the work item type as part of the movement, if required. The “Move work item” dialog provides an option to select the target project, type and provide the reason for the movement for tracking purposes.
Create copy of work item…: Create a copy of the existing work item in the same or different project. This option also allows you to copy the work item to a different work item type. At the time of the copy, the system allows you to include related artifacts such as the attachments, links, and child work items.
Email work item: Share the work item over email. This option opens the email construction page with options to add to email IDs, specify a subject, add details on a note field, and attach the main details of the work item. Work item data can link to the work item by adding a hyperlink to the work item ID. The receiver of the email can open the work item directly using this link.
Delete: Delete the current work item.
- Templates: Create a template to define the default values for a set of fields. For example, you can define a task template with a predefined area path for a team and share it with them, as shown in Figure 3-10.
 Figure 3-10
Capturing a template
Once it’s saved, use “Copy link” to copy the link of the template, which can be shared with others or posted on your team configuration or dashboard to create new work items based on this template. The template can be applied by selecting the work item context menu as well.
New branch: This option allows you to create a new branch out of the existing branch and link to the current work item. When the epic represents a feature and a feature branch strategy is followed by the team for the development of features, then this option supports the quick branching and linking operations.
- Request Feedback: You can request a team member or stakeholder verify the completeness of the current work item or provide feedback on the work item. This feature is used to fine-tune the work items before considering them as part of sprint planning or can be used to get different viewpoints or sign-off from concerned stakeholders, as shown in Figure 3-11.
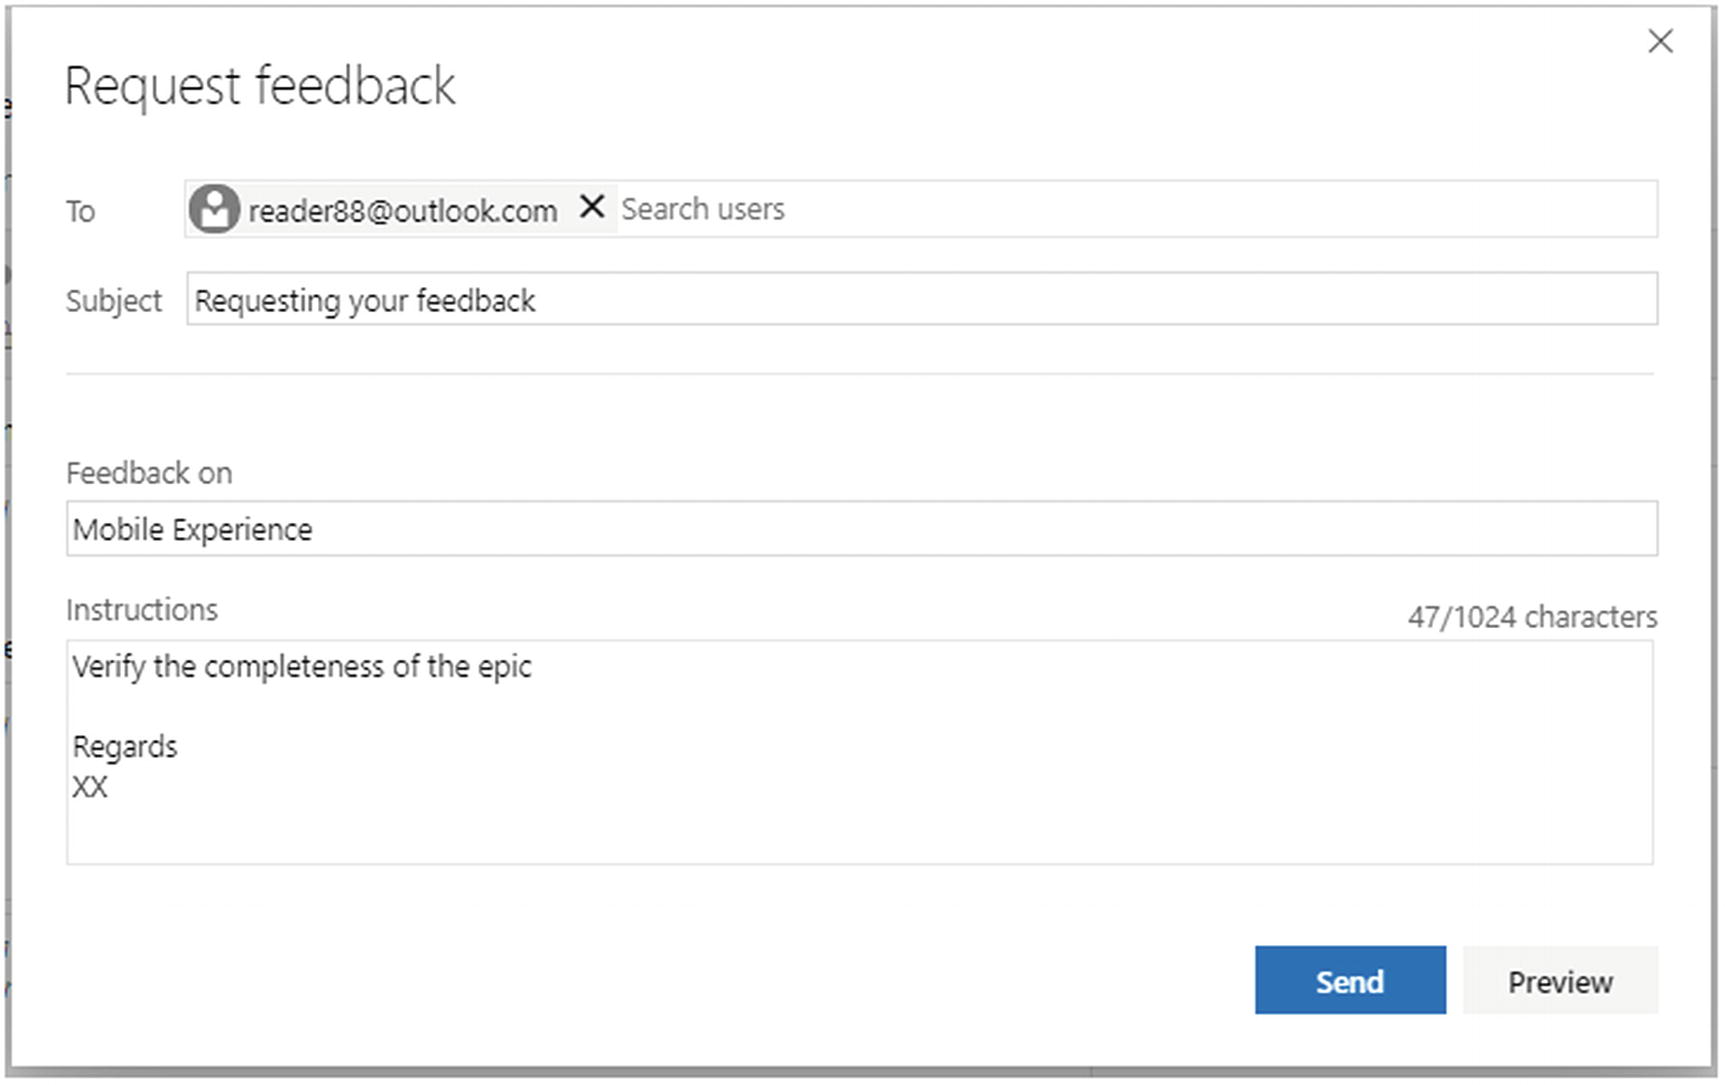 Figure 3-11
Requesting feedback
The “Request feedback” dialog allows you to specify the target members of the feedback request and instructions to provide the feedback, as shown in Figure 3-12. The Preview option shows the preview of the mail shared with the team. Figure 3-12
Preview feedback request 1
Figure 3-12 shows the preview of the request feedback email. The email captures the project name and the team that the requestor belongs to. Scroll down to view the “Provide feedback” button. Clicking this button takes the user to the specified work item, where the user can provide the feedback in the Discussion section.
Customize: This will take the user to Organization Settings ➤ Boards ➤ process customization. Process template customization is covered in Chapter 2.
Keyboard shortcuts: This option highlights the important keyboard shortcuts used in Azure DevOps. By clicking the link “Full list of keyboard shortcuts,” you can refer to the complete set of shortcuts.
The remaining two options available on top of the work item are comments and Add tag.
Comments: This provides the number of discussions added to the work item and a navigation link to the Discussion section in the work item.
Add Tag: This option provides a facility to add tags to a work item. Tags help filter and query the work items.
Filters

Work items
Filter By Keyword: Filter the list of work items by using keywords such as feature or epic based on the requirement.
Filter by Type: Filter the work items based on type. This filter option lists all the work item types available based on the process template. Multiple types can be selected to view the work items of various types.
Filter by Assigned to: Filter based on the assignment of work item to team members.
Filter by State: Filter based on the various states of the work item.
Filer by Area: Filter by the areas defined.
Filter by Tags: Filter by the tags. This option allows you to combine the tags using the OR and AND operators.
View Options

View options
View: This will allow you to view completed work items in the list or not.
Filter: This option allow you to view filter options, discussed in the previous section.
Full Screen: The last icon allows you to view the work items list in full-screen mode.
Options
Recently Used: This drop-down provides options to filter based on a few parameters such as the work items assigned to the user, work items the user is following, and items where the user’s name is mentioned in discussions, related to his activities, and based on recent state updates.
New Work Item: This option supports the addition of new work items to the project and was discussed already earlier in the chapter.
Open in Queries: This opens the filtered work item list in the Query window, where you can add more filters and query elements. We’ll discuss queries in more detail later in this chapter.
Column Options: This option allows you to add new columns or remove an existing column from the grid view of the work items, as shown in Figure 3-15. Also, you can set the default sort order of work items based on specific columns.

Columns
Import Work Items: Work items can be prepared offline using CSV files and imported into the system in bulk.
Explore this feature further using the sample CSV file content shown in Figure 3-16, with one task and one bug. If required, we can add more columns such as Description, Area Path, etc., and capture the requirement details. Figure 3-16
Data
Select the Import Work Items option to upload the file to Azure DevOps.
The system will parse the data based on the columns defined and shown to the user to confirm, as shown in Figure 3-17. The user can either edit the data or save it as is. Figure 3-17
Uploaded data
Select Save Items to create the work items and generate the IDs for newly created work items, as shown in Figure 3-18. Figure 3-18
Saving items
Recycle Bin: Azure DevOps allows you to remove the unwanted work items by changing the status to Remove. Once the work items are marked as Remove, they will be moved to the Recycle Bin, where the user can permanently delete the work item or restore it by changing the state.
Boards
Boards support another view of the work items and provide additional options to perform different activities related to the work items. By default, there will be one board configured for every team. The user can mark one of the boards as their favorite.

Selected board
Board Selection

Team board selection
Use the star symbol on or near the team board selection to mark a specific board as your favorite. Select the people icon next to the star symbol to view the Team Profile page. This view lists the board, backlog, sprints, and dashboard corresponding to the team. Also, this view shows the members who belong to the team.
Analytics
Board: Work items will be displayed as cards in a board.
Analytics: This shows the analytics report in terms of cumulative flow diagram and velocity.
The Cumulative Flow Diagram: Get insights about a selected team’s workload, throughput, and potential bottlenecks, as shown in Figure 3-21. To customize the report, set the columns, swimlanes, and timeframe.
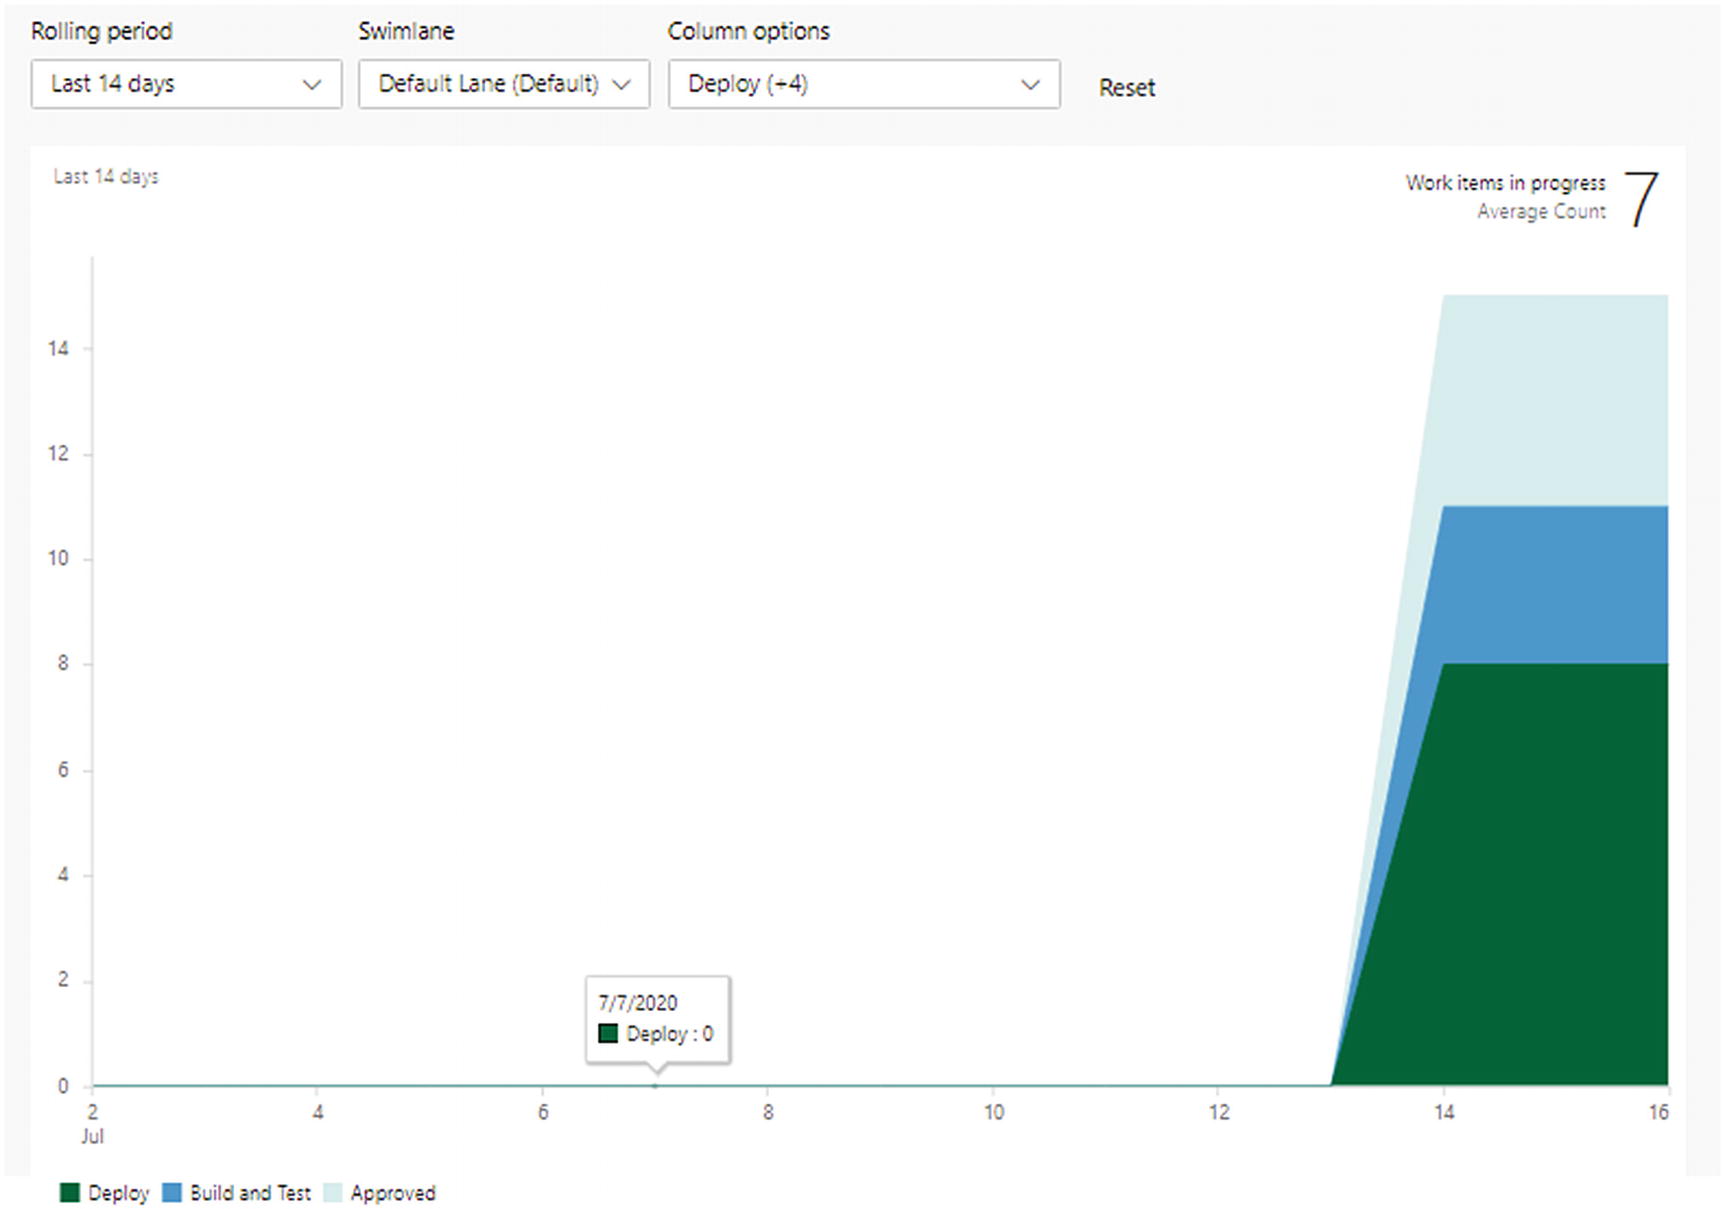
The cumulative flow diagram
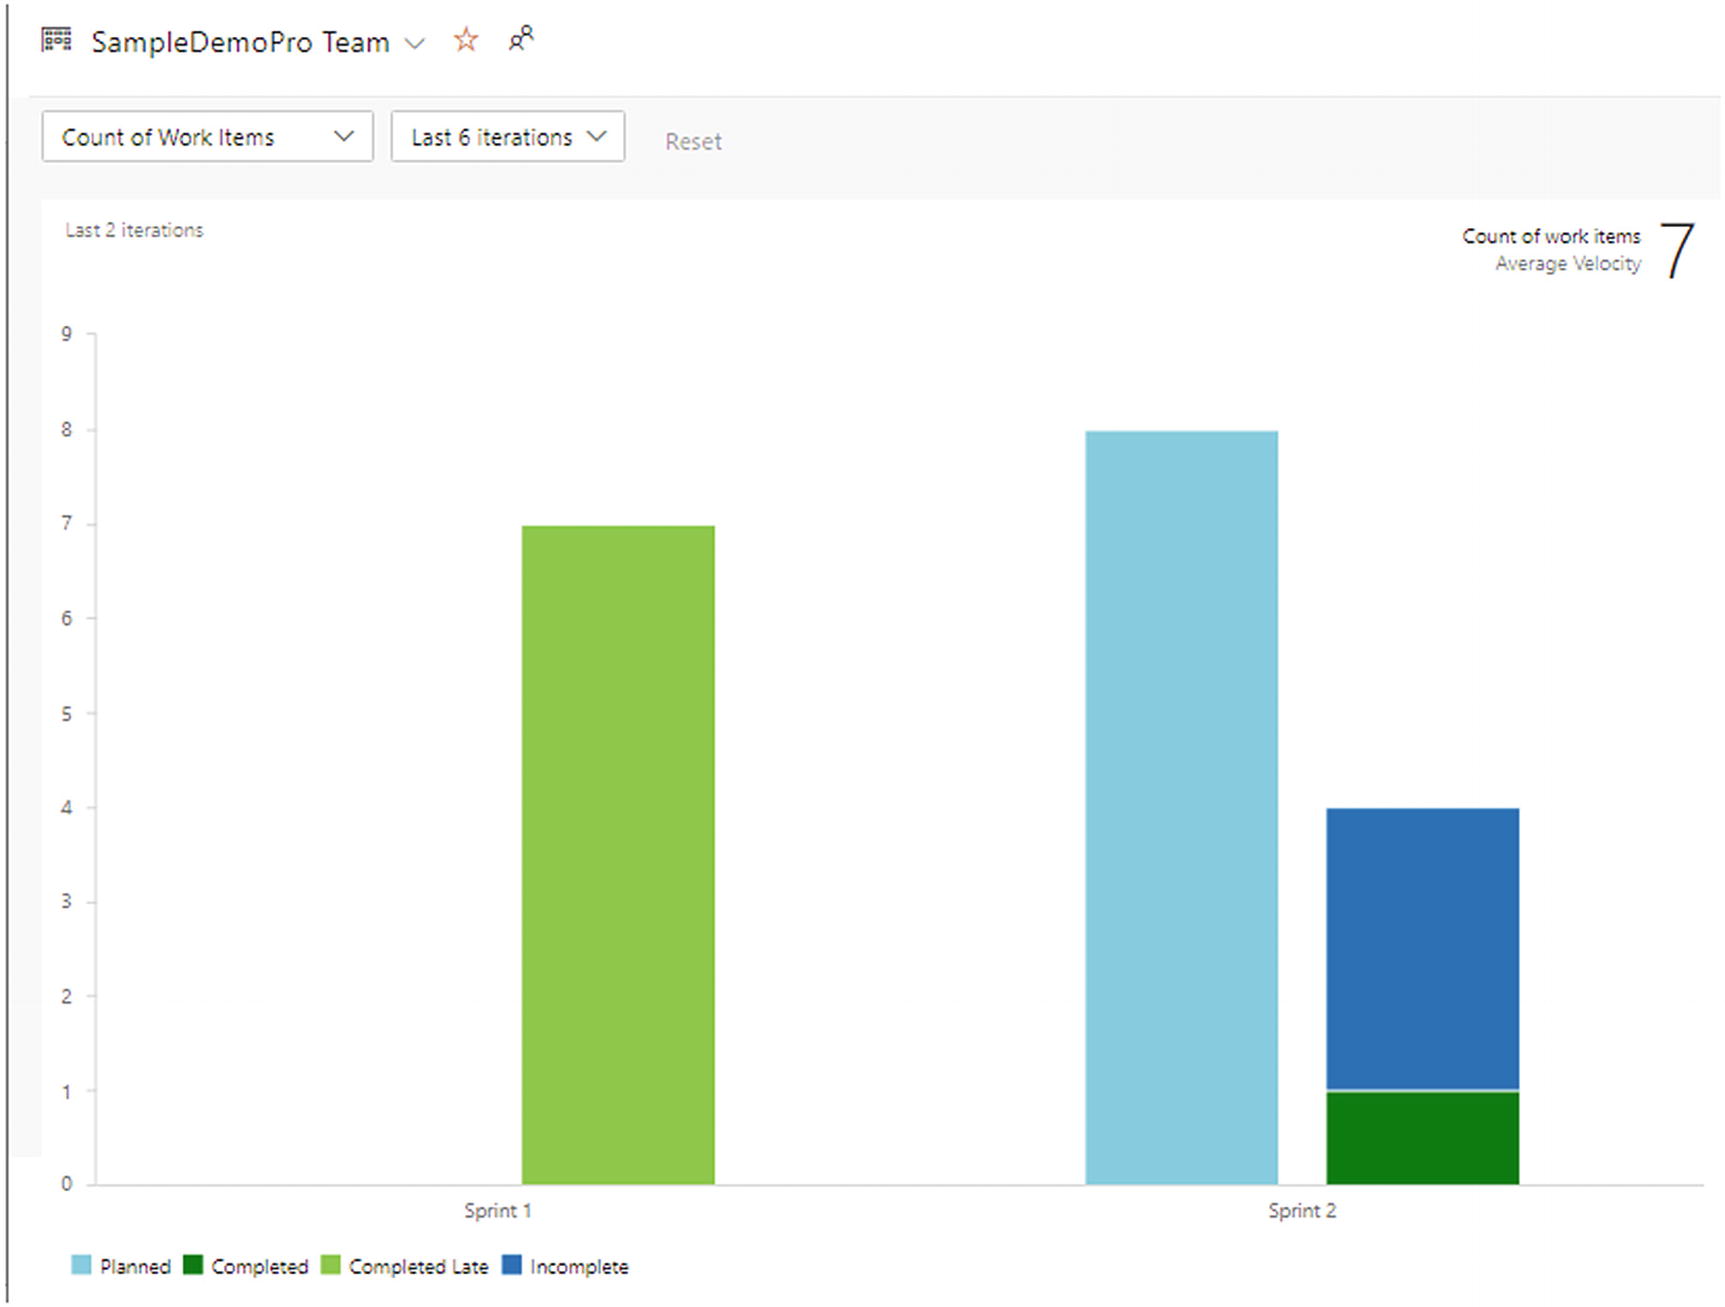
A velocity report
View as Backlog: Display the work items in a backlog view, which will be discussed in the next section.
View Options

View options for boards
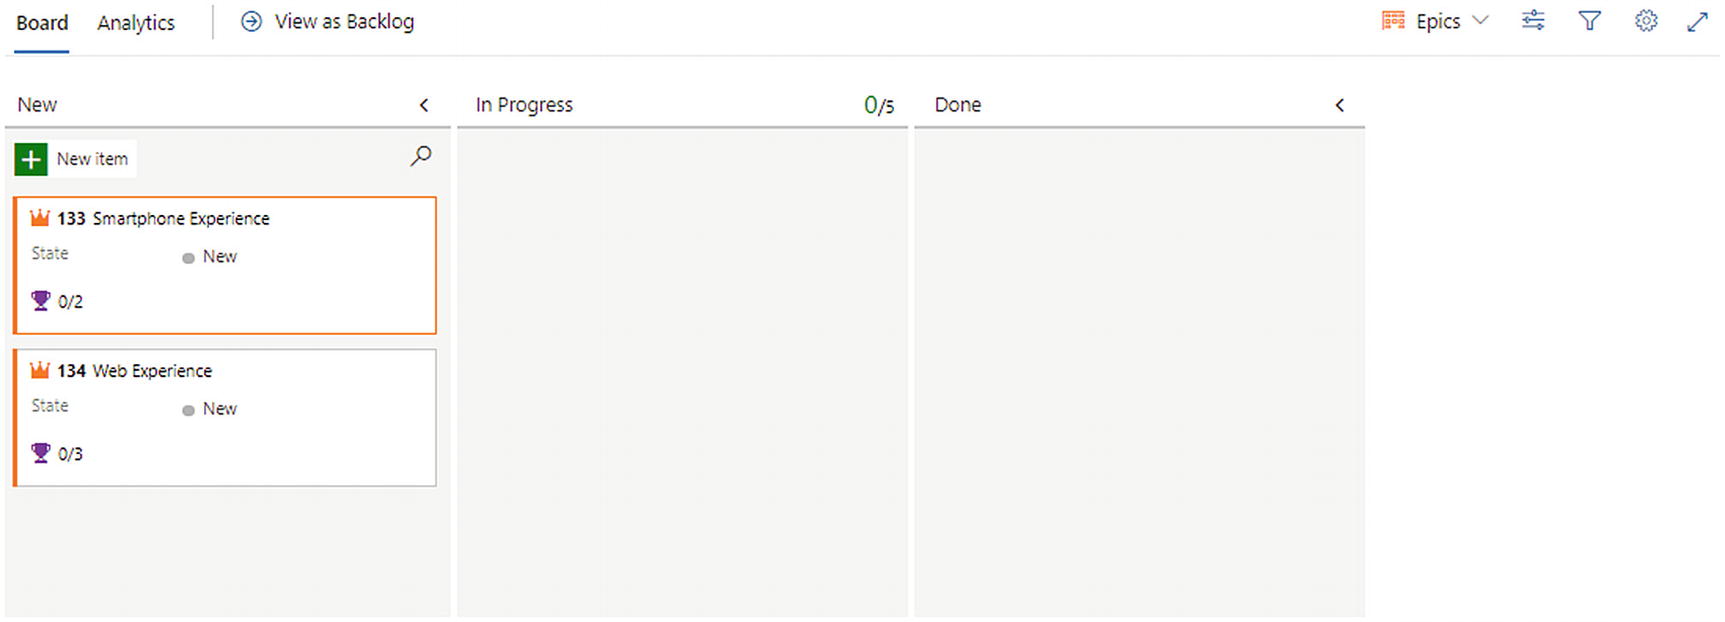
Epics view
The second icon (![]() ) shows an option to toggle the live update on and off. The third icon (
) shows an option to toggle the live update on and off. The third icon (![]() ) toggles the filter options on the top of the board. The last icon (
) toggles the filter options on the top of the board. The last icon (![]() ) allows the user to navigate to full-screen mode.
) allows the user to navigate to full-screen mode.
Board Settings
Clicking the gear symbol brings up the team configuration, especially the board-level configurations. The Settings dialog supports various options to customize the cards and board.
Cards Configuration
Fields: This section lists the fields displayed in the card. The user can configure the fields of importance here.
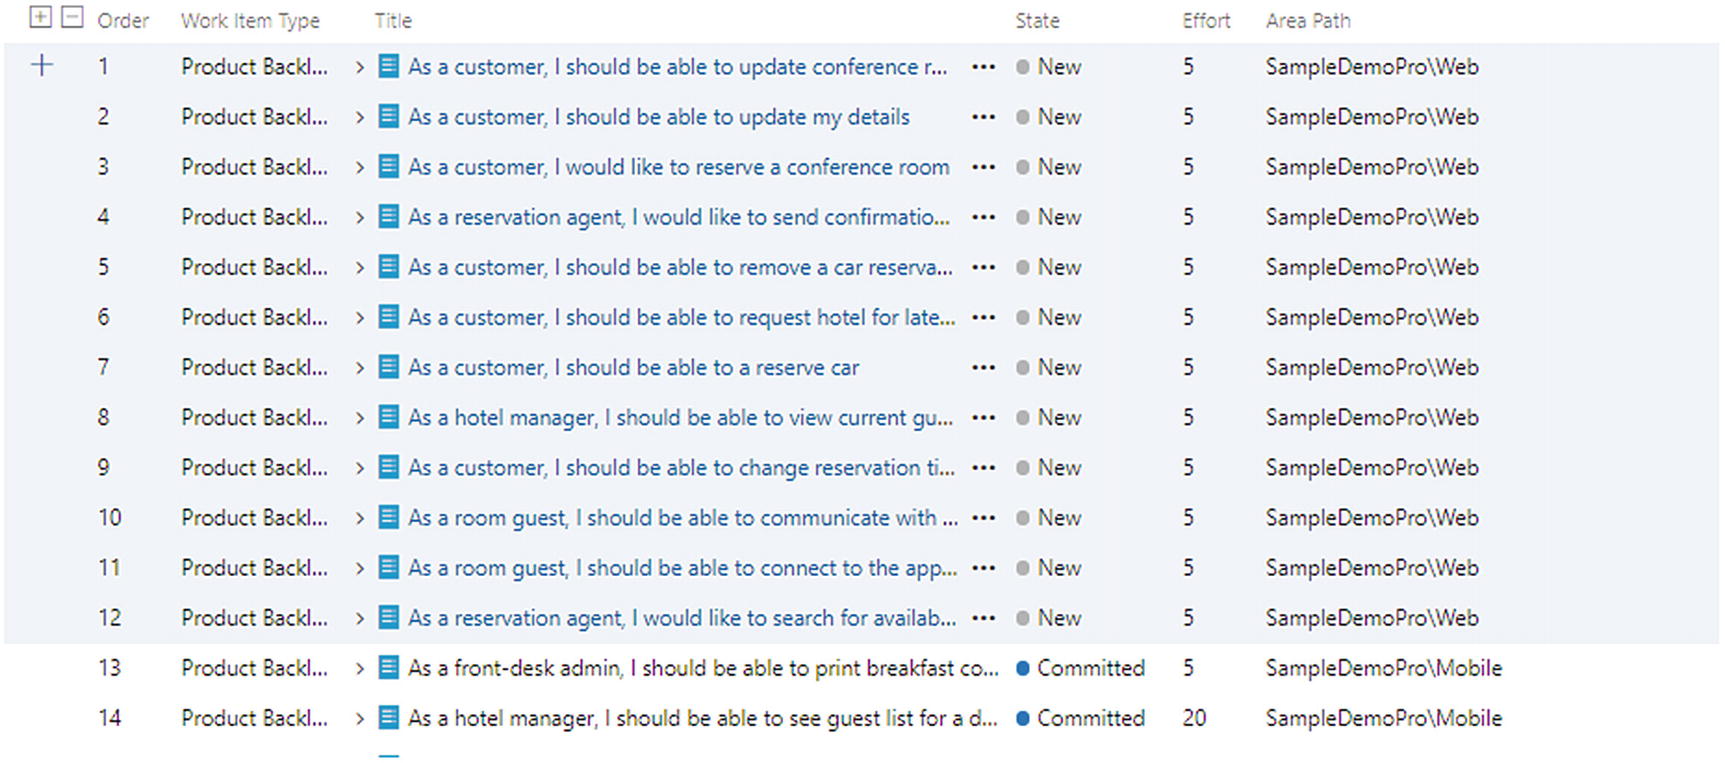
Styles: Define a style rule to make the important content stand out. In Figure 3-25, the selected style defines the bugs with a different background color; this makes the bug stand out in the board.

Cards Style 1

Card style 2
Tag Colors: Tag colors support the configuration of different tag colors. Select a tag and configure the color against each tag to highlight some of the important tags in the board.
Once the tag colors are applied, the cards will change the display of the tags, as shown in Figure 3-27.
Tag color
Annotations: Annotations show the number of tasks, tests, or GitHub linked to the current work item, as shown in Figure 3-28. By default, all these visual icons are selected and shown on the card.

Annotations 1

Annotations 2
Tests: This configuration defines how the tests should be displayed on the card.
Board Configuration
Columns: This defines the columns available in the board. By default, there are four different columns: New, Approved, Build and Test, and Deploy.
Each column section shows the column name and status mapping for the bug and product backlog item. This setting is related to backlog items. If we open the settings related to an epic or feature, different options will be listed.
The Approved column has additional options to configure the work in progress limit, indicating the number of work items that should be displayed or shown as in progress. This section allows you to split the column into doing and done as well. The definition of done is another configuration available to define the criteria for qualifying a work item marked as Done. The Build and Test columns have similar options to configure the WIP, definition of done, and splitting of the column.
Moreover, this tab enables you to add a column to the board either using the plus sign on top or using the options on the header of the column names, as shown in Figure 3-30.
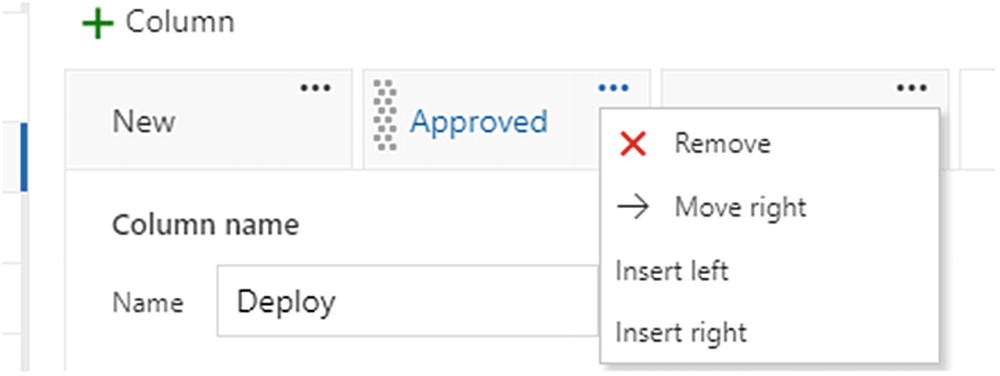
Column movement
Swimlanes: Swimlanes allow you to group the work items horizontally. By default, there will be only one swimlane available. This setting allows you to add more swimlanes to group the work items horizontally on the board. In Figure 3-31, two new swimlanes are configured: Bugs and Product Backlog.

Swimlane 1

Swimlane 2
Card reordering: This configuration defines the behavior of a card when dragging and dropping to a new column. There are two options available to order the card: either to place the new card in the drop location or to push it to the beginning and keep the order of the other cards as is, as shown in Figure 3-33.

Card reordering
Status Badge: Badges will be used to display the current status of the team on the dashboard. Badges can be configured using this section and copying the image URL, which can be inserted into any custom application to display the status information, as shown in Figure 3-34.
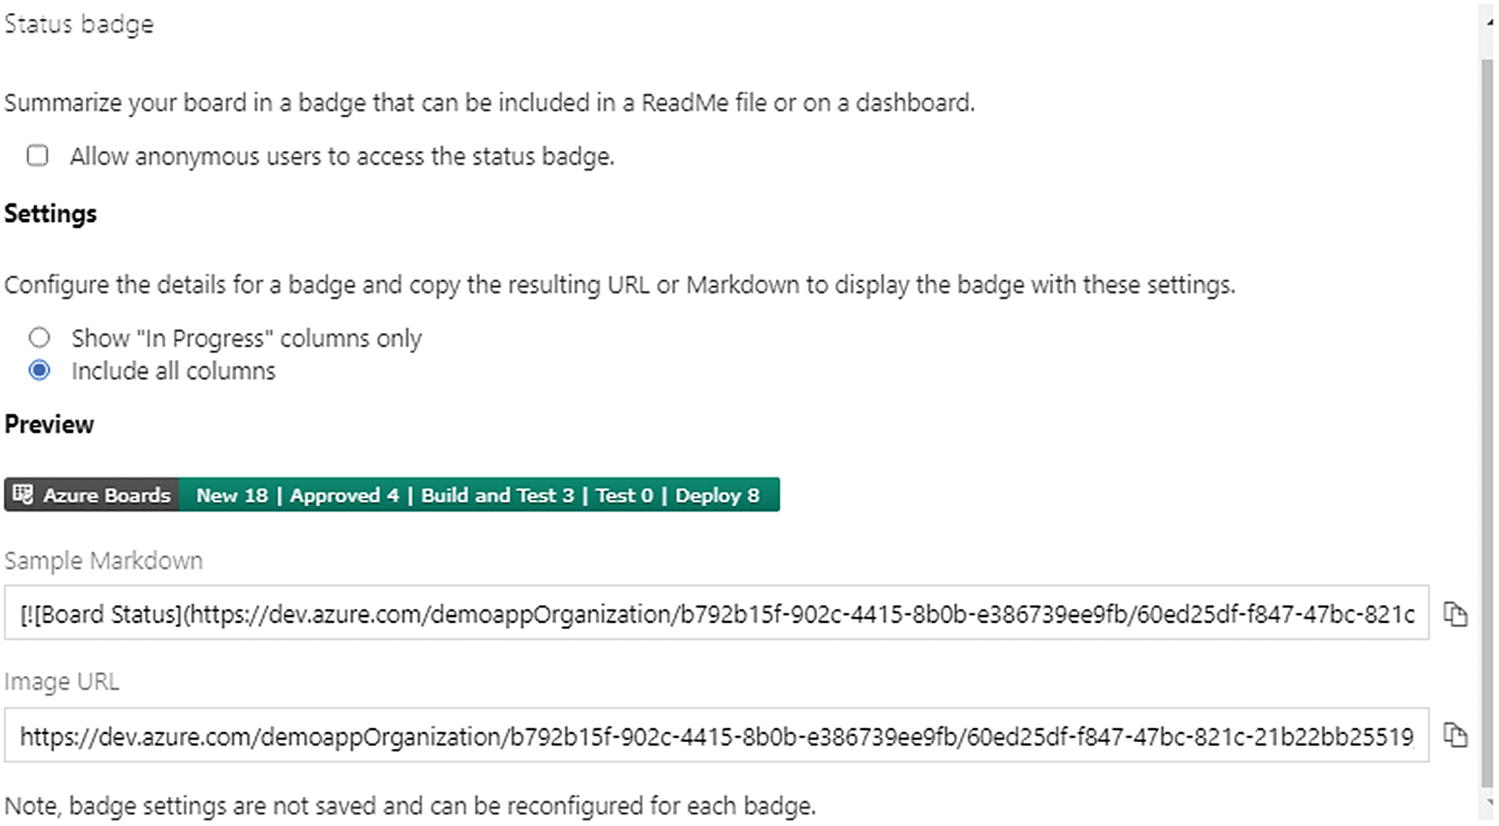
Status badge
General Configuration
Backlogs: The backlog configuration allows you to configure the backlog navigation levels available in the team board.
Working days: This configuration allows you to configure the working days of the team. This information supports the capacity planning of the team.
Working with bugs: This configures how the bugs will be handled by your team. Some teams consider bugs along with tasks and include them in sprint planning; others treat bugs differently and will not include them in the backlog and sprint planning area.
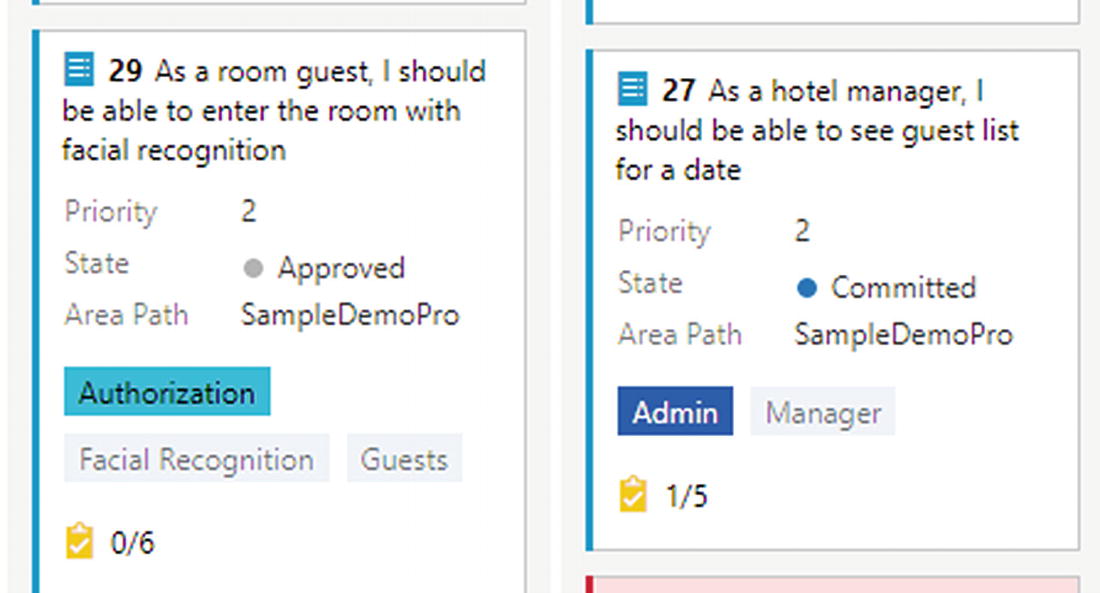
Cards
Each card in the board represents one work item. If the view selected is for backlog items, then the card shows backlog items associated with the current team. At the beginning of the card, there is an option to add a new item using this icon: ![]() . This option supports the creation of a new product backlog or bug. If the view changes, then this option allows you to create a new feature and epic.
. This option supports the creation of a new product backlog or bug. If the view changes, then this option allows you to create a new feature and epic.

Card

State

Context menu
Open: This allows you to open the work item as a pop-up. A work item can be opened by clicking the title of the work item as well.
Edit Title: This allows inline editing of the title.
Move to iteration: Assign the work item to a specific iteration such as Sprint 2 or Sprint 3.
Add Task: Add a subtask to implement the product backlog item fully or partially. One product backlog can have multiple tasks to implement it. The Add Task operation expands the card and provides an option to enter the title of the task.
Once it’s added, the user can navigate to the task by clicking the title and filling in the remaining details, if required.
Also, this view allows you to drag to rearrange the order of the tasks. Newly added tasks can be moved up to complete them first or to set a higher priority for them.
If the user selects the task using the check box, this indicates that the task is completed and marked as done.
Add Test: This is the same as adding tasks. The user can add test cases against a product backlog item to test the functionality.
A test suite corresponding to the test cases can be opened using the right arrow next to “Add test.” Figure 3-38 shows the test suite opened for some test cases. We’ll discuss test suites in more detail later in the chapter.
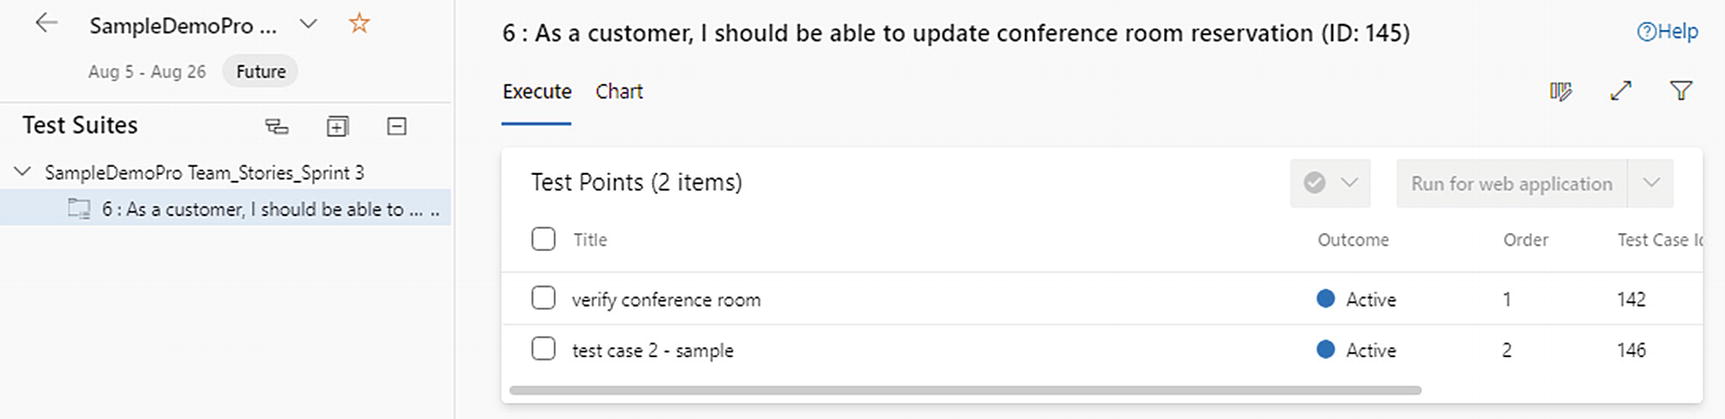
Test suite
Delete: Delete the work item. This will move the work item into the Recycle Bin. The user can restore the work item, if required.
New Branch: Create a new branch to implement the current work item and link to the work item.
Backlogs

Backlog Tab
Instead of listing the work items as cards, they are displayed as a grouped list along with option to do iteration or sprint planning. Options such as the team backlog filter; favorite icon; team settings; filters; different views based on backlog, epics, and feature; filter options; analytics; and new work items are the same as boards. Additional options will be discussed in this section.

Backlog planning
Using the New Sprint option at the end of the Planning blade, you can add more iterations/sprints to the list. The Planning blade can be closed to view more fields of the work items.
Column Options

Column options
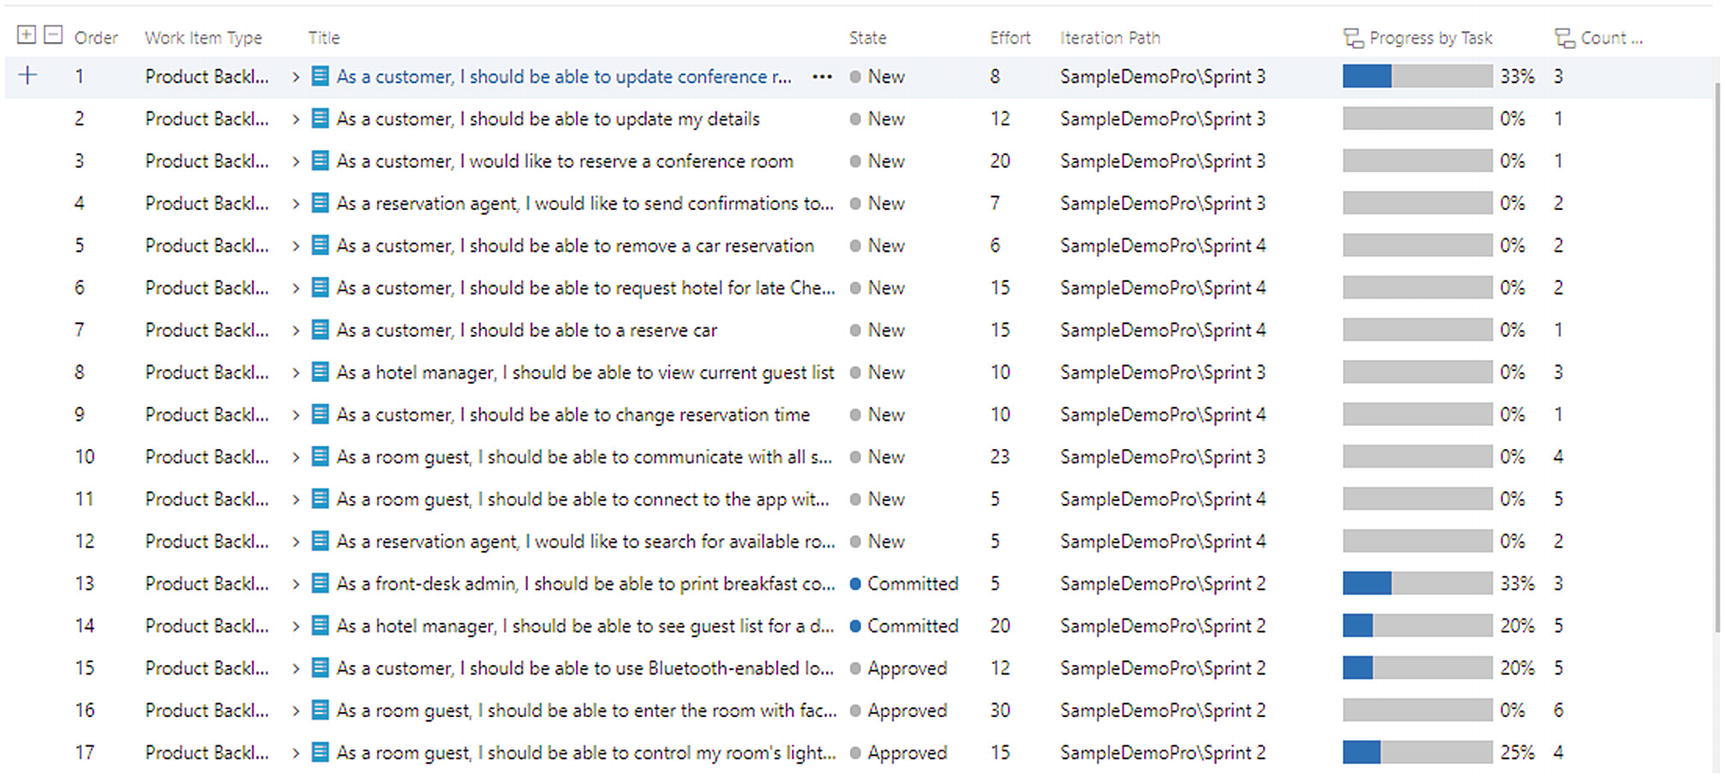
Rollup columns
Rollup fields provide a lot of information about the completeness of the task and the related work items.
Progress by all Work Items: Progress indicator by calculating the progress across all work items associated with the current backlog item
Progress by Bug: Progress calculation only based on bug
Progress by Effort: Progress based on effort
Progress by Task: Progress by tasks completion
Count of Work items: Count of associated work items
Count of Bug: Count of bugs logged against the backlog
Count of Task: Count of task
Sum of Effort: Sum of the efforts
Sum of Remaining Work: Sum of remaining work

Custom rollup 1
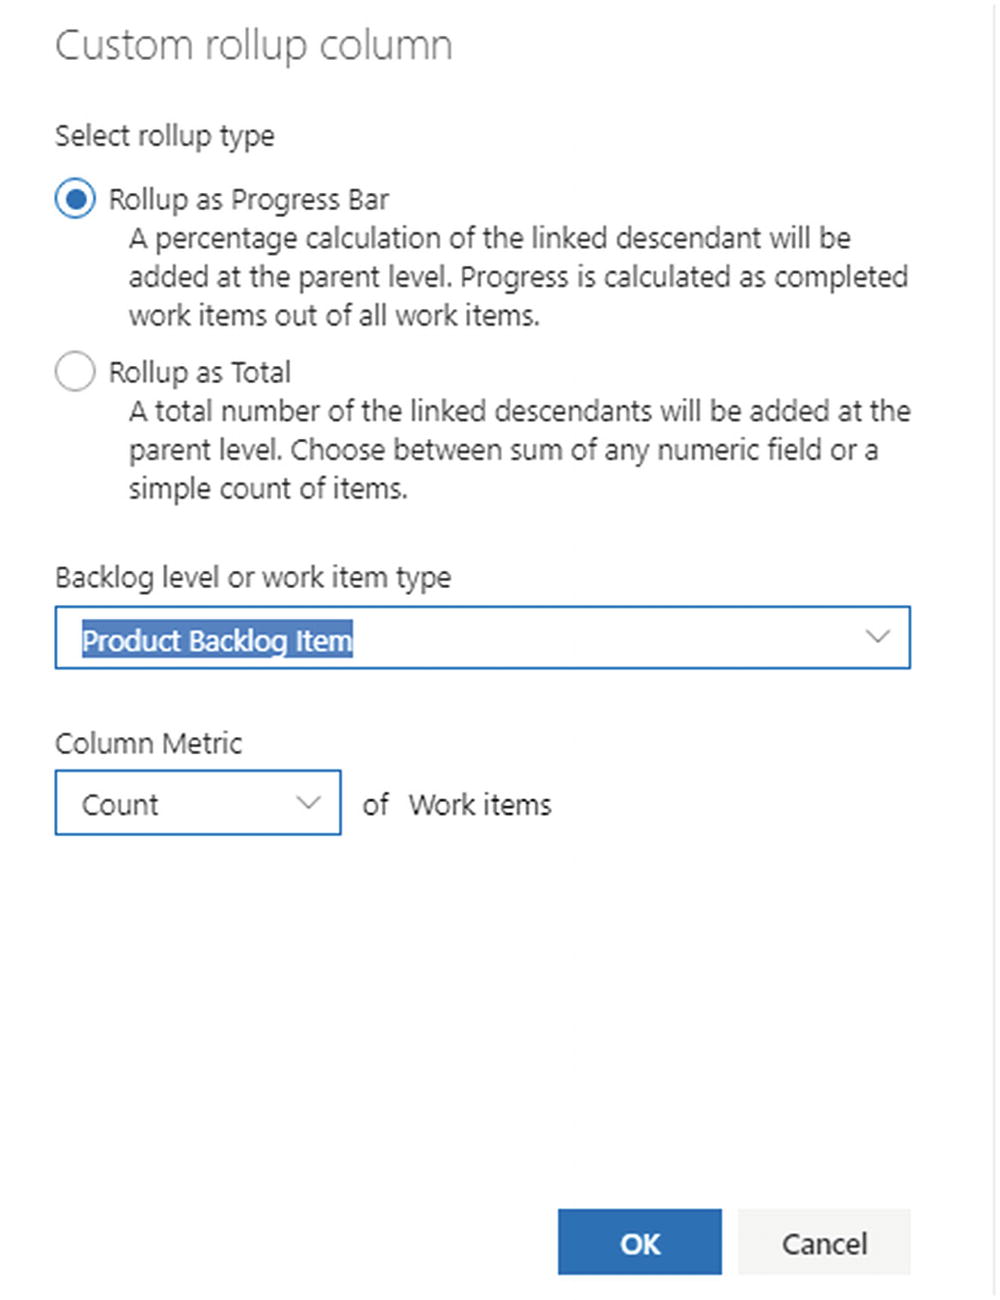
Custom rollup 2
Options

Backlog options
Create Query captures the filtered work items as a query for future usage. We’ll discuss queries in more detail later in this chapter. The Email option will be used to share the listed work items over an email format.
The basic work item details along with a link to the work item will be captured in the email.

Backlog options
Edit: This allows you to edit the fields of the work item. The user can select multiple work items by using Shift and the arrow keys. After selecting multiple items, select the Edit option to edit a set of fields at once, as shown in Figure 3-47.
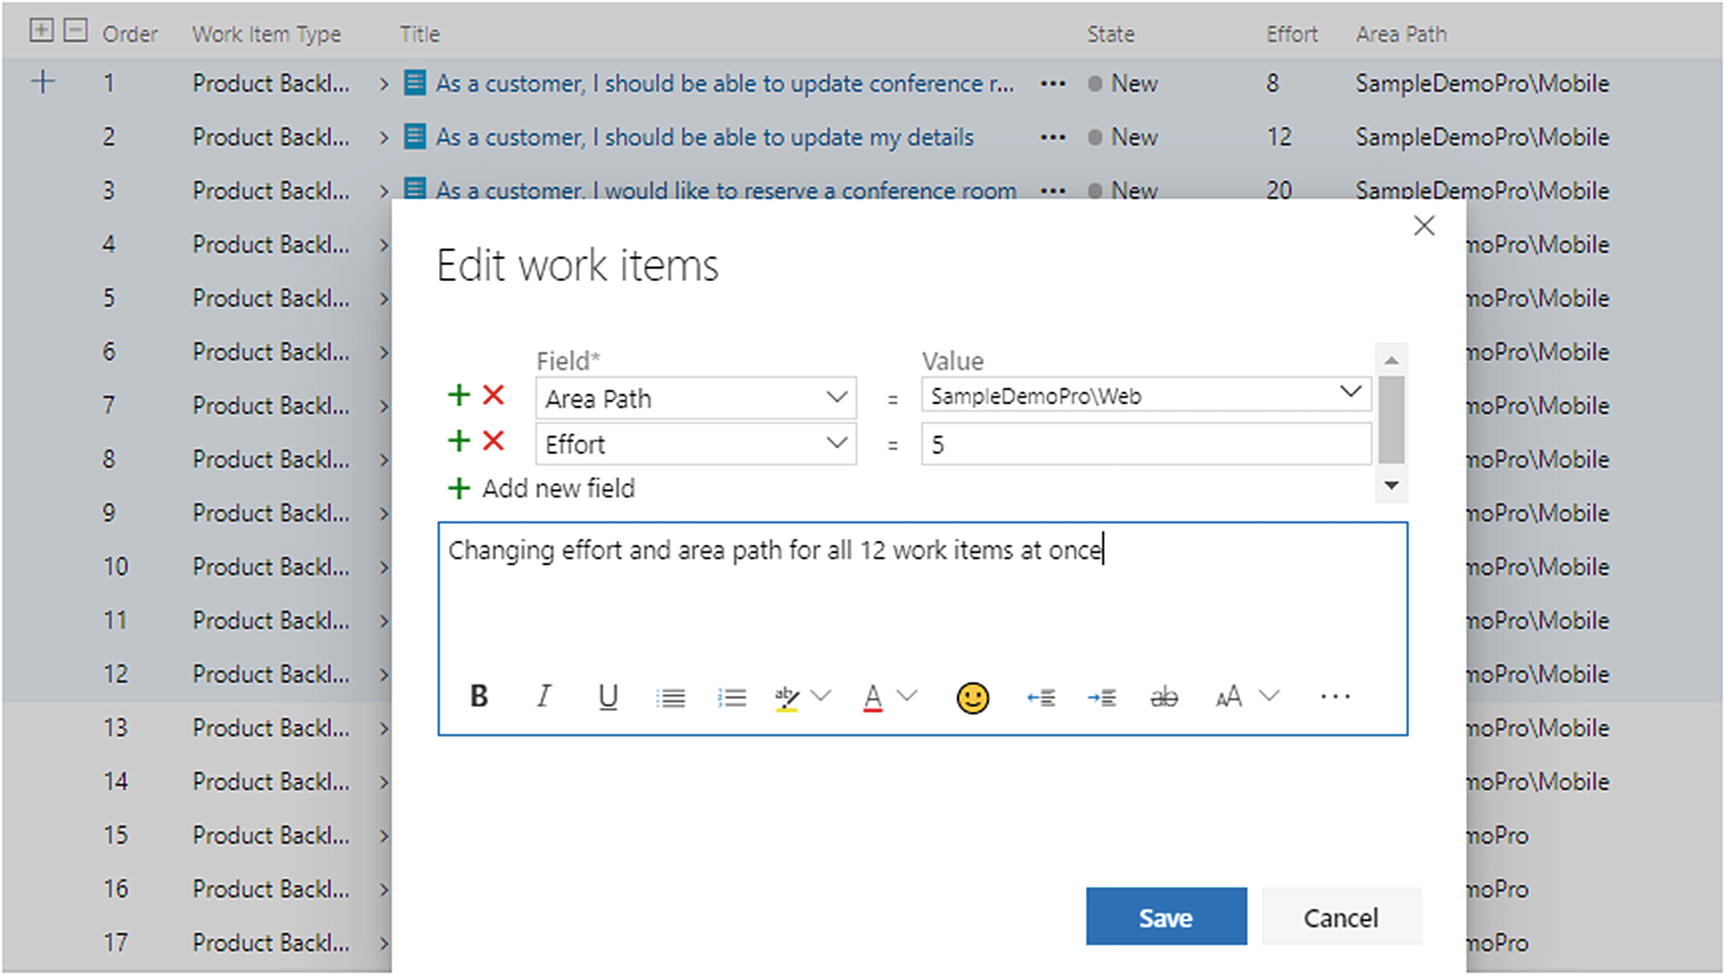
Editing a work item
Bulk edit result
Assign to: Just like the Edit option, this option supports the bulk assignment of selected work items.
Copy to clipboard: This selects a set of work items and copies the listed field details into a file.
Delete: This deletes the selected work items.
Templates: This captures the template out of a work item, as explained in the previous section.
Add link: This adds a link to an existing or new work item. This operation supports the linking of multiple work items with a single work item. But the linking may fail based on the relationship or link type selected for the work item link. For example, in Figure 3-49 there are 12 work items selected and trying to link to an existing work item with the link type as Child.

Adding a link
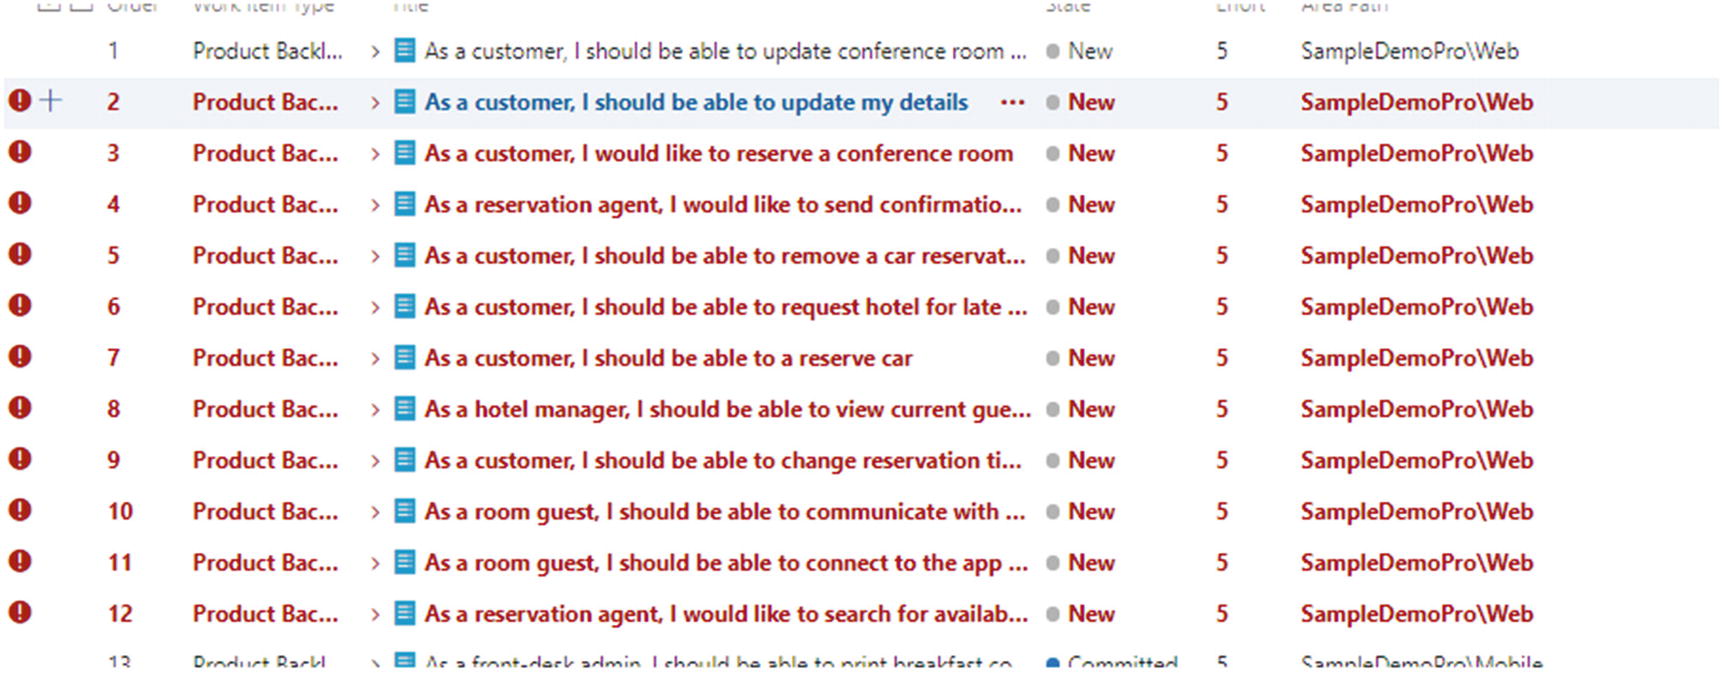
Adding a link result
Move to iteration: This maps the selected work items to an iteration or sprint.
Change parent: This changes the parent of the work item to a different existing work item.
Move to position: This option helps in reprioritizing the work items in the Backlog view. This can be done by dragging the work items to different positions as well.
Change type: This changes the type of the work item, as explained in the previous section.
Move to team project: This moves the work item to another team project.
Email: This emails the work item to a group or stakeholder to review the content.
New Branch: This creates a new branch for implementing this work item.
Sprints

Sprints

Sprints options

Sprints: Top options
Burndown Trend report 1

Burndown Trend report 2
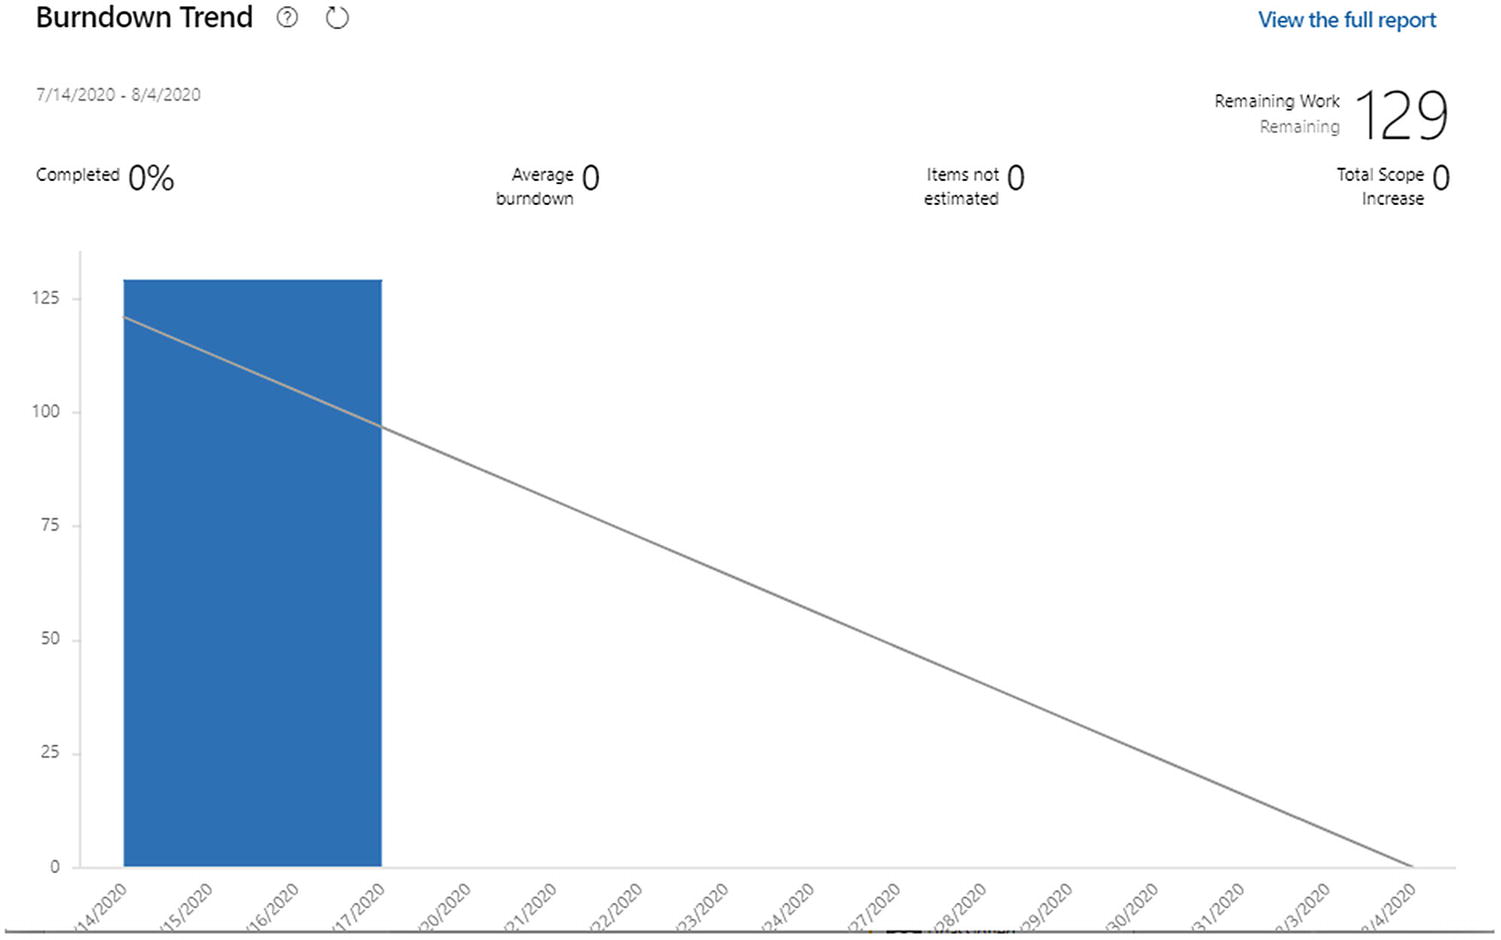
The line shows the ideal trend, whereas the column shows the actual progress. Various filtering and search options are available on top of the report to extract the required information from this report.

More sprint options
Taskboard: This shows the sprint work items in the board, just like the Boards section. Work item cards provide similar options like the cards in the Boards section, which allows you to change the look and feel of the card and do limited operation on the work items.
Backlog: This is a similar view as the Backlog section, but limited with work items mapped for the selected sprint.
Capacity: This section helps in configuring the team capacity. Based on team availability, the total effort available for a sprint will be calculated. The team can enter the day off and partial availability data, which helps the sprint planning.
Team can enter the day off using the link provided in the Capacity tab.
Team can also specify the kind of work or activity one can perform, as shown in Figure 3-57.

Capacity

Sprints: Capacity 2
Analytics: This shows the Burndown Trend report discussed in previous section.
New Work Item: This shows another option to add new work items to the list.
Column Options: This shows the different column options for the board. The user can add or remove columns based on the sprint requirements using this option.
Sprint: Select different sprints to view the work items planned for each sprint or the items completed in previous sprints.
Person All: You can filter the view with the assigned team member, as shown in Figure 3-59. This view will expand and shows only the work items assigned to the selected team member; the remaining work items will be in collapsed mode.

Person view
View Options: By default, the taskboard displays work items grouped under backlog items. You can change this view to group them under the assigned team member using the People option. This will be helpful in driving the daily standup call and tracking the progress of individuals.
Also, the user can select the side pane to display work details or planning. “Work details” shows the workgroup by activity and team member and shows the pending work or effort required to complete the work, as shown in Figure 3-60.

Work details

Sprints: Planning
Filter: This toggles the filter options available for the board.
Settings: This is a subset of settings in the Boards section to decide on the card data and general settings.
Full Screen: This displays the section in full-screen mode, which provides additional screen space for users to work on the work items.
Queries
The Queries section supports the filtering of required work items based on various criteria. The initial view lists the saved queries under My Queries and Shared Queries, where My Queries will be available to only the user, and the Shared Queries will be shared across the team.

Folders
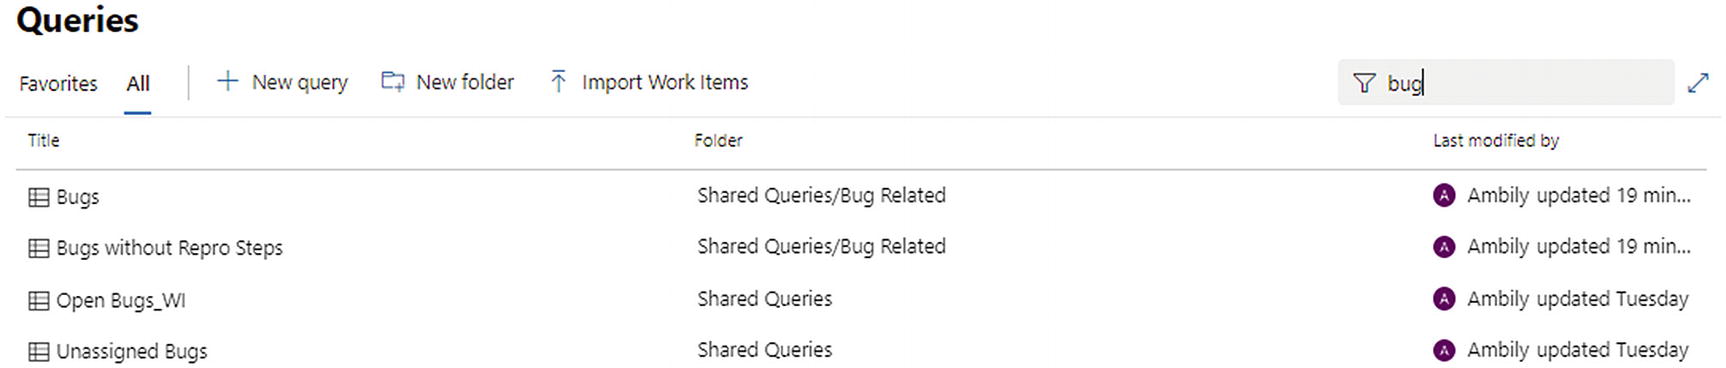
Filtering queries
Run Query: This runs the query and shows the results page, as shown in Figure 3-64.
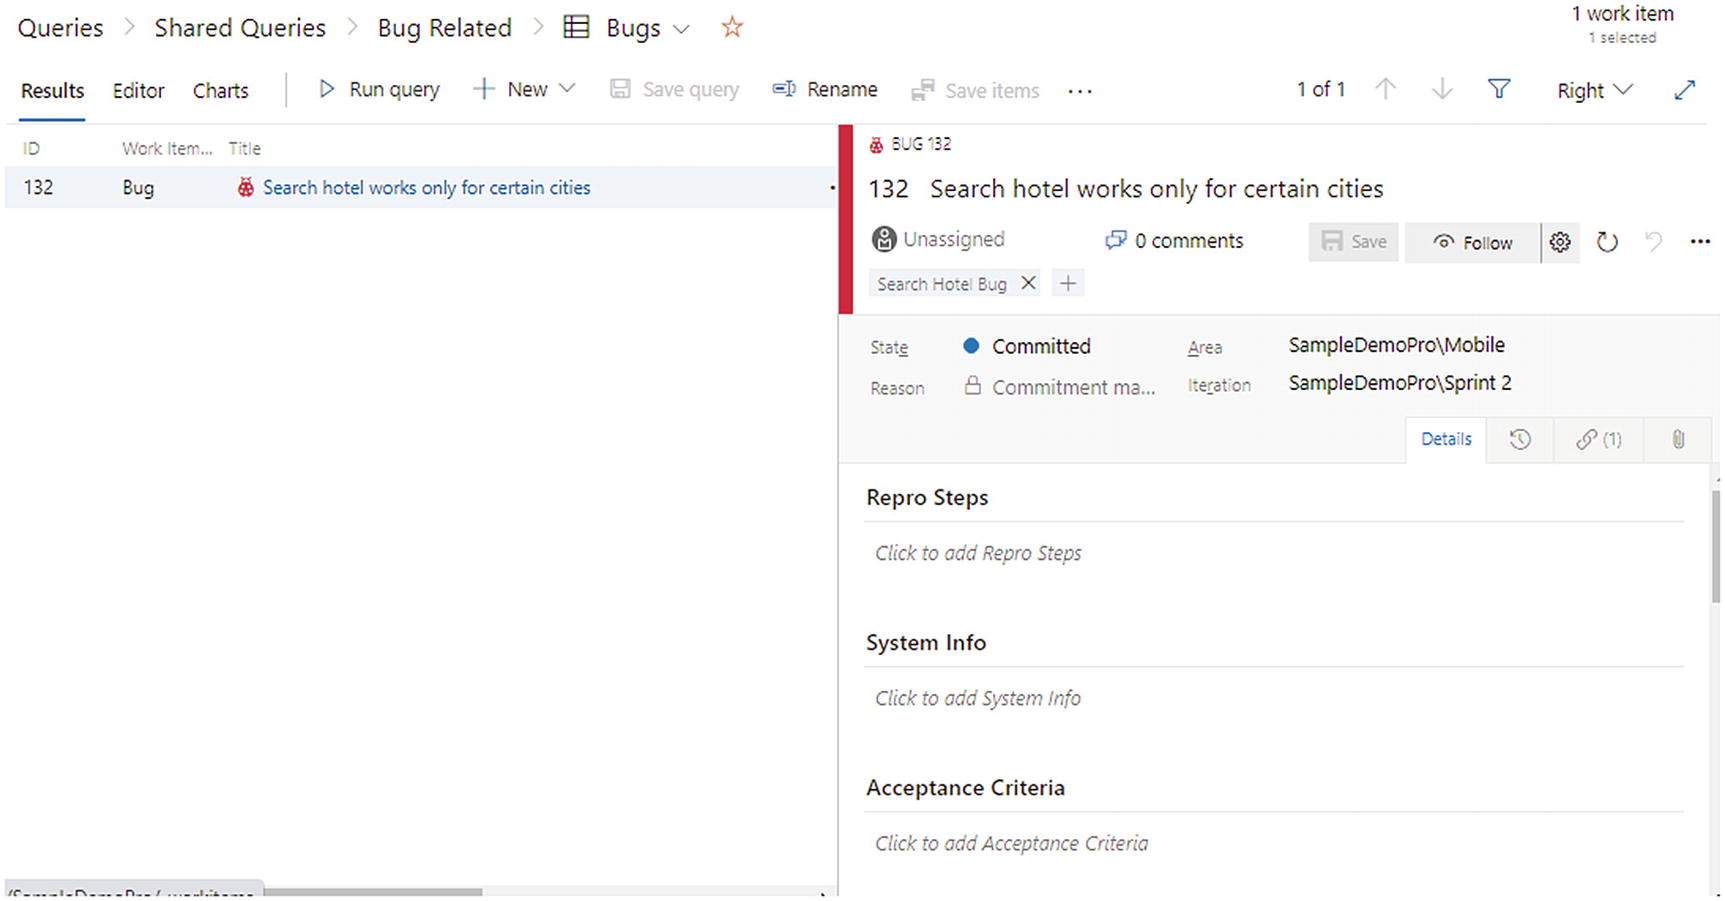
Running a query
Edit: This allows you to edit an existing query.
Rename: This allows you to rename an existing query.
Delete: This deletes the query.
Add to Team Favorites: This allows you to add the query to a team’s favorite list.
Security: This defines the security and permission for the queries. Select the user or group and allow permissions such as Contribute, Delete, Permission management, and Read. The user can set permissions such as Allow, Deny, and Not set.
Add to dashboard: Add the query result in different forms to the team’s dashboard.
New Query

Default query conditions
By default, only a few columns are listed in the query result view. The user can add more columns using the Column options. The “Save query” option will be used to save the query into different folders.
Once the query is saved, new options to save the query with a different name (Save as) and Rename will appear on the top option list. The following are some of the other options available on top of the query editor:
The Results tab: This shows the query result on a separate tab.
The New option: This helps create new queries or work items.
Revert Changes: This will be enabled to revert changes that are not yet saved.
Email query: Email the current query result.
Copy query URL: This copies the current query URL, which will allow the team members to share it to other stakeholders to refer to a specific list of queries.
Export to CSV: This exports the result into CSV format for offline reference. After updates, this can be imported back to the system as well.
Type of Queries
Flat list of work items (Default): This is a list of work items, as shown in Figure 3-66.
Work items and direct links: These are work items with one level of child elements.
Tree of work items: These are work items with a multilevel view.
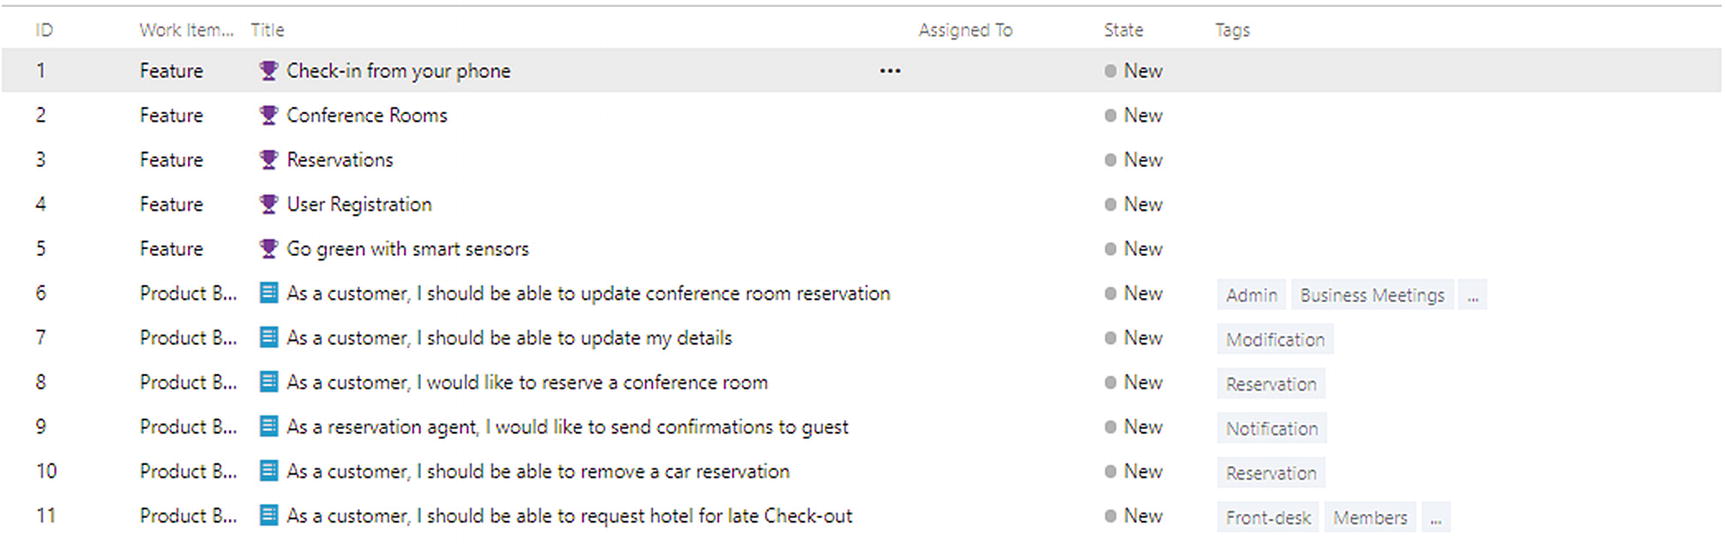
Flat list of work items

Work items and direct links

Filter options

Tree of work items
Moreover, in both cases, there are filters corresponding to top-level work items and linked work items. Filters define the filter conditions or the requirements of the work items. New filters can be added using the plus sign available at the beginning of the filter row and deleted using the cross icon next to it. The third icon, the check box, represents the grouping of the filters based on a logical operation like AND or OR.

Filters
The next three columns show the field, operator, and value combination to define the core filter condition.
The user can query across all projects in the organization to view the work status across the organization. Select the “Query across projects” option to query the work items across the organization.

Work Offline
The Export to CSV option allows you to download the result of the query into CSV format.
The downloaded data will have the columns selected as part of the query result only. If you need more columns, select the column before downloading to include it in the result. If the result contains multiple Title fields, like the one shown in Figure 3-70, then the query will be either work items with a direct link or a tree of work items. In Figure 3-70, Title 1 shows the product backlog item’s title, whereas Title 2 shows the title of the task, the child of product backlog item.
To add or delete the work items offline to Azure DevOps, install and configure the Azure DevOps Office Integration from https://visualstudio.microsoft.com/downloads/.
Now, open an Excel file and navigate to the Team ➤ New List option.

Connecting to the Azure DevOps server
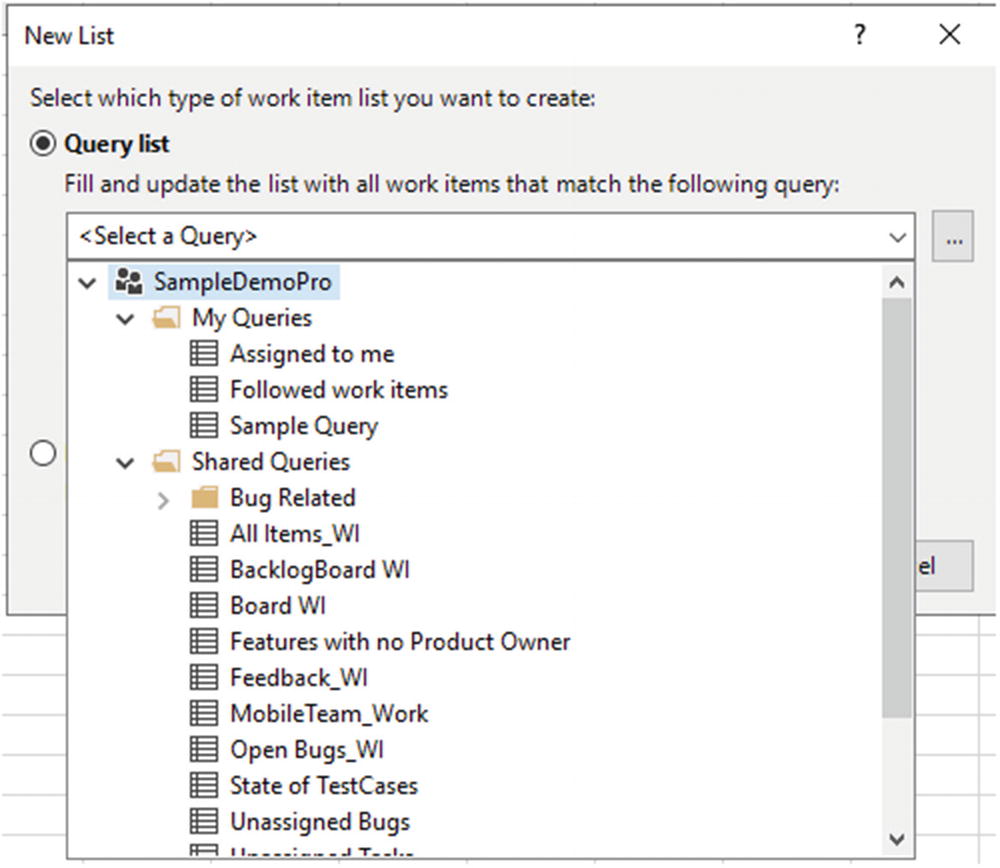
Selecting a query

Offline view of work items

Offline editing of work items
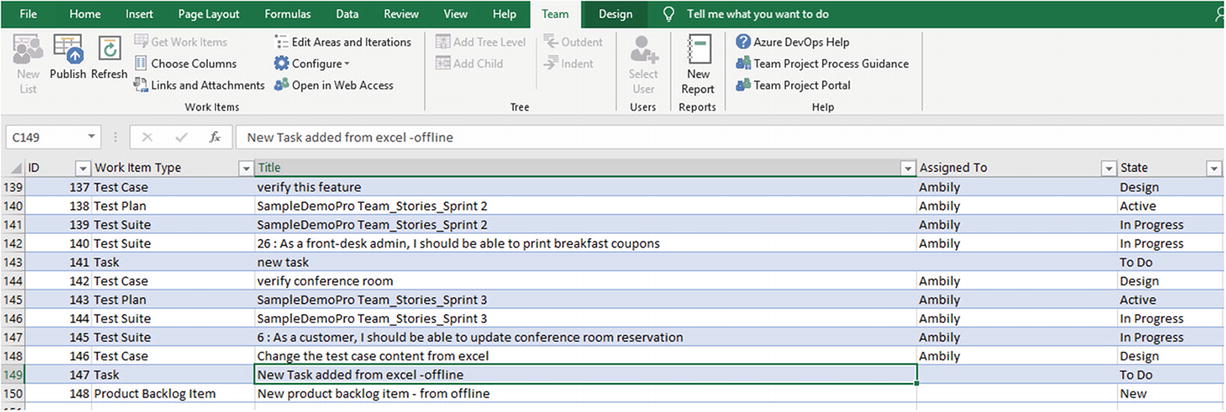
Publishing work items
Summary
The Azure DevOps features support the end-to-end management of requirements from all aspects. Business requirements can be captured using various epics and features, whereas the low-level implementation tasks will be captured using product backlog items and tasks. The requirements are not limited to functional and architectural requirements; Azure DevOps also covers the NFRs such as scalability testing, security testing, performance testing, and so on. The system supports the traceability of the requirements in different dimensions such as the code developed based on the requirement, test cases that are executed to verify the requirements, defects identified in the implementation, the build or release containing the requirements, and so on.