The field of project management has evolved over the years from the management of resources to include areas such as optimization and productivity boosters. Project managers have always managed resources and maintained schedules, but today’s project managers add multiple dimensions such as agility and technology to these regular duties. Technical managers are the new norm to handle the growing adoption of agile and DevOps practices and automation. The collaborative and self-driven culture of the modern workforce provides more room for project managers to optimize their activities.
Azure DevOps complements project management activities by facilitating more automated features for the managers to track the work, optimize areas, and tightly control and maintain schedule. Project execution means creating a project, managing the end-to-end development cycle of the project, and onboarding teams with the proper permissions. In Azure DevOps, projects related to the same domain or business unit are grouped under an organization . Therefore, an organization is a collection of projects. In earlier versions, this was called a project collection .

Organization structure
Each project can have multiple repositories to hold the codebase in separate areas. For example, a project handling the microservices will have one repo for each microservice. The repos will be further divided into branches to manage the code versioning and collaborative work. This chapter covers the high-level features of organizations and projects and touches upon a few configurations related to repos and branches. Repos and branches will be covered in more detail in Chapter 4. Also, most of the configurations discussed in this chapter will be revisited in later chapters based on their importance when setting up the end-to-date DevOps configuration.
Organizations
Organizations are the highest level of aggregation in Azure DevOps. From an enterprise perspective, organizations can be used to group the user licenses, the billings for a set of related projects, connections to an enterprise Azure AD, and global notifications and policies. More features of organizations will be discussed later in this book.
Creating an Organization
You can create a free organization by navigating to the Azure DevOps site: https://azure.microsoft.com/en-us/services/devops/.
Select the option “Start free” to activate a free instance of Azure DevOps. Azure DevOps supports using a Microsoft ID for login, where you can provide an existing live email address (@hotmail.com, @outlook.com, @live.com, etc.) or create one to proceed.
Once the login completes, Azure DevOps prompts you to continue with organization creation.

Creating a new project
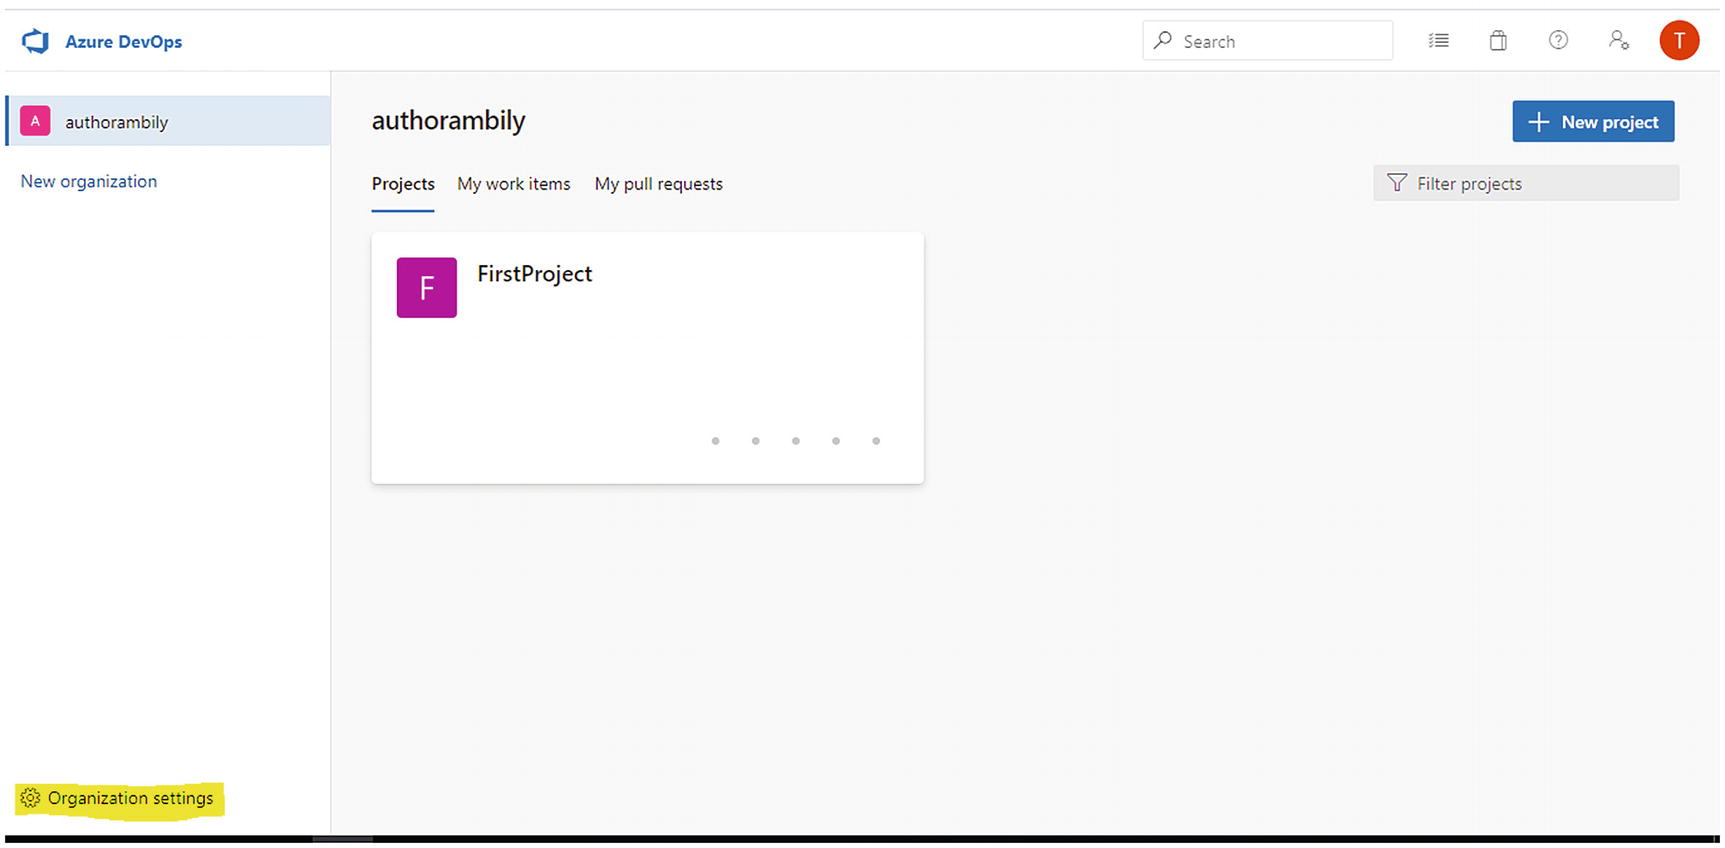
Organization Settings
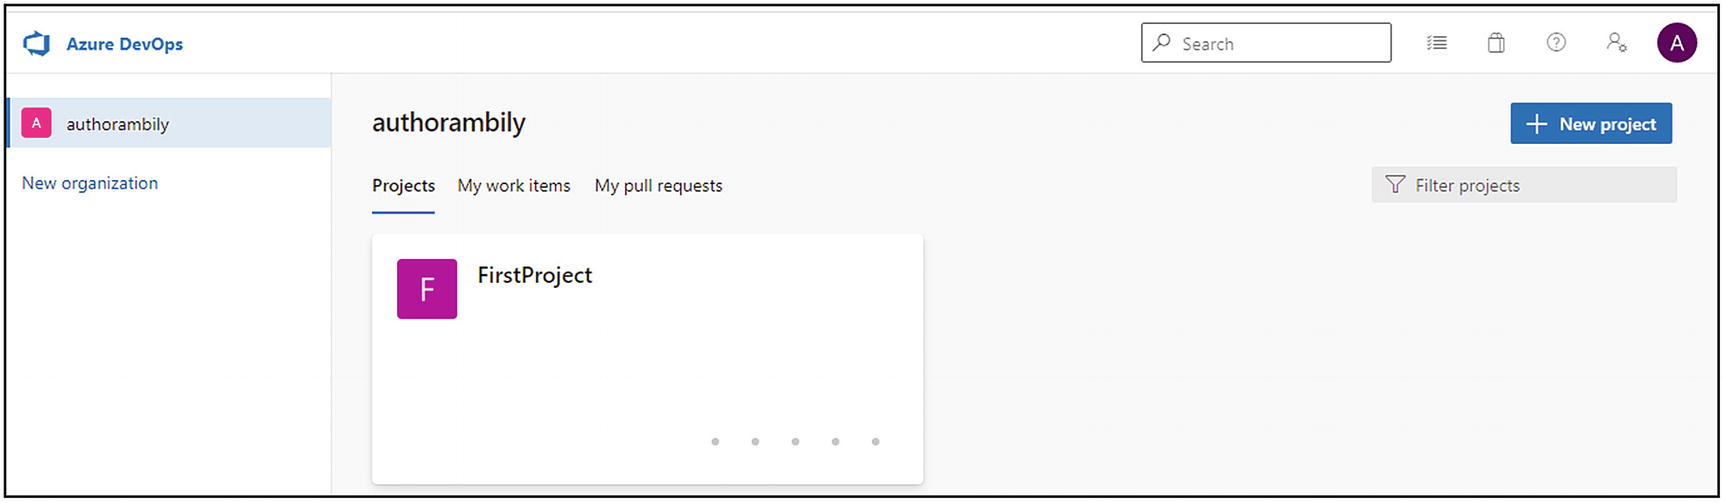
The organization home page shows the list of existing projects in the organization, “My work items” tab, and “My pull requests” tab as shown in Figure 2-3. Hovering the cursor over each of the project tiles allows users to navigate to the selected project’s components such as the repo, board, pipeline, etc. The “My work items” tab displays all the work items assigned to that user irrespective of the project. If a user contributes to multiple projects, this view provides a unified look at all the work items assigned to the user. Also, this view lists the activities related to the user. The “My pull requests” tab lists the pull requests (PRs) created by the user. More about the work items and PRs will be covered in subsequent chapters.
Organization settings
Briefly take a look at the different settings available in the organization settings. These settings are used as part of project execution. For example, the settings under Boards ➤ Process will be used to customize the project template when setting up the execution process. Similarly, the settings under Security help us to define organizational policies as part of the build and deployment operations.
General ➤ Overview
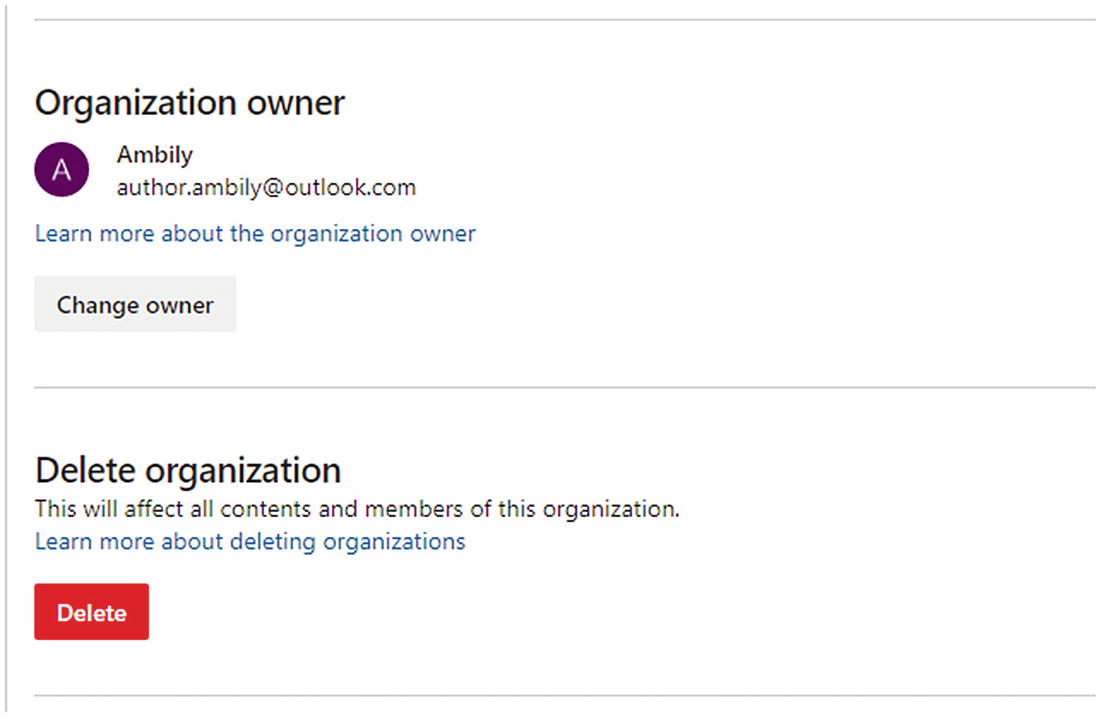
The Overview section allows you to manage the general properties associated with an organization such as the name of the organization, privacy URL, time zone, and description.
Change owner: This option is used to transfer the owner permission to another member of the organization.
Delete organization: Remove the organization and associated projects. Only the owner can delete the organization along with all artifacts associated with it.
Changing the owner
General ➤ Projects
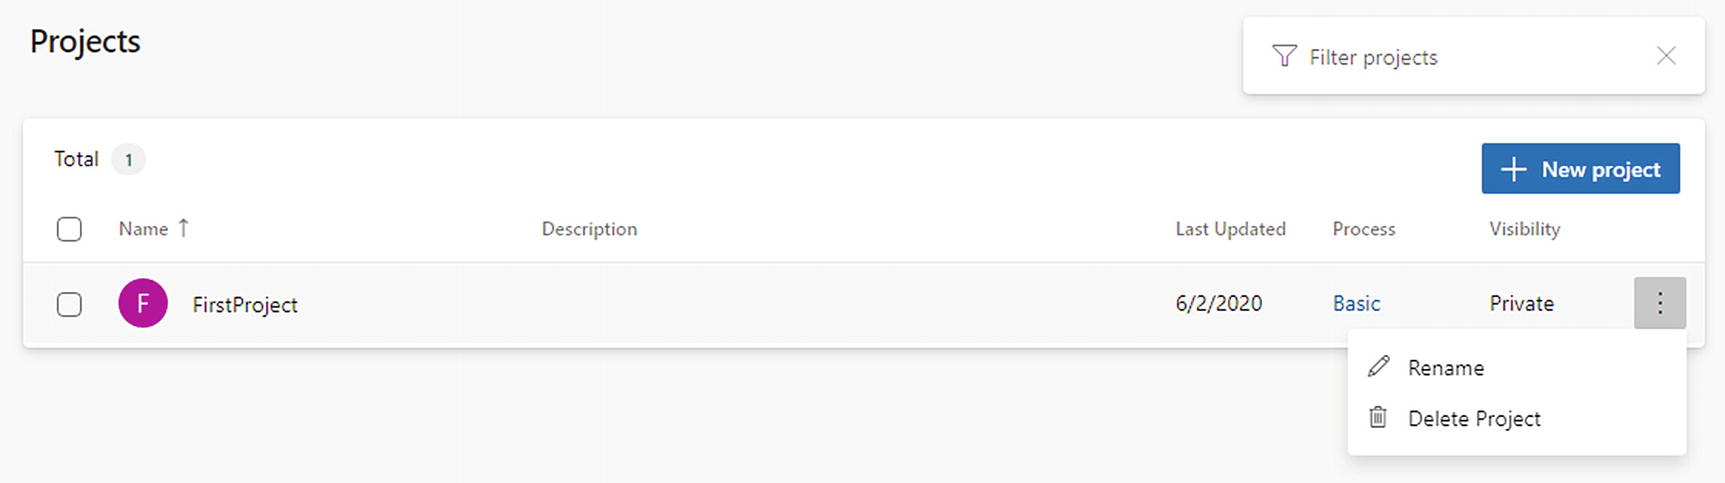
Organization Settings ➤ General ➤ Projects
General ➤ Users
Basic
Stakeholders
Visual Studio Subscriber
Only five Basic users are allowed for the free organization setup; but you can add unlimited stakeholders to your project.
Basic users have permission to access all the DevOps components, all the way from boards until the pipeline. This doesn’t mean that access to all projects are allowed. The permission is there, but access is provided based on the access provided in each project at a granular level. Stakeholders have access to boards to view the backlog items, progress, sprint execution, and dashboards. They won’t have access to the code repositories or the build and release pipeline. Visual Studio Subscriber has the same access as a Basic user but with an attached Visual Studio license. You can find details about the permissions and access levels at https://docs.microsoft.com/en-us/azure/devops/organizations/security/access-levels?view=azure-devops.
Add a few users as Basic users and a few users as Stakeholders using the Add Users option.

Adding new users
In the Users section, you can change the user access levels. This section allows you to reassign a user license to a new user, remove an existing user from the organization, or resend the invite to join the organization. Moreover, the Manage User option allows you to track the overall user permissions.
General ➤ Billing
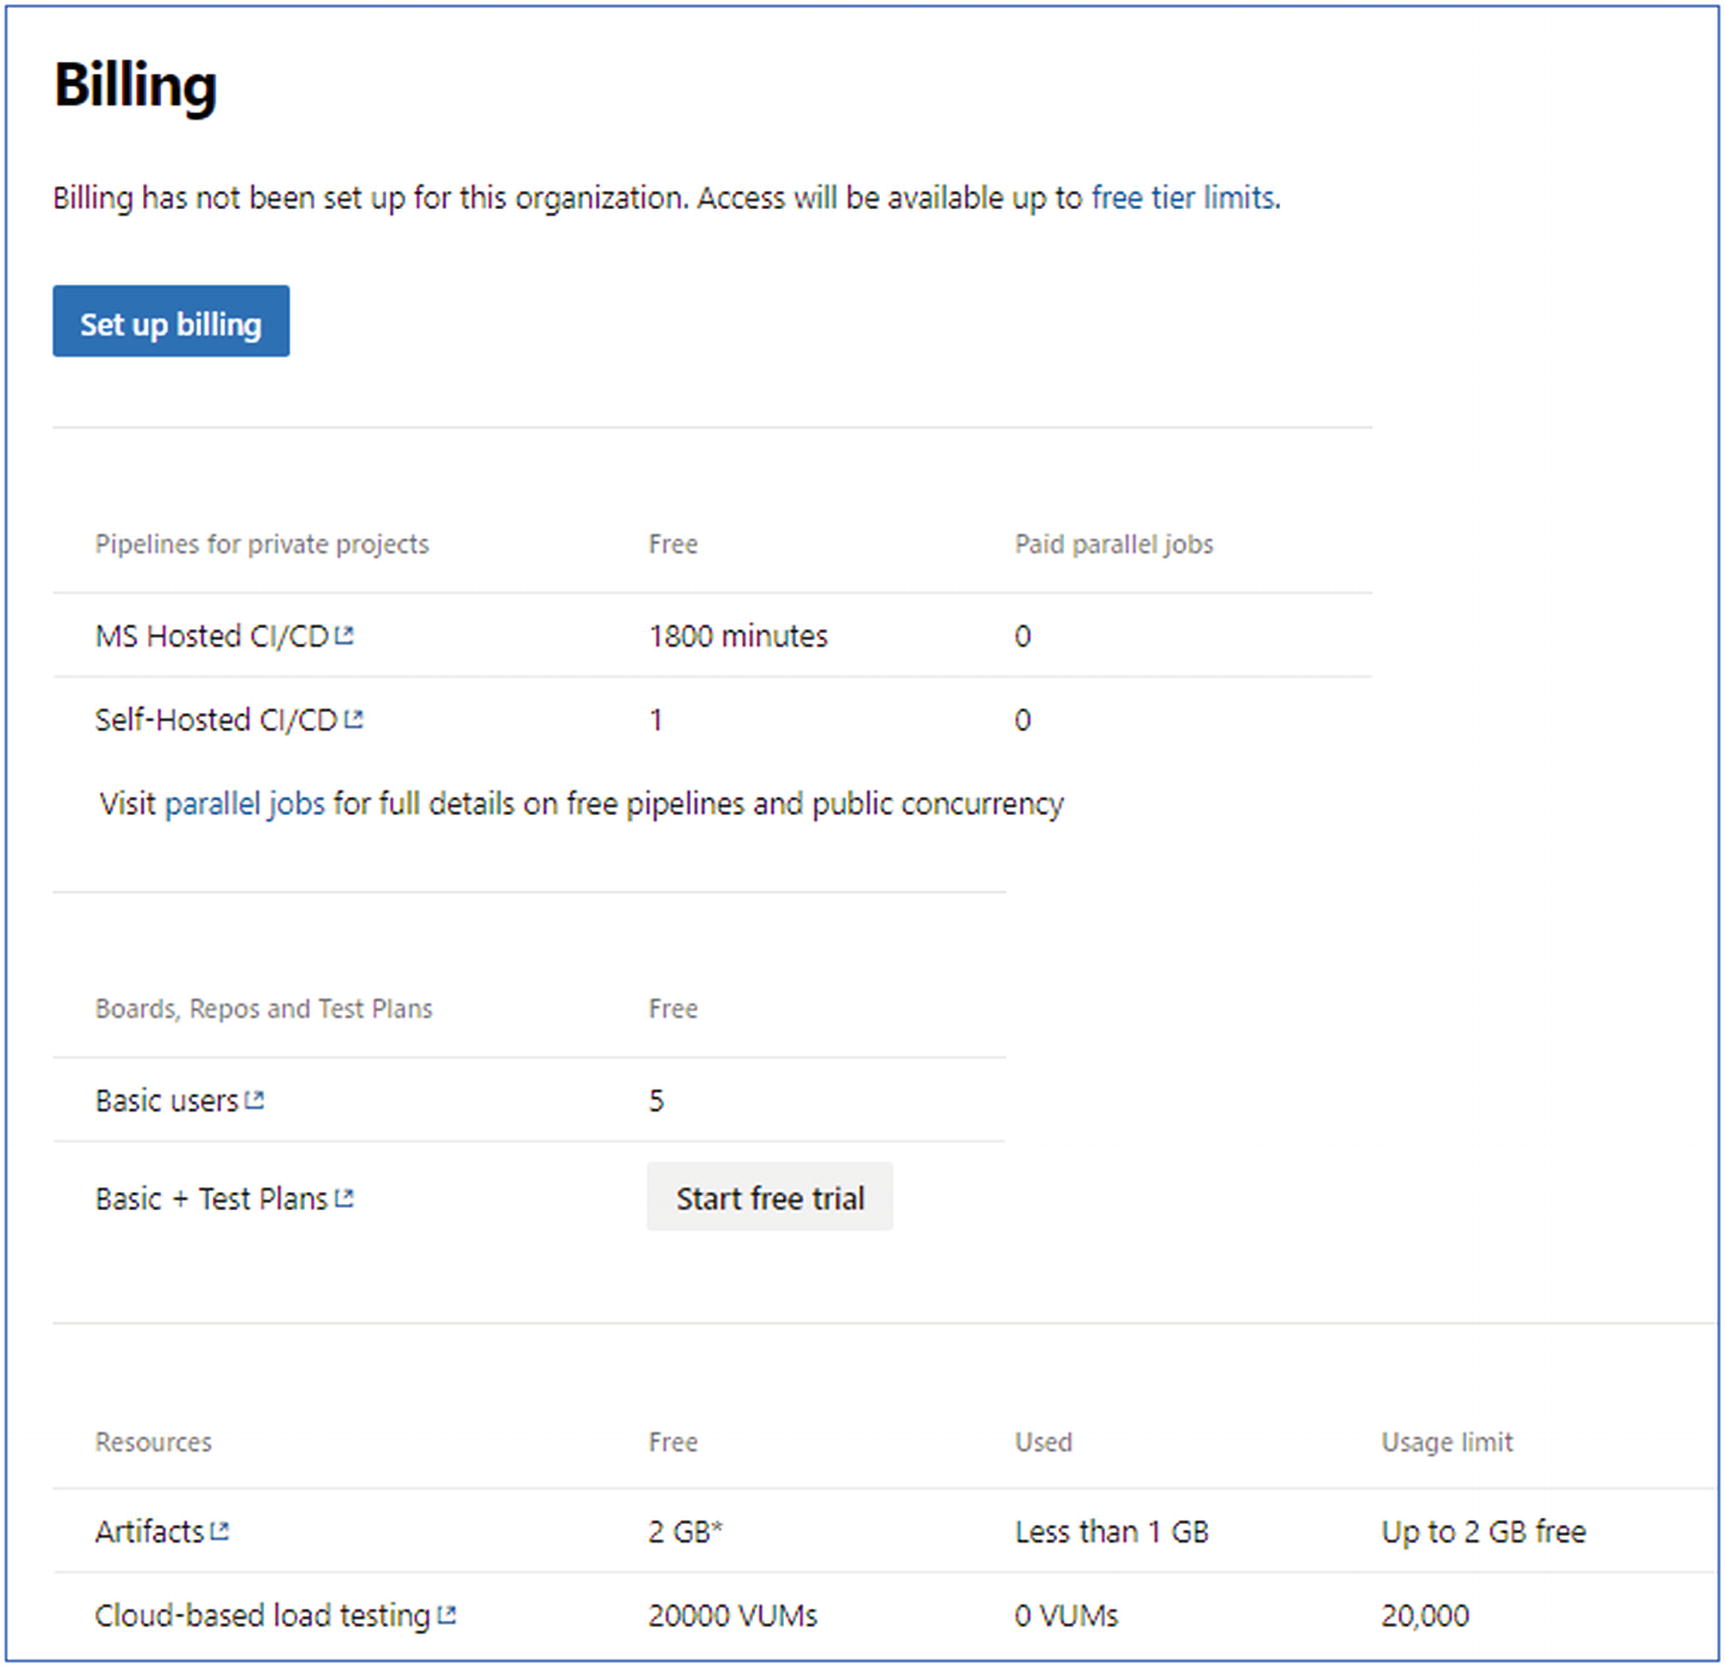
Billing
General ➤ Auditing

Auditing section
Moreover, the Streams tab allows you to configure new log streams from Azure Event Grid, Splunk, and Azure Monitor Logs. Mainly, streams are used to analyze the production or staging environment logs to identify any potential threats.
General ➤ Global Notifications
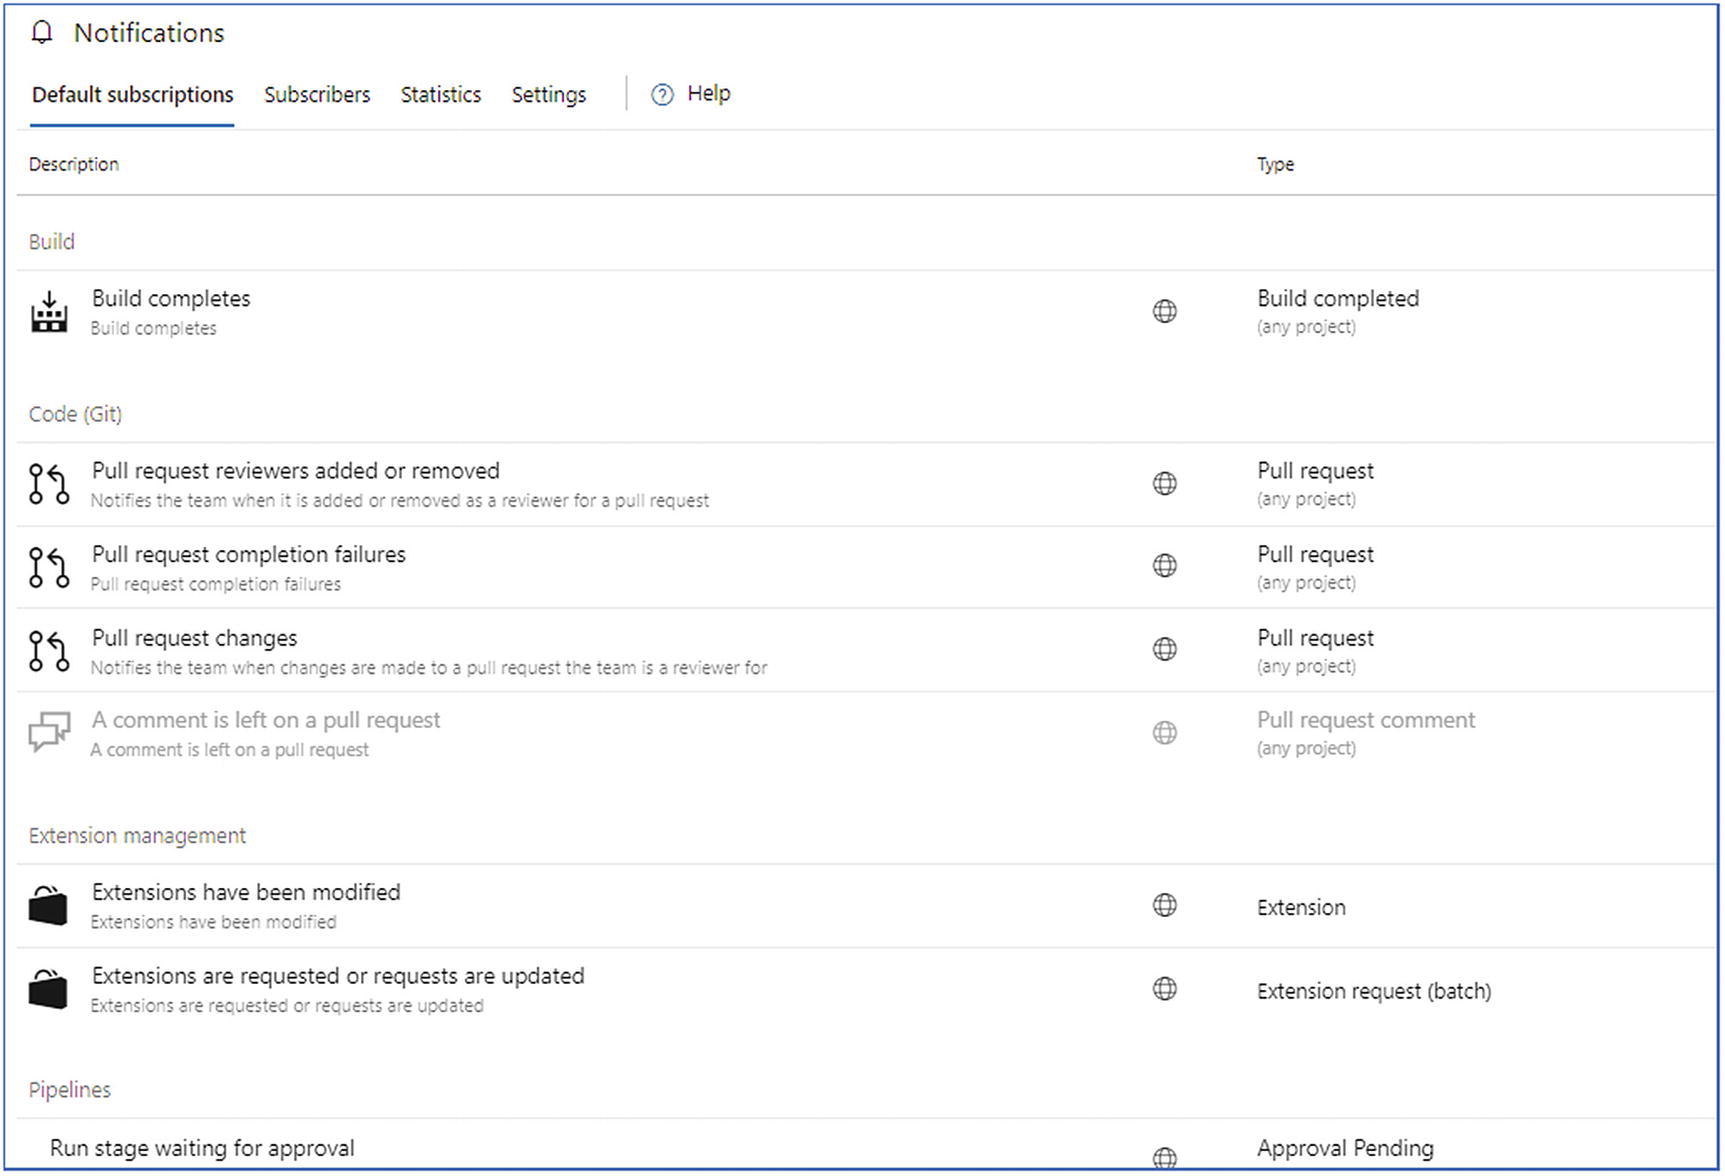
Default notifications

Notifications: Settings
General ➤ Usage
The Usage section shows the dynamic view of the usage of the system in terms of Team Services Through Units (TSTUs).
There are many filters and column selection options available to filter the data in lower levels. Moreover, this report provides an option to save the content in CSV format.
General ➤ Extensions
The Extensions section provides an option to add customized services from the community or other companies. The Extensions section provides an interface to customize Azure DevOps based on your requirements. Also, this option helps you explore the useful community-built services integration. Azure DevOps extensions are available in the Visual Studio Marketplace: https://marketplace.visualstudio.com/azuredevops?utm_source=vstsproduct&utm_medium=L1BrowseMarketplace&targetId=bc12d2e1-b56e-461e-a3eb-1852f2030883.
For example, the SonarQube extension (https://marketplace.visualstudio.com/items?itemName=SonarSource.sonarqube) available in the Marketplace supports the build tasks to integrate the SonarQube code analysis as part of the build steps. We will explore different extensions in later chapters.
The Security option available in this section is important. The organization owner can provide permission for another member to install an extension using this feature. Otherwise, only the organization owner is allowed to install an external extension.
General ➤ Azure Active Directory
Azure AD integration helps map the organization members to the enterprise Azure AD identity. This helps track the activities of internal users.
Security ➤ Policies
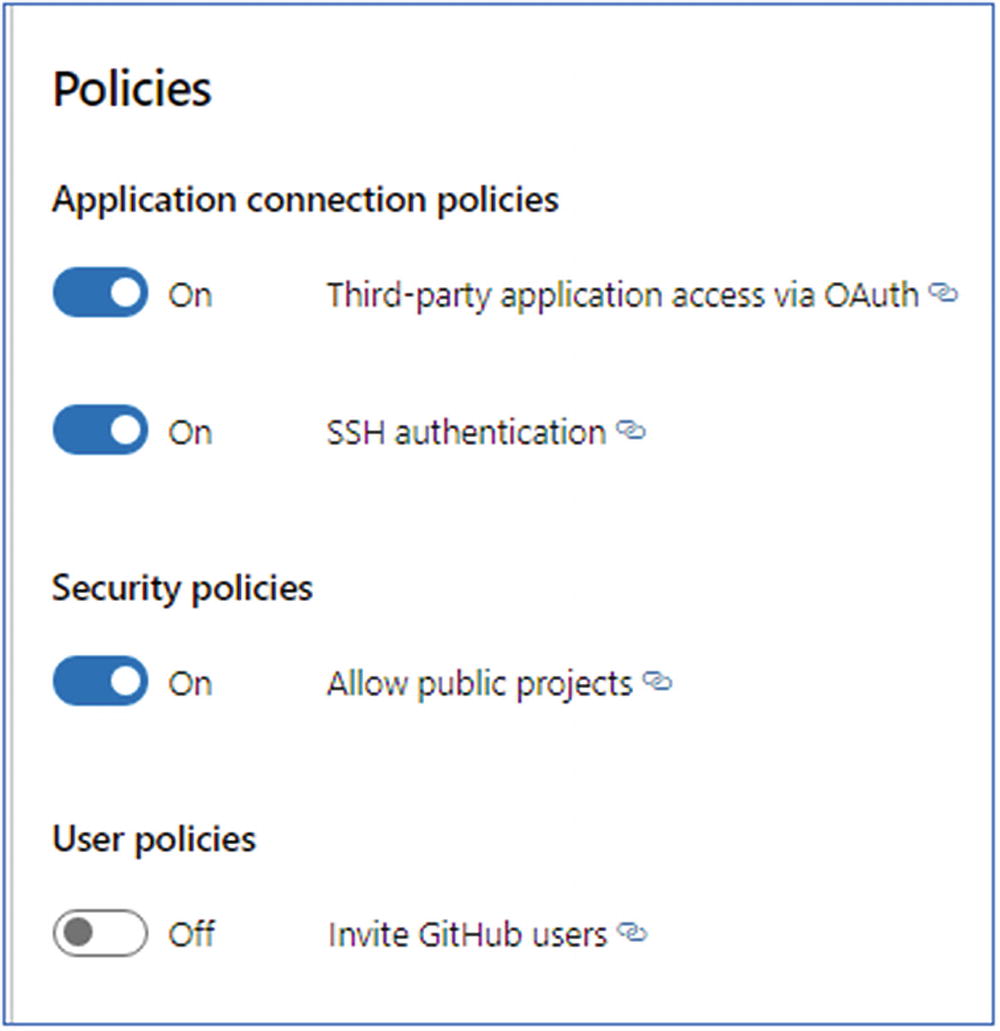
Organization: Policies
Security ➤ Permissions
The Permissions section has settings related to organization-level permissions for each group and user. From here, new groups can be configured with specific permissions as well.
You can learn more about permissions and their values in the “Project Settings ➤ General ➤ Permissions” section.
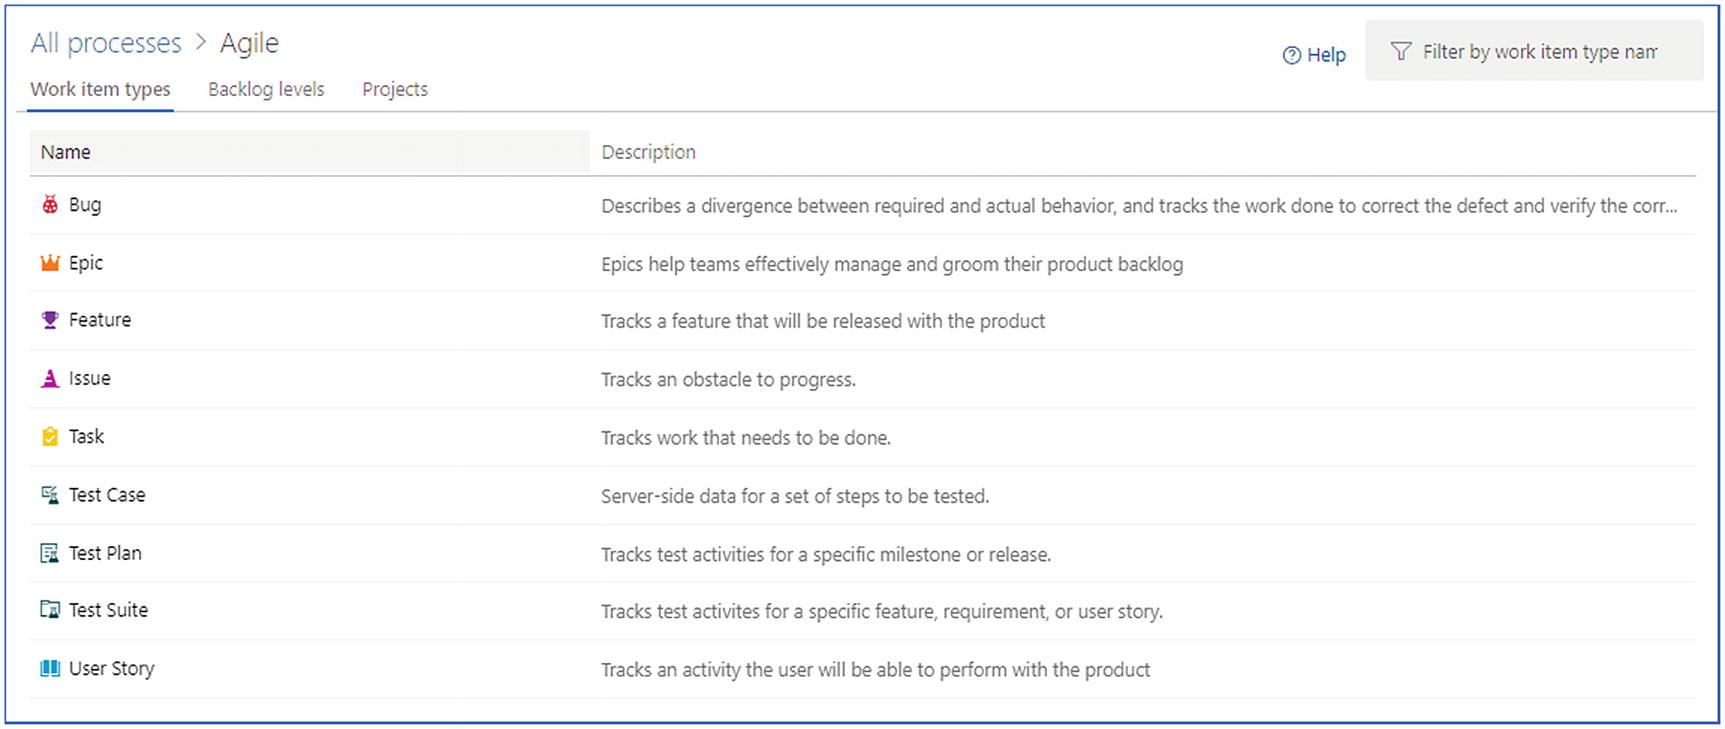
Boards ➤ Process
Basic: This is suitable for those who are getting started with project management in Azure DevOps.
Agile: This is the template defined for agile teams.
Scrum: This is for scrum teams.
CMMI: This is a standard template used for projects with lots of formalities and auditable requirements.
Understanding the process template is important to defining proper project management. Select a process template to explore this further.
Basic Process Template

Process template: Basic
Agile Process Template
Process template: Agile
Scrum Process Template

Process template: Scrum
CMMI Process Template
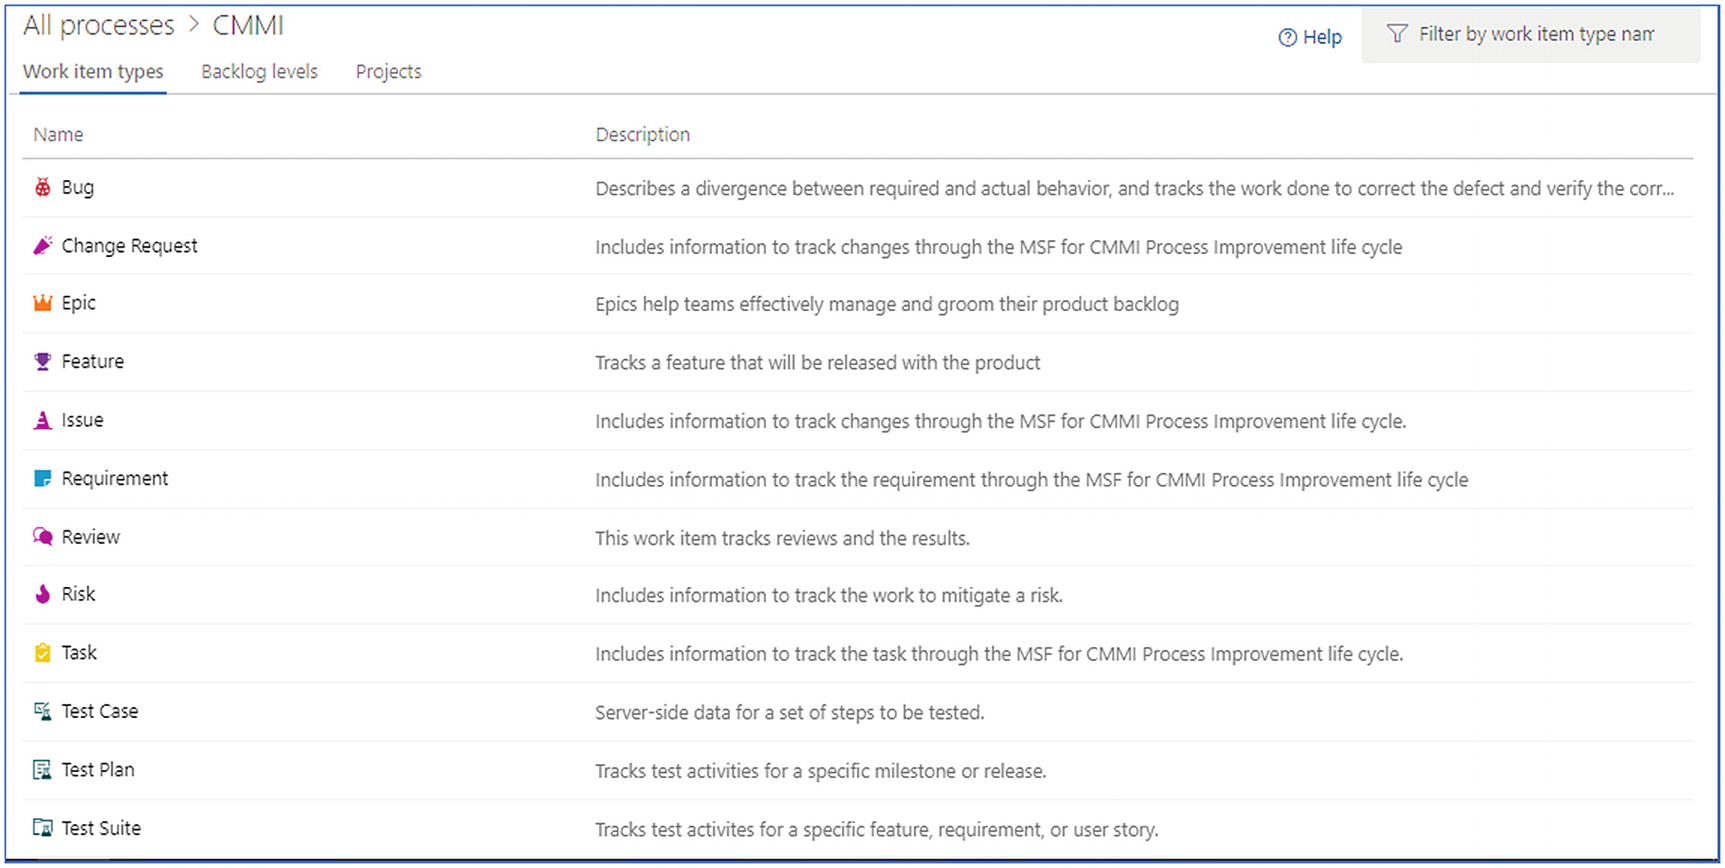
Process template: CMMI
Customization of the process templates will be covered in the “Process Template Customization” section of this chapter.
Pipelines ➤ Agent Pools
Microsoft-hosted agents: Agents are hosted by Microsoft and available based on your subscription mode.
Self-hosted agents: Users can host or configure agents on their own systems or in cloud subscriptions.
Azure Virtual Machine Scale Set (VMSS) agent: These are self-hosted agents, autoscaled to support the demand.
Each agent pool shows the jobs running on the pool, the agents configured against the pool, the owner, and the permissions. We will look at agent pools in Chapter 6.
Pipelines ➤ Settings
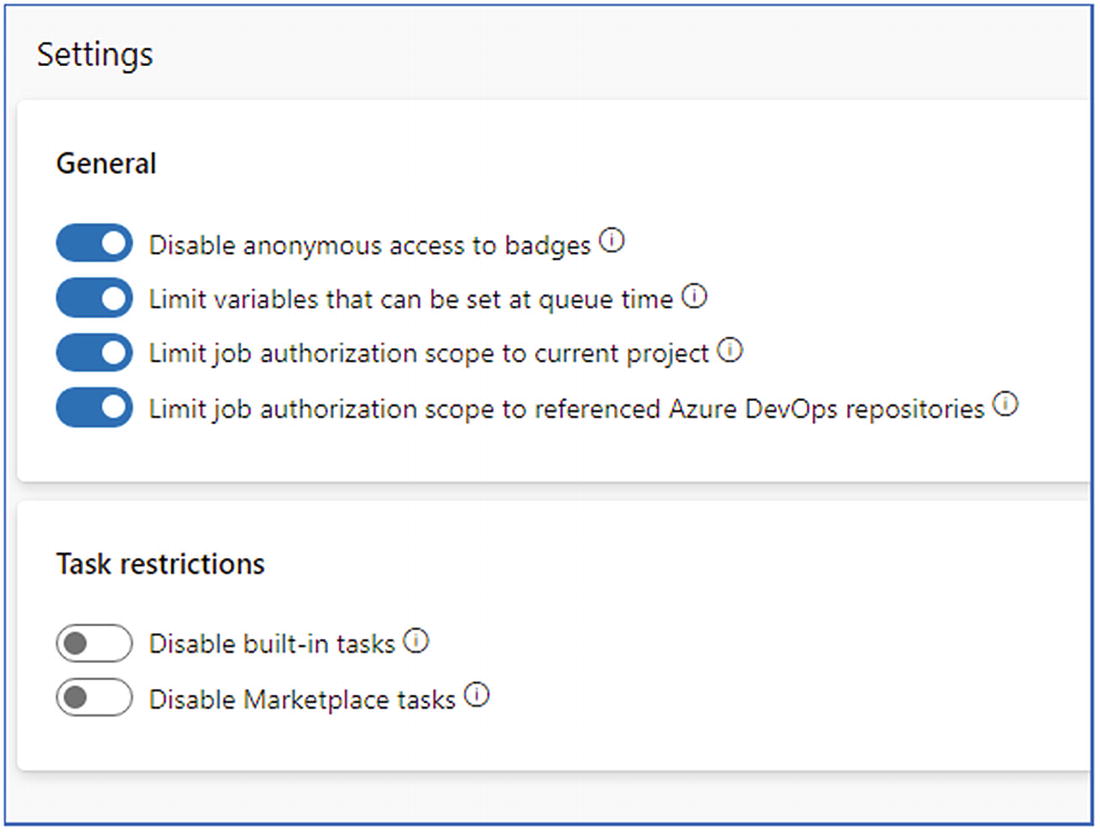
Organization Settings ➤ Pipeline ➤ Settings
Pipelines ➤ Deployment Pools
Deployment pools define the set of target systems that will be used for deployment by a few or all of the projects under this organization. Defining a new deployment pool requires you to configure the target systems using PowerShell commands, which will be explained in detail as part of Chapter 6.
Pipelines ➤ Parallel Jobs
Parallel job execution depends on the agent pool configuration and subscription tier. For a free trial account, the Microsoft hosted agent pool provides ten parallel jobs, which means the build can be configured to execute multiple tasks in parallel. You’ll learn more about the job execution in Chapter 6.
Pipelines ➤ OAuth Configurations
The OAuth Configurations settings allow you to define connections with enterprise subscriptions such as GitHub, GitHub Enterprise, and Bitbucket over OAuth 2.0.
Artifacts ➤ Storage
Artifacts are the executable resulting from a build or the package used for deployment. The “Artifact storage” setting shows the storage used by different artifacts such as the pipeline artifacts, symbols used for debugging, NuGet package feeds, and so on.
This data helps the organization administrators analyze the storage usage and control the costs associated with the organization by configuring the proper retention policies.
Projects
Projects are used to group the activities related to the development of a solution or product. One project consists of the teams working on the project, different policies followed, sprint cadence followed, release pipelines, and daily activities. If the organization exists for the business group, new business project initiation starts by creating a new team project in Azure DevOps. The setup of the team project in Azure DevOPs determines how the project will execute.
Creating a Project
Under Create Organization, we have created a project with basic details such as the project name and the type of the project, whether public or private. In this section, click the “New project” option available on the organization’s home page to explore more options corresponding to creating a project. Start with configuring a new project to understand the different elements of a project.
Starting a new project

New project settings
Git: This is a distributed version control system, where the user branches the code locally. Users can create different branches locally and commit the changes in a logical completion of task or work. All the changes can be managed and versioned locally until merged back into the centralized repository.
Team Foundation Version Control: In this kind of version control, versioning is done only in a centralized server. Users should merge the changes to the centralized repository often to avoid losing any work. Versioning is not available locally.
Agile: Agile is one of the most popular execution approaches, where the requirements are realized in defined iterations. This iterative approach allows the team to deliver value to end customers in chunks, which enable the team to sensitize the real user expectations and feedback in an early stage.
Basic: The Basic template provides a simple template for first-time users of Azure DevOps.
CMMI: This approach was followed earlier in the waterflow model of execution, where the activities are executed in a sequential manner. All the design and development complete as one entire work item to deliver the end product all at once to the customer. This approach takes more time to get to market and gets real feedback from customers. But this approach is suitable for specific products where the partial release doesn’t really deliver any kind of value to the end customer.
Scrum: This approach follows agile principles where features are released before the complete project. In scrum, teams execute the activities in sprints and deliver different product backlogs in sprints. Most of the sprint deliverables don’t release to the end customer; instead, scrum team define a separate release cadence to handle the end-user releases.
Select an appropriate version control system and process template to proceed with the project creation.
Project Settings
Before getting into the details of the project components, explore the project settings, especially the ones configured by the project administrator. Project settings provide a centralized place to handle all the project-related configurations.
General ➤ Overview
The Overview section allows you to reconfigure the project name, description, process template, and visibility. Along with these basic details, it also allows you to add a new project administrator and delete the project.
Boards: Agile planning and execution
Repos: Code versioning and management
Pipelines: Build and release pipelines
Test Plans: Manual test plans
Artifacts: Management of packages ready for delivery
Based on the project, disable the components that will not be used. For example, some enterprise projects with high security concerns manage the code in local Git repositories instead of Azure DevOps and use the Azure DevOps boards for agile execution and Azure DevOps pipelines for build and release. In the case of a containerized application deployment, the built-in Artifacts component is not used; instead, an external container registry like Azure Container Registry or Docker Image Registry will be used. In this case, project administrator can disable the Artifacts option.
General ➤ Teams
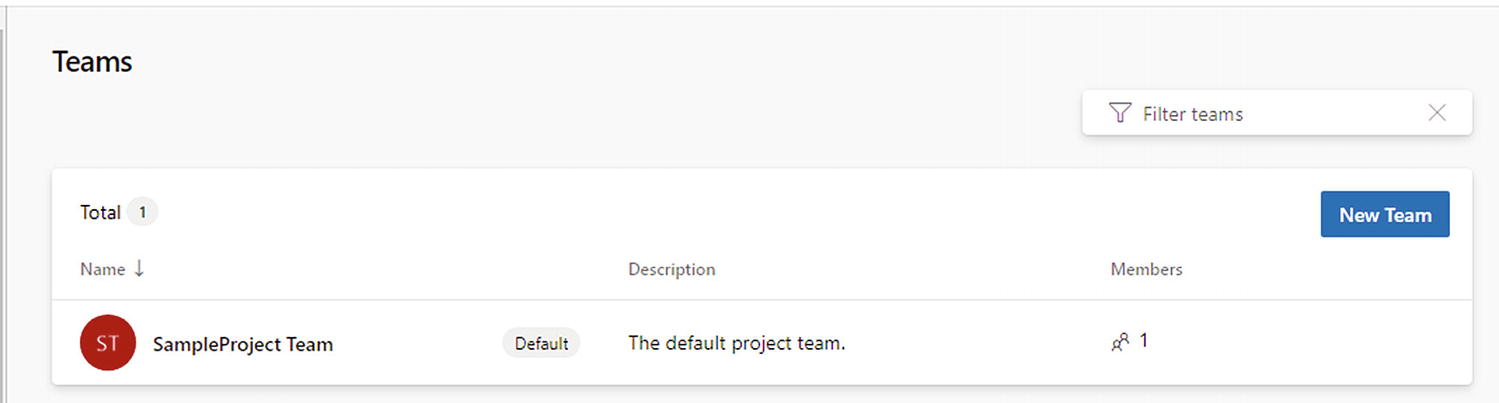
Teams

Adding team members
Creating a New Team

Creating a new team

Creating another new team
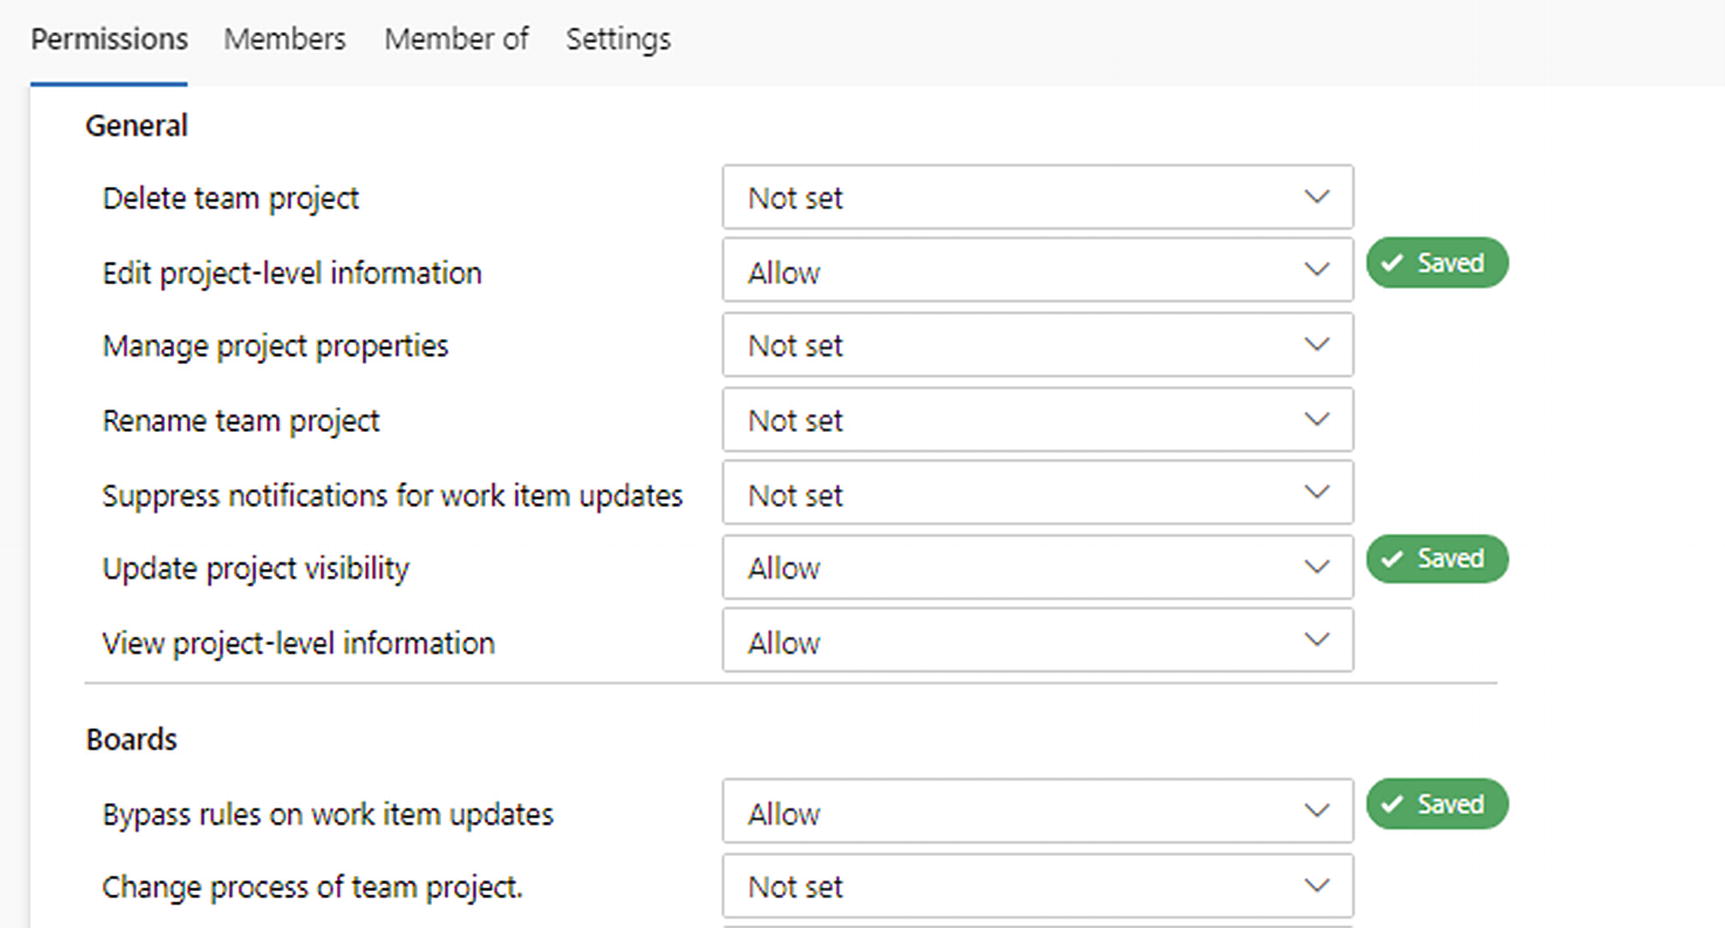
General ➤ Permissions
End-to-end project execution involves many people with different roles and requirements. A project manager or a business stakeholder will be interested in task completion and how many pending activities there are. At the same time, a developer would concentrate on the source code and associated artifacts, a tester would focus on the test plan and overall functionality, and so on. Group the different team members under different groups to define the required permissions.

Project permissions
Editing permissions

Permissions: Member of tab
The Settings tab allows you to modify the group image or avatar, name, and description. It also allows you to delete the group.
General ➤ Notifications
The Notifications section provides different built-in notification capabilities. Some notifications are configured by default. For example, when a build completes, members get a notification to their configured emails.
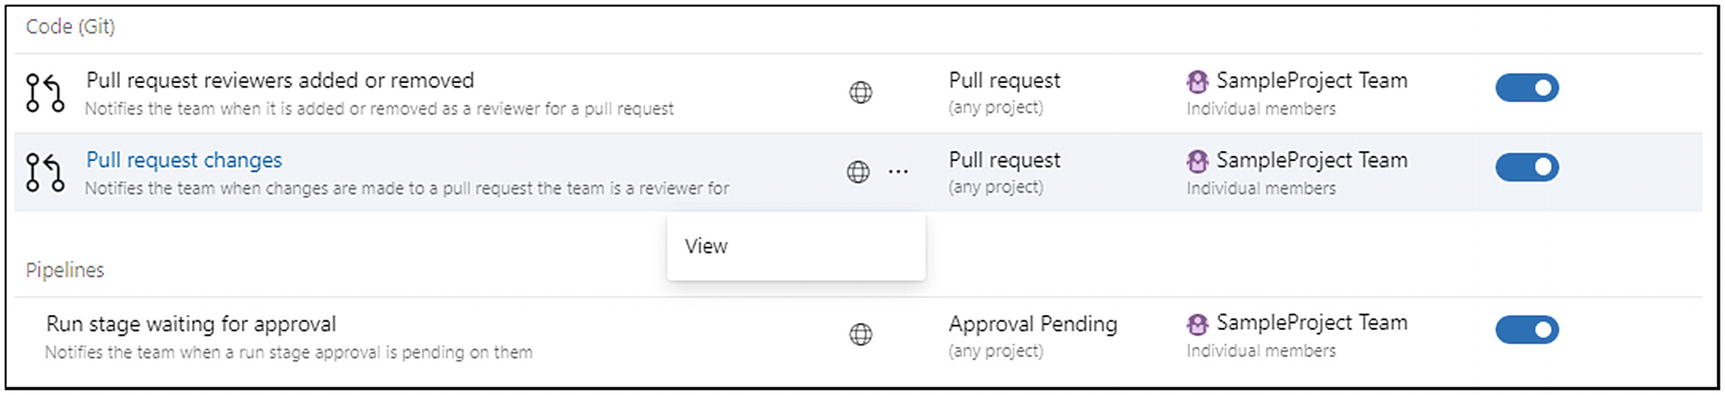
Viewing the notification details
Selecting the View option opens the configuration of the selected notification; you can define the description of the notification, who will receive the notification, and the filter criteria.
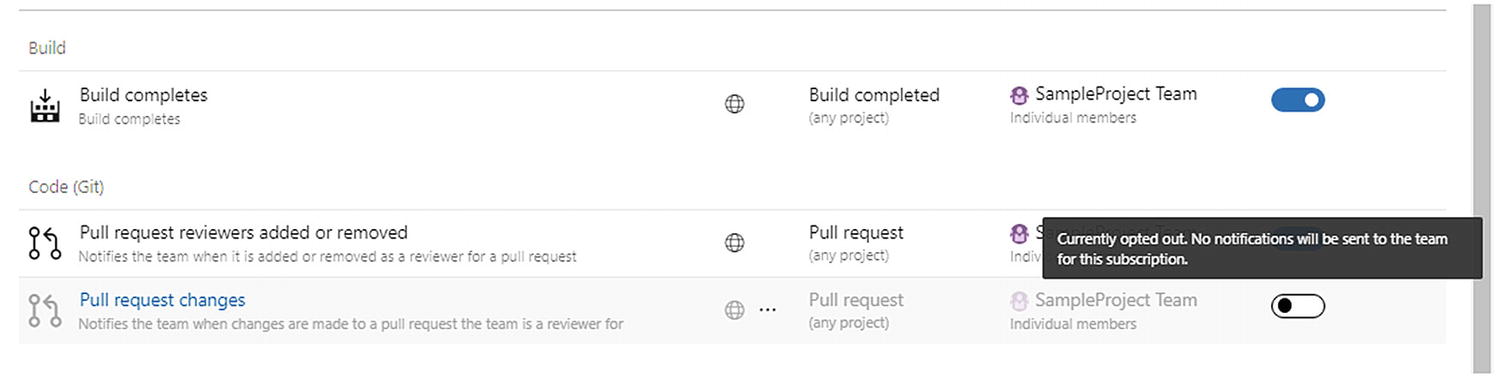
Opting out of a notification

New notification

New notification criteria
Click Finish to complete the configuration of a new notification, which gets triggered on build fails.
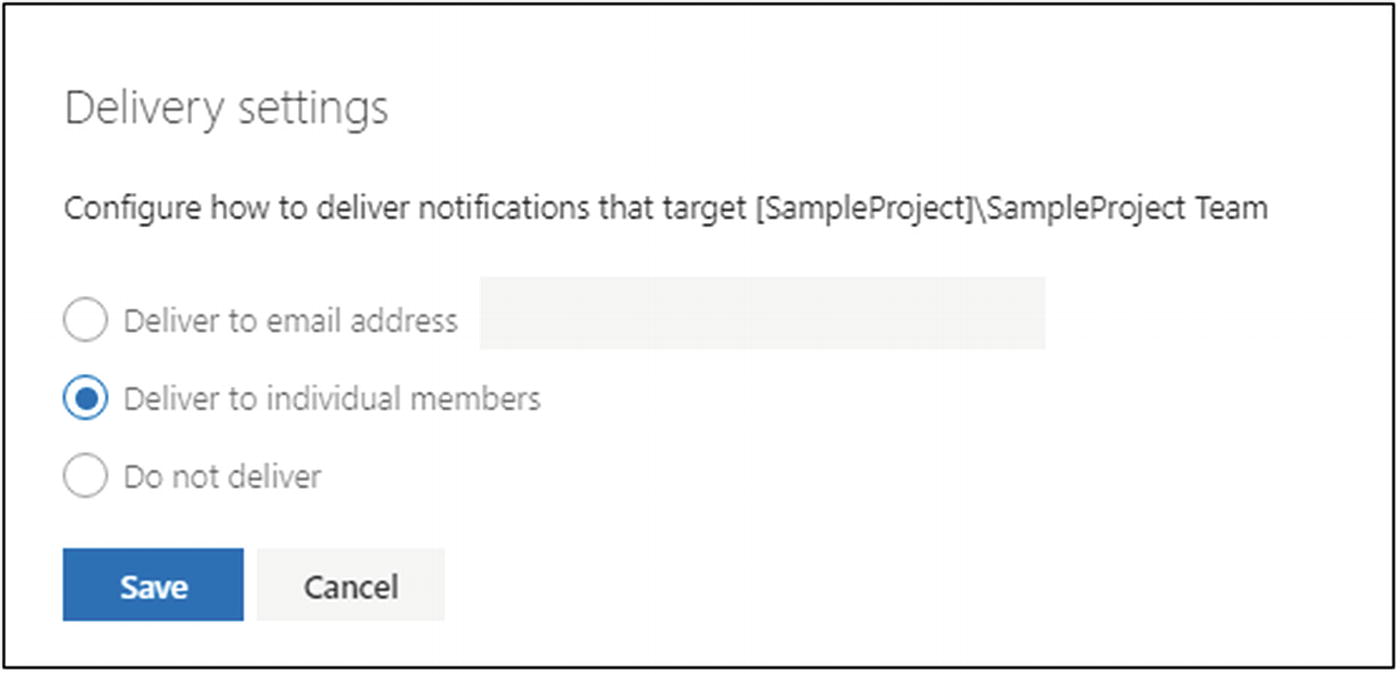
Delivery settings
Click [![]() ] to open the section in full-screen mode.
] to open the section in full-screen mode.
General ➤ Service Hooks
Service hooks help to trigger or notify an external system about an internal event. For example, if you configured your build in an external Jenkins system and want to notify the code commits to Jenkins, utilize the service hooks with code push event defined in Azure DevOps.

Creating a subscription
General ➤ Dashboards

Dashboard permissions
Boards ➤ Project Configuration

Sprint iterations: multilevel
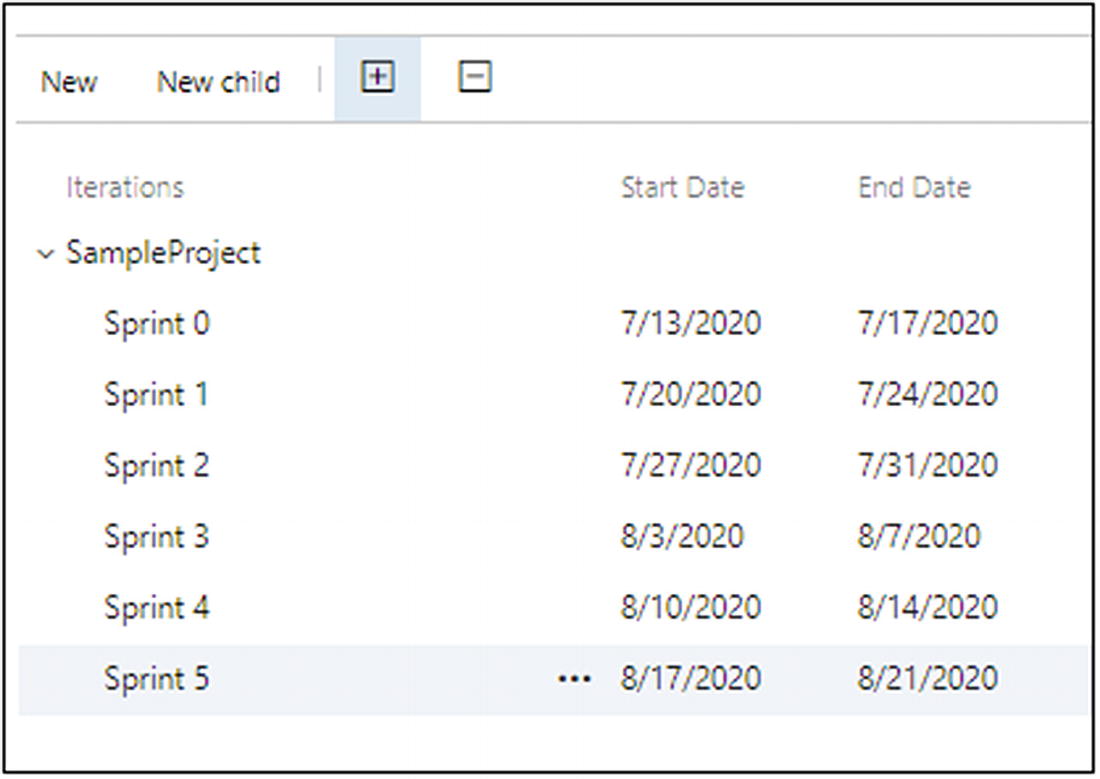
Sprint iterations
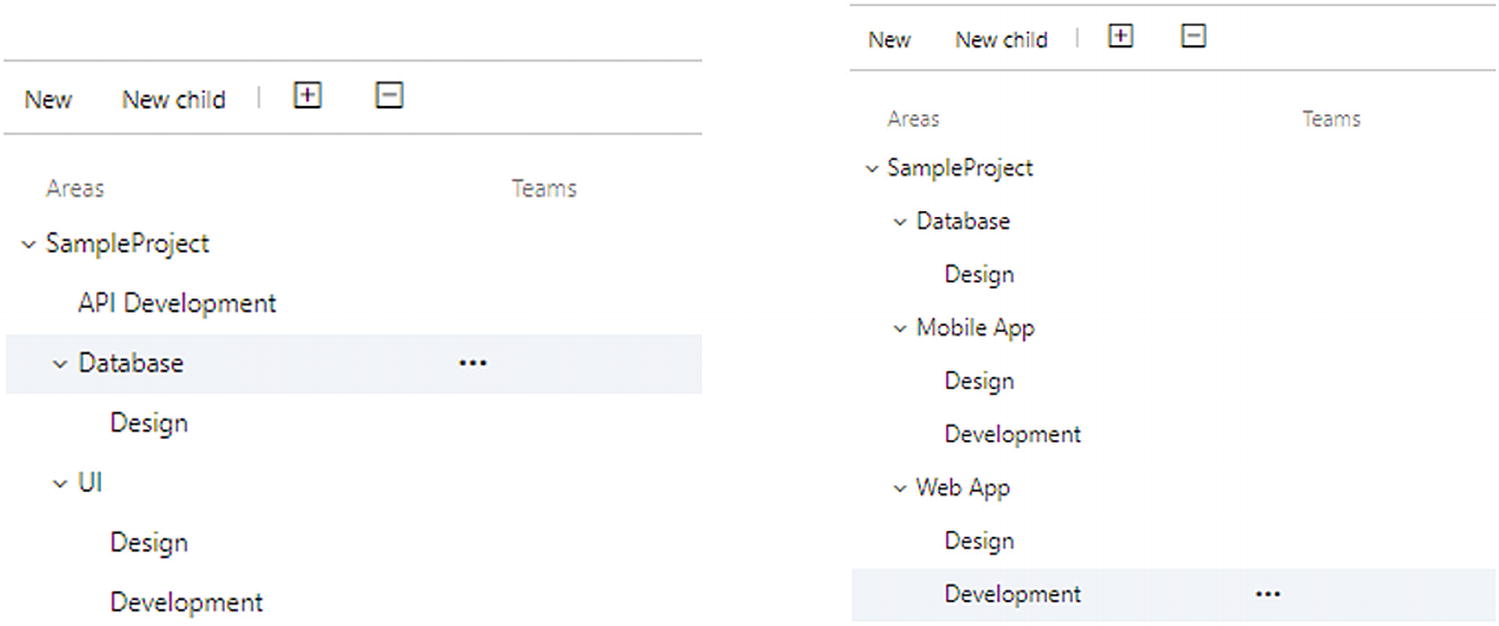
Areas: based on different modules and components
Areas are used to separate the work, especially the work items in boards and as part of queries. This will be discussed as part of Chapter 3.
Boards ➤ Team Configuration
The team configuration settings related to boards, iterations, areas, and templates for teams. Under the General settings, configure the navigation levels and working days. Also, this allows you to configure how the bugs or defects are treated as part of sprint boards.
The Iterations tab allows you to decide on what iterations this team is going to contribute. Teams such as the design team may be onboarded as part of the initial iterations. Sometimes, performance testers will be onboarded after a few iterations only.

Team configuration: Areas
Boards ➤ GitHub Connections
Even though Azure DevOps provides a full-fledged end-to-end solution for DevOps implementation, enterprises may look to manage the overall DevOps process using multiple tools such as GitHub, GitLab, Jenkins, and so on. GitHub is a popular code repository, which can be integrated with Azure Boards to manage the end-to-end activities.
Using a GitHub account: This option allows the user to configure the connection by providing GitHub credentials.
Personal access token: Pass the personal access token (PAT) created in GitHub to Azure DevOps to configure the connection. Refer to https://docs.github.com/en/github/authenticating-to-github/creating-a-personal-access-token to understand how to create a PAT.
GitHub Enterprise Server: If an enterprise has GitHub Enterprise set up, use this option and use the client ID and client secret from the GitHub Enterprise configuration to connect. Refer to the Microsoft documentation to understand more about the GitHub Enterprise Server configuration: https://docs.microsoft.com/en-us/azure/devops/boards/github/connect-to-github?view=azure-devops#connect-azure-devops-services-to-github-enterprise-server.
Once the GitHub credentials or PAT or enterprise configuration is passed, the system will ask to authorize a few permissions to share data between the GitHub account and Azure DevOps.

GitHub integration, completed
Repos ➤ Repositories

Repos default

Creating a new repo with Git
Also, this dialog allows you to set up the .gitignore file, which explains which file types should be ignored as part of version control. For example, in a C# project, we may not do the version control of the DLLs generated as part of the build.
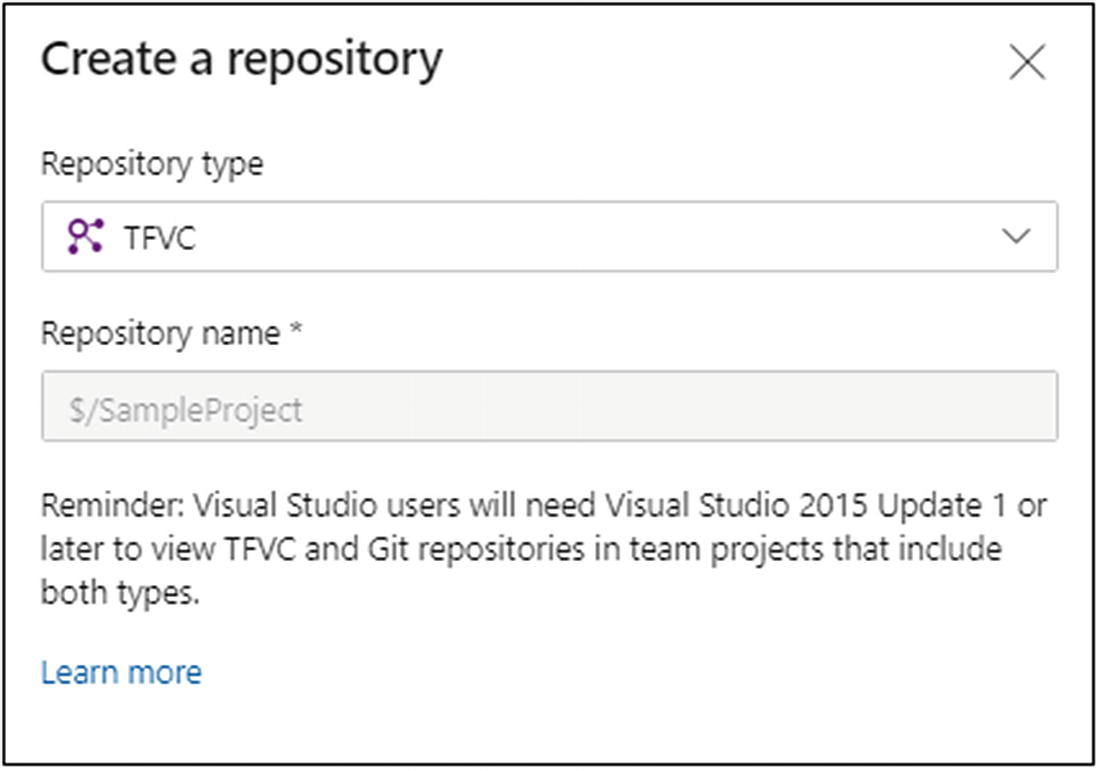
Creating a new repo with TFVC
Repo Settings

Repo settings
Repo Policies
Select the Policies tab to set different policies for the repo and branches. Turn on the required policies for the repo to protect the code quality.

Repo policies
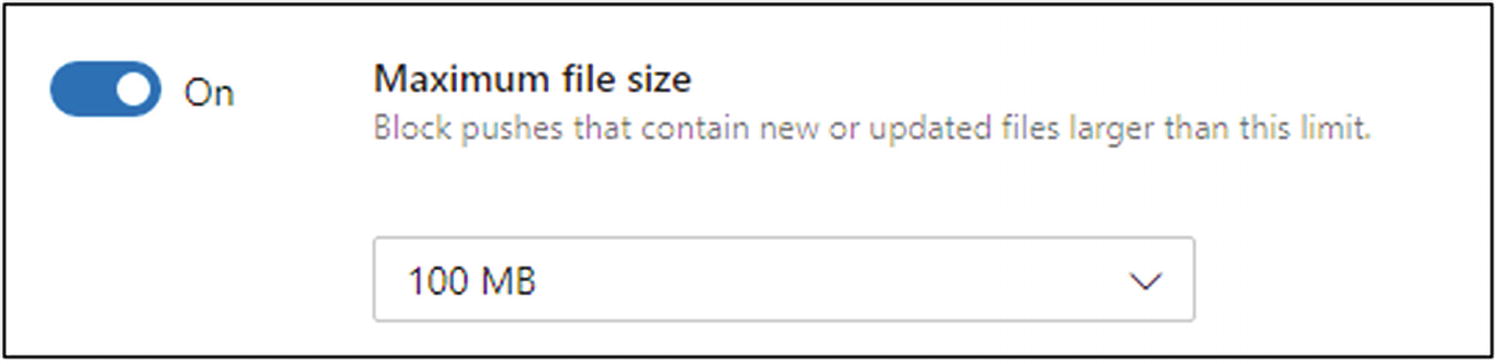
Repo policy file size
Branch Policies
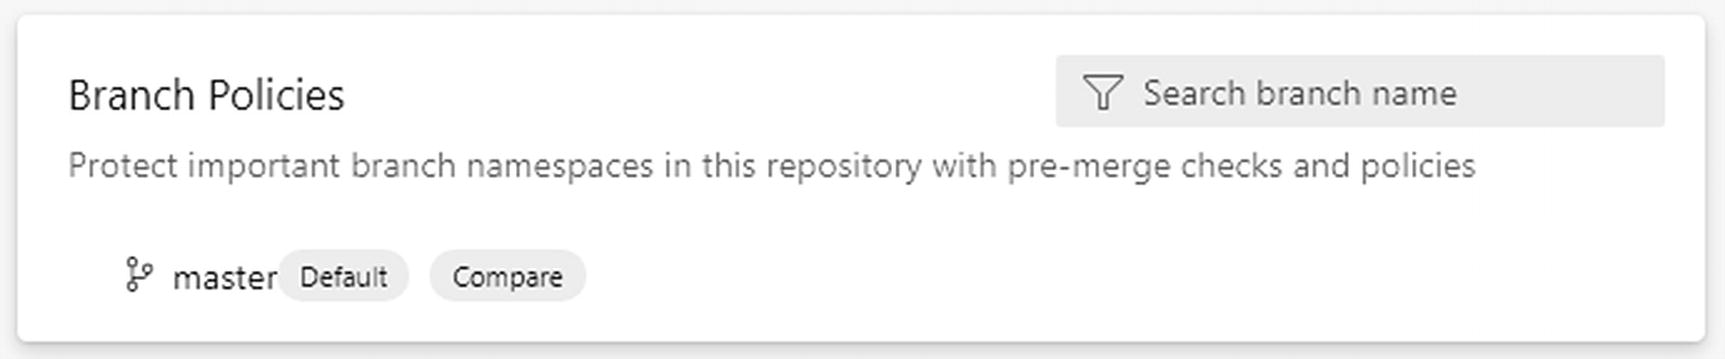
Branch policy settings
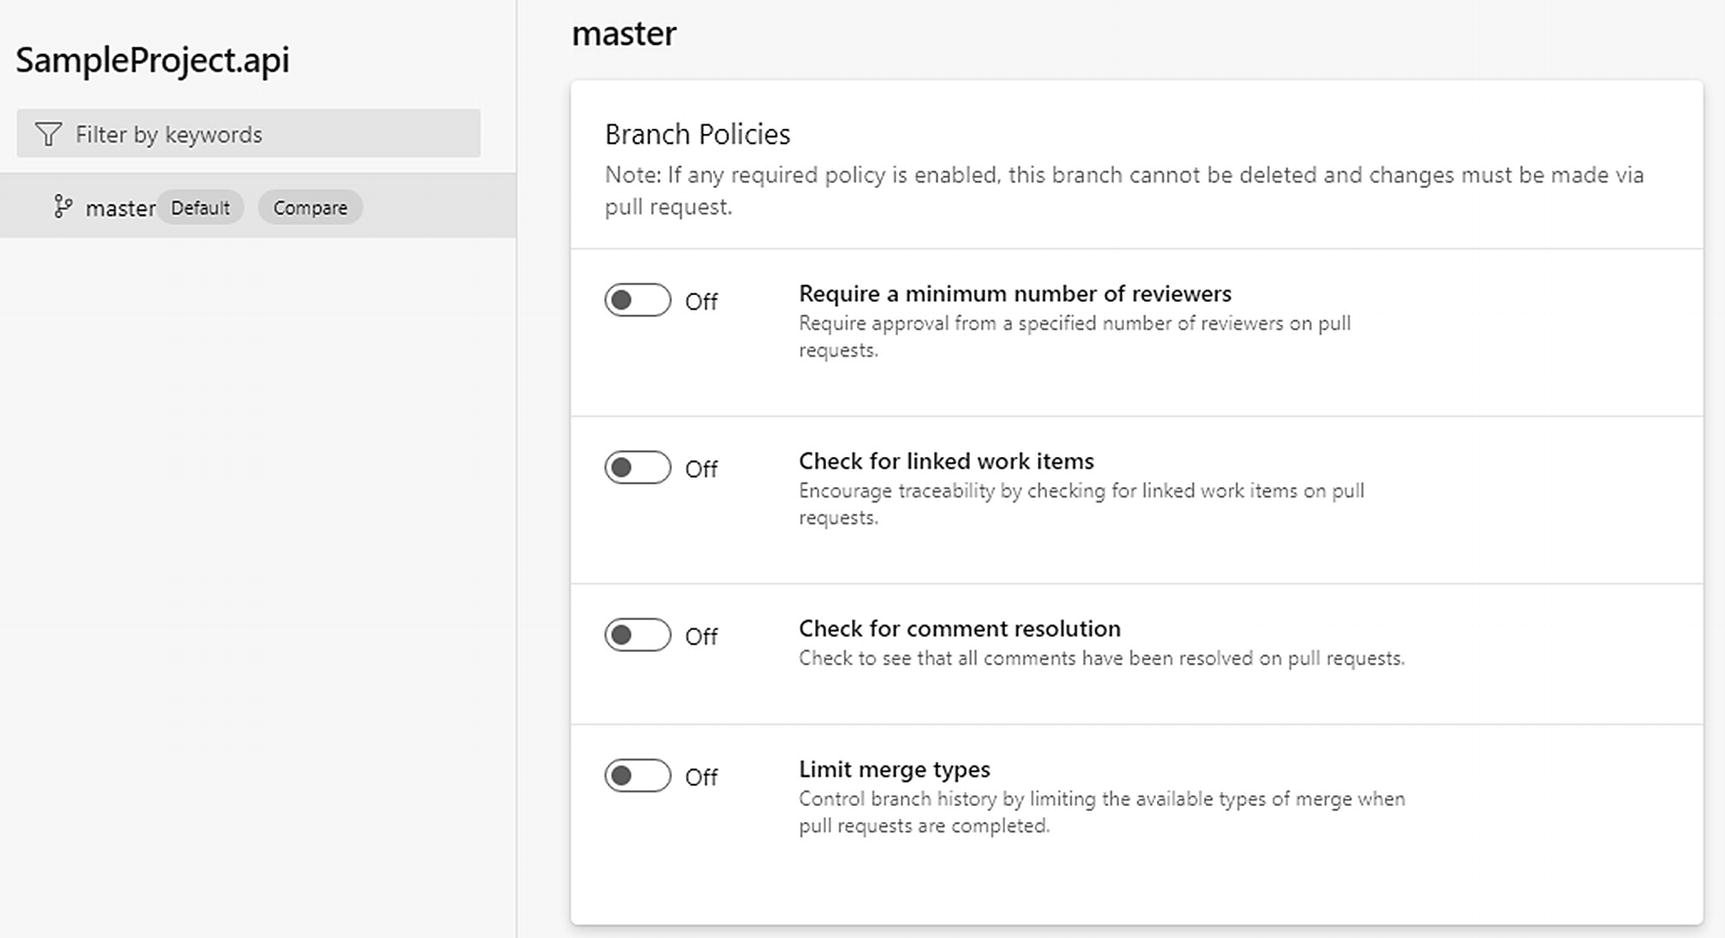
Branch policies

Requiring a minimum number of reviewers

“Check for linked work items” options
The “Check for comment resolution” policy will be discussed after understanding the usage of comments as part of pull requests. Review comments provide an option for collaboration and pass messages to another person about the Git commits.

Merge types
Basic merge: This creates a merge commit to the target by pointing to the source and target as parents. This preserves all the history information. When the number branches increase, then the commit history in the target or parent branch is more complex and will be difficult to manage.
Squash merge: Instead of adding all the commits from the source branch, squash merging takes all the changes and adds them as a single commit to the target branch. This will reduce the commit history in the target or parent branch.
Rebase and fast-forward: Rebase rewrites the changes from one branch to another without creating any commit.
Rebase with merge commit: After rebasing the target branch, do a merge commit to complete the merge operation.

Branch policies, expanded

Branch policies, reviewer policy
Repo Permissions
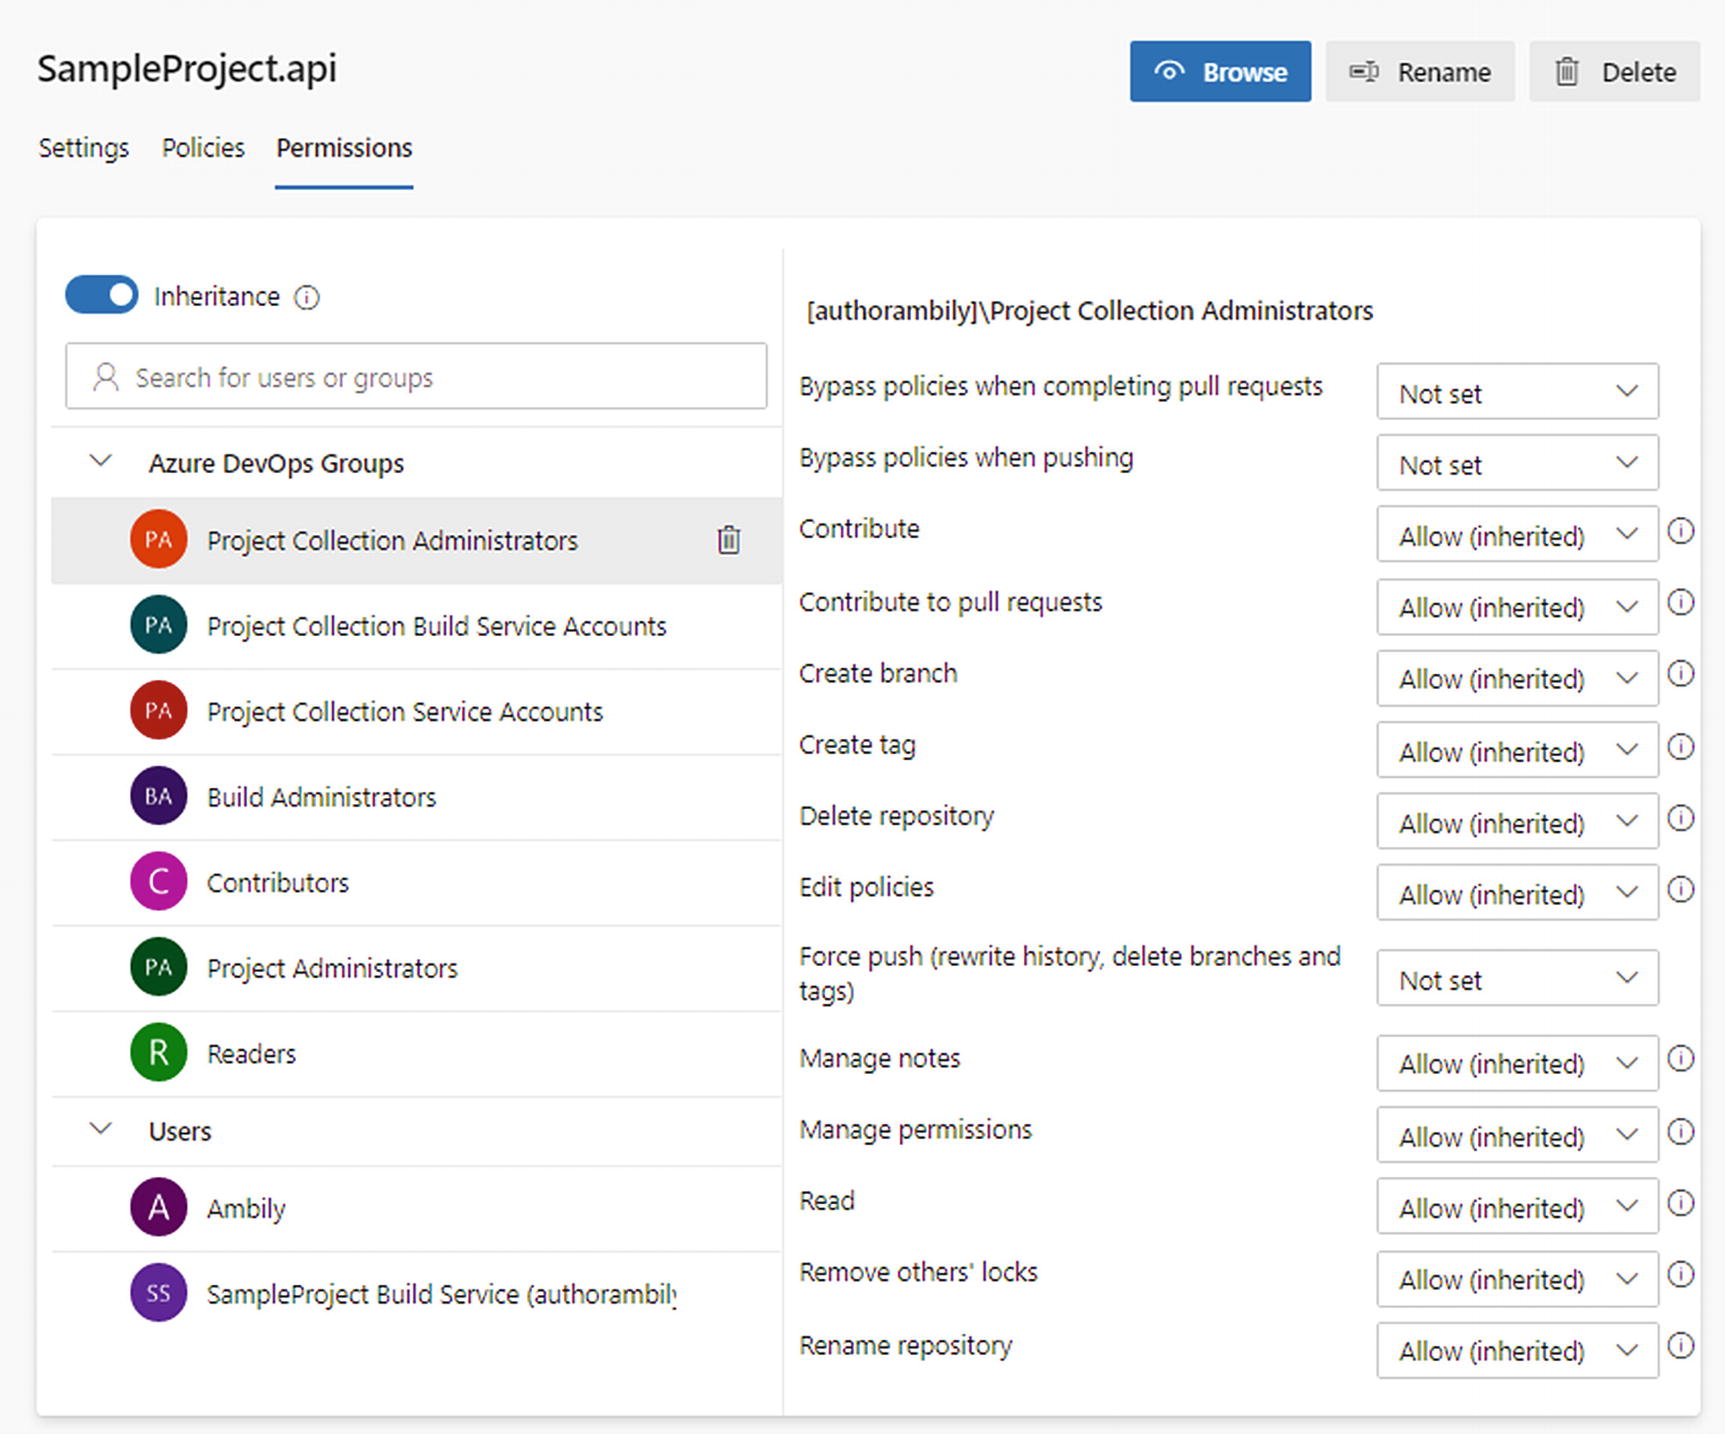
Repo permissions

Repo permissions: Git refs permissions
Select a branch to modify the permissions associated with the branch. Similarly, permissions related to the tags can be modified here.
All Repositories: Settings

All Repositories settings
All Repositories: Policies
The Policies section under All Repositories allows similar configuration as for repo policies. In addition to the normal policies, this section allows you to protect namespaces associated with all the repositories.

Adding branch protection
Select the type of protection required for the branch to continue. Once you select the protection type, select different branch policies discussed earlier in the “Branch Policies” section. Users can protect the current and future branches using a pattern such as master, releases/*, dev, etc. The user can either specify the branch name or provide a pattern indicating the branch name. For example, * indicates all branches in the repo.
Pipeline ➤ Agent Pools
Microsoft-hosted agents: Agents are hosted by Microsoft and available based on your subscription mode.
Self-hosted agents: Users can host or configure agents on their own systems or in a cloud subscription.
Azure Virtual Machine Scale Set (VMSS) agent: These are self-hosted agents, autoscaled to support the demand.
Each agent pool shows the jobs running on the pool, agents configured against the pool, owner, and permissions. We will look at agent pools in Chapter 6.
Pipeline ➤ Parallel Jobs
Parallel job configuration was explained in detail as part of organization settings. The project-level settings help you control the usage of agent pools and parallel job availability.
Pipeline ➤ Settings
The Settings section under Pipeline configures the retention policies associated with runs and pipeline. Also, this section provides options to configure a few of the pipeline parameters such as publishing metadata from a pipeline, disabling anonymous access to a status badge API, and so on.
Pipeline ➤ Test Management
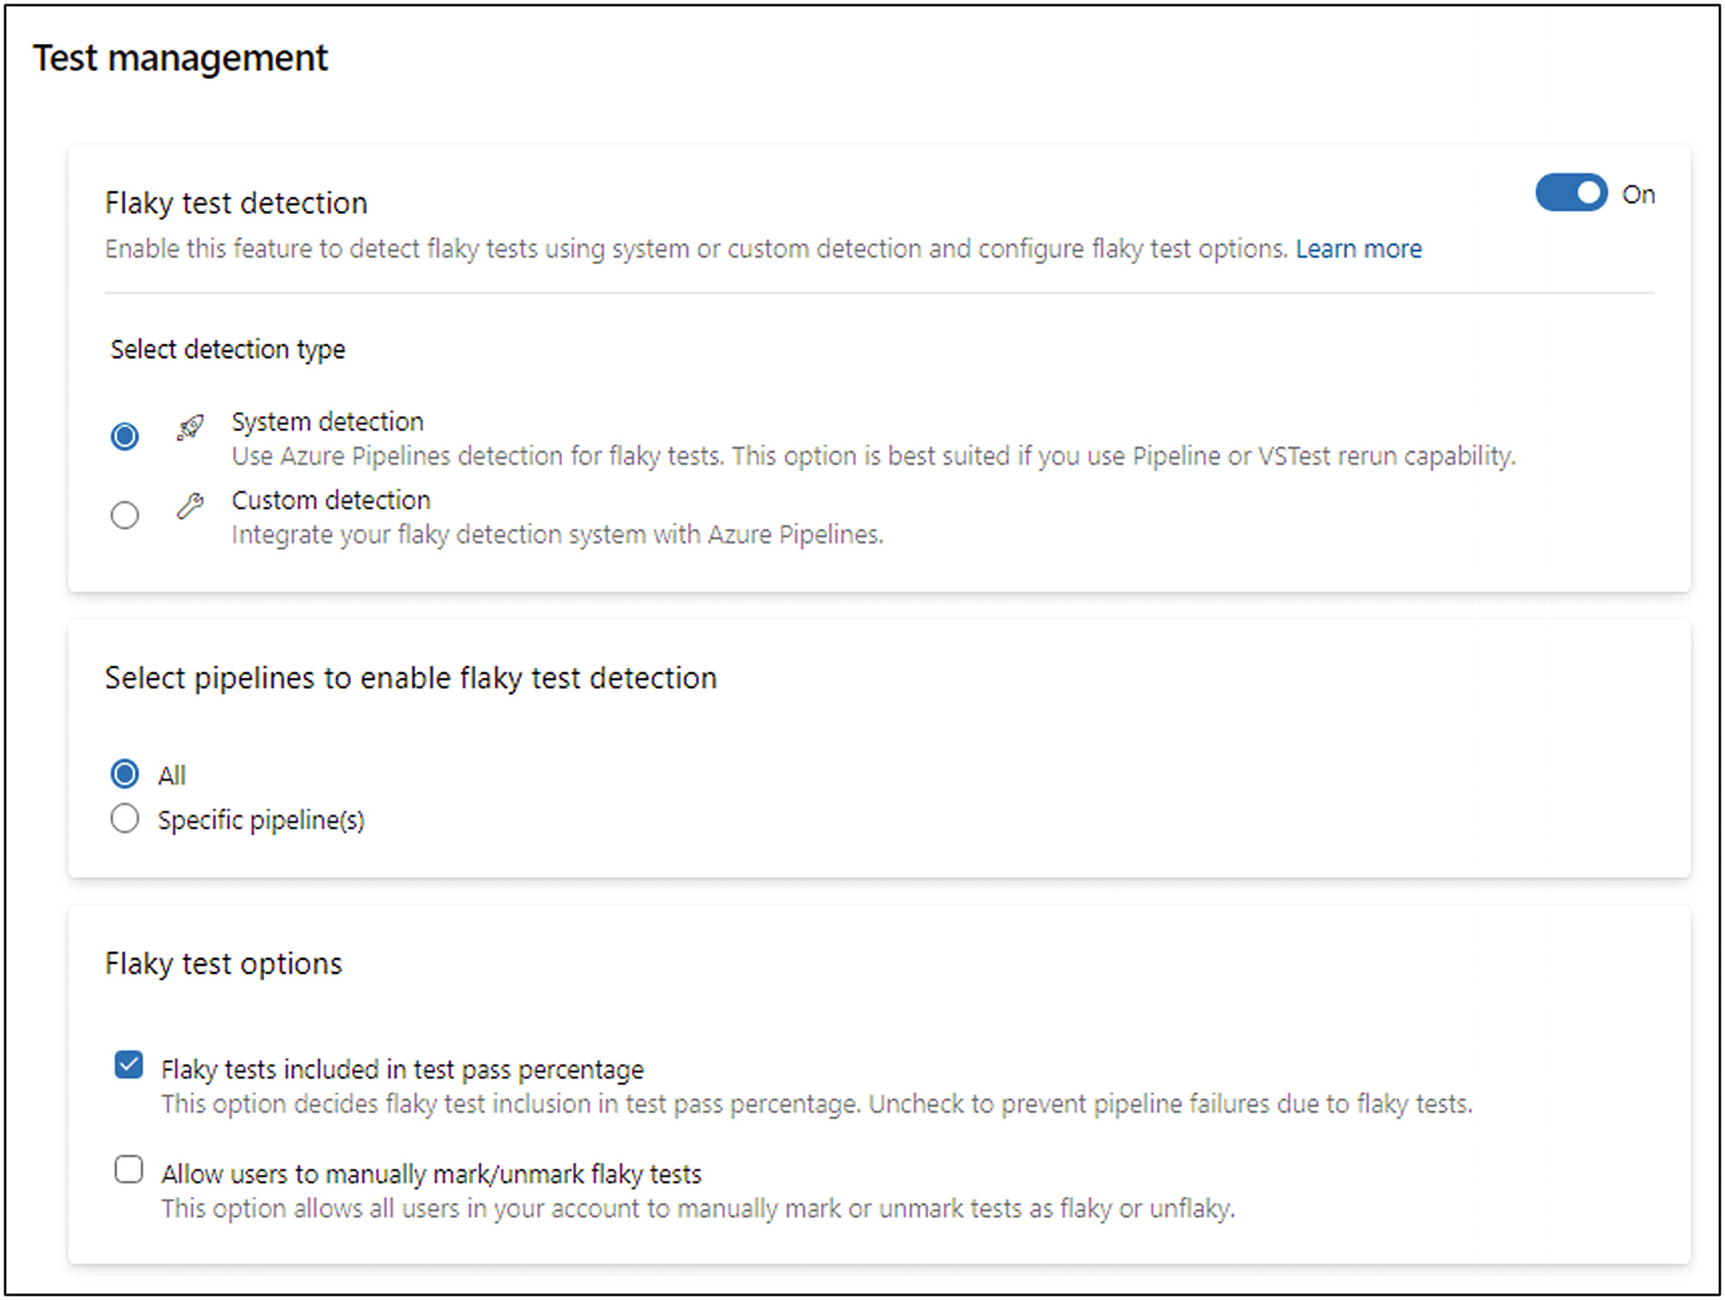
Test management settings
Pipeline ➤ Release Retention
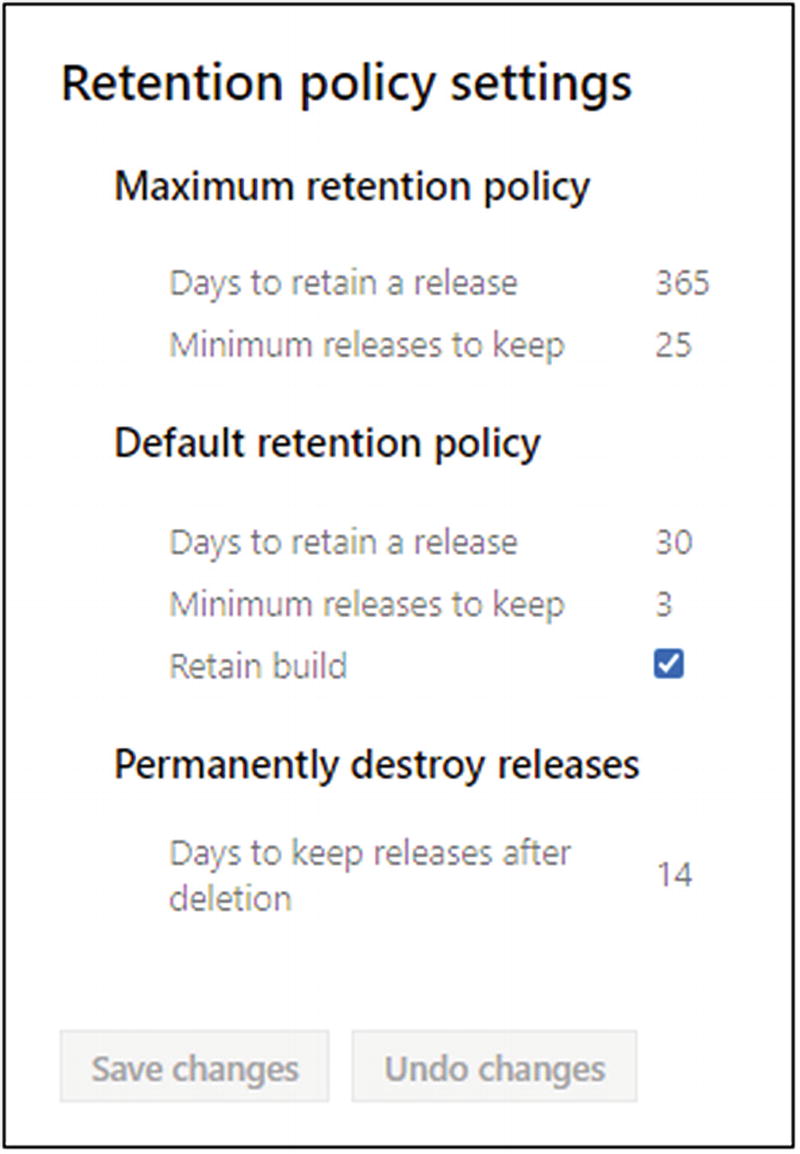
Release retention policies
Pipeline ➤ Service Connections
This section presents the connection settings to external systems. If the deployment of the project is in Azure, then define a service connection to the Azure subscription using the various supported mechanisms. The “New service connection” option shows the list of supported external systems including Azure, Chef, GitHub, Jenkin, SSH, and so on. You’ll learn more about services connections and how to configure various connection in Chapter 6.
Pipeline ➤ XAML Build Services
XAML builds are the old build setup based on Windows Workflow Foundation (WWF). This section supports any legacy XAML builds available in your project.
Test ➤ Retention

Retention of test results
Process Template Customization
Azure DevOps provides four process templates: Basic, Agile, Scrum, and CMMI. Based on the enterprise requirements, you may require basic customization of existing process templates. Complex process customization is not recommended.
Starting the Customization
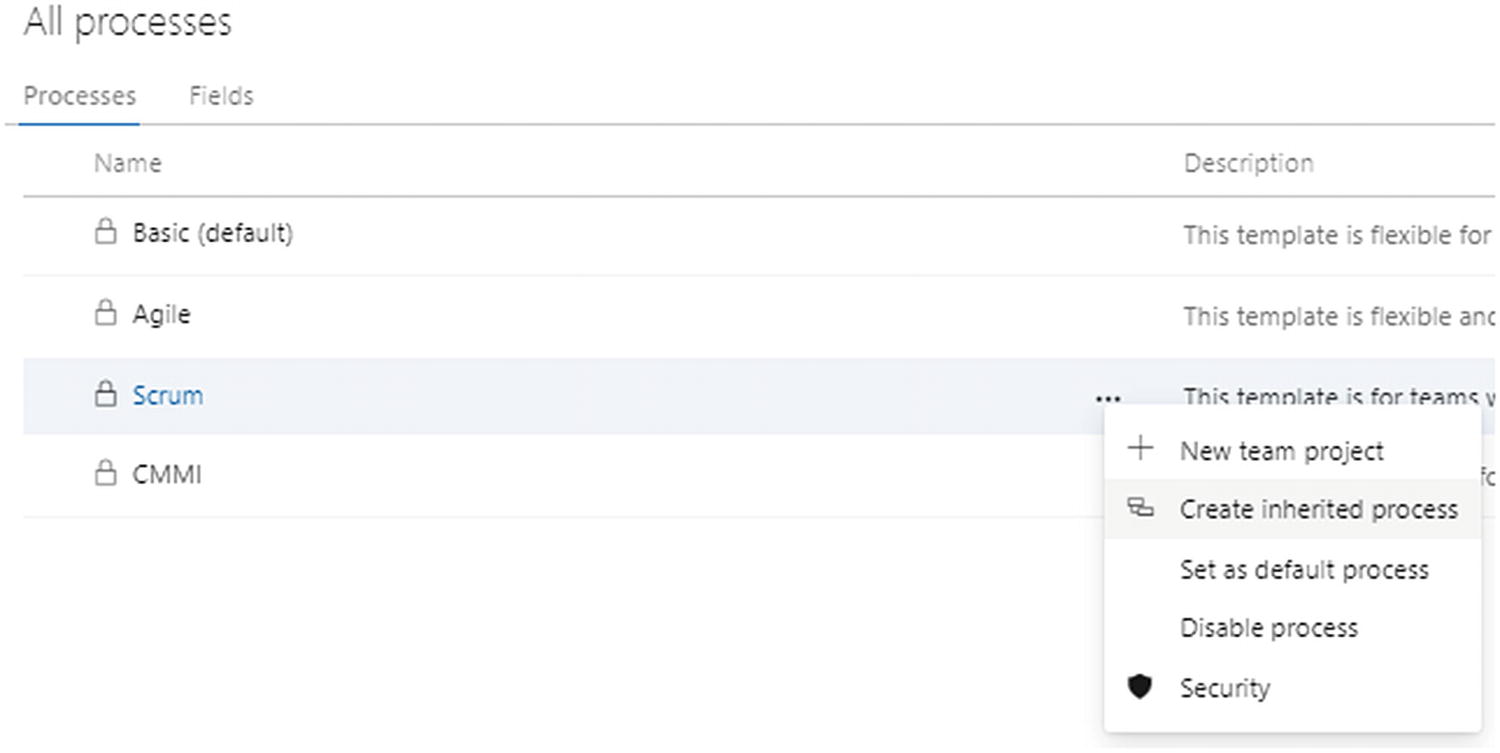
Creating an inherited process
Provide a name for the custom process template, say SampleScrum. Once it’s created, select it to navigate to the work items associated with it. Initially the custom template will have the same set of work items as the base process template. You can add new work item types to the process template as well as edit existing process templates.
Adding a New Work Item
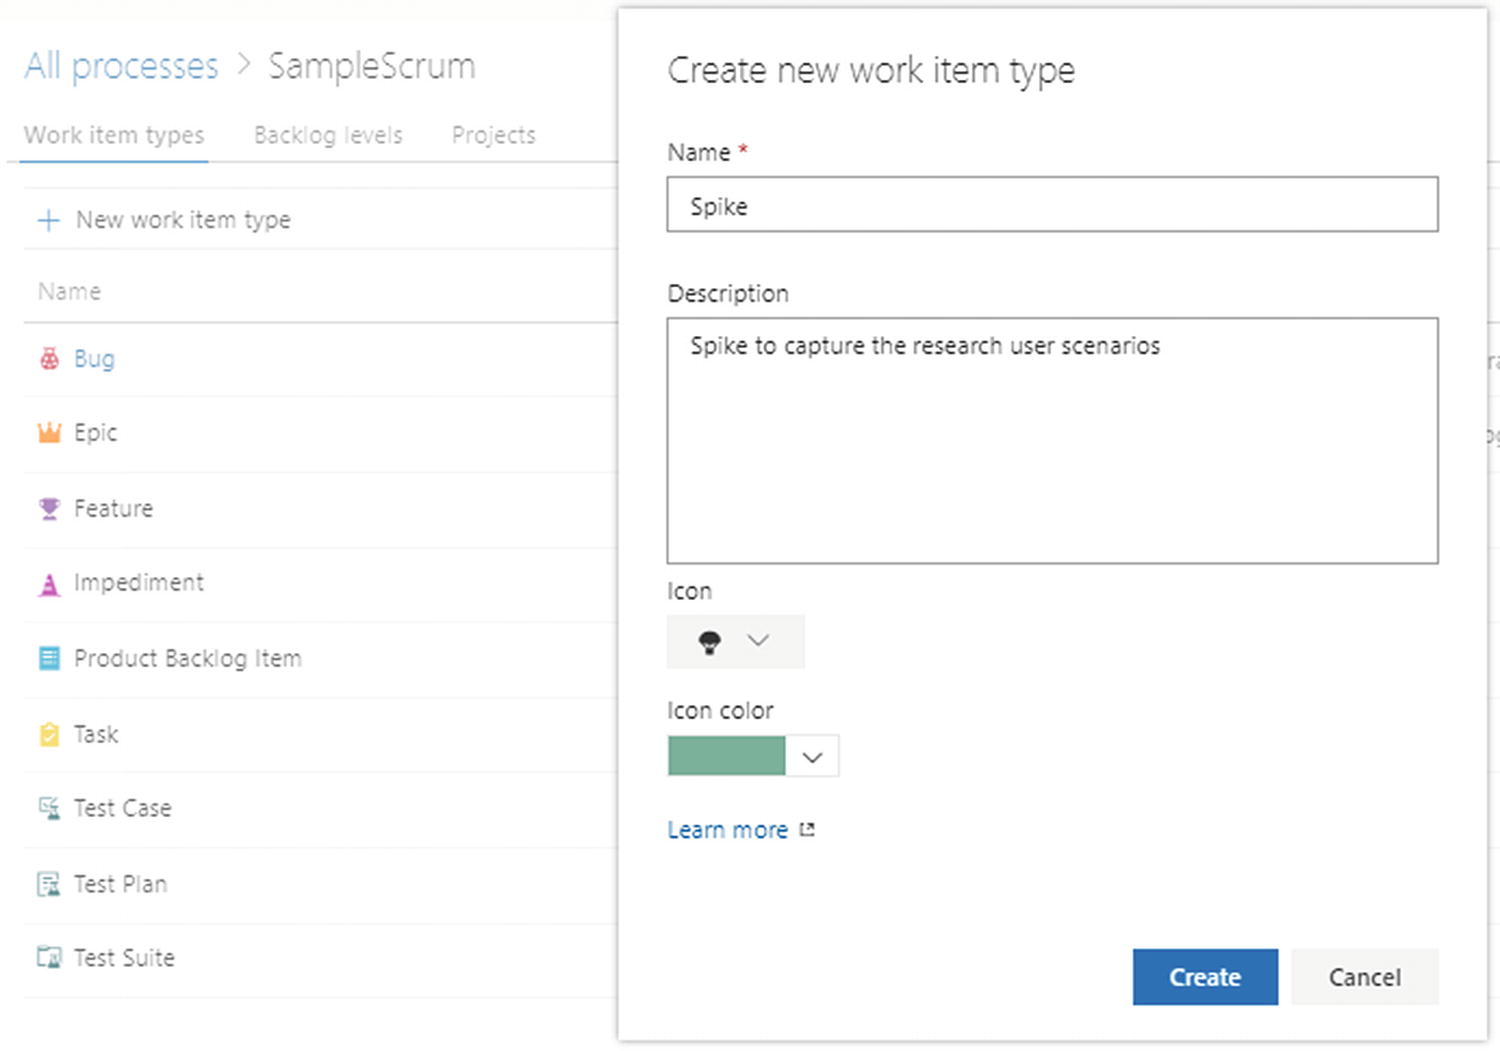
Creating a new work item type

Creating a new work item type
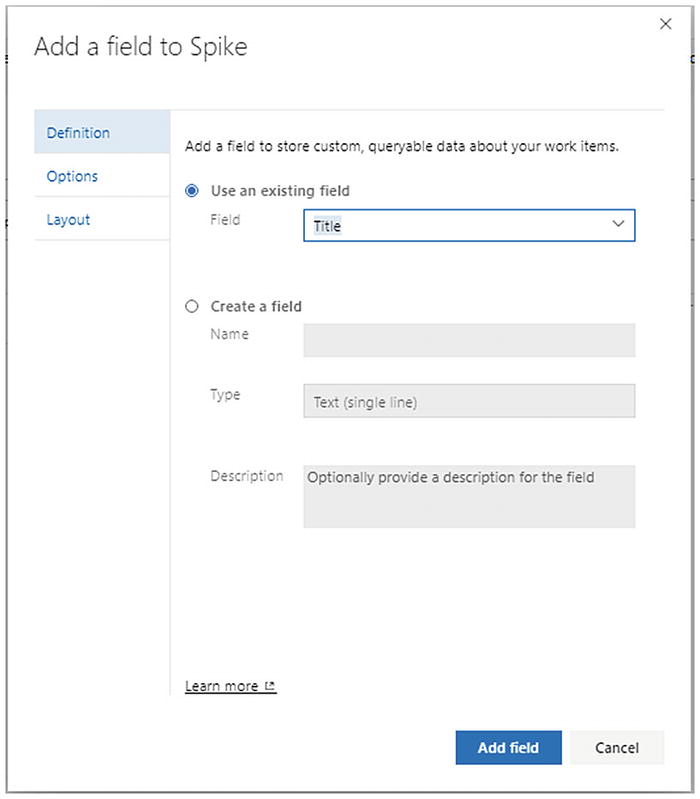
Layout: Layout defines the basic structure or elements of the work item. User can use the options “New field,” “New group,” and “New page.” The “Get extensions” options helps in adding more complex controls available in Marketplace like the Multivalue control, color picklist control, and so on. The “New field” option opens the “Add a field to new work item” dialog, as shown in Figure 2-61. Select an existing field or add a new field. Specify whether the field is mandatory and specify the default value of the field using the Options tab. The Layout tab helps arrange the new field in the work item.
Creating a new work item type
State: By default, there will be three states defined: New, Committed, and Done. The user can add new states under different predefined categories.
Rule: The user can define rules associated with the work item. Figure 2-62 shows an example of a custom rule, which marks the priority field as mandatory when a new work item is created and marks the default value as 3.

Creating a new work item type
Rules will be defined as a combination of a set of conditions and actions.
Similarly, you can edit and disable an existing work item. Disable will remove unwanted work items from the list of available work items associated with the process template.
Summary
This chapter focused on the different organization and project configuration settings. These configurations and permission settings are used across the life cycle of the project execution. Each of the settings will be revisited based on its usage in other areas of the life cycle. With the organization and project configuration completed, we can explore how to manage the requirements using the requirements management features of Azure DevOps in the next chapter.