
Chapter 4
Basic Planning and Structuring of Your Application
Thus far, we’ve gotten you straight into coding a few apps, given you some background information on screen resolutions, JavaScript, and CSS, and we’ve given you a giant bag of free (and cheap) “stuff” in the form of various resources that you can use while developing. It would not be difficult for you to, given this information, go completely crazy coding all sorts of neat things and putting them out there for the world to see and use. The only problem is, without you actually considering what you’re building, the world might not be too keen on actually using what you’ve built. And nothing can make one more depressed than spending hours and hours on a project that only you (and perhaps a few friends) will ever see.
In this chapter, we’re going to talk about application development in two different ways: Planning your application, which involves understanding what you’re building and how you can make sure you don’t overlook vital pieces; and structuring your code, which is a much simpler idea but just as important for reasons we’ll discuss. This is the “bringing order into chaos” chapter, and we hope that you’ll heed our warnings and advice!
Know Thy Audience
If you have any sort of passion for creating something, than you might have had the experience before of thinking, “I wish that I had a tool that did [insert witty idea here] … I know, I’ll just build it!” At this point you most likely went out and hacked something together for your own use, and then realized that others might be interested in using it as well. I know I do this all the time whenever I create a new web or mobile application, building for my own needs or for people that have needs like my own. Perhaps these people are your audience.
Or maybe you are just one of those people who see problems that others don’t. You know that if you put something out there to solve a certain problem, others will latch on and praise your name. Perhaps they are your audience.
Or finally, maybe you’re an innovator that thinks you have tapped into the next great game, service, or program that people will be clamoring to use. If you put a little effort into it (maybe only 50–100 hours of coding), you can see the dollar signs adding up from the addicted masses—they’re certainly your audience, right?
Well, perhaps your passion, ingenuity, and innovation will be enough, and the audience will magically appear. But let’s think about this for a moment; in each of the preceding examples, you’re taking a rather large leap in assuming that your passions, problems, and joys will generalize to a lot of other people out there. If you were in a company and pitched these products to others, the first question would be, “How do we know we have an audience?” Simply answering, “I’d buy it,” is not enough. You’ve got to have some idea of who you’re targeting and whether they’re interested.
Giving People What They Want
There are a number of ways you might start researching your next application. Sometimes a need jumps out at you, or you see an obvious opportunity. Other times you might think something would be a hit but have no idea whether it truly will or not. While you can watch Twitter and Facebook for complaints you could remedy, or perhaps use some sort of survey to understand what your audience wants, we’ll present a very easy method here that speaks to one universal rule: Know what people are looking for. The followingmethod should give you some indication of how people are spending their time online, and thus let you know where you may have an opportunity.
We start with a popular advertising system on the web, Google’s Adwords. It is free to sign up, and even if you never place a single ad, one tool Adwords offers that you might find very useful is the External Keyword Tool (https://adwords.google.com/select/KeywordToolExternal). This tool tells you how many people are searching Google for a particular keyword. It’s a great way to see if people are actually interested in something you want to build.
For example, a project that I’ve considered building for some time (and actually have built up, in some sense) would be a web site for aspiring writers to hone their skills. I envision a web site where a person would get a topic, write some form of prose (short story, essay, poem, etc.) and have others vote on the piece. Winners of topics would have some “cred” given to them, and perhaps win real prizes.
How do I find out if there is a market for this? Well, I might use the Keyword Tool to do a few simple searches, like those in Figures 4–1, for the keywords “writing contest” and “writing help.”

Figure 4–1. Google Keyword Search for “writing contest” and “writing help”
One should remember that Keyword Search is designed to be usedbyadvertisers, so a bit of deciphering the unfriendly mangled mess of language that is “Marketing SEO Speak” is important. First, I know that “writing contest” has about 2.5 times more traffic (in terms of monthly searches on Google) than “writing help.” This is useful information in that it suggests that there are more people looking for contests and recognition versus constructive comments on their writing. If my web site or app is going to have both of these elements, it seems the contest angle might be better used. If, however, I’m not completely sure what my app or web site will be, I might find the Keyword Ideas list (Figure 4–2) to be particularly helpful:
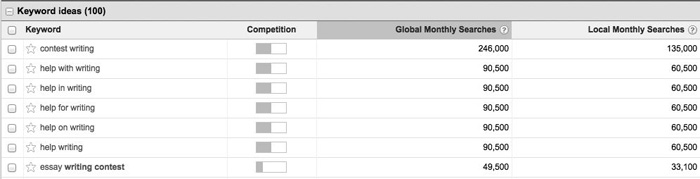
Figure 4–2. Partial Keyword Ideas list for the search terms above
Here the “competition” column might be useful in telling me where to go. You see “competition” according to Google Adwords is how many other advertisers out there are trying to get their ads to appear when people search for the keyword listed. I’d have stiff competition for “contest writing” (or another item farther down the list, “free help writing a business plan”), but very little competition for “essay writing contest” (or another item not shown: “persuasive writing contest”).
Using the External Keywords tool in Adwords, I can get an idea of not only for what people are searching, but also for what other companies are advertising. This can help you better understand if an audience exists for your product (by using keywords you suspect they’d use in Google) and if there are already a lot of alternatives you’d be up against. While word–of–mouth advertising can work well for some products, you shouldn’t underestimate the power of search traffic!
Who Is My User?
Provided that you know an audience exists for your product, you now must figure out who your user is. Recently, in attending a course filled with bright, young future MBA–holding executives, I was amazed to find them annoyed at the idea of “targeting” or finding their niche users and marketing specifically to them. They balked at the idea of not marketing to “everyone,” without realizing that:a) “everyone” might not be interested and b) the target user is more motivated to actually use your product than a generic “everyman” (or “everywoman”) out there.
Learning about your users is best accomplished by studying either your own product (in its early stages) or other products or web sites already in existence. If you’re building an app that’s going to track commuter transit arrival and departure times and delays, perhaps look around at whom competing apps or services are targeting. There is a good chance you’ll be targeting the same group, and so putting some time and effort into considering that group’s needs and desires in a product is time well spent.
Let’s talk through an example of this, with the fictional transit application I mentioned earlier. Identifying an audience can be difficult, and you may need to consider more than one group of people. One group that seems logical to consider is busy commuters or business travelers. If I want to target this group, I might ask and answer a few questions, such as:
- What features in my app or web site will be attractive to busy people?
- What features, nuances, or procedures in my app will slow down a fast–moving person?
- What features can my app have that would actually be useful to someone who uses public transportation?
- How can I easily signal to my busy user that something important is going on (i.e., a late arriving bus or train)?
- How will my application be used? Will it be used to plan a trip, or at the last minute to reroute? Or both?
The list can go on from there, but you get the picture. By developing a hypothetical “user” and putting yourself in his or her shoes, you can better understand what you need to do to make his or her life easier. Make it easier, and you’ll gain a user or customer! Then simply rerun the same research on your next demographic, perhaps this time “leisure travelers” or “tourists.”
Not all of this research has to take place in your head; resources exist to tap into what your potential users are saying. Perhaps take a look at the reviews of your potential competitors, and see what people are loving and hating about those apps. You can also check out user groups and forums, and even conduct simple Twitter searches to get a handle on the “issues” in a given area.
As I mentioned a few paragraphs back, you might also already be in a position to have this information at hand. If you’ve developed a web site or application in the past, you might have used a product such as Google Analytics (http://google.com/analytics) or Flurry Analytics (http://www.flurry.com). These products can track who uses your application and give you invaluable information that you can later use to define your “user.”
For example, in one application that I wrote, I had a simple form that people could use to tell me a bit more about themselves. From there, I found out that the average user of my app was between 25 and 34 years old, as seen in Figure 4–3.
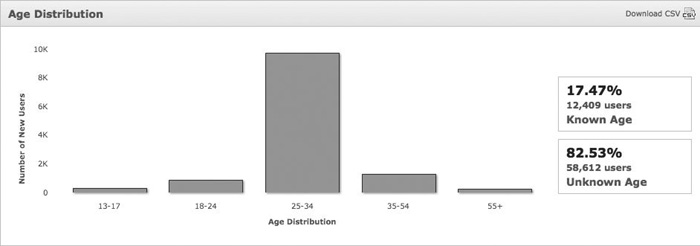
Figure 4–3. The age distribution for an application
This information can be useful in a number of ways. First, I might think about features this group would find important and focus on those in future releases. Or perhaps I’ll shift my small advertising budget away from the teen to early 20’s market and focus more on 25– to 34–year–olds to attract new users. The more I know about my users, the better I can understand their needs, and the better my web site or application can serve them.
One word of caution though: you might notice that my application only has known information for 17% of users. It happens to be that the portion of my application that records this information may be more useful to certain demographics, which could skew my data. Without getting deeply into discussion about this particular program, it is good to note that you should never rely on one source, especially if you have only a small bit of data, or feel you may have a skewed sample.
Once I have information from a variety of sourcesabout my audience and my users, I can create a plan.
Having a Plan
Planning is quite possibly the easiest thing to overlook as a new developer eager to play, build, and profit. In this section, we’ll discuss issues regarding what type of application to build, how that application should look, and how the user should move through it. By understanding all of these from the start, we can keep our priorities in order, and when coding, simply implement what we’ve already worked out. Let’s start by looking at the different types of mobile applications or interfaces we could build.
All Mobile Is Not the Same
The title of this book includes the words “web apps,” which inherently acknowledges that there are other sorts of apps out there. Let’s talk about the three types of mobile interfaces or applications.
Native Applications
If you’ve owned or used an Android phone (which I hope you have, if you’re reading this book), you’ve probably used a few of the applications on it. The web browser is one of these applications, the contacts application is another, and the calculator application is still another. These applications, for Android, are generally written using Java and compiled using special tools known as the Android Software Development Kit, or SDK. These tools are free to download and use, to create applications that you can publish in the Android Marketplace.
These applications are called “native” applications in that they execute straight from the phone. The user has a dedicated icon for them, and tapping it opens the application (See Figure 4–4). These applications can store data easily on the phone, and can interface with one another if the user allows. Typically they must be downloaded and installed via the Marketplace or a publisher’s web site but can also be “side–loaded” or installed on a device by downloading and running the application’s APK package on your handset.

Figure 4–4. FAILboard Pro:a native Android application
Native applications tend to be faster because all pieces of the application live in the phone’s memory and they also have deeper access to the hardware of the phone, which the web browser does not have. By the same token, native applications come with risksto the end–user; the application just installed might really be a trojan trying to steal information, or the developers, in a haste to push out an update, did not pay attention to what they were doing andleft a security vulnerability in place. This is similar to what happened to Skype in 2011, when someone discovered that usernames and passwordswere being saved on users’ handsets in unencrypted human–readable text, which anyone could easily retrieve. Luckily, a fix for the problem was quickly made available. For developers, developing a native application may take more time and may also come with a steeper learning curve, especially if the developer is already versed in HTML, CSS, JavaScript, and other web technologies.
Mobile Web Sites
A mobile web site, or website optimized for mobile devices, is generally viewed by users after they navigate either directly to it or to the regular web sitewhich redirects them to the mobile version. These are still websites, and do not normally store data on the user’s device or interact with it very closely. Essentially, they are just there to be a presentation and not really to interact intensely with your users. This is generally the most basic way for a company or web site to improve the mobile user experience. Mobile web sites allow you to conduct some basic operations, but do not interact with you other than to provide a few simple pages of text and perhaps a form or two.
Because of this, these web sites lack the “full featured-ness” of their bigger brothers on the desktop (i.e., the full web site) and also may not be particularly optimized for smartphone or tablet screens (e.g., tablets may see a too–big version, smartphones may see a too–small version, depending on which device the web site is targeting). While developers may like this approach, as it’s fairly simple to create, update, and test, end–users do not think of these mobile web sites as applications. If your goal is to build something for interactivity or to be seen as a tool, then you will probably want to avoid the simplicity of this approach in favor of a Web Application.
Web Applications
Finally we get to the union of the first two types of applications we’ve discussed, and the type of application we’ve been developing in this book. Web applications attempt to bring the seamlessness of a native app with the relative ease of coding and updating that comes from a mobile web site. For example, our earlier apps in this book (see Chapters 2 and 3) had buttons users could easily push, just like the native app shown in Figure 4–4, but lived inside of a web browser. If the user were to create a shortcut to the application (or the application itself could ask the user if they’d like to create one), then the app could have its own icon just like a native app does. There are also techniques that web apps can use to integrate themselves into the operating system just like native apps do.
It is best to think of it this way: web applications, just like regular applications, are meant to be interacted with instead of just viewed.
So Which Do I Build?
By now, you might be wondering what direction you really want to go. And honestly, while this book focuses on the benefits of web applications (as they are generally easier to program than native applications, are more full featured than mobile sites, and are accessible to beginner programmers), you might not be able to use just one solution. Again we refer to the idea of knowing your user. If your user is in an area where they’ll always have cellular service, then perhaps a web app will be just as useful as a native application. If the user uses a variety of different devices (e.g., Android, Windows Phone, or iOS powered), then a web app might be the easiest way to be on all three of those platforms at once.
In the end, you must develop your mobile strategy to accommodate your user. Later in this book (Chapter 13), we’ll tell you how you can “cheat” a bit by turning a web app into a native app with little to no work (thus allowing you to have at least a web app and a native application for Android).
Once you’ve chosen how you want to build your mobile strategy, you should consider avoiding the urge to jump right in and code something. A good developer plans out his or her applications, whether they are native, web–based, or mobile web sites. This step can be grouped under the idea of structuring your application, which we’ll discuss next.
Structuring Your Application
In this section, we’re going to talk about the process of designing your application from the ground up. This takes the form of three steps, a wireframing or mockup stage, a graphical designing phase, and a code structuring stage. Let’s start by talking about design.
Wireframing / Mockup
It can be very tempting to have an idea, and then immediately begin coding it up without thinking about how the end product is going to look. This can be a bad idea for a number of reasons:
- It might lock you into a design that doesn’t really look that good in the end (i.e., it’s too cluttered). Or you might realize that your design isn’t as efficient as it could have been if you hadn’t jumped right into creating buttons and boxes!
- It might prevent you from innovating because you don’t “feel like” changing things to add new features.
- It might stop you from soliciting feedback until the end of the project, when it may be too time consuming to change things. It’s easier to show your design to users to see if they find it intuitive, and then tweak a drawing, rather than show them an app and then recode to make the design better.
To prevent these things, many designers create wireframe diagrams or “mockups” of their applications. For example, a very crude mockup for a transit app like the one we discussed earlier might look like this (Figure 4–5).
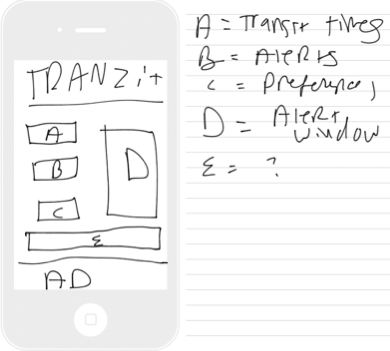
Figure 4–5. A crude mockup of the Tranzit application
As I mentioned, this is a rather crude mockup; in fact, it’s probably not even version .0001 of the design I’d eventually have. In mocking it up though, I do realize something. I built buttons for transit times, alerts, and preferences; I set aside space for alerts; and I even set aside some space at the bottom for an advertisement. However, I have another bit of screen, labeled “E,” that I have no idea what I might do with. With a mockup, I can simply erase and redraw to get it right. If I were developing this in real life, though, I might end up with an empty space there without really realizing it until it was already near version 1.0.
Obviously, you can create mockups however you like. Figure 4–5 was created using an application on my tablet which lets me draw freehand (as you can probably tell). One could also lay out a mockup in a web editor with actual images, buttons, and more (even though the buttons would not actually work). Another option is to use a program such as PowerPoint or Keynote, where it is easy to draw boxes, make animations, and create many similar drawings.
HotGlooand Other Mockup Tools
If you are looking for a web–based tool for creating your mockups, then you might want to check out HotGloo. The product home page is shown in Figure 4–6 (http://www.hotgloo.com/). This tool, which comes complete with a monthly subscription, is probably one of the best and easiest–to–use wireframing tools that I have used. Some wireframing tools I have used provide you with only the basic wireframes, but HotGloo allows you to do a lot of your visual designing and wireframing simultaneously, saving you time.
Other products that you may want to consider include LucidChart (http://www.lucidchart.com) and Pencil Project (http://pencil.evolus.vn), which may integrate into existing tools you already use, such as Microsoft Visio.
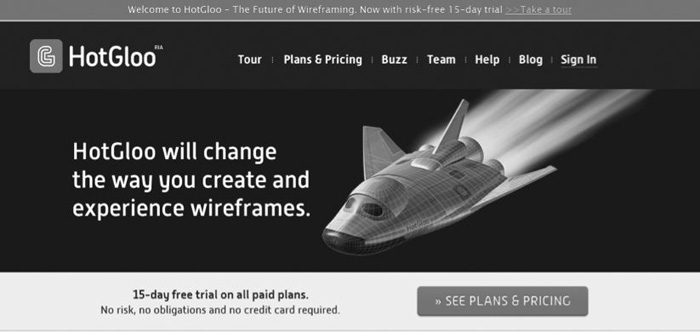
Figure 4–6. The HotGloo web site, which we can safely assume was wireframed in HotGloo
User Movement: Navigation or Storyboard
Once you have your wireframe completed, it is then time to sit down and connect the dots to figure out how you are going to structure the content on your site, mapping out all of the pages and the sections to which they will belong. This part of the process is called site mapping and can be pretty easy and fun if you take your time with it. If your application isn’t particularly linear (e.g., perhaps it’s a game), you can also think of this as storyboarding. In the simplest terms, it’s laying out content in an organized and logical manner.
While creating your map it is best to try and keep content that is similar in similar sections or groups. This will make it easier when building your app as you can easily see at a glance what pages in your application need to be associated with each other. In the case of a game, think of this as presenting your information in a logical manner:keeping all of the “gold” and things you can buy with it together, orall of the “life points” and enhancements affecting them together, and so on.
Take a look atFigure 4–7 following to get a better idea of how a traditional sitemap looks. Notice how it is very similar to those family tree projects that we were all forced to do in grammar school? Well, it is pretty much the same principle. The parent pages (or sections) of the site each have child pages that are associated with that section or category.
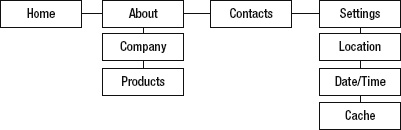
Figure 4–7. A simple sitemap for demo application
For this sitemap, I used a graphic design tool to create the mockup for this book; butwhenever I am working on a project for personal use, or when I am sitting down with a client that wants to see something quickly, I will sketch the sitemap and wireframes out on a napkin or piece of notebook paper.
Use whatever you have available to create your sitemap. No matter how it is created, the important thing is that yousit down and thinkthrough how your pages are organized to make building and developing easier on your end.
The last thing any developer wants to do is get 80% through working on a project, only to have to go back and do something over again because a mistake was made due to a lack of proper planning!
Now that we know how the app looks and how the content is organized, we can begin coding. Let’s spend the last few pages of this chapter discussing how best to structure our development environment for maximum productivity.
Structuring Your Development
With the high–level information set, you’ll also want to consider good practical rules for development that can keep you organized and efficient while writing your app. Following, we’ll discuss some ideas for structuring your code and the directories in which it will be kept.
Code Structure
Now that you have your wireframes completed and you have a rough idea of where you want all the elements on your page to go, it’s time to start figuring out how you are going to structure your code so you are not doing more work than is needed when building your applications.
You’re probably scratching your head right now thinking,“ How difficult can it be? I’m just writing text to a page.” You would be right. However, let’s say you have ten different pages in your application. You push out an update to your web application and realize that you have a problem with something in your footer.
If not properly prepared, our hapless developer may have copy and pasted the same footer throughout ten different HTML pages that make up the application. Now that it is time to update that code, our fictional developer has to update ten different HTML files with the new footer information.
An easier way to properly structure this code would have been to take the footer information, which is the same throughout the entire site, and create a separate file for it. Then in your code you can include that file into your page templates and display it on every page as before. If you ever have to change that code in the future, with this method all you have to do is change the code in one file, making your life a lot easier.
Let’s take a look at the sample following. In Listing 4–1 we have a very sparse page that is using PHP to pull in that extra page code that we would like to have on each page.
Listing 4–1. Using a PHP Include Statement We Will Pull In Extra Code to be Included On Our Page
<!DOCTYPE HTML>

<html>

<head>

<meta charset="utf-8">

<title>Super Cool Web Application</title>

</head>

<body>

<header>Super Awesome Header</header>

<article>

<header>Article Header</header>

<p>Fusce luctus accumsan odio. Cras vel sodales mi. Suspendisse et arcu quis magna

feugiat ultrices sit amet non erat. Etiam malesuada dui venenatis eros gravida aliquet.

Aliquam erat volutpat. Nullam dapibus cursus ultricies. Suspendisse congue accumsan

purus non scelerisque. Phasellus ut sapien libero, vel luctus velit.</p>

</article>


<!-- This is where we use PHP to include another file into our document -->

<?php include('footer.php'), ?>


</body>

</html>
If you look toward the bottom of that listing you will notice that I am pulling in the page footer.php (see Listing 4–2). I am doing this by wrapping my include function in the <?php ?> tags. This tells your page to execute PHP code if your server supports it, and in this code is looking for the footer document that is in the same relative path as the document listed previously. If you are using the Uniform Server local development server that we discussed earlier in the book, then this should work like a charm. Otherwise we may need to specify a relative path; for example, if I put all of my “included” files into a directory named “includes,” my code may read: include('includes/footer.php'). We’ll talk about directory structure in a moment, so once you’re done here you’ll know how the relative path will look to your files.
Now that we know what it looks like to include a file in your document using PHP, we are going to take a look at what the innards of that PHP file look like, so you can see how simple it is to structure your code in an easy, reusable fashion.
Listing 4–2. A Look Inside the footer.php File
<footer>
<ul>
<li><a href="#">Home</a></li>
<li><a href="#">About</a></li>
<li><a href="#">Contact</a></li>
<li><a href="#">Privacy Policy</a></li>
<li><a href="#">Terms and Conditions</a></li>
</ul>
<p>© 2011 Super Awesome Site, Inc. All rights reserved.</p>
</footer>
As you can see here, the code in this document is pretty basic. We have an unordered list that is floated to the right of the document and some copyright text that will float to the left of it. We will just imagine that somewhere off in the distance there is a stylesheet created for this document that makes everything pretty.
Now the cool thing about PHP is that it runs on the server, not on the client side. That means that none of the PHP code you include in your HTML document (whether this means including other documents into your template, or custom created classes, functions, etc.) will ever be visible to the client. What the client will see when he or she loads the page and views the source is just one seamless HTML document (see Listing 4–3).
Listing 4–3. Viewing Our Faux Article In a Browser Would Show One Complete HTML Document, With No Server Side PHP Code
<!DOCTYPE HTML>
<html>
<head>
<meta charset="utf-8">
<title>Super Cool Web Application</title>
</head>
<body>
<header>Super Awesome Header</header>
<article>
<header>Article Header</header>
<p>Fusce luctus accumsan odio. Cras vel sodales mi. Suspendisse et arcu quis magna
feugiat ultrices sit amet non erat. Etiam malesuada dui venenatis eros gravida aliquet.
Aliquam erat volutpat. Nullam dapibus cursus ultricies. Suspendisse congue accumsan
purus non scelerisque. Phasellus ut sapien libero, vel luctus velit.</p>
</article>
<!-- This is where we use PHP to include another file into our document -->
<footer>
<ul>
<li><a href="#">Home</a></li>
<li><a href="#">About</a></li>
<li><a href="#">Contact</a></li>
<li><a href="#">Privacy Policy</a></li>
<li><a href="#">Terms and Conditions</a></li>
</ul>
<p>© 2011 Super Awesome Site, Inc. All rights reserved.</p>
</footer>
</body>
</html>
Folder Structure
In the previous example we discussed segmenting your files into small structures to make them more manageable. With more files, you’ll probably also want to create directories to store specific files grouped by function.
In Figure 4–8, I created a mock folder structure for a make–believe application. Just like separating your code in your documents, it is also good practice to neatly arrange your folder structure in such a way that you can easily find the files you need throughout the development life of your app.
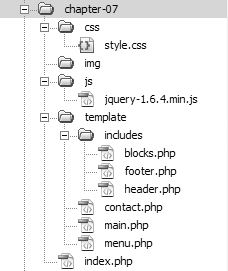
Figure 4–8. A neatly organized mock folder structure as seen in the file browser of Adobe Dreamweaver CS5.5
Here we are sticking with a very basic structure in which all of the resource directories (such as our css, img, and js folders) are in the Document Root folder of the site, and there is a template folder which will hold the template code for the different pages of our web application.
Inside of the template folder there is an includes folder which we will use to house documents that are used throughout the application, such as markup code for the header or footer, and maybe even some random blocks of content. Referring to our example in the previous section on relative paths, the include line in our index.php file in Figure 4–8 would reference the footer file as include('template/includes/footer.php'). This not only keeps things separated, it makes logical sense as well. The footer is part of the template, and it’s included in pretty much everything, hence it lives in the includes directory, within the template directory.
Now when it comes time to develop our application or make an update in the future we won’t have to try and remember where all of our code is located because we can easily and logically find it at a glance.
If we want to edit the information on the contact page we will just edit the template file located at /template/contact.php. If we see a problem with the header file we can easily jump into /template/includes/header.php and make any changes we need to our hearts’ content, and then have those changes reflected throughout the entire application.
Summary
Hopefully now that you reached the end of yet another chapter you have a better idea of what kind of thought process and work goes into the creation of a web application, or even a web site, before the actual coding begins. If you were working for an agency or studio, or other developer–centric business, then you would probably be on a team of people and each person would be responsible for their own tasks and taking care of different parts of planning before it was handed off to you as a developer. (You’d probably also have a lot more in terms of testing teams, development milestones, builds, etc.) If you are working for yourself, however, you now know what to do to make your life a little more bearable and your workload just a bit more tidy.