
Chapter 11
Pushing the Limits with
Audio and Video
Audio and video are two of the most difficult topics to cover in the mobile web. While each one individually can do a lot to enhance the visual and audible appeal of a site or application, more often than not both technologies end up being abused by mobile content creators. For example, one form of abuse I have noticed becoming more common in the mobile world is audio based advertisements targeted toward mobile browsers. While both audio and video technologies can be used incorrectly or just in a regular plain old annoying manner, they do serve wonderful purposes when used correctly.
Let’s say, for instance, that we’re working on a mobile gaming application and we want to add some relaxing loop of background music to enhance our user’s experience. We can use the built-in HTML5 capabilities of the Android operating system’s browser to do this fairly easily, with only a few lines of code, when using the audio tag. On top of that, we can even use a little bit of JavaScript to manipulate that audio element as well. We can do things such as play, stop, or pause the audio on the press of a button.
We also have the ability, though Android’s Browser program, to make use of the HTML5 video tag as well to enhance our web applications with video formatted in h.264, MPEG-4, and WebM format. Both of these tags—the audio and video tag—when used properly, can create some top-notch user experiences to enhance the applications they are featured in and make them ooze with excellence.
Throughout this chapter we will take a look at each of these elements, their APIs, and the pros and cons of using each of these new HTML5 tags in our budding applications.
Audio for Mobile Web Apps
Until a few years ago, if you, as a developer, wanted to include audio in your web application, your choices were pretty slim to none. Almost every solution out there involved using an Adobe Flash and would use Flash as a middleman to pipe the audio to the users’ audio input device. While it was possible to add audio to your user experience via the embed and object tags, more often than not you were left with a pretty limiting and unacceptable user experience that left your end users—and developers—wishing for more.
The rise in HTML5 adoption rates, has made working with audio (while still a pain on some rare instances) generally smooth in Android implementation of the HTML5 audio tag. There are plenty of examples out there of mobile web applications and games making use of the audio element to bring background music and sound effects to their projects, which can help create more engaging scenarios for users to explore.
Unfortunately, like most things in the Web Development world, not all audio codec’s are created equal. This is especially true when focusing on the mobile world. Google’s Android operating system has been making use of the HTML5 audio tag since Android 2.0 first came out in the middle of 2010, yet it only makes use of two of the more popular audio codec choices—MP3 and the AAC audio format.
Utilizing the HTML5 audio Tag
Using the HTML5 audio tag is really simple. Take a look at this example in Listing 11–1 where we add a repeating audio loop to a user’s page.
Listing 11–1. Basic use of the HTML5 audio element
<audio autoplay="autoplay" controls="controls">

    <source src="audio/stairwell.ogg" type="audio/ogg" />

    <source src="audio/stairwell.mp3" type="audio/mpeg" />

    "Sorry, your browser does not support the audio element."

</audio>
The basic usage of the audio tag is very similar to other tags in the HTML space. When declaring the HTML audio element, we could invoke several attributes in our document. Let us take a look at some of those attributes below:
autoplay—If called this attribute will play your audio element the moment it is ready and availablecontrols—Determines whether or not the controls for this audio element are displayed to the user.loop—If set, this attribute tells the audio to loop itself indefinitely. Just like the song that never ends!preload—This determines whether or not the audio element will be preloaded into the page on document load.src—The URL to the audio file.
Looking at Listing 11–1, we can also notice that the audio tag contains two other source tags as well. These source tags each have src attributes that point to the URL of the file on the server.
The reason for the multiple tags is actually an ingenious method of writing one HTML document that works across many browsers. Your browser, if it supports the HTML5 audio tag, will look through each of those source codec’s until it finds one that works for your browser. If it succeeds in finding an appropriate file (i.e., you provide a version of the file that can be played on the users’ system), it will play it. If it doesn’t, it will do nothing at all. If for some reason you are viewing this page from an older Android device that does not display the audio tag, then the browser will ignore the element all together and display the preset error message of “Sorry. Your browser does not support the audio image” as shown in Figure 11–1.

Figure 11–1. The HTML5 audio element on an Android Gingerbread 2.3 device with the ‘controls’ the attributes set
Integrating Audio into Who’s That Tweet?
In the first application we used in this book, we asked people to guess which Twitter account produced a given tweet. Now imagine we want to put in a bit of audio to soothe the savage mind of those playing our game. We could easily do so with the Audio tag, using the code in the following Listing 11–2.
Listing 11–2. HTML Code for Who’s That Tweet? with Audio
<!DOCTYPE HTML>

<html>

<head>

<meta charset="utf-8">

<title>Who’s That Tweet?</title>

<link href='http://fonts.googleapis.com/css?family=Droid+Sans&v1' rel='stylesheet' type='text/css'>

<link rel="stylesheet" type="text/css" href="css/style.css">

<script type="text/javascript" src="js/jquery-1.6.1.min.js"></script>

<script type="text/javascript" src="js/main.js"></script>

</head>

<body>

<audio autoplay="autoplay" loop="loop">

    <source src="audio/themesong.ogg" type="audio/ogg" />

</audio>


  <header>

    <div class="score"><strong>Score:</strong><span>0</span></div>

    <h2>Player 1</h2>

  </header>

  <section>

    <div id="tweet">

      <div class="avatar"></div>

      <div class="content"></div>

    </div>

    <ul></ul>

  </section>

</body>

</html>
In this case, we’ve started playing our theme song, and we’ve set the loop attribute so that it will simply loop repetitiously until the end of time. We don’t specify controls, and we aren’t showing any message if the audio can’t be loaded. Now we just need to find a good theme song that won’t annoy our users too much!
Working with Audio Codecs
If you are building your application for an Android device, you are going to want to stick to one of the three following codecs that are available throughout the platform: MPEG-2 Audio Layer III (MP3), Advanced Audio Coding (AAC), and the open source fan favorite Ogg. While each one has its own benefits, most developers out there usually just stick to MP3 and Ogg as there are plenty of free open source tools available to convert your audio to those formats.
MP3
The MP3 audio format is what is referred to as a lossy compression audio format. Lossy compression formats are very popular in multimedia and if you have ever worked with a graphic design program before such as Adobe Fireworks, Gimp, or Adobe Photoshop, then chances are you are loosely (no pun intended) familiar with lossy compression when trying to squeeze a few extra bytes out of an image. The same method of removing parts of a digital image to decrease the size, while not compromising the integrity of the image, can also be applied to audio.
In the example of MP3, a compression algorithm is run through the digital audio and removes parts of the track that normally the average human ear is not able to pick up. A lower bitrate for the MP3 file indicates that more data have been removed from the recording.
While some individuals claim to hear a tinny sound from MP3s due to the missing audio information, most people cannot seem to tell the difference when compared to a lossless digital copy. This makes MP3 a fantastic audio codec to use for your HTML5 audio as you can get incredibly small files that download and stream quickly to your user’s browser. This being said, you should be careful to use a decent bitrate for an MP3 file—say 128 kbps. Anything lower may have a tinny sound on quality audio devices (for example, the HTC Rezound). Moving up to 192, 256, or 320 kbps may be useful if it doesn’t make the file too big; however, you may find it unnecessary given the relatively small benefits. Over 320 kbps is probably a waste unless your app is built for audiophiles!
For the most part, MP3 is the de facto audio format of the Internet, which is why almost every major browser supports MP3 audio with HTML5 out of the box with no additional plug-ins.
AAC
Advanced Audio Coding, also known as AAC, is another audio format out there on the horizon. If you have ever purchased music off of Apple iTunes, then you have most likely purchased music in this audio format. AAC was developed by several companies—including Sony, Nokia, Dolby, and AT&T. This format, which does achieve better audio quality than its MP3 predecessor, was declared an International audio standard in the spring of 1997.
One of the reasons this audio format is popular with developers, besides the obvious fact of having better sounding audio compared to its competitors, is that no licenses or patent payments are needed to distribute or stream AAC encoded content. Note that this licensing only applies to the actual encoding—you can’t take copyrighted material that doesn’t belong to you, encode it in AAC, and laugh at the lawyers after you distribute it to the world. Well, I guess you can laugh, but that’s not going to help your case!
Ogg
Another up and comer in our quest to conquer HTML5 audio on Android devices is one of my personal favorite codecs: Ogg. The creators of Ogg have stated in the past that they created Ogg to be a format that was not bogged down by restrictions and software patents. This has promoted Ogg’s adoption as a default HTML5 audio codec in a majority of browsers out there. There is a good chance that if you encode your audio in the Ogg format that it will not only work on Android devices but it will also work on a slew of other devices and browsers out there on the market today.
While Ogg is a lossy compression format like MP3 and AAC, the framework behind Ogg can be found in several lossless audio formats out on the market, like OggPCM and FLAC. With Ogg, you can have it your way: tiny files or huge lossless files. The sky’s the limit.
Using the Audacity Audio Editor
One of my favorite pieces of open source audio software is Audacity (http://audacity.sourceforge.net/). This free cross platform application lets you easily import a wide variety of audio from many different formats. Using Audacity, you can easy splice audio together, cut audio files, record live audio, change pitch and speed of audio files, add noise to audio tracks, reduce the levels of audio tracks that are too high, and a lot of other really cool and useful features (see Figure 11–2).
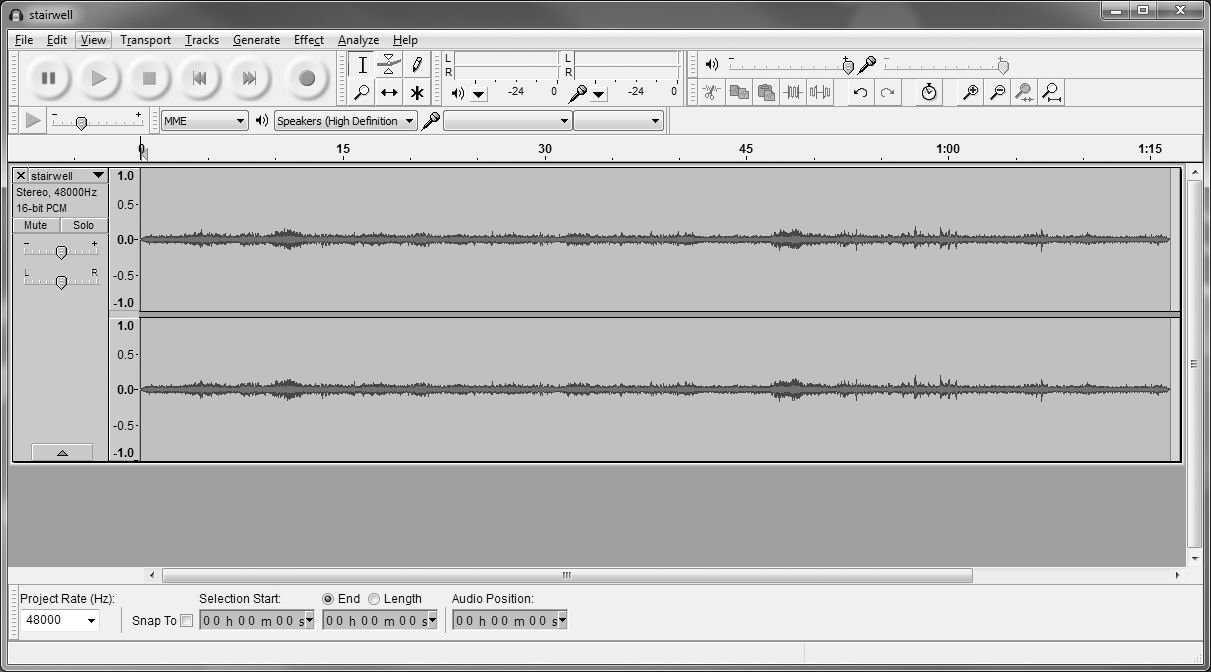
Figure 11–2. Audacity 1.3 Beta editing a creative commons audio file
Whenever I am working with audio from a client and I am presented with a large 512MB–1024MB WAV audio file, Audacity is always my first choice for trimming out sections of that audio file that I do not need or converting that audio file to a much smaller and more manageable format.
Since this book is only intended to cover the beginner’s aspects of designing for Android mobile devices, I will not go into too much depth about all the features that you can tap into with Audacity. Instead, I’ll cover some of the basics such as exporting one audio format to another.
If you are going to want to convert your files to the MP3 format, then you are going to need to download the LAME MP3 Library. You can do this fairly painlessly by going to the preferences in Audacity.
- Go to the Edit menu and choose Properties.
- Choose the Libraries option in the left hand section of the Properties window as shown in Figure 11–3.
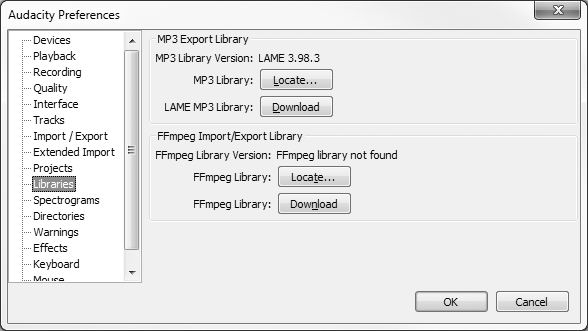
Figure 11–3. Viewing the Audacity 1.3 Beta Preferences dialog box.
- Once there, you can choose to point Audacity to your LAME library if you already have it installed on your computer. If you do not already have the LAME library installed, continue to step 4.
- Click the Download button, which will take you a site where can download the latest and greatest copy of the LAME MP3 Library, as shown in Figure 11–4.
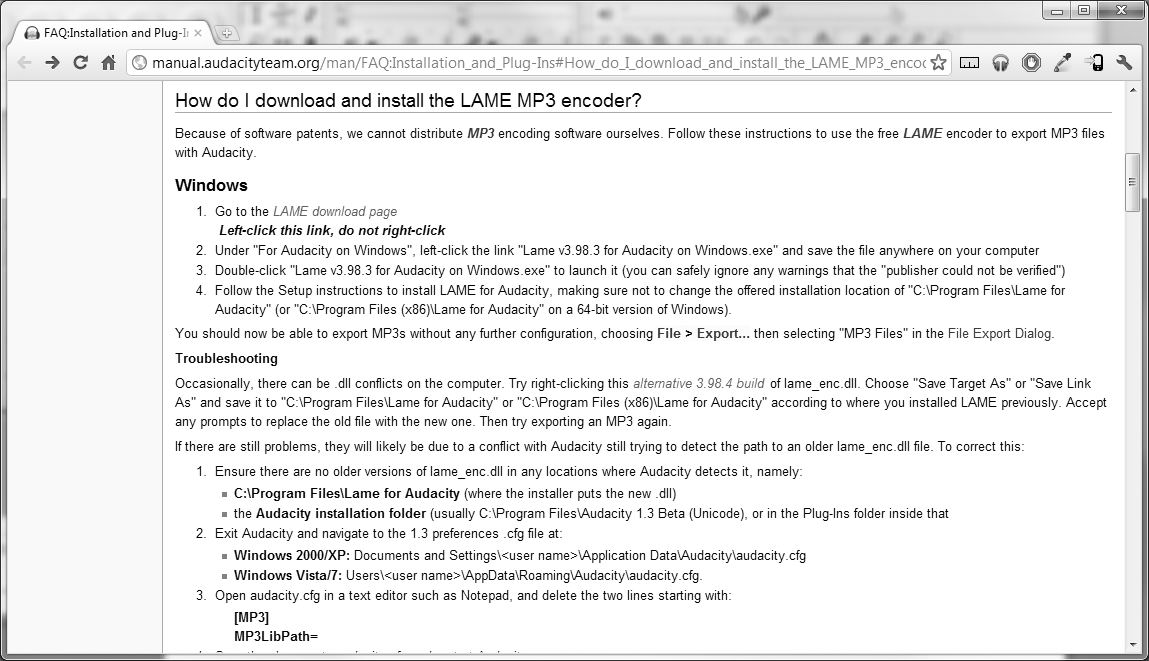
- Once you download the library and unzip it to your hard drive, you will be all set to record and export audio to the MP3 format.
If you take a look at Figure 11–2 from earlier in this section, you will see that we are already working with a creative commons audio file called stairwell.ogg. What we are going to do is take this Ogg file and convert it to a MP3 file in no time at all. To do this:
- Click File in the menu bar, and then select the Export item as seen in Figure 11–5.
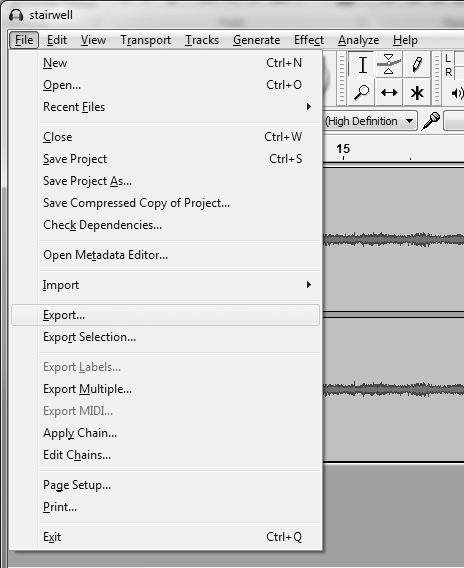
Figure 11–5. Choosing Export from the Audacity File menu in Audacity 1.3 Beta.
- In the drop down box, make sure to change the file format to MP3 instead of the current format of the audio file.
- Choose where you want to save the file, click the Save button, and you are all done!
See, did I not promise you that would be painless or what? Now that you know how to quickly convert your audio from one format to another, it’s time to move on to the fun part of manipulating that audio through the very handy HTML5 Audio Data API.
Audio Data API
Using the Audio Data API, a developer can interact with their audio data in ways that were not possible just a few years ago. Using JavaScript and some HTML, you could easily create your own controls to interact with your audio data, as we can see in Listing 11–3.
Taking a look at the following example, you can see that we are expanding on Listing 11–1 and adding in some new custom built controls to play and stop the audio.
Listing 11–3. A more advanced look at the HTML5 Audio Data API
<audio id="audioDemo">

    <source src="audio/stairwell.ogg" type="audio/ogg" />

    <source src="audio/stairwell.mp3" type="audio/mpeg" />

    "Sorry, your browser does not support the audio element."

</audio>


<button id="play">Play</button>

<button id="pause">Pause</button>


<script type="text/javascript">

    var audio = document.getElementById('audioDemo'),

    var playButton = document.getElementById('play'),

    var pauseButton = document.getElementById('pause'),


    playButton.addEventListener('click', function() {

        audio.play();

    }, false);


    stopButton.addEventListener('click', function() {

        audio.pause();

    }, false);

</script>
When you run this code in your browser, the first thing you would probably notice is the lack of any audio controls on the page at all, except the two buttons we added to the page with the IDs of play and pause. These buttons, while not as pretty as those seen in Figure 11–6, will be our only means of manipulating the audio on the page.
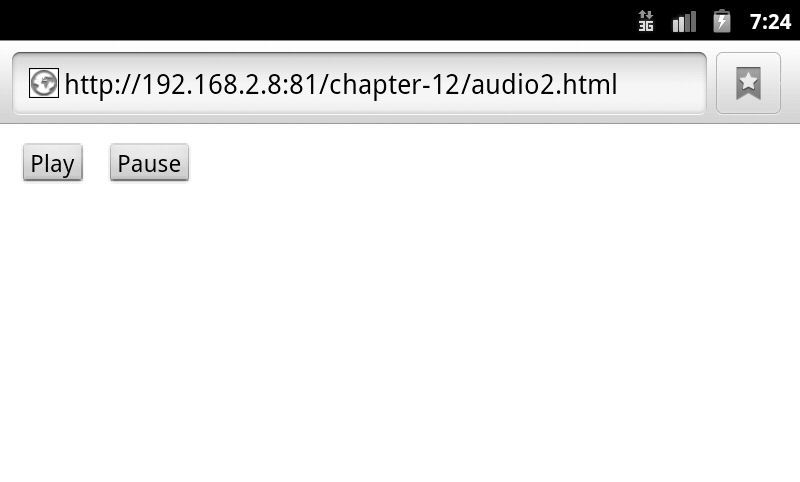
Figure 11–6. Loading our demo HTML5 audio document on an Android 2.3.4 Gingerbread device
Now, if you look at the bottom of the Listing 11–3, in the JavaScript, we can examine where the real magic is happening. Here, we declare the variables for audio, playButton, and pauseButton. Next, we add an event listener to each of those buttons so that when the user clicks those buttons, we fire off some code to either play or stop the audio stream. If we’d like, we could include additional buttons for volume, which would take a similar form to the code above, but call audio.volume=X where X would be a number between 0 and 1, indicating volume level percentage (so if you would like to increase the volume by 10%, your code would read audio.volume = audio.volume + .1).
You are not just limited to pausing your audio files at will, either. Using the HTML5 Audio Data API, you can easily control many aspects of playing or enjoying audio in a page, such as manipulating the volume of the audio file, analyzing how many beats per minute are in a track, creating your own audible tones combining the awesome powers of canvas with the Audio Data API, and a lot more.
Adding Video to Mobile Applications
Now that we’ve covered the wonderful world of audio, it’s time to take a walk on the visually appealing side of Internet multimedia with HTML5 video. The video tag is another one of those new HTML5 elements to emerge over the next few years. It was created to make the job of a developer easier and to move us away from our dependency on Adobe Flash. Unfortunately for us, no one can really agree on a video standard and with so many obstacles, codecs, licensing agreements, and patents standing in our way, we are not likely to get any closer to coming up with a universal video format for browser-based consumption anytime soon.
The good news is that since we are only focusing our efforts on Android based devices we do not have to deal with a lot of the frustrations that come with working with HTML5 video in the desktop computing world. Here, it is very simple. A few video codecs out there will work with Android browsers, and as long as you stick with one, or all, of them, you will be able to present your mobile users with a richer multimedia experience.
Using the HTML5 video Tag
Invoking the HTML5 video tag is just as easy as calling the audio tag we discussed earlier in the chapter. Take a look at Listing 11–3 to see how we can use a few lines of code to easily display video to our users.
Listing 11–3. Basic use of the HTML5 video element
<video width="320" height="240" controls="controls" poster="video/big_buck_bunny.jpg">

    <source src="video/big_buck_bunny.mov" type="video/mp4" />

    <source src="video/big_buck_bunny.ogg" type="video/ogg" />

    <source src="video/big_buck_bunny.webm" type="video/webm" />

    Sorry! Unfortunately your browser does not support the video tag

</video>
In this example, we are just calling a video file and setting the width of the video container to 320 pixels and the height to 240 pixels. We are also telling the video to display its controls so the user can play, pause, stop, and manipulate the volume of the video. You can see what this looks like on a mobile device in Figure 11–7.
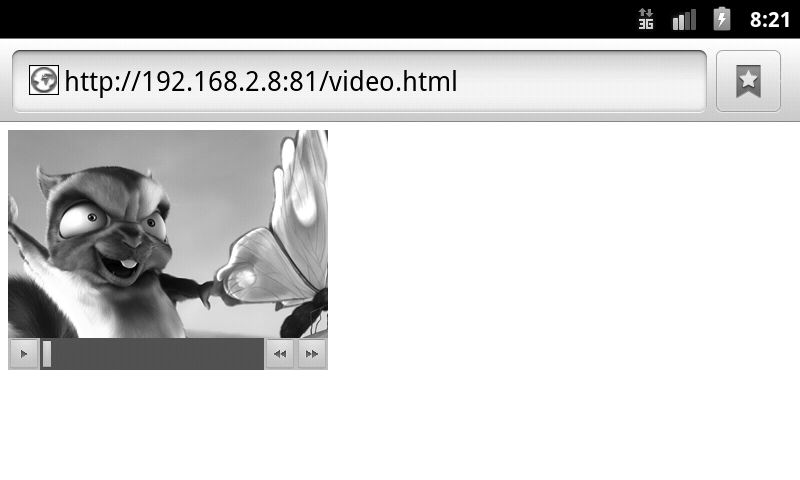
Figure 11–7. Viewing an HTML5 video on an Android 2.3.4 Gingerbread device
You’ll also notice that the video tag differs from the audio tag by having different attributes. The main one that sticks out is the poster attribute, which lets us add a screenshot (or any other image we have) to represent the video that is about to be played. This is great for mobile devices because when you go to play a video on an Android device, instead of playing the video in the browser as one would expect after years of using a desktop computer, the Android device will pass the video stream along to its built-in video player, which will play the video for you.
While this feature is fun and handy, it completely takes away a lot of the reasons someone would use the Video Data API, since it plays the video outside of our page—in a dedicated video application. This breaks the user experience and prevents us from controlling exactly what the user will see when they watch our video.
In a moment, we’ll give a video example similar to the one we used with the audio API up above. However, we should note that while there are some cool things you can do with the Video Data API, a lot of them tend to be well beyond what most people need. The following are the basics; however, the full API is available to reference at www.w3.org/2010/05/video/mediaevents.html. Now let’s take a look at the most useful attributes you can use when developing your next mobile web application that uses video!
height—controls the height of the video being playedwidth—controls the width of the video being playedpreload—If set, will preload the video when the page loadsautoplay—If set, will automatically play the video when it is readyloop—If set, will loop the video indefinitelycontrols—If set, will display controls to the user to control the videosrc—The URL which points to the source of the video file
Codecs
Just like we did with audio, video must be encoded into one of a few formats that the native Android web browser supports (mentioned subsequently). Encoding video can be a bit trickier than audio in that you’re encoding two things—namely the audio and the video! We’ll walk through the formats you can use, and discuss how to move audio and video between them with ease.
h.264/MPEG-4
Over the years, MPEG-4 has become one of the premiere standards in video encoding on the Internet and in our daily consumer lives, especially when it comes to high definition video. Recently, MPEG-4 has come into the public consciousness through the rise of social video sharing sites like YouTube and Vimeo, which allow users to upload videos in this format. The current version of MPEG-4 is properly known as h.264/MPEG-4 AVC, and is the standard for high quality video compression, such as that found on a Blu-ray disc.
Ogg Theora
Theora is a free and open source lossy video compression format created by the same foundation responsible for maintaining the Ogg audio codec, Xiph. Org Foundation. While Theora itself is based on a proprietary video codec called VP3, it was later released into the public domain, making it free for anyone to use as of March 2002.
Ogg Theora is similar in design to MPEG-4 and has quickly been progressing as a technology over the last several years. While it is still not as comparable in quality to MPEG-4 video, it is so close that a lot of developers who previously preferred the wide acceptance of MPEG-4 now opting to go the HTML5 video route have started jumping onto the Theora bandwagon.
WebM
A new contender in the video world is Google’s very own WebM video codec. Announced at the Google I/O conference in 2010, WebM is a royalty free video codec that Google put out there in the wild to try and circumvent a lot of the problems that were popping up in the HTML5 audio and video. While everyone is excited to use these new technologies in their web applications and web sites, it is hard to do so without all of the browser makers agreeing on a standard.
WebM is completely royalty free, which means that anyone can pick up the technology and include it with their web browser without worrying about Google knocking on their door in the future demanding a payout. Recall, though, that this refers to the technology—not the actual content. Distributing copyrighted movies will get others to knock on your door demanding a payout!
Even with this royalty-free safety net, WebM has had a pretty slow adoption rate when compared to other video codecs out there, like Ogg Theora.
Using Handbrake to Transcode Videos
Now that you have a better understanding of some of the video codecs out there, I bet you’re asking yourself how you go about creating video content to use in your application with them. One of the easiest and hassle-free means of doing so is a nifty little application called Handbrake (http://handbrake.fr/). Handbrake is another one of those fabulous open source applications created to make the everyday lives of video enthusiasts, and your average video transcoding consumers, easier.
Take a look at Figure 11–8. This is the default view we are presented when we open the Handbrake application. As you can see, everything here is incredibly user friendly and easy to use. On the top of the application, if you click the movie clapboard icon, you can set the source of the video you would like to transcode, or convert from one format to another. Below that icon, you have an area where you can set the destination of the newly created video as well as change the container you would like to house your video in. The two containers that Handbrake offers are the MKV and M4V video containers. A container is simply the file format that is used to hold the two separate parts of the video (the pictures and the audio).
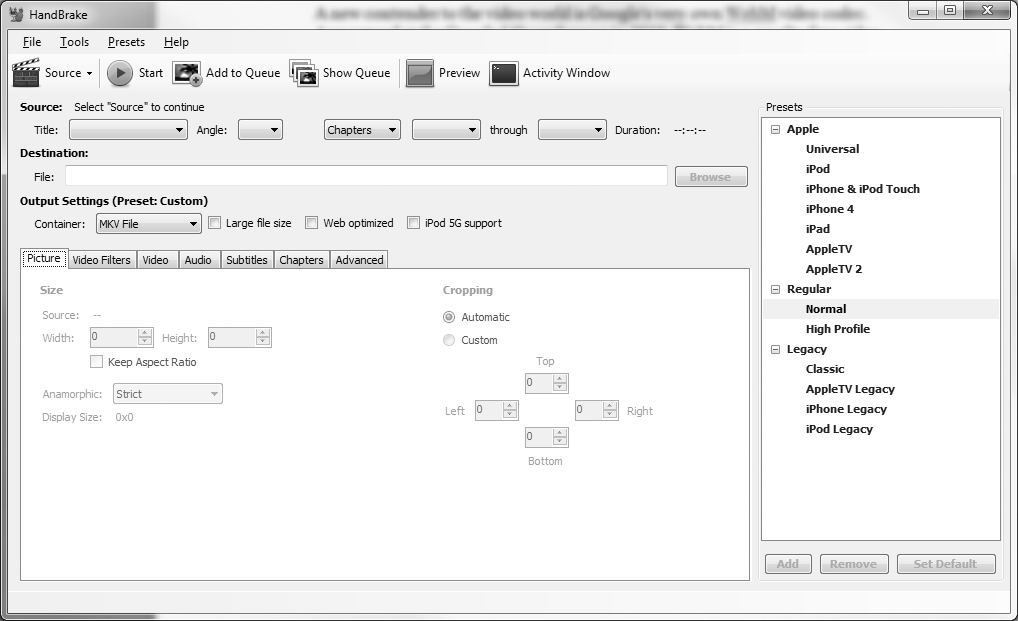
Figure 11–8. A view of Handbrake after opening it up on a Windows 7 operating system
The bottom half of the application is a tabbed view that you can use to customize your video even more to your liking. The most important tab here for our purposes is going to be the Video tab. Here, you can set which codec you would like to convert your video to. Handbrake offers you three choices for video conversion depending on which video container you choose—MPEG-4 or Ogg Theora.
The right hand side of the application is where a lot of the magic will be happening for you. Here, you can choose from a variety of preconfigured video settings so all you have to do is input a video source, decide where you want to save your video, choose one of the settings that strike your fancy, and start encoding.
If you take a look at Figure 11–9, you will also notice two little checkboxes next to the video container options. These checkboxes, Web Optimized and iPod 5G Support, are two options you may want to experiment with when encoding your videos. In some cases, I have found that these settings have helped me create better quality video files for use in the browser. At other times, however, they caused me nothing but heartache. It all comes down to the video file you are using as your source material. Video can be tricky, especially when transcoding it from one format to another. In the end, one must generally “play” a bit with settings to get the best possible result. If your video file is large (therefore needing more time to transcode), you might consider splitting off a small section of it to experiment with. Once you’ve found the right combination of settings and options, you can then convert the long version of the video, saving yourself some time.
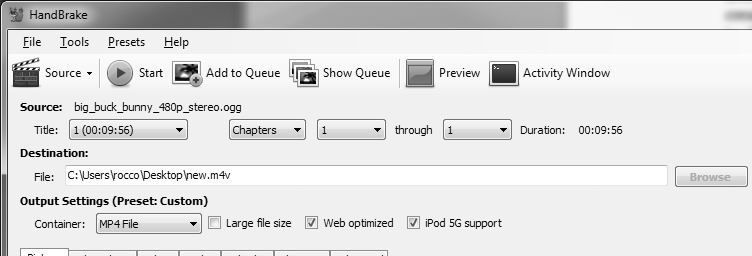
Figure 11–9. Setting the video source, destination and video container settings within Handbrake for Windows 7
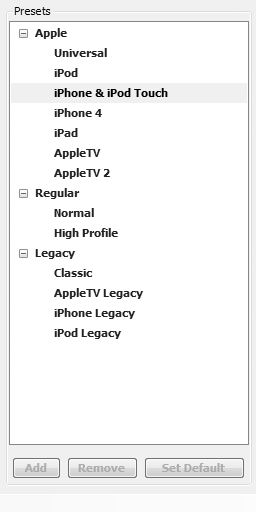
Figure 11–10. Selecting the iPhone & iPod Touch preset configuration settings for our video
Finally, the number of options that you have access to in Handbrake may be a bit overwhelming. If you’re looking for something easier, you might want to check out more consumer-friendly (i.e., made for non-developers or power users) solutions such as DoubleTwist (www.doubletwist.com) and Videora (www.videora.com). Both can convert videos to a format that is viewable on a mobile device with very little effort or need to customize.
Now that we’ve got some basic information covered on creating, displaying, and working with your own audio and video, we’ll introduce some areas you might extend your applications by interfacing with different APIs available to programmers.
Exploring on Your Own: Music Service APIs
Many web services offer access to programmers to their platform via an API (application programming interface). In this section, we’re going to talk about two popular applications, and the APIs they offer. You might find that by tying your application into one of these services, you not only will have access to some cool tools—you’ll also add appeal to your application for users of that service.
“Scrobbling” Tracks to Last.fm
Last.fm is a service that is designed not only to stream music to your computer or phone, but also to learn about your preferences intelligently. One way it does this is by allowing multiple devices (i.e., iOS devices and android phones where the Last.fm client is installed) to send listened track information to Last.fm, a process Last.fm refers to as ‘scrobbling’. For instance, I use Google Music to listen to my music collection through my browser. By using an extension for Chrome that scrobbles my tracks to Last.fm, I can view my listening behavior later, and Last.fm knows what sorts of music I like to listen to (Figure 11–11).

Figure 11–11. My Last.fm recently listened to tracks
Once a track is recorded, it informs Last.fm about my listening habits. This is useful in telling Last.fm what to recommend to me, and it allows me to find new music I might like.
Imagine that we’d like to present snippets of music to a user in our new app, MusicDiscovery. MusicDiscovery, hypothetically, takes 45-second song clips and plays them for the user. Users rate how much they like the song, and if they rate it high enough, we scrobble it to Last.fm so that it can record their preferences. How would we go about doing this?
First, we need to learn about the Last.fm API. Most web services that offer API access will clearly show how to use it in a section of their website labeled “for developers” or “API access.” Last.fm includes an “API” link on the bottom of their home page, which takes one to the API homepage (Figure 11–12).
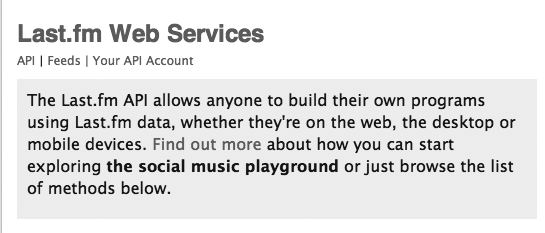
Figure 11–12. The Last.fm Web Services page
Looking over the Last.fm API information, it seems to be a two-step process. First, one must apply to be a developer (which involves telling Last.fm what you plan to use their data for, i.e., commercial or non-commercial use), and filling out a bit of basic information about your app. Once that’s taken care of, you can explore the use of their API.
The API Intro page lists some essential information, including the API root URL. This is the web address that we’ll be sending information to. Most of these requests will make use of AJAX, a technology that we’ll discuss in detail in the next chapter. Browsing the documentation, we find examples of how to send data to Last.fm.
As we can see in Figure 11–13, our requests to the Last.fm API take the form of specially formed URLs or HTTP POST requests. The Last.fm API then returns responses using XML.
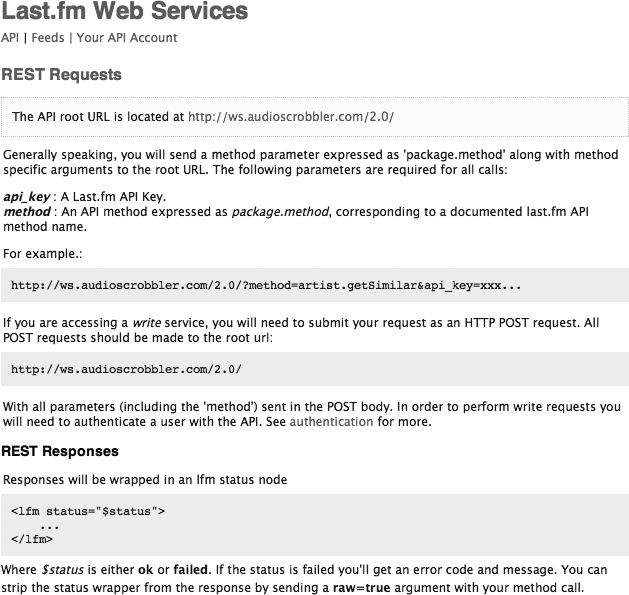
Figure 11–13. The Last.fm API request documentation
Now that we know roughly how information will be passed back and forth between our application and Last.fm, we can begin exploring the scrobbling feature. Last.fm’s scrobbling documentation (www.last.fm/api/scrobbling, Figure 11–14) lays out the entire process in detail, including which API calls (or functions) to use, and what criteria to use when sending a scrobble request.
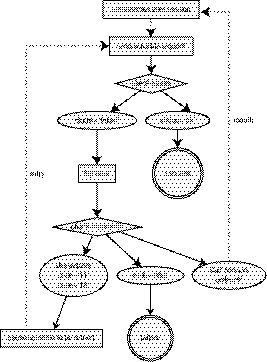
Figure 11–14. The scrobbling process
Now that we’ve got all the pieces, all we’d need to do is write the appropriate JavaScript code to take the current piece of music the user has rated, look it up in Last.fm’s catalog, and send the scrobble request. Here’s where you can flex your programming muscle and work it out. Along the way, be sure to check out the rest of Last.fm’s extensive lookup and recording features. Not only can you enhance your user experience for Last.fm users, you can also use Last.fm data to enhance the experience for your own users who don’t use Last.fm!
Tapping into the Power of Amazon’s Product Advertising API
Amazon.com started off around 15 years ago as a bookstore. Now they have evolved into a massive retail giant that offers everything from books to cloud computing servers and more. Recently, they’ve expanded their music offerings quite a bit, and developers who feature music or videos in their apps may want to provide links to purchase these resources through Amazon.
The Amazon Product Advertising API (https://affiliate-program.amazon.com/gp/advertising/api/detail/main.html, Figure 11–15) is a massive web site so we can only highlight its main features here. You could literally spend days exploring everything you can do with Amazon’s data, all with the goal of driving revenue through offering Amazon products for sale through your app.
Figure 11–15. The Amazon Product Advertising API
Amazon offers not only documentation on their API, but also developer forums where you can ask other developers for help and even code samples, which can get you up and running quickly.
A few quick searches of the code database uncovers a very interesting piece of code for anyone looking to build an application that showcases a particular artist. Say you’re in a band and want to build an app for your band. You’ve decided to build a web app, since that will easily run on everyone’s smartphone, and you’re storing your concert recordings, demos, and albums in Amazon’s S3 cloud storage. How might we go about selling those to fans? There’s a demo for it, known as iObjects (http://j.mp/iobjects, Figure 11–16).

Figure 11–16. The iObjects Code Sample
While this is quite a bit more complicated than the Last.fm API we discussed in the previous section, it can really showcase the power of using an API in your application. Now you don’t need to worry about payments for your material (since Amazon Flexible Payment System (FPS) can take care of that), and you can easily offer products through your app, through Amazon, which—chances are—your fans are familiar with and use regularly!
As we have seen, using APIs from services such as Amazon or Last.fm can add not only interactivity to your application, but also new revenue streams and ways to innovate. Your band (or your client’s band) will certainly distinguish themselves when their users can download the song while still at the concert, and you’ll be the developer hero that made it all happen!
Summary
Audio and video can be pretty painless to work with on the mobile HTML5 front because of the limited number of handsets and operating systems that you have to support. However, as mentioned at the beginning of the chapter, they are both technologies that can be easily abused, or quickly turn against you, if not used properly. In this chapter, I hope I have presented you with the tools needed to use these technologies to your benefit.
When it comes to audio and video conversion and manipulation, we have not even begun to scratch the surface in regards to what tools are available for you to use to get the job done. There are just way too many quality audio and video tools out there—we could probably fill an entire book talking just about them. You do not have to use the tools I’ve suggested in this chapter and I encourage you to do some research and find the best solution that works for you.