
Video: Basics and Applications
In the previous chapter, I covered the Glass camera and image processing, so naturally the next step is video. One of the most important features of Glass is recording video. Hands-free video recording, initiated by your voice with the commands “OK Glass” and then “Record a video,” is a major selling point of Glass. Obviously, as a developer, you want to integrate video in your apps, expecting to record a video, play it, process it, and maybe do some other fun stuff with the videos out there in the world. By the end of this chapter, you’ll know exactly how to achieve all these goals.
The solutions you’ll see covered in detail here, along with tested working code, include the following:
- How to capture a video quickly, using the standard way
- How to capture a video in a custom way, with a preview feature
- How to play video, in a general Android way and in a Glass-specific way
- How to extract frames from a video and use OpenCV to process the frames with effects such as canny, sepia, pixelize, posterize, and color conversions
- How to use the powerful FFmpeg library and accomplish video processing tasks including offering rotation; applying effects such as canny, sepia, and vintage; and extracting sound and images
- How to search YouTube videos and play your favorite song like in karaoke
After learning these techniques, you should be ready to integrate video into your own apps and build some great tools and fun apps.
Capturing Video
The Android Camera developer guide (http://developer.android.com/guide/topics/media/camera.html) summarizes two ways to capture videos: the quick way that uses a camera intent and the custom way that may be more appropriate if you want to have a more customized look and special features. In the following sections, I’ll introduce the detailed steps to capture videos in both ways, and I’ll note what’s unique on Glass. Before starting, I assume you have built a new app called MyVideoApps based on the GlasswareTemplate app used in previous chapters. You can also check out the complete app in the book’s source code; if you import the project and see any errors, you can fix the errors by opening its Properties window, selecting Android, and then changing the Target Name under Project Build Target to Glass Development Kit Preview.
The camera intent ACTION_VIDEO_CAPTURE lets you record a video from your app in a few lines of code. Follow these steps to test this:
- Change your res/menu/main.xml to have the following two menu items:
<item
    android:id="@+id/basicvideocapture"
    android:title="@string/basicvideocapture"/>
<item
    android:id="@+id/stop"
    android:icon="@drawable/ic_stop"
android:title="@string/stop"/> - In res/values/strings.xml, add these lines:
<string name="app_name">My Video Apps</string>
<string name="say_videoapps">Chapter Five</string>
<string name="basicvideocapture">Basic Capture</string> - In MenuActivity.java’s onOptionsItemSelected method, add this case statement:
case R.id.basicvideocapture:
    Intent intent = new Intent(this, BasicVideoCaptureActivity.class);
    startActivity(intent);
return true; - Create a new class called BasicVideoCaptureActivity and add the code in Listing 5-1.
Listing 5-1. Capturing Video Using the Camera Intent
private static final int CAPTURE_VIDEO_ACTIVITY_REQUEST_CODE = 100;
    private static final int VIDEO_PLAY_REQUEST_CODE = 200;
    private Uri mFileUri;

private static File getOutputMediaFile(int type){
        File mediaStorageDir = new File(Environment.getExternalStoragePublicDirectory(
                Environment.DIRECTORY_MOVIES), "MyVideoApps");

        // Create the storage directory if it does not exist
        if (! mediaStorageDir.exists()){
            if (! mediaStorageDir.mkdirs()){
                Log.d("MyCameraApp", "failed to create directory");
                return null;
            }
        }

        // Create a media file name
        String timeStamp = new SimpleDateFormat("yyyyMMdd_HHmmss").format(new Date());
        File mediaFile;
        if (type == MEDIA_TYPE_IMAGE){
            mediaFile = new File(mediaStorageDir.getPath(), "IMG_"+ timeStamp + ".jpg");
        }
        else if (type == MEDIA_TYPE_VIDEO) {
            mediaFile = new File(mediaStorageDir.getPath, "VID_"+ timeStamp + ".mp4");
        }
        else return null;

        return mediaFile;
    }

    public void onCreate(Bundle savedInstanceState) {
        super.onCreate(savedInstanceState);
        setContentView(R.layout.start);

        Intent intent = new Intent(MediaStore.ACTION_VIDEO_CAPTURE);
        mFileUri = getOutputMediaFileUri(MEDIA_TYPE_VIDEO);
        intent.putExtra(MediaStore.EXTRA_OUTPUT, mFileUri);
        intent.putExtra(MediaStore.EXTRA_VIDEO_QUALITY, 1); // set the video image quality to high
        startActivityForResult(intent, CAPTURE_VIDEO_ACTIVITY_REQUEST_CODE);
    }


    @Override
    protected void onActivityResult(int requestCode, int resultCode, Intent data) {
        if (requestCode == VIDEO_PLAY_REQUEST_CODE) {
            finish();
            return;
        }

        if (requestCode == CAPTURE_VIDEO_ACTIVITY_REQUEST_CODE) {
            if (resultCode == RESULT_OK) {
                Intent i = new Intent();
                i.setAction("com.google.glass.action.VIDEOPLAYER");
                i.putExtra("video_url", ""+data.getExtras().get(CameraManager.EXTRA_VIDEO_FILE_PATH));
                startActivityForResult(i, VIDEO_PLAY_REQUEST_CODE);
            }
            else if (resultCode == RESULT_CANCELED) {
                Toast.makeText(this, "Video capture cancelled", Toast.LENGTH_LONG).show();
            }
        }
} - Add BasicVideoCaptureActivity to your AndroidManifest.xml.
<activity
    android:name="com.morkout.myvideoapps.BasicVideoCaptureActivity"
    android:enabled="true"
    android:label="@string/app_name" >
</activity>
Run the app on Glass and say “OK Glass” and then “Chapter 5.” You’ll see a live card with the message “My Video Apps.” Tap the touchpad to see the first item in the menu, which is Basic Capture. Tap again to start the video capture, which is the same UI of the default Glass video capture. After “Stop recording” is selected and you tap to accept the video, you’ll see the recorded video playing, using the Glass’s video player intent com.google.glass.action.VIDEOPLAYER. I’ll discuss video play in more detail soon.
Here are a few things to note in Listing 5-1:
- intent.putExtra(MediaStore.EXTRA_OUTPUT, mFileUri); is called for the ACTION_VIDEO_CAPTURE intent. In the “Video capture intent” section of the Android Camera developer guide mentioned earlier, it states that the EXTRA_OUTPUT setting is optional but strongly recommended. It also says, “If you do not specify this value, the Camera application saves the requested video in the default location with a default name, specified in the returned intent’s Intent.getData() field.” However, this is not the case: date.getData() in onActivityResult always returns null on Glass whether you have the putExtra call or not. On other Android devices such as Nexus 7, the behavior is as documented.
- In addition to that, even if you call putExtra, the video doesn’t get saved to the location specified in putExtra; it’s still saved in the default DCIM/Camera directory. Fortunately, you can retrieve the saved path using data.getExtras().get(CameraManager.EXTRA_VIDEO_FILE_PATH)).
Video captured this way (or in the custom way discussed next), unlike video captured using the Glass camera button, doesn’t show in the Glass timeline. But you can implement your own share features, such as the ability to upload to Google Drive shown in Chapter 4.
What if you want to preview the scene before you start recording a video or set the recorded video format or frame rate? Or what if you want to add a custom UI such as showing the recorded frames while capturing a video? Then you have to implement video capture in the custom way, using the Android MediaRecorder class; see its API documentation page for all the customization you can do, at http://developer.android.com/reference/android/media/MediaRecorder.html. Now follow these steps to capture video using MediaRecorder on Glass:
- Add a new menu item in menu.xml and a new string entry in strings.xml.
<item
        android:id="@+id/customvideocapture"
        android:title="@string/customvideocapture"/>

<string name="customvideocapture">Custom Capture</string> - Add a new case statement in MenuActivity.java.
case R.id.customvideocapture:
    Intent intent2 = new Intent(this, CustomVideoCaptureActivity.class);
    startActivity(intent2);
return true; - Create a preview.xml file in layout.
<FrameLayout xmlns:android="http://schemas.android.com/apk/res/android "
    xmlns:tools="http://schemas.android.com/tools "
    android:layout_width="match_parent"
    android:layout_height="match_parent"
    tools:context=".MainActivity" >

    <SurfaceView
        android:id="@+id/preview"
        android:layout_width="match_parent"
        android:layout_height="match_parent" >
    </SurfaceView>

    <TextView
        android:id="@+id/timer"
        android:layout_width="wrap_content"
        android:layout_height="wrap_content"
        android:layout_marginTop="95dp"
        android:layout_gravity="center"
        android:text="" />
</FrameLayout> - Create a new class called CustomVideoCaptureActivity.java, as shown in Listing 5-2.
Listing 5-2. Capturing Video Using the Custom Method
public void onCreate(Bundle savedInstanceState) {
    super.onCreate(savedInstanceState);
    setContentView(R.layout.preview);
    getWindow().addFlags(WindowManager.LayoutParams.FLAG_KEEP_SCREEN_ON);
    mTimerInfo = (TextView)findViewById(R.id.timer);
    mTimerInfo.setText("Long Press to Record");
    mPreview = (SurfaceView)findViewById(R.id.preview);
    mPreviewHolder = mPreview.getHolder();
    mPreviewHolder.addCallback(surfaceCallback);
    mCamera = getCameraInstance();

    mGestureDetector = new GestureDetector(this, this);
}

private void initPreview() {
    if ( mCamera != null && mPreviewHolder.getSurface() != null) {
        try {
            mCamera.setPreviewDisplay(mPreviewHolder);
        }
        catch (IOException e) {
            Toast.makeText(CustomVideoCaptureActivity.this, e.getMessage(), Toast.LENGTH_LONG).show();
        }

        if ( !mCameraConfigured ) {
            Camera.Parameters parameters = mCamera.getParameters();
            parameters.setPreviewFpsRange(30000, 30000);
            parameters.setPreviewSize(640, 360);
            mCamera.setParameters(parameters);
            mCameraConfigured = true;
        }
    }
}

private void startPreview() {
    if ( mCameraConfigured && mCamera != null ) {
        mCamera.startPreview();
        mInPreview = true;
    }
}

SurfaceHolder.Callback surfaceCallback = new SurfaceHolder.Callback() {
    public void surfaceCreated( SurfaceHolder holder ) {
        initPreview();
    }

    public void surfaceChanged( SurfaceHolder holder, int format, int width, int height ) {
        startPreview();
    }

    public void surfaceDestroyed( SurfaceHolder holder ) {
        releaseCamera();
    }
};

private final Handler mHandler = new Handler();
private final Runnable mUpdateTextRunnable = new Runnable() {
    @Override
    public void run() {
        if (mRecording) {
            mTimerInfo.setText(String.format("%02d:%02d:%02d",
                  TimeUnit.MILLISECONDS.toHours(second*1000),
                  TimeUnit.MILLISECONDS.toMinutes(second*1000) -
                  TimeUnit.HOURS.toMinutes(TimeUnit.MILLISECONDS.toHours(second*1000)),
                  TimeUnit.MILLISECONDS.toSeconds(second*1000) -
                  TimeUnit.MINUTES.toSeconds(TimeUnit.MILLISECONDS.toMinutes(second*1000))));
            second++;
        }
        mHandler.postDelayed(mUpdateTextRunnable, 1000);
    }
};

@Override
public void onLongPress(MotionEvent e)
{
    if (mRecording)
        return;

    if (prepareVideoRecorder()) {
        mrec.start();
        mRecording = true;
        second = 0;
        mHandler.post(mUpdateTextRunnable);

    } else {
        releaseMediaRecorder();
    }
}

@Override
public boolean onCreateOptionsMenu(Menu menu) {
    MenuInflater inflater = getMenuInflater();
    inflater.inflate(R.menu.videocapture, menu);
    return true;
}

@Override
public boolean onOptionsItemSelected(MenuItem item) {
    switch (item.getItemId()) {
    case R.id.stoprecording:
        stopAndPlayVideo();
    }
    return true;
}

void stopAndPlayVideo() {
    stopRecording();
    mTimerInfo.setText("Recording Done");
    Toast.makeText(CustomVideoCaptureActivity.this, "Video saved to " + mOutputFile.getAbsolutePath(), Toast.LENGTH_SHORT).show();

    Intent i = new Intent();
    i.setAction("com.google.glass.action.VIDEOPLAYER");
    i.putExtra("video_url", mOutputFile.getAbsolutePath());
    startActivity(i);
}

public static Camera getCameraInstance(){
    Camera c = null;
    try {
        c = Camera.open();
    }
    catch (Exception e){
        Log.e(TAG, e.getMessage());
    }
    return c;
}

private boolean prepareVideoRecorder(){

    if (mCamera != null){
        mCamera.release(); // release the camera for other applications
    }
    mCamera = getCameraInstance();
    if (mCamera == null) return false;

    mrec = new MediaRecorder();

    mCamera.unlock();
    mrec.setCamera(mCamera);
    mrec.setAudioSource(MediaRecorder.AudioSource.CAMCORDER);
    mrec.setVideoSource(MediaRecorder.VideoSource.CAMERA);
    mrec.setProfile(CamcorderProfile.get(CamcorderProfile.QUALITY_HIGH));
    mrec.setPreviewDisplay(mPreviewHolder.getSurface());

    mOutputFile = getOutputMediaFile(MEDIA_TYPE_VIDEO);
    mrec.setOutputFile(mOutputFile.toString());

    try {
        mrec.prepare();
    }
    catch (Exception e) {
        Log.e(TAG, e.getMessage());
        return false;
    }

    return true;
}

@Override
protected void onPause() {
    super.onPause();
    releaseMediaRecorder(); // if you are using MediaRecorder, release it first
    releaseCamera();        // release the camera immediately on pause event
}

@Override
protected void onDestroy() {
    if (mRecording)
        stopAndPlayVideo();
    mRecording = false;
    super.onDestroy();
}
private void releaseMediaRecorder(){
    if (mrec != null) {
        mrec.reset();
        mrec.release();
        mrec = null;
    }
}

private void releaseCamera(){
    if (mCamera != null){
        mCamera.release();
        mCamera = null;
    }
}

protected void stopRecording() {
    if(mrec!=null)
    {
        mrec.stop();
        mrec.release();
        mrec = null;
        releaseCamera();
        mRecording = false;
    }
} - As always, don’t forget to add CustomVideoCaptureActivity in AndroidManifest.xml.
<activity
    android:name="com.morkout.myvideoapps.CustomVideoCaptureActivity"
    android:enabled="true"
    android:label="@string/app_name" >
</activity> - Create a new videocapture.xml file in res/menu with the following content to show a Stop Recording menu option while recording a video:
<?xml version="1.0" encoding="utf-8"?>
<menu xmlns:android="http://schemas.android.com/apk/res/android " >
    <item
        android:id="@+id/stoprecording"
        android:title="@string/stoprecording"/>
</menu> - Add <string name="stoprecording">Stop Recording</string> in strings.xml.
Run the app, and now you’ll see another menu option, Custom Capture, after Basic Capture. Tap it, and you’ll see the camera preview; long press the Glass touchpad to start recording. A TextView indicating the time passed would also show. Tapping the touchpad while recording shows a single menu item, Stop Recording. Swipe down on it to exit the menu and continue recording, and tap it to stop recording and start playing the recorded video.
Listing 5-2 looks a little long, but it consists of three main, easier-to-understand parts.
- Here’s the preview part: You should be familiar with the preview-related code in onCreate, initPreview, startPreview, surfaceCreated, surfaceChanged, and surfaceDestroyed. The code is basically the same as the preview code in the previous chapter.
- Here’s the new prepareVideoRecorder and the UI during recording part: The order of setting mrec, a MediaRecorder instance, is important, although the order doesn’t have to be 100 percent like the one in the listing. For example, the order of setAudioSource and setVideoSource can be changed. But the code here has been tested and runs well on Glass, so unless you have a good reason to change it, I recommend you use the time saved to do something more interesting. While recording, a thread keeps updating the time information on the UI thread.
- Here’s the stop, play, and cleanup part: After a video is stopped via the menu selection or the swipe-down gesture, MediaRecorder and Camera need to be released, and the saved video, set with mrec.setOutputFile, is played with the com.google.glass.action.VIDEOPLAYER intent.
Before exploring how to apply powerful video-processing techniques to the video captured, let’s give video play a more detailed treatment.
You saw in the previous two sections how the com.google.glass.action.VIDEOPLAYER intent is used to play video. This should be the preferred way to play video on Glass because it provides the consistent Glass UI for video play. However, if you’re an experienced Android developer, you’re probably already familiar with using VideoView to play video. In this section, I’ll discuss what works for Glass and what doesn’t when you apply your previous Android knowledge of VideoView.
Follow the similar steps you’ve done in this chapter and previous two chapters to create a new menu item called Play and a new class called VideoPlayerActivity and tie together all the pieces (which means you need to update the menu.xml, strings.xml, MenuActivity.java, and AndroidManifest.xml files).
Create a new layout file called videoview.xml.
<?xml version="1.0" encoding="utf-8"?>
<RelativeLayout xmlns:android="http://schemas.android.com/apk/res/android "
    android:layout_width="match_parent"
    android:layout_height="match_parent"
    android:layout_gravity="center_horizontal"
    android:background="@color/black" >

    <VideoView
        android:id="@+id/video_player_view"
        android:layout_width="match_parent"
        android:layout_height="match_parent"
        android:layout_centerInParent="true" />
</RelativeLayout>
Add the code in Listing 5-3 to VideoPlayerActivity.java.
Listing 5-3. Two Ways to Play Video
public void onCreate(Bundle savedInstanceState) {
        super.onCreate(savedInstanceState);

        String filepath;
        Bundle extras = getIntent().getExtras();
        if (extras != null)
            filepath = extras.getString("filepath");
        else {
            filepath = copyAsset("in.mp4");
        }

        // play video using VideoView
        Uri uri = Uri.parse(filepath);
        setContentView(R.layout.videoview);
        VideoView videoView = (VideoView)  findViewById(R.id.video_player_view);
        MediaController mediaController = new MediaController(this);
        mediaController.setAnchorView(videoView);
        videoView.setMediaController(mediaController);
        videoView.setVideoURI(uri);
        videoView.start();

        // play video using the Glass video player
        // Intent i = new Intent();
        // i.setAction("com.google.glass.action.VIDEOPLAYER");
        // i.putExtra("video_url", filepath);
        // startActivityForResult(i, VIDEO_PLAY_REQUEST_CODE);
    }

    protected void onActivityResult(int requestCode, int resultCode, Intent data) {
        if (requestCode == VIDEO_PLAY_REQUEST_CODE)
            finish();
    }

    String copyAsset(String filename) {
        final String PATH = Environment.getExternalStorageDirectory().toString() + "/myvideoapps/";
        File dir = new File(PATH);
        if (!dir.exists()) {
            if (!dir.mkdirs()) {
                Log.v(TAG, "ERROR: Creation of directory " + PATH + " on sdcard failed");
                return null;
            } else {
                Log.v(TAG, "Created directory " + PATH + " on sdcard");
            }
        }

        if (!(new File( PATH + filename).exists())) {
            try {
                AssetManager assetManager = getAssets();
                InputStream in = assetManager.open(filename);
                OutputStream out = new FileOutputStream(PATH + filename);

                byte[] buf = new byte[1024];
                int len;
                while ((len = in.read(buf)) > 0) {
                    out.write(buf, 0, len);
                }
                in.close();
                out.close();

            } catch (IOException e) {
                Log.e(TAG, "Was unable to copy " + filename + e.toString());
                return null;
            }
        }
        return PATH + filename;
    }
Run the app again and select the third menu item, Play. You’ll see a sample video file in.mp4, being played with the VideoView class. The in.mp4 file will be copied from the app’s asset directory to the external storage’s myvideoapps subdirectory.
VideoView basically is a wrapper of MediaPlayer, the primary API for playing sound and video on Android. VideoView makes it much easier to add video play in your app. Its setMediaController can easily add a nice video control to your app, including play, pause, fast-forward, reverse, and time information, as shown in Figure 5-1.
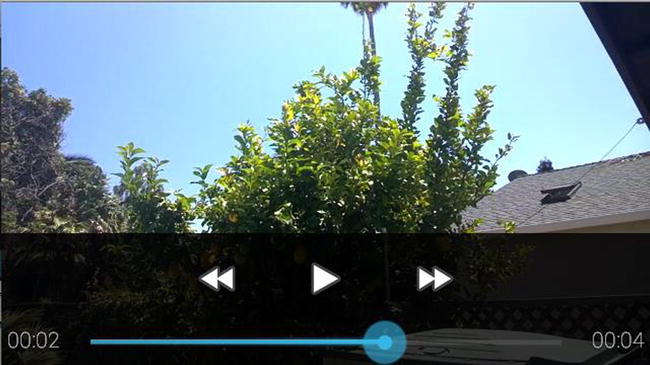
Figure 5-1. Video play using the Android VideoView API
However, there’s some glitch with the media controller on Glass, as least as of the XE 16 update: Only the play and pause functions work fine, and you cannot drag the circle to move the video play position. It’s likely that by the time you read the book, the glitch will have been fixed and you can continue to use VideoView like it’s supposed to do. But as a general principle, when you apply your Android knowledge and port your Android code to Glass, always watch out for subtle differences. Although MediaPlayer, on which VideoView is based, offers a more powerful way to play video than VideoView and may fix the issue with VideoView, I won’t discuss it further because the native Glass intent com.google.glass.action.VIDEOPLAYER provides the simplest and best solution for video play on Glass. You can pause and replay the video and easily move to any position of the video. In Listing 5-3, comment out the eight lines of code after the comment play video using VideoView and uncomment the four lines of code after the comment play video using the Glass video player. Then run the app to see again how the native Glass video player works, as shown in Figure 5-2.

Figure 5-2. Video play using the Glass com.google.glass.action.VIDEOPLAYER intent
Now that you have the basics of video capture and play covered, it’s time to move on to something more powerful and fun.
In the previous chapter, you saw an example of OpenCV being used to create a Canny edge detector effect on an image. In this section, I’ll show you more examples of using OpenCV APIs to process frames of a video. First, you need to use the Android MediaMetadataRetriever class’s getFrameAtTime method to get a Bitmap object of a specific frame. Then you call OpenCV’s core and imgproc modules to process the bitmap for different effects. The sample code in Listing 5-3 retrieves frames from the first three seconds of video, at an interval of 0.5 second, and applies OpenCV functions to each frame before displaying it in an ImageView. To build and test this, simply follow these steps:
- Create a new menu item called OpenCV Frame in menu.xml and update strings.xml and MenuActivity.java.
- Add a new layout file called videoframe.xml.
<RelativeLayout xmlns:android="http://schemas.android.com/apk/res/android "
    xmlns:tools="http://schemas.android.com/tools "
    android:layout_width="match_parent"
    android:layout_height="match_parent"
    tools:context=".VideoFrameActivity" >

    <ImageView
        android:id="@+id/frame"
        android:layout_width="wrap_content"
        android:layout_height="wrap_content"
        android:layout_alignParentTop="true"
        android:layout_centerHorizontal="true" />

</RelativeLayout> - Create a new class called VideoFramesActivity.java with the code in Listing 5-4.
Listing 5-4. Retrieving and Processing Video Frames Using OpenCV
public class VideoFramesActivity extends Activity {
    ImageView mFrame;
    MediaMetadataRetriever mRetriever;
    int sec = 0;
    public final static String TAG = "VideoFramesActivity";

    @Override
    public void onCreate(Bundle savedInstanceState) {
        super.onCreate(savedInstanceState);
        setContentView(R.layout.videoframe);

        mFrame = (ImageView) findViewById(R.id.frame);

        // load and initialize OpenCV library – see http://docs.opencv.org/java/org/opencv/android/OpenCVLoader.html#initDebug ()
        if (!OpenCVLoader.initDebug()) {
            finish();
        }
        showFrame();
    }

    private final Handler mHandler = new Handler();
    private final Runnable mUpdateFrameRunnable = new Runnable() {
        @Override
        public void run() {
            mRetriever = new MediaMetadataRetriever();
            try {
                mRetriever.setDataSource(copyAsset("in.mp4"));                 mFrame.setImageBitmap(processBitmap(mRetriever.getFrameAtTime(sec,MediaMetadataRetriever.OPTION_CLOSEST)));

                mFrame.invalidate();
                sec+=500000;
                if (sec>3000000) return;

                mHandler.post(mUpdateFrameRunnable);
            } catch (Exception e) {
                e.printStackTrace();
            } finally {
                try {
                    mRetriever.release();
                } catch (RuntimeException e) {
                }
            }
        }
    };

    String copyAsset(String filename) {
        ... // same as Listing 5-3
    }

    public Bitmap processBitmap(Bitmap bitmap) {
        Bitmap newBitmap;
        Mat matFrom = new Mat();
        Utils.bitmapToMat(bitmap, matFrom);

        Mat matIntermediate = new Mat();
        Mat matFinal = new Mat();

        Imgproc.resize(matFrom, matIntermediate, new Size(), 2.0, 2.0, Imgproc.INTER_NEAREST);

        // canny
        Mat matIntermediate2 = new Mat();
        Imgproc.Canny(matIntermediate, matIntermediate2, 80, 90);
        Imgproc.cvtColor(matIntermediate2, matFinal, Imgproc.COLOR_GRAY2BGRA, 4);

        // sepia
        // Mat mSepiaKernel;
        // mSepiaKernel = new Mat(4, 4, CvType.CV_32F);
        // mSepiaKernel.put(0, 0, /* R */0.189f, 0.769f, 0.393f, 0f);
        // mSepiaKernel.put(1, 0, /* G */0.168f, 0.686f, 0.349f, 0f);
        // mSepiaKernel.put(2, 0, /* B */0.131f, 0.534f, 0.272f, 0f);
        // mSepiaKernel.put(3, 0, /* A */0.000f, 0.000f, 0.000f, 1f);
        // Core.transform(matIntermediate, matFinal, mSepiaKernel);

        // pixelize
        // Size size = new Size();
        // Mat matIntermediate2 = new Mat();
        // Imgproc.resize(matIntermediate, matIntermediate2, size, 0.1, 0.1, Imgproc.INTER_NEAREST);
        // Imgproc.resize(matIntermediate2, matFinal, matIntermediate.size(), 0., 0., Imgproc.INTER_NEAREST);

        // posterize
        // Mat matIntermediate2 = new Mat();
        // Imgproc.Canny(matIntermediate, matIntermediate2, 80, 90);
        // matIntermediate.setTo(new Scalar(0, 0, 0, 255), matIntermediate2);
        // Core.convertScaleAbs(matIntermediate, matIntermediate2, 1./16, 0);
        // Core.convertScaleAbs(matIntermediate2, matFinal, 16, 0);

        // http://docs.opencv.org/java/org/opencv/imgproc/Imgproc.html#COLOR_BayerGB2RGB
        //Imgproc.cvtColor(matIntermediate, matFinal, Imgproc.COLOR_BGR2GRAY); // black and white
        //Imgproc.cvtColor(matIntermediate, matFinal, Imgproc.COLOR_BGR2RGB);  // blue
        //Imgproc.cvtColor(matIntermediate, matFinal, Imgproc.COLOR_BGR2Luv);
        //Imgproc.cvtColor(matIntermediate, matFinal, Imgproc.COLOR_BGR2HLS);
        //Imgproc.cvtColor(matIntermediate, matFinal, Imgproc.COLOR_BGR2HSV);

        newBitmap = Bitmap.createBitmap(matFinal.cols(), matFinal.rows(), Bitmap.Config.ARGB_8888);
        Utils.matToBitmap(matFinal, newBitmap);

        matFinal.release();
        return newBitmap;
    }

    public void showFrame() {
        mHandler.post(mUpdateFrameRunnable);
    }
} - Add VideoFramesActivity to AndroidManifest.xml.
- Add the OpenCV library to your project, as shown in the “OpenCV” section of the previous chapter, by selecting the properties of your project MyVideoApps. Then select Android and click Add in the Library section of the Properties window. Then copy libs’s armeabi-v7a folder from the SmartCamera project in Chapter 4 (see Figure 4-8 of Chapter 4) to MyVideoApps’s libs folder.
Run the app on Glass and select OpenCV Frame. You’ll see six images, two of which shown in Figure 5-3, with the Canny effects on Glass.

Figure 5-3. Applying the OpenCV Canny effect to video frames
Note Retrieving frame function getFrameAtTime takes 0.6 to 1.2 seconds on Glass to return, but the OpenCV call returns almost immediately. Also, the first parameter of getFrameAtTime is for microseconds, 1/1000,000 second, and a typical frame rate is 30 per second.
To see different OpenCV effects, comment out the code after // canny, uncomment the code after // sepia, pixelize, posterize, or color change, and run the app. For example, Figure 5-4 shows a frame with the sepia effect, and Figure 5-5 shows the posterize effect.
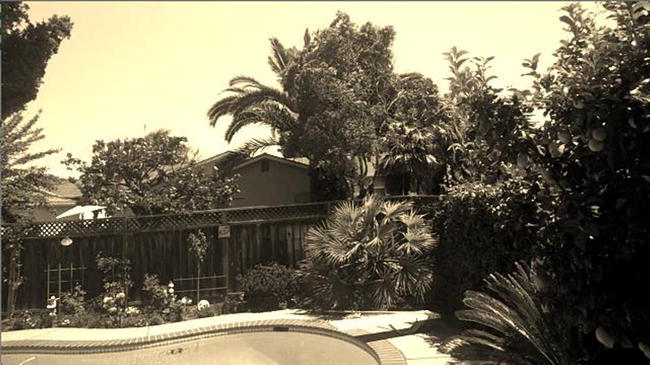
Figure 5-4. Applying the OpenCV sepia effect to a frame
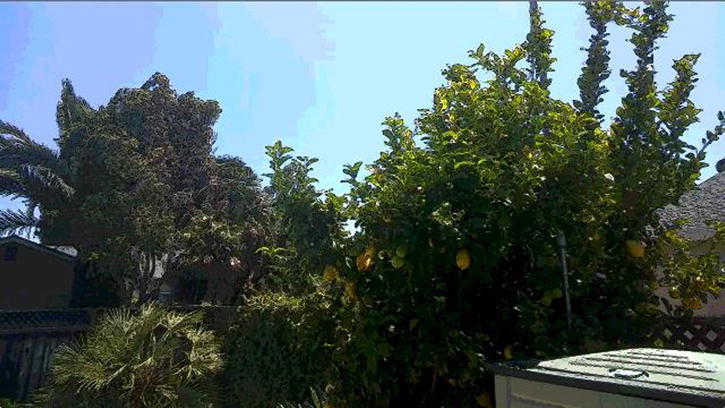
Figure 5-5. Applying the OpenCV posterize effect to a frame
See http://docs.opencv.org/java/org/opencv/imgproc/Imgproc.html for complete documentation of OpenCV image processing, which you can apply to your video frames.
What if you want to process and apply some special effect to an entire video, instead of just some frames of it? Obviously, it’d be infeasible to process each frame of a video. A 5-second video with 30 frames per second would have 150 frames, and on average each frame would take about 1 second to be retrieved and processed, meaning it’d take 2.5 minutes to process the short video. There has to be a better way.
Note If you’re interested in how to process the camera preview frames in real time, you should check out the ZBarScannerActivity.java file of the ZBarScannerActivity project I discussed in Chapter 4, where onPreviewFrame is used to scan barcode image in real time.
FFmpeg is the best open source library to record, convert, and stream video (and audio too). There are several FFmpeg libraries for Android, but unfortunately none of them is easy to build and integrate with your own app. The easiest way to add FFmpeg to your Glass app is to use a library called FFmpeg4Android, which has an Android app in Google Play that, if you have a non-Glass Android device such as Nexus 7, you can install and try the FFmpeg commands.
Test the Library Client on Glass
To test the library on your Glass in order to integrate it into your app, follow the steps at http://androidwarzone.blogspot.com/2011/12/ffmpeg4android.html to download the FFmpeg4Android project library source and the demo client source. Import both projects into your Eclipse workspace. You should see something like Figure 5-6.
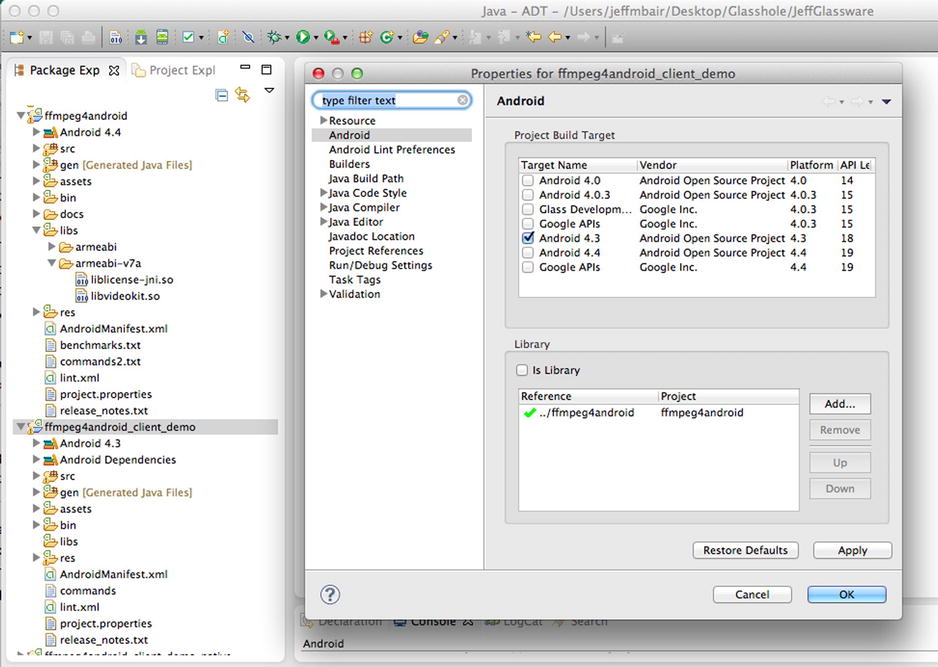
Figure 5-6. Importing the FFmpeg4Android library and demo client
To test the demo client on your Glass, you need to download launchy, an app to launch native Android apps, at https://github.com/kaze0/launchy.
Note Native Glass apps can be launched via voice commands or the touchpad after speaking or selecting OK Glass. Native Android apps are not started by voice command or shown in the OK Glass menu, so the app appears to run only once right after installation, but with launchy, you can run a native Android app as many times as you want.
After downloading and importing launchy into Eclipse, install it to Glass. Then you can say “OK Glass” followed by “Run an app,” or you can select “Run an app” from the OK Glass menu to launch it. After it’s launched, you’ll see a list of apps you can start. Simply swipe forward or backward to navigate the list and tap to select the highlighted app. Figure 5-7 shows the two screens.
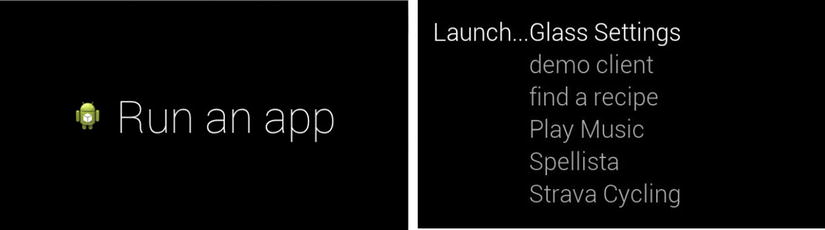
Figure 5-7. Launching and selecting a native Android app
Select the demo client app, and you’ll see the FFmpeg demo client UI as shown in Figure 5-8; swipe forward to reveal the Invoke button. Tap the Glass touchpad when Invoke is highlighted. You’ll see a message box saying “Exporting As MP4 Video.” After the exporting is done, the video is saved as /sdcard/videokit/out.mp4. You do remember how to use the adb shell command to explore your Glass folders, right? If not, you should review Chapter 2 or check out a great blog article, written by Andres Calvo, the technical reviewer of this book, about the adb tool (http://ocddevelopers.com/2014/installing-native-android-apps-on-glass-adb-101/).
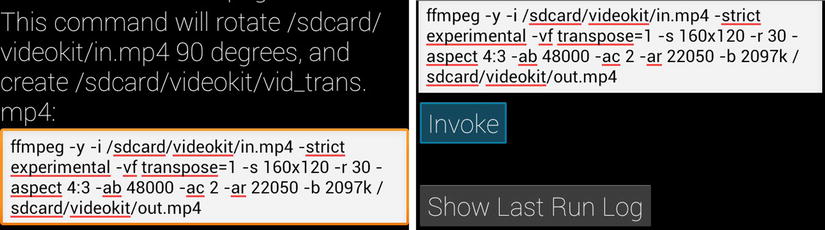
Figure 5-8. Testing the FFmpeg library demo client
Installing the FFmpeg4Android demo client and using launchy to test the client are optional. But I found using launchy and testing a native Android app on Glass to be helpful in Glass app development.
Integrating the FFmpeg Library
Follow these steps to integrate and use the library in the app MyVideosApp:
- Add the FFmpeg4Android library to the project (similar to Figure 5-6).
- Add a new menu entry called FFmpeg Processing to menu.xml, strings.xml, and MenuActivity.java.
- Add a new menu XML file called videoprocessing.xml.
<?xml version="1.0" encoding="utf-8"?>
<menu xmlns:android="http://schemas.android.com/apk/res/android " >

    <item
        android:id="@+id/original"
        android:title="@string/original"/>
    <item
        android:id="@+id/processed"
        android:title="@string/processed"/>
    <item
        android:id="@+id/sepia"
        android:title="@string/sepia"/>
    <item
        android:id="@+id/vintage"
        android:title="@string/vintage"/>
    <item
        android:id="@+id/canny"
        android:title="@string/canny"/>
    <item
        android:id="@+id/rotate"
        android:title="@string/rotate"/>
    <item
        android:id="@+id/extractsound"
        android:title="@string/extractsound"/>
    <item
        android:id="@+id/extractimages"
        android:title="@string/extractimages"/>
</menu> - Add to strings.xml the menu items in step 3.
<string name="original">Original Video</string>
<string name="processed">Processed Result</string>
<string name="sepia">Sepia Effect</string>
<string name="vintage">Vintage Effect</string>
<string name="canny">Canny Effect</string>
<string name="rotate">Rotate Video</string>
<string name="extractsound">Extract Sound</string>
<string name="extractimages">Extract Images</string> - Copy and paste the PhotoViewActivity.java file from the SmartCamera app of the previous chapter; this is to show the images extracted from video.
- Create a new class called VideoProcessingActivity.java with the code in Listing 5-5.
Listing 5-5. Video Processing Using FFmpeg
public void onCreate(Bundle savedInstanceState) {
        super.onCreate(savedInstanceState);
        setContentView(R.layout.start);
        mTextView = (TextView) findViewById(R.id.hello_view);
        mTextView.setText("Tap for Menu");

        copyAsset(mOriginal);

        setWorkingFolder(PATH);
        copyLicenseAndDemoFilesFromAssetsToSDIfNeeded();

        mGestureDetector = new GestureDetector(this);

        mGestureDetector.setBaseListener(new GestureDetector.BaseListener() {
            @Override
            public boolean onGesture(Gesture gesture) {
                if (gesture == Gesture.TAP) {
                    openOptionsMenu();
                }
                return true;
            }
        });
    }

    public boolean onGenericMotionEvent(MotionEvent event){
        if (mGestureDetector != null) {
            return mGestureDetector.onMotionEvent(event);
        }
        return false;
    }

    @Override
    public boolean onCreateOptionsMenu(Menu menu) {
        MenuInflater inflater = getMenuInflater();
        inflater.inflate(R.menu.videoprocessing, menu);
        return true;
    }

    @Override
    public boolean onOptionsItemSelected(MenuItem item) {
        switch (item.getItemId()) {
        case R.id.original:
            Intent i = new Intent();
            i.setAction("com.google.glass.action.VIDEOPLAYER");
            i.putExtra("video_url", PATH + mOriginal);
            startActivity(i);
            return true;

        case R.id.processed:
            if (mProcessed == null)
                Toast.makeText(VideoProcessingActivity.this,
                        "No video or image just processed yet", Toast.LENGTH_LONG)
                        .show();
            else if (mProcessed.equalsIgnoreCase("image_extracted")) {
                mTextView.setText("");
                Intent intent = new Intent(this, PhotoViewActivity.class);
                startActivity(intent);
                finish();
            }
            else {
                Intent i2 = new Intent();
                i2.setAction("com.google.glass.action.VIDEOPLAYER");
                i2.putExtra("video_url", PATH + mProcessed);
                startActivity(i2);
            }
            return true;

        case R.id.sepia:
            mProcessed = "m-sepia.mp4";
            setCommand("ffmpeg -y -i /sdcard/myvideoapps/in.mp4 -strict experimental -vf colorchannelmixer=.393:.769:.189:0:.349:.686:.168:0:.272:.534:.131 -s 640x480 -r 30 -aspect 4:3 -ab 48000 -ac 2 -ar 22050 -b 2097k -vcodec mpeg4 /sdcard/myvideoapps/m-sepia.mp4");
            setProgressDialogTitle("Adding Sepia Effect...");
            setProgressDialogMessage("After completed, tap to see more options");
            runTranscoing();
            return true;

        case R.id.vintage:
            mProcessed = "m-vintage.mp4";
            setCommand("ffmpeg -y -i /sdcard/myvideoapps/in.mp4 -strict experimental -vf curves=vintage -s 640x480 -r 30 -aspect 4:3 -ab 48000 -ac 2 -ar 22050 -b 2097k -vcodec mpeg4 /sdcard/myvideoapps/m-vintage.mp4");
            setProgressDialogTitle("Adding Vintage Effect...");
            setProgressDialogMessage("After completed, tap to see more options");
            runTranscoing();
            return true;

        case R.id.canny:
            mProcessed = "m-canny.mp4";
            setCommand("ffmpeg -y -i /sdcard/myvideoapps/in.mp4 -strict experimental -vf edgedetect=low=0.1:high=0.2 -s 640x480 -r 30 -aspect 4:3 -ab 48000 -ac 2 -ar 22050 -b 2097k -vcodec mpeg4 /sdcard/myvideoapps/m-canny.mp4");
            setProgressDialogTitle("Adding Canny Effect...");
            setProgressDialogMessage("After completed, tap to see more options");
            runTranscoing();
            return true;

        case R.id.rotate:
            mProcessed = "m-rotate.mp4";
            setCommand("ffmpeg -y -i /sdcard/myvideoapps/in.mp4 -strict experimental -vf transpose=1 -s 160x120 -r 30 -aspect 4:3 -ab 48000 -ac 2 -ar 22050 -b 2097k /sdcard/myvideoapps/m-rotate.mp4");
            setProgressDialogTitle("Rotating Video...");
            setProgressDialogMessage("After completed, tap to see more options");
            runTranscoing();
            return true;

        case R.id.extractsound:
            mProcessed = "m-sound.mp3";
            setCommand("ffmpeg -i /sdcard/myvideoapps/in.mp4 -vn -ar 44100 -ac 2 -ab 192 -f mp3 /sdcard/myvideoapps/m-sound.mp3");
            setProgressDialogTitle("Sound Extracting...");
            setProgressDialogMessage("After completed, tap to see more options");
            runTranscoing();
            return true;

        case R.id.extractimages:
            mProcessed = "image_extracted";
            setCommand("ffmpeg -i /sdcard/myvideoapps/in.mp4 /sdcard/myvideoapps/in-image%d.jpg");
            setProgressDialogTitle("Image Extracting...");
            setProgressDialogMessage("After completed, tap to see more options");
            runTranscoing();
            return true;

        default:
            return super.onOptionsItemSelected(item);
        }
}
Add VideoProcessingActivity and PhotoViewActivity to AndroidManifest.xml, and run the app. Select the FFmpeg Processing menu option; you’ll see a Tap for Menu option. Tap and swipe on Glass, and you’ll see the options Original Video, Processed Result, Sepia Effect, Vintage Effect, Canny Effect, Rotate Video, Extract Sound, and Extract Images. Select one of the effects, wait about 20 seconds to see the “Transcoding Finished” message, and then choose Processed Result. You’ll see the whole video has been processed and applied with the effect. Extracting sound or images takes about three seconds. You can see selected images in a CardScrollView.
The code in Listing 5-5 is pretty self-explanatory. If you need to write your own FFmpeg commands to achieve your desired video processing result, you should check out the FFmpeg documentation at www.ffmpeg.org/ffmpeg-filters.html and download and test with a command-line FFmpeg tool for your OS platform at www.ffmpeg.org/download.html. The previous commands in Listing 5-5 have been tested first on Mac using the binary download at http://ffmpegmac.net.
It’s hard to imagine the Internet without YouTube these days, and it’s easy to think of a video search app using YouTube. In the Fireside Chat with the Glass team at Google I/O 2013 (available at https://developers.google.com/events/io/sessions/332695704), when asked what Glass app each person expects developers to build, Isabelle Olsson, the industrial designer behind Glass, said she’d love to see a karaoke app because she loves karaoke and thinks it’d be awesome to sing karaoke facing your friends, with Glass, “instead of staring into a screen with words on it.” While it’s not possible to build a full-fledged Glass karaoke app in this section of this chapter, YouTube integration gives you the best chance for an app pretty close to that.
First you need to figure out how to query YouTube and get the results. YouTube offers an easy-to-use API at https://developers.google.com/youtube/2.0/developers_guide_protocol_api_query_parameters. A sample query that returns videos, in the JSON data format, of the Godfather movie theme song “Speak Softly Love” with, yes, lyrics (now this sounds like karaoke, doesn’t it?) is this: https://gdata.youtube.com/feeds/api/videos?q=speak+softly+love+lyrics&orderby=viewCount&v=2&alt=json.
Listing 5-6 shows the code that makes a simple HTTP get call. In Chapter 7, I’ll cover network programming and HTTP requests in detail, implemented in AsyncTask with JSON parsing.
Listing 5-6. Using the YouTube API to Query Data
private class GetVideos extends AsyncTask<Void, Void, Void> {
    @Override
    protected void onPreExecute() {
        super.onPreExecute();
    }

    @Override
    protected Void doInBackground(Void... arg0) {
        try {
            DefaultHttpClient httpClient = new DefaultHttpClient();
            HttpGet httpGet = new HttpGet(url);
            HttpResponse httpResponse = httpClient.execute(httpGet);
            HttpEntity httpEntity = httpResponse.getEntity();

            String jsonStr = EntityUtils.toString(httpEntity);
            if (jsonStr != null) {
                JSONObject jsonObj = new JSONObject(jsonStr);
                entries = jsonObj.getJSONObject("feed").getJSONArray("entry");
            } else {
                Log.e(TAG, "Couldn't get any data from the url");
            }

        } catch (Exception e) {
            Log.e(TAG, e.getMessage());
        }
        return null;
    }

    @Override
    protected void onPostExecute(Void result) {
        super.onPostExecute(result);

        try {
            for (int i = 0; i < entries.length(); i++) {
                JSONObject entry = entries.getJSONObject(i);
                String title = entry.getJSONObject("title").getString("$t");
                String viewCount = entry.getJSONObject("yt$statistics").getString("viewCount");
                String thumbnail = entry.getJSONObject("media$group").getJSONArray("media$thumbnail").getJSONObject(0).getString("url");
                JSONObject link = entry.getJSONArray("link").getJSONObject (0);
                mVideos.add(new Video(title, link.getString("href"), viewCount, thumbnail));
            }

        }
        catch (Exception e) {
        }
    }
}
Video is a simple class that encapsulates the video’s attributes that you’re interested in.
class Video {
    String mtitle;
    String murl;
    String mviewCount;
    String mThumbnail;
    ImageView mImageView;
    Bitmap mBitmap;
    Boolean mDrawn;
    ...
}
Follow these steps to use a ListView to display the query result mVideos:
- Add a new layout file called videolist.xml.
<?xml version="1.0" encoding="utf-8"?>
<FrameLayout xmlns:android="http://schemas.android.com/apk/res/android "
        xmlns:tools="http://schemas.android.com/tools "
        android:layout_width="match_parent"
        android:layout_height="match_parent"
        android:keepScreenOn="true"
        android:background="@color/black"
        tools:context=".MainActivity">

        <ListView
                android:layout_width="wrap_content"
                android:layout_height="wrap_content"
                android:id="@+id/listView"
                android:layout_gravity="left|top"
                android:paddingLeft="18dp"
                android:listSelector="#0000FF"/>

</FrameLayout> - In the new VideoSearchActivity.java’s onCreate method, call setContentView(R.layout.videolist);.
- At the end of onPostExecute in Listing 5-6, right after the for loop that builds the query result mVideos, add the following lines of code:
mListView = (ListView) findViewById(R.id.listView);
mMovieList = new VideoAdapter(mActivity, R.layout.listitem, mVideos);
mListView.setAdapter(mMovieList);
mListView.setOnItemClickListener(new VideoLauncher()); - Add a new layout file called listitem.xml for each video result entry.
<?xml version="1.0" encoding="utf-8"?>
<LinearLayout xmlns:android="http://schemas.android.com/apk/res/android "
    android:layout_width="fill_parent"
    android:layout_height="?android:attr/listPreferredItemHeight"
    android:orientation="horizontal"
    android:padding="3dip" >

    <ImageView
        android:id="@+id/thumbnail"
        android:layout_width="30dp"
        android:layout_height="30dp"
        android:layout_marginRight="3dp"
        android:layout_marginTop="5dp"
        android:adjustViewBounds="true"
        android:maxHeight="50dp"
        android:maxWidth="50dp"
        android:scaleType="center" />

    <LinearLayout
        android:layout_width="wrap_content"
        android:layout_height="wrap_content"
        android:layout_marginLeft="10dip"
        android:orientation="vertical" >

        <TextView
            android:id="@+id/title"
            android:layout_width="wrap_content"
            android:layout_height="wrap_content"
            android:ellipsize="marquee"
            android:singleLine="true"
            android:textStyle="bold" />

        <TextView
            android:id="@+id/viewcount"
            android:layout_width="wrap_content"
            android:layout_height="wrap_content" />
    </LinearLayout>

</LinearLayout> - Add the VideoAdapter class implementation with the getView method, which defines how to show each video item. Because you use the thumbnail URL for each result to make the list look nicer, you need to load those URLs asynchronously so the main UI thread doesn’t get blocked. This is what the SetImageTask AsyncTask is for in Listing 5-7.
Listing 5-7. Loading Thumbnail URLs Asynchronously
class VideoAdapter extends ArrayAdapter<Video> {
private ArrayList<Video> videos;

public VideoAdapter(Context context, int resource, ArrayList<Video> videos) {
    super(context, resource, videos);
    this.videos = videos;
}

// for each list item
public View getView(int position, View convertView, ViewGroup parent){
    View v = convertView;

    if (v == null) {
        LayoutInflater inflater = (LayoutInflater) getContext().getSystemService(Context.LAYOUT_INFLATER_SERVICE);
        v = inflater.inflate(R.layout.listitem, null);
    }

    Video video = videos.get(position);

    if (video != null) {
        TextView title = (TextView) v.findViewById(R.id.title);
        TextView viewCount = (TextView) v.findViewById(R.id.viewcount);
        ImageView thumbnail = (ImageView) v.findViewById(R.id.thumbnail);
        video.mImageView = thumbnail;
        if (!(VideoSearchActivity.thumbnailMaps.containsKey(video.getThumbnail()))) {
            // set image asynchronously
            new SetImageTask().execute(video);
        }

        if (title != null){
            title.setText(video.getTitle());
        }
        if (viewCount != null) {
            viewCount.setText("Views: " + video.getViewCount());
        }

        if (VideoSearchActivity.thumbnailMaps.containsKey(video.getThumbnail()))
            thumbnail.setImageBitmap(VideoSearchActivity.thumbnailMaps.get(video.getThumbnail()));
    }

    // the view must be returned to our activity
    return v;
}

private class SetImageTask extends AsyncTask<Video,Void,Void> {
    @Override
    protected void onPreExecute() {
        super.onPreExecute();
    }

    @Override
    protected Void doInBackground(Video... params) {
        try {
            Video video = params[0];
            VideoSearchActivity.thumbnailMaps.put(video.getThumbnail(), downloadBitmap(video.getThumbnail()));
        }
        catch(Exception e) {
            e.printStackTrace();
        }
        return null;
    }

    @Override
    protected void onPostExecute(Void result) {
        super.onPostExecute(result);
        for (int i = 0; i < videos.size(); i++) {
            Video v = videos.get(i);
            if(v.mBitmap!=null && !v.mDrawn) {
                v.mImageView.setImageBitmap(v.mBitmap);
                v.mDrawn = true;
            }
            if (VideoSearchActivity.thumbnailMaps.containsKey(v.getThumbnail()))
                v.mImageView.setImageBitmap(VideoSearchActivity.thumbnailMaps.get(v.getThumbnail()));
        }
    }
}

private Bitmap downloadBitmap(String url) {
    final DefaultHttpClient client = new DefaultHttpClient();
    Bitmap image = null;
    final HttpGet getRequest = new HttpGet(url);
    try {
        HttpResponse response = client.execute(getRequest);
        final int statusCode = response.getStatusLine().getStatusCode();
        if (statusCode != HttpStatus.SC_OK) {
            return null;
        }

        final HttpEntity entity = response.getEntity();
        if (entity != null) {
            InputStream inputStream = null;
            try {
                inputStream = entity.getContent();
                image = BitmapFactory.decodeStream(inputStream);
            } finally {
                if (inputStream != null) {
                    inputStream.close();
                }
                entity.consumeContent();
            }
        }
    } catch (Exception e) {
        Log.e(TAG, e.getMessage());
    }

    return image;
    }
}
You’re working in the Glass world and no keyboard entry is available, so you have to use voice input for query. This may sound a bad thing if you’re used to other smartphone keyboard input, but after you get used to Glass’s hands-free voice input, you’ll find Glass’s speech recongnition engine powerful and easy to use. So, just add the following three lines of code at the end of onCreate to launch the speech recognition intent:
Intent i = new Intent(RecognizerIntent.ACTION_RECOGNIZE_SPEECH);
i.putExtra(RecognizerIntent.EXTRA_PROMPT, "Speak a song title:");
startActivityForResult(i, VOICE_RECOGNIZER_REQUEST_CODE);
Then add a new method and call the AsyncTask GetVideos().execute method, shown here:
protected void onActivityResult(int RequestCode, int ResultCode, Intent data) {
       switch(RequestCode) {
       case VOICE_RECOGNIZER_REQUEST_CODE:
             if(RequestCode == VOICE_RECOGNIZER_REQUEST_CODE && ResultCode == RESULT_OK) {
                    ArrayList<String> results = data.getStringArrayListExtra(RecognizerIntent.EXTRA_RESULTS);

                    if (results.size() > 0) {
                            mTitle = results.get(0);
                            mTitle = mTitle.replace(' ', '+'),
                            url = url.replaceAll("<title>", mTitle);
                            new GetVideos().execute();
                    }
             }
             break;
       }
       super.onActivityResult(RequestCode, ResultCode, data);
}
Playing the Video and Let’s Karaoke
This part is easy, especially on Glass. With the com.google.glass.action.VIDEOPLAYER intent on Glass, you can simply pass a regular YouTube URL, and the video will play with the built-in media controls. Unlike on other Android devices, other play solutions like VideoView or WebView won’t work.
public void launchVideo(String youtubeurl) {
    Intent i = new Intent();
    i.setAction("com.google.glass.action.VIDEOPLAYER");
    i.putExtra("video_url", youtubeurl);
    startActivity(i);
}

private class VideoLauncher implements AdapterView.OnItemClickListener {
    public void onItemClick(AdapterView parent, View v, int position, long id) {
        Video video = (Video)parent.getSelectedItem();
        mActivity.launchVideo(video.murl);
    }
}
In XE 12, the previous code works perfectly. But with the XE 16 update, you can’t scroll the ListView implemented earlier. This little annoyance won’t scare away us developers, though. Just replace the last line of the code in step 3 earlier, shown here:
mListView.setOnItemClickListener(new VideoLauncher());
with the following:
mListView.setChoiceMode(ListView.CHOICE_MODE_SINGLE);
mListView.setClickable(true);
Remove the class VideoLauncher implementation in the previous section, add GestureDetector mGestureDetector; before onCreate, add mGestureDetector = createGestureDetector(this); at the end of onCreate, and add the following code to make the ListView scrollable and selectable:
private GestureDetector createGestureDetector(Context context) {
    GestureDetector gestureDetector = new GestureDetector(context);
    gestureDetector.setBaseListener( new GestureDetector.BaseListener() {
        @Override
        public boolean onGesture(Gesture gesture) {
            if (gesture == Gesture.TAP) { // On Tap, generate a new number
                Video video = (Video)mListView.getSelectedItem();
                mActivity.launchVideo(video.murl);
                return true;
            } else if (gesture == Gesture.SWIPE_RIGHT) {
                mListView.setSelection(mListView.getSelectedItemPosition()+1);
                return true;
            } else if (gesture == Gesture.SWIPE_LEFT) {
                // do something on left (backwards) swipe
                mListView.setSelection(mListView.getSelectedItemPosition()-1);
                return true;
            }
            return false;
        }
    });

    return gestureDetector;
}

// this method is required for tap on touchpad to work!
public boolean onGenericMotionEvent(MotionEvent event) {
    if (mGestureDetector != null) {
        return mGestureDetector.onMotionEvent(event);
    }
    return false;
}
Finally, just add a new menu item called YouTube Search, update MenuActivity.java, and add VideoProcessingActivity to AndroidManifest.xml. Run the app and say “OK Glass” and then “Chapter 5.” Then select YouTube Search and say your favorite song title. You’ll see a list of matched results, as shown in Figure 5-9. Swipe forward and backward and select the highlighted one; then start singing facing your friends! Enjoy yourself because you deserve it!
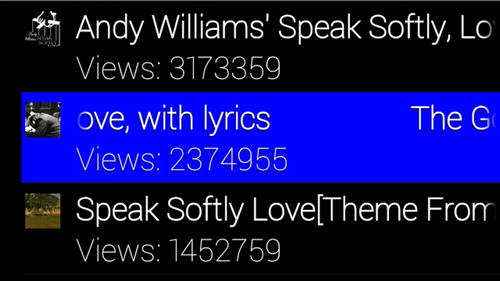
Figure 5-9. YouTube video search results
Summary
In this chapter, you started with the basic video capture and custom video capture with preview and then looked at how video can play on Glass. Then I discussed how to use OpenCV to add image effects on frames extracted from video. A more powerful video-processing library, FFmpeg, was introduced with detailed instructions of how to integrate it with your own app. Commands for various video filtering effects were presented. Finally, a YouTube video search and play app was covered in detail, which can be used as the foundation of a full-fleged karaoke app.
You probably have noticed more than once the inconvenience, at least under certain circumstances, of having to use the touchpad to make a selection after the voice commands “OK Glass,” “Smart camera,” “Chapter 5,” or “Speak softly, love.” Is it possible to go 100 percent hands-free? If not, what exactly can you do and cannot do? Also, how about some in-depth coverage of audio processing, such as recoding what you sing while you’re doing the karaoke? Voice and audio will be the topic of next chapter.