CHAPTER 2
Getting Started with
the Maps API
When Google Maps was introduced in February 2005, it was immediately hailed as a major advance in web mapping. By preloading the map beyond the borders of what was visible in the browser, Google was able to create an illusion that you had the entire world at your fingertips. Page refreshes to change map views became a thing of the past.
Just a few months later, Google extended this achievement by offering the same mapping system it used itself, free of charge, to anyone with minimal web programming skills. More than any other event, the release of this API fostered the creation of the geoweb and spawned a proliferation of geospatially aware sites across the Web.
Now it's your turn.
We'll start with a simple web page, and then piece by piece build a complete Google map on it, making every step clear along the way. Before the chapter's over you'll be ready to add a reasonable map to web sites of your own.
An XHTML Framework
Google Maps is fundamentally a web application; therefore, every Maps API implementation is based on a web page. Our first map example is no exception, and the basic XHTML structure for the page is shown in Listing 2-1.
Listing 2-1. The Basic Map Page XHTML
<!DOCTYPE html PUBLIC "-//W3C//DTD XHTML 1.0 Strict//EN"

                      "http://www.w3.org/TR/xhtml1/DTD/xhtml1-strict.dtd">

<html xmlns="http://www.w3.org/1999/xhtml">

  <head>

    <meta http-equiv="Content-Type" content="text/html; charset=UTF-8" />

    <title>Google Maps API Basic Example</title>

    <link type="text/css" rel="stylesheet" href="listing_02_02.css" />

  </head>

  <body>

    <div id="map"></div>

  </body>

</html>
As you can see, this is little more than an absolutely minimal XHTML page.
The Map Container
Your XHTML does require one very particular element, a container for the map itself. This is the <div id="map"> line highlighted in Listing 2-1. You can use whatever id you want, as long as the same id value is used in the JavaScript we'll be writing that references it.
Caution As with any XHTML id attribute, the map container's id needs to be unique on the page. It's especially important here to avoid unexpected behavior from the JavaScript.
For simplicity, my example page in Listing 2-1 contains only a map, but most of the time your Google map will be integrated with other content on a page. In any case, the id is how the JavaScript finds the correct XHTML container in which to build the map. Also, be aware that any other content in this map container will be erased by the Maps API.
Page Style
To make the map visible on the page, we'll also need a little bit of CSS, shown in Listing 2-2.
Listing 2-2. The Basic Map Page Stylesheet
html {

  height: 100%;

}


body {

  height: 100%;

  margin: 0;

}


#map {

  width: 100%;

  height: 100%;

}
Since this page contains only a map, I have included rules to make the map occupy the entire height and width of the page. If the page had other content, you'd use additional CSS as appropriate to lay the page out and place the map as desired within it.
This is a good place to say a few words about layout. Despite its distinctive appearance and high level of interactivity, there's nothing magical about a Google Map: it is built of XHTML, formatted with CSS. As such, it is part and parcel of the XHTML and CSS of your page. You position it as you would any other page element, and it can inherit style from their containing elements.
So you need to pay attention to a map page's structure and design, the same as you would for any other web page. You're likely to have trouble with a Google map on the page if your XHTML isn't well-formed; ideally, it should pass the W3C's Markup Validation Service (http://validator.w3.org), but at the least, all your opening and closing tags need to match up. And further, if you're seeing strange behavior from a map, a good place to start troubleshooting is your page layout in CSS.
Caution As frequently happens in web design, Internet Explorer presents certain challenges for laying out pages with Google Maps. In particular, IE requires additional "help" for determining the height of page elements; it doesn't automatically pick up on the size of Google Maps' dynamic XHTML. This is why the html and body tags in Listing 2-2 need height:100% in their CSS; without those rules IE wouldn't know how tall to render the elements.
In general, your map container always needs to have an explicit height supplied to it. If you have a map that works fine in other browsers but doesn't display at all in IE, this is the first thing to look for.
Linking In the API
Our page is now ready for you to add the Google Maps API itself. A single XHTML element is required to include it:
<script type="text/javascript"
src="http://maps.google.com/maps?file=api&v=2.124&key="></script>
As you can see, this is a standard XHTML directive to include an external JavaScript file, served by maps.google.com. We'll add this element to the head section of the page.
Although this script element as shown is sufficient to get you started, it does include a couple of options that merit a closer look before we move on.
Versions
Like most software proprietors, Google releases new versions of the Maps API periodically, usually every 1–2 weeks. The version our page uses is 2.124, determined by the v=2.124 in the script element's src attribute.
This version number will work fine for all the examples in this book, but as the API continues to evolve, our examples will be left behind. They're stationary at v=2.124. The downside is obvious: we won't have access to new features that Google releases. But there is an upside, too; it does sometimes happen that new versions are incompatible with certain existing map pages, so that upgrading can break your map. We prevent this by "planting our stake" at 2.124.
Tip You can always find information on current and past versions of the API in the Google Maps API wiki at http://mapki.com.
If you want to use a newer version of the Maps API, you do so by substituting that number for the 2.124 in the src URL. You then need to test your existing page functionality thoroughly, to ensure that everything still works—that nothing on your page was broken by the new version.
If everything still works, great! Go ahead and implement the new feature. If not, you basically have three options:
- Stay with the previous version and live without the new feature.
- Troubleshoot the error and find a fix, if your JavaScript skills are up to the task.
- If the problem is minor enough, ignore it and implement the new feature anyway. It's always possible that Google will fix the incompatibility on their side at some point.
None of these are ideal, but they do reflect the reality of software development.
If you'd like to learn more about Maps API versions, there's a section covering the alternatives at the end of this chapter. However, you can safely stick with v=2.124 for the remainder of this book.
API Keys
The other URL component in the API script element is key=, and it's used for specifying your Maps API key. This is essentially your authorization to use Google Maps on your web site, and it's an important piece to understand.
When You Don't Need an API Key
You'll notice that the key= parameter was blank in my script element shown earlier, which I said was sufficient for now. That's because a key isn't required for local development work, viewing web pages through your own computer's filesystem. This means URLs that begin with file://, rather than the usual http:// of pages on the Web. So a URL like this is fine without an API key:
file:///C:/Documents+and+Settings/Sterling/My+Documents/basic_map.html
In Windows, you can typically open an XHTML file in your default browser by simply navigating to the file in Windows Explorer and then double-clicking on it.
When You Do Need an API Key
Whenever a map page is delivered to your browser from a web server, it will need to have a valid API key. This can be a local development server, your production web server, or any public web site. The key factor is that the URL starts with http://.
How to Get and Use a Key
Fortunately, getting an API key is pretty easy. Simply go to http://code.google.com/apis/maps/signup.html, indicate your acceptance of the Terms and Conditions, and enter your web site's URL. Although Google's terms are fairly lenient, make sure your web site does comply with them.
API keys are based on the URL you supply to Google, so it's important to get this right. Here are some tips to guide you:
- Generally, it's best to enter just your site's root domain name, such as
http:// mydomain.com. Such a key will be valid for all pages within that site. - A root domain key will also work for pages using a www prefix. (For example, a key registered for
http://mydomain.comalso works forhttp://www.mydomain.com.) - The root key will work as well if your site is hosted at a subdomain, such as
http://webapps.mydomain.com. (By contrast, a key you'd registered forhttp://www.mydomain.comwouldn't.) - If your page may be served from more than one root domain, you'll need a key for each domain and additional program code to switch them dynamically. See Appendix C for a snippet of JavaScript to help you do this.
- You may also need to get a key for development servers. For example, it's fine to request a key for
http://localhost. - If you lose your key, don't worry: just go back and request it again. Assuming you give the same URL, Google will give you the same key, and there's no problem with this.
Once you have your key, simply paste it into the script tag that includes the API in your page, like this:
<script type="text/javascript"
src="http://maps.google.com/maps?file=api&v=2.124&key=ABQIAAN_IKAOv">
</script>
Note that a real API key is much longer than I've just shown. Also, be aware that I'll omit the API key from most XHTML listings in this book, both for brevity and because my API key wouldn't work for you anyway. Don't forget to paste in a key of your own, right after key=, as needed.
Displaying the Map
All the pieces are now in place, and you're finally ready to show the map on your web page. There are two components you need to add to make this happen, and Listing 2-3 shows our XHTML with them highlighted.
Listing 2-3. Ready to Display the Map
<!DOCTYPE html PUBLIC "-//W3C//DTD XHTML 1.0 Strict//EN"
"http://www.w3.org/TR/xhtml1/DTD/xhtml1-strict.dtd">
<html xmlns="http://www.w3.org/1999/xhtml">
<head>
<meta http-equiv="Content-Type" content="text/html; charset=UTF-8" />
<title>Google Maps API Basic Example</title>
<link type="text/css" rel="stylesheet" href="listing_02_02.css" />
<script type="text/javascript"
src="http://maps.google.com/maps?file=api&v=2.124&key="></script>
<script type="text/javascript" src="listing_02_04.js"></script>
</head>
<body onload="loadMap()" onunload="GUnload()">
<div id="map"></div>
</body>
</html>
In the head section, we have a new script element, linking in the JavaScript that puts the API to work. We'll look at that in detail in the next section. And in the body tag, we have an onload event handler to initialize the map when the page loads.
Note Don't worry about GUnload; that's simply an API function to "clean up" after the map when the user leaves the page. It should be included on any page that has a map, but that's as much as you need to know about it.
The JavaScript to Make It Happen
We're now ready to look at our first real piece of JavaScript, Listing 2-4. It's mostly a single function, loadMap, containing the functionality to set the API in motion and display a map on the page.
Listing 2-4. The Basic Map JavaScript
var map;


function loadMap()

{

  var mapDiv = document.getElementById('map'),


  if (!GBrowserIsCompatible())

  {

    mapDiv.innerHTML =

      'Sorry, your browser isn't compatible with Google Maps.';

  }

  else

  {

    map = new GMap2(mapDiv);

    map.setCenter(new GLatLng(39.9, −105.2), 10);

  }

};
Let's examine each piece of the JavaScript loadMap function to be clear what's going on. First, we need to get our map container from the XHTML:
var mapDiv = document.getElementById('map'),
This basically gives the JavaScript a "handle" on the map container that it can work with. The text inside the parentheses and quotes needs to match the id of the map container div in the XHTML, back in Listing 2-1. As you'll recall, it's simply called map.
Next, it's good to make sure the user's browser is compatible with Google Maps:
if (!GBrowserIsCompatible())

{

  mapDiv.innerHTML =

    'Sorry, your browser isn't compatible with Google Maps.';

}
While this isn't strictly necessary to make the map work, it's definitely good practice and should always be included. Very few browsers aren't compatible, but it's much better to give those that aren't a nice message than a bunch of messy errors.
Now we're in the thick of it. The next step is to create the map object itself:
map = new GMap2(mapDiv);
I'll talk more about the GMap2 object in a moment, but it should already be fairly clear what's going on here. We're creating a new Google map, using the mapDiv XHTML container.
Finally, we need to tell the map where on Earth we want to see. We do that with a call to the map's setCenter function thus:
map.setCenter(new GLatLng(39.9, −105.2), 10);
There are two parts to this, supplied as parameters:
- The latitude and longitude where you want the map view to be centered. Here it's
(39.9, −105.2), or a few miles northwest of Denver. - The starting zoom level for the map. In this case, I'm using
10, a good medium zoom.
ZOOM LEVELS
Zoom levels, illustrated here, specify how large an area the map shows.
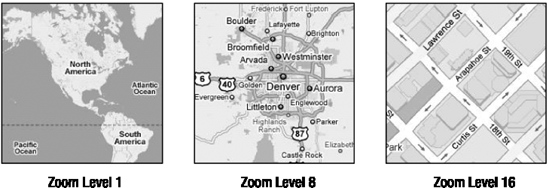
In Google Maps, zoom level 0 fits the entire Earth into 256 pixels. Each higher zoom level covers half the area but at twice the detail, so zoom level 1 would need a map 512 pixels wide to show the whole Earth. The maximum zoom varies by map type and location but is typically between 15 and 20.
That's it! With the JavaScript in place, our page now displays a map of the Colorado Front Range, as shown in Figure 2-1.

Figure 2-1. The map appears.
The Basic Maps API Objects
The Google Maps API makes good use of JavaScript's object orientation. All of the API functionality is encapsulated in objects, but if you haven't done object-oriented programming before, don't worry—it's not hard.
Let's walk through a few of the more fundamental Maps API objects. This initial description is only a taste of what's availabel; the API has dozens of objects for many different uses. Appendix D contains a list of resources to guide you as far as you might want to go through the Maps API.
GMap2
This is the granddaddy of them all, the core map object. Without it, you don't have a Google map on your page, so setting it up is always one of the first things you'll do. In fact, you need to both create the map object:
map = new GMap2(mapDiv);
and initialize it (as discussed earlier):
map.setCenter(new GLatLng(39.9, −105.2), 10);
before you can do anything else with the map.
Throughout the book we'll be seeing plenty of other things that can be done with GMap2, but the two basic operations just shown are enough to get you started.
Note The "2" in GMap2 signifies that we're using Version 2 of the API. It was completely overhauled from Version 1, but they coexisted for a time, hence the 2 in the name. It's simply called GMap2 regardless of which specific release of the API you're using, such as 2.124 in our case.
GLatLng
GLatLng is the Google Maps embodiment of the basic geospatial concepts latitude and longitude. It's used whenever the API needs to refer to a specific point on the globe. So it's used a lot.
You've already seen the GLatLng object in action as we were setting up the map in our initial block of JavaScript. Let's extract it into a variable of its own:
var coordinates = new GLatLng(39.9, −105.2);

map.setCenter(coordinates, 10);
This way, we can reuse the coordinates for something else in the next section.
GLatLng has a few other tricks up its sleeve—for instance, it can tell us how far away it is from another GLatLng—but for now, this will do.
GMarker
Here's something new to add to our little map, a marker staking out a specific point. We'll reuse the coordinates object we declared in the last section to place a marker at the center of the map, and then have a bit of fun. I've highlighted the new lines of code for you in Listing 2-5.
Listing 2-5. Coordinates and Markers
var map;


function loadMap()

{

  var mapDiv = document.getElementById('map'),


  if (!GBrowserIsCompatible())

  {

    mapDiv.innerHTML =

      'Sorry, your browser isn't compatible with Google Maps.';

  }

  else

  {

    map = new GMap2(mapDiv);

    var coordinates = new GLatLng(39.9, −;105.2);

    map.setCenter(coordinates, 10);


    var marker = new GMarker(coordinates);

    marker.bindInfoWindowHtml('<p>Hello, World!</p>'),

    map.addOverlay(marker);

  }

};
Note what's going on in the last three lines here:
- We create the
GMarker, at thecoordinateswe set up earlier. - We give it something to say: a snippet of XHTML, within the
bindInfoWindowHtmlfunction. Infowindow is the Google Maps term for the "bubble" that typically pops open when a map marker is clicked. - We add it to the map, using the
GMap2object's ownaddOverlayfunction.
Figure 2-2 shows the results of our handiwork.
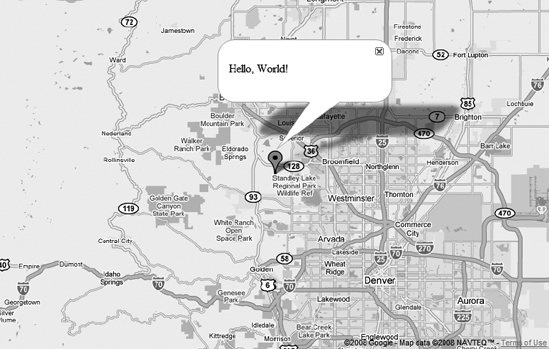
Figure 2-2. Hello, World!
Map Controls and Types
Our JavaScript is beginning to grow, and our map is beginning to improve. Let's round it out by adding the standard Google Maps controls, the onscreen tools that let a user interact with the map.
All of these controls are optional, and there may be times when you leave one or more of them out, but generally visitors to your page will be happier if they feel fully in control. And since the controls are easily added, using the GMap2 object's addControl function, there's usually little excuse not to include them on most maps.
I'll walk you through each of the basic map controls, and then we'll add them all to the JavaScript code. First up is the basic pan and zoom control (Figure 2-3), usually found at the upper left of a Google map.
map.addControl(new GLargeMapControl());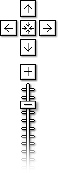
Figure 2-3. GLargeMapControl
Next we have the map scale (Figure 2-4), which automatically adjusts to show distance on the map.
map.addControl(new GScaleControl());Figure 2-4. GScaleControl
The overview is the map-within-a-map at the lower right that shows a wider view of the area (Figure 2-5). It's really helpful for users to orient themselves, especially when they first jump into a map showing a small area.
map.addControl(new GOverviewMapControl());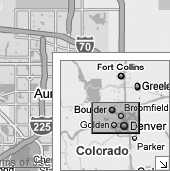
Figure 2-5. GOverviewMapControl
Finally, Figure 2-6 shows the map type selection buttons.
map.addControl(new GMapTypeControl());Figure 2-6. GMapTypeControl
While we're on the subject of map types, let's spruce up our map a bit by adding the Terrain map type, which isn't included on a default API map. This will also illustrate some more capabilities of the GMap2 object.
It's done in two parts. First, we must explicitly specify a list of map types when creating the map object:
map = new GMap2(mapDiv,

  {mapTypes: [G_NORMAL_MAP, G_SATELLITE_MAP, G_HYBRID_MAP,G_PHYSICAL_MAP]});
There are many different options you can specify in the second parameter when creating GMap2, but the relevant one for now is the list of mapTypes. Note that we list the three usual types—Normal, Satellite, and Hybrid—plus the new one, Physical (what Terrain is called inside the API). This creates the GMap2 object with exactly that list of types. If we'd wanted to leave one out instead, we could have done that simply by excluding it from the list.
Tip When you specify a list of map types like this, the buttons at the upper right of the map (for switching between types) will be in the same order as your types were in the JavaScript.
The second step is to start the map out with the Terrain type, and we do this by adding another parameter to setCenter, after the center coordinates and the zoom level.
map.setCenter(coordinates, 10, G_PHYSICAL_MAP);
As we move forward, you'll see that anything we might want to do with a Google map is just a variation on this process, specifying different options when calling API functions.
Bringing It All Together
Our first map has come a long way in a short time, and this is a good opportunity to take stock. Combining all the extra code from the preceding sections produces the completed map shown in Figure 2-7. It's ready to publish on the Web.
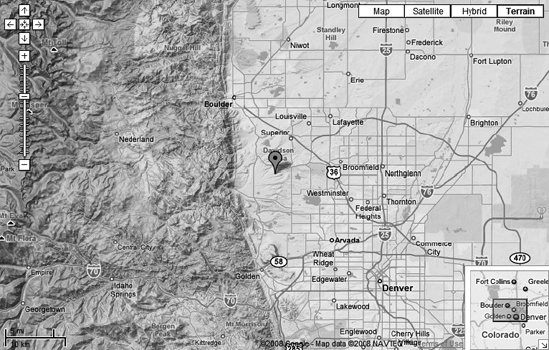
Figure 2-7. The complete map
Listing 2-6 shows the final JavaScript for everything we've covered in this chapter, together in one place. I've highlighted the changes from Listing 2-5 for your reference.
Listing 2-6. JavaScript for the Complete Map Page
var map;


function loadMap()

{

  var mapDiv = document.getElementById('map'),


  if (!GBrowserIsCompatible())

  {

    mapDiv.innerHTML =

      'Sorry, your browser isn't compatible with Google Maps.';

  }

  else

  {

    map = new GMap2(mapDiv,

      {mapTypes: [G_NORMAL_MAP, G_PHYSICAL_MAP, G_SATELLITE_MAP, G_HYBRID_MAP]});

    var coordinates = new GLatLng(39.9, −105.2);

    map.setCenter(coordinates, 10, G_PHYSICAL_MAP);


    var marker = new GMarker(coordinates);

    marker.bindInfoWindowHtml('<p>Hello, World!</p>'),

    map.addOverlay(marker);


    map.addControl(new GScaleControl());

    map.addControl(new GOverviewMapControl());

    map.addControl(new GMapTypeControl());

    map.addControl(new GLargeMapControl());

  }

};
Putting It to Use
You now have everything you need to add a basic Google map to a web page of your own. I'm sure you can see how, but to make certain that you don't miss anything, here are the essential steps.
- Lay out your page, creating and positioning a container for the map in your XHTML. Don't neglect this step.
- Save the code from Listing 2-6 to your own site, giving it a name like basic_map.js.
- Change the latitude and longitude of the
coordinatesobject to match the location you want your map to show. - Edit the XHTML fragment in
bindInfoWindowHtmlto display your own message.
- Change the latitude and longitude of the
- Add the two
scriptelements andbodyevent handlers from Listing 2-3 to your own XHTML.- Register an API key for your domain and paste it into the first
scripttag. - Ensure that the
srcattribute of the secondscripttag matches your JavaScript file name (such as basic_map.js) instead oflisting_02_04.js.
- Register an API key for your domain and paste it into the first
- Tweak other settings as needed for your own application, following the guidelines in this chapter. Don't be afraid to experiment!
Congratulations! You have your own Google map.
Other Version Options
Before we move on, and while we're on the subject of putting the map into your own page, it wouldn't hurt for you to know a bit more about Map API versions. As you'll recall from earlier in the chapter, we're using version 2.124, and that's fine up to a point. But it's not quite the full story; the Google Maps API supports four different options for version selection, controlled by what follows the v=2 in the API script element. Which version you use depends mostly on how much public exposure a particular map page will receive. We've already covered one option; following are the other three.
Note Version 1 of the Maps API was discontinued in 2006, and Google has yet to even mention a Version 3. So for our purposes, the major version to use is always 2.
2.S
The s stands for Stable, and that's what this version is: the latest stable release from Google. It gets moved forward now and then when Google considers a release to have been in general use long enough to have proven itself, but it always lags considerably behind the latest and greatest. For instance, at this writing 2.s is serving a release that's 16 months old.
Because of its stability, 2.s is the version that Google recommends for use on production web sites. But personally, I prefer specifying the exact version, like 2.124.
2
This is the simplest option, and it's not a bad choice during the development of your map. It will use the latest release from Google, ensuring that you have the newest enhancements. However, occasionally significant bugs do find their way into an official release, and (more rarely) a new feature will be incompatible with existing API implementations.
For these reasons, it does happen that a map which was working fine will suddenly break when Google pushes a new release. Therefore, it's not recommended that you use 2 on production web pages, only during development. And only if you're interested in keeping quite up-to-date with what Google's doing in the API.
For you thrill-seekers and adrenaline junkies, 2.x is the eXtreme version. It's essentially a preview of Google's next API release, and as such it always includes the very first look at cool new features. The disadvantage is that these prereleases often contain significant bugs and will break your map fairly frequently.
My advice is not to use 2.x until you're fairly comfortable with Maps API programming, and maybe not even then if you want to focus on your own development work rather than Google's. But definitely never, ever use it on a production web site.
Summary
You now have the basic framework to start building map mashups: a Google map that you can insert into any web page. It's a blank slate onto which the world's geodata can be written.
In Chapter 3 we'll begin that process, "consuming" geoXML from the Web and displaying it on our map.