CHAPTER 5
Your Map and the Real World
In many ways, the geoweb is all about connecting the virtual, online world with the real, physical world by means of mapping. In this chapter, we'll look at various techniques for making the "last mile" of that connection. We'll examine the issues surrounding the conversion of generic place information to latitude and longitude coordinates, and then we'll tour some of the ways your map can connect with real-world, often real-time data, including traffic, driving directions, and street-level photographs. Finally, we'll connect the map with that most real of topics—money—by adding advertising to the map itself.
We'll do this by following a pattern similar to what we have done before, building out an example map to illustrate the various techniques. As in Chapter 4, there is a good quantity of JavaScript here, so there will be plenty of concrete examples for you to draw from when building your own maps. And again, I'll do my best to introduce the new concepts plainly, to walk you through them at a manageable pace.
The example we'll build in this chapter is a route finder web page for San Francisco, and the basic XHTML can be found in Listing 5-1.
Listing 5-1. The Starting XHTML for the Route Finder Page
<!DOCTYPE html PUBLIC "-//W3C//DTD XHTML 1.0 Strict//EN"
"http://www.w3.org/TR/xhtml1/DTD/xhtml1-strict.dtd">
<html xmlns="http://www.w3.org/1999/xhtml">
<head>
<meta http-equiv="Content-Type" content="text/html; charset=UTF-8" />
<title>Your Map and the Real World</title>
<link type="text/css" rel="stylesheet" href="../chapter_04/listing_04_02.css" />
<script type="text/javascript"
src="http://maps.google.com/maps?file=api&v=2.124&key="></script>
<script type="text/javascript" src="listing_05_02.js"></script>
</head>
<body onload="loadMap()" onunload="GUnload()">
<div id="map"></div>
<div id="sidebar">
<h2>Route Finder</h2>
<p>
Start Address
<button onclick="geocode()">Find</button>
<input type="text" id="start" />
</p>
</div>
</body>
</html>
You've seen most of this code several times before; in fact, we're actually reusing the CSS from Listing 4-2. The new content is in the sidebar, where we now have a text input for the user to enter a starting address for their route. When they do so and click the Find button, a JavaScript event handler named geocode takes over. But what does geocode do?
Geocoding
Geocoding is the process of turning ordinary street addresses into latitude/longitude coordinates, and it's one of the most important tools for a map developer. Most people don't know the latitude and longitude of their home, but they do know their address. Similarly, databases that you may work with are far more likely to contain addresses than coordinates. But in either case, the coordinates are what you need for showing the information on a map. So having a geocoder at your disposal is going to be crucial; not surprisingly, Google provides one in the Maps API.
The basic use of the Maps API geocoder can be seen in Listing 5-2, where the geocode function has been added to our usual map JavaScript.
Listing 5-2. JavaScript with Geocoder Interface
// Declare variables for later use

var map;

var geocoder;

var startMarker;


function loadMap()

{

  // loadMap: initialize the API and load the map onto the page


  // Get the map container div

  var mapDiv = document.getElementById('map'),


  // Confirm browser compatibility with the Maps API

  if (!GBrowserIsCompatible())

  {

    mapDiv.innerHTML =

      'Sorry, your browser isn't compatible with Google Maps.';

  }


  else

  {

    // Initialize the core map object

    map = new GMap2(mapDiv,

      {mapTypes: [G_NORMAL_MAP, G_SATELLITE_MAP, G_HYBRID_MAP, G_PHYSICAL_MAP]});


    // Set the starting map viewport, based on center coordinates and zoom level

    var coordinates = new GLatLng(37.75, −122.44);

    map.setCenter(coordinates, 12);


    // Add the standard map controls

    map.addControl(new GLargeMapControl());

    map.addControl(new GScaleControl());

    map.addControl(new GOverviewMapControl());

    map.addControl(new GMapTypeControl());


    // Initialize the geocoder object

    geocoder = new GClientGeocoder();

  }

};


function geocode()

{

  // geocode: Call the Google geocoder with the address supplied by the user

  var address = document.getElementById('start').value;

  geocoder.getLatLng(address, afterGeocode);

};


function afterGeocode(coordinates)

{

  // afterGeocode: Callback function for the geocoder, showing the coords on the map

  startMarker = new GMarker(coordinates);

  map.addOverlay(startMarker);

};
There are several parts to this, so let's go over them one at a time.
First, we always need to declare the variables we're going to be working with. In this case, it's the geocoder itself, plus a marker to show the geocoded address on the map:
var geocoder;

var startMarker;
Next, we initialize the geocoder object into the variable we declared for it. This is quite straightforward also:
geocoder = new GClientGeocoder();

geocoder.setViewport(map.getBounds());
The first line just creates GClientGeocoder (client because it's based in the web browser). The second line tells it to emphasize results from the current map viewport, the geographic area currently visible on screen. If someone just enters a street address, we want the geocoder to give preference to matching addresses here in San Francisco, rather than in some other city.
Next up is the event handler referenced by the XHTML in Listing 5-1, simply named geocode. All it does is extract the user-entered address from the XHTML (using our familiar getElementById function) and send it off to the Google geocoder:
var address = document.getElementById('start').value;

geocoder.getLatLng(address, afterGeocode);
The only thing you might not expect, then, is afterGeocode, the second parameter to geocoder.getLatLng. This is a callback function (as introduced in Chapter 3) that the geocoder will pass control to after it has finished its work. If you recall, callbacks are used when a process needs to go online to do its job, and it shouldn't surprise you that geocoding is in this category.
So the final block of code in Listing 5-2, naturally, is the callback function itself, afterGeocode. It receives the coordinates for the address back from Google and just places a marker there:
startMarker = new GMarker(coordinates);

map.addOverlay(startMarker);
You should recognize the basic code to place a map marker from the examples in the last three chapters, and it's no different here. The coordinates are coming from the geocoder, but the marker doesn't care.
The results can be seen in Figure 5-1. The user has entered an address, and a marker showing its location has been placed on the map.

Figure 5-1. San Francisco map with geocoded address
Tip For various licensing reasons, the geocoder supplied in the Maps API is not the same as that used on maps.google.com. So you can't reliably test your geocoding by comparing it with results from the main Google Maps web site; they won't always match up.
Coding For the Real World
Listing 5-2 showed the most basic use of the Maps API geocoder. In keeping with the subject of this chapter, there are a few real-world considerations that should be added to the code. This is sometimes known as defensive coding—programming that acknowledges that things don't always happen as we might first expect—and the changes are shown in Listing 5-3: a rewriting of the afterGeocode function from Listing 5-2.
Listing 5-3. Defensive Coding in the Geocoder Callback Function
function afterGeocode(coordinates)

{

  // afterGeocode: Callback function for the geocoder, showing the coords on the map

  if (coordinates == null)

    alert('Address not found. Please try again.'),

  else if (!map.getBounds().contains(coordinates))

    alert('Address not found in map area. Please try again.'),

  else

  {

    // Address was found

    if (startMarker == null)

    {

      // This is the first time we've geocoded an address, so create the marker

      startMarker = new GMarker(coordinates);

      map.addOverlay(startMarker);

    }

    else

    {

      // The marker already exists; just move it to the new coordinates

      startMarker.setPoint(coordinates);

    }

  }

};
First, I'm checking to see if the Google geocoder was able to find the address that the user entered. If it couldn't, the coordinates passed to the callback will be null, and we'll have no place to put a map marker. So instead, I use alert to tell the user about the problem:
if (coordinates == null)

  alert('Address not found. Please try again.'),
The alert function opens a small message dialog containing the given string, and it's a simple way to display an important message to the user, as you can see in Figure 5-2.
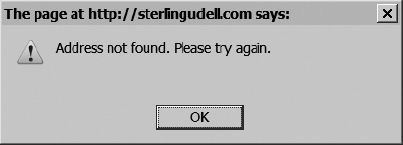
Figure 5-2. An alert dialog
Caution Don't overuse alert. Because the user has to click OK to dismiss the message before they can do anything else, alert can quickly become annoying to your site visitors. Only use it when you genuinely need to get their attention; consider using a DHTML message (see Chapter 10) instead.
Second, if Google found the address, I also check to confirm that it was within the map area. This covers cases where the user enters an address that the geocoder found, but in a distant location, such as in another state.
else if (!map.getBounds().contains(coordinates))

  alert('Address not found in map area. Please try again.'),
Note the test here: map.getBounds returns the boundaries of the map viewport, which you can then immediately query to see if it contains the coordinates.
If the address was found in the map area by the geocoder, afterGeocode moves into the process of placing a map marker at the correct coordinates, and here we have another fork in the code: what if this isn't the first address that the user has looked up? If we naively proceed as in Listing 5-2 and just create a new marker each time, the map could soon become littered with them. So instead, we check to see if the marker has already been created:
if (startMarker == null)
In other words, a null marker tells us to proceed as before by creating a marker. Otherwise, the best course is to move the existing startMarker to the new coordinates:
else

  startMarker.setPoint(coordinates);
As your JavaScript skill advances, I'll be introducing you to more of these real-world coding situations.
Geocoding Considerations
Now that you've seen geocoding in action, you probably have some idea of how useful it can be in mapping endeavors. But before we move on, I just need to brief you on a few caveats about geocoding in general and the Google geocoder in particular.
The first is that geocoding is far from an exact science. There are many, many variations in address formats, and it's just not possible for a geocoder to decipher one hundred percent of them. Also, the data from which geocoders work is somewhat general; although the people at Google probably have a reasonable idea of the coordinates of your street, they don't actually know the coordinates of your house with absolute precision. So geocoding is a computer's educated guess at best—and its wild guess at worst. Particularly with incomplete or misspelled addresses, the results can be just completely wrong. There are also some addresses that a given geocoder will be unable to find at all.
The second issue you should be aware of is that geocoding is a complicated process. It takes some time—perhaps a second or two—to geocode each address. In fact, geocoding takes so much effort that Google limits access to the geocoder; as of this writing, it's 15,000 requests per visitor per day1. This may seem like a generous quota, but it's actually not hard to get into a situation where you exceed it.
Also, recall that Google's geocoder is asynchronous, requiring the afterGeocode callback function shown earlier. There are hidden dangers to asynchronous code, especially for beginners. If you were using JavaScript, like that in Listings 5-1 and 5-2, to geocode a whole list of addresses—for example, from a customer database—you'd need to be careful to not send a given address to the geocoder until the previous one had finished. Otherwise, you'd have a situation where later requests would "cancel out" earlier ones, causing lost geocoding requests and incomplete processing of your address list.
__________
1. Note that this limit is per web site visitor, making it quite unlikely you'll hit it with an ordinary map application. For more information, please see http://tinyurl.com/25um3w.
For these and other reasons, the best practice is to not geocode more addresses than you need to.
OHIO: Only Handle It Once
The recommended approach to follow with geocoding, therefore, is to save the latitude and longitude the first time you successfully geocode a given address. There are a number of advantages to this:
- Once you know that a given address is correctly geocoded, saving its coordinates means that a change on Google's side can't cause it to go astray.
- Geocoding all your addresses ahead of time means that later tasks, such as loading of a web page, will be faster.
- It's generally a more efficient use of computing resources, for both you and Google.
This principle is sometimes known as OHIO, an acronym for Only Handle It Once: it's better to get your geocoding done for good the first time and leave it alone thereafter. We'll look into techniques for doing this with geocoding in Chapters 9 and 10, but for now, just be aware of the issues and don't rush headlong into geocoding lots of addresses.
Driving Directions
Now that we have geocoded a starting address, let's press on with the Route Finder page by getting driving directions to a destination. For reasons that will become clear later in the chapter, we aren't going to support directions to arbitrary addresses, just a limited list of locations that we know to be acceptable. Listing 5-4 shows that list as XHTML content to be added to the page sidebar, within a select element. It could easily contain a much more comprehensive list of destinations in San Francisco, but this is sufficient for illustrating the technique.
Listing 5-4. select a Destination
<p>

  Destination

  <select id="finish" onchange="destinationChange()">

    <option value="">Please select:</option>

    <option value="37.809, −122.4146" >The Embarcadero</option>

    <option value="37.79516, −122.39379">Ferry Terminal</option>

    <option value="37.76976, −122.46765">Golden Gate Park</option>

    <option value="37.80733, −122.47411">The Presidio</option>

    <option value="37.79482, −122.40277">Transamerica Pyramid</option>

  </select>

</p>
As you've seen before, this select has an event listener. Changing the selected option calls the destinationChange JavaScript function, as shown in Listing 5-5.
Listing 5-5. The destinationChange Event Handler
function destinationChange()

{

  // destinationChange: Update destination marker from the drop-down list


  // Extract the new destination from the drop-down

  var finish = document.getElementById('finish'),

  var value = finish.options[finish.selectedIndex].value;

  if (value != '')

  {

    // Valid destination:  create a coordinates object from it

    var coordinates = eval('new GLatLng(' + value + ')'),


    if (finishMarker == null)

    {

      // This is the first time the user has selected a destination

      finishMarker = new GMarker(coordinates);

      map.addOverlay(finishMarker);

    }

    else

    {

      // The marker already exists; just move it to the new coordinates

      finishMarker.setPoint(coordinates);

    }


    // Ensure that the destination point is visible on the map

    if (!map.getBounds().contains(coordinates))

      map.panTo(coordinates);

  }

};
Note that this event handler is shown in isolation here for clarity, but in practice it should be added (along with var finishMarker) to our existing JavaScript (from Listings 5-2 and 5-3).
Tip All listings in this book are availabel for download from my web site. For example, to see destinationChange in context, Listing 5-5 may be found at http://sterlingudell.com/bgmm/chapter_05/listing_05_05.js, or in ZIP format from http://apress.com.
There are several interesting things going on at the beginning of this function, so let's go over them one by one. First, we're using our old friend getElementById to retrieve the select element itself:
var finish = document.getElementById('finish'),
Now the fun starts. We want to get the selected option and extract its value attribute (containing the latitude and longitude for the destination). All select elements have a built-in attribute, selectedIndex, that tells which option in their list is currently selected. So we can use this, as finish.selectedIndex, to get at the option in question. And finally, the value attribute of that option returns the coordinate pair specified in the XHTML (back in Listing 5-4):
var value = finish.options[finish.selectedIndex].value;
It's a lot to do in a single line of JavaScript, so take your time and make sure you're clear on each piece.
Now we have the coordinates as a string, such as '37.809, −122.4146', in our value variable. We're not quite done yet, though, because we need them as a GLatLng object to feed back into the Maps API. We create this object by using the eval function:
var coordinates = eval('new GLatLng(' + value + ')'),
We add (or concatenate) the latitude/longitude value into the string being evaluated and get a GLatLng object out the other side.
These few lines of code are typical of extracting data from XHTML content for use in JavaScript; it's often a bit messy, but it's essential to making a dynamic web page work. Once we've finished this, in the latter half of destinationChange we're ready to move on and create a destination marker, much as we did with startMarker in Listing 5-3. And the results of all this hard work can be seen in Figure 5-3.

Figure 5-3. Destination marked on the map
So now we have both a starting point and a destination, and we're ready to get directions from one to the other. In preparation, we need to add a couple of elements to our XHTML, as highlighted in Listing 5-6.
Listing 5-6. XHTML for Driving Directions
<!DOCTYPE html PUBLIC "-//W3C//DTD XHTML 1.0 Strict//EN"
"http://www.w3.org/TR/xhtml1/DTD/xhtml1-strict.dtd">
<html xmlns="http://www.w3.org/1999/xhtml">
<head>
<meta http-equiv="Content-Type" content="text/html; charset=UTF-8" />
<title>Your Map and the Real World</title>
<link type="text/css" rel="stylesheet" href="../chapter_04/listing_04_02.css" />
<script type="text/javascript
src="http://maps.google.com/maps?file=api&v=2.124&key="></script>
<script type="text/javascript" src="listing_05_07.js"></script>
</head>
<body onload="loadMap()" onunload="GUnload()">
<div id="map"></div>
<div id="sidebar">
<h2>Route Finder</h2>
<p>
Start Address
<button onclick="geocode()">Find</button>
<input type="text" id="start" />
</p>
<p>
Destination
<select id="finish" onchange="destinationChange()">
<option value="">Please select:</option>
<option value="37.809, −122.4146">The Embarcadero</option>
<option value="37.79516, −122.39379">Ferry Terminal</option>
<option value="37.76976, −122.46765">Golden Gate Park</option>
<option value="37.80733, −122.47411">The Presidio</option>
<option value="37.79482, −122.40277">Transamerica Pyramid</option>
</select>
<button onclick="getDirections()">Directions</button>
</p>
<div id="directions"></div>
</div>
</body>
</html>
The button element is quite straightforward; it's really just a place for the user to click to initiate the process. The other new element, <div id="directions">, will be used by Google's driving directions object to display the results as text in the sidebar.
As with the geocoder, interacting with that object will occur in two parts: first we initialize it, and then we use it. To initialize the object, we add a couple of lines to our loadMap function:
var panel = document.getElementById('directions'),

directions = new GDirections(map, panel);
Note that we're linking the directions object to both the map and the sidebar div; thus any driving directions generated will be both drawn on the map and listed in the sidebar.
The object is actually used in the getDirections event handler (attached to our new button element), as shown in Listing 5-7.
Listing 5-7. The Driving Directions Event Handler
function getDirections()

{

  // getDirections: Request driving directions from start to destination


  if ((startMarker == null) || (finishMarker == null))

    alert('Please select a starting address and destination for directions.'),

  else

  {

    // Collect the start and finish points as 'lat,lon' strings

    var waypoints = [startMarker.getPoint().toUrlValue(),

                     finishMarker.getPoint().toUrlValue()];


    // Load driving directions for those points

    directions.loadFromWaypoints(waypoints);

  }

};
Again, what you see in Listing 5-7 is a single function in isolation, to be appended to our growing JavaScript listing. Fear not; I'll bring it all together in one place again before the end of the chapter.
We lead off here with a bit of defensive coding: if the user tries to get directions before selecting their endpoints, we remind them of this with an alert. Otherwise, we get on with the business of the driving directions.
The first stage is to collect the endpoints, with a multiple-step process (similar to the way we built tabbed infowindows from XHTML content in Chapter 4):
- Get the coordinates for each marker, using its
getPointfunction:
startMarker.getPoint() - Convert each point into a text string, using
toUrlValue:
startMarker.getPoint().toUrlValue() - Declare a variable,
waypoints, and initialize it with the two strings:
var waypoints = [startMarker.getPoint().toUrlValue(),

                 finishMarker.getPoint().toUrlValue()];
The only slightly odd thing here is that we're using toUrlValue to convert each coordinate pair from an object into a string, the opposite of what we did with our destination select earlier. Google seems to have built the GDirections object this way to facilitate using it with external data, but in our case it actually means an extra step.
Note Directions can also be retrieved directly from addresses, rather than from coordinates as I'm doing here. While such an approach is easier in the simplest case (because you don't need to do the geocoding yourself), it becomes more complicated to handle when the geocoding inevitably goes wrong.
At any rate, we're finally ready to request the directions, and we do so as follows:
directions.loadFromWaypoints(waypoints);
It seems almost anticlimactic, because we've done all the hard work before getting to this point, but the results are well worth it, as shown in Figure 5-4.
As you can see, Google does quite a lot for you in supplying directions; details include total distance and time in the sidebar, directions and distance for each turn, and blowup maps all along the way.

Figure 5-4. Driving directions on the map and in the sidebar, with built-in blowup maps
Traffic
We've had some intense JavaScript in the last couple of sections, so let's take a break and do something easy before we launch into more difficult features like Street View. As an enhancement to the driving directions, in this section we'll add a real-time traffic overlay to our map.
Again, we'll start off with a user-interface element to control the feature, highlighted in Listing 5-8.
Listing 5-8. XHTML for the Traffic Overlay
<!DOCTYPE html PUBLIC "-//W3C//DTD XHTML 1.0 Strict//EN"
"http://www.w3.org/TR/xhtml1/DTD/xhtml1-strict.dtd">
<html xmlns="http://www.w3.org/1999/xhtml">
<head>
<meta http-equiv="Content-Type" content="text/html; charset=UTF-8" />
<title>Your Map and the Real World</title>
<link type="text/css" rel="stylesheet" href="../chapter_04/listing_04_02.css" />
<script type="text/javascript
src="http://maps.google.com/maps?file=api&v=2.124&key="></script>
<script type="text/javascript" src="listing_05_09.js"></script>
</head>
<body onload="loadMap()" onunload="GUnload()">
<div id="map"></div>
<div id="sidebar">
<h2>Route Finder</h2>
<p>
Start Address
<button onclick="geocode()">Find</button>
<input type="text" id="start" />
</p>
<p>
Destination
<select id="finish" onchange="destinationChange()">
<option value="">Please select:</option>
<option value="37.809, −122.4146">The Embarcadero</option>
<option value="37.79516, −122.39379">Ferry Terminal</option>
<option value="37.76976, −122.46765">Golden Gate Park</option>
<option value="37.80733, −122.47411">The Presidio</option>
<option value="37.79482, −122.40277">Transamerica Pyramid</option>
</select>
<button onclick="getDirections()">Directions</button>
</p>
<p>
<input type="checkbox" id="show_traffic" checked="checked"
onclick="toggleTraffic()" />
Show Traffic
</p>
<div id="directions"></div>
</div>
</body>
</html>
As mentioned, the traffic object is an overlay, so once it's initialized (in our loadMap function), we add it to the map as we would a GMarker or GGeoXml, with the addOverlay function:
traffic = new GTrafficOverlay();

map.addOverlay(traffic);
Similarly, the event handler to control its display looks remarkably like the toggleCampgrounds function used in Chapter 4. It's exactly the same principle: when the user has clicked the checkbox, the toggleTraffic function executes and hides or shows the overlay based on the state of the checkbox (see Listing 5-9).
Listing 5-9. The JavaScript Function to Control the Traffic Overlay
function toggleTraffic()

{

  // toggleTraffic: Turn the traffic overlay on or off

  if (document.getElementById('show_traffic').checked)

    traffic.show();

  else

    traffic.hide();

};
The results are visible in Figure 5-5; major highways are overlaid with thick lines in different colors based on current traffic congestion.
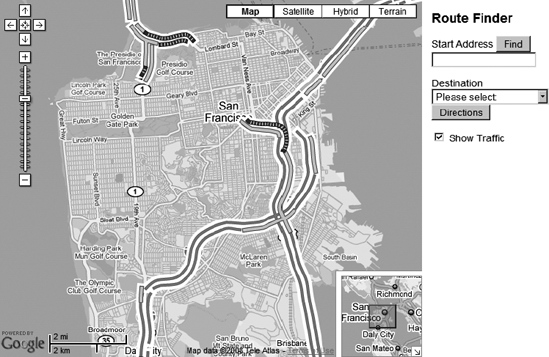
Figure 5-5. Real-time traffic
Street View
Google's Street View feature is a network of immersive, street-level, panoramic photos covering much of the United States and expanding in other countries. Like most Google Maps features, it's available to developers through the Maps API, so we're going to add it to our Route Finder map.
Working with panoramic photos is inherently a bit complicated, so perhaps it's not surprising that integrating Street View is not entirely simple. I've pared it back as much as I realistically can, but nonetheless, it's still the most involved piece of JavaScript we've tackled so far in this book. But it is worth it; Street View really is an impressive addition to a mapping application. We're going to use it to allow the page visitor to see any of our destinations up close and personal. It would also be a great feature for a realty web site, a travel guide, or many other types of maps.
We'll start off easily enough, adding just another button to our XHTML, as in Listing 5-10. Clicking the Street View button should open an infowindow containing the panorama for the currently selected destination. In addition, we're going to need a bit more CSS, so that's referenced here; I'll discuss it in detail in Listing 5-13, in a few pages. Note also that this is the final XHTML listing for this chapter, containing every feature we'll cover.
Moving on to the JavaScript, we're going to need a variable for a Street View object, so we declare that first, at the top:
var streetviewClient;
This is the main Street View "controller" object. We'll then initialize it in the usual place, our loadMap function:
streetviewClient = new GStreetviewClient();
The pieces are now in place, so it's time to start looking at the code to make it work. The first stage can be found in Listing 5-11, the onclick event handler for the Street View button on the page.
Listing 5-11. The getView Function
function getView()

{

  // getView: Retrieve a streetview panorama for the selected destination


  if (finishMarker == null)

    alert('Please select a destination.'),

  else

  {

    // Retrieve the streetview panorama for the coordinates of the marker

    var coordinates = finishMarker.getPoint();

    streetviewClient.getNearestPanorama(coordinates, afterView);

  }

};
We lead off here with defensive coding again, making sure that the user has selected a destination. Assuming she has, you'll need the coordinates of the destination marker, from the getPoint function that we've used before:
var coordinates = finishMarker.getPoint();
Then a fairly simple call to the getNearestPanorama function passes control to the streetviewClient object. Google's panoramic photos are all at specific points throughout the city, so this function asks for information about the one closest to our target.
streetviewClient.getNearestPanorama(coordinates, afterView);
It takes two parameters, the coordinates of our target point and the name of a callback function to be invoked after the panorama retrieval has finished. This function, afterView, can be seen in Listing 5-12. It looks daunting—the largest function we've yet written—but as usual, take it one step at a time and it should all make sense.
Listing 5-12. The Street View Callback Function
function afterView(streetviewData)

{

  // afterView: Callback function for Street View panorama retrieval


  if (streetviewData.code == G_GEO_SUCCESS)

  {

    // Create a DHTML element to contain the panorama

    var streetViewer = document.createElement('div'),


    // Create the Street View panorama object

    var panorama = new GStreetviewPanorama(streetViewer);


    // Extract the precise lat/lon coordinates from the Street View data object

    var coordinates = new GLatLng(streetviewData.location.lat,

                                  streetviewData.location.lng);


    // Tell the panorama object to display view for those coordinates

    panorama.setLocationAndPOV(coordinates, streetviewData.location.pov);


    // Open an infowindow with the panorama container element

    streetViewer.className = 'streetViewer';

    finishMarker.openInfoWindow(streetViewer);

  }

};
We begin with defensive coding again, making sure that the panorama retrieval worked by checking its code against the predefined value G_GEO_SUCCESS. Assuming that's OK, we move into the main processing of the callback.
Tip Variables in all uppercase, like G_GEO_SUCCESS here, typically signify values that are predefined for you in the API or elsewhere. This use of uppercase is not a requirement, but it is a widely used convention that makes these predefined values easier to distinguish from "ordinary" variables, and it's one that Google makes good use of in the Maps API.
If you're familiar with programming in other languages, these are the closest that JavaScript has to constants.
First, we need an XHTML container for the panorama. Because the viewer will go into an infowindow (which is not yet open), we need to generate this container on the fly. You do this with the document.createElement function; it dynamically creates an XHTML element of the supplied type (in this case, a div). We can then assign this div to a local variable, streetViewer, for use later in the function:
var streetViewer = document.createElement('div'),
Next up is creating the Flash panorama viewer object:
var panorama = new GStreetviewPanorama(streetViewer);
Note that you pass GStreetviewPanorama the XHTML container where you'll want it to display; in our case, it's the streetViewer div created in the previous step.
Moving on, we need to get the coordinates for this panorama from the streetviewData object that we received in the callback. If you recall, we requested the panorama nearest to our destination point; we didn't know the precise location of that panorama. But the coordinates returned in streetviewData specify that location:
var coordinates = new GLatLng(streetviewData.location.lat,

                              streetviewData.location.lng);
It's a fairly simple manner of creating a new GLatLng object from the received coordinates.
The next step is to initialize the panorama object from those coordinates, like so:
panorama.setLocationAndPOV(coordinates, streetviewData.location.pov);
This call also includes a second parameter for POV, or point of view. A panorama's point of view is essentially what direction it's looking from its base coordinates: north/south, east/west, up/down, and zoom in/out. We're just going to use the default POV for the panoramic photo from Google, contained within location.pov in the streetviewData parameter. Point of view can get quite complicated, so let's leave it at that for now; this is good enough for our purposes.
We're nearly there now; you just need to prepare the container element for display.
streetViewer.className = 'streetViewer';
The process of setting the className of the streetViewer container element is exactly the same as for adding class="streetViewer" in ordinary XHTML, and it allows you to target the element with CSS (as you'll see in the next listing).
Finally, all the pieces are in place, and you're ready to display an infowindow containing the panorama.
finishMarker.openInfoWindow(streetViewer);
The openInfoWindow function passes the supplied XHTML element—in our case, the streetViewer container div, with its panorama—to the standard Google Maps infowindow.
And we're done, with the fruits of our labor visible in Figure 5-6, an interactive panorama that the user can move and zoom to get a real-world view of their destination.
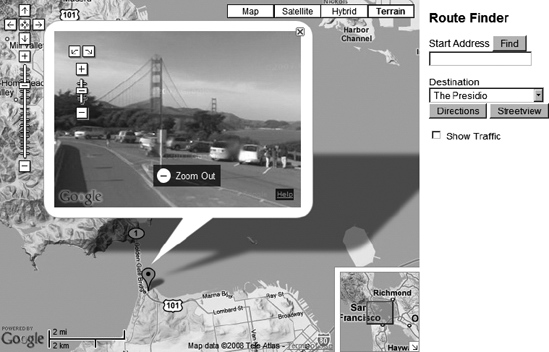
Figure 5-6. Street View panorama for a destination
As alluded to previously, there's one final aspect required, a bit of CSS to control the presentation of the panorama. Specifically, we just need to set its height and width, as highlighted in Listing 5-13. It's accomplished using the className of streetViewer that we applied in JavaScript.
Listing 5-13. Style for the Street View Panorama
html {

  height: 100%;

}


body {

  height: 100%;

  margin: 0;

  font-family: sans-serif;

  font-size: 90%;

}


#map {

  width: 75%;

  height: 100%;

}


#sidebar {

  position: absolute;

  left: 75%;

  top: 0;

  right: 0;

  bottom: 0;

  overflow: auto;

  padding: 1em;

}


h1 {

  margin: 0;

  font-size: 220%;

}

h2 {

  margin: 0;

  font-size: 125%;

}


.streetViewer {

  width: 350px;

  height: 250px;

}
Incidentally, Street View is why I used a select list for destinations, rather than geocoding addresses as we do for the starting location. Google doesn't have panoramic photos for every address, so I'm limiting the destinations to places where I know Street View exists.
Map Advertising
As a reward for getting through the Street View code, how about earning a bit of money from your map? That's exactly what the GAdsManager object does, placing location-sensitive Google AdSense advertisements on your map. Because they're placed geographically in an area that your page visitor is already looking at, they're likely to be relevant to that visitor, and you'll get paid with every click-through.
Because map advertising is a part of Google's AdSense program, you'll need to have an AdSense account to put ads on your own map. It's the same program used for placing standard Google ads on ordinary web pages, so if you are already doing that, you can reuse your publisher ID here. If you don't have one yet, you can sign up at http://www.google.com/adsense. Google will review your web site and, ideally, approve it for the AdSense program. However, be aware that not every application is approved, and it may take a few days in any case.
Assuming that you have been accepted to the AdSense program, your publisher ID ("pub-" followed by a 16-digit number, like "pub-01234567890123456") can be found in the upper-right corner of your AdSense account pages. You'll need it to place ads on your own maps.
So with your publisher ID in hand, you're ready to begin. You start by declaring a variable for the ad manager object, at the beginning of the JavaScript as usual:
var ads;
Once you've done that, showing ads on the map is as simple as initializing ads in your loadMap function.
ads = new GAdsManager(map, 'pub-01234567890123456', {maxAdsOnMap: 10});

ads.enable();
A few additional points about GAdsManager:
- I'm supplying a single option,
maxAdsOnMap, meaning that my map will never show more than 10 advertisements at once. - In addition to creating the
adsobject, we also have toenableit. Advertisements are disabled by default. - Don't forget to use your own AdSense publisher ID (as a text string) in the second parameter.
The results are shown in Figure 5-7.
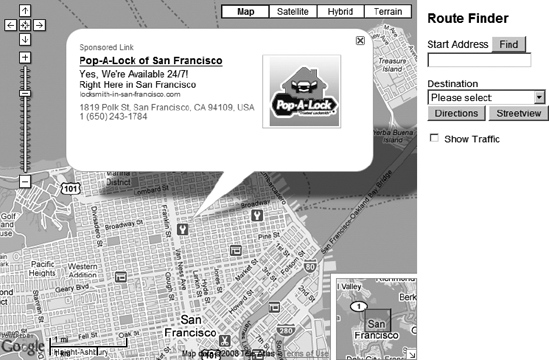
Figure 5-7. Location-specific ads on the map
It's also worth noting here that map advertising is relatively new and doesn't yet have the adoption rate enjoyed by traditional AdSense. Advertisers also come and go all the time. So don't be surprised if any given map has few ads at any given moment.
Bringing It All Together
Our Route Finder map is now complete; as a review, Listing 5-14 brings together all the code for the various components.
Listing 5-14. The Complete Route Finder Page JavaScript
// Declare variables for later use

var map;

var geocoder;

var startMarker;

var finishMarker;

var directions;

var traffic;

var streetviewClient;

var ads;


function loadMap()

{

  // loadMap: initialize the API and load the map onto the page


  // Get the map container div

  var mapDiv = document.getElementById('map'),


  // Confirm browser compatibility with the Maps API

  if (!GBrowserIsCompatible())

  {

    mapDiv.innerHTML =

      'Sorry, your browser isn't compatible with Google Maps.';

  }

  else

  {

    // Initialize the core map object

    map = new GMap2(mapDiv,

      {mapTypes: [G_NORMAL_MAP, G_SATELLITE_MAP, G_HYBRID_MAP, G_PHYSICAL_MAP]});


    // Set the starting map viewport, based on center coordinates and zoom level

    var coordinates = new GLatLng(37.75, −122.44);

    map.setCenter(coordinates, 12);


    // Add the standard map controls

    map.addControl(new GLargeMapControl());

    map.addControl(new GScaleControl());

    map.addControl(new GOverviewMapControl());

    map.addControl(new GMapTypeControl());


    // Initialize the geocoder object and tie it to the current map view

    geocoder = new GClientGeocoder();

    geocoder.setViewport(map.getBounds());


    // Initialize the driving directions object

    var panel = document.getElementById('directions'),

    directions = new GDirections(map, panel);


    // Initialize the traffic object

    traffic = new GTrafficOverlay();

    map.addOverlay(traffic);


    // Initialize the Street View controller object

    streetviewClient = new GStreetviewClient();


    // Initialize the map advertising object

    ads = new GAdsManager(map, 'pub-01234567890123456', {maxAdsOnMap: 10});

    ads.enable();

  }

};


function geocode()

{

  // geocode: Call the Google geocoder with the address supplied by the user

  var address = document.getElementById('start').value;

  geocoder.getLatLng(address, afterGeocode);

};


function afterGeocode(coordinates)

{

  // afterGeocode: Callback function for the geocoder, showing the coords on the map

  if (coordinates == null)

    alert('Address not found. Please try again.'),

  else if (!map.getBounds().contains(coordinates))

    alert('Address not found in map area. Please try again.'),

  else

  {

    // Address was found

    if (startMarker == null)

    {

      // This is the first time we've geocoded an address, so create the marker

      startMarker = new GMarker(coordinates);

      map.addOverlay(startMarker);

    }


    else

    {

      // The marker already exists;; just move it to the new coordinates

      startMarker.setPoint(coordinates);

    }

  }

};


function destinationChange()

{

  // destinationChange: Update destination marker from the drop-down list


  // Extract the new destination from the drop-down

  var finish = document.getElementById('finish'),

  var value = finish.options[finish.selectedIndex].value;

  if (value != '')

  {

    // Valid destination:  create a coordinates object from it

    var coordinates = eval('new GLatLng(' + value + ')'),


    if (finishMarker == null)

    {

      // This is the first time the user has selected a destination

      finishMarker = new GMarker(coordinates);

      map.addOverlay(finishMarker);

    }

    else

    {

      // The marker already exists; just move it to the new coordinates

      finishMarker.setPoint(coordinates);

    }


    // Ensure that the destination point is visible on the map

    if (!map.getBounds().contains(coordinates))

      map.panTo(coordinates);

  }

};


function getDirections()

{

  // getDirections: Request driving directions from start to destination


  if ((startMarker == null) || (finishMarker == null))

    alert('Please select a starting address and destination for directions.'),


  else

  {

    // Collect the start and finish points as 'lat,lon' strings

    var waypoints = [startMarker.getPoint().toUrlValue(),

                     finishMarker.getPoint().toUrlValue()];


    // Load driving directions for those points

    directions.loadFromWaypoints(waypoints);

  }

};


function toggleTraffic()

{

  // toggleTraffic: Turn the traffic overlay on or off

  if (document.getElementById('show_traffic').checked)

    traffic.show();

  else

    traffic.hide();

};


function getView()

{

  // getView: Retrieve a Street View panorama for the selected destination


  if (finishMarker == null)

    alert('Please select a destination.'),

  else

  {

    // Retrieve the Street View panorama for the coordinates of the marker

    var coordinates = finishMarker.getPoint();

    streetviewClient.getNearestPanorama(coordinates, afterView);

  }

};


function afterView(streetviewData)

{

  // afterView: Callback function for Street View panorama retrieval


  if (streetviewData.code == G_GEO_SUCCESS)

  {

    // Create a DHTML element to contain the panorama

    var streetViewer = document.createElement('div'),


    // Create the Street View panorama object

    var panorama = new GStreetviewPanorama(streetViewer);


    // Extract the precise lat/lon coordinates from the Street View data object

    var coordinates = new GLatLng(streetviewData.location.lat,

                                  streetviewData.location.lng);


    // Tell the panorama object to display view for those coordinates

    panorama.setLocationAndPOV(coordinates, streetviewData.location.pov);


    // Open an infowindow with the panorama container element

    streetViewer.className = 'streetViewer';

    finishMarker.openInfoWindow(streetViewer);

  }

};
Recall that the final, complete XHTML for this chapter can be found back in Listing 5-10.
Summary
In the last two chapters we've covered a wide range of ways to improve your Maps API implementation, including plenty of practical examples that you can apply directly to your own code. You know how to geocode addresses into map coordinates—and when not to. You're also ready to create your own map mashups with all the latest bells and whistles, including these:
- Driving directions
- Traffic overlays
- Street View immersive panoramas
- Map-based advertising
So next, we're going to change gears, moving on from the core Maps API and entering the world of mapplets, small map "gadgets" that run on the main Google Maps web site rather than a page of your own. In the process, you'll learn how to leverage the traffic of maps.google.com to expose your mashup to a far wider audience.