CHAPTER 7
Creating a Mapplet
By now, you should have a pretty good understanding of the mapplet ecosystem: where mapplets live, what they do, and their relation to the familiar Google Maps API. By inserting your own geospatial content and functionality into maps.google.com, as we've seen, mapplets are an excellent way to open your geodata to millions of potential users.
So, the logical next step is to learn how to build and deploy a mapplet of your own. I'll start this chapter by presenting and analyzing a simple mapplet, giving you a guided tour of its internal structure and how it differs from code we've covered before. We'll then take a look at related mapplet programming considerations, including hosting, installing, testing, and publishing. The chapter closes with another, real-world example of a basic mapplet that can serve as a direct template for one of your own.
A "Hello, World" Mapplet
Let's jump right into our first example, which draws heavily from the "Hello, World" code of Chapter 2. Listing 7-1 shows that example converted into mapplet form. Some of the code should already look familiar to you, but I'll review it all in the next few pages.
Listing 7-1. The "Hello, World" Mapplet
<?xml version="1.0" encoding="UTF-8"?>

<Module>

  <ModulePrefs title="Creating a Mapplet">

    <Require feature="sharedmap" />

  </ModulePrefs>

  <Content type="html"><![CDATA[

    <style type="text/css">

      h1 {

        font-size: 120%;

      }

    </style>


    <h1>New York City</h1>

    <p id="hello">Hello, World!</p>


    <script type="text/javascript">

      // Initialize the map

      var map = new GMap2();

      var coordinates = new GLatLng(40.72, −73.99);

      map.setCenter(coordinates, 11);


      // Add a marker with infowindow

      var marker = new GMarker(coordinates);

      marker.bindInfoWindow(document.getElementById('hello'));

      map.addOverlay(marker);

    </script>

  ]]></Content>

</Module>
The base language here is XML, as discussed in the previous chapter, so all of the code is contained within XML elements. Note the first line of the mapplet:
<?xml version="1.0" encoding="UTF-8"?>
A line like this starts off every XML document and simply indicates to any computer reading it that it is indeed XML. The version is always 1.0. The encoding, how the text of the document is represented internally, should usually be UTF-8. So as a rule, every mapplet will start with a line just like this one.
Caution Although encodings other than UTF-8 will work for English-language mapplets, XML that contains special characters from another language (such as ñ or ç) is more sensitive to encoding. To be safe, stick with UTF-8, unless you're working with a specific encoding for another (especially non-Western) language and you know what you're doing.
A couple of other notes about XML bear mentioning here. First, it's customary to refer to a complete unit of XML (such as Listing 7-1) as a document, even though it doesn't always correspond to how we traditionally use that word. In this case, the XML document specifies a mapplet, and as such you'll also see it referred to as the mapplet specification. I'll use both terms throughout this part of the book.
Second, you may have noticed that the tag names in this XML document are in mixed upper- and lowercase. If your only prior experience with XML is XHTML, this may look wrong to you. But every XML flavor defines its own standard for character case, and the Mapplet API specifies camel case (as described in Chapter 3). So for a mapplet, it would be wrong to use the XHTML convention of all lowercase tags.
Gadget-Related Code
As mentioned in the previous chapter, mapplets are derived from the iGoogle Gadgets API, and this shared lineage is evident in much of the basic code structure. I'll go over the basic concepts you need to know for mapplets here, and throughout this part of the book, I'll be pointing out frequent code snippets drawn from the underlying Gadgets API.
The Module Element
The first XML element in the document is Module, and the rest of the mapplet's code is always contained within its opening and closing tags. Incidentally, all well-formed XML documents have a single enclosing element like this, and it's actually called the document element. The Module element doesn't take any attributes, so it's always simply <Module> and </Module> at the beginning and end of your mapplet specification.
The name "Module" itself is a nod to the idea that each mapplet is a self-contained piece, ready to be plugged into the My Maps page, allowing the user to apply functionality in a modular way.
Module Preferences
Within Module, the next element in the mapplet is ModulePrefs. Short for "Module Preferences," ModulePrefs contains various metadata defining information about the mapplet, rather than the mapplet's functional code. It roughly corresponds to some of the elements found in the head section of an XHTML document, such as the title and meta tags.
Most of the metadata in ModulePrefs is specified as attributes. For simplicity, Listing 7-1 contains only a single attribute:
title="Creating a Mapplet"
Not surprisingly, this is the title of the mapplet, which Google Maps will display in the sidebar area whenever our mapplet is active. Unless we specify otherwise, this will also be the title shown for our mapplet in Google's directory.
We'll see some more attributes for ModulePrefs later in the chapter, but they'll all follow the pattern shown here, so this is sufficient as an introduction.
The Shared Map
Within the ModulePrefs opening and closing tags are other XML elements that serve as directives to the mapplet platform, requesting various features that our mapplet will require. In the very simple example in Listing 7-1 there is again only one of these:
<Require feature="sharedmap" />
The sharedmap feature is the main Google map itself, and it is actually this one line of code that marks this XML document as a mapplet specification (rather than an iGoogle gadget, which would otherwise use the same set of XML tags). As such, this line is required within the ModulePrefs element of every mapplet.
And again, there are other possible features that mapplets may Require. I'll cover more later in this chapter and the next, as well as in Appendix C.
The Content Element
After ModulePrefs, there's only one XML element remaining in our mapplet specification, Content. This is where the real mapplet functionality lives, in the form of XHTML snippets, CSS, and JavaScript, all of which I'll discuss in this section.
The Content element has one required attribute, type="html". This is another spillover from the Gadgets API: gadgets have several possible types that behave in different ways. Only the html type is applicable to mapplets, though, so this is another piece of code that is simply required.
So as a practical matter, the main XHTML functionality of the mapplet will always be contained between the following two lines:
<Content type="html"><![CDATA[
and
]]></Content>Mapplet XHTML and CSS
We're now finished with the gadget-derived code; everything within the Content element is pure XHTML. Apart from the script element (which will be discussed in the next section), the content here will all be contained in the Google Maps sidebar, at the lower left of the browser window.
As such, our simple introductory mapplet doesn't have much content, just a first-level heading and a paragraph saying "Hello, World":
<h1>New York City</h1>

<p id="hello">Hello, World!</p>
I've added an id to the paragraph so that I can reuse its content from the JavaScript, but we'll get to that in a minute.
For illustration, I've also included a bit of CSS, modifying the appearance of the heading:
h1 {

  font-size: 120%;

}
You may be wondering why the CSS (and JavaScript) are internal to the code, in style and script elements, rather than linked in from external files as is the usual web design best practice. It's not a requirement of the Mapplets API—a link element will work just fine in a mapplet—but it is recommended. Here's why.
If you'll recall, in the last chapter I discussed that mapplets, because they live on maps.google.com, can potentially get a lot of traffic. And I also mentioned that Google hosts the actual mapplet served to site visitors, so that your host's bandwidth won't get overwhelmed if you create a popular mapplet.
However, if you link external CSS or JavaScript into your mapplet, such a linkage effectively bypasses the Google cache and goes directly to your own host. If this mapplet then becomes very popular, your host needs to support all those requests and could become overloaded. So it's generally safer to let Google handle it; they have more bandwidth than you do.
There will occasionally be times when it's impractical to avoid using external files, especially if you want to use third-party JavaScript libraries. In such a case, you may simply have to support the traffic—or use the trick for utilizing the Google cache you'll find in Appendix C. But generally, it's cleaner and simpler to just include the CSS and JavaScript internally; so that's how my examples are written.
Mapplet JavaScript
We've finally reached the code that makes the mapplet work, and it's plain JavaScript:
// Initialize the map

var map = new GMap2();

var coordinates = new GLatLng(40.72, −73.99);

map.setCenter(coordinates, 11);


// Add a marker with infowindow

var marker = new GMarker(coordinates);

marker.bindInfoWindow(document.getElementById('hello'));

map.addOverlay(marker);
If you were to compare this with the original Maps API "Hello, World" code back in Listing 2-5, you'd find that it has extremely few differences:
- Initializing the
GMap2object is easier, taking no parameters, as discussed in the preceding chapter. - The map is centered on different coordinates and uses a different zoom level, just for a bit of variety.
- We're using
bindInfoWindowfor our popup content, following a lead from Chapter 4.
That's it! And with the exception of the GMap2 initialization, all of this code is exactly as it would be in the traditional Maps API. I've been telling you all along that mapplets are more similar to the Maps API than they are different, and here's the proof. It's actually the same JavaScript code.
Tip Recall that, in the previous section, we included some CSS to style the sidebar content? With mapplets, such CSS doesn't apply to infowindows, even when we reuse the content from the sidebar (as we've done here). To style infowindow content in a mapplet, you'll generally need to use inline style attributes on the content elements themselves.
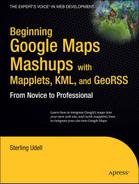
The end result can be seen in Figure 7-1: the sidebar content (including the mapplet title and URL added automatically by Google), the map marker on New York City, and the infowindow.
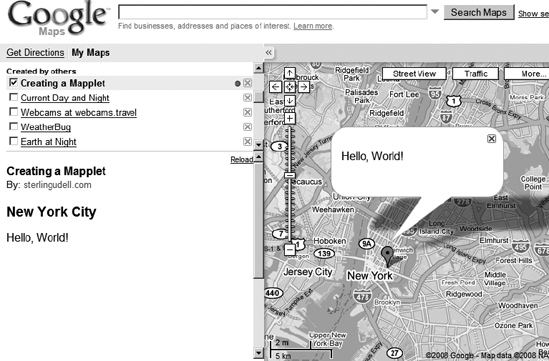
Figure 7-1. Hello, World!
Deploying Your Mapplet
The code for our introductory mapplet is now complete, so in this section we'll look at how to get it working on Google Maps. Because mapplets can't work in isolation, this is a more involved process than we had in the first part of the book, where we could simply place the Maps API code in a local XHTML file and look at it in our browser.
Hosting and Uploading
With mapplets, the specification (and any associated files) must be hosted on a web server where the Google Map can access it. This is true even though the mapplet code used on maps.google.com is hosted by Google itself; Google is simply caching it for you.
If you have a web server or hosting service of your own, that's usually the best place to host your mapplet. When you do so, the mapplet's XML document is no different from a web page's XHTML source; you'll edit it on your own computer and upload it as you ordinarily would. I recommend creating a separate directory or folder on your host for your mapplets, but such organization is up to you.
In any case, you'll need the URL of your mapplet's specification on your host for the next step. It'll look something like this:
http://www.mydomain.com/mapplets/my_mapplet.xml
Of course, substitute your own host's domain and mapplet path names into the URL (though it's customary for XML document file names to end with .xml). And as with any web development, whenever you make a change to your mapplet, you'll need to upload the latest version to your host before it will be availabel for use.
If you're going this route and hosting your own mapplets, you won't need to use the Google Gadget Editor, so feel free to skip the next section and rejoin the chapter at "Installing by URL."
The Google Gadget Editor
Google provides an online tool for editing and hosting iGoogle gadgets, called the Gadget Editor, and we can use the same tool for mapplets. If you don't have a web server to host your mapplets on, this is a good alternative. Even if you do have your own host, this can be a convenient place to try out new mapplet concepts, before creating an "official" version on your own server. Doing so saves the uploading step during the development cycle.
The Gadget Editor is itself a gadget, and as such, you'll need to install it before it can work. And the natural place to do so is iGoogle, the personalized Google start page. If you haven't done so yet, you'll first need to sign up for iGoogle by clicking on the iGoogle link at www.google.com. Once you're in iGoogle, you can install the Gadget Editor by browsing to http://tinyurl.com/6b8hpp and clicking Add It Now.
With the Gadget Editor installed on your iGoogle home page, you'll see that it's basically a small text editor, as shown in Figure 7-2. Generally, it supports all the common editor functions, like cut, copy, and paste. So you create your mapplet here simply by editing its XML source.
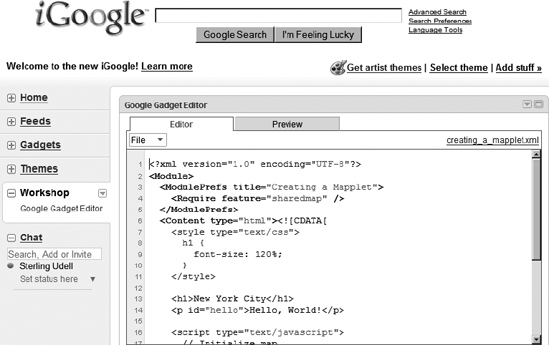
Figure 7-2. The Google Gadget Editor, in place on iGoogle
Tip The Google Gadget Editor also has a preview tab, which—when editing an ordinary iGoogle gadget—is used to see your work in progress. With a mapplet, the Preview tab shows only the sidebar content, but this can be handy to preview in its own right.
When you have your mapplet ready to try, you'll need to save it. Under the File menu at the upper left of the Gadget Editor you'll find familiar options like Save and Save As; simply save your mapplet with a logical name (ending in .xml). You can also do other standard file operations like Open and Rename; you can even open a mapplet from a URL, a good way to get started with the examples from this book.
Caution The iGoogle page will very occasionally reload itself, and when it does so, you'll lose everything not saved in the Gadget Editor. To disable its automatic reload, install the Developer gadget from http://tinyurl.com/5hkws4 onto the same iGoogle tab as the Gadget Editor. And of course, the old computer user's adage of "Save early, save often" still applies!
Then, all you need to install your mapplet on Google Maps is its URL, and this is most easily obtained from the link with your gadget's name at the upper-right corner of the editor. In Figure 7-2, for example, the link is creating_a_mapplet.xml. Simply right-click on the link and use your browser's equivalent of Copy Link Location. The result, for a file saved in the Gadget Editor, should be a URL something like this:
http://hosting.gmodules.com/ig/gadgets/file/118225708399163529220/your_mapplet.xml
This is the URL you'll need in the next section to install your mapplet.
Note The Gadget Editor's File menu has a Publish option, which is useful for deploying iGoogle gadgets. It's of less use for Mapplets, though; the only small advantage it offers over the method just described is a bit of XML validation.
Installing by URL
Once you have your mapplet's URL, you're ready to install it into Google Maps and see it in action. So, browse to maps.google.com—you'll probably want to do this in a different browser tab from the Google Gadget Editor, if you're using that—and open the My Maps page. From there, click on the Browse the Directory link at the top of the page.
Once you're in the directory, you need to depart from the usual mapplet installation procedure. Near the top of the page, next to the Search button, you should see a link labeled Add by URL (see Figure 7-3). Clicking this will open a text entry field where you can supply the URL of your mapplet, either on your own domain, or on hosting.gmodules.com if you're using the Google Gadget Editor.

Figure 7-3. Add a mapplet by URL
Tip If you try to add a valid mapplet URL but Google tells you it's not found, that typically means you have a problem with your XML. Try pasting your specification into the Mapplet Scratch Pad (discussed in the next section), which should give you a more informative error message.
After you've entered your URL and clicked the Add button, return to the main maps page with the Back to Google Maps link at the upper left of the directory page, and you should see your mapplet installed. Now you can try your mapplet out. Test it in different geographical areas and at different zoom levels, and in conjunction with other mapplets (as discussed in the previous chapter). And give yourself a pat on the back: your content is on the map!
Mapplet Developer Tools
Of course, it will often happen that your mapplet doesn't work exactly as you'd like the first time out. When this occurs, you'll naturally need to return to the mapplet's source code, either on your own host or the Google Gadget Editor (as appropriate), and make changes. You won't need to repeat the installation instructions in the previous section, though, unless your mapplet's URL changes.
Also, Google has produced a couple of specialized mapplets to assist you in the development process. You can find them in the standard mapplet directory under the Developer Tools category, as shown in Figure 7-4. My advice is to install both the Mapplet Scratch Pad and the Developer mapplet; read on for a discussion of each.

Figure 7-4. The Developer Tools mapplets
In case you're wondering, I don't find the other developer mapplet, API Reference, particularly useful. It's basically a long list of the functions in the Mapplets API, and in my opinion, it's unwieldy and less helpful than the official API documentation at http://code.google.com/apis/maps. You can also find additional reference resources in Appendix D of this book.
Developer Mapplet
You'll recall that Google caches your mapplet on its servers, ensuring that it's always availabel to Maps users without overburdening your own host. This is excellent for bandwidth conservation, but it has a downside when developing mapplets. As you're making changes to your mapplet's XML specification, adding features or hunting down bugs, your latest changes won't show up on Google Maps right away. Instead, you'll still see whatever version Google has cached on their servers, and it can be an hour or two before they refresh their cache.
The Developer Mapplet was created by Google to eliminate this problem. When active, it adds a Reload link to the upper-right corner of the sidebar area for the selected mapplet (you can actually see this link back in Figure 7-1). Clicking this link will cause Google to refresh their cache of your mapplet's XML immediately and reload it into the Maps window.
I strongly recommend that anyone working on mapplets install the Developer Mapplet tool.
Mapplet Scratch Pad
Mapplet Scratch Pad can be thought of as the Google Gadget Editor's little brother on the Maps side. At first glance, it appears similar, with an editor window for XML and a Preview button. Paste in a mapplet specification, and you can immediately see it in action on the map. Nice.
What's missing, however, are all the File operations. This means that there's no way to save your work (it'll be lost when you leave the Scratch Pad), and no way to get a URL to install your mapplet for real.
So the Mapplet Scratch Pad is of limited usefulness when you're developing a real mapplet. Nonetheless, it can be handy for early prototyping (before you copy the XML to a more permanent location), or as a fast way to debug changes to an existing mapplet. There's also hope that Google may improve the Scratch Pad with time, as the mapplet platform continues to mature.
Publishing Your Mapplet
Once you have your mapplet in satisfactory working order, you're nearly ready to share it with the world. There are a few finishing touches to be added, and then we can talk about distribution.
Additional Metadata
If you recall, toward the top of our mapplet specification is the ModulePrefs element, whose attributes contain metadata about the mapplet itself. So far we've only seen one, title, but there are a handful of others that you're recommended to complete before you release a mapplet. All of the following attributes will be included in the single ModulePrefs tag; we'll see an example in Listing 7-2 later in the chapter.
description
A short summary of what your mapplet does. For example, "Retail store locations for Acme, Inc."
author
Simply your name, as you would want it to appear on the mapplet detail page that Google automatically creates in their directory.
author_email
Your contact e-mail address, also for use in the directory. Note that there are spam considerations here; to help filter it out, Google recommends that you use a Gmail address and append a random word to your name with a plus sign, such as [email protected].
thumbnail
The URL of an image to display for your mapplet in the directory listing pages. The image should be 120 pixels wide and 60 pixels tall. This is essentially your mapplet's visual branding in the directory, and as such it typically makes sense to use a company logo or brand if availabel. But if not, a small screenshot will do.
Both this image and the next must be of type PNG, JPG, or GIF.
screenshot
Another image URL, this one is for placement on your mapplet's detail page in the directory. As its name implies, this image should be a screen capture of your mapplet in action on Google Maps, showing potential users what they'll be getting. It should be 280 pixels wide, and though it can be any height, you shouldn't make it any taller than is necessary to show what your mapplet does.
Those attributes, along with title, are what Google considers to be required for mapplets submitted to their directory. They're not strictly required—you can submit a mapplet without them—but for a good listing, you're encouraged to include as many as you can.
There are also a couple of optional attributes. Feel free to include the following in your ModulePrefs, or not, as you like.
directory_title
If you'd like the title for your mapplet in the directory to be different than what appears in the sidebar on Google Maps, include it here. This is most often used if the title of your mapplet is variable; what's shown in the directory must be constant.
author_location
A text string describing your physical location, such as "Key West, Florida, USA."
Submitting Your Mapplet to the Directory
With all the required metadata attributes present and correct, your creation is ready for submission to the Google mapplet directory. This is the same directory that we've been using throughout this chapter and the last, accessed from the Browse the Directory link on My Maps, and it's the single best way to publicize your new mapplet.
The submission process is quite easy: just point your browser to http://maps.google.com/ig/submit?synd=mpl and enter your mapplet specification's URL. Google will do some basic validation before queuing your mapplet for approval; assuming your mapplet meets their terms of service (as I'm sure it will), you can expect to see it in the main directory in one to two weeks.
Once your mapplet is submitted, you can continue to make improvements to it, and these changes will propagate to the directory automatically—there's no need to resubmit. Changes to your mapplet's functionality (in the Content section, mostly) will take effect within a couple of hours, subject to Google's ordinary caching procedures. Its directory is only updated every week or two, however, so changes to metadata will appear in that timeframe instead.
Publishing a Link
As well as using Google's directory, you can also publicize your mapplets yourself, on your own web pages. When you do so, it's best to supply a link that takes visitors directly to your mapplet's installation page on Google Maps, allowing users to add it quickly and easily.
The URL for such a link is as follows:
http://maps.google.com/maps/mpl?moduleurl=[your mapplet's URL]
Of course, you'll need to substitute your actual mapplet specification's URL for [your mapplet's URL], after the moduleurl= parameter.
As suggested in the previous chapter, a good way to integrate such a link is by including it on a web page directly related to the mapplet's functionality. For example, if you have a Contact Us page that lists your company's locations, build that same location list into a mapplet and link to it from that page.
Putting It to Use
We've now covered the entire process of building a mapplet, from conceptualization and prototyping through testing and deployment. To bring everything together and solidify the lesson, let's look at the specification for a real-world mapplet—and discuss some of its real-world issues.
For this example, the mapplet in question is for Placeopedia, the site dedicated to geo-locating Wikipedia entries that we first encountered back in Chapter 3. Take a look at Listing 7-2 for the complete specification XML, and we'll then go over it piece by piece.
Listing 7-2. The Placeopedia Mapplet Specification
<?xml version="1.0" encoding="UTF-8"?>

<Module>

  <ModulePrefs title="Placeopedia"

               description="The latest 50 Wikipedia entries with locations."

               author="Sterling Udell"

               author_email="[email protected]"

               screenshot="http://sterlingudell.com/bgmm/chapter_07/screenshot.png"

               thumbnail="http://sterlingudell.com/bgmm/chapter_07/thumbnail.png">

    <Require feature="sharedmap" />

    <Require feature="dynamic-height"/>

  </ModulePrefs>

  <Content type="html"><![CDATA[

    <style type="text/css">

      p {

        font-size: 90%;

      }

    </style>


    <p>

      The latest 50 Wikipedia entries with locations, from

      <a href="http://www.placeopedia.com/">placeopedia.com</a>.

    </p>


    <script type="text/javascript">

      // Initialize the map

      var map = new GMap2();


      // Adjust the height of the sidebar display

      _ IG_AdjustIFrameHeight();


      // Add KML feed

      var geoXml = new GGeoXml('http://www.placeopedia.com/cgi-bin/kml.cgi'),

      map.addOverlay(geoXml);

    </script>

  ]]></Content>

</Module>
Module Preferences
As always with a mapplet, the XML opens with the ModulePrefs section, and here you can see that I've included all the required metadata attributes:
<ModulePrefs title="Placeopedia"

             description="The latest 50 Wikipedia entries with locations."

             author="Sterling Udell"

             author_email="[email protected]"

             screenshot="http://sterlingudell.com/bgmm/chapter_07/screenshot.png"

             thumbnail="http://sterlingudell.com/bgmm/chapter_07/thumbnail.png">
The screenshot and thumbnail can be seen in Figures 7-5 and 7-6, containing a snapshot of the map and the Placeopedia logo, respectively.
Figure 7-5. The Placeopedia mapplet screenshot

Figure 7-6. The Placeopedia thumbnail
Next in the XML come the Require feature elements, and in addition to sharedmap, I'm also including a standard Gadget library called dynamic-height. It's linked in using exactly the same technique:
<Require feature="dynamic-height"/>
I recommend doing this with virtually every mapplet, and the reason is to overcome a small bug in Google's sidebar rendering. If you look back at Figure 7-1, showing our first mapplet, you'll notice a scrollbar on the lower part of the sidebar. For some reason, Google sets the mapplet sidebar content area to a height of 367 pixels, which means that (on most monitors) this superfluous scrollbar appears. The API's dynamic-height library allows us to overcome this bug, setting the height of the sidebar area to match our actual content height.
Don't worry if you don't fully understand that at this point, just take my word for it and include dynamic-height in your mapplets. There is also a line of JavaScript you'll need to make it work, but we'll get to that in a couple of pages.
Note If you've done gadget development before, you might be familiar with the height metadata attribute that the Gadgets API defines. Although it sounds like a promising approach to fixing this bug, it doesn't actually work for a mapplet, necessitating the use of dynamic-height instead.
Sidebar Content
This conveniently brings us to the sidebar content itself, at the top of the Content element. In this particular mapplet, there's not a lot of additional content required beyond what will be plotted on the map. So, I've just included a note about what the mapplet is showing, with a link back to the Placeopedia web site:
<p>

  The latest 50 Wikipedia entries with locations, from

  <a href="http://www.placeopedia.com/">placeopedia.com</a>.

</p>
For a slightly more polished appearance, I'm also applying some light CSS to the sidebar content paragraph:
p {

  font-size: 90%;

}
Tip One thing you generally shouldn't do with sidebar style is to change the font family. Doing so will visually clash with the existing Google Maps fonts and create a jarring appearance; better to simply inherit the font from the Maps page.
I recommend that, as a minimum, a mapplet's sidebar should always contain a credit and link to your site. Although Google shows the hosting domain automatically, it doesn't provide a link to it, and in some cases (like when using the Google Gadget Editor) it may not even be your domain. Not providing a link would squander the viral marketing opportunity that mapplets provide.
But usually, the sidebar is a good place to provide additional content, much as we did with the sidebar on our traditional Maps API pages in Chapters 4 and 5. Be aware, however, that the sidebar is only visible when your mapplet is selected. If the user is combining your mapplet with others into a "mashup of mashups," your mapplet may not be the one selected, and your sidebar content won't be visible. Or, the user may have left the My Maps page and returned to the Google Maps' Search Results.
Therefore, you shouldn't use this area for content that is crucial to your mapplet's function. Instead, try to use the sidebar for additional content that might helpful but isn't strictly necessary, and keep the mission-critical content on the map itself.
Functionality
And now, our feature presentation: the JavaScript that brings the mapplet to life. In this case, the core functionality is contained in the geoXML feed from Placeopedia itself, so there isn't very much coding. Let's take a look at what we do have.
As usual, we begin by initializing the map object, in the simplified Mapplets API way:
var map = new GMap2();
Next comes a line to invoke the dynamic-height library that we Required earlier:
_IG_AdjustIFrameHeight();
As its name implies, this function is adjusting the height of the sidebar area (which is actually an iframe). You'll need this line of code whenever you're using dynamic-height, but you don't want to call it until your sidebar content is finalized. In other words, if your sidebar has dynamic content placed by JavaScript, call _IG_AdjustIFrameHeight after that content has finished loading.
Finally, all that's left to do is to add the geoXML content to the map. The following lines do so, and you should recognize them—they're copied directly from Listing 3-1.
var geoXml = new GGeoXml('http://www.placeopedia.com/cgi-bin/kml.cgi'),

map.addOverlay(geoXml);
Figure 7-7 shows this mapplet in action.
As before, geoXML (via the GGeoXml object) is a great, easy way to get content onto the map. However, with mapplets some care needs to be taken regarding when to use geoXML; it's not generally appropriate to bring arbitrary, external content into your own mapplet.
First, doing so would be counter to the entire mapplet philosophy; each mapplet should be a single, self-contained piece of geo-functionality, enabling the user to mix and match on their own.
For example, if you had a web site of hiking trails, it would be great to use the Maps API to map the trails on your own site. It might also make sense to add a GeoRSS feed of weather data to your own map, allowing your visitors to plan hikes based on local conditions. And, it would be perfect to repackage your trail locations as a mapplet. However, what would be less ideal would be to include the weather feed on your mapplet as well; better to let users mix in weather forecasts themselves, if they want to, using a dedicated mapplet from a weather web site.
A related consideration is that, typically, content within a mapplet should be your own. And again, this goes back to the philosophy of mapplets: they're about getting your content and functionality onto Google maps. When you publish a mapplet, it's your name that's attached to it, so it should really be your content within it.
This doesn't mean that other sites' content is strictly off limits, but rather that ordinary rules of respect and ownership apply. Ask permission before publishing someone else's content. And if they decline permission, abide by that.
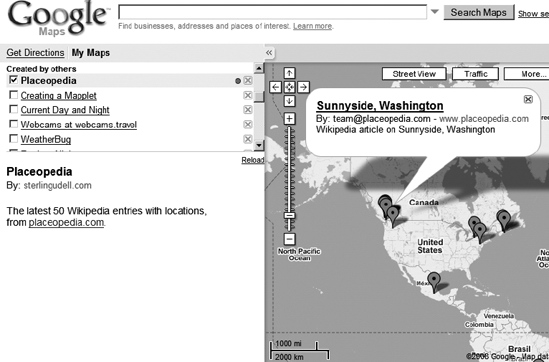
Figure 7-7. The Placeopedia mapplet
One exception to this rule is data that's in the public domain, such as information with a Creative Commons license, or published by U.S. government bodies. If you have an idea for a great mapplet based on data from the National Weather Service or the U.S. Geological Survey, for example, go for it!
Tip When you're publishing your own geodata to a mapplet, it's still a good idea to use geoXML. In Chapter 10 I'll cover techniques for creating your own KML and GeoRSS feeds.
Summary
With the grounding you already have in the Maps API, creating mapplets is really quite easy, and this chapter has given you the tools to do it. In a nutshell, the process goes like this:
- Create your mapplet by wrapping the specified XML elements around your sidebar content XHTML and map-controlling JavaScript.
- Save the XML to a public web server (the Google Gadget Editor counts as public, for these purposes).
- Install your mapplet on Google Maps to work the bugs out.
- Publish the final mapplet to the Google directory and, usually, your own web site.
In the next chapter, you'll take your newfound mapplet skills to the next level by learning how to interact with the Google map and the user. I'll also introduce you to some other useful libraries we can borrow from the Gadgets API and give you some guidance that should help your creations integrate well into the mapplet ecosystem.