
![]()
Serving JSON
Up until this point, we have been focusing on JSON primarily from a front-end perspective. However, as a data interchange format, JSON plays an important role on the back end of our applications as well. Therefore, in order to further empower ourselves in the ways of JSON, we will explore how to set up our very own web server, utilizing an open source technology known as Node.js.
Once we have our own server up and running, you will learn how to utilize said server to provide JSON, receive JSON, and even store/persist JSON.
Node.js, commonly referred to as Node, is a runtime environment created by Ryan Dahl that allows us to devise a web server using nothing other than JavaScript. That’s right, JavaScript. Now before you begin to presume that this can’t be considered a true server, let me assure you that Node is incredibly powerful and extremely efficient. So much so, that it’s used by many popular brands, such as Walmart, PayPal, and eBay, to name a few.
Node is built on top of Chrome’s V8 JavaScript engine, making JavaScript the ideal language of our server. Furthermore, because Node makes use of the latest V8 code base, our server can utilize the cutting-edge inclusions of the JavaScript API, such as File-System, Web Workers, etc. The benefits don’t just stop there either. Because JavaScript is an event-driven language, the functions within Node remain asynchronous and are capable of handling data-intensive applications. Last, Node can run without additional software, such as Apache, being installed, making it simple and convenient to install on either Windows or Mac.
Upon navigating to nodejs.org/download/, we are immediately presented with the tools that will get us up and running. As there is no reason to take anything but the path of least resistance, we will download and install the Windows Installer (.msi). Whether you chose the 32-bit vs. the 64-bit version is dependent on your current operating system. While most programs designed for the 32-bit versions of Windows are compatible with 64-bit versions, the same cannot be stated for 64-bit software on 32-bit Windows.
To find out if your computer is running a 32-bit or 64-bit version of Windows, in Windows 8 or Windows 8.1, do the following:
- Open System by right-clicking the Windows button and selecting System from the list.
- Within the System pane, you can view the system type.
To find out if your computer is running a 32-bit or 64-bit version of Windows, in Windows 7 or Windows Vista, do the following:
- Open System by clicking the Start button, right-clicking Computer, and then clicking Properties.
- Under System, you can view the system type.
If your computer is running Windows XP, do the following:
- Click Start.
- Right-click My Computer and then click Properties.
- If you don’t see “x64 Edition” listed, then you’re running the 32-bit version of Windows XP.
- If “x64 Edition” is listed under System, you’re running the 64-bit version of Windows XP.
Once you determine which bit operating system your machine is running, click the corresponding Windows Installer. As I am running a 32-bit version of Windows, as shown in Figure 10-1, I will be installing the 32-bit Node Windows Installer.
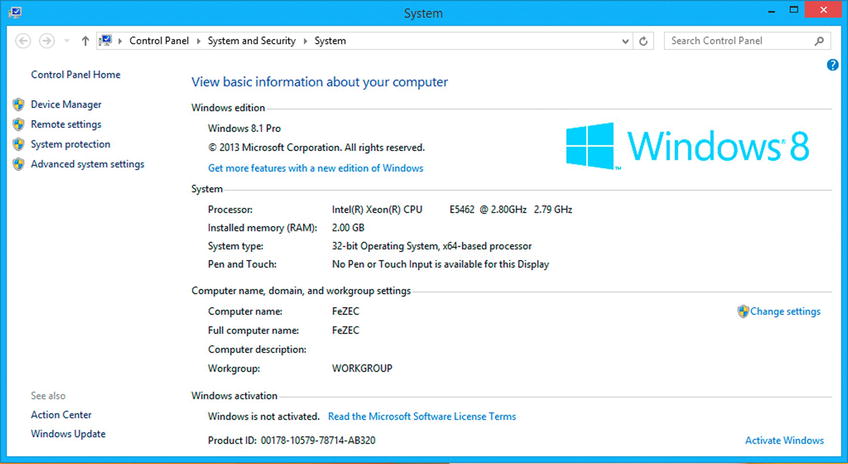
Figure 10-1. Determining Windows operating system type: 32-bit vs. 64-bit
By clicking either the 32-bit or 64-bit button, depending on your browser, the .msi should begin downloading. Depending on the browser, you may have to acknowledge that you wish the file to be saved. Once the file has been downloaded successfully, navigate to the directory in which it has been downloaded and double-click the installer, to initiate the installation wizard. At this point, the Node setup wizard will walk you through the installation step-by-step. To begin the processes, click Next.
The second screen of the wizard presents us with the license agreement of Node. Before continuing on to the next screen, you must accept the terms in the license agreement. Take this opportunity to read and accept the End-User License Agreement and then click Next to configure the installation.
The following few screens enable you to change the default configurations of the installation. Such configurations determine in which directory to install Node, or how corresponding features should be installed. Unless you feel comfortable enough to modify these settings, you should leave them as they are and continue to the installation screen shown in Figure 10-2.
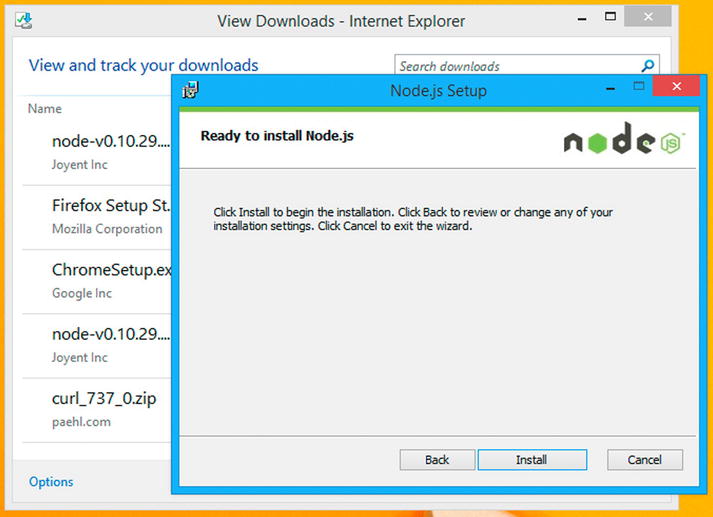
Figure 10-2. Node setup wizard
Once you reach this screen, simply click Install, and then sit back and relax for a short moment. You will be presented with confirmation that the Node setup wizard has completed. At this point, feel free to click Finish to exit the wizard. By default, Node and its features are installed globally, and often, system-wide variable changes may not always be recognized until after a reboot. Therefore, before we verify that the installation of Node was successful, it will be wise to reboot.
Once Windows loads, we can verify the installation of Node. We will achieve this with the assistance of the command-line interpreter, also known as the command prompt. To access the command prompt application, right-click your desktop’s Start button and choose Run from the list of options. Within the input field, simply type cmd.exe, then click the button labeled “OK.”
Figure 10-3 reveals the command terminal in which we can enter commands. The terminal will open to a defaulted folder that exists on the hard drive. Which folder depends on whether you run cmd.exe as an administrator or as a user. If you run it as an administrator, the default folder will be that of a system folder, whereas if you open it as a user, it will reflect your user’s folder. Figure 10-3 reveals my directory as C:UsersUrZA>, which simply reflects the directory that corresponds to the account that I logged in to on the machine. Of course, that account user is named UrZA.
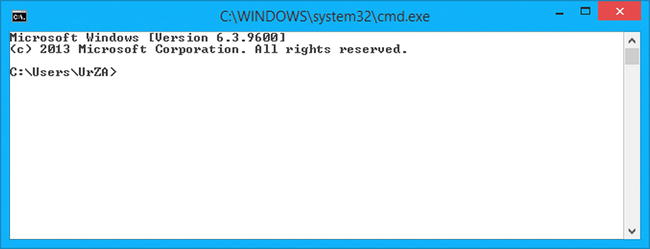
Figure 10-3. Command prompt interface
In order to ensure that Node was installed and configured successfully, type node --version within the terminal, then hit Enter. If Node has successfully been configured for your user account, you should be provided with the numerical version of Node that has been installed.
If you are presented with something that reflects the vX.XX.XX format, as shown in Figure 10-4, then congratulations; you can begin work with Node right away. Feel free to fast-forward to the “Building an HTTP Server” section.
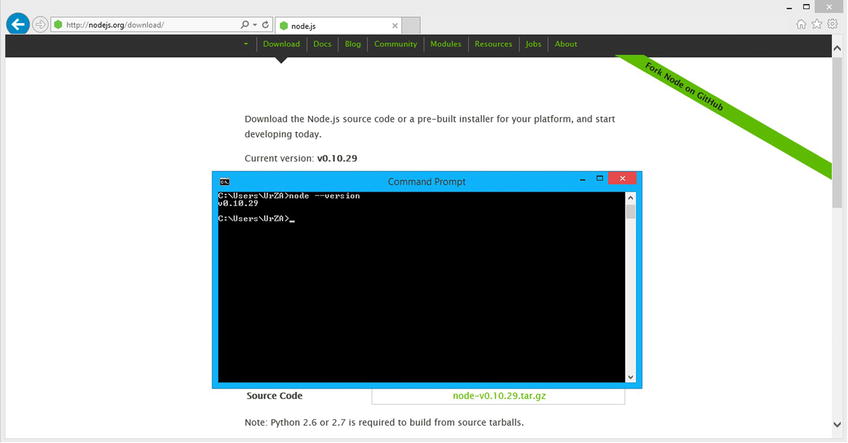
Figure 10-4. The Node --version command outputs the installed version of Node.js
If, on the other hand, the terminal outputs the message that Node is not recognized as an internal or external command, operable program, or batch file, it’s evident that Node has not been correctly installed. In order to correct this, there are a few steps that can be taken.
The Node installation will install node.exe within the C:Program Files odejs directory by default. Take a moment to verify that this executable is indeed present within this folder. If you have altered the destination during the setup process, please navigate to that directory instead. If you do not witness the node.exe executable within the determined directory, the installation may not have successfully completed. Please run the installation wizard once again to rerun the setup process followed by a system reboot.
If you are able to verify the presence of node.exe within the chosen directory, the failure of the command prompt to execute the command node --version may be due to the fact that the directory to which it is installed lies outside the directories utilized by the shell. To be certain as to whether this is the case, type the command PATH within the command prompt. The output shown in Figure 10-5 lists the default directories used by the shell.
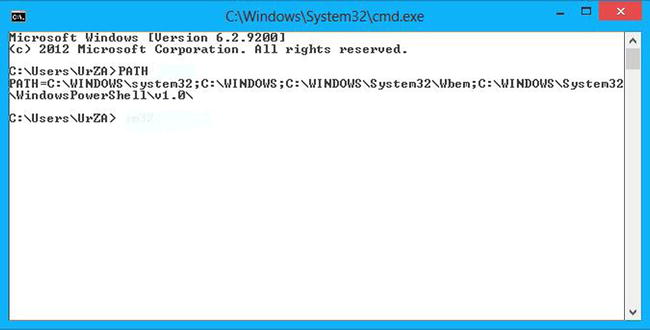
Figure 10-5. Output of the PATH variable
As you can see, C:Program Files odejs is not among the outputted directories. In this case, we may have to include the installed directory as one of the directories to be used by the shell. This can be achieved by adding the nodejs directory to that of the PATH environment variable. In order to add the necessary directory to our PATH environment, we must navigate to the Control Panel window and type “environment variables” within the input field that reads “Search Control Panel” and hit Enter. This will filter the results in the panel, revealing a result labeled “Edit the system environment variables.” Click this result and, on the window that opens thereafter, click the button labeled “Environment Variables....” At this point, you should be presented with a window displaying both User and System variables, as shown in Figure 10-6.
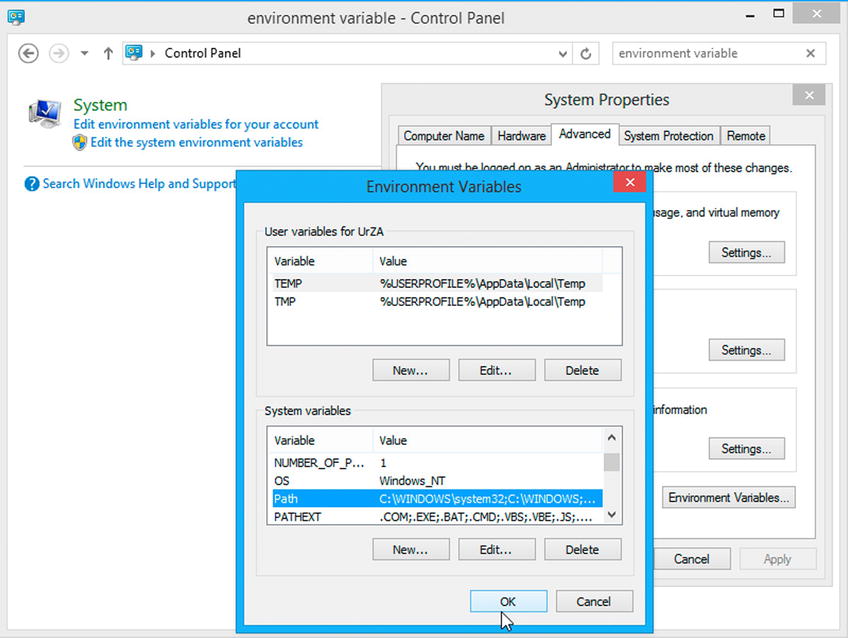
Figure 10-6. Add environment variables to Windows
Next, click the New... button immediately below the System variables box. Where it asks for the “Variable name:”, supply “PATH.” Additionally, for the “Variable value:”, supply “C:UsersUrZA AppDataRoaming pm.” (Do not use quotations, and replace UrZA with your user name.) Once those fields are supplied, click OK.
Next, within the System variables section, locate a variable labeled “Path,” select it, and click the button labeled “Edit...”, located directly below the System variables section. As the Path already exists, we simply have to append our nodejs directory to the list. This is accomplished by typing ;C:Program Files odejs to the end of the Variable value field. Note the use of the semicolon (;) before the actual directory. This is used to delimit one path from another.
![]() Note If you changed the default installation directory, you would have to supply that directory to the PATH environment variable instead.
Note If you changed the default installation directory, you would have to supply that directory to the PATH environment variable instead.
Once the nodejs directory has been added to our PATH environment variable, accept the changes by hitting OK on all remaining windows. Next, reopen the Command Prompt window and run the following command: node --version.
Mac Installation
Upon navigating to nodejs.org/download/, we are immediately presented with the tools that will get us up and running. As there is no reason to take anything but the path of least resistance, we will download and install the Mac OS X Installer (.pkg). Unlike the installers for Windows/Linux, the Mac Installer provides a universal installer. Go ahead and click the button labeled “Universal,” to begin the download of the Mac Installer. Depending on which browser you are currently using, such as Chrome or Firefox, you may receive some form of notification that requires you to confirm that you wish to download the indicated file.
Once the download has completed, locate the Node installer on your system. Ordinarily, files are downloaded to your Downloads folder. Once you locate the installer, double-click the installer, to initiate the installation wizard. At this point, the Node setup wizard will walk us through the installation step-by-step. The initial screen simply informs us of where the package will install node and npm. Feel free to click the button labeled “Continue.”
The second screen of the wizard presents us with the Node license agreement. Before continuing to the next screen, you must accept the terms in the agreement. Take this opportunity to read the software license agreement, then click Continue, to agree to the terms of the agreement. Upon agreeing to the terms, we will continue into the configuration portion of the installation.
The next screen enables us to configure the default destination of the installation. Unless you have multiple hard drives, you may only have one option available, as reflected in Figure 10-7. Select the appropriate destination and continue to the installation screen.

Figure 10-7. Node Mac setup wizard
Once you reach this screen, simply click Install, then sit back and relax for a short moment. You will be presented with confirmation that the Node setup wizard has completed successfully. You might note that the Summary screen displays the paths to where both node and the Node Package Manager, or npm, binaries are located. Additionally, it recommends that we ensure that /usr/local/bin is specified as a directory within our $PATH environment variable.
The $PATH environment variable is a colon-delimited list of directories that your shell searches through when you enter a command. The shell searches through each of these directories, one by one, until it finds a directory in which the executable exists. If the path is not configured with the directory that holds our two bin files, they will not be found and, therefore, never executed.
In order to verify that our $PATH variable possesses the /usr/local/bin directory, we must utilize the built-in command line of the Unix OS known as Terminal. There are a few ways to access Terminal, but we will rely on Spotlight. Simply clicking the magnifying glass in the top-right corner, or pressing Command and Space at the same time, will provide access to Spotlight. Within the input field to the right of where it states Spotlight, type in “Terminal,” without the quotations. This will begin the search and display access to the Terminal application. Select the result shown as the Top Hit, to bring up the Terminal interface.
Within the terminal, type echo $PATH, then hit the Enter key on your keyboard to execute the statement. The list of directories that are configured for your environment should be outputted to the terminal. The directories that are listed within my environment can be viewed in Figure 10-8.
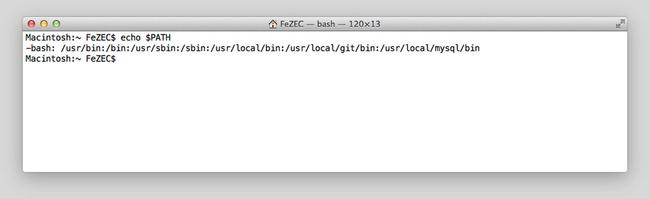
Figure 10-8. Exported $PATH configuration
Among the directories listed, if you are able to verify /usr/local/bin, it should be safe to presume that the node and npm binaries are accessible. If, however, the preceding path is not found within the $PATH environment variable, we will have to configure it. Utilizing the terminal, type nano ~/.bash_profile, then hit Enter. This will bring up the personal initialization file. It is here that we will configure our $PATH variable.
If your .bash_profile is empty, as shown in Figure 10-9, simply add the line export PATH=$PATH:/usr/local/bin, then, on your keyboard, hold down the Control key and press the X key to exit. Before the application terminates, you will be promoted to save the changes, as shown in Figure 10-10. Simply hit Y to save, and proceed to exit .bash_profile.
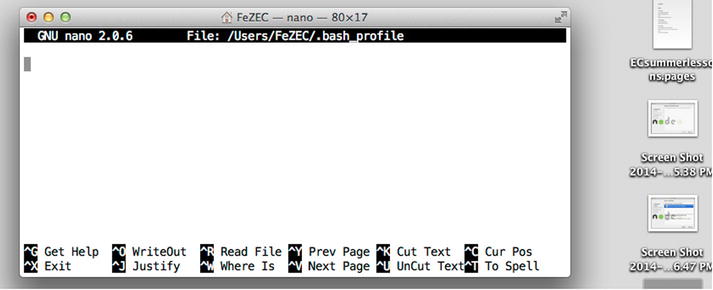
Figure 10-9. Empty .bash_profile content
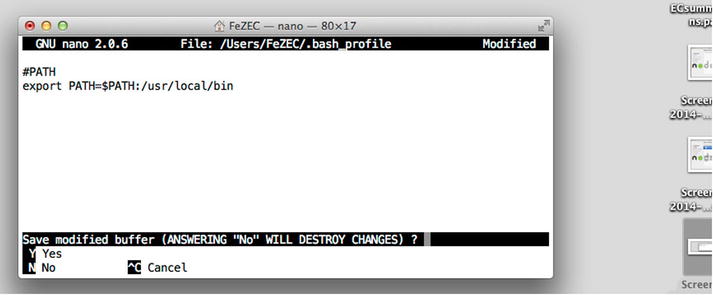
Figure 10-10. Configuring the $PATH environment variable to include /usr/local/bin
![]() Note The preceding code (shown in Figure 10-10) will not impair your existing environment variables. It will merely append the /usr/local/bin directory to the existing list.
Note The preceding code (shown in Figure 10-10) will not impair your existing environment variables. It will merely append the /usr/local/bin directory to the existing list.
As the code within the .bash_profile is only run prior to a terminal session, close the existing Terminal application and open the application once again. This time, when you type echo $PATH and then hit the Enter key on your keyboard to execute the statement, you should see /usr/local/bin among the list of directories shown.
In order to know whether or not Node was installed and configured successfully, type the command node –-version within the console, then hit Enter. If Node has successfully been configured, you should be provided with the version of Node that has been installed.
If you are presented with output that reflects the format vX.XX.XX, such as that shown in Figure 10-11, then congratulations; we can begin working with Node right away. Feel free to click Close, to exit the Node installation wizard and proceed to the section “Building an HTTP Server.”
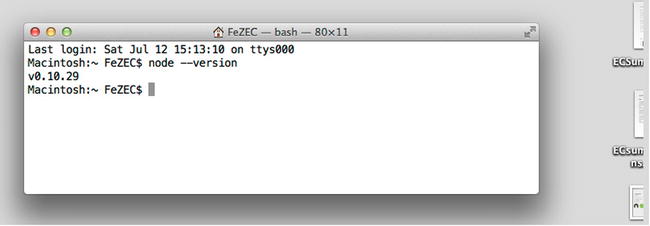
Figure 10-11. node --version resulting in the output of the installed version of Node.js
Building an HTTP Server
With Node installed and configured properly, it is high time to begin building an HTTP server that we can continue to build on in the upcoming chapters. As it was stated at the beginning of this chapter, Node is a platform that utilizes the JavaScript language. Therefore, much of the code that we will be working with will be simply vanilla JavaScript.
In this chapter, I will be discussing the components and methods that make up a Node server. While all code will be utilizing pure JavaScript, some of these concepts may seem new to you. With that in mind, I will attempt to keeps things as simple as possible. However, I wish to provide you with an example of what we will be working with. This will, I hope, provide you with a concrete example that you can keep in mind throughout this chapter. Listing 10-1 illustrates an introductory Node server that acts as our foundation for this chapter.
Listing 10-1. Extremely Basic Node Server
 1 var http = require('http'),
 2 var server = http.createServer();
 3     server.addListener('request', requestHandler);
 4     server.listen(1337, '127.0.0.1'),
 5
 6 function requestHandler(request, response) {
 7     console.log( request.url );
 8     console.log( request.headers );
 9     var body="Hello World";
10     response.statusCode = 200;
11     response.setHeader("Content-Type", "text/plain");
12     response.setHeader("Content-Length", Buffer.byteLength( body, 'utf8') );
13     response.end( body );
14 };
15 console.log('Server running at http://127.0.0.1:1337/'),
Listing 10-1, displays 15 lines of code that make up the content of a simple Node server. The first four lines are all that are required to devise a Node Web Server. The latter nine lines of code demonstrate how to configure a simple response for any and all incoming HTTP requests. Let’s walk through the code and discuss each statement.
We begin by loading the built-in HTTP module of the Node platform via the require function. As each module is simply a JavaScript object, we assign the loaded module and then assign it to a well-labeled variable. In this case, that variable is labeled “http” (line 1). Utilizing the createServer method exposed by the HTTP object, we establish a new instance of a web server. Next, we assign it to the variable labeled “server,” in order to configure the web server (line 2). From there, we begin with our first configuration, which is to provide a function to the server as the default handler for all incoming requests to this server instance. When the server receives an incoming request, it dispatches a “request” event notification, to which the associated handler is invoked, thereby handling the request (line 3). Last, we configure the server to monitor any incoming transmissions to the specified domain (127.0.0.1), along with the specified port (1337) (line 4).
The final portion of code (lines 6–15) represents the business logic of the response. The handler that is provided to the server will consistently be provided two arguments for every incoming request. The first argument, the request, represents an object that retains the configurations of the client’s request. This object can be used to obtain the method, URL, and the headers of the request, as seen in lines 2–3. The second argument is the response, which, as an object, exposes the necessary properties to configure an HTTP response, as seen in lines 10–13.
Within the body of the request handler, we obtain the reference to the response object and begin to provide it with a status code. We will set this to 200, to reflect the acknowledgment of the request provided (line 10). Next, we configure the headers of the response. As we will be providing back the text “Hello World,” we use the setHeader method to inform the client of the Content-Type (line 11).
Last, we invoke the response object’s end method, which not only enables us to provide the response with an entity body, it also signifies the response has been fully crafted, fulfilling the request and providing the response back to the client. The very last line of code serves only to output to the Terminal console that the server has been initiated (line 13).
If at this point, if you were to navigate to http://127.0.0.1:1337, you would not be provided with any response from our server. That is because, at this point, we haven’t started our Node application. We must inform the Node engine to parse the preceding JavaScript, in order for our server to be operational. To accomplish this, it will be necessary to save the base_server.js within a directory that you will be able to easily navigate to via the command-line utility. You can obtain the location of a file simply by right-clicking the document and selecting “Get Info” for Mac or “Properties” for a PC. To obtain the location of the file in question, you will have to look in the General tab. I have mine saved in the following directory:
//PC
C:UsersUrZADesktopBeginningJSONchapter10server

//Mac
/Users/FeZEC/Desktop/BeginningJSON/chapter10/server
At this point, if you have closed the Terminal or Command Prompt window, open it once more and type the following:
//For PC:
cd C:UsersUrZADesktopBeginningJSONchapter10server

//For Mac:
cd /Users/FeZEC/Desktop/BeginningJSON/chapter10/server
However, rather than referencing the location of my file, replace the preceding path with the directory that holds your file. Note that I did not add the name of the file. At this point, within the Terminal application, type node 10-1.js and then hit Return on your keyboard. If you have successfully navigated to the proper directory and provided Node with the proper file name, you should see the statement Server running at http://127.0.0.1:1337/ outputted to the terminal. If, however, you are provided with an error, Error: Cannot find module, you may have accidentally misspelled the file name or navigated into the incorrect directory.
If the problem persists, and the error continues to state that it is unable to find the module provided, simply move base_server.js directly to your desktop. Then, open the console window and type: node ~/Desktop/10-1.js (Mac) or node C:UsersYourUserNameHereDesktop10-1.js (PC), then hit Enter. This time, rather than navigating into the desktop directory before informing Node of the file name to run, execute the Node shell and explicitly specify the full path of the script.
We could have just as easily navigated to the desktop directory first, then typed node 10-1.js. The difference is that when you are within the directory that holds the file, you do not require specifying the path.
Now that we have our server up and running, let’s open our preferred browser and navigate to http://127.0.0.1:1337. Upon your arrival, you should see “Hello World” outputted to the screen, as in Figure 10-12.
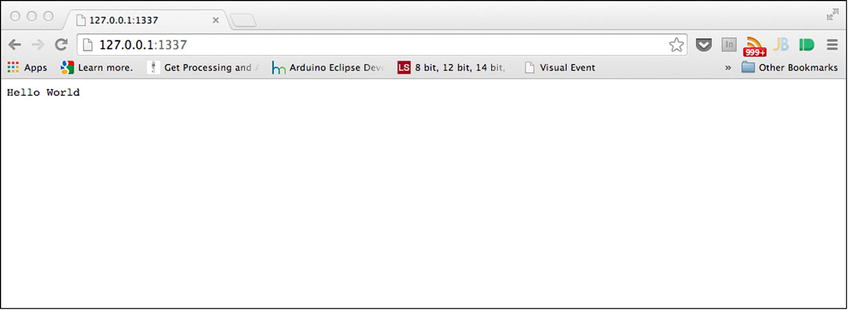
Figure 10-12. Our first “Hello World” Node Server
If you were to open your developer console, bring the network pane into view, and refresh the page, you would be able to view the headers of our response, however minimal they may be. What you should see are the following headers:
HTTP/1.1 200 OK
Content-Type: text/plain
Content-Length: 11
Date: Mon, 14 Jul 2014 00:19:09 GMT
Over the course of this chapter, we will continue to modify the body of code that exists within requestHandler, so that we can serve JSON to our web applications.
Now, exit out of the browser and locate the console window that was used to start up our server and give it focus. While holding the Control key on the keyboard, press the letter C, to shut down the application. A running server will not reflect changes to the JavaScript code. It will be necessary to shut down the server instance and start it back up, for any changes to be present.
The great thing about the Node API is that it’s relatively small, given how powerful it is. You can view the entire documentation from the Node web site located at http://nodejs.org/api/. If you find yourself feeling a bit overwhelmed from looking at the table of contents, let me assure you that I am only going to talk about a few aspects of the API. Those aspects are the following modules: HTTP, Path, URL, and File System. Furthermore, for the purpose of this chapter, we will only be regarding a subset of said modules.
Modules, for all intents and purposes, are nothing more than JavaScript objects. By referencing a specific module, we are able to utilize the interface to which the object exposes. Additionally, as they are broken out into their own context, we can choose to load in only the objects that our server requires, thereby lowering the amount of overhead on the server. While it is possible to create your own modules (following the CommonJS architecture), we will only be considering built-in modules of Node.
Each module in Node (built-in or custom) can be imported into an application via a simple function call. That function is simply require. As demonstrated by the signature in Listing 10-2, the require function simply expects a singular argument, which represents the module to load in.
Listing 10-2. Signature of the require Method
require( 'module' );
For all built-in modules, we can simply specify the name of the module. The aforementioned modules HTTP, Path, URL, and File System can be imported using their respective names: http, path, url, and fs.
For each module specified, a corresponding object is loaded into the application and evaluated. It will be necessary to assign the object returned to an appropriately labeled variable, so that its interface can be utilized at a later point in time. Listing 10-3 demonstrates how we can load and reference the preceding modules.
Listing 10-3. Imported Modules via the require Method
var http = require('http'),
var path = require('path'),
var url = require('url'),
var fileSystem = require('fs'),
The first module referenced is that of http, and it is essential for any Node server. It is responsible, with the help of several internal objects, for facilitating the mechanisms of an HTTP server.
The HTTP Module
The HTTP module is responsible for devising a server instance and initiating server-side HTTP requests (which will be used for our proxy). It concerns the handling of streams, as well as parsing messages into headers and, possibly, an entity body. In order to remain flexible for any and all possible applications, the HTTP module possesses an extremely low-level API. What this means is that, much like a box of LEGOs, all the individual parts required to build a server have been packaged within Node. However, it will be up to us to connect the individual pieces as we see fit.
The parts that have shipped within the HTTP module box that we will be exploring for the duration of this chapter are http.IncomingRequest, http.ServerResponse, http.Server, http.ClientRequest, and http.Streams. The two methods outlined in Table 10-1 will be the two methods of the HTTP module that we will use throughout this chapter.
Table 10-1. Methods of the HTTP Module
|
Methods |
Description |
|---|---|
|
createServer([requestListener]) |
Returns a new web server object |
|
request(options, [callback]) |
Enables the ability to issue server requests. *Returns an instance ClientRequest |
The HTTP method createServer is solely responsible for instantiating a server instance that will be used for monitoring connections to our server. I will discuss the server shortly. As you can see from the signature in Table 10-1, an optional callback can be supplied as an argument of the method. This will be the method that will be invoked the moment a request is made of our server. Any provided requestListener must possess the following signature: function (request, response);.
The first argument provided, request, is an instance of the IncomingMessage Object. IncomingMessage exposes an API that is instrumental in obtaining all parts of the request. Through it, we can obtain the requested URL, the request method, the supplied headers of the request, and the entity body, if one was supplied.
Table 10-2 outlines the interface of the IncomingMessage object that makes it simple for our application to obtain key aspects of the request. However, you may notice there is no attribute for obtaining the entity body. As this is a slightly more complex task, I will discuss how to obtain the entity body in the “The Proxy Server” section.
Table 10-2. Methods of the IncomingMessage Object
|
Methods |
Description |
|---|---|
|
url |
Returns as a string the URL that is present in the actual HTTP request |
|
Method |
Returns the HTTP request method as a string |
|
Headers |
Returns an object containing the request headers and values. *Header names are lowercased. |
The second argument, the response, is an instance of an object member of the HTTP module known as ServerResponse. It will be through the interface of the response instance that we can provide a response back to the client of the request. The exposed interface of the ServerResponse Object that we will make use of can be viewed in Table 10-3.
Table 10-3. Methods of the ServerResponse Object
|
Methods |
Description |
|---|---|
|
response.setHeader(name, value) |
Sets a single header value for the response |
|
response.write(chunk, [encoding]) |
Sends a chunk of the response body. *Can be called multiple times. Possible encodings are binary or utf8. |
|
response.statusCode |
Setter method used to generate the status-line of the response. *Expected assignment is a valid HTTP status code. |
|
response.end([data], [encoding]) |
Signals the end of the response. It can be called with an entity body. *Data must be in string form. |
http.Server
The request and response instances supplied to the requestListener method are always supplied by our server instance and for any incoming request. In short, the server instance is an event dispatcher or event emitter, notifying any event listeners to the incoming event via the “request” notification (See Table 10-5). Because the server is an event dispatcher, it’s a matter of preference if you wish to designate requestListener at the time of creating the server instance. As an alternative, if you prefer the more object-oriented route, you can choose to listen for the “request” notification, via the server’s addListener method (See Table 10-4). The two possible manners, as shown in Listing 10-4, are equivalent.
Listing 10-4. Providing a Callback as the Function to Trigger, per Incoming Request
var serverA= http.createServer(requestListener);
//or
var serverB=http.createServer();
    serverB.addListener("request", requestListener);
Table 10-4. Methods of the Server object
|
Members |
Description |
|---|---|
|
addListener( event , callback ); |
Assigns an event handler for a particular event |
|
listen( port, [hostname]) |
Begins accepting connection on the specified port and hostname |
Table 10-5. Events of the Server object
|
Event |
Description |
|---|---|
|
request |
Emitted each time there is a request. The event handler will receive a request and response instance. |
In order for our server to monitor the request, we must first establish which connections it is responsible for. In order to do this, we will use the listen method of our server instance. The listen method, as shown in Listing 10-5, can be supplied with two arguments. The first parameter, port, is required, while the second parameter, hostname, remains optional. For the purposes of this book, both will be used.
Listing 10-5. Signature of the listen Method
listen( port, [hostname]);
Where hostname is required, we will always use the IP address 127.0.0.1, which is simply a way to access one’s own computer’s network services. The value of the port, on the other hand, is used to afford multiple servers the ability to listen to the same IP. However, by specifying a port, all running servers on 127.0.0.1 will be able to distinguish their incoming requests from the others.
At this point, you should have an understanding of the basic components that are used to craft a rudimentary Node server. Before we continue to learn the remaining parts, let’s review, in a simple exercise, what we have learned.
EXERCISE 10-1. YOUR FIRST JSON SERVER
Use the HTTP module and its members to create a server that monitors all incoming traffic on port 1337. Furthermore, utilizing the interface of both the response and request objects, provide the necessary implementation that results in the response headers shown following. The response should satisfy only the target resource of the request (shown following).
Request Headers
GET /message.json HTTP/1.1
Host: 127.0.0.1:1337
Accept: application/json

Response Headers
HTTP/1.1 200 OK
Content-Type: application/json
Content-Length: 25

{"message":"hello-world"}
![]() Hint In order to arrive at the correct Content-Length for the entity body, you must supply the body to the following method: Buffer.byteLength( data , 'utf8'));.
Hint In order to arrive at the correct Content-Length for the entity body, you must supply the body to the following method: Buffer.byteLength( data , 'utf8'));.
Test if you are correct by navigating your browser to your server. Be sure to append a few paths after the URL and port to ensure that only the request is satisfied: http://127.0.0.1:1337/[paths-here].
Listing 10-6 reveals the answer to the previous exercise. We begin by importing our HTTP module (line 1). We then invoke its createServer method to initialize our server (line 2). Additionally, using the optional parameter, we supply the callback method that will be triggered for each incoming request. Utilizing the listen method, inform the server to monitor our localhost, with a focus on port 1337 (line 3).
Listing 10-6. Answer to Our JSON Exercise
 1 var http   = require('http'),
 2 var server = http.createServer(requestHandler);
 3     server.listen(1337);
 4 function requestHandler( request, response ) {
 5    if (request.url === "/message.json") {
 6        var body = JSON.stringify({
 7                      message : "hello-world"
 8                   });
 9       response.statusCode = 200;
10       response.setHeader("Content-Type", "application/json");
11       response.setHeader("Content-Length", Buffer.byteLength(body, 'utf8'));
12       response.end(body);
13   }
14 };
15 console.log('Server running at http://127.0.0.1:1337/'),
When an incoming request notification occurs, our requestHandler function will be invoked and supplied two objects: request and response (line 4). Per the exercise, our task was to ensure that the response was provided only for the requested /message.json resource. To ensure that we respond only to that resource, we must obtain the requested URL and compare it before we handle it (line 5). This is accomplished with strict equality. If, and only if, the requested resource matches /message.json do we configure a response.
Utilizing the JSON.stringify method (remember: Node runs on JavaScript), we convert an object into a string (line 6). From there, utilizing the setter method of the statusCode attribute of the response object, we assign it a value of 200. This will inform the client that the request was understood (line 9). Next, utilizing the setHeader method, we supply the Content-Type, which, of course, is application/json (line 10). In order to calculate the Content-Length, we supply the body variable, which is currently assigned our JSON text, to the Buffer.byteLength method. Utilizing the proper encoding, we can arrive at the proper Character-Length (line 11).
Remember that Character-Length is not simply the character length but, rather, the length in bytes. While ASCII characters require 1 byte per character, you should remember that JSON is UTF8. Therefore, it is simply safer to rely on the Buffer.byteLength method to determine the length of our UTF8-encoded JSON values.
Last, we use the end method of our response object to signify that our response has been configured at last. Additionally, we supply our body variable as an argument to the optional parameter.
If we were to run this server and navigate to http://127.0.0.1:1337/, we should not be provided with anything. In fact, the request should never be fulfilled. A response is only completed with the invocation of response.end(). However, this method will only be triggered if we navigate to http://127.0.0.1:1337/message.json. Upon arriving at this URL, we will also be faced with our JSON message outputted to the viewport, as shown in Figure 10-13.
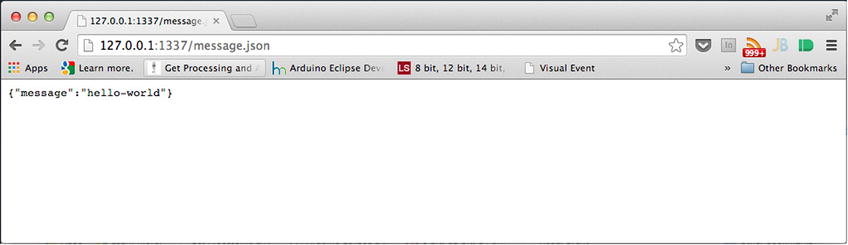
Figure 10-13. message.json outputs the expected JSON
To keep things simple, the previous exercise only required that you configure a response for a particular request. However, it should be known that all requests be provided a proper response. Failure to use the end method of the response object will result in the client waiting until a time-out occurs. You can experience a time-out simply by navigating to 127.0.0.1:1337/.
A request can be handled in any manner you see fit. The preceding exercise created an object on the fly, but we could just as easily have provided the contents of a JSON document, by tapping into the File System module.
Nevertheless, by monitoring the interface of the IncomingRequest instance, whether it’s by the exposed URL or any of its configured headers, we can determine how to best satisfy the request. This takeaway will be essential for the remainder of this chapter.
If you are following along with the source code provided, take a moment to locate the file labeled “xss-server.js” within Chapter 10. Right-click the file and select “Get-Info,” if you’re on Mac, or “Properties,” for a PC. Within the General tab, locate the absolute path for the file and copy it.
Now, open up a second window of the Command Prompt (PC) or Terminal.app (Mac). Within this second command window, we are going to start our xss-server. At this point, type “node” and then paste the location to the aforementioned xss-server.js. If the address is found, you should see a message informing you that a server is running at http://127.0.0.1:8080.
Ensure that your previous server is still running, by navigating to http://127.0.0.1:1337/message.json. I hope {"message":"hello-world"} is outputted to the screen. If so, the server is ready to receive our request; otherwise, we must start up our exercise server once again.
Now, with both servers running, proceed to http://127.0.0.1:8080. If you are not following along with the source code, navigate your browser to http://json.sandboxed.guru/chapter10/xss-exercise.html. Upon arriving at either of the two destinations, you will be presented with the code for an xhr object configured to make a request to http://127.0.0.1:1337/message.json. Now, open the developer’s console, copy and paste the code provided for the request, and execute the code to observe the results. As in our previous chapter, you should be confronted with the infamous network error, as shown in Figure 10-14.
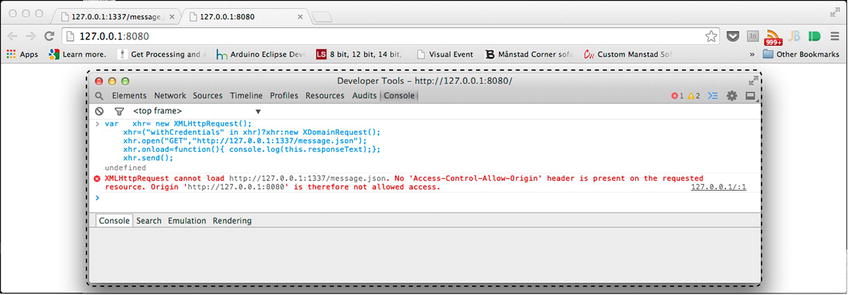
Figure 10-14. Cross-origin network error
However, as we are in control of the server and can configure the headers for message.json, we can resolve this in one of three manners. The first is to incorporate the necessary headers, as outlined by the W3C CORS standard. Second, we can utilize a proxy to make authorized requests on our client’s behalf. Third, we can exchange JSON as valid JavaScript via JSONP.
At this point in the chapter, we have everything we require to fulfill a request via the first and third option; however, we have yet to discuss a few particulars that would enable us to devise a proxy. That being said, let’s resolve the matter by way of incorporating the CORS header Access-Control-Allow-Origin (see Listing 10-7).
Listing 10-7. message.json with CORS Enabled
 1 var http   = require('http'),
 2 var server = http.createServer(requestHandler);
 3     server.listen(1337, '127.0.0.1'),
 4 function requestHandler( request, response ) {
 5    if (request.url === "/message.json") {
 6        var body = JSON.stringify({
 7                      message : "hello-world"
 8                   });
 9       response.statusCode = 200;
10       response.setHeader("Access-Control-Allow-Origin", '*'),
11       response.setHeader("Content-Type", "application/json");
12       response.setHeader("Content-Length", Buffer.byteLength(body, 'utf8'));
13       response.end(body);
14   }
15 };
16 console.log('Server running at http://127.0.0.1:1337/'),
Listing 10-7 reveals in bold the inclusion of the CORS header and configures its value to that of the wildcard * token. This will provide authorization to all requests from any origin. However, we could have determined whether the source origin via the origin header was exposed via request.headers, to determine if the indicated source origin should be authorized to access the resource. If we determine the source origin to be authorized, we can simply configure the value for the header with the source origin of the incoming message, as seen in Listing 10-8.
Listing 10-8. message.json CORS Enabled for json.andboxed.guru Only
 8        //.. code truncated
 9       var sourceOrigin  = request.headers.origin;
10       var originAllowed = (sourceOrigin === "http://json.sandboxed.guru") ? sourceOrigin : null;
11       response.setHeader( "Access-Control-Allow-Origin", originAllowed );
12       //.. code truncated
The preceding code in Listing 10-8 obtains the origin header from the incoming message via the request object. (In Node, all exposed headers are lowercase.) Utilizing the value returned from this header, we can determine if it is a source origin we are expecting, such as that of json.sandboxed.guru. We can match the value against more values; however, as this is simply for demonstrative purposes, I chose just the one. Utilizing a tertiary operator (a succinct, if else, evaluation), we determine if the source origin should be provided as the value to the Access-Control-Allow-Origin header. If it is a match, we will provide the origin. However, if it is not a match, we will supply the value with null.
With the new line in place, let’s restart our server. First, we must shut down the server by pressing Control+C, then we can initialize our server by typing node, followed by the name of the exercise.js file. Alternatively, you could hit the up key on your keyboard within the console to use a previous command. Either way, hit Enter, once the proper command is in place, to run the server.
At this point, an attempt to obtain the message.json resource from either http://127.0.0.1:8080 or http://json.sandboxed.guru/chapter10/xss-exercise.html will be successful. Congratulations, you have just configured your first CORS-enabled resource to handle simple requests. At this point, feel free to shut down both servers, as we will shortly modify our code to provide JSONP also.
JSONP Server
A JSONP server, as you recall from Chapter 9, requires us to pad our JSON entity, so that the script engine views it as valid JavaScript. In other words, we cannot return JSON as an entity body whose structural composition is that of a collection (signified by the beginning and ending of the { and } tokens).
While this will not prohibit us from returning JSON, whose structural composition is that of an ordered list, we will still be confronted with the dilemma of obtaining the data upon being evaluated by the script engine. In order to combat this, our JSON must be wrapped or padded by the grouping operator and prepended with a function name supplied by the requesting client. The JSONP model establishes that this identifier should be provided as the value to a query string parameter labeled “jsonp.”
Let’s leverage our existing JSON server to support the JSONP format also, so that if a request for the resource message.json arrives, we can continue to supply it with JSON. However, should the URL possess the jsonp parameter, we can manipulate the JSON to reflect the JSONP model. Because the request.url provides us with a string reflecting the entire URL as it pertains to the request, it will be necessary to use string manipulation to mask the various components that could possibly be reflected in the string. In other words, we will have to isolate any and all query strings from the path of our resource from the provided string. Furthermore, for any query string key provided, it will be necessary to obtain its corresponding value. Only by taking this route can we be certain our conditions for a particular URL will be a match. Additionally, it will allow our server to determine whether to respond with JSON or JSONP. We can validate the conditions accordingly, utilizing some vanilla JavaScript, as demonstrated in Listing 10-9.
Listing 10-9. Skeletal Body of a requestHandler to Extract the Possible jsonp Key-Value from the request.url
 1 function requestHandler( request ,  response ){
 3    if(request.url === '/message.json') {
 4         // return JSON entity
 5    } else if(request.url.toLowerCase().indexOf('/message.json?jsonp=') > - 1) {
 6         // return JSONP entity;
 7    } else {
 8         // 404 file not found;
 9       }
10 }
11 function getParamKey(key, str) {
12    var regExp = new RegExp(key.toLowerCase() + '=[^&]*'),
13    var matchingValue = (str.toLowerCase()).match(regExp);
14    for (var i = 0; i < matchingValue.length; i++) {
15          var replacedValue = matchingValue[i].replace(key + '=', ''),
16          matchingValue[i] = replacedValue;
17    }
18    return decodeURIComponent(matchingValue[0]);
19 };
Listing 10-9 reflects the skeletal structure to assess whether the requested /message.json resource should be returned as JSON or JSONP. The code begins by assessing whether the request.url matches exactly that of the /messages.json (line 3). If this is the case, we will continue to provide the response in JSON form. If, however, the URL requested does not explicitly match that of /messages.json, we further analyze it to determine if the URL in question contains the following substring: /message.json?jsonp= (line 5). This is accomplished through the inherited indexOf method possessed by all strings. If the substring is found within the request URI, the character index, as to the beginning of the match, will be supplied as the value of the evaluation. However, if the substring is not found, it returns the integer -1. Therefore, should the value be greater than -1, we can be sure that the request is for message.json and that the client wishes to receive the response as JSONP. If the URL does not reflect any of these conditions, we shall supply the status code of 404 (File Not Found).
Last, in order to extract the value possessed by the jsonp parameter, we will utilize a modified version of our getCookie function, discussed in Chapter 7. This time, however, rather than extracting a particular key from a cookie, we will be extracting the value of a particular parameter. As we will no longer be “getting-cookies” but, rather, obtaining a “parameter-key,” we will name this method getParamKey.
The function getParamKey is called with two arguments. The first represents the key to extract, while the second represents the string that is in possession of the key we seek to obtain (line 11). Utilizing a regular expression, we analyze the provided string for a possible pattern match (line 12). That pattern, of course, is the name of the key, followed by the = token and any subsequent characters, providing that character is not the & token (which would denote the beginning of another key). From there, if the pattern is matched, we store those matches in the matchingValue variable (line 13). Next, as our match will reflect the key = value format, we must isolate the value (line 15). We can achieve this easily by replacing our key= with and empty string '', essentially deleting that portion of our string. Last, we decode the value, in case it is URL-encoded, and then return it to the caller of the function (line 18).
![]() Note When dealing with JSONP, it will be beneficial to ensure that the returned value is not URL encoded, lest we wrap our JSON with a label such as %20someMethod%20.
Note When dealing with JSONP, it will be beneficial to ensure that the returned value is not URL encoded, lest we wrap our JSON with a label such as %20someMethod%20.
Let’s now revisit our previous code from Listing 10-7 and begin serving up our JSON/JSONP server (see Listing 10-10).
Listing 10-10. Simple JSON and JSONP Server
 1 var http = require('http'),
 2 var server = http.createServer();
 3 server.addListener("request", requestHandler);
 4 server.listen(1337, '127.0.0.1'),
 5 function requestHandler(request, response) {
 6     var body;
 7     if (request.url === '/message.json') {
 8         // return JSON entity;
 9         response.statusCode = 200;
10         response.setHeader("Access-Control-Allow-Origin", "*");

11         response.setHeader("Content-Type", "application/javascript");
12         body = JSON.stringify({ message : "hello-world" });
13     } else if (request.url.toLowerCase().indexOf('/message.json?jsonp=') > -1) {
14         // return JSONP entity;
15         response.statusCode = 200;
16         response.setHeader("Content-Type", "application/javascript");
17         var jsonText = JSON.stringify({ message : "hello-world" });
18         body = getParamKey("jsonp", request.url) + "(" + jsonText + ");";
19     } else {
20         // 404 file not found;
21         response.statusCode = 404;
22         response.setHeader("Content-Type", "text/html");
23         body = "<h1>404<h1> page not found";
24     }
25     (body) ? response.end(body) : response.end();
26 };
27 function getParamKey(key,str) {
28    var regExp = new RegExp(key.toLowerCase() + '=[^&]*'),
29    var matchingValue = (str.toLowerCase()).match(regExp);
30    for (var i = 0; i < matchingValue.length; i++) {
31          var replacedValue = matchingValue[i].replace(key + '=', ''),
32          matchingValue[i] = replacedValue;
33    }
34    return decodeURIComponent(matchingValue[0]);
35 };
36 console.log('Server running at http://127.0.0.1:1337/'),
Listing 10-10 reflects in bold the latest code changes inserted into our earlier json.server, in order to fulfill a request for JSONP. At this point in time, let’s run Listing 10-10 and navigate your browser to http://127.0.0.1:1337/message.json. You should find that your browser continues to output the previous message, as shown in Figure 10-13. Now, if you were to append ?jsonp=someMethod to the current URL (http://127.0.0.1:1337/message.json?jsonp=someMethod), you should be presented with the same JSON text, only now it should reflect the JSONP model, as seen in Figure 10-15.
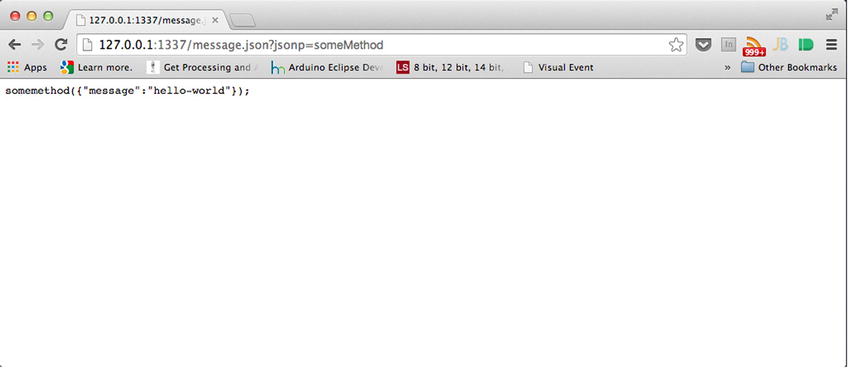
Figure 10-15. Output of JSONP, demonstrating the client-supplied value as the prepended function name
Any value you provide for the jsonp key will continue to be prepended to the padded JSON. As our server is now serving JSONP, let’s test its acquisition from another origin. For those following along with the source code, feel free to run the jsonp.html from within the BeginingJSON/chapter10/ directory; otherwise, navigate your browser to http://json.sandboxed.guru/chapter10/jsonp.html. What you should be witnessing is a button labeled “load jsonp,” such as that in Figure 10-16.

Figure 10-16. jsonp.html from y, configured to load in JSONP from your local server
By clicking this button, we will dynamically inject a script tag into our document. As you may have already guessed, the resource that is specified as the external resource to obtain is none other than that of your server. With that being said, and with our server up and running, let’s do as the button suggests and load some JSONP.
Much as is illustrated in Figure 10-17, no matter how many times you click the button, the result will always be the same. That result is the reception of JSONP from your server. Congratulations! At this point, you have successfully configured a server to fulfill a JSONP request.
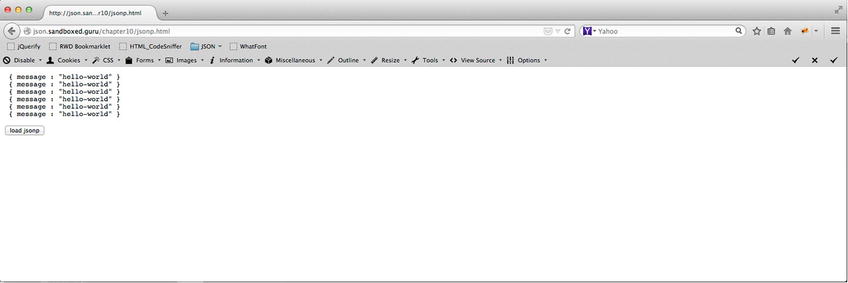
Figure 10-17. json.sandboxed.guru successfully receiving JSONP from your server
The Proxy Server
Before we delve into the proxy server, we must revisit our previous discussion pertaining to the members of the HTTP module. As you may recall, I had previously mentioned that the HTTP module possesses the ability to make client requests directly from the server. This is achieved via the request method belonging to the HTTP module.
The request method, the second method of the HTTP module shown in Table 10-2, whose signature is the request(options, [callback]);, provides the server with the ability to configure a client request. This method, as witnessed in the signature, is able to receive two parameters. The first parameter, options, must be provided with an object whose member’s make up the request line, in addition to the headers of the request. Such members can be seen in Table 10-6.
Table 10-6. Possible Keys That Can Belong to the Argument of the options Parameter
|
Properties |
Description |
|---|---|
|
host |
A domain name or IP address of the server that issues the request |
|
port |
Port of the provided host |
|
method |
A string specifying the HTTP request method |
|
path |
Requested resource. *Defaults to / |
|
headers |
An object containing request headers |
The second parameter, callback, represents the function to be triggered as the handler on receiving a response from the remote server. In order to obtain the response, the function indicated as the callback must possess the signature shown in Listing 10-11.
Listing 11-11. Signature of the Request callback Parameter
callback( response );
As in the case of our earlier review of the requestHandler, the callback function supplied to the method will receive an instance of the IncomingMessage object, from which it will be able to reference the headers and status code of the response. At this point, let’s take a moment to put all of this information together into code and walk through it.
Listing 10-12 demonstrates the minimal amount of code to configure a server-side request. We begin by devising an object that will be used to represent the request line of our request. It is supplied with necessary values for the properties host, path, and method (line 2). We then provide our configured object as our first argument to the http.request method. Next, we provide an argument as the callback. This function will be used to handle the IncomingMessage object provided by the remote server (line 3). Once the request is fulfilled, and a response has been provided, it will be made available to our called function, from which our application can extract the headers and status of the response (line 5–line 6).
Listing 10-12. Minimal Code Required to Handle a Server-Side Request Using the http.request Method
 1 var http = require('http'),
 2 var options = {  host:"json.sandboxed.guru",
                    path:'/chapter10/data/imagedata.txt',
                    method:"GET"
                 };
 3  http.request(options, callback);
 4  function callback( response ){
 5        console.log( response.statusCode );
 6        console.log( response.headers );
 7  };
What should, I hope, be apparent is that our code is missing a means of extracting the entity body of the response. In order to receive the entity body for our IncomingMessage object, we must learn how to consume the data directly from the stream.
The IncomingMessage object, and all of its instances, is a subclass of a stream. What this simply means is that the interface possessed by a stream is also possessed by any IncomingMessage instance.
![]() Note Obtaining data from IncomingMessage applies to any IncomingMessage object that possesses an entity body, even for all incoming requests to our server.
Note Obtaining data from IncomingMessage applies to any IncomingMessage object that possesses an entity body, even for all incoming requests to our server.
A stream, as defined by Node.org, is an abstract interface implemented by various objects in Node. I like to equate a stream to a common garden hose. If you can bring to mind a garden hose, the first thing that you might visualize is a long tube that possesses a relatively small diameter. This small diameter is what ultimately restricts the flow of water, thereby allowing only a finite volume of water to exit per second. Now, envision that garden hose as the cable that connects your computer to a server across the Internet. Similarly, the diameter of this hose represents your bandwidth. The bytes sent from the server are streamed, much like running water through the restricting tube, and arrive at your computer, where they accumulate, only instead of water molecules, our stream consists of data-packets.
There are two events that are dispatched by Node streams, as outlined in Table 10-7, that enable us to consume the streaming data. Those events are data and end.
Table 10-7. Events of http.Stream
|
Properties |
Description |
|---|---|
|
data |
Enough bytes are available for the stream to consume. |
|
end |
All bytes from the stream have been consumed. |
The data event is fired when enough data becomes available to consume from the stream. Depending on the amount of bytes that make up an entity body, this event may fire multiple times. Each time the data event is fired, any callback function will be provided “chunks” of available data. This allows our application to consume the available bytes as they arrive.
The second event, end, informs our application that the handler reading from the stream has consumed every bit of data and should not expect anymore.
In order to listen for either of these events, we can attach listeners directly to the provided IncomingMessage instance. Listing 10-13 reveals the necessary code required to consume an entity body from our response.
Listing 10-13. Skeletal Body of Code Required to Consume an Entity Body from an IncomingMessage object
1 var http = require('http'),
2 var options = {  host:"json.sandboxed.guru",
                    path:'/chapter10/data/imagedata.txt',
                    method:"GET"
                 };
 3  http.request(options, callback);
 4  function callback( proxy_response ){
 5        console.log( response.statusCode );
 6        console.log( response.headers );
 7    proxy_response.addListener('data', function(chunkOfData) {
 8       //do something with a chunk of data
 9    });
10    proxy_response.addListener ('end', function() {
11       //end of stream reached
12    });
13  };
Listing 10-13 incorporates (in bold) the necessary listeners for the data and end events to properly work with incoming data, to receive a possible entity body from a response. While Listing 10-13 does not currently provide any particular implementation to handle the provided data, we can honestly do anything with it. We could piece it all back together onto a variable, so that we can read it in its entirety, once the data has been consumed fully. Or, as it will be in the case of our proxy, we can pipe it directly into our response.
At this point in time, if the preceding code from Listing 10-13 were to be executed on the server, the request would never be initiated. Calling the request method does not initiate the actual request. Much like the xhr object in JavaScript, we must trigger the submission of the request. This is accomplished through the ClientRequest instance.
http.ClientRequest
When the request method is invoked, an instance of the ClientRequest object is created and returned to the caller of the method. It will be through the interface possessed of this method that we can provide, along with our request, an entity body.
As shown in Table 10-8, the ClientRequest interface possesses an end method. This method signifies that our request is fully configured, thereby initiating the actual request. Additionally, the end method can accept an optional argument, which allows for the submission of an entity body, along with our request.
Table 10-8. ClientRequest Methods
|
Properties |
Description |
|---|---|
|
end([data], [encoding]) |
Finishes sending the request. *It can be called with an entity body. *Data must be in string, binary, or UTF-8 form. |
|
abort |
Aborts a request |
Listing 10-14 demonstrates the bare bones of code required when working with a client request. To better understand the code, let’s walk through it.
Listing 10-14. Entire Skeletal Structure for Facilitating Proxy Calls
 1 var http = require('http'),
 2 var options = {hostname:"json.sandboxed.guru", path:'/chapter10/data/imagedata.txt', method:"GET"};
 3 var clientRequest=http.request(options, responseHandler);
 4     clientRequest.end();
 5 function responseHandler(proxy_response) {
 6    console.log('STATUS: ' + proxy_response.statusCode);
 7    console.log('HEADERS: ' +proxy_response.headers);
 8    proxy_response.addListener('data', function(chunkOfData) {
 9       //do something with a chunk of data
10    });
11    proxy_response.addListener ('end', function() {
12        //end of stream reached
13    });
14 }
The code begins with the inclusion of an http instance (line 1). Next, we configure an object with the particulars of the request and assign it to a variable labeled “options” (line 2). From there, we initialize our ClientRequest through the http.request method and supply it with the options variable as well as the handler of the provided response (line 3). Much as with the response object from our earlier discussions, the ClientRequest has the ability to contain an entity body. For this reason, the request is not invoked immediately. It will be a requirement to use its exposed end method to signify that the request is ready. That being said, and with no body to supply for the request, we invoke the end method on the referenced ClientRequest (line 4).
The next block of code pertains to the management of the response from the remote network. Our callback responseHandler is invoked upon the reception of the IncomingMessage. This IncomingMessage is supplied as the argument to our proxy_response parameter (line 5), from which we are able to obtain the existing headers (line 6) and status code (line 7).
From there, we are able to monitor the stream for any incoming data that makes up the entity of the response. Adding an event listener via the addListener method and specifying which event to listen for, we can monitor the incoming bytes of data. The data event will supply the event handler with a chunk of data that can either be used to send back a response with the use of response.write or assembled for internal processing (line 8). In the preceding listing, I have opted to assemble the incoming transmission. Each chunk of data provided to the handler is appended onto our existing data variable (line 9).
Last, we attach an event listener to monitor for the end event, so that we can be made aware that we have read all the bytes on the provided stream (line 11).
EXERCISE 10-2. YOUR FIRST PROXY SERVER
Leveraging the code from Listing 10-14, as well as what you learned earlier in the chapter, building a proxy server should be no sweat. In this exercise, you are asked to devise the necessary implementation that would result in the following (proxy) request headers for the resulting incoming request headers.
Request Headers (Proxy)
GET /chapter10/data/imagedata.txt HTTP/1.1
Host: json.sandboxed.guru
Accept: *
Request Headers (Incoming)
GET /proxy/ HTTP/1.1
Host: 127.0.0.1:1337
Accept: *
As this is a proxy, be sure to write all incoming chunkOfData directly to the response. Similarly, don’t forget about the headers. Once the stream has been exhausted of all data, be sure to end the response. The answer can be seen in Listing 10-15.
Listing 10-15. Answer to the Proxy Exercise
 1 var http = require('http'),
 2 var server = http.createServer( );
 3     server.addListener('request',requestHandler);
 4     server.listen(1337, '127.0.0.1'),
 5 function requestHandler(request, response) {
 6     if (request.url.toLowerCase().indexOf("/proxy/") >-1 ) {
 7          var options = { host:"json.sandboxed.guru",
                          path:'/chapter10/data/imagedata.txt',
                          method:"GET" };
 8         var clientRequest=http.request(options, responseHandler);
 9             clientRequest.end();
10         function responseHandler(proxy_response) {
11            response.writeHead(proxy_response.statusCode, proxy_response.headers);
12            proxy_response.addListener('data', function(chunkOfData) {
13               response.write(chunkOfData);
14            });
15            proxy_response.addListener ('end', function() {
16                response.end();
17            });
18         }
19     } else {
20        response.statusCode = 200;
21        body = 'proxy calls occur at /proxy/';
22        response.setHeader("Content-Type", "text/plain");
23        response.setHeader("Content-Length", Buffer.byteLength(body, 'utf8'));
24        (body) ? response.end(body) : response.end();
25     }
26 };
27 console.log('Server running at http://127.0.0.1:1337/'),
Listing 10-15 reveals, in bold, the necessary code required to fulfill the requirements of the preceding exercise. As the code builds on Listing 10-14, I will discuss only the lines that are required to satisfy the exercise.
Per the exercise, a proxy should only occur if it has been determined that an incoming request seeks a resource located within the /proxy/ directory. Utilizing indexOf, we can determine if the /proxy/ substring exists within request.url. If the substring is found, the index returned will be greater than -1, and, therefore, the subsequent block of code will be able to run (line 6). Of course, within that subsequent block of code resides our proxy.
Once we initiate our proxy, the supplied callback is provided a reference to an IncomingMessage object. As our proxy is merely making a request on behalf of our client in order to circumvent the same-origin policy, we must simply provide all aspects of the request, unaltered, as the response from our server. Therefore, once we can obtain the headers and status line of the proxy_response, we simply relay them onto the response that we will provide back to our client. This is achieved via the expose writeHead method (line 11).
Similarly, we have to route any incoming data chunks to the response of our incoming request. This is accomplished via the write method (line 13). Last, once all data has been consumed from the stream, we invoke response.end() to deliver the response back to the requesting client (line 16).
If you were to run this server and navigate to the URL, http://127.0.0.1/proxy/, you should be presented with similar results, as shown in Figure 10-18.
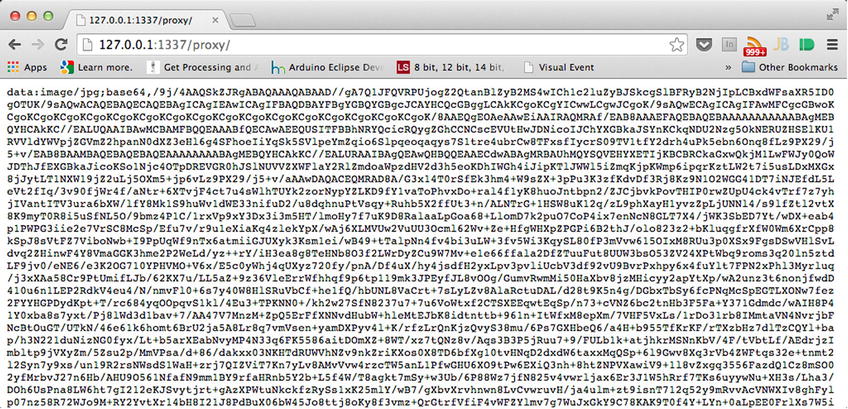
Figure 10-18. A rather large image whose data has been encoded into Base64
Currently, our proxy will always and only request, on our behalf, the preceding Base64 data. However, as this is rather limiting, let’s modify it to possess the ability to fetch other files as well. On my server, json.sandboxed.guru, within the /chapter10/data/ directory, I have placed the following files: imagesA.json, imagesB.json, and imagesC.json. You may remember these from Chapter 8. Utilizing a singular line of JavaScript, we ensure that these files can be fetched in addition to the existing imagesdata.txt file (see Listing 10-16).
Listing 10-16. Altering Our Proxy to Fetch Additional Files from json.sandboxed.guru
 1 var http = require('http'),
 2 var server = http.createServer( );
 3     server.addListener('request',requestHandler);
 4     server.listen(1337, '127.0.0.1'),
 5 function requestHandler(request, response) {
 6     if (request.url.toLowerCase().indexOf("/proxy/") >-1 ) {
 7          var options = { hostname:"json.sandboxed.guru",
                          path:'/chapter10/data/' + request.url.substr(7) ,
                          method:"GET" };
 8         var clientRequest=http.request(options, responseHandler);
 9             clientRequest.end();
10         function responseHandler(proxy_response) {
11            response.writeHead(proxy_response.statusCode, proxy_response.headers);
12            proxy_response.addListener('data', function(chunkOfData) {
13               response.write(chunkOfData);
14            });
15            proxy_response.addListener ('end', function() {
16                response.end();
17            });
18         }
19     } else {
20        response.statusCode = 200;
21        body = 'proxy calls occur at /proxy/';
22        response.setHeader("Content-Type", "text/plain");
23        response.setHeader("Content-Length", Buffer.byteLength(body, 'utf8'));
24        (body) ? response.end(body) : response.end();
25     }
26 };
27 console.log('Server running at http://127.0.0.1:1337/'),
Listing 10-16 demonstrates how, through simple string manipulation, we can dynamically specify the resource to be requested from the remote server. Through the request.url, we can extract any resource that follows the first seven characters, which are precisely how many characters are used to specify /proxy/. From there, the remaining characters within the string can be appended to the value for our path. At this point, let’s shut down the currently running server, so that we can insert this amendment. Once it’s in place, we can start our server back up and navigate to the following:
http://127.0.0.1:1337/proxy/imagedata.txt
http://127.0.0.1:1337/proxy/imagesA.json
http://127.0.0.1:1337/proxy/imagesB.json
http://127.0.0.1:1337/proxy/imagesC.json
When navigating to any of the preceding destinations, you should be provided with the exact response, as if you directly obtained them from http://json.sandboxed.guru/chapter10/data/. The reason why is because we did obtain them directly from the preceding URL, via our proxy.
Congratulations! You have constructed a functioning proxy server.
Summary
This chapter contained a lot of advanced concepts, and you should be truly proud of yourself for making it through. A server is an integral component when it comes to the Internet, and not just for fetching static resources, as you have surely observed. A server, while capable of fetching static files, can in concert with server-side programming, generate the content of the response, evaluate the request, and even initiate requests of its own.
With the ease of the JavaScript language, and Chrome’s V8 engine, we were able to conveniently run and manage our own server. With it, we learned how to handle incoming requests, as well as how to configure a response. This chapter also provided a hands-on approach toward circumventing the same-origin policy of the browser. Additionally, you had a glimpse into the concepts of server-side programming, which will serve you well in the future or, at the very least, the next chapter.
In the upcoming chapter, we will continue to leverage the Node platform to create a simple JSON database. This database will allow incoming JSON data to be captured and stored locally on the file system, so that it can be retrieved by later requests.
Key Points from This Chapter
- A Node server can be programmed entirely in JavaScript via the Node’s HTTP module.
- end must be invoked on the response instance for a request to be completed.
- Neglecting to invoke end will result in the client’s request to time out.
- You must restart your server anytime a change is introduced to the code.
- Node possesses an extremely low-level API.
- Node is non-blocking/event-driven.
- IncomingMessages instances represent request/response arguments.
- You can obtain the headers, URLs, and request/status lines from IncomingMessages.
- To obtain an entity body from IncomingMessages, you must consume data from their stream.
- 127.0.0.1 is a way to access one’s own computer’s network services.
- Content-Length must specify bytes not character length.
- Ensure that the value supplied with the jsonp parameter is not URL-encoded when appending it to the padded JSON.
- With string manipulation, you can respond accordingly to any request.