CHAPTER 14
Authenticating Your Users
Authenticating user identities is common practice in today's Web applications. This is done not only for security-related reasons, but also to offer site customization features based on user preferences and type. Typically, users are prompted for a username and password, the combination of which forms a unique identifying value for that user. In this chapter, you'll learn how to prompt for and validate this information, using PHP's built-in authentication capabilities. Specifically, in this chapter you'll learn about:
- Basic HTTP-based authentication concepts
- PHP's authentication variables, namely
$_SERVER['PHP_AUTH_USER'] and$_SERVER['PHP_AUTH_PW'] - Several PHP functions that are commonly used to implement authentication procedures
- Three commonplace authentication methodologies: hard-coding the login pair (username and password) directly into the script, file-based authentication, and database-based authentication
- Further restricting authentication credentials with a user's IP address
- Taking advantage of the
Auth_HTTPpackage - Testing password guessability using the CrackLib extension
- Recovering lost passwords using one-time URLs
HTTP Authentication Concepts
The HTTP protocol offers a fairly effective means for user authentication. A typical authentication scenario proceeds like this:
- The client requests a restricted resource.
- The server responds to this request with a 401 (Unauthorized access) response message.
- The client (browser) recognizes the 401 response and produces a pop-up authentication prompt similar to the one shown in Figure 14-1. Most modern browsers are capable of understanding HTTP authentication and offering appropriate capabilities, including Internet Explorer, Netscape Navigator, Mozilla, and Opera.
- The user-supplied credentials (namely, the username and password) are sent back to the server for validation. If the user supplies correct credentials, access is granted; otherwise it's denied.
- If the user is validated, the browser stores the authentication information within its authentication cache. This cache information remains within the browser until the cache is cleared, or until another 401 server response is sent to the browser.
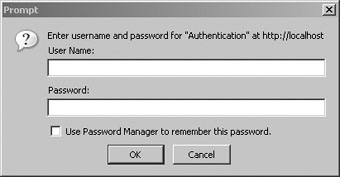
Figure 14-1. An authentication prompt
Although HTTP authentication effectively controls access to restricted resources, it does not secure the channel in which the authentication credentials travel. That is, it is fairly trivial for a well-positioned attacker to sniff, or monitor, all traffic taking place between a server and a client. Both the supplied username and password are included in this traffic, both unencrypted. To eliminate the possibility of compromise through such a method, you need toimplement a secure communications channel, typically accomplished using Secure Sockets Layer (SSL). SSL support is available for all mainstream Web servers, including Apache and Microsoft Internet Information Server (IIS).
PHP Authentication
Integrating user authentication directly into your Web application logic is convenient and flexible; convenient because it consolidates what would otherwise require some level of interprocess communication, and flexible because integrated authentication provides a much simpler means for integrating with other components of an application, such as content customization and user privilege designation. The remainder of this chapter examines PHP's built-in authentication feature and demonstrates several authentication methodologies that you can immediately begin incorporating into your applications.
Authentication Variables
PHP uses two predefined variables to authenticate a user: $_SERVER['PHP_AUTH_USER'] and $_SERVER['PHP_AUTH_PW']. These variables store the username and password values, respectively. While authenticating is as simple as comparing the expected username and password to these variables, thereare two important caveats to keep in mind when using these predefined variables:
- Both variables must be verified at the start of every restricted page. You can easily accomplish this by authenticating the user prior to performing any other action on the restricted page, which typically means placing the authentication code in a separate file and then including that file in the restricted page using the
require()function. - These variables do not function properly with the CGI version of PHP, nor do they function on Microsoft IIS. See the sidebar about PHP authentication and IIS.
Useful Functions
Two standard functions are commonly used when handling authentication via PHP: header() and isset(). Both are introduced in this section.
header()
The header() function sends a raw HTTP header to the browser. The string parameter specifies the header information sent to the browser. Its prototype follows:
void header(string string [, boolean replace [, int http_response_code]])
The optional replace parameter determines whether this information should replace or accompany a previously sent header. Finally, the optional http_response_code parameter defines a specific response code that will accompany the header information. Note that you can include this code in the string, as will soon be demonstrated. Applied to user authentication, this function is useful for sending the WWW authentication header to the browser, causing the pop-up authentication prompt to be displayed. It is also useful for sending the 401 header message to the user, if incorrect authentication credentials are submitted. An example follows:
<?php

   header('WWW-Authenticate: Basic Realm="Book Projects"'),

   header("HTTP/1.1 401 Unauthorized");


?>
Note that unless output buffering is enabled, these commands must be executed before any output is returned. Neglecting this rule will result in a server error, because of the violation of the HTTP specification.
isset()
The isset() function determines whether a variable has been assigned a value. Its prototype follows:
boolean isset(mixed var [, mixed var [,...]])
It returns TRUE if the variable contains a value, and FALSE if it does not. As applied to user authentication, the isset() function is useful for determining whether the $_SERVER['PHP_AUTH_USER'] and $_SERVER['PHP_AUTH_PW'] variables are properly set. Listing 14-1 offers a usage example.
Listing 14-1. Using isset() to Verify Whether a Variable Contains a Value
<?php

    // If the username or password isn't set, display the authentication window

    if (! isset($_SERVER['PHP_AUTH_USER']) || ! isset($_SERVER['PHP_AUTH_PW'])) {

        header('WWW-Authenticate: Basic Realm="Authentication"'),

        header("HTTP/1.1 401 Unauthorized");


    // If the username and password are set, output their credentials

    } else {

        echo "Your supplied username: ".$_SERVER['PHP_AUTH_USER']."<br />";

        echo "Your password: ".$_SERVER['PHP_AUTH_PW']."<br />";

    }

?>
PHP Authentication Methodologies
There are several ways you can implement authentication via a PHP script. In doing so, you should always consider the scope and complexity of your authentication needs. This section discusses five implementation methodologies: hard-coding a login pair directly into the script, using file-based authentication, using database-based authentication, using IP-based authentication, and using PEAR's HTTP authentication functionality. Examine each authentication approach and then choose the solution that best fits your needs.
Hard-Coded Authentication
The simplest way to restrict resource access is by hard-coding the username and password directly into the script. Listing 14-2 offers an example of how to accomplish this.
Listing 14-2. Authenticating Against a Hard-Coded Login Pair
if (($_SERVER['PHP_AUTH_USER'] != 'specialuser') ||

   ($_SERVER['PHP_AUTH_PW'] != 'secretpassword')) {

      header('WWW-Authenticate: Basic Realm="Secret Stash"'),

      header('HTTP/1.0 401 Unauthorized'),

      print('You must provide the proper credentials!'),

      exit;

}
In this example, if $_SERVER['PHP_AUTH_USER'] and $_SERVER['PHP_AUTH_PW'] are equal to specialuser and secretpassword, respectively, the code block will not execute, and anything ensuing that block will execute. Otherwise, the user is prompted for the username and password until either the proper information is provided or a 401 Unauthorized message is displayed due to multiple authentication failures.
Although authentication against hard-coded values is very quick and easy to configure, it has several drawbacks. Foremost, all users requiring access to that resource must use the same authentication pair. In most real-world situations, each user must be uniquely identified so that user-specific preferences or resources can be provided. Second, changing the username or password can be done only by entering the code and making the manual adjustment. The next two methodologies remove these issues.
File-based Authentication
Often you need to provide each user with a unique login pair, making it possible to log user-specific login times, movements, and actions. This is easily accomplished with a text file, much like the one commonly used to store information about Unix users (/etc/passwd). Listing 14-3 offers such a file. Each line contains a username and an encrypted password pair, with the two elements separated by a colon (:).
Listing 14-3. The authenticationFile.txt File Containing Encrypted Passwords
jason:60d99e58d66a5e0f4f89ec3ddd1d9a80

donald:d5fc4b0e45c8f9a333c0056492c191cf

mickey:bc180dbc583491c00f8a1cd134f7517b
A crucial security consideration regarding authenticationFile.txt is that this file should be stored outside the server document root. If it is not, an attacker could discover the file through brute-force guessing, revealing half of the login combination. In addition, although you have the option to skip password encryption, this practice is strongly discouraged, because users with access to the server might be able to view the login information if file permissions are not correctly configured.
The PHP script required to parse this file and authenticate a user against a given login pair is only a tad more complicated than the script used to authenticate against a hard-coded authentication pair. The difference lies in the script's additional duty of reading the text file into an array, and then cycling through that array searching for a match. This involves the use of several functions, including the following:
file (string filename):Thefile()function reads a file into an array, with each element of the array consisting of a line in the file.explode(string separator, string string [, int limit]):Theexplode()function splits a string into a series of substrings, with each string boundary determined by a specific separator.md5(string str):Themd5()function calculates an MD5 hash of a string, using RSA Security Inc.'s MD5 Message-Digest algorithm (http://www.rsa.com/).
Note Although they are similar in function, you should use explode() instead of split(), because split() is a tad slower due to its invocation of PHP's regular expression parsing engine.
Listing 14-4 illustrates a PHP script that is capable of parsing authenticationFile.txt, potentially matching a user's input to a login pair.
Listing 14-4. Authenticating a User Against a Flat File Login Repository
<?php

    // Preset authentication status to false

    $authorized = FALSE;


    if (isset($_SERVER['PHP_AUTH_USER']) && isset($_SERVER['PHP_AUTH_PW'])) {


        // Read the authentication file into an array

        $authFile = file("/usr/local/lib/php/site/authenticate.txt");


        // Search array for authentication match

        // If using Windows, use


        if (in_array($_SERVER['PHP_AUTH_USER'].

                     ":"

                     .md5($_SERVER['PHP_AUTH_PW'])."
", $authFile))

            $authorized = TRUE;

    }

    // If not authorized, display authentication prompt or 401 error

    if (! $authorized) {

        header('WWW-Authenticate: Basic Realm="Secret Stash"'),

        header('HTTP/1.0 401 Unauthorized'),

        print('You must provide the proper credentials!'),

        exit;

    }

    // restricted material goes here...

?>
Although the file-based authentication system works great for relatively small, static authentication lists, this strategy can become somewhat inconvenient when you're handling a large number of users, when users are regularly being added, deleted, and modified, or when you need to incorporate an authentication scheme into a larger information infrastructure (into a preexisting user table, for example). Such requirements are better satisfied by implementing a database-based solution. The following section demonstrates just such a solution, using a database to store authentication pairs.
Database-based Authentication
Of all the various authentication methodologies discussed in this chapter, implementing a database-driven solution is the most powerful, because it not only enhances administrative convenience and scalability, but also can be integrated into a larger database infrastructure. For purposes of this example, the data store is limited to three fields—a primary key, a username, and a password. These columns are placed into a table called logins, shown in Listing 14-5.
Note If you're unfamiliar with the MySQL server and are confused by the syntax found in this example, consider reviewing the material found in Chapter 30.
Listing 14-5. A User Authentication Table
CREATE TABLE logins (

   id TINYINT UNSIGNED NOT NULL AUTO_INCREMENT,

   username VARCHAR(16) NOT NULL,

   pswd VARCHAR(32) NOT NULL,

   PRIMARY KEY(id));
A few lines of sample data follow:
id    username    password

1     wjgilmore   098f6bcd4621d373cade4e832627b4f6

2     mwade       0e4ab1a5a6d8390f09e9a0f2d45aeb7f

3     jgennick    3c05ce06d51e9498ea472691cd811fb6
Listing 14-6 displays the code used to authenticate a user-supplied username and password against the information stored within the logins table.
Listing 14-6. Authenticating a User Against a MySQL Database
<?php

    /* Because the authentication prompt needs to be invoked twice,

       embed it within a function.

    */

    function authenticate_user() {

        header('WWW-Authenticate: Basic realm="Secret Stash"'),

        header("HTTP/1.0 401 Unauthorized");

        exit;

    }

    /* If $_SERVER['PHP_AUTH_USER'] is blank, the user has not yet been

       prompted for the authentication information.

    */

    if (! isset($_SERVER['PHP_AUTH_USER'])) {


        authenticate_user();


    } else {


        // Connect to the MySQL database

        mysql_pconnect("localhost","authenticator","secret")

            or die("Can't connect to database server!");


        mysql_select_db("corporate")

            or die("Can't select database!");


        // Create and execute the selection query

        $query = "SELECT username, pswd FROM userauth

                  WHERE username='$_SERVER[PHP_AUTH_USER]' AND

                  pswd=MD5('$_SERVER[PHP_AUTH_PW]')";


        $result = mysql_query($query);

        // If nothing was found, reprompt the user for the login information

        if (mysql_num_rows($result) == 0) {


            authenticate_user();


        } else {

            echo "Welcome to the secret archive!";

        }

    }

?>
Although database authentication is more powerful than the previous two methodologies described, it is really quite trivial to implement. Simply execute a selection query against the logins table, using the entered username and password as criteria for the query. Of course, such a solution is not dependent upon specific use of a MySQL database; any relational database could be used in its place.
IP-based Authentication
Sometimes you need an even greater level of access restriction to ensure the validity of the user. Of course, a username/password combination is not foolproof; this information can be given to someone else, or stolen from a user. It could also be guessed through deduction or brute force, particularly if the user chooses a poor login combination, which is still quite common. To combat this, one effective way to further enforce authentication validity is to require not only a valid username/password login pair, but also a specific IP address. To do so, you only need to slightly modify the userauth table used in the previous section, and modify the query used in Listing 14-6. The revised table is displayed in Listing 14-7.
Listing 14-7. The logins Table Revisited
CREATE TABLE logins (

   id TINYINT UNSIGNED NOT NULL AUTO_INCREMENT,

   pswd VARCHAR(32) NOT NULL,

   ip VARCHAR(15) NOT NULL,

   PRIMARY KEY(id));
The code for validating both the username/password and IP address is displayed in Listing 14-8.
Listing 14-8. Authenticating Using a Login Pair and an IP Address
<?php

    function authenticate_user() {

        header('WWW-Authenticate: Basic realm="Secret Stash"'),

        header("HTTP/1.0 401 Unauthorized");

        exit;

     }

     if(! isset($_SERVER['PHP_AUTH_USER'])) {

         authenticate_user();

     } else {


        mysql_connect("localhost","authenticator","secret")

            or die("Can't connect to database server!");


        mysql_select_db("corporate")

            or die("Can't select authentication database!");


        $query = "SELECT username, pswd FROM logins

            WHERE username='$_SERVER[PHP_AUTH_USER]'

            AND pswd=MD5('$_SERVER[PHP_AUTH_PW]')

            AND ip='$_SERVER[REMOTE_ADDR]'";


        $result = mysql_query($query);


        if (mysql_num_rows($result) == 0)

            authenticate_user();

        else

            echo "Welcome to the secret archive!";


        mysql_close();


     } # end if

?>
Although this additional layer of security works quite well, keep in mind it is not foolproof. The practice of IP spoofing, or tricking a network into thinking that traffic is emanating from a particular IP address, has long been a tool in the savvy attacker's toolbox. Therefore, if such an attacker gains access to a user's username and password, they could conceivably circumvent your IP-based security obstacles.
Taking Advantage of PEAR: Auth_HTTP
While the approaches to authentication discussed thus far work just fine, it's always nice to hide some of the implementation details within a class. The PEAR class Auth_HTTP satisfies this desire quite nicely, taking advantage of Apache's authentication mechanism and prompt (see Figure 14-1) to produce an identical prompt but using PHP to manage the authentication information. Auth_HTTP encapsulates many of the messy aspects of user authentication, exposing the information and features you're looking for by way of a convenient interface. Furthermore, because it inherits from the Auth class, Auth_HTTP also offers a broad range of authentication storage mechanisms, some of which include the DB database abstraction package, LDAP, POP3, IMAP, RADIUS, and SAMBA. This section shows you how to take advantage of Auth_HTTP to store user authentication information in a flat file.
Installing Auth_HTTP
To take advantage of Auth_HTTP's features, you need to install it. Therefore, invoke PEAR and pass it the following arguments:
%>pear install -o auth_http
Because Auth_HTTP is dependent upon another package (Auth), you should pass at least the −o option, which will install this required package. Execute this command and you'll see output similar to the following:
Did not download dependencies: pear/File_Passwd, pear/Net_POP3, pear/MDB,

pear/MDB2, pear/Auth_RADIUS, pear/Crypt_CHAP, pear/File_SMBPasswd,

use --alldeps or --onlyreqdeps to download automatically

pear/Auth can optionally use package "pear/File_Passwd" (version >= 0.9.5)

pear/Auth can optionally use package "pear/Net_POP3" (version >= 1.3)

pear/Auth can optionally use package "pear/MDB"

pear/Auth can optionally use package "pear/MDB2" (version >= 2.0.0RC1)

pear/Auth can optionally use package "pear/Auth_RADIUS"

pear/Auth can optionally use package "pear/Crypt_CHAP" (version >= 1.0.0)

pear/Auth can optionally use package "pear/File_SMBPasswd"

pear/Auth can optionally use PHP extension "imap"

pear/Auth can optionally use PHP extension "vpopmail"

downloading Auth_HTTP-2.1.6.tgz ...

Starting to download Auth_HTTP-2.1.6.tgz (9,327 bytes)

.....done: 9,327 bytes

downloading Auth-1.3.0.tgz ...

Starting to download Auth-1.3.0.tgz (39,759 bytes)

...done: 39,759 bytes

install ok: channel://pear.php.net/Auth-1.3.0

install ok: channel://pear.php.net/Auth_HTTP-2.1.6
Once installed, you can begin taking advantage of Auth_HTTP's capabilities. For purposes of demonstration, the following section considers how to authenticate against the database.
Authenticating Against a MySQL Database
Because Auth_HTTP subclasses the Auth package, it inherits all of Auth's capabilities. Because Auth subclasses the DB package, Auth_HTTP can take advantage of using this popular database abstraction layer to store authentication information in a database table. To store the information, this example uses a table identical to one used earlier in this chapter:
CREATE TABLE logins (

   id TINYINT UNSIGNED NOT NULL AUTO_INCREMENT,

   username VARCHAR(8) NOT NULL,

   pswd VARCHAR(32) NOT NULL,

   PRIMARY KEY(id));
Next, you need to create a script that invokes Auth_HTTP, telling it to refer to a MySQL database. This script is presented in Listing 14-9.
Listing 14-9. Validating User Credentials with Auth_HTTP
<?php

    require_once("Auth/HTTP.php");

    // Designate authentication credentials, table name,

    // username and password columns, password encryption type,

    // and query parameters for retrieving other fields


    $dblogin = array (

        'dsn' => "mysql://corpweb:secret@localhost/corporate",

        'table' => "logins",

        'usernamecol' => "username",

        'passwordcol' => "pswd",

        'cryptType' => "md5"

        'db_fields' => "*"

    );


    // Instantiate Auth_HTTP

    $auth = new Auth_HTTP("DB", $dblogin) or die("Can't connect!");


    // Begin the authentication process

    $auth->start();


    // Message to provide in case of authentication failure

    $auth->setCancelText('Authentication credentials not accepted!'),


    // Check for credentials. If not available, prompt for them

    if($auth->getAuth())

        echo "Welcome, $auth->commonname<br />";

?>
Executing Listing 14-9, and passing along information matching that found in the logins table, allows the user to pass into the restricted area. Otherwise, the error message supplied in setCancelText() is displayed.
The comments should really be enough to guide you through the code, perhaps with one exception regarding the $dblogin array. This array is passed into the Auth_HTTP constructor along with a declaration of the data source type. See the Auth_HTTP documentation at http://pear.php.net/package/Auth_HTTP for a list of the accepted data source types. The array's first element, dsn, represents the Data Source Name (DSN). A DSN must be presented in the following format:
datasource:username:password@hostname/database
Therefore, a DSN similar to the following would be used to log in to a MySQL database:
mysql://corpweb:secret@localhost/corporate
See the DB documentation at http://pear.php.net/package/DB for a complete list of accepted datasource values.
The next three elements, namely table, usernamecol, and passwordcol, represent the table that stores the authentication information, the column title that stores the usernames, and the column title that stores the passwords, respectively.
The cryptType element specifies whether the password is stored in the database in plain text or as an MD5 hash. If it is stored in plain text, cryptType should be set to none, whereas if it is stored as an MD5 hash, it should be set to md5.
Finally, the db_fields element provides the query parameters used to retrieve any other table information, such as the commonname field.
Auth_HTTP, its parent class Auth, and the DB database abstraction class provide users with a powerful array of features capable of carrying out otherwise tedious tasks. Definitely take time to visit the PEAR site and learn more about these packages.
User Login Administration
When you incorporate user logins into your application, providing a sound authentication mechanism is only part of the total picture. How do you ensure that the user chooses a sound password, of sufficient difficulty that attackers cannot use it as a possible attack route? Furthermore, how do you deal with the inevitable event of the user forgetting his password? Both topics are covered in detail in this section.
Testing Password Guessability with the CrackLib Library
In an ill-conceived effort to prevent forgetting their passwords, users tend to choose something easy to remember, such as the name of their dog, their mother's maiden name, or even their own name or age. Ironically, this practice often doesn't help users to remember the password and, even worse, offers attackers a rather simple route into an otherwise restricted system, either by researching the user's background and attempting various passwords until the correct one is found, or by using brute force to discern the password through numerous repeated attempts. In either case, the password typically is broken because the user has chosen a password that is easily guessable, resulting in the possible compromise of not only the user's personal data, but also the system itself.
Reducing the possibility that such easily guessable passwords could be introduced into the system is quite simple, by turning the procedure of unchallenged password creation into one of automated password approval. PHP offers a wonderful means for doing so via the CrackLib library, created by Alec Muffett (http://www.crypticide.com/dropsafe/). CrackLib is intended to test the strength of a password by setting certain benchmarks that determine its guessability, including:
- Length: Passwords must be longer than four characters.
- Case: Passwords cannot be all lowercase.
- Distinction: Passwords must contain adequate different characters. In addition, the password cannot be blank.
- Familiarity: Passwords cannot be based on a word found in a dictionary. In addition, passwords cannot be based on the reverse spelling of a word found in the dictionary. Dictionaries are discussed further in a bit.
- Standard numbering: Because CrackLib's author is British, he thought it a good idea to check against patterns similar to what is known as a National Insurance (NI) number. The NI number is used in Britain for taxation, much like the Social Security number (SSN) is used in the United States. Coincidentally, both numbers are nine characters long, allowing this mechanism to efficiently prevent the use of either, if a user is naive enough to use such a sensitive identifier for this purpose.
Installing PHP's CrackLib Extension
To use the CrackLib extension, you need to first download and install the CrackLib library, available at http://sourceforge.net/projects/cracklib. If you're running a Linux/Unix variant, it might already be installed, because CrackLib is often packaged with these operating systems. Complete installation instructions are available in the README file found in the CrackLib package.
PHP's CrackLib extension was unbundled from PHP as of version 5, and moved to the PHP Extension Community Library (PECL), a repository for PHP extensions. Therefore, to use CrackLib, you need to download and install the crack extension from PECL. See http://pecl.php.net/ for more information about PECL.
Once you install CrackLib, you need to make sure that the crack.default_dictionary directive in php.ini is pointing to a password dictionary. Such dictionaries abound on the Internet, so executing a search will turn up numerous results. Later in this section you'll learn more about the various types of dictionaries at your disposal.
Using the CrackLib Extension
Using PHP's CrackLib extension is quite easy. Listing 14-10 offers a complete usage example.
Listing 14-10. Using PHP's CrackLib Extension
<?php

    $pswd = "567hejk39";


    /* Open the dictionary. Note that the dictionary

       filename does NOT include the extension.

     */

    $dictionary = crack_opendict('/usr/lib/cracklib_dict'),


    // Check password for guessability

    $check = crack_check($dictionary, $pswd);


    // Retrieve outcome

    echo crack_getlastmessage();


    // Close dictionary

    crack_closedict($dictionary);

?>
In this particular example, crack_getlastmessage() returns the string "strong password" because the password denoted by $pswd is sufficiently difficult to guess. However, if the password is weak, one of a number of different messages could be returned. Table 14-1 offers a few other passwords, and the resulting outcome from passing them through crack_check().
Table 14-1. Password Candidates and the crack_check() Function's Response
| Password | Response |
| Mary | it is too short |
| 12 | it's WAY too short |
| 1234567 | it is too simplistic/systematic |
| street | it does not contain enough DIFFERENT characters |
By writing a short conditional statement, you can create user-friendly, detailed responses based on the information returned from CrackLib. Of course, if the response is strong password, you can allow the user's password choice to take effect.
Dictionaries
Listing 14-10 uses the cracklib_dict.pwd dictionary, which is generated by CrackLib during the installation process. Note that in the example, the extension .pwd is not included when referring to the file. This seems to be a quirk with the way that PHP wants to refer to this file, and could change some time in the future so that the extension is also required.
You are also free to use other dictionaries, of which there are many freely available on the Internet. Furthermore, you can find dictionaries for practically every spoken language. One particularly complete repository of such dictionaries is available on the University of Oxford's FTP site: ftp.ox.ac.uk. In addition to quite a few language dictionaries, the site offers a number of interesting specialized dictionaries, including one containing keywords from many Star Trek plot summaries. At any rate, regardless of the dictionary you decide to use, simply assign its location to the crack.default_dictionary directive, or open it using crack_opendict().
One-Time URLs and Password Recovery
As sure as the sun rises, your application users will forget their passwords. All of us are guilty of forgetting such information, and it's not entirely our fault. Take a moment to list all the different login combinations you regularly use; my guess is that you have at least 12 such combinations. E-mail, workstations, servers, bank accounts, utilities, online commerce, securities and mortgage brokerages, and so on. We use passwords to manage nearly everything these days. Because your application will assumedly be adding yet another login pair to the user's list, a simple, automated mechanism should be in place for retrieving or resetting the user's password should it be forgotten. Depending on the sensitivity of the material protected by the login, retrieving the password might require a phone call or sending the password via the postal service. As always, use discretion when you devise mechanisms that may be exploited by an intruder. This section examines one such mechanism, referred to as a one-time URL.
A one-time URL is commonly given to a user to ensure uniqueness when no other authentication mechanisms are available, or when the user would find authentication perhaps too tedious for the task at hand. For example, suppose you maintain a list of newsletter subscribers and want to know which and how many subscribers are actually reading each monthly issue. Simply embedding the newsletter into an e-mail won't do, because you would never know how many subscribers were simply deleting the e-mail from their inboxes without even glancing at the contents. Rather, you could offer them a one-time URL pointing to the newsletter, one of which might look like this:
http://www.example.com/newsletter/0503.php?id=9b758e7f08a2165d664c2684fddbcde2
In order to know exactly which users showed interest in the newsletter issue, a unique ID parameter like the one shown in the preceding URL has been assigned to each user, and stored in some subscribers table. Such values are typically pseudorandom, derived using PHP's md5() and uniqid() functions, like so:
$id = md5(uniqid(rand(),1));
The subscribers table might look something like the following:
CREATE TABLE subscribers (

   id SMALLINT UNSIGNED NOT NULL AUTO_INCREMENT,

   email VARCHAR(55) NOT NULL,

   hash VARCHAR(32) NOT NULL,

   read CHAR,

   PRIMARY KEY(id));
When the user clicks this link, causing the newsletter to be displayed, the following code could execute before displaying the newsletter:
    $query = "UPDATE subscribers SET read='Y' WHERE hash='$id'";

    mysql_query($query);
The result is that you will know exactly how many subscribers showed interest in the newsletter, because they all actively clicked the link.
This very same concept can be applied to password recovery. To illustrate how this is accomplished, consider the revised logins table shown in Listing 14-11.
Listing 14-11. A Revised logins Table
CREATE TABLE logins (

   id TINYINT UNSIGNED NOT NULL AUTO_INCREMENT,

   email VARCHAR(55) NOT NULL,

   username VARCHAR(16) NOT NULL,

   pswd CHAR(32) NOT NULL,

   hash CHAR(32) NOT NULL,

   PRIMARY KEY(id));
Suppose one of the users found in this table forgets his password and thus clicks the Forgot password? link, commonly found near a login prompt. The user will arrive at a page in which he is asked to enter his e-mail address. Upon entering the address and submitting the form, a script is executed similar to that shown in Listing 14-12.
Listing 14-12. A One-Time URL Generator
<?php

    // Create unique identifier

    $id = md5(uniqid(rand(),1));


    // User's email address

    $address = $_POST[email];


    // Set user's hash field to a unique id

    $query = "UPDATE logins SET hash='$id' WHERE email='$address'";

    $result = mysql_query($query);


    $email = <<< email

Dear user,

Click on the following link to reset your password:

http://www.example.com/users/lostpassword.php?id=$id

email;


// Email user password reset options

mail($address,"Password recovery","$email","FROM:[email protected]")
echo "<p>Instructions regarding resetting your password have been sent to

         $address</p>";

?>
When the user receives this e-mail and clicks the link, the script lostpassword.php, shown in Listing 14-13, executes.
Listing 14-13. Resetting a User's Password
<?php

    // Create a pseudorandom password five characters in length

    $pswd = substr(md5(uniqid(rand())),5);


    // User's hash value

    $id = $_GET[id];


    // Update the user table with the new password

    $query = "UPDATE logins SET pswd='$pswd' WHERE hash='$id'";

    $result = mysql_query($query);


    // Display the new password

    echo "<p>Your password has been reset to $pswd.</p>";

?>
Of course, this is only one of many recovery mechanisms. For example, you could use a similar script to provide the user with a form for resetting his own password.
Summary
This chapter introduced PHP's authentication capabilities, features that are practically guaranteed to be incorporated into many of your future applications. In addition to discussing the basic concepts surrounding this functionality, several common authentication methodologies were investigated. Decreasing password guessability by using PHP's CrackLib extension was also examined. Finally, this chapter offered a discussion of recovering passwords using one-time URLs.
The next chapter discusses another popular PHP feature—handling file uploads via the browser.