CHAPTER 34
MySQL Views
Even relatively simplistic data-driven applications rely on queries involving several tables. For instance, suppose you want to create an interface that displays each employee's name, e-mail address, total number of absences, and bonuses. The query might look like this:
SELECT emp.employee_id, emp.firstname, emp.lastname, emp.email,

       COUNT(att.absence) AS absences, COUNT(att.vacation) AS vacation,

       SUM(comp.bonus) AS bonus

FROM employees emp, attendance att, compensation comp

WHERE emp.employee_id = att.employee_id

AND emp.employee_id = comp.employee_id

GROUP BY emp.employee_id ASC

ORDER BY emp.lastname;
Queries of this nature are enough to send shudders down one's spine because of their size, particularly when they need to be repeated in several locations throughout the application. Another side effect of such queries is that they open up the possibility of someone inadvertently disclosing potentially sensitive information. For instance, what if, in a moment of confusion, you accidentally insert the column emp.ssn (the employee's Social Security number, or SSN) into this query? This would result in each employee's SSN being displayed to anybody with the ability to review the query's results. Yet another side effect of such queries is that any third-party contractor assigned to creating similar interfaces would also have essentially surreptitious access to sensitive data, opening up the possibility of identity theft and, in other scenarios, corporate espionage.
What's the alternative? After all, queries are essential to the development process, and unless you want to become entangled in managing column-level privileges (see Chapter 29), it seems you'll just have to grin and bear it.
This has long been the case for MySQL users, which is why the addition of a new feature known as views has generated such excitement. Available as of MySQL 5.0, using views offers a way to encapsulate queries that is much like the way a stored routine (see Chapter 32) embodies a set of commands. For example, you could create a view of the preceding example query and execute it like this:
SELECT * FROM employee_attendance_bonus_view;
This chapter begins by briefly introducing the concept of views and the various advantages of incorporating views into your development strategy. It then discusses MySQL's view support, showing you how to create, execute, and manage views. Finally, you'll learn how to incorporate views into your PHP-driven Web applications.
Introducing Views
Also known as a virtual table, a view consists of a set of rows that is returned if a particular query is executed. A view isn't a copy of the data represented by the query, but rather simplifies the way in which that data can be retrieved, by abstracting the query through an alias of sorts.
Views can be quite advantageous for a number of reasons, several of which follow:
- Simplicity: Certain data items are subject to retrieval on a frequent basis. For instance, associating a client with a particular invoice would occur quite often in a customer relationship-management application. Therefore, it might be convenient to create a view called
get_client_name, saving you the hassle of repeatedly querying multiple tables to retrieve this information. - Security: As highlighted in this chapter's introduction, there may be situations in which you'll want to make quite certain some information is made inaccessible to third parties, such as the SSNs and salaries of employees in a corporate database. A view offers a practical solution to implement this safeguard.
- Maintainability: Just as an object-oriented class abstracts underlying data and behavior, a view abstracts the gory details of a query. Such abstraction can be quite beneficial in instances where that query must later be changed to reflect modifications to the schema.
Now that you have a better understanding of how views can be an important part of your development strategy, it's time to learn more about MySQL's view support.
MySQL's View Support
To the MySQL community's great delight, views were integrated into the MySQL distribution as of version 5.0. In this section, you'll learn how to create, execute, modify, and delete views.
Creating and Executing Views
Creating a view is accomplished with the CREATE VIEW statement. Its prototype follows:
CREATE

    [OR REPLACE]

    [ALGORITHM = {MERGE | TEMPTABLE | UNDEFINED }]

    [DEFINER = { user | CURRENT_USER }]

    [SQL SECURITY { DEFINER | INVOKER }]

    VIEW view_name [(column_list)]

    AS select_statement

    [WITH [CASCADED | LOCAL] CHECK OPTION]
Throughout the course of this section, the CREATE VIEW syntax in its entirety will be introduced; however, for now let's begin with a simple example. Suppose your corporate database consists of a table called employees, which contains information about each employee. The table creation syntax looks like this:
CREATE TABLE employees (

   id SMALLINT UNSIGNED NOT NULL AUTO_INCREMENT,

   employee_id CHAR(8) NOT NULL,

   first_name VARCHAR(25) NOT NULL,

   last_name VARCHAR(35) NOT NULL,

   email VARCHAR(55) NOT NULL,

   phone CHAR(10) NOT NULL,

   salary DECIMAL(8,2) NOT NULL,

   PRIMARY KEY(id)


)
A developer has been given the task of creating an application that allows employees to quickly look up the contact information of their colleagues. However, because salaries are a sensitive matter, the database administrator has been asked to create a view consisting of only the name, e-mail address, and phone number for each employee. The following view provides the interface to that information, ordering the results according to the employees' last names:
CREATE VIEW employee_contact_info_view AS

  SELECT first_name, last_name, email, phone

  FROM employees ORDER BY last_name ASC;
This view can then be called like so:
SELECT * FROM employee_contact_info_view;
This produces results that look similar to this:
+------------+-----------+-------------------+-------------+

| first_name | last_name | email             | phone       |

+------------+-----------+-------------------+-------------+

| Bob        | Connors   | [email protected]   | 2125559945  |

| Jason      | Gilmore   | [email protected] | 2125551212  |

| Matt       | Wade      | [email protected]  | 2125559999  |

+------------+-----------+-------------------+-------------+
Note that in many ways MySQL treats a view just like any other table. In fact, if you execute SHOW TABLES (or perform some similar task using phpMyadmin or another client) while using the database within which the view was created, you'll see the view listed alongside other tables:
mysql>SHOW TABLES;
This produces the following:
+-----------------------------+

| Tables_in_corporate         |

+-----------------------------+

| employees                   |

| employee_contact_info_view  |

+-----------------------------+
Now execute the DESCRIBE statement on the view:
mysql>DESCRIBE employee_contact_info_view;
+------------+-------------+------+-----+---------+-------+

| Field      | Type        | Null | Key | Default | Extra |

+------------+-------------+------+-----+---------+-------+

| first_name | varchar(25) | NO   |     |         |       |

| last_name  | varchar(35) | NO   |     |         |       |

| email      | varchar(55) | NO   |     |         |       |

| phone      | char(10)    | NO   |     |         |       |

+------------+-------------+------+-----+---------+-------+
You might be surprised to know that you can even create views that are updatable. That is, you can insert new rows and update existing ones. This matter is introduced in the later section "Updating Views."
Customizing View Results
Keep in mind that a view isn't constrained to return each row defined in the query that was used to create the view. For instance, it's possible to return only the employees' last names and e-mail addresses:
SELECT last_name, email FROM employee_contact_info_view;
This returns results similar to the following:
+-----------+-------------------+

| last_name | email             |

+-----------+-------------------+

| Connors   | [email protected]   |

| Gilmore   | [email protected] |

| Wade      | [email protected]  |

+-----------+-------------------+
You can also override any default ordering clause when invoking the view. For instance, the employee_contact_info_view view definition specifies that the information should be ordered according to last name. But what if you want to order the results according to phone number? Just change the clause, like so:
SELECT * FROM employee_contact_info_view ORDER BY phone;
This produces the following output:
+------------+------------+-------------------+------------+

| first_name | last_name  | email             | phone      |

+------------+------------+-------------------+------------+

| Jason      | Gilmore    | [email protected] | 2125551212 |

| Bob        | Connors    | [email protected]   | 2125559945 |

| Matt       | Wade       | [email protected]  | 2125559999 |

+------------+------------+-------------------+------------+
For that matter, views can be used in conjunction with all clauses and functions, meaning that you can use SUM(), LOWER(), ORDER BY, GROUP BY, or any other clause or function that strikes your fancy.
Passing in Parameters
Just as you can manipulate view results by using clauses and functions, you can do so by passing along parameters as well. For example, suppose that you're interested in retrieving contact information only for a particular employee, but you can remember only his first name:
SELECT * FROM employee_contact_info_view WHERE first_name="Jason";
This returns:
+------------+-----------+-------------------+------------+

| first_name | last_name | email             | phone      |

+------------+-----------+-------------------+------------+

| Jason      | Gilmore   | [email protected] | 2125551212 |

+------------+-----------+-------------------+------------+
Modifying the Returned Column Names
Table column-naming conventions are generally a product of programmer convenience, occasionally making for cryptic reading when presented to an end user. When using views, you can improve upon these names by passing column names via the optional column_list parameter. The following example re-creates the employee_contact_info_view view, replacing the default column names with something a tad more friendly:
CREATE VIEW employee_contact_info_view

  (`First Name`, `Last Name`, `Email Address`, `Telephone`) AS

  SELECT first_name, last_name, email, phone

  FROM employees ORDER BY last_name ASC
Now execute the following query:
SELECT * FROM employee_contact_info_view;
This returns:
+------------+-----------+-------------------+-------------+

| First Name | Last Name | Email Address     | Telephone   |

+------------+-----------+-------------------+-------------+

| Bob        | Connors   | [email protected]   | 2125559945  |

| Jason      | Gilmore   | [email protected] | 2125551212  |

| Matt       | Wade      | [email protected]  | 2125559999  |

+------------+-----------+-------------------+-------------+
Using the ALGORITHM Attribute
ALGORITHM = {MERGE | TEMPTABLE | UNDEFINED}
Using this MySQL-specific attribute, you can optimize MySQL's execution of the view. Three settings are available, all of which are introduced in this section.
MERGE
The MERGE algorithm causes MySQL to combine the view's query definition with any other clauses passed in when executing the view. For example, suppose that a view named employee_contact_info_view was defined using this query:
SELECT * FROM employees ORDER BY first_name;
However, the following statement was used to execute the view:
SELECT first_name, last_name FROM employee_contact_info_view;
The MERGE algorithm would actually cause the following statement to execute:
SELECT first_name, last_name FROM employee_contact_info_view ORDER by first_name;
In other words, the view's definition and the SELECT query have been merged.
TEMPTABLE
If the data found in a view's underlying table changes, the changes will be reflected immediately by way of the view the next time the table is accessed through it. However, when working with particularly large or frequently updated tables, you might first consider dumping the view data to a TEMPORARY table to more quickly release the view's table lock.
When a view is assigned the TEMPTABLE algorithm, the corresponding TEMPORARY table is created at the same time that the view is created.
UNDEFINED
When a view is assigned the UNDEFINED algorithm, MySQL attempts to determine which of the two algorithms (MERGE or TEMPTABLE) should be used. While there are a few specific scenarios in which the TEMPTABLE algorithm is preferred (such as when aggregate functions are used in the query), generally, the MERGE algorithm is more efficient. Therefore, unless the query conditions dictate that one algorithm is preferred over the other, you should use UNDEFINED (the default).
If the UNDEFINED algorithm is assigned to the view, MySQL will choose TEMPTABLE if the query denotes a one-to-one relationship between its results and those found in the view.
Using Security Options
[DEFINER = { user | CURRENT_USER }]


[SQL SECURITY { DEFINER | INVOKER }]
With MySQL 5.1.2, additional security features were added to the CREATE VIEW command that help to control how privileges are determined each time a view is executed.
The DEFINER clause determines which user account's privileges will be examined at view execution time to determine whether the privileges are sufficient to properly execute the view. If set to the default of CURRENT_USER, the executing user's privileges are examined; otherwise, DEFINER can be set to a specific user, with the user identified using the syntax 'user@host' (for example, 'jason@localhost'). Only users possessing the SUPER privilege are able to set the DEFINER clause to another user.
The SQL_SECURITY clause determines whether the view creator's (DEFINER, which then looks to the setting of the aforementioned DEFINER clause) or invoker's (INVOKER) privileges should be examined when the view is executed.
Using the WITH CHECK OPTION Clause
WITH [CASCADED | LOCAL] CHECK OPTION
Because it's possible to create views based on other views, there must be a way to ensure that attempts to update a nested view do not violate the constraints of their definitions. Furthermore, although some views are updatable, there are cases where it wouldn't be logical to modify a column value in such a way that it would break some constraint imposed by the view's underlying query. For example, if the query retrieves only rows where city = "Columbus", then creating a view that includes the WITH CHECK OPTION clause will prevent any subsequent view update from changing any value in the column to anything other than Columbus.
This concept and the options that modify MySQL's behavior in this regard are perhaps best illustrated with an example. Suppose that a view named experienced_age_view was defined with the LOCAL CHECK OPTION option and contains the following query:
SELECT first_name, last_name, age, years_experience

   FROM experienced_view WHERE age > 65;
Note that this query refers to another view, named experienced_view. Suppose this view was defined like so:
SELECT first_name, last_name, age, years_experience

   FROM employees WHERE years_experience > 5;
If experienced_age_view were defined with the CASCADED CHECK OPTION option, an attempt to execute the following INSERT query would end in failure:
INSERT INTO experienced_age_view SET

   first_name="Jason", last_name="Gilmore", age="89", years_experience="3";
The reason that it would fail is that the years_experience value of 3 would violate the constraint of experienced_age_view that requires years_experience to be at least 5 years. On the contrary, if the experienced_age_view view were defined as LOCAL, the INSERT query would be valid because only the age value would be greater than 65. However, if age were set to anything below 65, such as 42, the query would fail because LOCAL checks against the view being referenced in the query, which in this case is experienced_age_view.
Viewing View Information
MySQL offers three ways to learn more about your existing views: use the DESCRIBE command, use the SHOW CREATE VIEW command, or use the INFORMATION_SCHEMA database. All three solutions are introduced in this section.
Using the DESCRIBE Command
Because a view is akin to a virtual table, you can use the DESCRIBE statement to learn more about the columns represented by the view. For example, to review the view named employee_contact_info_view, execute the following command:
DESCRIBE employee_contact_info_view;
This produces the following output:
+----------------+--------------+------+-----+-------------+----------+

| Field          | Type         | Null | Key | Default     | Extra    |

+----------------+--------------+------+-----+-------------+----------+

| First Name     | varchar(25)  | NO   |     |             |          |

| Last Name      | varchar(35)  | NO   |     |             |          |

| Email Address  | varchar(55)  | NO   |     |             |          |

| Telephone      | char(10)     | NO   |     |             |          |

+----------------+--------------+------+-----+-------------+----------+
Using the SHOW CREATE VIEW Command
You can review a view's syntax by using the SHOW CREATE VIEW command. Its prototype follows:
SHOW CREATE VIEW view_name;
For instance, to review the employee_contact_info_view view syntax, execute the following command:
SHOW CREATE VIEW employee_contact_info_viewG
This produces the following output (slightly modified for readability):
*************************** 1. row ***************************

                View: employee_contact_info_view

         Create View: CREATE ALGORITHM=UNDEFINED DEFINER=`root`@`localhost`

            SQL SECURITY DEFINER VIEW `employee_contact_info_view`

            AS select `employees`.`first_name`

            AS `first_name`,`employees`.`last_name`

            AS `last_name`,`employees`.`email`

            AS `email`,`employees`.`phone`

            AS `phone` from `employees`

            order by `employees`.`last_name`

character_set_client: latin1

collation_connection: latin1_swedish_ci
While useful, you can view the code syntax, and much more, by using the INFORMATION_SCHEMA database.
Using the INFORMATION_SCHEMA Database
The INFORMATION_SCHEMA database includes a views table, which contains the following:
SELECT * FROM INFORMATION_SCHEMA.viewsG
Assuming employee_contact_info_view is the only existing view, executing this statement produces the following output:
*************************** 1. row ***************************

       TABLE_CATALOG: NULL

        TABLE_SCHEMA: chapter34

          TABLE_NAME: employee_contact_info_view

     VIEW_DEFINITION: select first_name, last_name, email, phone from employees

        CHECK_OPTION: NONE

        IS_UPDATABLE: YES

             DEFINER: root@localhost

       SECURITY_TYPE: DEFINER

CHARACTER_SET_CLIENT: latin1

COLLATION_CONNECTION: latin1_swedish_ci
Of course, the beauty of using the information schema is the ability to query any aspect of a view, rather than being forced to sort through a mountain of information. For example, you could use the following query if you just wanted to retrieve the names of the views defined for the chapter34 database:
SELECT table_name FROM INFORMATION_SCHEMA.views WHERE table_schema="chapter34"G
Modifying a View
An existing view can be modified using the ALTER VIEW statement. Its prototype follows:
ALTER [ALGORITHM = {UNDEFINED | MERGE | TEMPTABLE}

   VIEW view_name [(column_list)]

   AS select_statement

   [WITH [CASCADED | LOCAL] CHECK OPTION]
For example, to modify employee_contact_info_view, changing the SELECT statement to retrieve only the first name, last name, and telephone number, execute the following command:
ALTER VIEW employee_contact_info_view

  (`First Name`, `Last Name`, `Telephone`) AS

  SELECT first_name, last_name, phone

  FROM employees ORDER BY last_name ASC;
Deleting a View
Deleting an existing view is accomplished with the DROP VIEW statement. Its prototype looks like this:
DROP VIEW [IF EXISTS]

   view_name [, view_name]...

   [RESTRICT | CASCADE]
For instance, to delete the employee_contact_info_view view, execute the following command:
DROP VIEW employee_contact_info_view;
Including the IF EXISTS keywords will cause MySQL to suppress an error if an attempt is made to delete a view that doesn't exist. At the time of publication, the RESTRICT and CASCADE keywords are ignored, although presumably they will be representative of new features in a future release.
Updating Views
The utility of views isn't restricted solely to abstracting a query against which a user can execute SELECT statements. Views can also act as an interface from which the underlying tables can be updated. For example, suppose that an office assistant is tasked with updating key columns in a table consisting of employee contact information. The assistant should be able to view and modify only the employee's first name, last name, e-mail address, and telephone number, and should be prevented from viewing or manipulating the SSN and salary. The view employee_contact_info_view, created earlier in this chapter, will satisfy both conditions, acting as both an updatable and selectable view. In fact, a view is not updatable only if its query satisfies any of the following conditions:
- It contains an aggregate function such as
SUM(). - Its algorithm is set to
TEMPTABLE. - It contains
DISTINCT,GROUP BY,HAVING,UNION, orUNION ALL. - It contains a join.
- It contains a nonupdatable view in the
FROMclause. - It contains a subquery in the
SELECTorFROMclause, and a subquery in theWHEREclause that refers to a table in theFROMclause. - It refers solely to literal values, meaning there are no tables to update.
For example, to modify employee Bob Connors' phone number, you can execute the UPDATE query against the view, like so:
UPDATE employee_contact_info_view

       SET phone="2125558989" WHERE email="[email protected]";
The term "updatable view" isn't restricted solely to UPDATE queries; you can also insert new rows via the view, provided that the view satisfies a few constraints:
- The view must contain all the columns in the underlying table that aren't assigned a default value.
- The view columns cannot contain an expression. For example, the view column
CEILING(salary)will render the view uninsertable.
Therefore, based on the present view definition, a new employee could not be added using the employee_contact_info_view view because table columns that are not assigned a default value, such as salary and ssn, are not available to the view.
Incorporating Views into Web Applications
Like the stored procedure and trigger examples presented in the previous two chapters, incorporating views into your Web applications is a rather trivial affair. After all, views are virtual tables and can be managed much in the same way as a typical MySQL table, using SELECT, UPDATE, and DELETE to retrieve and manipulate the content they represent. As an example, execute the employee_contact_info_view view created earlier in this chapter. To save you the trouble of referring back to the beginning of the chapter, the view creation syntax is repeated here:
CREATE VIEW employee_contact_info_view

  (`First Name`, `Last Name`, `E-mail Address`, `Telephone`) AS

  SELECT first_name, last_name, email, phone

  FROM employees ORDER BY last_name ASC;
The following PHP script executes the view and outputs the results in HTML format:
<?php


    // Connect to the MySQL database

    $mysqli = new mysqli("localhost", "websiteuser", "secret", "corporate");


    // Create the query

    $query = "SELECT * FROM employee_contact_info_view";


    // Execute the query

    if ($result = $mysqli->query($query)) {


        printf("<table border='1'>");

        printf("<tr>");


        // Output the headers

        $fields = $result->fetch_fields();

        foreach ($fields as $field)

            printf("<th>%s</th>", $field->name);


        printf("</tr>");


        // Output the results

        while ($employee = $result->fetch_row()) {


            $first_name = $employee[0];

            $last_name = $employee[1];

            $email = $employee[2];

            $phone = $employee[3];


// Format the phone number

            $phone = ereg_replace("([0-9]{3})([0-9]{3})([0-9]{4})",

                                  "(\1) \2-\3", $phone);


            printf("<tr>");

            printf("<td>%s</td><td>%s</td>", $first_name, $last_name);

            printf("<td>%s</td><td>%s</td>", $email, $phone);

            printf("</tr>");


      }


   }


?>
Executing this code produces the output displayed in Figure 34-1.
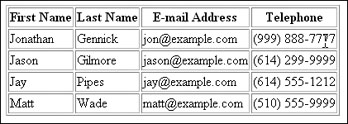
Figure 34-1. Retrieving results from a view
Summary
This chapter introduced views, a new feature introduced in MySQL 5.0. Views can greatly cut down on otherwise repetitive queries in your applications, and enhance security and maintainability. In this chapter you learned how to create, execute, modify, and delete MySQL views, and incorporate them into your PHP-driven applications.
The next chapter delves into the topic of queries, covering numerous concepts that you're bound to encounter repeatedly when building data-driven Web sites.