
CHAPTER 35
Practical Database Queries
The last several chapters served as an introduction to numerous concepts regarding using PHP and MySQL together to retrieve and manipulate data. This chapter expands your knowledge, demonstrating several challenges that you're bound to repeatedly encounter while creating database-driven Web applications. In particular, you'll learn more about the following concepts:
- Tabular output: Listing query results in an easily readable format is one of the most commonplace tasks you'll implement when building database-driven applications. This chapter explains how to programmatically create these listings, and how to extend the
mysqliinterface to incorporate new custom functionality. - Sorting tabular output: Often, query results are ordered in a default fashion, by product name, for example. But what if the user would like to reorder the results using some other criteria, such as price? You'll learn how to provide table-sorting mechanisms that let the user search on any column.
- Subqueries: Even simple data-driven applications often require queries to work with multiple tables, typically using joins. However, as you'll learn, many of these operations can also be accomplished with the arguably much more intuitive subquery, available as of MySQL 4.1.
- Cursors: Very similar to how an array pointer enables you to easily navigate throughout an array's elements, a cursor (a feature new to MySQL 5.0) enables you to swiftly navigate database result sets, as described later in this chapter.
- Paged results: Database tables often consist of hundreds, even thousands, of records. When large result sets are retrieved, it often makes sense to separate these results across several pages and provide the user with a mechanism to navigate back and forth between these pages. This chapter explains how to do so.
The goal of this chapter is to provide you with some general insight regarding how you might go about implementing these concepts. After you've finished reading this chapter, if your mind is racing regarding how you can build upon these ideas, then the goal of this chapter has been met.
Sample Data
Many of the examples found throughout much of this chapter are based upon the products and sales tables, presented here:
CREATE TABLE products (

   id INT NOT NULL AUTO_INCREMENT,

   product_id VARCHAR(8) NOT NULL,

   name VARCHAR(25) NOT NULL,

   price DECIMAL(5,2) NOT NULL,

   description MEDIUMTEXT NOT NULL,

   PRIMARY KEY(id)

);


CREATE TABLE sales (

   id SMALLINT UNSIGNED NOT NULL AUTO_INCREMENT,

   client_id SMALLINT UNSIGNED NOT NULL,

   order_time TIMESTAMP NOT NULL,

   sub_total DECIMAL(8,2) NOT NULL,

   shipping_cost DECIMAL(8,2) NOT NULL,

   total_cost DECIMAL(8,2) NOT NULL,

   PRIMARY KEY(id)


);
Creating Tabular Output with PEAR
Be it travel options, product summaries, or movie show times, displaying information in a tabular, or grid, format is one of the most commonplace presentational paradigms in use today. And while from the very beginning Web developers have stretched the original intention of HTML tables to their boundaries, the introduction of XHTML and CSS is making Web-based tabular presentations more manageable than ever. In this section, you'll learn how to build data-driven tables using PHP, MySQL, and a PEAR package called HTML_Table.
Note PEAR was introduced in Chapter 11. If you're not yet familiar with PEAR, consider taking a moment to review Chapter 11 before continuing.
While it's certainly possible to output database data into an HTML table by hard-coding the table tag elements and attributes within your PHP code, doing so can quickly grow tedious and error-prone. Given the prevalence of table-driven output on even simple Web sites, the problems of mixing design and logic in this manner can quickly compound. So what's the solution? Not surprisingly, one is already at your disposal through PEAR, and it's called HTML_Table.
In addition to greatly reducing the amount of design-specific code you need to contend with, the HTML_Table package also offers an easy way to incorporate CSS formatting attributes into the output. In this section, you'll learn how to install HTML_Table and use it to quickly build tabular data output. Note that the intent of this section is not to introduce you to every HTML_Table feature, but rather to highlight some of the key characteristics that you'll most likely want to use on a regular basis. See the PEAR Web site for a complete breakdown of HTML_Table capabilities.
Installing HTML_Table
To take advantage of HTML_Table's features, you need to install it from PEAR. Start PEAR, passing it the following arguments:
%>pear install -o HTML_Table
Because HTML_Table depends upon another package, HTML_Common, passing along the −o option also installs that package if it's not presently available on the target system. Execute this command, and you'll see output similar to the following:
downloading HTML_Table-1.8.1.tgz ...

Starting to download HTML_Table-1.8.1.tgz (17,048 bytes)

......done: 17,048 bytes

downloading HTML_Common-1.2.4.tgz ...

Starting to download HTML_Common-1.2.4.tgz (4,519 bytes)

...done: 4,519 bytes

install ok: channel://pear.php.net/HTML_Common-1.2.4

install ok: channel://pear.php.net/HTML_Table-1.8.1
Once installed, you can begin taking advantage of HTML_Table's capabilities. Let's work through a few examples, each building upon the previous to create more presentable and useful tables.
Creating a Simple Table
At its most basic level, HTML_Table requires just a few commands to create a table. For instance, suppose you want to display an array of data as an HTML table. Listing 35-1 offers an introductory example that uses a simple CSS style sheet (which is not listed, for sake of space) in conjunction with HTML_TABLE to format the sales data found in the $salesreport array.
Listing 35-1. Formatting Sales Data with HTML_Table
<?php


    // Include the HTML_Table package

    require_once "HTML/Table.php";


    // Assemble the data in an array


    $salesreport = array(

    '0' => array("12309","45633","2007-12-19

01:13:42","$22.04","$5.67","$27.71"),

    '1' => array("12310","942","2007-12-19 01:15:12","$11.50","$3.40","$14.90"),

    '2' => array("12311","7879","2007-12-19

01:15:22","$95.99","$15.00","$110.99"),

    '3' => array("12312","55521","2007-12-19 01:30:45","$10.75","$3.00","$13.75")

    );


    // Create an array of table attributes

    $attributes = array('border' => '1'),


    // Create the table object

$table = new HTML_Table($attributes);


    // Set the headers


    $table->setHeaderContents(0, 0, "Order ID");

    $table->setHeaderContents(0, 1, "Client ID");

    $table->setHeaderContents(0, 2, "Order Time");

    $table->setHeaderContents(0, 3, "Sub Total");

    $table->setHeaderContents(0, 4, "Shipping Cost");

    $table->setHeaderContents(0, 5, "Total Cost");


    // Cycle through the array to produce the table data


    for($rownum = 0; $rownum < count($salesreport); $rownum++) {

        for($colnum = 0; $colnum < 6; $colnum++) {

            $table->setCellContents($rownum+1, $colnum,

                                     $salesreport[$rownum][$colnum]);

        }

    }


    // Output the data


    echo $table->toHTML();


?>
The outcome of Listing 35-1 is displayed in Figure 35-1.
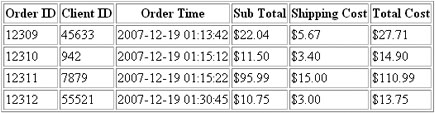
Figure 35-1. Creating a table with HTML_Table
Creating More Readable Row Output
While the data found in Figure 35-1 is fairly easy to digest, outputting large amounts of data can quickly become tedious to view. To alleviate some of the difficulty, designers often color every other table row, to break up the row elements. Doing so is trivial with HTML_Table. For instance, create a style sheet consisting of the following style:
td.alt {

   background: #CCCC99;


}
Now add the following line directly following the completion of the for loops in Listing 35-1:
$table->altRowAttributes(1, null, array("class"=>"alt"));
Executing the revised script produces output similar to that found in Figure 35-2.
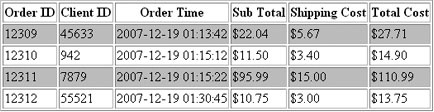
Figure 35-2. Alternating row styling with HTML_Table
Creating a Table from Database Data
While using arrays as the data source to create tables is great for introducing the basic fundamentals of HTML_Table, chances are you're going to be retrieving this information from a database. Therefore, let's build on the previous examples by retrieving the sales data from a MySQL database and presenting it to the user in a tabular format.
The general process really doesn't differ much from that presented in Listing 35-1, except this time you'll be navigating through a result set rather than a standard array. Listing 35-2 contains the code.
Listing 35-2. Displaying MySQL Data in Tabular Format
<?php


    // Include the HTML_Table package

    require_once "HTML/Table.php";


    // Connect to the MySQL database

    $mysqli = new mysqli("localhost", "websiteuser", "secret", "corporate");


    // Create an array of table attributes

    $attributes = array('border' => '1'),


    // Create the table object

    $table = new HTML_Table($attributes);


    // Set the headers


    $table->setHeaderContents(0, 0, "Order ID");

    $table->setHeaderContents(0, 1, "Client ID");

    $table->setHeaderContents(0, 2, "Order Time");

    $table->setHeaderContents(0, 3, "Sub Total");

    $table->setHeaderContents(0, 4, "Shipping Cost");

    $table->setHeaderContents(0, 5, "Total Cost");


    // Cycle through the array to produce the table data

// Create and execute the query

    $query = "SELECT id AS `Order ID`, client_id AS `Client ID`,

                     order_time AS `Order Time`,

                     CONCAT('$', sub_total) AS `Sub Total`,

                     CONCAT('$', shipping_cost) AS `Shipping Cost`,

                     CONCAT('$', total_cost) AS `Total Cost`

                     FROM sales ORDER BY id";


    $result = $mysqli->query($query);


    // Begin at row 1 so don't overwrite the header

    $rownum = 1;


    // Format each row


    while ($obj = $result->fetch_row()) {


        $table->setCellContents($rownum, 0, $obj[0]);

        $table->setCellContents($rownum, 1, $obj[1]);

        $table->setCellContents($rownum, 2, $obj[2]);

        $table->setCellContents($rownum, 3, $obj[3]);

        $table->setCellContents($rownum, 4, $obj[4]);

        $table->setCellContents($rownum, 5, $obj[5]);


        $rownum++;


    }


    // Output the data

    echo $table->toHTML();


    // Close the MySQL connection

    $mysqli->close();


?>
Executing Listing 35-3 produces output identical to that found earlier in Figure 35-1.
Generalizing the Output Process
Granted, hard-coding the output variables into HTML_Table is fairly easy; however, this is a task that could be used dozens of times in a single application alone. Therefore, it makes sense to devise a general solution that can be used repeatedly no matter the data. What's great about using the object-oriented mysqli interface is that you can actually extend it, enhancing its functionality for your own needs. This section extends the mysqli class, adding the method tabular_output() to it.
As you learned in Chapter 7, it's possible to extend an existing class by using the extends keyword. To refresh your memory, the general template looks like this:
class child extends parent

{

   // Insert new features here


}
For the purposes of this demonstration, you'll create a child class named corporate_mysqli that extends the mysqli parent class. The new class is found in Listing 35-3.
Listing 35-3. Generalizing the Tabular Output Task
class corporate_mysqli extends mysqli

{


   // The tabular_output method accepts a query

   // and formats its results using HTML_Table


   function tabular_output($query)

   {


      // Create the table object


      $table = new HTML_Table();


      $result = $this->query($query);


      // Retrieve the field attributes

$fieldInfo = $result->fetch_fields();


      // Begin column offset at 0


      $colnum = 0;


      // Cycle through each field, outputting its name


      foreach($fieldInfo as $field) {


         $table->setHeaderContents(0, $colnum, $field->name);


         $colnum++;


      }


      // Cycle through the array to produce the table data


      // Begin at row 1 so don't overwrite the header


      $rownum = 1;


      // Reset column offset


      $colnum = 0;


      // Cycle through each row in the result set


      while ($row = $result->fetch_row()) {


         // Cycle through each column in the row


         while ($colnum < mysqli_field_count($this)) {


            $table->setCellContents($rownum, $colnum, $row[$colnum]);

            $colnum++;


         }

$rownum++;

         $colnum = 0;


      }


      // Output the data


      echo $table->toHTML();


   }


} // end class
For the purposes of this demonstration, any custom CSS styling tags were removed, but you could easily add a few additional method parameters to pass this information along.
Next, create the query and instantiate the corporate_mysqli class, like so:
require_once "HTML/Table.php";


// Create the query

$query = "SELECT id AS `Order ID`, client_id AS `Client ID`,

          order_time AS `Order Time`,

          CONCAT('$', sub_total) AS `Sub Total`,

          CONCAT('$', shipping_cost) AS `Shipping Cost`,

          CONCAT('$', total_cost) AS `Total Cost`

          FROM sales ORDER BY id";


// Instantiate the new class


$mysqli = new corporate_mysqli("localhost", "websiteuser", "secret", "corporate");


// Invoke the tabular_output method


$mysqli->tabular_output($query);
The outcome will look identical to that found in Figure 35-1.
Sorting Output
When displaying query results, it makes sense to order the information using criteria that is convenient to the user. For example, if the user wants to view a list of all products in the products table, ordering the products in ascending alphabetical order will probably suffice. However, some users may want to order the information using some other criteria, by price for example. Often, such mechanisms are implemented by linking listing headers, such as the table headers used in the previous examples. Clicking any of these links will cause the table data to be sorted using that header as the criterion.
In this section, you'll learn how to extend the tabular_output() method created in the previous section. In fact, doing so is incredibly easy, because all you need to do is make three modifications to the code. First, modify the foreach statement responsible for outputting the header information so that it looks like this:
foreach($fieldInfo as $field) {


$header = "<a href='".$_SERVER['PHP_SELF'].

                    "?keyword=".$field->orgname."&"

                   .$_SERVER['QUERY_STRING']."'>".$field->name."</a>";


                   $table->setHeaderContents(0, $colnum, $header);


                   $colnum++;


}
This links each header title back to the originating script, passing the desired sortable column title to it. For example, the Order Time link looks like this:
<a href='viewsales.php?sort=order_time'>Order Time</a>
Next, modify the query to change the ORDER BY target. Let's revise the query found in the previous section:
$query = "SELECT id AS `Order ID`, client_id AS `Client ID`,

          order_time AS `Order Time`,

          CONCAT('$', sub_total) AS `Sub Total`,

          CONCAT('$', shipping_cost) AS `Shipping Cost`,

          CONCAT('$', total_cost) AS `Total Cost`

          FROM sales ORDER BY $sort ASC";
Finally, a ternary operator, introduced in Chapter 3, is used to determine whether the user has clicked one of the header links:
$sort = (isset($_GET['sort'])) ? $_GET['sort'] : "id";
If a sort parameter has been passed via the URL, that value will be the sorting criteria. Otherwise, a default of id is used. It's very important that you make sure $_GET['sort'] does indeed consist of one of the column names, and does not consist of additional query statements that could retrieve unintended information or potentially modify or destroy your data! Therefore, be sure to preface the query with some sort of logic capable of determining this:
$columns = array('id','order_time','sub_total','shipping_cost','total_cost'),


if (in_array($sort, $columns)) {

   // Proceed with the query


}
Of course, you could further automate this process by using a method such as fetch_fields().
Loading the script for the first time results in the output being sorted by id. Example output is shown in Figure 35-3.
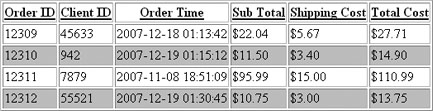
Figure 35-3. The sales table output sorted by the default id
Clicking the Client ID header re-sorts the output. This sorted output is shown in Figure 35-4.
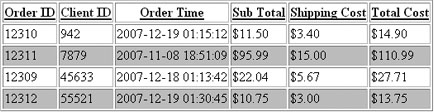
Figure 35-4. The sales table output sorted by client_id
Creating Paged Output
Separating query results across several pages has become a commonplace feature for e-commerce catalogs and search engines. This feature is convenient not only to enhance readability, but also to further optimize page loading. You might be surprised to learn that adding this feature to your Web site is a trivial affair. This section demonstrates how it's accomplished.
This feature depends in part on MySQL's LIMIT clause. The LIMIT clause is used to specify both the starting point and the number of rows returned from a SELECT query. Its general syntax looks like this:
LIMIT [offset,] number_rows
For example, to limit returned query results to just the first five rows, construct the following query:
SELECT name, price FROM products ORDER BY name ASC LIMIT 5;
This is the same as:
SELECT name, price FROM products ORDER BY name ASC LIMIT 0,5;
However, to start from the fifth row of the result set, you would use the following query:
SELECT name, price FROM products ORDER BY name ASC LIMIT 5,5;
Because this syntax is so convenient, you need to determine only three variables to create mechanisms for paging throughout the results:
- Number of entries per page: This value is entirely up to you. Alternatively, you could easily offer the user the ability to customize this variable. This value is passed into the
number_rowscomponent of theLIMITclause. - Row offset: This value depends on what page is presently loaded. This value is passed by way of the URL so that it can be passed to the
offsetcomponent of theLIMITclause. You'll see how to calculate this value in the following code. - Total number of rows in the result set: You must specify this value because it is used to determine whether the page needs to contain a next link.
Interestingly, no modifications to the MySQL database class are required. Because this concept seems to cause quite a bit of confusion, the code is reviewed first, and then the example is presented in its entirety in Listing 35-4. To begin, connect to the MySQL database and set the number of entries that should appear per page, as shown next. Note that the extended corporate_mysqli class is used from the last section. However, even if you're not using this class, the code should be easily adaptable to your specific needs.
<?php

   $mysqli = new corporate_mysqli("localhost", "websiteuser",

                                  "secret", "corporate");


   $pagesize = 4;
Next, a ternary operator determines whether the $_GET['recordstart'] parameter has been passed by way of the URL. This parameter determines the offset from which the result set should begin. If this parameter is present, it's assigned to $recordstart; otherwise, $recordstart is set to 0.
$recordstart = (int) $_GET['recordstart'];

$recordstart = (isset($_GET['recordstart'])) ? $recordstart : 0;
Next, the database query is executed and the data is output using the tabular_output() method created in the last section. Note that the record offset is set to $recordstart, and the number of entries to retrieve is set to $pagesize.
$query = "SELECT id AS `Order ID`, client_id AS `Client ID`,

          order_time AS `Order Time`,

          CONCAT('$', sub_total) AS `Sub Total`,

          CONCAT('$', shipping_cost) AS `Shipping Cost`,

          CONCAT('$', total_cost) AS `Total Cost`

          FROM sales ORDER BY id LIMIT $recordstart, $pagesize";


$mysqli->tabular_output($query);
Next, you must determine the total number of rows available, which you can accomplish by removing the LIMIT clause from the original query. However, to optimize the query, use the count() function rather than retrieve a complete result set:
$result = $mysqli->query("SELECT count(client_id) AS count FROM sales");

list($totalrows) = $result->fetch_row();
Finally, the previous and next links are created. The previous link is created only if the record offset, $recordstart, is greater than 0. The next link is created only if some records remain to be retrieved, meaning that $recordstart + $pagesize must be less than $totalrows.
// Create the 'previous' link

   if ($recordstart > 0) {

      $prev = $recordstart - $pagesize;

      $url = $_SERVER['PHP_SELF']."?recordstart=$prev";

      printf("<a href='%s'>Previous Page</a>", $url);

   }


   // Create the 'next' link

   if ($totalrows > ($recordstart + $pagesize)) {

      $next = $recordstart + $pagesize;

      $url = $_SERVER['PHP_SELF']."?recordstart=$next";

      printf("<a href='%s'>Next Page</a>", $url);

   }
Sample output is shown in Figure 35-5. The complete code listing is presented in Listing 35-4.
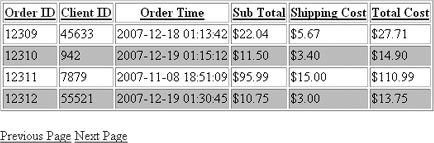
Figure 35-5. Creating paged results (four results per page)
Listing 35-4. Paging Database Results
$mysqli = new corporate_mysqli("localhost", "websiteuser", "secret", "corporate");


$pagesize = 4;


$recordstart = (int) $_GET['recordstart'];


$recordstart = (isset($_GET['recordstart'])) ? $recordstart : 0;

$query = "SELECT id AS `Order ID`, client_id AS `Client ID`,

                    order_time AS `Order Time`,

                    CONCAT('$', sub_total) AS `Sub Total`,

                    CONCAT('$', shipping_cost) AS `Shipping Cost`,

                    CONCAT('$', total_cost) AS `Total Cost`

                    FROM sales ORDER BY id LIMIT $recordstart, $pagesize";


$mysqli->tabular_output($query);


// Retrieve total rows in order to determine whether 'next' link should appear


$result = $mysqli->query("select count(client_id) as count FROM sales");


list($totalrows) = $result->fetch_row();


// Create the 'previous' link

if ($recordstart > 0) {

   $prev = $recordstart - $pagesize;

   $url = $_SERVER['PHP_SELF']."?recordstart=$prev";

      printf("<a href='%s'>Previous Page</a>", $url);

}


// Create the 'next' link

if ($totalrows > ($recordstart + $pagesize)) {

   $next = $recordstart + $pagesize;

   $url = $_SERVER['PHP_SELF']."?recordstart=$next";

   printf("<a href='%s'>Next Page</a>", $url);


}
Listing Page Numbers
If you have several pages of results, the user might wish to traverse them in a nonlinear order. For example, the user might choose to jump from page one to page three, then page six, then back to page one again. Thankfully, providing users with a linked list of page numbers is surprisingly easy. Building on Listing 35-4, you start by determining the total number of pages, and assigning that value to $totalpages. You determine the total number of pages by dividing the total result rows by the chosen page size, and round upward using the ceil() function:
$totalpages = ceil($totalrows / $pagesize);
Next, you determine the current page number, and assign it to $currentpage. You determine the current page by dividing the present record offset ($recordstart) by the chosen page size ($pagesize) and adding one to account for the fact that LIMIT offsets start with 0:
$currentpage = ($recordstart / $pagesize ) + 1;
Next, create a method titled pageLinks(), add it to the corporate_mysql class, and pass it the following four parameters. Note that using the corporate_mysql class isn't a requirement; you could just as easily create this as a function.
$totalpages:The total number of result pages, stored in the$totalpagesvariable.$currentpage:The current page, stored in the$currentpagevariable.$pagesize:The chosen page size, stored in the$pagesizevariable.$parameter:The name of the parameter used to pass the record offset by way of the URL. Thus far,recordstarthas been used, so the following example sticks with that parameter.
The pageLinks() method follows:
function pageLinks($totalpages, $currentpage, $pagesize,$parameter) {


   // Start at page one

   $page = 1;


   // Start at record zero

   $recordstart = 0;


   // Initialize $pageLinks

   $pageLinks = "";


   while ($page <= $totalpages) {

      // Link the page if it isn't the current one

      if ($page != $currentpage) {

         $pageLinks .= "<a href="".$_SERVER['PHP_SELF']."

                        ?$parameter=$recordstart">$page</a> ";

      // If the current page, just list the number

} else {

         $pageLinks .= "$page ";

      }

         // Move to the next record delimiter

         $recordstart += $pagesize;

         $page++;

   }

   return $pageLinks;


}
Finally, you call the function like so:
echo "Pages: ".

$mysqli->pageLinks($totalpages, $currentpage, $pagesize, "recordstart");
Sample output of the page listing, combined with other components introduced throughout this chapter, is shown in Figure 35-6.
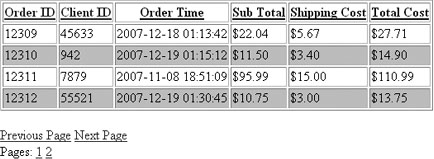
Figure 35-6. Generating a numbered list of page results
Querying Multiple Tables with Subqueries
A properly normalized database is key to building and managing a successful data-driven project. Of course, with this additional degree of efficiency comes complexity, not only in terms of the rigorous structuring of the database schema to ensure correspondence to the rules of normalization, but also in terms of building queries capable of stretching across multiple tables (known as a join).
Available as of version 4.1, subqueries offer users a secondary means for querying multiple tables, using a syntax that is arguably more intuitive than that required for a join. This section introduces subqueries, demonstrating how they can cut lengthy joins and tedious multiple queries from your application. Keep in mind that this isn't an exhaustive discourse on MySQL's subquery capabilities; for a complete reference, see the MySQL manual.
Simply put, a subquery is a SELECT statement embedded within another statement. For instance, suppose that you want to create a spatially enabled Web site that encourages carpooling by presenting members with a list of individuals who share the same ZIP code. The relevant part of the members table looks like this:
+-----+------------+-----------+--------------+-------+--------+

| id  | first_name | last_name | city         | state | zip    |

+-----+------------+-----------+--------------+-------+--------+

|   1 | Jason      | Gilmore   | Columbus     | OH    | 43201  |

|   2 | Matt       | Wade      | Jacksonville | FL    | 32257  |

|   3 | Sean       | Blum      | Columbus     | OH    | 43201  |

|   4 | Jodi       | Stiles    | Columbus     | OH    | 43201  |

+-----+------------+-----------+--------------+-------+--------+
Without subqueries, you would need to execute two queries or a slightly more complex query known as a self-join. For purposes of illustration, the approach of executing two queries is presented. First, you would need to retrieve the member's ZIP code:
$zip = SELECT zip FROM members WHERE id=1
Next, you would need to pass that ZIP code into a second query:
SELECT id, first_name, last_name FROM members WHERE zip='$zip'
A subquery enables you to combine these tasks into a single query, like so:
SELECT id, first_name, last_name FROM members

       WHERE zip = (SELECT zip FROM members WHERE id=1);
This returns the following output:
+----+------------+------------+

| id | first_name | last_name  |

+----+------------+--------- --+

|  1 | Jason      | Gilmore    |

|  3 | Sean       | Blum       |

|  4 | Jodi       | Stiles     |

+----+------------+------------+
Performing Comparisons with Subqueries
Subqueries are also very useful for performing comparisons. For example, suppose that you added a column titled daily_mileage to the members table, and prompted members to add this information to their profile for research purposes. You are interested to know which members travel more than the average of all members on the site. The following query makes this determination:
SELECT first_name, last_name FROM members WHERE

   daily_mileage > (SELECT AVG(daily_mileage) FROM members);
You're free to use any of MySQL's supported comparison operators and aggregation functions when creating subqueries.
Determining Existence with Subqueries
Building on the carpool theme, suppose that your Web site prompts members to list the types of vehicles at their disposal (a motorcycle, van, or four-door car, for instance). Because logically some members would possess multiple vehicles, two new tables are created to map this relation. The first table, vehicles, stores a list of vehicle types and descriptions:
CREATE TABLE vehicles (

   id TINYINT UNSIGNED NOT NULL AUTO_INCREMENT,

   name VARCHAR(25) NOT NULL,

   description VARCHAR(100),

   PRIMARY KEY(id));
The second table, member_to_vehicle, maps member IDs to vehicle IDs:
CREATE TABLE member_to_vehicle (

   id TINYINT UNSIGNED NOT NULL AUTO_INCREMENT,

   member_id SMALLINT UNSIGNED NOT NULL,

   vehicle_id TINYINT UNSIGNED NOT NULL,

   PRIMARY KEY(member_id, vehicle_id));
Based on the members table data presented earlier in this section, the member_to_vehicle table looks like the following. Keep in mind that the idea of a carpool includes giving members who do not own a car the opportunity to find a ride in return for sharing the cost of travel. Therefore, not all members are present in this table, because it includes only members who own a car.
+-----------+------------+

| member_id | vehicle_id |

+-----------+------------+

|    1      |      1     |

|    1      |      2     |

|    3      |      4     |

|    4      |      4     |

|    4      |      2     |

|    1      |      3     |

+-----------+------------+
Now, suppose that you want to determine which members own at least one vehicle. Use the EXISTS clause in conjunction with a subquery to easily retrieve this information:
SELECT DISTINCT first_name, last_name FROM members WHERE EXISTS

   (SELECT * from member_to_vehicle WHERE

      member_to_vehicle.member_id = members.id);
+------------+-----------+

| first_name | last_name |

+------------+-----------+

| Jason      | Gilmore   |

| Sean       | Blum      |

| Jodi       | Stiles    |

+------------+-----------+
The same outcome can also be produced by using the IN clause, like so:
SELECT first_name, last_name FROM members

   WHERE id IN (SELECT member_id FROM member_to_vehicle);
Performing Database Maintenance with Subqueries
Subqueries aren't limited solely to selecting data; you can also use this feature to manage your database. For instance, suppose you expanded the carpooling service by creating a way for members to monetarily compensate other members for long-distance rides. Members have only so much credit allotted to them, so the credit balance must be adjusted each time the member purchases a new ride, which can be achieved as follows:
UPDATE members SET credit_balance =

   credit_balance - (SELECT cost FROM sales WHERE sales_id=54);
Using Subqueries with PHP
Like many of the other MySQL features introduced in previous chapters, using subqueries within your PHP applications is a transparent process; just execute the subquery like you would any other query. For example, the following script builds upon the corporate_mysqli class created earlier in this chapter, retrieving a list of individuals sharing the same ZIP code as user jason. Of course, there is no need to use the corporate_mysqli class to use subqueries.
<?php

   $mysqli = new corporate_mysqli("localhost", "websiteuser",

                                  "secret", "corporate");


   $query = "SELECT id, first_name, last_name FROM members

             WHERE zip = (SELECT zip FROM members WHERE id=1)";


   $mysqli->tabular_output($query);


?>
Iterating Result Sets with Cursors
If you've ever opened a file using PHP's fopen() function or manipulated an array of data, you used a pointer to perform the task. In the former case, a file pointer is used to denote the present position in the file, and in the latter case, a pointer is used to traverse and perhaps manipulate each array value.
Most databases offer a similar feature for iterating through a result set. Known as a cursor, it allows you to retrieve each row in the set separately and perform multiple operations on that row without worrying about affecting other rows in the set. Why is this useful? Suppose your company offers employees a holiday bonus based on their present salary and commission rates. However, the size of the bonus depends on a variety of factors, with the scale arranged like so:
- If salary > $60,000 and commission > 5%, bonus = salary ∞ commission
- If salary > $60,000 and commission <= 5%, bonus = salary ∞ 3%
- All other employees, bonus = salary ∞ 7%
As you'll learn in this section, this task is easily accomplished with a cursor.
Databases such as Oracle and Microsoft SQL Server have long offered cursor support; as of version 5.0, MySQL does too. In this section, you'll learn how to create and use MySQL cursors.
Cursor Basics
Before moving on to how MySQL cursors are created and used, take a moment to review some basics regarding this feature. Generally speaking, the lifecycle of a MySQL cursor must proceed in this order:
- Declare the cursor with the
DECLAREstatement. - Open the cursor with the
OPENstatement. - Fetch data from the cursor with the
FETCHstatement. - Close the cursor with the
CLOSEstatement.
Each of these tasks and the corresponding statements are introduced in the following sections. Also, although MySQL's cursor functionality is already quite usable, there are a few general restrictions worth mentioning. At present, MySQL cursors can be best described as having the following characteristics:
- Server-side: Some database servers can run both server-side and client-side cursors. Server-side cursors are managed from within the database, whereas client-side cursors can be requested by and controlled within an application external to the database. MySQL supports only server-side cursors.
- Read-only: Cursors can be readable and writable. Read-only cursors can read data from the database, whereas write cursors can update the data pointed to by the cursor. MySQL supports only read-only cursors.
- Asensitive: Cursors can be either asensitive or insensitive. Asensitive cursors reference the actual data found in the database, whereas insensitive cursors refer to a temporary copy of the data that was made at the time of cursor creation. MySQL supports only asensitive cursors.
- Forward-only: Advanced cursor implementations can traverse data sets both backward and forward, skip over records, and perform a variety of other navigational tasks. At present, MySQL cursors are forward-only, meaning that you can traverse the data set in the forward direction only. Furthermore, MySQL cursors can move forward only one record at a time.
Creating a Cursor
Before you can use a cursor, you must create (declare) it using the DECLARE statement. This declaration specifies the cursor's name and the data it will work with. Its prototype follows:
DECLARE cursor_name CURSOR FOR select_statement
For example, to declare the bonus-calculation cursor discussed earlier in this section, execute the following declaration:
DECLARE calc_bonus CURSOR FOR SELECT id, salary, commission FROM employees;
After you declare the cursor, you must open it to use it. This task is introduced next.
Opening a Cursor
Although the cursor's query is defined in the DECLARE statement, the query isn't actually executed until the cursor has been opened. You accomplish this with the OPEN statement:
OPEN cursor_name
For example, to open the calc_bonus cursor created earlier in this section, execute the following:
OPEN calc_bonus;
Using a Cursor
Using the information pointed to by the cursor is accomplished with the FETCH statement. Its prototype follows:
FETCH cursor_name INTO varname1 [, varname2...]
For example, the following stored procedure (stored procedures were introduced in Chapter 32), calculate_bonus(), fetches the id, salary, and commission columns pointed to by the cursor, performs the necessary comparisons, and finally inserts the appropriate bonus:
DELIMITER //


CREATE PROCEDURE calculate_bonus()

BEGIN


   DECLARE emp_id INT;

   DECLARE sal DECIMAL(8,2);

   DECLARE comm DECIMAL(3,2);

   DECLARE done INT;


   DECLARE calc_bonus CURSOR FOR SELECT id, salary, commission FROM employees;


   DECLARE CONTINUE HANDLER FOR NOT FOUND SET done = 1;


   OPEN calc_bonus;


   BEGIN_calc: LOOP


      FETCH calc_bonus INTO emp_id, sal, comm;


      IF done THEN

         LEAVE begin_calc;

      END IF;


      IF sal > 60000.00 THEN

         IF comm > 0.05 THEN

            UPDATE employees SET bonus = sal * comm WHERE id=emp_id;

         ELSEIF comm <= 0.05 THEN

            UPDATE employees SET bonus = sal * 0.03 WHERE id=emp_id;

         END IF;

      ELSE

         UPDATE employees SET bonus = sal * 0.07 WHERE id=emp_id;

      END IF;


   END LOOP begin_calc;


   CLOSE calc_bonus;


END//


DELIMITER ;
Closing a Cursor
After you've finished using a cursor, you should close it with the CLOSE statement, to recuperate the potentially significant system resources. To close the calc_bonus cursor opened earlier in this section, execute the following:
CLOSE calc_bonus;
Closing a cursor is so important that MySQL will automatically close it upon leaving the statement block within which it was declared. However, for purposes of clarity, you should strive to explicitly close it using CLOSE.
Using Cursors with PHP
Like using stored procedures and triggers, using cursors in PHP is a fairly trivial process. Execute the calculate_bonus() stored procedure (which contains the calc_bonus cursor) created previously:
<?php


  // Instantiate the mysqli class

  $db = new mysqli("localhost", "websiteuser", "secret", "corporate");


  // Execute the stored procedure

  $result = $db->query("CALL calculate_bonus()");


?>
Summary
This chapter introduced many common tasks you'll encounter when developing data-driven applications. You were presented with a convenient and easy methodology for outputting data results in tabular format, and then learned how to add actionable options for each output data row. This strategy was further expanded by showing you how to sort output based on a given table field. You also learned how to spread query results across several pages by creating linked pages listings, enabling the user to navigate the results in a nonlinear fashion.
The next chapter introduces MySQL's database indexing and full-text search capabilities, and shows you how to execute Web-based database searches using PHP.