CHAPTER 27
The Many MySQL Clients
MySQL comes with quite a few utilities, or clients, each of which provides interfaces for carrying out various tasks pertinent to server administration. This chapter offers a general overview of the most commonly used clients, and provides an in-depth introduction to the most prominent two of the bunch, namely mysql and mysqladmin. Because the MySQL manual already does a fantastic job at providing a general overview of each client, this chapter instead focuses on those features that you're most likely to regularly use in your daily administration activities.
Of course, not all users are interested in managing databases from the command line; therefore, both the MySQL developers and third parties have been hard at work building GUI-based management solutions. This chapter concludes with an overview of several of the most prominent GUI-based administration applications.
Introducing the Command-Line Clients
MySQL is bundled with quite a few client programs, a total of 18 to be exact (as of 5.1.4-beta). This section offers extensive introductions to the two most prominent clients (mysql and mysqladmin), and concludes with a brief introduction to the others.
The mysql Client
The mysql client is an extremely useful SQL shell, capable of managing almost every conceivable aspect of a MySQL server, including creating, modifying, and deleting tables and databases, creating and managing users, viewing and modifying the server configuration, and querying table data. Although the majority of the time you'll likely be working with MySQL via a GUI or an API, this client is nonetheless invaluable for carrying out various administration tasks, particularly given its scriptable functionality within the shell environment. Its general usage syntax follows:
mysql [options] [database_name] [noninteractive_arguments]
The client can be used in interactive or noninteractive mode, both of which are introduced in this section. Regardless of which you use, you'll typically need to provide connection options. Although exactly which credentials are required depends upon your server configuration (a matter discussed in detail in Chapter 29), you typically need a hostname (--host=, -h), username (--user=, -u), and password (--password=, -p). Often you'll want to include the target database name (--database=, -D) to save the extra step of executing the USE command once you've entered the client. Although order is irrelevant, the connection options are generally entered like so:
%>mysql -h yourhostname -u yourusername -p -D databasename
Note that the password is not included on the command line. For example, consider an attempt to connect to a MySQL server residing at www.example.com using the username jason, the password secret, and the database corporate:
%>mysql -h www.example.com -u jason -p -D corporate
You might also include other options, many of which are introduced in the later section "Useful mysql Options," or press Enter to be prompted for the password. Once prompted, you would enter secret. If your credentials are valid, you'll be granted access to the client interface, or permitted to execute whatever noninteractive arguments are included on the command line.
Using mysql in Interactive Mode
To use mysql in interactive mode, you need to first enter the interface. As already explained, you do so by passing along appropriate credentials. Building on the previous example, suppose you want to interact with the corporate database located on the www.example.com server:
%>mysql -h www.example.com -u jason -p -D corporate

Enter password:

Welcome to the MySQL monitor.  Commands end with ; or g.

Your MySQL connection id is 2

Server version: 5.1.14-beta-community-nt MySQL Community Server (GPL)

Type 'help;' or 'h' for help. Type 'c' to clear the buffer.


mysql>
Once connected via the mysql client, you can begin executing SQL commands. For example, to view a list of all existing databases, use this command:
mysql>SHOW databases;
To switch to (or use) another database, the mysql database for example, use this command:
mysql>USE mysql;
Note To switch to the mysql database, you'll almost certainly require root access. If you don't have root access, and have no other databases at your disposal, you can switch to the test database, created by MySQL at installation time, or create a new database. However, if you're relying on a third party to manage your MySQL installation, keep in mind that this database may have been previously removed for administrative reasons.
Once you've switched to the mysql database context, you can view all tables with this command:
mysql>SHOW TABLES;
This returns the following:
+------------------------------------+

| Tables_in_mysql                    |

+------------------------------------+

| columns_priv                       |

| db                                 |

| event                              |

| func                               |

| general_log                        |

| help_category                      |

| help_keyword                       |

| help_relation                      |

| help_topic                         |

| host                               |

| plugin                             |

| proc                               |

| procs_priv                         |

| slow_log                           |

| tables_priv                        |

| time_zone                          |

| time_zone_leap_second              |

| time_zone_name                     |

| time_zone_transition               |

| time_zone_transition_type          |

| user                               |

+------------------------------------+

21 rows in set (0.00 sec)
To view the structure of one of those tables, for instance, the host table, use this command:
mysql>DESCRIBE host;
This returns:
+--------------------------+---------------+------+--------+-----------+-------+

| Field                    | Type          | Null |  Key   | Default   | Extra |

+--------------------------+---------------+------+--------+-----------+-------+

| Host                     | char(60)      | NO   | PRI    |           |       |

| Db                       | char(64)      | NO   | PRI    |           |       |

| Select_priv              | enum('N','Y') | NO   |        | N         |       |

| Insert_priv              | enum('N','Y') | NO   |        | N         |       |

| Update_priv              | enum('N','Y') | NO   |        | N         |       |

| Delete_priv              | enum('N','Y') | NO   |        | N         |       |

| Create_priv              | enum('N','Y') | NO   |        | N         |       |

| Drop_priv                | enum('N','Y') | NO   |        | N         |       |

| Grant_priv               | enum('N','Y') | NO   |        | N         |       |

| References_priv          | enum('N','Y') | NO   |        | N         |       |

| Index_priv               | enum('N','Y') | NO   |        | N         |       |

| Alter_priv               | enum('N','Y') | NO   |        | N         |       |

| Create_tmp_table_priv    | enum('N','Y') | NO   |        | N         |       |

| Lock_tables_priv         | enum('N','Y') | NO   |        | N         |       |

| Create_view_priv         | enum('N','Y') | NO   |        | N         |       |

| Show_view_priv           | enum('N','Y') | NO   |        | N         |       |

| Create_routine_priv      | enum('N','Y') | NO   |        | N         |       |

| Alter_routine_priv       | enum('N','Y') | NO   |        | N         |       |

| Execute_priv             | enum('N','Y') | NO   |        | N         |       |

| Trigger_priv             | enum('N','Y') | NO   |        | N         |       |

+--------------------------+---------------+------+--------+-----------+-------+

20 rows in set (0.13 sec)
You can also execute SQL queries such as INSERT, SELECT, UPDATE, and DELETE. For example, suppose you want to select all values residing in the Host, User, and password columns of the user table, found in the mysql database, and order it by the Host:
mysql>SELECT Host, User, password FROM user ORDER BY Host;
In summary, you can execute any query via the mysql client that MySQL is capable of understanding.
Note MySQL treats query keywords in a case-insensitive fashion. For the sake of consistency, the keywords are capitalized in this book. Keep in mind, however, that while on Windows and OS X the default is to treat table names and field names in a case-insensitive fashion, on Unix they are indeed case sensitive.
You can exit the mysql client by executing any of the following commands: quit, exit, q, or Ctrl-D.
Using mysql in Batch Mode
The mysql client also offers batch mode capabilities, used for both importing schemas and data into a database and piping output to another destination. For example, you can execute SQL commands residing in a text file by having the mysql client consume the contents of /path/to/file using the < operator, like so:
%>mysql [options] < /path/to/file
This feature has many uses. For instance, one possible use of this feature is to have server statistics sent via e-mail to a system administrator each morning. For example, suppose that you want to monitor the number of slow-executing queries that have taken place on the server. Start by creating a user with no password, named mysqlmonitor, granting the user only usage privileges on the mysql database. Then, create a file named mysqlmon.sql and add the following line to it:
SHOW STATUS LIKE "slow_queries";
Then, if you're running MySQL on Unix, you can place the following line into crontab:
0 3 * * * mysql -u monitor < mysqlmon.sql | mail -s "Slow queries"

[email protected]
Each time this command executes, an e-mail titled "Slow queries" will be sent to [email protected] at 3 a.m. each morning. The e-mail body will contain a number consisting of the value of the status variable slow_query.
If you're running Windows, you can use the Event Scheduler to similar ends.
Incidentally, you can also execute a file while already logged into the mysql client, by using the source command:
mysql>source mysqlmon.sql
Useful mysql Tips
This section enumerates a few useful tips that all MySQL users should know when starting out with the mysql client.
Paging Output
You can page through output using your operating system's paging commands. For example:
%>mysql < queries.sql | more
Displaying Results Vertically
Use the G option to display query results in a vertical output format. This renders the returned data in a significantly more readable fashion. Consider this example in which all rows are selected from the mysql.db table by using the G option:
mysql>use mysql;

mysql>select * from dbG

*************************** 1. row ***************************

   Host: %

   Db: test%

   User:

   Select_priv: Y

   Insert_priv: Y

   Update_priv: Y

   ...

*************************** 2. row ***************************

...
Logging Queries
When working interactively with the mysql client, it can be useful to log all results to a text file so that you can review them later. You can initiate logging with the tee or T option, followed by a file name and, if desired, prepended with a path. For example, suppose you want to log the session to a file named session.sql:
mysql>T session.sql

Logging to file 'session.sql'

mysql>show databases;

+--------------+

| Database    |

+-------------+

| mysql        |

| test            |

+-------------+
Once logging begins, the output exactly as you see it here will be logged to session.sql. To disable logging at any time during the session, execute notee, or .
Getting Server Statistics
Executing the status, or s, command will retrieve a number of useful statistics regarding the current server status, including uptime, version, TCP port, connection type, total queries executed, average queries per second, and more.
Suppose that you manage a table consisting of 10,000 newsletter members, and one day decide to use the mysql client to delete a now unneeded test account. It's been a long day, and without thinking you execute
mysql>DELETE FROM subscribers;
rather than
mysql>DELETE FROM subscribers WHERE email="[email protected]";
Whoops, you just deleted your entire subscriber base! Hopefully a recent backup is handy. The --safe-updates option prevents such inadvertent mistakes by refusing to execute any DELETE or UPDATE query that is not accompanied with a WHERE clause. Comically, you could also use the --i-am-a-dummy switch for the same purpose!
Modifying the mysql Prompt
When simultaneously working with several databases residing on different servers, you can quickly become confused as to exactly which server you're using. To make the location obvious, modify the default prompt to include the hostname. You can do this in several ways.
First, you can modify the prompt on the command line when logging into mysql:
%>mysql -u jason --prompt="(u@h) [d]> " -p corporate
Once you're logged into the console, the prompt will appear like so:
(jason@localhost) [corporate]>
Second, to render the change more permanent, you can also make the change in the my.cnf file, under the [mysql] section:
[mysql]

...

prompt=(u@h) [d]>
Finally, on Linux only, you can include the hostname on the prompt via the MYSQL_PS1 environment variable:
%>export MYSQL_PS1="(u@h) [d]>"
Note A complete list of flags available to the prompt are available in the MySQL manual.
Outputting Table Data in HTML and XML
This cool but largely unknown feature of the mysql client allows you to output query results in XML and HTML formats, using the --xml (-X) and --html (-H) options, respectively. For example, suppose you want to create an XML file consisting of the databases found on a given server. You could place the command SHOW DATABASES in a text file and then invoke the mysql client in batch mode, like so:
%>mysql -X < showdb.sql > serverdatabases.xml
The result is that a file named serverdatabases.xml is created that consists of output similar to the following:
<?xml version="1.0"?>

<resultset statement="show databases">

  <row>

        <field name="Database">information_schema</field>

  </row>

  <row>

        <field name="Database">corporate</field>

  </row>

  <row>

        <field name="Database">test</field>

  </row>

</resultset>
Viewing Configuration Variables and System Status
You can view a comprehensive listing of all server configuration variables via the SHOW VARIABLES command:
mysql>SHOW VARIABLES;
As of version 5.0.3, this command returns 234 different system variables. If you'd like to view just a particular variable, say the default table type, you can use this command in conjunction with LIKE:
mysql>SHOW VARIABLES LIKE "table_type";
This returns:
+------------------+----------+

| Variable_name    | Value    |

+------------------+----------+

| table_type       | MyISAM   |

+------------------+----------+
Viewing system status information is equally as trivial:
mysql>SHOW STATUS;
This returns:
+----------------------+---------+

| Variable_name        | Value   |

+----------------------+---------+

| Aborted_clients      | 0       |

| Aborted_connects     | 0       |

| Bytes_received       | 334     |

| Bytes_sent           | 11192   |

...

| Threads_running      | 1       |

| Uptime               | 231243  |

+----------------------+---------+

213 rows in set (0.00 sec)
As of version 5.0.3, this returns 213 different status variables. To view just a single item from the status report, say the total amount of bytes sent, use this command:
mysql>SHOW STATUS LIKE "bytes_sent";
+------------------+-------+

| Variable_name    | Value |

+------------------+-------+

| Bytes_sent       | 11088 |

+------------------+-------+

1 row in set (0.00 sec)
If you'd like to retrieve groups of similarly named variables (which often imply similar purpose), you can use the % wildcard. For example, the following command would retrieve all of the variables used to track statistics pertinent to MySQL's query caching feature:
mysql>SHOW STATUS LIKE "Qc%";
Useful mysql Options
Like all clients introduced in this chapter, mysql offers a number of useful options. Many of the most important options are introduced here:
--auto-rehash:By default,mysqlcreates hashes of database, table, and column names to facilitate auto-completion (you can auto-complete database, table, and column names with the Tab key). You can disable this behavior with--no-auto-rehash. If you'd like to re-enable it, use this option. If you don't plan to use auto-completion, consider disabling this option, which will slightly speed startup time.--column-names:By default,mysqlincludes the column names at the top of each result set. You can disable them with--no-column-names. If you'd like to re-enable this behavior, use this option anew.--compress,-C:Enables data compression when communicating between the client and server.--database=name,-D:Determines which database will be used. When using mysql interactively, you can also switch between databases as necessary with theUSEcommand.--default-character-set=character_set:Sets the character set.--disable-tee:If you've enabled logging of all queries and the results with the option --tee or with the command tee, you can disable this behavior with this option.--execute=query,-equery:Executes a query without having to actually enter the client interface. You can execute multiple queries with this option by separating each with a semicolon. Be sure to enclose the query in quotes so that the shell does not misinterpret it as multiple arguments. For example:
%>mysql -u root -p -e "USE corporate; SELECT * from product;"--force,-f:When used in noninteractive mode, MySQL can read and execute queries found in a text file. By default, execution of these queries stops if an error occurs. This option causes execution to continue regardless of errors.--host=name,-h:Specifies the connection host.--html,-H:Outputs all results in HTML format. See the corresponding tip in the section "Useful mysql Tips" for more information about this option.--no-beep,-b:When rapidly typing and executing queries, it's commonplace for errors to occur, resulting in the annoying beeping error. Use this option to disable the sound.--pager[=pagername]:Many queries produce more information than can fit on a single screen. You can tell the client to present results one page at a time by assigning a pager. Examples of valid pagers include the Unix commandsmoreandless. Presently, this command is only valid on the Unix platform. You can also set a pager while inside themysqlclient by using thePcommand.--password,-p:Specifies the password. Note that you shouldn't supply the password on the command line, as you might the username or host, but rather should wait for the subsequent prompt so that the password isn't stored in plain text in your command history.--port=#,-P:Specifies the host connection port.--protocol=name:MySQL supports four connection protocols, including memory,pipe,socket, andtcp. Use this option to specify which protocol you'd like to use:- TCP protocol: Used by default when the client and server reside on two separate machines, and requires port 3306 to function properly (the port number can be changed with --
port). You need to use TCP if the client and server reside on different computers, although you can also use it when all communication is conducted locally. - Socket files: A Unix-specific feature that facilitates communication between two different programs, and is the default when communication takes place locally.
- Shared memory: A Windows-only feature that uses a common memory block to enable communication.
- Named pipes: A Windows-only feature that functions similarly to Unix pipes.
- TCP protocol: Used by default when the client and server reside on two separate machines, and requires port 3306 to function properly (the port number can be changed with --
Note Neither of the preceding Windows-specific options is enabled by default (TCP is the default on Windows for both local and remote communication).
--safe-updates,-U:Causesmysqlto ignore allDELETEandUPDATEqueries in which theWHEREclause is omitted. This is a particularly useful safeguard for preventing accidental mass deletions or modifications. See the section "Useful mysql Tips" for more information about this option.--skip-column-names:By default,mysqlincludes headers containing column names at the top of each result set. You can disable inclusion of these headers with this option.--tee=name:Causes mysql to log all commands and the resulting output to the file specified byname. This is particularly useful for debugging purposes. You can disable logging at any time while inside mysql by issuing the command notee, and can later re-enable it with the commandtee. See the corresponding tip in the section "Useful mysql Tips" for more information about this option.--vertical,-E:Causesmysqlto display all query results in a vertical format. This format is often preferable when you're working with tables that contain several columns. See the corresponding tip in the section "Useful mysql Tips" for more information about this option.--xml,-X:Causes all results to be output in XML format. See the corresponding tip in the section "Useful mysql Tips" for more information about this option.
The mysqladmin Client
The mysqladmin client is used to carry out a wide array of administrative tasks, perhaps most notably creating and destroying databases, monitoring server status, and shutting down the MySQL server daemon. Like mysql, you need to pass in the necessary access credentials to use mysqladmin.
For example, you can examine all server variables and their values, by executing:
%>mysqladmin -u root -p variables

Enter password:
If you've supplied valid credentials, a long list of parameters and corresponding values will scroll by. If you want to page through the results, you can pipe this output to more or less if you're using Linux, or more if you're using Windows.
mysqladmin Commands
While mysql is essentially a free-form SQL shell, allowing any SQL query recognized by MySQL, mysqladmin's scope is much more limited, recognizing a predefined set of commands, many of which are introduced here:
createdatabasename:Creates a new database, the name of which is specified bydatabasename. Note that each database must possess a unique name. Attempts to create a database using a name of an already existing database will result in an error.dropdatabasename:Deletes an existing database, the name of which is specified bydatabasename. Once you submit a request to delete the database, you are prompted to confirm the request, to prevent accidental deletions.extended-status:Provides extended information regarding the server status. This is the same as executingshow statusfrom within themysqlclient.flush-hosts:Flushes the host cache tables. You need to use this command if a host's IP address changes. Also, you need to use this command if the MySQL server daemon receives a number of failed connection requests from a specific host (the exact number is determined by themax_connect_errorsvariable), because that host will be blocked from attempting additional requests. Executing this command removes the block.flush-logs:Closes and reopens all logging files.flush-status:Resets status variables, setting them to zero.flush-tables:Closes all open tables and terminates all running table queries.flush-threads:Purges the thread cache.flush-privileges:Reloads the privilege tables. If you're using the GRANT and REVOKE commands rather than directly modifying the privilege tables using SQL queries, you do not need to use this command.kill id[,id2[,idN]]:Terminates the process(es) specified byid,id2, throughidN. You can view the process numbers with theprocesslistcommand.old-passwordnew-password:Changes the password of the user specified by-utonew-passwordusing the pre-MySQL 4.1 password-hashing algorithm.passwordnew-password:Changes the password of the user specified by-utonew-passwordusing the post-MySQL 4.1 password-hashing algorithm.ping:Verifies that the MySQL server is running by pinging it, much like a Web or mail server might be pinged.processlist:Displays a list of all running MySQL server daemon processes.reload:Alias of the commandflush-privileges.refresh:Combines the tasks carried out by the commandsflush-tablesandflush-logs.shutdown:Shuts down the MySQL server daemon. Note that you cannot restart the daemon usingmysqladmin. Instead, it must be restarted using the mechanisms introduced in Chapter 26.status:Outputs various server statistics, such as uptime, total queries executed, open tables, average queries per second, and running threads.start-slave:Starts a slave server. This is used in conjunction with MySQL's replication feature.stop-slave:Stops a slave server. This is used in conjunction with MySQL's replication feature.variables:Outputs all server variables and their corresponding values.version:Outputs version information and server statistics.
Other Useful Clients
Like the mysql and mysqladmin clients, all utilities introduced in this section can be invoked with the --help option.
mysqldump
The mysqldump client is used to export existing table data, table structures, or both from the MySQL server. If requested, the exported data can include all necessary SQL statements required to re-create the dumped information. Furthermore, you can specify whether to dump one, some, or all databases found on the server, or even just specific tables in a given database.
You can invoke mysqldump using any of the following three syntax variations:
%>mysqldump [options] database [tables]

%>mysqldump [options] --databases [options] database1 [database2...]

%>mysqldump [options] --all-databases [options]
Consider a few examples. The first example dumps just the table structures of all databases found on a local server to a file named output.sql:
%>mysqldump -u root -p --all-databases --no-data > output.sql
Note that the output is being directed to a file; otherwise, the output would be sent to standard output, the screen. Also, keep in mind that the .sql extension is not required. This extension is used here merely for reasons of convenience; you can use any extension you wish.
The next example dumps just the data of a single database, corporate:
%>mysqldump -u root -p --no-create-info corporate > output.sql
The final example dumps both the structure and the data of two tables located in the corporate database, including DROP TABLE statements before each CREATE statement. This is particularly useful when you need to repeatedly re-create an existing database, because attempting to create already existing tables results in an error; thus the need for the DROP TABLE statements.
%>mysqldump -u root -p --add-drop-table corporate product staff > output.sql
Caution The mysqldump client should be run only during times of relative inactivity, because of the way it locks tables during the backup process.
mysqlshow
The mysqlshow utility offers a convenient means for determining which databases, tables, and columns exist on a given database server. Its usage syntax follows:
mysqlshow [options] [database [table [column]]]
For example, suppose you want to view a list of all available databases:
%>mysqlshow -u root -p
To view all tables in a particular database, such as mysql:
%>mysqlshow -u root -p mysql
To view all columns in a particular table, such as the mysql database's db table:
%>mysqlshow -u root -p mysql db
Note that what is displayed depends entirely upon the furnished credentials. In the preceding examples, the root user is used, which implies that all information will be at the user's disposal. However, other users will likely not have as wide-ranging access. Therefore, if you're interested in surveying all available data structures, use the root user.
mysqlhotcopy
You can think of the mysqlhotcopy utility as an optimized mysqldump, but using Perl and its MySQL DBI module, and various optimization techniques to back up one or several databases, writing the data to a file (or files) of the same name as the database that is being backed up. Although optimized, this utility comes at somewhat of a disadvantage insofar as it can be run only on the same machine on which the target MySQL server is running. Further, it's not available for Windows, and only supports MyISAM and Archive tables. If you require remote backup capabilities, take a look at mysqldump or MySQL's replication features.
Three syntax variations are available:
%>mysqlhotcopy [options] database1 [/path/to/target/directory]

%>mysqlhotcopy [options] database1...databaseN /path/to/target/directory

%>mysqlhotcopy [options] database./regular-expression/
As is the norm, numerous options are available for this utility, a few of which are demonstrated in the usage examples. In the first example, the corporate and mysql databases are copied to a backup directory:
%>mysqlhotcopy -u root -p corporate mysql /usr/local/mysql/backups
The following variation of the first example adds a default file extension to all copied database files:
%>mysqlhotcopy -u root -p --suffix=.sql corporate mysql /usr/local/mysql/backups
For the last example, a backup is created of all tables in the corporate database that begin with the word sales:
%>mysqlhotcopy -u root -p corporate./^sales/ /usr/local/mysql/backups
Like all other MySQL utilities, you must supply proper credentials to use mysqlhotcopy's functionality. In particular, the invoking user needs to have SELECT privileges for those tables being copied. In addition, you need write access to the target directory. Finally, the Perl DBI::mysql module must be installed.
Tip Although, like all other utilities, you can learn more about mysqlhotcopy by invoking it with the --help option, more thorough documentation can be had via perldoc. Execute perldoc mysqlhotcopy for a comprehensive guide.
The mysqlimport utility offers a convenient means for importing data from a delimited text file into a database. It is invoked using the following syntax:
%>mysqlimport [options] database textfile1 [textfile2...]
This utility is particularly useful when migrating to MySQL from another database product or legacy system, because the vast majority of storage solutions (MySQL included) are capable of both creating and parsing delimited data. An example of a delimited datafile follows:
Hemingway, Ernest	The Sun Also Rises	1926


Steinbeck, John	Of Mice and Men	1937


Golding, William	Lord of the Flies	1954
In this example, each item (field) of data is delimited by a tab ( ), and each row by a newline (
). Keep in mind that the delimiting characters are a matter of choice, because most modern storage solutions offer a means for specifying both the column and the row delimiters when creating and reading delimited files. Suppose these rows were placed in a file called books.txt and you wanted to read this data from and write it to a database aptly called books:
%>mysqlimport -u root -p --fields-terminated-by=

 >--lines-terminated-by=
 books books.sql
The executing user requires INSERT permissions for writing the data to the given table, in addition to FILE privileges to make use of mysqlimport. See Chapter 29 for more information about setting user privileges.
myisamchk
Although it is widely acknowledged that MySQL is quite stable, certain conditions out of its control can result in corrupt tables. Such corruption can wreak all sorts of havoc, including preventing further insertions or updates, and even resulting in the temporary (and in extreme cases, permanent) loss of data. If you experience any table errors or oddities, you can use the myisamchk utility to check MyISAM table indices for corruption, and repair them if necessary. It's invoked using the following syntax:
%>myisamchk [options] /path/to/table_name.MYI
In the absence of any options, myisamchk just checks the designated table for corruption. For example, suppose you want to check the table named staff that resides in the corporate database:
%>myisamchk /usr/local/mysql/data/corporate/staff.MYI
Varying degrees of checks are also available, each of which requires additional time but more thoroughly reviews the table for errors. Although the default is simply check (--check), there also exists a medium check (--medium-check) and an extended check (--extend-check). Only use the extended check for the most severe cases, because medium check will catch the overwhelming majority of errors, and consume considerably less time. You can also review extended information for each of these checks by supplying the -information (-i) option, which offers various table-specific statistics.
If problems are identified with the table, you'll be notified accordingly. If an error is found, you can ask myisamchk to attempt to repair it by supplying the -recover (-r) option:
%>myisamchk -r /usr/local/mysql/data/corporate/staff.MYI
Note that what is presented here is just a smattering of the options available to this utility. Definitely consult the manual before using myisamchk to check or repair tables. Also, you should only run myisamchk when the MySQL server daemon is not running. If you don't have the luxury of taking your database server offline, take a look at the next utility, mysqlcheck.
mysqlcheck
As of version 3.23.38, the mysqlcheck utility offers users the means for checking and, if necessary, repairing corrupted tables while the MySQL server daemon is running. It can be invoked in any of the three following ways:
%>mysqlcheck [options] database [tables]

%>mysqlcheck [options] --databases database1 [database2...]

%>mysqlcheck [options] --all-databases
In addition to the typical user credentials and concerned databases and tables, you can specify whether you want to analyze (-a), repair (-r), or optimize (-o) by passing in the appropriate parameter. So, for example, suppose the staff table, located in the table corporate, became corrupted due to sudden hard-drive failure. You could repair it by executing:
%>mysqlcheck -r corporate staff
Like myisamchk, mysqlcheck is capable of finding and repairing the overwhelming majority of errors. In addition, it offers a wide-ranging array of features. Therefore, before you use it to resolve any mission-critical problems, take some time to consult the MySQL manual to ensure that you're using the most effective set of options.
Client Options
This section highlights several of the options shared by many of MySQL's clients, mysql and mysqladmin included. The options are divided into two categories: connection options and general options. Before moving on to a breakdown of the options falling under these two categories, take a moment to review a few simple rules that you should keep in mind when using these options:
- Options can be passed to clients in three ways: via the command line, environment variables, or configuration files. If you plan on using a particular option repeatedly, the preferred way to set it is through a configuration file. MySQL's configuration files were first introduced in Chapter 26.
- Any options assigned via the command line override assignments located in configuration files or environment variables.
- Options are case sensitive. For example,
-pis representative of password, but-Pdenotes a port number. - When you pass options via the command line, they are prefaced with either one hyphen or two, depending upon whether you're using the short or long form. When they are passed in a configuration file, they are not prefaced with hyphens at all. Throughout this chapter, where applicable, both the short and long forms are simultaneously introduced.
- Some options require you to assign a value, and others provoke a certain behavior simply by being referenced. If an option requires a value, it will be noted when the option is introduced.
- If an option requires a value, and the option's long form is used, you assign this value by following the option with an equal sign and then the value. For example, if you're referencing the hostname option's long form, you could assign www.example.com to it. For example:
--host=www.example.com - When using the option's short form, you assign a value by simply noting the value directly after the option. You can include a space for readability, although you're not constrained to do so. For example:
-h www.example.com - The only option that does not follow this format is the password option, the reason for which is explained in the next section.
Connection Options
There are six commonly used connection options that you'll likely consider using when starting a mysql client. The long and short forms are listed here:
--host=name,-h:Specifies the target database host. If you're connecting to the localhost, you can omit this option.--password[=name],-p:Specifies the connecting user's password. Although you can include the password on the command line, doing so is unadvisable, because it could be logged to a command history file, causing a considerable security risk. Instead, upon execution, you'll be prompted for the password, which will not be echoed back to the screen when you enter it. Regardless of which route you choose, keep in mind that neither protects against password sniffing through network monitoring when you connect to a remote host, because the password, along with all other connection information, is transmitted unencrypted unless MySQL's Secure Sockets Layer (SSL) capabilities are used. See Chapter 29 for more information about MySQL's SSL feature.--pipe,-W:Specifies that named pipes will be used to connect to the server.--port=port_num,-P:Specifies the port to use when connecting to the MySQL server. Note that you can't just specify a nonstandard port (3306 is the default) without configuring the MySQL server daemon to listen on that port. You can do so simply by passing this same option to the mysqld daemon at startup time.--socket=/path/to/socket,-s:For localhost connections, a socket file is required. By default this file is created in/tmpon Unix machines. On Windows machines, this option determines the name of the pipe (by default this name is MySQL) used for local connections when named pipes are used.--user=name,-u:Specifies the connecting user's username.
General Options
The following list highlights many of the options available to all or most clients. You can verify whether a particular client supports a given option by outputting the client's help page with the option --help.
--compress,-C:Enables compression for the protocol used for client/server communication.--defaults-file=/path/to/configuration/file:At startup, each client typically searches in several locations for configuration files and applies the settings accordingly. You can override this behavior by specifying the location of a configuration file with this option.--defaults-extra-file=/path/to/configuration/file:Reads this file after all other configuration files have been read. You might use such a file during application testing, for example.--help,-?:Outputs help information before exiting. You can pipe the results through a pager to facilitate reading. For example, the following command takes advantage of the Unixmorecommand to page output:
%>mysql --help | more--no-defaults:Ignores all configuration files.--print-defaults:Outputs the options that will be used by the client as defined within configuration files and environment variables.--silent,-s:Decreases client chatter, or output. Note that this option does not necessarily suppress all output.--variable-name=value:Sets a variable's value. Note that the option isn't actually called "variable-name." Rather, this is intended as a placeholder for the name of whatever variable you're trying to modify.--verbose,-v:Outputs more output than would occur by default.--version,-V:Exits after outputting client version information.
MySQL's GUI Client Programs
Cognizant that not all users are particularly comfortable working from the command line, MySQL AB has been making great strides in developing graphically based management solutions. Four free products are currently available, and are released under MySQL AB's dual licensing model (see Chapter 25 for more about MySQL AB's licensing arrangements):
- MySQL Administrator: Facilitates all manner of tasks pertinent to the health and operation of the database, such as user management, health monitoring, data backup and restoration, and log monitoring.
- MySQL Query Browser: Makes it easy to create databases, tables, views, and stored procedures, as well as query and manage your data.
- MySQL Workbench: Allows you to manage your data models graphically. At the time of writing, Workbench was under heavy development, and is likely to change so significantly by the time this book is published that it is not discussed in this section.
- MySQL Migration Toolkit: Eases the migration of your schemas and data from a variety of proprietary database solutions to MySQL.
You have the choice of selectively downloading each as you see fit from the MySQL Web site, or downloading them in a single package called MySQL GUI Tools. I recommend downloading the package, giving you the opportunity to experiment with all of them.
Following an overview of the GUI Tools installation process, additional details about each program are offered.
Installing GUI Tools
The GUI Tools package is available on all of the standard platforms, Linux, Mac OS X, and Windows included. Source code is also available if you want to build it yourself. Head on over to http://dev.mysql.com/downloads/ and download the appropriate version for your platform. The installation process is easy enough so as not to warrant a thorough explanation here; just initiate the process, review the usage terms, and choose which components you'd like to install.
MySQL Administrator
MySQL Administrator was first released to the public in January 2004. Despite being under development for more than three years, this product remains a moving target, with features being added and tweaked on a regular basis.
MySQL Administrator offers a number of compelling features:
- Interfaces are provided for managing every conceivable aspect of the server, including the daemon service, users and privileges, configuration variables, logging, and more.
- Comprehensive user administration allows the administrator to manage each user's username, password, privileges, and resource usage. Additionally, administrators can maintain contact information for each user, including their name, e-mail address, description, additional contact information, and even a picture. A screenshot of the user privilege management interface is shown in Figure 27-1.
- Real-time graphical monitoring tracks connection and memory usage, traffic, SQL queries, replication status, and user connections.
- A GUI-based means is available for both backing up and restoring schemas and data. Also included is a feature for scheduling backups, which proves particularly useful on the Windows platform.

Figure 27-1. Managing user privileges with MySQL Administrator
MySQL Query Browser
MySQL Administrator is great for maintaining all aspects of your database, and is capable of handling everything from executing backups to reviewing server logs. However, it's not possible to manage your data and table structures using this application. That's where MySQL Query Browser comes into the picture.
MySQL Query Browser offers an amazingly efficient means for interacting with your MySQL data. It is arguably the most capable MySQL-specific data administration interface released to date, offering a point-and-click means for inserting, modifying, and deleting data; query auto-completion; a tabbed interface, reminiscent of the Firefox browser, for simultaneously managing multiple database sessions; and a convenient interface for navigating the MySQL documentation. In addition to structure- and data-editing capabilities, it's also possible to compare result sets, review query efficiency, create and manage stored procedures and views, and much more.
A list of MySQL Query Browser's feature highlights follows:
- A point-and-click query generator enables you to quickly assemble
SELECTqueries. - Databases and tables are easily created and modified using the Table Editor, shown in action in Figure 27-2. You'll see that this interface offers an excellent means for reviewing and editing a table.
- You can bookmark large or tedious queries, saving you the hassle of continuously re-creating them. Query history is also saved across sessions, and categorized according to date, affording you the opportunity to easily review and later execute previous queries.
- Stored procedures and views are created and managed with surprising ease, using a point-and-click interface.
- The MySQL documentation is quickly accessible through an interface that breaks down the features according to task and function.
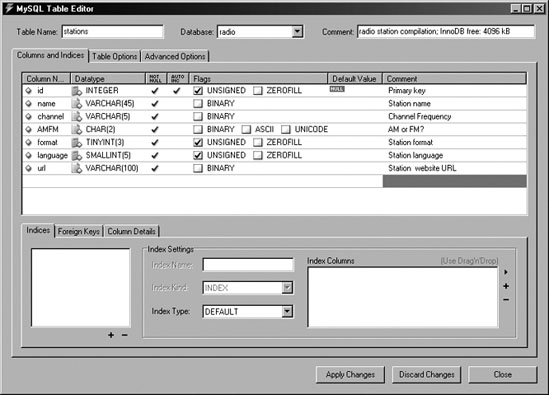
Figure 27-2. Editing a table schema with MySQL Query Browser
MySQL Migration Toolkit
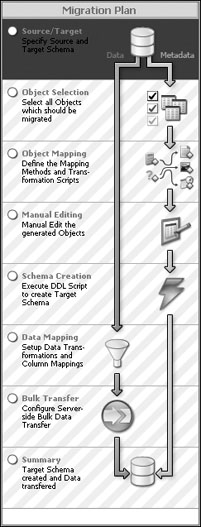
Organizations around the globe increasingly view MySQL as a viable, cost-efficient alternative to the expensive databases that have drained corporate budgets for years. Yet the cost and time required to migrate often enormous data stores to another solution can be extravagant. Accordingly, the MySQL developers created the MySQL Migration Toolkit, a well-constructed seven-step wizard (a screenshot of which is shown in Figure 27-3) that you can use to both speed the process and reduce errors.
Currently the MySQL Migration Toolkit is capable of migrating schemas and data from Microsoft Access, MaxDB, Microsoft SQL Server, Oracle, and Sybase. You can also migrate data from any database supporting a generic JDBC driver, as well as from other MySQL installations.
Figure 27-3. MySQL Migration Toolkit wizard
Note On the MySQL Web site, you'll find several great screencasts demonstrating the process of migrating schemas and data from a variety of databases. The Microsoft SQL Server migration screencast is particularly compelling because it demonstrates the successful migration of the well-known Northwind database to MySQL.
phpMyAdmin
Although not a product offered by MySQL, phpMyAdmin is such a valuable administration tool that it certainly bears mentioning here. A Web-based MySQL administration application written in PHP, phpMyAdmin is used by countless thousands of developers, and is practically a staple among Web hosting providers around the globe. It's not only very stable (it has been in development since 1998), but also feature-rich thanks to an enthusiastic development team and user community. Speaking as a longtime user of this product, it's difficult to fathom how one could get along without it.
phpMyAdmin offers a number of compelling features:
- phpMyAdmin is browser based, allowing you to easily manage remote MySQL databases from anywhere you have access to the Web. SSL is also transparently supported, allowing for encrypted administration if your server offers this feature. A screenshot of the interface used to manage tables in the
mysqldatabase is offered in Figure 27-4. - Administrators can exercise complete control over user privileges, passwords, and resource usage, as well as create, delete, and even copy user accounts.
- Real-time interfaces are available for viewing uptime information, query and server traffic statistics, server variables, and running processes.
- Developers from around the world have translated phpMyAdmin's interface into 50 languages, including English, Chinese (traditional and simplified), Arabic, French, Spanish, Hebrew, German, and Japanese.
- phpMyAdmin offers a highly optimized point-and-click interface that greatly reduces the possibility of user-initiated errors.
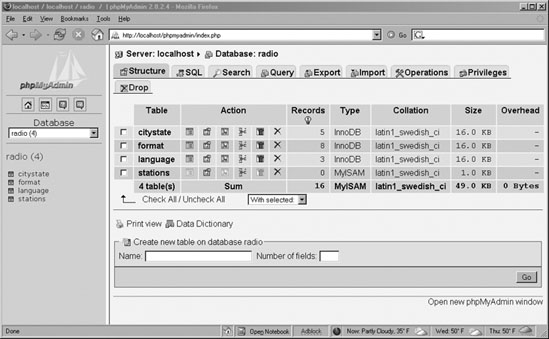
Figure 27-4. Overview of the mysql database
phpMyAdmin is released under the GNU General Public License. The official phpMyAdmin Web site, http://www.phpmyadmin.net/, offers source downloads, news, mailing lists, a live demo, and more.
Summary
This chapter introduced MySQL's many clients, and provided special attention to what for many are the two most important of the bunch: mysql and mysqladmin. Several of the most prevalent GUI-based management solutions were also presented. Because administration is such a key aspect of maintaining a healthy database server, consider experimenting with all of them to determine which route best fits your specific database management situation.
The next chapter addresses another key aspect of MySQL: table structures and datatypes. You'll learn about the various table types and the supported datatypes and attributes, and will be presented with numerous examples regarding how to create, modify, and use databases, tables, and columns.