
Chapter 1
Introducing R: What It Is and How to Get It
What you will learn in this chapter:
- Discovering what R is
- How to get the R program
- How to install R on your computer
- How to start running the R program
- How to use the help system and find help from other sources
- How to get additional libraries of commands
R is more than just a program that does statistics. It is a sophisticated computer language and environment for statistical computing and graphics. R is available from the R-Project for Statistical Computing website (www.r-project.org), and following is some of its introductory material:
R is an open-source (GPL) statistical environment modeled after S and S-Plus. The S language was developed in the late 1980s at AT&T labs. The R project was started by Robert Gentleman and Ross Ihaka (hence the name, R) of the Statistics Department of the University of Auckland in 1995. It has quickly gained a widespread audience. It is currently maintained by the R core-development team, a hard-working, international team of volunteer developers. The R project webpage is the main site for information on R. At this site are directions for obtaining the software, accompanying packages, and other sources of documentation.
R is a powerful statistical program but it is first and foremost a programming language. Many routines have been written for R by people all over the world and made freely available from the R project website as “packages.” However, the basic installation (for Linux, Windows or Mac) contains a powerful set of tools for most purposes.
Because R is a computer language, it functions slightly differently from most of the programs that users are familiar with. You have to type in commands, which are evaluated by the program and then executed. This sounds a bit daunting to many users, but the R language is easy to pick up and a lot of help is available. It is possible to copy and paste in commands from other applications (for example: word processors, spreadsheets, or web browsers) and this facility is very useful, especially if you keep notes as you learn. Additionally, the Windows and Macintosh versions of R have a graphical user interface (GUI) that can help with some of the basic tasks.
R can deal with a huge variety of mathematical and statistical tasks, and many users find that the basic installation of the program does everything they need. However, many specialized routines have been written by other users and these libraries of additional tools are available from the R website. If you need to undertake a particular type of analysis, there is a very good chance that someone before you also wanted to do that very thing and has written a package that you can download to allow you to do it.
R is open source, which means that it is continually being reviewed and improved. R runs on most computers—installations are available for Windows, Macintosh, and Linux. It also has good interoperability, so if you work on one computer and switch to another you can take your work with you.
R handles complex statistical approaches as easily as more simple ones. Therefore once you know the basics of the R language, you can tackle complex analyses as easily as simple ones (as usual it is the interpretation of results that can be the really hard bit).
Getting the Hang of R
R is unlike most current computer programs in that you must type commands into the console window to carry out most tasks you require. Throughout the text, the use of these commands is illustrated, which is indeed the point of the book.
Where a command is illustrated in its basic form, you will see a fixed width font to mimic the R display like so:
help.start()When the use of a particular command is illustrated, you will see the user-typed input illustrated by beginning the lines with the > character, which mimics the cursor line in the R console window like so:
> data1 = c(3, 5, 7, 5, 3, 2, 6, 8, 5, 6, 9)Lines of text resulting from your actions are shown without the cursor character, once again mimicking the output that you would see from R itself:
> data1
 [1] 3 5 7 5 3 2 6 8 5 6 9
So, in the preceding example the first line was typed by the user and resulted in the output shown in the second line. Keep these conventions in mind as you are reading this chapter and they will come into play as soon as you have R installed and are ready to begin using it!
The R Website
The R website at www.r-project.org is a good place to visit to obtain the R program. It is also a good place to look for help items and general documentation as well as additional libraries of routines. If you use Windows or a Mac, you will need to visit the site to download the R program and install it. You can also find installation files for many Linux versions on the R website.
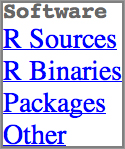
The R website is split into several parts; links to each section are on the main page of the site. The two most useful for beginners are the Documentation and Download sections.

In the Documentation section (see Figure 1-1) a Manuals link takes you to many documents contributed to the site by various users. Most of these are in HTML and PDF format. You can access these and a variety of help guides under Manuals ⇒ Contributed Documentation. These are especially useful for helping the new user to get started. Additionally, a large FAQ section takes you to a list that can help you find answers to many question you might have. There is also a Wiki, and although this is still a work in progress, it is a good place to look for information on installing R on Linux systems.
In the Downloads section you will find the links from which you can download R. The following section goes into more detail on how to do this.
Downloading and Installing R from CRAN
The Comprehensive R Archive Network (CRAN) is a network of websites that host the R program and that mirror the original R website. The benefit of having this network of websites is improved download speeds. For all intents and purposes, CRAN is the R website and holds downloads (including old versions of software) and documentation (e.g. manuals, FAQs). When you perform searches for R-related topics on the internet, adding CRAN (or R) to your search terms increases your results. To get started downloading R, you’ll want to perform the following steps:

The details for individual operating systems vary, so the following sections are split into instructions for each of Windows, Macintosh, and Linux.
Installing R on Your Windows Computer
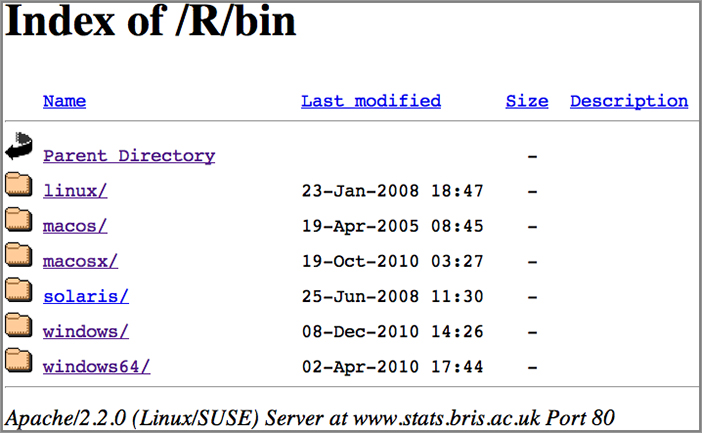
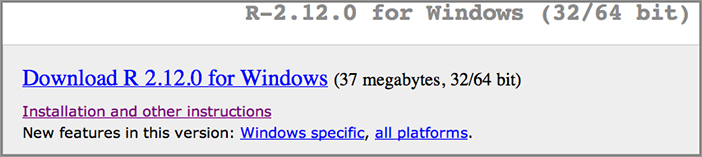
The install files for Windows come bundled in an .exe file, which you can download from the windows folder (refer to Figure 1-4). Downloading the .exe file is straightforward (see Figure 1-5), and you can install R simply by double-clicking the file once it is on your computer.
Run the installer with all the default settings and when it is done you will have R installed.
Versions of Windows post XP require some of additional steps to make R work properly. For Vista or later you need to alter the properties of the R program so that it runs with Administrator privileges. To do so, follow these steps:
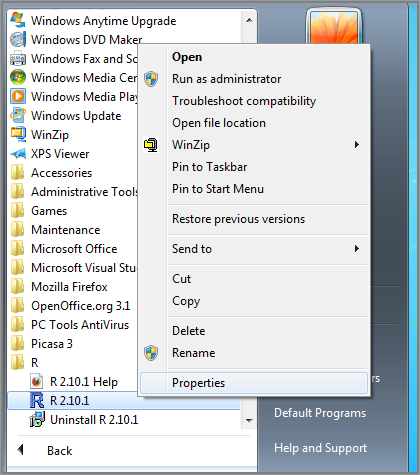
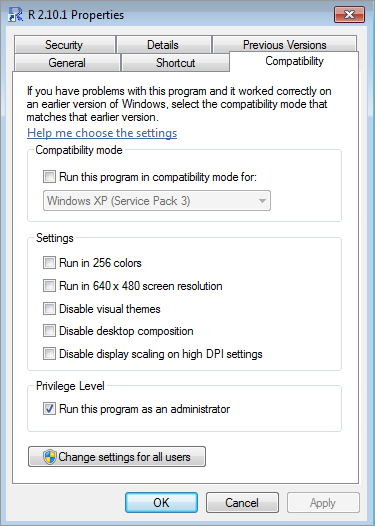
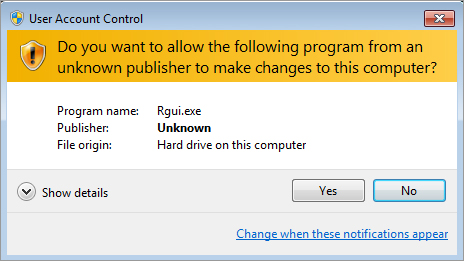
Now R is set to run with administrator access and will function correctly. This is important, as you see later. R will save your data items and a history of the commands you used to the disk and it cannot do this without the appropriate access level.
Installing R on Your Macintosh Computer
The install files for OS X come bundled in a DMG file, which you can download from the macosx folder (refer to Figure 1-4).
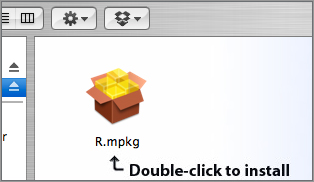
Once the file has downloaded it may open as a disk image or not (depending how your system is set up). Once the DMG file opens you can double-click the installer file and installation will proceed (see Figure 1-9). Installation is fairly simple and no special options are required. Once installed, you can run R from Applications and place it in the dock like any other program.
Installing R on Your Linux Computer
If you are using a Linux OS, R runs through the Terminal program. Downloadable install files are available for many Linux systems on the R website (see Figure 1-10). The website also contains instructions for installation on several versions of Linux. Many Linux systems also support a direct installation via the Terminal.
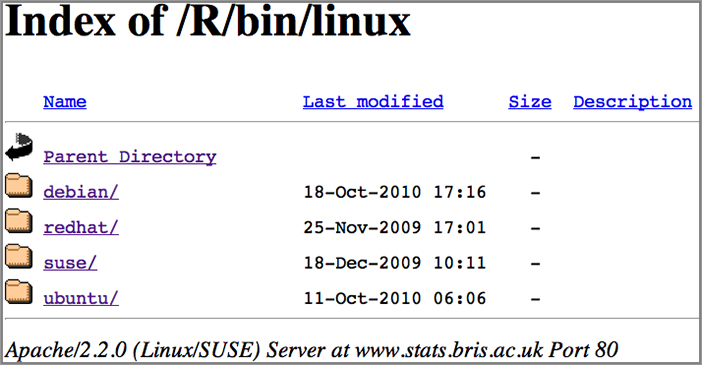
The major Linux systems allow you to install the R program directly from the Terminal, and R files are kept as part of their software repositories. These repositories are not always very up-to-date however, so if you want to install the very latest version of R, look on the CRAN website for instructions and an appropriate install file. The exact command to install direct from the Terminal varies slightly from system to system, but you will not go far wrong if you open the Terminal and type R into it. If R is not installed (the most likely scenario), the Terminal may well give you the command you need to get it (see Figure 1-11)!
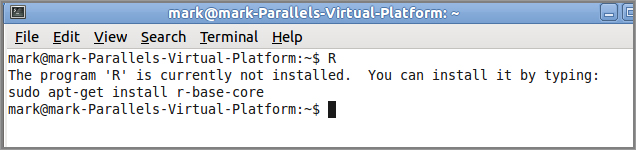
In general, a command along the following lines will usually do the trick:
sudo apt-get install r-base-coreIn Ubuntu 10.10, for example, this installs everything you need to get started. In other systems you may need two elements to install, like so:
sudo apt-get install r-base r-base-devThe basic R program and its components are built from the r-base part. For many purposes this is enough, but to gain access to additional libraries of routines the r-base-dev part is needed. Once you run these commands you will connect to the Internet and the appropriate files will be downloaded and installed.
Once R is installed it can be run through the Terminal program, which is found in the Accessories part of the Applications menu. In Linux there is no GUI, so all the commands must be typed into the Terminal window.
Running the R Program
Once R is installed you can run it in a variety of ways:
- In Windows the program works like any other—you may have a desktop shortcut, a quick launch icon, or simply get to it via the Start button and the regular program list.
- On a Macintosh the program is located in the Applications folder and you can drag this to the dock to create a launcher or create an alias in the usual manner.
- On Linux the program is launched via the Terminal program, which is located in the Accessories section of the Applications menu.
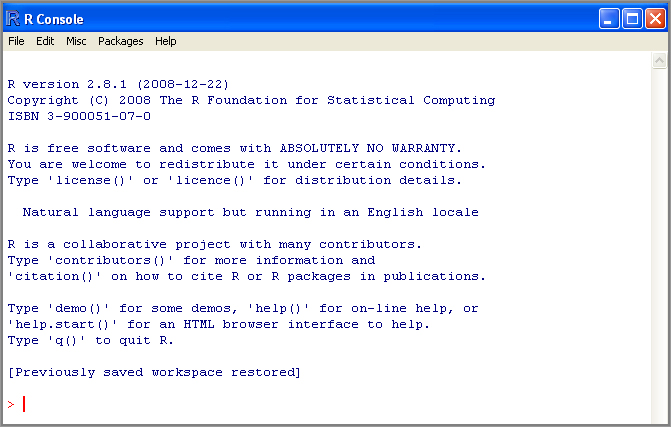
Once the R program starts up you are presented with the main input window and a short introductory message that appears a little different on each OS:
- In Windows a few menus are available at the top as shown in Figure 1-12.
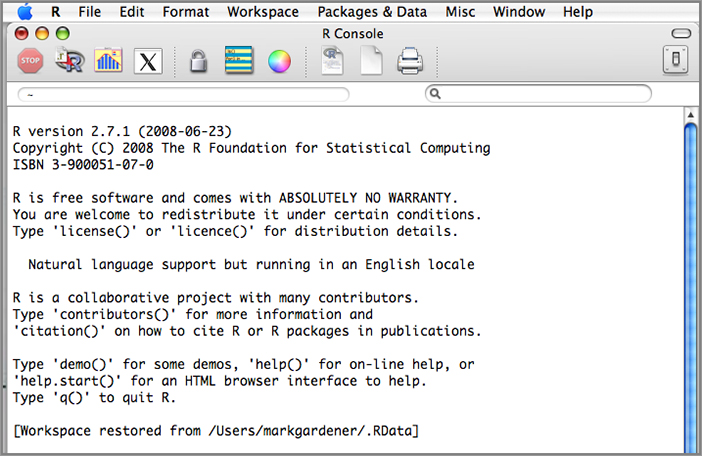
- On the Macintosh OS X, the welcome message is the same (see Figure 1-13). In this case you also have some menus available and they are broadly similar to those in the Windows version. You also see a few icons; these enable you to perform a few tasks but are not especially useful. Under these icons is a search box, which is useful as an alternative to typing in help commands (you look at getting help shortly).
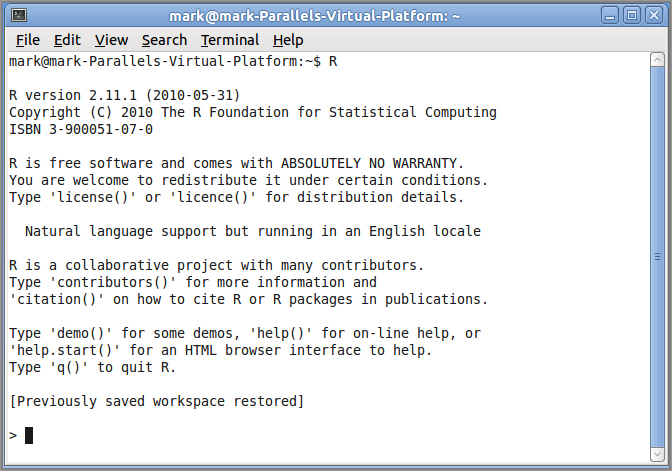
- In Linux systems there are no icons and the menu items you see relate to the Terminal program rather than R itself (see Figure 1-14).
R is a computer language, and like any other language you must learn the vocabulary and the grammar to make yourself understood and to carry out the tasks you want. Getting to know where help is available is a good starting point, and that is the subject of the next section.
Finding Your Way with R
Finding help when you are starting out can be a daunting prospect. A lot of material is available for help with R and tracking down the useful information can take a while. (Of course, this book is a good starting point!) In the following sections you see the most efficient ways to access some of the help that is available, including how to access additional libraries that you can use to deal with the tasks you have.
Getting Help via the CRAN Website and the Internet
The R website is a good place to find material that supports your learning of R. Under the Manuals link are several manuals available in HTML or as PDF. You’ll also find some useful beginner’s guides in the Contributed Documentation section. Different authors take different approaches, and you may find one suits you better than another. Try a few and see how you get on. Additionally, preferences will change as your command of the system develops. There is also a Wiki on the R website that is a good reference forum, which is continually updated.
The Help Command in R
R contains a lot of built-in help, and how this is displayed varies according to which OS you are using and the options (if any) that you set. The basic command to bring up help is:
help(topic)Simply replace topic with the name of the item you want help on. You can also save a bit of typing by prefacing the topic with a question mark, like so:
?topicYou can also access the help system via your web browser by typing:
help.start()This brings up the top-level index page where you can use the Search Engine & Keywords hyperlink to find what you need. This works for all the different operating systems. Of course, you need to know what command you are looking for to begin with. If you are not quite sure, you can use the following command:
apropos(‘partword’)This searches through the help files for matches to the word you typed, you replace ‘partword’ with the text you want to search for. Note that unlike the previous help() command you do need the quotes (single or double quotes are fine as long as they match).
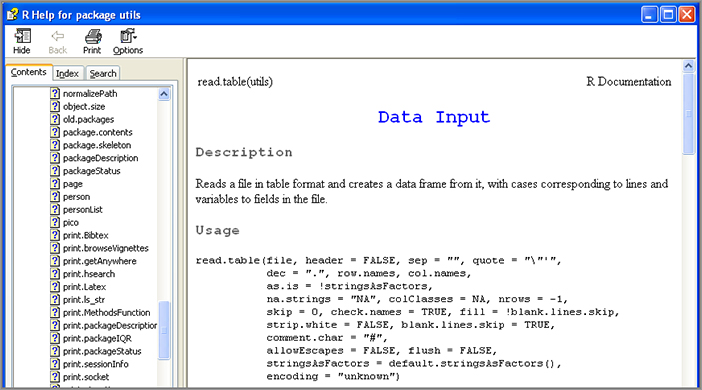
Help for Windows Users
The Windows default help generally works fine (see Figure 1-15), but the Index and Search tabs only work within the section you are in, and it is not possible to get to the top level in the search hierarchy. If you return to the main command window and type in another help command, a new window opens so it is not possible to scroll back through entries unless they are in the same section.
Once you are done with your help window, you can close it by clicking the red X button.
Help for Macintosh Users
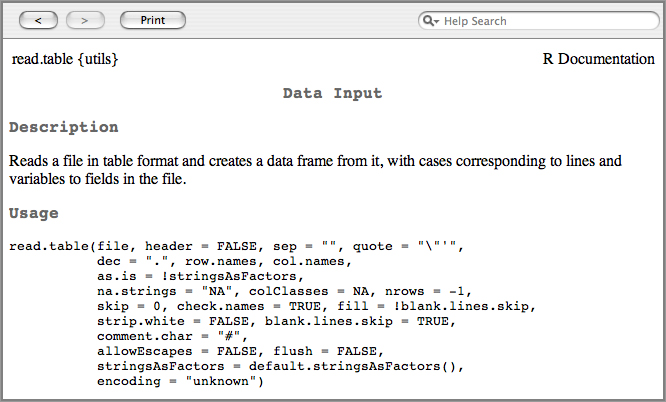
In OS X the default help appears in a separate window as HTML text (see Figure 1-16). The help window acts like a browser and you can use the arrow buttons to return to previous topics if you follow hyperlinks. You can also type search terms into the search box.
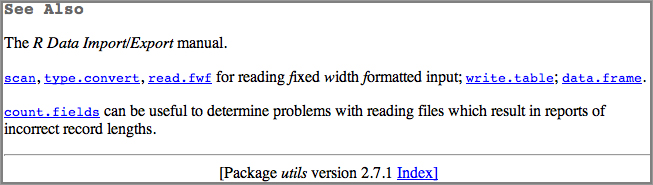
Scrolling to the foot of the help entry enables you to jump to the index for that section (Figure 1-17). Once at the index you can jump further up the hierarchy to reach other items.
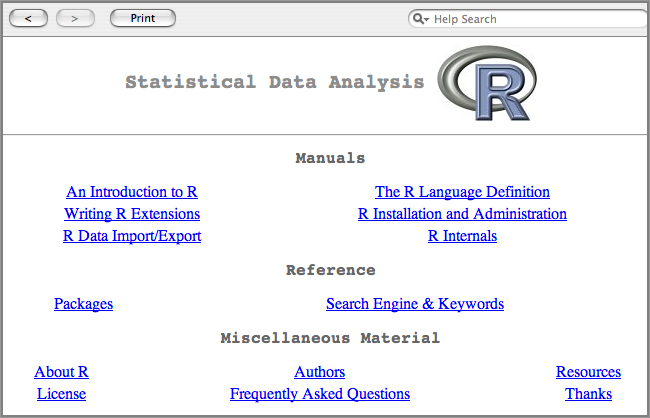
The top level you can reach is identical to the HTML version of the help that you get if you type the help.start() command (see Figure 1-18), except that it is in a dedicated help window rather than your browser.
Once you are finished you can close the window in the usual manner by clicking the red button. If you return to the main command window and type another help item, the original window alters to display the new help. You can return to the previous entries using the arrow buttons at the top of the help window.
Help for Linux Users
Help in Linux is displayed by default as plain text and appears in the Terminal window, temporarily blotting out what was displayed previously (see Figure 1-19).
Once the topic is displayed you can scroll down (and back up) using the down and up arrows. When you are finished, hit the Q key and return to the Terminal window.
Help For All Users
A good way to explore the help features of R however, and the way that is universal to all OS is to use the HTML version of the system. Although at this point you will not really know any R commands, it is a useful time to look at a specific command to illustrate the help feature. In this example you look at the mean() command. As you may guess, this determines the arithmetic mean of a set of numbers. Try the following:
help.start()Anatomy of a Help Item in R
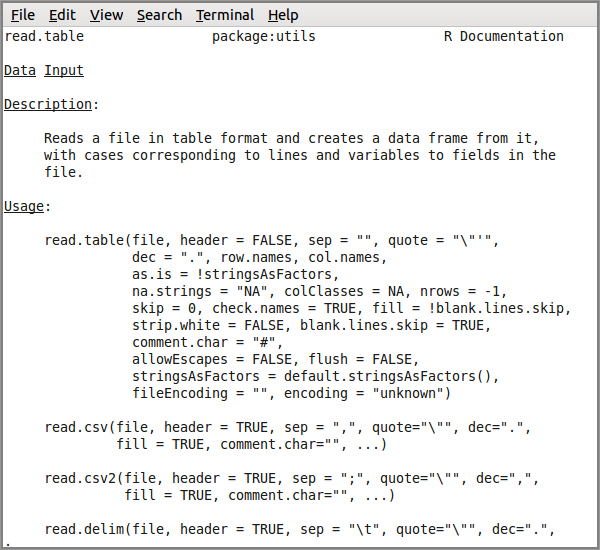
Knowing how to get the most out of the help files is very handy and a good way to learn more about R and how it works. Take a look at a specific example of a help window here using the mean() command again. You start by bringing up the help item for this command. You can type one of the following:
help(mean)
?mean
Alternatively, you might have used the HTML help and put this into the search box. In any event you will get a help entry that looks like Figure 1-20. The entry begins with the name of the command, followed by the name of the package in curly brackets where the command is found.

In Figure 1-20 you see mean{base}. This tells you that the mean() command is found in the base package. This entry becomes more useful when you come to use commands and routines that are not part of the standard installation of R, which you will look at shortly.
At the top of your help entry you also see a title and a brief description of what the command does. The next part tells you how to use the command in detail (see Figure 1-21) and the syntax (that is, how to write out the command). The syntax is important because you need to ensure that when you type something, R “knows” exactly what you want to do.
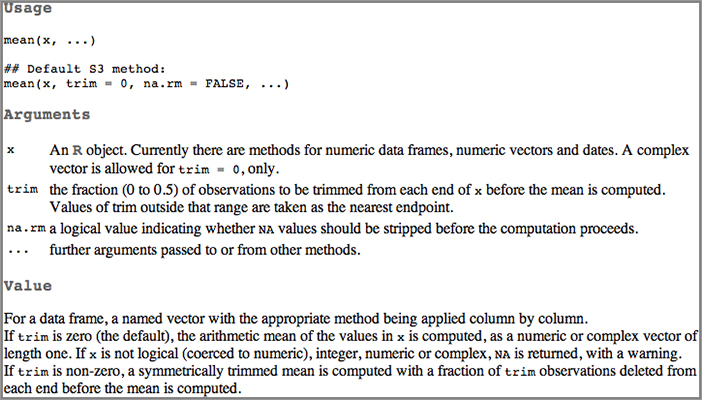
The help entry shows what arguments are required as part of the command (think of them as additional instructions) and gives a bit of explanation. The bottom part of a help entry typically gives some references (see Figure 1-22) and some other related commands. In Windows or Macintosh, these are hyperlinks so you can click them and jump to their help entries. In Linux the help is plain text so there are no hyperlinks. If, however, you used help.start() and brought up the HTML help system in your web browser, the hyperlinks do appear.
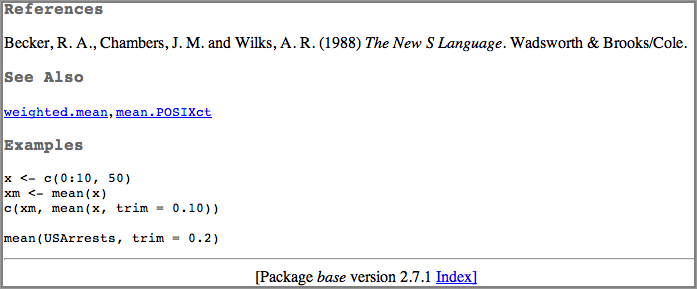
At the very end you see some examples of how to use the command “in action.” These examples can be copied to the clipboard and pasted into the main command console so you can see what they do. Sometimes these examples can be a bit tricky to interpret, but as you learn more about R you will be able to decipher how they work and what they do more easily. The example of the mean() command is simple, but even this might seem a bit daunting at this stage!
The first line of the examples in Figure 1-22 is creating a series of numbers so that you have something to make a mean of. Here R makes an item called x, which comprises the values 0 to 10 with a 50 at the end. The next line uses the mean command in its simplest form and generates a standard mean from the x item. The result is called xm. The third line takes the result of your mean (xm) and also makes a new mean using the trim argument. Try typing the commands from the example in the help entry yourself or copy and paste from R. The commands look like this:
> x <- c(0:10, 50)
> xm <- mean(x)
> c(xm, mean(x, trim = 0.10))
You should see two values as the result:
[1] 8.75 5.50The first (8.75) is the mean of the series of values and the second (5.50) is the trimmed mean, a way of knocking off extreme values.
The final example line takes a trimmed mean (a bit more trim, using a larger trim value of 0.2 rather than the 0.1 used before) of an example data set called USArrests. R contains a lot of built-in example data; these data are often used for examples and you can access them yourself quite easily. To see what the USArrests data looks like type:
USArrestsNote that R is case sensitive and that you need to type the name exactly as it appears here. By opening a simple help entry, reading through it carefully, and looking at the examples, you can learn a lot about how R works and what you are able to do with it.
Command Packages
The R program is built from a series of modules, called packages. These packages are libraries of commands that undertake various functions. When you first start R several packages are loaded on your computer and become ready for use. You can see what is available by using the search() command like so:
> search()
 [1] ".GlobalEnv"        "tools:RGUI"        "package:stats"     "package:graphics"
 [5] "package:grDevices" "package:utils"     "package:datasets"  "package:methods"
 [9] "Autoloads"         "package:base"
Here you can see, for example, no less than seven packages; these are loaded and start to carry out the most basic and important functions in R. Learning how to deal with these packages is useful, because you may want to add extra analytical routines to your installation of R to extend its capabilities.
Standard Command Packages
When you use the search() command you can see what packages are loaded and ready for use. You can see, for example, the graphics package, which carries out many of the routines required to create graphs.
Several other packages are ready-installed but not automatically loaded and immediately available. For example, the splines package contains routines for smoothing curves, but is not automatically loaded. To see what packages are available you can type:
installed.packages()The output can be quite long, especially if you have downloaded additional packages to your version of R. Running and manipulating packages is examined shortly, but first you should read the next section where you will consider additional packages and what they might do for you.
What Extra Packages Can Do for You
The basic installation of R provides a wealth of commands that carry out many of the tasks that you might need. However, it cannot do everything—there may well be occasions when you need to run a particular type of analysis and the commands you need are not available. Because of the way R is put together it is possible to create specialist libraries of commands that can be bolted on whenever required. Many such packages are available from the CRAN website.
If you need to conduct a particular analysis and find that the basic installation of R does not have appropriate commands available, there is every chance that someone before you has come across the same problem. The CRAN website contains more than 2,600 additional packages that are available to carry out many extra “things” that were not included in the basic installation of R.
You can see an entire list of these additional packages by going to the CRAN website and clicking the Packages hyperlink. There are a lot, so browsing by name is going to take quite a while. One way to see what types of thing are available is to use the CRAN Task Views link. This enables you to browse by topic and highlights the sorts of thing that you may want to do and shows the specific packages that are available. In this way you can target the types of package most relevant to your needs.
At time of writing 28 Task Views were available. The subjects are listed in Table 1-1.
Table 1-1: Task Views and Their Uses
| Title | Uses |
| Bayesian | Bayesian Inference |
| ChemPhys | Chemometrics and Computational Physics |
| ClinicalTrials | Clinical Trial Design, Monitoring, and Analysis |
| Cluster | Cluster Analysis & Finite Mixture Models |
| Distributions | Probability Distributions |
| Econometrics | Computational Econometrics |
| Environmetrics | Analysis of Ecological and Environmental Data |
| ExperimentalDesign | Design of Experiments (DoE) & Analysis of Experimental Data |
| Finance | Empirical Finance |
| Genetics | Statistical Genetics |
| Graphics | Graphic Displays & Dynamic Graphics & Graphic Devices & Visualization |
| gR | gRaphical Models in R |
| HighPerformanceComputing | High-Performance and Parallel Computing with R |
| MachineLearning | Machine Learning & Statistical Learning |
| MedicalImaging | Medical Image Analysis |
| Multivariate | Multivariate Statistics |
| NaturalLanguageProcessing | Natural Language Processing |
| OfficialStatistics | Official Statistics & Survey Methodology |
| Optimization | Optimization and Mathematical Programming |
| Pharmacokinetics | Analysis of Pharmacokinetic Data |
| Phylogenetics | Phylogenetics, Especially Comparative Methods |
| Psychometrics | Psychometric Models and Methods |
| ReproducibleResearch | Reproducible Research |
| Robust | Robust Statistical Methods |
| SocialSciences | Statistics for the Social Sciences |
| Spatial | Analysis of Spatial Data |
| Survival | Survival Analysis |
| TimeSeries | Time Series Analysis |
Alternatively, you can search the Internet for your topic and you will likely find quite a few hits that mention appropriate R packages.
How to Get Extra Packages of R Commands
The easiest way to get these packages installed is to do it from within R itself. Windows and Macintosh have menu items that will assist this process. In Linux you must type in a command directly. You can also use this command in Windows or Macintosh. The next few sections look at each OS in turn.
How to Install Extra Packages for Windows Users
In Windows you can use the Packages menu. You have several options, but Install Package(s) is the one you will want most often. After you have selected a local mirror site you are presented with a list of available binary packages from which you can choose the ones you require (see Figure 1-23).
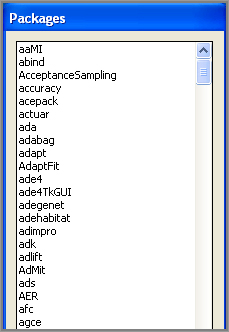
Once you have selected the packages you require, click OK at the bottom and the packages will be downloaded and installed directly into R.
If you have acquired package files directly from the Internet (usually as .zip), you can use the Install Package(s) from Local Zip Files option in the Packages menu. This allows you to select the files you want, and once again the packages are unzipped and installed right into R.
How to Install Extra Packages for Macintosh Users
In OS X navigate to the Packages & Data menu and select the Package Installer option. This brings up a window where you can select the package(s) that you want to install (see Figure 1-24). The window initially appears blank and you can click the Get List button to acquire the list from your selected source, which by default is the CRAN list of binary packages (those compiled and ready to go).
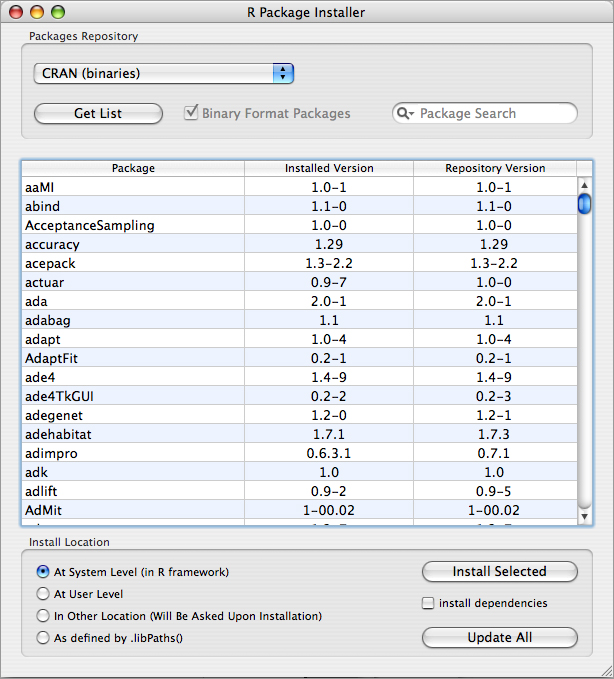
The next task is to select the package(s) you require and click the Install Selected button. (You can select multiple items using Cmd+click, Shift+click, and so on). It is simplest to locate the new packages in the default location (at the system level), where they are then available for all users. Once you click the Install Selected button, the selected packages are downloaded and installed into R.
It is also possible to download packages using your web browser and install the archive files. Usually the CRAN packages come as .tgz files. To manage the installation of these files, use the same window as before (refer to Figure 1-24) but this time alter the Packages Repository so that it reads Local Binary Package rather than the current CRAN (binaries). The page will remain blank because R will not know where to look for the file(s), so you need to click the Install button and then select the file(s) you require.
How to Install Extra Packages for Linux Users
In Linux systems there is no GUI and therefore no ready menu for you to use. You need to type a command into the console window to install any packages that you want. These commands will also work in Windows or Macintosh versions. You can view a list of available packages quite easily using the following command:
install.packages()Note that you end the command with parentheses. This command brings up a window allowing you to select your location and then displays the list of available packages from the CRAN system. You can select these packages by clicking each one you want. They remain selected until you click them again, as shown in Figure 1-25.
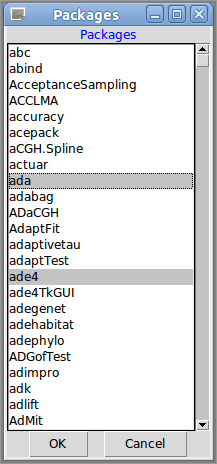
Once you have selected what you want, click OK and the packages are retrieved. Unlike Windows or OS X the packages are source files and are “built” once they are downloaded. For all practical purposes, when you click OK the packages are installed for you and are ready to use (you just have to wait while the packages are compiled and built).
If you know the name of a package you can install it directly by adding its name into the parentheses of the command like so:
install.packages(‘ade4’)This gets the ade4 package from the CRAN repository and downloads and installs it for you. Note that the name of the package you require must be in quotes; single or double quotes are fine as long as they are not mixed.
You can install many possible packages of commands. For example, try the following command:
install.packages(“gdata”)This starts the process of installing the gdata library to your computer. First you will be asked to select the local mirror site—select something near to your geographic location and the appropriate files will be downloaded and installed into your system. The gdata package provides various programming tools for data manipulation, you can find out more by typing help(gdata).
Running and Manipulating Packages
Once you have some packages installed you need to be able to access the new commands available in these packages. The packages are not automatically ready for use and you must load them to make the library of code routines available for use.
You can see which packages are loaded and running using the following command:
search()If you do this before you load any additional packages, you will see the core form of the R basic distribution. The following resulted from the search() command on a Mac OS X with R version 2.7.1 installed:
> search()
 [1] ".GlobalEnv"        "tools:RGUI"        "package:stats"
 [4] "package:graphics"  "package:grDevices" "package:utils"
 [7] "package:datasets"  "package:methods"   "Autoloads"
[10] "package:base"
You can see that the basic R program is actually comprised of several smaller units, no less than seven packages in this case. By default the new packages are not automatically ready for use but need to be loaded.
Loading Packages
It is simple to load packages as required. Start by issuing the following command:
library(package)The library() command retrieves the appropriate package and makes its contents available for you (think of it as adding to your library of available commands). Note that you do not need to put the package name in quotes. Most authors try hard to avoid using names for commands that exist in other packages. However, some duplication is unavoidable. If you load a library that contains a command with a duplicate name, you are given a brief message to this effect. The new command is the one that works and the older version is temporarily unavailable.
You can see what packages are installed using the following command:
installed.packages()If you have downloaded a lot of packages, this display can be quite extensive. As well as additional packages, the display lists the basic parts of the R distribution.
Windows-Specific Package Commands
In Windows you can see what packages are available to be used by selecting Load Package from the Packages menu. This brings up a simple list, from which you can select a package to load (see Figure 1-26).
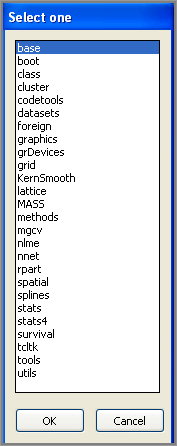
If you want to load a package, select one (or more) and click OK, otherwise you can simply use the list to view items you have downloaded and then click the Cancel button.
Macintosh-Specific Package Commands
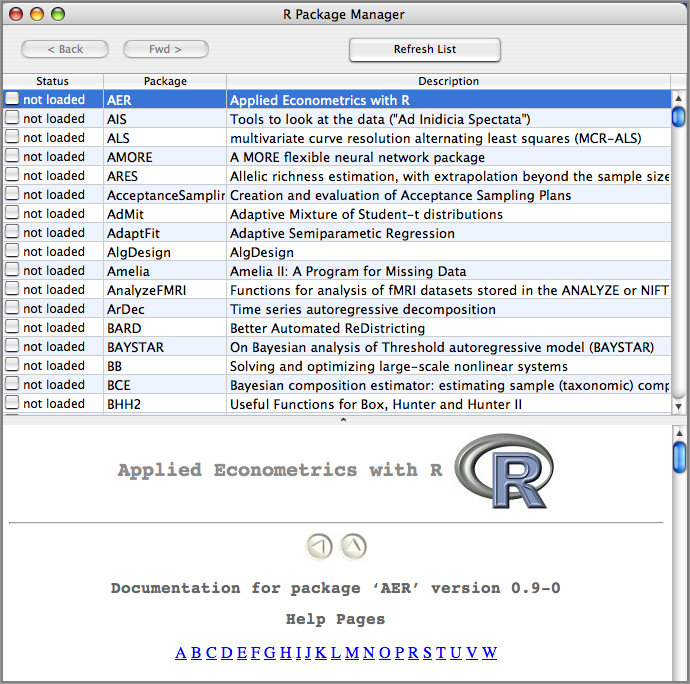
In Macintosh OS you can use the Package Manager option in the Packages & Data menu (see Figure 1-27). This brings up a window that lists all the packages downloaded and available for use.
If you click a package name you gain access to the help for that package, so you are able to explore the commands without loading the library. If you decide to load a particular package (or more than one), you can check the box in the Status column. You can also unload a package which is discussed in the next section.
Removing or Unloading Packages
If you have loaded some packages and want to remove one, perhaps to free up an overwritten command, you can use the detach() command like so:
detach(package:name)You simply replace the name part with the name of the package that you want to remove. Once removed, a package is not totally gone; you can still use the library() command to get it back when required.
Summary
- The Comprehensive R Archive Network (CRAN) is available via www.r-project.org. This is the place to get software and related documentation.
- You use R by typing commands into the console window.
- In Windows and Macintosh the GUI provides some additional menu items.
- R has an extensive help system, which you can access via the help() command. The help.start() command opens the help system in a web browser.
- Adding CRAN to a web search often brings up useful entries when searching for information.
- You can obtain many additional packages of commands and you can install these additional packages using the install.packages() command.
Exercises
You can find answers to these exercises in Appendix A.
What You Learned in this Chapter
| Topic | Key Points |
| Obtaining R | The website www.r-project.org is the home of the Comprehensive R Archive Network (CRAN) and is the source of software and documentation. |
| Installing R | The R website contains specific installers for the main operating systems. In Linux, R can often be installed from the command line in the Terminal. |
| Running R | R is driven by typing commands into the console window. Windows and Macintosh operating systems have additional menus. In Linux, R is driven via the Terminal and there are no menus. |
| The Help System | R contains extensive documentation, which can be accessed by various commands. |
| help(command)?command | Brings up a help entry for the specified command. |
| help.start() | Opens the help system in the system default browser. |
| apropos(“partword”) | Shows all the commands that contain the “partword”. |
| Additional packages of R commands | R is built from various modules called packages. Additional packages provide extra commands for specific purposes. These packages are found on the website and can be managed using various commands. In Windows and Macintosh the GUI also has menus that help with package management. |
| install.packages(“pkg”) | Installs a library (package) of commands from the CRAN website. |
| installed.packages() | Shows a list of the packages that are installed. |
| library(pkg) | Loads a package of commands, making them available for use (the package must already be installed). |
| search() | Shows a list of packages (and other objects) that are loaded and available for use. |
| detach(package:name) | Makes a package unavailable for use. Replace name with the package name to be detached. The named package will now not show up when the search() command is used. |