The word robotics can mean a lot of things. For some people, it is anything that moves by itself; kinetic art is robotics. To other people, robotics means something that is mobile or something that can move itself from place to place. There is actually a field called mobile robotics ; automatic vacuum cleaners, such as a Roomba or a Neato, fall into this category. To me robotics falls somewhere in between kinetic art and mobile robotics.
A robot is technology that applies logic to perform a task in an automated manner. This is a fairly broad definition, but robotics is a fairly broad field. It can cover everything from a child’s toy to the automatic parallel parking capabilities in some automobiles. We build a small mobile robot in this book.
Many of the principals that you are exposed to in this book are easily transferable to other areas. In fact, we will go through the entire process of building a robot from beginning to end. A little later in this chapter, I go over the project that we will build. At that time, I will provide a list of the parts used in in this book. These parts include sensors, drivers, motors, and so forth. You are welcome to use whatever you have on hand because, for the most part, everything we go through in this book can be applied to other projects.
Robotics Basics
The ability to gather data
The ability to process, or do something with the gathered data
The ability to interact with the environment
In the following chapters, we apply this principal to build a small mobile robot. We will use ultrasonic rangefinders and infrared sensors to gather data about the environment. Specifically, we will identify when there is an object to be avoided, when we are about to drive off the edge of a table, and the contrast between the table and the line that we will follow. Once we have this data, we will apply logic to determine the appropriate response.
We will use Python in a Linux environment to process the information and send commands to our motors. I chose Python as the programming language because it is easy to learn, and you don’t have to have a complex development environment to build some pretty complex applications.
Our interaction with the environment will be simply to control the speed and direction of motors. This will allow our robot to move about freely on the table or floor. There really isn’t much to driving a motor. We will look at two ways of doing it: with a motor driver made for the Raspberry Pi and with a common motor controller.
This book is intended to be challenging. I cover some pretty complex material and I do it quickly. There is no way that I can provide detailed coverage on any of these topics, but I hope to get you to a functional robot by the end of the book. In each chapter, I try to provide you with more resources to follow up on the topics discussed. You will struggle at times; I did and I frequently still do.
Not everyone will be interested in all the subjects. The expectation is that you will expand on the areas that interest you the most outside of this book. Persistence pays off.
At the end of the book, I add a little more challenge. In Chapter 9, we begin leveraging the real power of the Raspberry Pi. We look at computer vision. Specifically, we look at an open source package called OpenCV (CV stands for computer vision). It is a common and very powerful collection of utilities that make working with images and video streams very easy. It’s also a six-hour build on the most recent version of the Raspberry Pi. To make things a little easier and a lot less time-consuming, I have available for download a version of the operating system with OpenCV already installed. I discuss this more in Chapter 2.
Linux and Robotics
Linux is a Unix-based operating system. It is very popular with programmers and computer scientists because it’s simple and straightforward. They seem to enjoy the text-based interface of the terminal. Yet, for many others, including me, Linux can be very challenging. So, why in the world would I choose this environment for an introduction-to-robotics book? The answer to that question is threefold.
First, when you work with robotics, you eventually have to confront Linux. That’s just a fact. You can do a lot without ever typing a single sudo command, but you will have limited capabilities. The sudo command stands for super user do in Linux. This tells the operating system that you are about to perform a protected function that requires more than general user access. You will learn more about this when we begin working with the Raspberry Pi.
Second, Linux is challenging. As I stated before, this book will challenge you. If you have worked in Linux before, then this reason doesn’t apply to you. However, if you are new to Linux, the Raspberry Pi, or working in a command line, then some of the things that we do will be challenging. And that’s good. You’re learning something new and it should be a challenge.
Third, and this is by far the most important, the Raspberry Pi uses Linux . Yes, you can install other operating systems on the Pi, but it was designed and intended to use Linux. In fact, the Raspberry Pi has its own flavor of Linux called Raspbian . This is the recommended operating system, so it is what we’ll use. One of the nice things about using a prebuilt operating system, besides its ease of use, is many of the tools are already installed and ready to go.
Since we are using Linux, we will use command-line instructions extensively. This is where most new users have problems. Command-line code is entered via a terminal. Raspbian has a Windows-style interface that we will use, but much of it uses the terminal. A terminal window is available in the graphical user interface (GUI) , so we will use that. However, when we set up the Pi, we will set it up to boot into terminal mode by default. Getting to the GUI is only a simple startx command. All of this is covered in Chapter 2.
Sensors and GPIO
GPIO stands for general-purpose input/output. It represents all the various connections to devices. The Raspberry Pi has a lot of GPIO options: HDMI, USB, audio, and so forth. However, when I talk about GPIO in this book, I’m generally referring to the 40-pin GPIO header. This header provides direct access to most of the board’s functionality. I discuss this in Chapter 2.
Arduino also has GPIO. In fact, one could argue that Arduino is all GPIO and nothing else. This isn’t far from the truth given that all the other connections are there to allow you to communicate with and power the AVR chip at the heart of the Arduino.
All of these headers and GPIO connections are there so we can access sensors outside the boards themselves. A sensor is a device that gathers data. There are many different types of sensors, and all serve a purpose. Sensors can be used for detecting light levels, the range to an object, temperature, speed, and so forth. In particular, we will use GPIO headers with an ultrasonic rangefinder and an IR detector.
Motion and Control
One thing that most definitions of a robot have in common is that it needs to be able to move. Sure, you can have a robot that doesn’t actually move, but this type of device generally falls under the moniker of IoT, the Internet of Things.
There are many ways to add motion to your project. The most common is the use of motors. But you can also use solenoids, air, or water pressure. I discuss motors more in Chapter 6.
Although it is possible to drive a motor directly off a Raspberry Pi or an Arduino board, it is strongly discouraged. Motors tend to draw more current than the processors on the boards can handle. Instead, it is recommended that you use a motor controller. Like motors, motor controllers come in many forms. The motor control board that we will use is accessed through the Raspberry Pi’s header. I also discuss how to drive motors with an L298N dual motor controller.
Raspberry Pi and Arduino
Raspberry Pi 3 B+

Arduino Uno
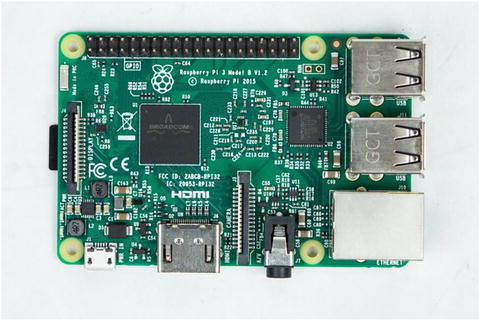
The Raspberry Pi is a single board computer that is about the size of a credit card. Despite its small size, it is a very capable device. The Pi runs a version of Linux that was customized to work on the ARM processor that drives it. This puts a lot of functionality into a small device that is easy to embed into things like robots. But, although it is a great computer, there are a few places where it does not excel. One area is interfacing with external devices. It can work with sensors and external devices, but the Arduino does this much better.
Arduino is another small processing device that is readily available and easy to use. Unlike a Raspberry Pi, however, it does not have the capacity for a full operating system. Rather than running a microprocessor like the ARM, it uses a different type of chip called a microcontroller . The difference is that a microcontroller is specifically designed to interact with sensors, motors, lights, and all kinds of devices. It directly interacts with these external devices. The Pi works through many layers of processing before it ever reaches the pins that a device is connected to.
By combining the Raspberry Pi and the Arduino, we are able to leverage what each does best. The Raspberry Pi offers the high-level processing power of a full computer. Arduino provides the raw control over external devices. The Pi allows us to process a video stream from a simple USB camera; whereas the Arduino allows us to gather the information from the various sensors, and apply logic to make sense of all that data, and then return concise findings to the Pi.
You will learn more about the Raspberry Pi in Chapter 2. Later on, you will connect an Arduino to the Pi and learn about programming it, as well as how to pass information back and forth between the Arduino and the Pi.
Project Overview
In this book, we will build a small mobile robot. The robot is designed to demonstrate the lessons that you learn in each chapter. However, before we can actually build the robot, we need to cover a lot of material and lay the foundation for future lessons.
The Robot

The front of our robot shows the ultrasonic sensors and Pi T Cobbler on a breadboard
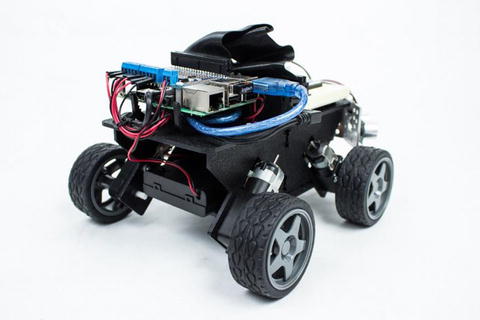
The back of our robot shows the Raspberry Pi and motor control board
Although I provide a list of the parts that I used for the project, you are welcome to use whatever parts you wish. The important thing is that they behave in a similar manner as those I have listed.
Bill of Materials (BOM)
For the most part, I tried to keep the list of materials as generic as possible. There are a couple of items that are vendor specific. I chose them because they provide a lot of functionality and convenience. The DC & Stepper motor controller and the Pi T-Cobbler are from an online retailer called Adafruit , which is a great resource for parts, tutorials, and inspiration. The chassis kit is from an online retailer called ServoCity , which produces many mechanical parts for robotics.
Runt Rover Junior robot chassis from ServoCity.com
Adafruit DC & Stepper Motor HAT for Raspberry Pi – Mini Kit PID: 2348
GPIO Stacking Header for Pi A+/B+/Pi 2/Pi 3 – Extra-long 2×20 Pins PID: 2223 (allows the use of additional plates and the Cobbler to attach to the breadboard)
Assembled Pi T-Cobbler Plus – GPIO Breakout – Pi A+, B+, Pi 2, Pi 3, Zero PID: 2028
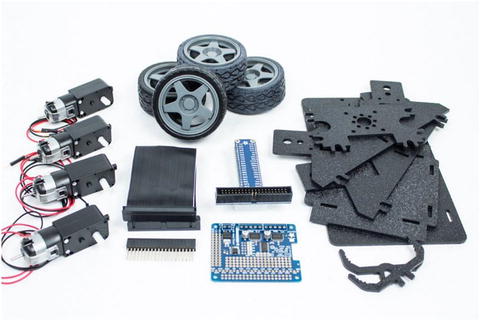
Runt Rover chassis parts and the Pi T Cobbler, ribbon cable, motor control hat, and extended header
Raspberry Pi 3 – Model B – ARMv8 with 1G RAM
Arduino Uno
4 × AA battery holder with on/off switch (powers the motors)
USB Battery Pack – 2200 mAh Capacity – 5V 1A Output PID: 1959 (powers the Raspberry Pi)
Half-size breadboard
Ultrasonic sensors – HC-SR04
You may want to get a few of these. As you will discover, ultrasonic sensors are unreliable at angles, and it is good to have an array of them. I use at least three on most of my projects.
A collection of jumper wires (see Figure 1-7)
You need both male-to-male jumpers and male-to-female jumpers. It is a good idea to get them in a number of colors. Black and red are used for powering your devices. A collection of other colors helps you make sense of your circuits. Fortunately, you can get jumpers of all types made out of a multicolored ribbon cable.
USB cables for your Arduino
A micro USB cable for your Raspberry Pi
A common USB phone charger, preferably one for a modern smartphone or tablet that can provide 2 amps of power
An HDMI TV or computer monitor
Most computer monitors do not have HDMI ports on them. You can get HDMI-to-DVI converters that allow you to use your existing monitor, however.
A USB keyboard and mouse (I like the Logitech K400 wireless keyboard and touchpad combination, but there are countless options out there)
A network-connected computer
- Wi-Fi or Ethernet cable for the Pi
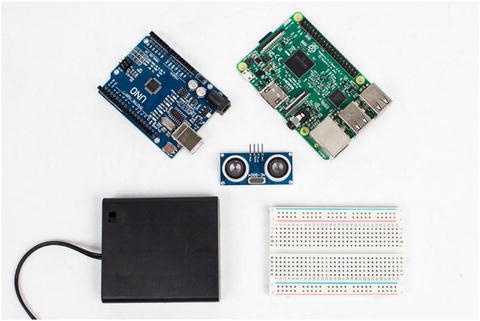 Figure 1-6
Common parts: Raspberry Pi, Arduino Uno, ultrasonic sensor, battery holder, and breadboard
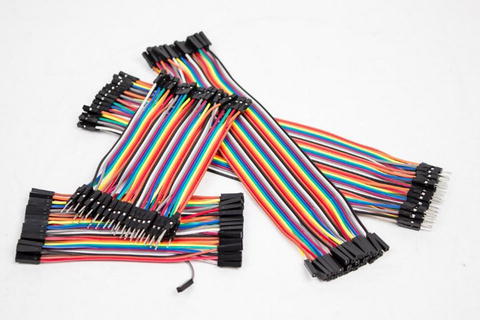 Figure 1-7
Jumpers in ribbon cable form. Pull off what you need
You don’t need to get fancy with the monitor and keyboard. Once you read Chapter 2, where we install and configure the Raspberry Pi , you no longer need them. I have a couple of the wireless keyboards because I usually have several projects going at once. For a monitor, I simply use one of my computer monitors with an HDMI-to-DVI adapter.
Hobby gearmotor – 200 RPM (pair)
Wheel – 65mm (rubber tire, pair)

DC geared motor and wheels

The L298N dual motor controller module comes in numerous varieties, but essentially work the same
There are a few other supplies that I keep around because they are used in virtually every project . In Chapter 7, we assemble the robot; you’ll need also double-sided foam mounting tape, 4-inch zip ties, and self-adhesive Velcro. As you continue in robotics, you’ll find yourself turning to these items a lot. In fact, you may want to stock up on various sizes of zip ties. Trust me.
Summary
Getting started in robotics does not need to be difficult. It is challenging, however. This book is an introduction to a few of the skills that you need to develop if you are to succeed in this field. The robot that we build introduces you to the Raspberry Pi, Linux, Arduino, sensors, and computer vision. These skills easily scale into larger robot and other similar projects.