The purpose of this book is to challenge you to build a simple robot that is expanded over time. It is intended to be difficult. It is intended to provide a hands-on experience to help you past the most difficult part of learning robotics: being intimidated by the technology. I’m going to teach you some of the basics of robotics the same way that I learned how to swim—by being thrown in to the deep end while someone more experienced watches over to make sure that you don’t drown.
So with that, I expect you to take what you experience and add to it through your own learning. I’ll get you going in the right direction, but there’s not going to be a lot of handholding. You have to fill in the gaps and learn some of the details—especially some of those for specific application—on your own.
This introduction to Python is no different. I am going to show you how to install the tools, use the editor, and write some simple programs. We are going to move quickly through program structure, syntax and formatting issues, data types, and variables, and right into control structures and some of the object-oriented aspects of Python. Don’t worry if any of this sounds like techno-babble, you’ll understand it before the end of this chapter.
At the end of the chapter, I don’t expect you to be able to write your own programs. What I do expect is for you to know how to write code, to use and be comfortable with the editor, and to compile and execute programs. Most importantly, you should be able to look at someone else’s code and be able to read it, have a basic understanding of what they are trying to do, and identify the building blocks. Dissecting other peoples’ code is important to learning quickly. One premise of this book is to not reinvent the wheel. Most of what you’re going to do has been done before, and it can be found if you do a little searching. Being able to read and understand what you find will help you reach your goals.
Community support for Python is excellent. The Python website is an invaluable source for learning and growing in Python. In particular, be sure to check out the beginner’s page at www.python.org/about/gettingstarted/ . We actually start here in the next section.
Get yourself a good book or two on Python. This book gets you started, but there is a lot of detail that won’t be covered. Look for books on design patterns in Python and different ways to build algorithms to make your code as efficient as possible. Find books that go in depth about your application.
Don’t think you have to learn Python, or any of the other topics in this book, on your own. There is an immense community out there. Find local meetups, clubs, and classes. Find your local hackerspace. I guarantee that you’ll find someone there that is able to help you.
Python Overview
Python is a high-level programming language created by Guido van Rossum in the late 1980s. It has become a very popular general-purpose language because it’s flexible, and relatively easy to learn and code. In many ways, Python is a very forgiving language, which lends to its ease of use. As you’ll see later in this chapter, Python manages data in a manner that is very intuitive for people new to programming. As such, it is a very popular tool for teaching programming fundamentals. The peculiar way in which it uses variables to manage large data sets has also made it very popular in the growing field of data science. Data scientists can import volumes of data and perform operations on data sets with very little code. Of course, Python has peculiarities that we explore more in depth as we work through this chapter.
Downloading and Installing Python
First, let’s discuss a little something about versions. There are essentially two flavors of Python: Python 2.7 and Python 3. In Python 3, creator Guido van Rossum decided to clean up the code without putting a lot of emphasis on backward compatibility; therefore, some of the code for version 2.7 simply won’t work in version 3 and vice versa. Python 3 is the current version and everything will eventually move over to it. In fact, at this point, most everything has. In terms of robotics , the big holdout was OpenCV, an open source library of computer vision functions, which we’ll use in Chapter 9. There are others that haven’t fully migrated yet either, so you’ll need to figure out what you want to do and if the packages you need have been ported over. We will use Python 2.7 for our project because many of the examples that you will find in your own research are in 2.7.
If you are using an Ubuntu or Debian Linux system, such as the Raspberry Pi, you’re done. The Python tools are already installed and ready to go. Most Debian-based distributions install Python as part of the basic image.
- 1.
Navigate to www.python.org/about/gettingstarted/ .
- 2.
Click Downloads.
- 3.
If you are using Windows, click Download Python 2.7.13.
- 4.
If you’re using another OS, select it from the list under Looking for Python with a different OS? This takes you to the appropriate download link.
- 5.
If you want to use an older release of Python (for some bizarre reason), you’ll find the appropriate links by scrolling down the page.
- 6.
Once it’s downloaded, run the installer and follow the directions on the screen.
Python Tools
There are numerous tools to support your Python development. Like most programming languages, the code is simply text that can be written with any text editor. You can write Python code with Notepad on your Windows machine. I wouldn’t recommend it, but you can do it. Applications like Notepad++ recognize a Python script based on the file extension and then highlight the code accordingly.
Your options are quite extensive. However, for our exercises, we’ll use the native tools that come with every installation of Python: the Python shell and the Python editor .
The Python Shell

The IDLE Python shell
Simple editing features, such as find, copy, and paste
Syntax highlighting
A text editor with syntax highlighting
A debugger with stepping and breakpoints
Since we’ll use this interface a lot throughout the book, it would be prudent to learn more about the IDLE interface and the many tools that it provides. You can start at the IDLE documentation page at https://docs.python.org/3/library/idle.html .
The Python Editor

The IDLE file editor
As you’ll learn later, formatting is very important in Python . With other languages, such as C and Java, white space is irrelevant to the compiler. Spaces, tabs, new lines, and blank lines make the code more readable for people. In Python, however, indentation denotes code blocks. IDLE manages all of this for you. It automatically indents your code, reducing the likelihood of syntax errors due to improper indentation.
There are also several tools to help you with your code. For instance, as you type, IDLE presents a list of possible statements appropriate for where you are in a line. There are a few ways to invoke this feature . Many times, it automatically pops open while you are typing. This generally happens while you are inside a function call and there are only a limited number of possibilities. You can also force it open by hitting Ctrl-space while typing. When you do this, you see a list of possible statements to choose from. When you select one of these statements, it completes the word for you and presents you with other options if they are available, such as any appropriate parameters. These are called calltips.
Calltips display the expected values for an accessible function and open when you type "(" after the function name. It displays the function signature and the first line of the docstring. It remains open until the cursor is moved outside the function or the closing ")" is typed.
Context highlighting is done through colors. As you type your code, some of the words change color. The colors have meaning and are a quick, visual way to verify that you are on the right track. The contexts highlighted in this way are output, errors, user output and Python keywords, built-in class and function names, names following class and def, strings, and comments.
- 1.
Open IDLE.
- 2.
Click File ➤ New File. This opens a new text editor window.
- 3.
Type pr.
- 4.
Press Ctrl-space. This displays the completion list with the word print highlighted.
- 5.
Type (.
This does a few things. It selects the highlighted text. In this case print. It also displays the calltip for the print function .
- 6.
Type "Hello World".
- 7.
The calltip closes after you type the closing ).
- 8.
Press Enter.
- 9.
Save this file as hello_world.py.
- 10.
Press F5 or select Run ➤ Run Module from the menu.
In the Python shell window, you should see something like this:
If you see this, then your code was successful. If you received an error of some sort, go back to make sure that your code looks like this:
Oh, by the way, you just wrote and ran your first Python program. When compared to other languages, you’ll notice Python’s simplicity. Often, a few lines of a Python operation would take several more lines in C, C++, or Java .
The Zen of Python
- 1.
Open IDLE.
- 2.
Type import this and press Enter.
- 3.
It should display the text shown in Figure 3-3 (but do it anyway).
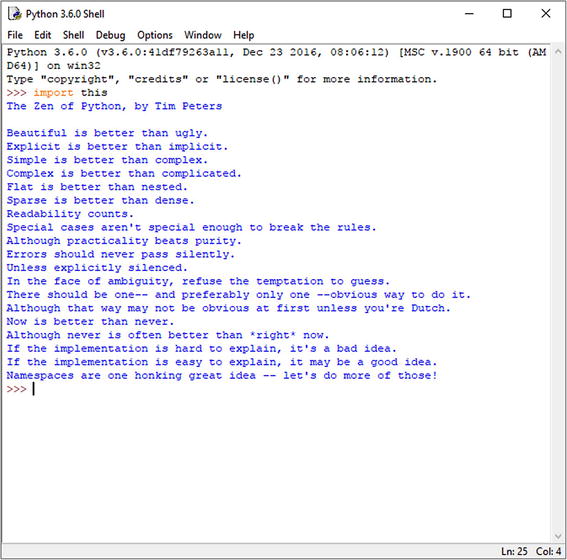
The Zen of Python
Writing and Running a Python Program
If you’re following along as you should, then you’ve just written and run your first Python program. If you’re not following along, don’t worry, we’ll do it again right now but with a little more programming.
Hello World
- 1.
Open hello_world.py.
- 2.
If you’re one of those rebels I mentioned earlier, open IDLE.
- 3.
Click File ➤ New File.
- 4.
Save this file as hello_world.py.
Now we’re all on the same page…
- 5.
Make the program look like this:
message = "Hello World"print(message) - 6.
Save the file.
- 7.
Press F5 or select Run ➤ Run Module from the menu.
You should see the same output as before:
All we did here was move the text from the print function into a variable, and then told Python to print the contents of that variable. I’ll cover variables shortly.
Basic Structure
Before we begin looking at program specifics, we need to be familiar with the structure of a Python program. We’ll take a look at the different parts of a program, how the program is formated using indentation, and how you will add meaningful context using comments.
Program Parts
As you’ve seen, there aren’t many required parts for a Python program. Most programing languages require you to create, at the very least, a main function of some sort. For the Arduino it is the loop() function. In C++, it is main(). Python does not have that. It jumps right into executing whatever commands it finds as it steps through the file. However, this does not mean that it’s entirely linear. I discuss functions and classes later in the workshop, but just know that the interpreter scans through the file and builds whatever functions and classes it finds before executing the other commands. This is one of the things that make Python so easy to learn. It simply doesn’t have quite as rigid of framework as you would find in most other languages.
Oh, and for you programming language purists, Python walks the line between a scripting language, where everything is executed through the interpreter, and a programming language . Some of the code is compiled into executables like C and C++. In fact, as we start to build modules, this is exactly what happens. However, in this book, we usually run it through the interpreter.
Indentation
As we work through the workshop, our programs become more complex. In particular, we’re going to start working with code blocks, which are commands that are grouped together to execute in a function or a loop, or as part of a condition. This kind of structure is critical to writing effective programs.
All programming languages have syntax for formatting code blocks. C-based languages, including Java, use curly brackets {} to contain a code block. Python does not do this. Python uses indentation. Blocks of code are indented to indicate that they are a related block. If a line in a block is not properly indented, you’ll get an error. This is one of the key reasons that we use IDLE. It automatically manages indentations . That doesn’t mean that you, as a user, can’t botch the program; it just means this type of error is greatly reduced.
As we progress through the workshop, you’ll see the importance of indentation. In the meantime, just know it’s important.
Finally, I want to make a brief note about indentation and editors. Text editors use different forms of indentation . Some use tab characters while others use two or four spaces. You are not able to see what is being used because these are invisible characters. This causes no end of frustration when you move from one editor to another. The better editors allow you to choose how you want the tab key to work (with a tab character or with a number of spaces, usually four). By default, IDLE uses four spaces.
Comments
Commenting code has become more important over time. It is an area where programmers are notoriously deficient. They use comments , but they are frequently cryptic or make assumptions about knowledge of the program that may not hold true for someone who picks up the code later. This would be less of an issue if they were any better about other forms of documentation. But, alas, they are not.
My lamentations aside, commenting is important, especially as you’re learning. So, get into the habit of using comments. Use them to explain what you’re doing or to enter small notes regarding logic.
A comment in Python is any line that begins with #. Python ignores everything following the # to the end of the line; for example:
In the preceding code, I added two comment lines to our hello_world.py program . I also added a blank line to help make the code a little easier to read. If you were to save and run this program, you would get exactly the same output that you did before.
You can also create a comment block using triple quotation marks, """. The Python compiler ignores any code between sets of these marks. You open and close the block with them. This allows you to write as much information as you’d like over multiple lines. This notation is frequently used for title blocks at the beginning of a file.
It is a good habit to simply outline your code with comments before you write it. Before you start writing, think about what you need your code to do and how you will go about doing it. Create a flow chart or simply write down the steps that you will take to accomplish your goal. Then translate this into a series of comments in your file before you write any actual code. This helps you structure the problem in your mind and improves your overall flow. If you identify a step that you are repeating, you likely have a candidate for a function. If you find that you are referencing a structured concept (like robot) that you want to imbue with special properties and functionality, you’ve got a class. Later, I discuss functions and classes in further detail.
Running a Program
As you saw earlier, there are a few ways to run a Python program .
From IDLE, you can simply press F5. You’ll need to make sure that the file is saved first, but this runs your file. If the file is not saved, you are prompted to do so. It is the same as selecting Run ➤ Run Module from the menu bar.
If your system is properly configured to run Python from the command line, you can execute a program from there, as well. You’ll need to either navigate to the location of the file or have the full file location in the call. To execute a Python script from the command line, you type python followed by the file to be run.
All three of these commands would run our Hello World program, although two of them are operating system specific. The first command assumes that you are executing the file from within the directory it is stored. The second command runs the program in Windows, assuming it is saved within a folder called exercises on the root of the C: drive. The third command runs the program on a Linux machine, assuming the file is saved in a file called exercises in your home directory .
Programming in Python
In the next few sections, we use the Python shell and enter commands directly. A little later, we get back to writing program files. But, for now, everything we’re doing can be demonstrated in the shell window.
Variables
Variables are essentially a convenient container for storing information. In Python, variables are very flexible. You don’t need to declare a type. The type is generally determined when you assign a value to it. In fact, you declare a variable by assigning a value to it. This is important to remember when you start with numbers. In Python, there is a difference between 1 and 1.0. The first number is an integer and the second number is a float. More on that shortly.
They can only contain letters, numbers, and underscores
They are case sensitive; for example, variable is not the same as Variable. That’s going to bite you later.
Don’t use Python keywords
Make the variable name meaningful with as few characters as possible
Be careful when using lowercase L and uppercase O. These characters look very similar to 1 and 0, which can lead to confusion. I’m not saying don’t use them; just make sure that it’s clear what you’re doing. It is strongly discouraged to use them as single-character variable names.
Data Types
Python is a dynamically typed language. This means that the type of data stored in a variable is not checked until the program is being executed, not while it is being compiled. This allows you to postpone assigning a type until a value is assigned. However, Python is also strongly typed, and it will fail if you try to perform an operation that is not valid for that data type. For instance, you cannot perform mathematical operations on a variable containing a string. As such, it is important to keep track of what type of data your variable references.
I’m going to talk about two basic data types: strings and numbers. Then I’ll discuss some of the more complex types: tuples, lists, and dictionaries. Python allows you to define your own types as classes. I’ll cover classes toward the end of the chapter, since there are a few other concepts we need to cover first.
Strings
A string is a collection of one or more characters contained within quotes. Quotes are how you indicate a string. For instance, “100” is a string; 100 is a number (an integer to be more accurate). You can use double or single quotation marks (just remember what you used). You can nest one type of quotes within another, but you will get an error, or worse, unexpected results, if you cross your quotes.
Here’s an example of double quotes:
Here’s an example of single quotes:
Here’s an example of single quotes inside double quotes:
Here’s an example of double quotes inside single quotes:
Triple quotes are used to span multiple lines within a string .
Here’s an example of triple quotes:
You can use single quotes as apostrophes if you escape them first. Escaping a character simply means you are telling the interpreter to view a character as a string character rather than a functional one.
Here’s an example of escaping quotes:
You can do this to the entire string by making it a raw string. In this next example, '/n' is used to move to a new line.
Here’s an example of a raw string:
String Manipulation
There are a lot of ways to manipulate strings. Some are fairly straightforward, such as concatenation—adding strings together. However, some of them are a little surprising. Strings are treated as a list of character values. Later in this chapter, we explore lists in greater detail. However, we are going to use some of the traits of lists to work with strings.
Because strings are lists, which are similar to arrays in other languages, we can reference specific characters within a string. Like lists, strings are zero indexed. This means the first character of a string is at position zero.
With strings, like lists, the first character is at index [0]:
When using a negative number, the index begins at the end of the string and works backward.
Slicing a string allows you to extract a substring. When slicing a string, you provide two numbers separated by a colon. The first number is the starting index and the second is the ending index.
Note that when slicing, the first index is inclusive and the second index is exclusive. In the previous example, the value at index [0] returned, “r”; whereas the value at index [3] was not, “o”.
When slicing , if you leave one of the indexes, the beginner or the end of the string is assumed.
Adding strings together is called concatenation . With Python, you can easily add strings together. This works with string literals and string variables. You can also multiply strings for an interesting effect.
You can add two strings together.
You can add string variables together, like this:
You can add a string variable and literal.
You can multiply string literals.
The multiplication of strings, however, only works on literals. It won’t work on string variables.
I suggest spending some time exploring these and other string manipulation methods . For more information, go to https://docs.python.org/3/tutorial/introduction.html#strings and https://docs.python.org/3.1/library/stdtypes.html#string-methods .
Numbers
Numbers in Python come in a few flavors, the most common of which are integers and floats. An integer is a whole number , whereas a float is a decimal. Python also uses a Boolean type that has a value of one or zero. These are frequently used as a flag or state, where one means “on” and zero means “off.” A Boolean is a subclass of integers and are treated as integers when performing operations.
As you might expect, you can perform mathematical operations with number types. Generally, if you perform arithmetic with one type, the result is that type. Math using integers usually results in an integer. However, if you perform division with integers, the result is a float. Math with floats result in a float. If you perform arithmetic with both types, the result is a float.
Adding two integers results in an integer.
Adding two floats result in a float.
Adding a float and an integer results in a float.
Subtraction and multiplication work the same way.
Division always results in a float.
The ** operator results in the first number raised to the power of the second.
There is one catch with Python floats, however. The interpreter sometimes produces a seemingly arbitrary number of decimal places. This has to do with how floating-point notation is stored in Python and how math is done within the interpreter .
For more information about this anomaly, go to https://docs.python.org/3/tutorial/floatingpoint.html .
Lists
A list is a collection of items in a particular order. In other languages, they are generally known as arrays . You can put anything you want in a list. The values stored in a list don’t have to be of the same data type. However, if you mix data types in a list, make sure that you know which type you are getting when you use it.
You worked with lists when you worked with strings. A string is essentially a list of characters. As such, indexing and slicing work with lists, as well.
A list is created using square brackets [].
Like strings, lists are zero indexed. This means the first element in a list is at position 0, the second is at position 1, and so forth. You can access the individual elements of a list by calling its index or location within the list.
Lists can also be sliced. When a list is sliced, the result is a new list containing the subset of the original list.
It is easy to add, change, and remove members of a list using slicing and concatenation.
This example adds members to a list.
This example changes members in a list.
This example removes the members of a list.
Assign list members to variables:
There are a number of methods automatically included in lists. For example, you can force the first letter of a name to be capitalized.
As I mentioned, a list can contain any type of data , including other lists. In fact, when we start working with computer vision, we will frequently use lists of lists to hold image data.
Lists are a very powerful and important aspect of Python. Visit https://docs.python.org/3/tutorial/introduction.html#lists to spend some time exploring lists.
Tuples
You’re going to hear the term tuple a lot when working with Python. A tuple is simply a special kind of list that cannot be changed. Think of a tuple as a list of constants, or a constant list. You declare a tuple using parentheses rather than square brackets.
Tuples are immutable, which means that once a tuple has been created, it cannot be changed. To change the contents of a tuple, a new tuple must be created. This is done using the same slicing techniques we used for strings and lists.
Note that we used list notation when slicing the tuple, colors[0:2] rather than colors(0:2). The result of the slice is still a tuple.
A tuple , however, can be replaced.
They can also be replaced with an empty tuple.
Dictionaries
A dictionary is similar to a list except that it allows you to name your items in the list. This is done using key/value pairs. The key becomes the index for the value. This allows you to add some meaningful structure to your lists. They are useful for holding a list of parameters or properties.
A dictionary is declared using curly brackets rather than square brackets.
You work with dictionaries in much the same way as you would an array. Except rather than providing an index number, you provide the key to access an element.
The key must be an immutable value, such as a number or a string. Tuples can also be used as keys.
A key cannot be defined more than once in a dictionary. Like variables, the value of a key is the last one assigned.
>>>BARB = {'type':'test-bed','color':'black','type':'wheeled'}>>>BARB{'color':'black','type':'wheeled'}In this example, the first 'type' value was overwritten by the second one.
Dictionaries can be nested as values within other dictionaries. In the following example, I have embedded the definition for my ongoing robotics project, Nomad into a dictionary of my robots.
>>>myRobots = {'BARB':'WIP','Nomad':Nomad,'Llamabot':'WIP'}>>>myRobots{'BARB': {'color':'black','type':'wheeled'},'Nomad': {'color':'black','type':'wheeled'},'Llamabot':'WIP'}
Of course, a dictionary wouldn’t be all that useful if you weren’t able to update and manipulate the values contained within. Making changes to a dictionary is similar to making changes to a list. The only real difference is that you use the key rather than the position to access the various elements.
To update a value , use the key to reference the value to be changed.
A key/value pair can be removed with the del statement.
A dictionary can be copied with the copy method of the dictionary class. To access the copy method, start with the name of the dictionary and add .copy() to the end.
To append one dictionary to the end of another, use the update method.
None Type
There is a special data type that is very important when working with classes and objects imported from other sources. This is the none type , which is an empty placeholder. It is used when we want to declare an object but define it later. It is also used to empty an object. You will see the none type in action later in this chapter, when we discuss classes. In the meantime, know that it exists and that it is essentially an empty placeholder.
A Final Note on Variables
As you worked through the examples in this section, you were working with variables. Notice how a variable accepted whatever value you provided it and happily returned exactly what you assigned. If you assign a list to a variable, it returns the list—square brackets and all. The same holds true for tuples, dictionaries, strings, and numbers. Whatever you assign to it is exactly what you get back. We saw this in action when we nested one dictionary inside another. By simply adding the dictionary name into the definition of another, we embedded all the values into the new dictionary.
Why do I point this out?
Later in the book, when we start working with functions and classes, you will assign complex data structures to your variables. It is important to know that whatever you assign to a variable is what the variable contains, and you can apply any methods or functions appropriate for that data type.
We used a method of the String class on our string variable, myRobot. A method is functionality that we give to a class. Since a data type is a built-in class, we can use methods from that class on our variables. I’ll discuss methods in much more detail when we start working with classes toward the end of this chapter.
Control Structures
In this section, we’re going to explore how to add structure to your code. Rather than just stepping through a program and executing each line of code as it is encountered, you probably want more control. These control structures allow you to execute code only when a specific condition exists, and to perform blocks of code multiple times.
For the most part, it’s going to be easier to walk you through these concepts than trying to describe them.
if Statements
The if statement allows you to test for a condition before you execute a block of code. The condition can be any value or equation that evaluates to either true or false.
This next piece of code loops through the robots list and determines whether the robot is Nomad.
Again, note the indentation as you type. IDLE indents another level after each line that ends in a colon, which should be every line that denotes a new block, such as loop statements and conditionals.
It’s important to also note how we test for equality. A single equals sign means assignment. Double equals signs tell the interpreter to compare for equality.
Equals | == |
Not equal | != |
Less than | < |
Greater than | > |
Less than or equal to | <= |
Greater than or equal to | >= |
You can also use and and or to test for multiple conditions .
Comparisons are also frequently used to determine if an object exists or contains a value. Essentially, a condition evaluates to true if it does not evaluate to false, 0, or none. This is very handy when you want to execute a piece of code only if an object exists, such as when you initialize sensors or connections through a serial port or network.
Loops
When you work with robotics, there are times that you want to repeat a block of code. Whether to perform a set of instructions on a collection of objects, or to execute a block of code for long as a condition exists, you need to use a loop.
Loops allow you to repeat a block of code to perform the tasks multiple times. There are two flavors of loops: the for loop and the while loop. Each provides a specific functionality that is crucial to writing efficient programs.
for Loop
A for loop performs a block of code for each element in a list. A collection of values— a tuple, list, or dictionary—is provided to the for loop. It then iterates through the list and executes the code contained in the code block. When it runs out of elements in the collection, the loop is exited and the next line of code outside the for block is executed.
As with the if statement, you put the code you want to run as part of the loop into a block indicated by indentation. It is important to make sure that you have your indentation correct, or you will get an error.
As you enter this into the Python shell, pay attention to what it does with indentation.
After you’ve entered the print command and pressed Enter, you need to press Enter again so that the shell knows that you’re done.
The program enters the robots list and pulls the first value, Nomad, which it then prints. Since this is the last line in the block, the interpreter returns to the list and extracts the next value. This repeats until there are no more values in the list . At this time, the program exits the loop.
I tend to use plural words for my list names. This allows me to use the singular form of the name to reference items within the list for a loop. For instance, each element in the tuple of Robots is a robot.
If you want to loop through the elements in a dictionary, you want to provide two variables to store the individual elements. You also need to use the items method of the dictionary class. This allows you to access each key/value pair in turn.
You can use the enumerate function to add a sequential numeric value to the output of a for loop.
while Loop
Whereas a for loop executes a block of code for each element in a list, the while loop executes a block of code as long as its condition evaluates to true. It is often used to execute code a specific number of times or while the system is in a specific state.
To loop through code a specific number of times, you use a variable to hold an integer value. In the following example, we tell the program to run the code for as long as the value of our count variable is less than five.
We start by declaring a variable, count, to hold our integer, and we assign it the value 1. We enter the loop and the value of 1 is less than 5, so the code prints the value to the console. We then increment the value of count by 1. Because this is the last statement in the loop, and the last value evaluated by the while condition was less than 5, the code returns to the while clause. The value of count , now 2, is still less than 5, so the code executes again. This process repeats until the value of count is 5. Five is not less than five, so the interpreter exits the loop without executing the code in the block.
Had we forgotten to increment the count variable, it would have resulted in an open loop. Because count is equal to 1, and we never increment it, the value of count is always equal to 1. One is less than five, so the code would never stop executing and we would need to press Ctrl-C to end it.
It’s also used as a type of main loop, executing the code continuously. You see the following in a lot of programs:
True always evaluates to true; therefore, the code within this block keeps executing until the program is exited. This is called an open loop since there is no close to it. Fortunately, there is a convenient way to exit open loops. If you find yourself in an open loop, or you just want to exit a program arbitrarily, press Ctrl-C. This causes the program to exit immediately. You will use this frequently.
This technique can also be used to make the program wait for a specific condition to be met. For instance, if we required a serial connection to be available before we continued, we would first initiate the connection command. Then we could wait for the connection to complete before continuing by using some like this:
The exclamation mark, also called a bang, represents not. So, in this case, assuming the connected variable contains the serial connection that evaluates to true when it is established, we are telling the program to execute the code contained in the while block as long as it is not connected.
In this case, the code we tell it to execute is called a pass , which is an empty command. It is used when you don’t actually want to do anything, but you need something there. So, we are telling the system this: “While you’re not connected, don’t do anything, and loop until you are connected.”
Functions
Functions are predefined blocks of code that we can call from within the program to perform a task. We’ve been using the print() function throughout this chapter. The print() command is a built-in function in Python. There are many predefined functions in Python and many more that can be added using modules. For more information about the available functions, check out the Python Standard Library at https://docs.python.org/3/library/index.html .
There will be many times that you want to create your own functions. Functions serve a few purposes.
Most often, you use a function to contain code that you want to execute throughout your program. Anytime you find yourself repeating the same set of operations throughout your code, you have a likely candidate for a function.
Functions are also widely used as a form of housekeeping. They can be used to move long processes somewhere other than your main program. This can make your code much easier to read. For instance, you could define actions for your robot as functions. When a condition is met in your main code, you simply call that function. Compare these two blocks of pseudo code :
And
In the first block, the code to move the robot is contained in the if statement . If it takes 30 lines of code to turn left (not likely, but bear with me), your main code would be 30 lines longer. If turning right takes the same amount of code, you would have another 30 lines—all of which you have to go through to find the line you are looking for. This gets very tedious.
In the second block, the code to turn is moved to a separate function. This function is defined elsewhere in the program, or as you’ll learn when we discuss libraries and modules, it could live in another file. This makes it easier to write and to read.
Defining a Function
To define your own function , you create the name of the function and a block of code that contains the operations you want to perform. The definition starts with the def keyword, followed by the name of the function, parentheses, and a colon.
Let’s create a simple function:
In this code, we created a simple function that simply prints the message “Hello World”. Now, whenever we want to print that message, we simply call that function.
To make things a little more interesting, we can provide the function with data to use. These are called arguments .
Passing Arguments
Frequently, we want to give information to the function to work with or on. To provide the information, we give the function one or more variables in which to store this information, called arguments.
Let’s create a new function that greets the user.
Here we created a new function called hello_user. We told it to expect to receive two pieces of information: the user’s first name and last name. The variable names in the function definition contain the data we want to use. The function simply prints the greeting using the two arguments that we provide.
Default Values
You can create a default value for an argument by simply assigning a value as you declare the function.
Note that the second time we called the function, we did not include a value. So, the function simply used the default value we assigned when we created the function.
Return Values
Sometimes we don’t just want the function to do something on its own. Sometimes we want it to give a value back to us. This is helpful to move a common calculation to a function, or if we want the function to validate that it ran correctly. Many built-in functions and those from external libraries return a 1 if the function succeeded and 0 if it failed.
To return a value , simply use the return keyword followed by the value or variable that you want to return. Keep in mind that return exits the function and provides the value to the line that called the function. So, make sure that you don’t do anything after the return statement .
A return statement can return more than one value. To return more than one value, separate each one with a comma. The function puts the values into a tuple that can be parsed by the calling code.
Adding Functionality through Modules
Modules are essentially a collection of functions in a file that you can include in your program. There are countless modules to make your life easier. Many modules are included as part of the standard Python installation. Others are available for download from various developers. If you can’t find what you’re looking for, you can create your own custom modules.
Importing and Using Modules
Importing modules is easy. As you’ve seen, you simply use the import keyword followed by the name of the module. This loads all the functions of that module for your use. Now, to use one of the functions from the module, you need to enter the module name followed by the function.
Some packages are very large, and you may not want to import the entire thing. If you know the specific function you need in your program, you can import only that part of the module.
This imports the sqrt function from the math module. If you import just the function, you will not need to prefix the function with the module name.
Lastly, you can provide an alias for the modules and functions that you import. This becomes very handy when you import a module with a fairly long name. In this example, I’m just being lazy:
Built-in Modules
The core Python libraries provide a lot of functionality for basic programs. However, there is a lot more functionality available, written by other developers and researchers. But before we go off into the wonderful world of third-party modules, let’s look at what comes with Python.
Open an IDLE instance and type the following:
You should get output that looks something like this:
This is a list of the modules that are built into Python and are available for use right now.
To get more information about a module, you can use the help() function . It lists all the modules currently installed and registered with Python. (Note that I had to truncate the list for printing.)
You can also use the help() function to get information on a specific module. First, you need to import the module. Again, the following listing was truncated for brevity.
You can learn a lot more about these built-in modules on the Python documentation site at https://docs.python.org/3/py-modindex.html .
Extended Modules
In addition to the built-in modules that you get with every Python installation, there are countless extensions that you can add called packages. Fortunately, the good folks at Python have provided a method to learn about third-party packages. Visit https://pypi.python.org/pypi for more information.
- 1.
Open a terminal window.
- 2.
In Windows, type
python -m pip install -U pip - 3.
In Linux or macOS, type
pip install -U pip
Once that is done, you’re ready to use PIP . Keep in mind that you’ll run PIP from the terminal, not from within the Python shell.
For this demonstration, we’ll install a package used for plotting mathematical formulas. matplotlib is a very popular package for visualizing data using Python. The actual use of this package is outside the scope of this workshop. For more information on using matplotlib, check out their website at https://matplotlib.org .
To install a new package, type
This installs the matplotlib library for your use.
Custom Modules
If you have several functions that you use all the time (generally referred to as helper functions), you might save them in a file called myHelperFunctions.py. You can then use the import command to make these functions available in another program.
Generally speaking, you save your custom module file to be imported in the same file location as the program that you are working on. This is the easiest and best way to make sure that the compiler can find the file. It is possible to save the file elsewhere, but then you either include the full path for the file or make changes to the system path variables. For now, keep any module files that you create in your working directory (the same location as the program that you are working on). This helps you avoid any additional heartache.
- 1.
Open IDLE.
- 2.
Click File ➤ New File. This opens a new text editor window.
- 3.
In the new file window, click File ➤ Save and name it myHelperFunctions.py.
- 4.
Enter the following code:
def hello_helper():print("I'm helper. I help.") - 5.
Save the file.
- 6.
Click File ➤ New File to create a new code file.
- 7.
Type the following:
import myHelperFunctionsmyHelperFunctions.hello_helper() - 8.
Save the file as hello_helper.py in the same directory that you saved myHelperFunctions.py.
- 9.
Press F5 or select Run ➤ Run Module from the menu.
In the shell window , you should see this:
Classes
Now we get to the good stuff: classes. A class is nothing more than the logical representation of a physical or abstract entity within your code; for instance, a robot. The robot class creates a framework that describes a physical robot to the program. How you describe it is entirely up to you, but it is represented in how you build the class. This representation is abstract in much the same way the word robot represents the abstraction of the concept of a robot. If we were standing in a room full of robots and I said, “Hand me the robot,” your response would likely be, “Which robot?” This is because the term robot applies to every robot in the room. But, if I were to say, “Hand me Nomad,” you would know the specific robot that I was talking about. Nomad is an instance of a robot.
This is how a class is used. You start by defining the class. You do this by constructing the abstraction of the entity that you want to represent; in this case, a robot. When you want to describe a specific robot, you create an instance of the class that applies to that robot.
A class is made up of functions called methods. Methods are functions within a class that perform work. For instance, you may have method in the robot class called drive_forward(). In this method, you add the code to make the robot to drive forward.
A method always requires the self parameter. This parameter is a reference to the instance of the class.
self is always the first parameter of a method.
Every class must have a special method called __init__. The __init__ method is called when an instance is created, and it initializes that instance of the class. In this method, you perform whatever needs to happen for the class to function. Most often, you define attributes for the class.
The attributes of a class are variables within the class that describe some feature. For instance, for the robot class, we want to name some functional attributes, like direction and speed. These are created in the __init__ method.
Mutator methods : These methods change values within the class. For instance, setters are a type of mutator method that set the value of an attribute.
Accessor methods : These methods access attributes within a class.
Helper methods : These include any number of methods that perform work within the class. For example, the obligatory __init__ method is a type of helper called a constructor. Helper methods are anything that performs work within a class, generally for other methods; for example, a method that formats a string prior to output.
Creating a Class
Before you delve in and start writing code, I suggest you take a little time to plan what you’re about to build. This doesn’t need to be an extensive plan that flushes out every detail, but it is good to have at least a rough outline of what you’re going to build before you build it.
Planning
The easiest way to do plan is on a sheet of paper, but if you prefer digital, your favorite text editor may do as well. You want to make a list or an outline of the class. Our example class is for a simulated wheeled robot, so we want to list the attributes that describe our robot, and then list the actions the robot will perform. These are our methods.
Initial Sample Robot Class
- Attributes
Name
Description
Primary color
Owner
- Methods
Drive forward
Drive backward
Turn left
Turn right
As you are writing your outline , imagine how you will use each method. What information, if any, will you need for it? What information, if any, will it return? If your method is expecting information in the form of parameters, is there a default value? If so, do you want to reserve the capability to change the default value programmatically? From my experience, the answer to this last question is almost always yes.
So, with these questions in mind, let’s revisit the outline.
Initial Sample Robot Class
- Attributes
Name
Description
Primary color
Owner
Default speed (default: 125)
Default duration (default: 100)
- Methods
Drive forward (parameter: speed) (return: none)
Drive backward (parameter: speed) (return: none)
Turn left (parameter: duration) (return: none)
Turn right (parameter: duration) (return: none)
Set speed (parameter: new speed) (return: none)
Set duration (parameter: new duration) (return: none)
As you can see, after revisiting the outline, we added a few new attributes and a few new methods. Default speed holds an integer value between 0 and 255. Later in the book, we use this value to set the speed of our motor controller. The half speed is 125. Default duration is the amount of time the robot moves in milliseconds. The value 100 is about 1/10 of a second. We also added two methods for setting the values of these two attributes.
In most programming languages, the attributes are private, which means that they can only be accessible from code contained in the class. As such, you create get() and set() methods to view and change the values. In Python, attributes are public and can be accessed or changed with a simple class.attribute call. Python attributes cannot be made private; however, the tradition in Python is to prefix an attribute that you want to be private with an underscore. This indicates to other developers that the attribute should be treated as private and not modified outside a class’s methods.
So, strictly speaking, the set speed and set duration methods are not strictly needed. If we want to indicate that these attributes are intended to be private and should only be updated with the method, then we precede the name with an underscore, like this:
You can create a class anywhere in your code. What makes classes so useful is that they encapsulate functionality that allows you to easily port it from one project to the next. For this reason, it is generally better to create a class as its own module and import it into your code. That is what we’ll be doing here.
- 1.
Create a new Python file and save it as robot_sample_class.py.
We’ll start by declaring our class and creating the required constructor function, __init__. Right now, all we need __init__ to do is initialize the attributes and move the values from the parameters to the attributes. Note that we have declared default values for speed and duration as 125 and 100, respectively.
- 2.
Enter the following code:
class Robot():"""A simple robot classThis multi-line comment is a good placeto provide a description of what the classis."""# define the initiating function.# speed = value between 0 and 255# duration = value in millisecondsdef __init__(self, name, desc, color, owner,speed = 125, duration = 100):# initilaizes our robotself.name = nameself.desc = descself.color = colorself.owner = ownerself.speed = speedself.duration = durationWith the initialization done, let’s look at writing our methods. As mentioned, methods are simply functions contained in a class that perform work within the class. Since we don’t have a robot to control at the moment, we simply print confirmation messages to the shell to simulate our robot.
def drive_forward(self):# simulates driving forwardprint(self.name.title() + " is driving" +" forward " + str(self.duration) +" milliseconds")def drive_backward(self):# simulates driving backwardprint(self.name.title() + " is driving" +" backward " + str(self.duration) +" milliseconds")def turn_left(self):# simulates turning leftprint(self.name.title() + " is turning " +" right " + str(self.duration) +" milliseconds")def turn_right(self):# simulates turning rightprint(self.name.title() + " is turning " +" left " + str(self.duration) +" milliseconds")def set_speed(self, speed):# sets the speed of the motorsself.speed = speedprint("the motor speed is now " +str(self.speed))def set_duration(self, duration):# sets duration of travelself. duration = durationprint("the duration is now " +str(self. duration)) - 3.
Save the file .
Now that we’ve created our new Robot class, we will use it to define Nomad as a Robot.
- 4.
Create a new Python file and save it as robot_sample.py.
We’ll start by importing the robot_sample_class code, and then use it to create a new robot called Nomad.
- 5.
Enter the following code :
import robot_sample_classmy_robot = Robot("Nomad", "Autonomous rover",black", "Jeff Cicolani")Using the class definition to create a new instance of the class is called instantiation . Note that we did not provide values for the last two parameters, speed and duration. Because we provided default values for these parameters, we did not need to provide values during instantiation. If we had not provided default values, we would get an error when we tried to run the code.
With our new robot instance, let’s do some work with it.
print("My robot is a " + my_robot.desc + " called " + my_robot.name)my_robot.drive_forward()my_robot.drive_backward()my_robot.turn_left()my_robot.turn_right()my_robot.set_speed(255)my_robot.set_duration(1000) - 6.
Save the file.
- 7.
Press F5 to run the program .
In the Python shell window, you should see something like this:
Styling
Before we wrap up this chapter, I want to take a moment to talk about styling your code. We’ve already seen that indentation is important and must meet strict guidelines to denote code blocks and so forth. But there are a few areas where you can affect less critical styling decisions. Of course, there are traditions within the Python community that are recommended.
There are a few best practices suggested by the creators and primary developers of Python. You can read all of their suggestions in the Python Style Guide at www.python.org/dev/peps/pep-0008/ . I recommend going through the style guide and practicing their suggestions before you develop some really bad habits (like I did). For now, let’s focus on how you name your variables, functions, and classes.
Blank Lines
Leaving blank lines between code blocks for logical, visual separation is just a good idea. It makes your code easier to read.
Commenting
Write comments in your code . Do it frequently and be verbose. When you come back to read your code later (for debugging or to reuse it for another project), you will want to know what you were thinking when the code was written, and what you were trying to do with it.
If your code ever makes it out into the wild, where other people read or review it, they will need the comments, too. Python is a community, and code is shared frequently. Well-commented and described code is greatly appreciated.
Naming Conventions
How you name your variables, functions, and classes is a personal decision. Do what is most comfortable for you. Python is a case-sensitive language. Using a capital letter in one place and not another creates two different variables and endless hours of frustration.
Common variable names are not addressed in the style guide, although the convention is to use mixed-case naming. Mixed-case names start with a lowercase character, but each word in the name is capitalized; for example, myRobots.
Functions and modules should be lowercase. To make them easier to read, use underscores between words. So our hello world function is named hello_world.
Classes should be named using CapWords. As the name implies, CapWords capitalizes the first letter of every word, including the first character in the name. This style is more commonly known as camel case .
Finally, lists and other collections should be pluralized. This is an indicator that the variable represents more than one object. For instance, robots is a list of robots. If we were addressing an individual item in the list, it would look something like this:
Summary
We use Python throughout this book. It is a very simple language to learn, and it provides a lot of powerful features. Many software developers think that Python is slow. But where it is slow in some areas, it more than makes up time in other areas, as you will see when we start working with computer vision in Chapter 9.