The purpose of this book is to challenge you to build a simple robot that will be expanded over time. This book is intended to be difficult; however, it isn’t too difficult or unnecessarily complicated. You’ll experience plenty of complications along the way, but the installation of the operating system on your Raspberry Pi does not need to be one of them.
Downloading and Installing Raspbian
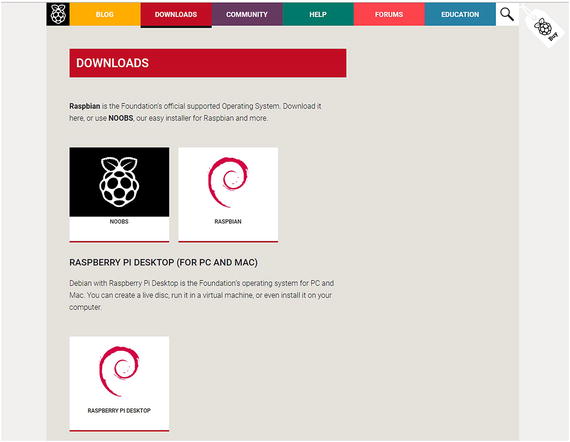
There are, essentially, two methods of installing the operating system (OS) on your Pi.
The first involves downloading the latest Raspbian image, writing it to an SD card, and going from there. This method requires the installation of a third-party software package that writes a bootable image on an SD card. The advantage is that it takes less room on your SD card. If you’re using a minimum 8GB SD card, this may be helpful; if you went bigger, then this consideration is moot.
Whereas the direct installation is not all that complicated (rather easy actually), there’s an easier way that doesn’t involve installing additional software on your system. NOOBS (New Out Of the Box Software) is designed to make the installation and configuration of your Raspberry Pi easier. It allows you to select from multiple operating systems and simply install. However, the NOOBS package remains on the SD card and eats up valuable space. It does allow you to go back and repair your OS or change the OS completely, but that can be handled manually quite easily.
Raspbian download screen
Raspbian with OpenCV
Toward the end of this book, we will work with computer vision to show you why you should use a Raspberry Pi rather than a less capable platform. In order to do that, however, you need to install OpenCV on your Pi. Unfortunately, there is no simple OpenCV installer for the Raspberry Pi. Because the Pi runs on an ARM processor, the package has to be compiled from source code, which is a six-hour process.
To make things easier for you, I precompiled OpenCV in Raspbian Jesse and created a downloadable image at https://github.com/jcicolani/Jesse-OpenCV .
You still need to walk through the installation and configuration process to customize the installation. The image includes the default settings that you need to change (with a few exceptions that were necessary to make the build).
The “Hard” Way
The more difficult method installs the Raspbian OS image directly on the SD card—ready to boot up. This is the method that I use because it really isn’t any more complicated than the previous method, and it allows me to use versions that are not available through NOOBS.
You have two options for your Raspbian installation. Jessie is the most recent stable version of the operating system; it is what we’ll be using. The first option is Raspbian Jessie with PIXEL—their new, optimized GUI. It is a 1.5GB download, and it is a 4.2GB image once it’s been decompressed. The second option is Raspbian Jessie Lite, a minimal image that is a much smaller 300MB download (1.4GB after decompression). However, minimal means no GUI, so everything is done via the command line. If you’re a fan of headless Linux, then this is the option for you. We will use the larger install with PIXEL .
- 1.
Navigate to www.raspberrypi.org/downloads/ .
- 2.
Click the Raspbian image.
- 3.
Select the Raspbian flavor that you want to install.
- 4.
Once the download is complete, decompress the file somewhere that you’ll easily find it.
- 5.
Download and install Win32 Disk Imager. This allows you to write the image file that you just downloaded to the micro SD card. You can get it at https://sourceforge.net/projects/win32diskimager/ .
- 6.
Optionally, you may also want to download SDFormatter to make sure that your SD card is properly prepared. You can get it at www.sdcard.org/downloads/formatter_4/ .
- 7.
Insert your micro SD card into the card reader connected to your computer.
- 8.If you have downloaded and installed SDFormatter, open it. You should see a dialog box similar to the one shown in Figure 2-2.
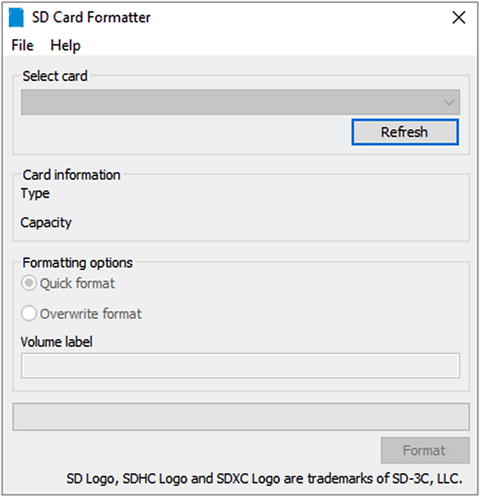 Figure 2-2
SD Card Formatter
- 9.
Make sure that you select the drive representing your SD card. You’re about to format it, so if you select the wrong thing, it will wipe out whatever you have on that drive. The tool usually selects the right one by default, but double check. It would be wise to disconnect any other external storage devices.
- 10.
Make sure that Format size adjustment is set to On. This removes any other partitions on the card and uses the whole thing. Leave all the other settings at the default.
- 11.
Click Start. When the process finishes, you’re ready to install the OS.
- 12.
To flash the image to the SD card, open Win32 Disk Imager .
- 13.
In the image file field, select the Raspbian image that you downloaded. You can click the file folder icon to navigate to it.
- 14.
Make sure that your SD card is selected in the device drop-down box. Again, selecting the wrong device can lead to a world of hurt; so pay attention.
- 15.
Click Write.
- 16.
Once the process has completed, remove the card from your card reader.
- 17.
Insert the card into the micro SD card reader on the Raspberry Pi.
That sounds lengthy, but it is remarkably fast and easy to do. Next, let’s walk through the NOOBS installation process.
The “Easy” Way
I call this method the “easy” way, although the hard way is actually pretty easy. What makes this easy is that you don’t have to write the image directly. You will probably want to format the card, but if it’s a new card, that may not be necessary. To make it even easier, if you bought your Pi as part of a starter kit, it probably came with NOOBS already installed on a micro SD card. If this is the case, you can skip the first few steps.
- 1.
Click the NOOBS image on the Downloads page.
- 2.
Select your NOOBS flavor. If you have a BitTorrent client installed, click Download Torrent . This is much faster than downloading the .zip file.
- 3.
Optionally, you may also want to download SDFormatter to make sure that your SD card is properly prepared. You can get it at www.sdcard.org/downloads/formatter_4/ .
- 4.
If you downloaded and installed SDFormatter, open it.
- 5.
Make sure that you select the drive representing your SD card. You’re about to format it, so if you select the wrong thing, it will wipe out whatever you have on that drive. The tool usually selects the right one by default, but double check. It would be wise to disconnect any other external storage devices.
- 6.
Make sure that Format size adjustment is set to On. This removes any other partitions on the card and uses the whole thing. Leave all the other settings at the default.
- 7.
Click Start. When the process has finished, you’re ready to install the OS.
- 8.
Unzip the NOOBS file directly onto the SD card.
- 9.
Remove the card from your card reader.
- 10.
Insert the card into the micro SD card reader on the Raspberry Pi.
- 11.
At this point, you need to hookup your Pi to continue. So, jump forward to the “Connecting Raspberry Pi” section in this chapter. Once you’ve complete those steps, come back to this section to continue the setup.
- 12.
When you connect power to the Raspberry Pi, it boots up to the NOOBS installation screen. If you used NOOBS Lite, you have your choice of OS. If you used the standard NOOBS download, your only option is Raspbian (which is OK because that’s what we’re using).
- 13.
Click Raspbian to make sure that it’s selected. Also make sure that you select the correct language at the bottom of the screen (in my case, it is English (US)).
- 14.
Click the Install button at the top of the screen.
The installation could take a little while, so go ahead and grab a cup of coffee.
Connecting Raspberry Pi
Now that your micro SD card is ready to go, you need to hook up your Raspberry Pi. If you’re using an original, first generation Pi, this is a little more complicated.
- 1.
Connect your monitor via the HDMI cable. If you are using a small television that is outfitted with component hookups rather than HDMI, the audio jack on the Pi is a four-pole component jack. You need an RCA-to-3.5mm converter, usually in cable form, to do this.
- 2.
Connect your keyboard and mouse to the USB ports. I use a wireless keyboard/touchpad combination because it’s compact and portable.
- 3.
Make sure that your micro SD card with Raspbian or NOOBS is installed in the micro SD port on the Pi. Essentially, this is the hard drive for your small computer, so it has to be in the right place. It will not read the OS through an SD card reader connected to one of the USB ports.
- 4.
If you are using an Ethernet cable, connect it to the Ethernet port . You may also plug a Wi-Fi dongle to the USB port. If you are using a Pi 3, as I am, Wi-Fi is built in.
- 5.
Connect the 5V power to the micro USB port. This port is only for power. You cannot access the board via USB.

Raspberry Pi connections
Username: pi
Password: raspberry
Of course, the default username and password are never secure. So, to keep your cybersecurity friends from running away with your robot, one of the first things we’re going to do is change the password. Later in the configuration, we will change the default username.
Configuring Your Pi
Now that we’ve taken care of the initial installation, we’re going to move on to a little customization. The Pi has several features that you can enable, depending on your particular use. Initially, they’re not enabled to reduce some of the overhead needed to run the OS. The configuration settings that we’re going to implement are for security and convenience.
Using raspi-config
To make customizations, the good folks at the Raspberry Pi Foundation have included a utility called raspi-config. A command-line terminal is necessary to use it. A single command is entered right now, but as we move forward in the workshops, you’ll become much more familiar with the terminal window. If you’re new to Linux (on which Raspbian is based), this can be a little intimidating. It doesn’t need to be, and I’ll do my best to ease you into it. But you will have to learn your way around it.
You can find more information about the raspi-config utility at www.raspberrypi.org/documentation/configuration/raspi-config.md .
At this point, you should have already booted into your Raspberry Pi. If not, do so now.
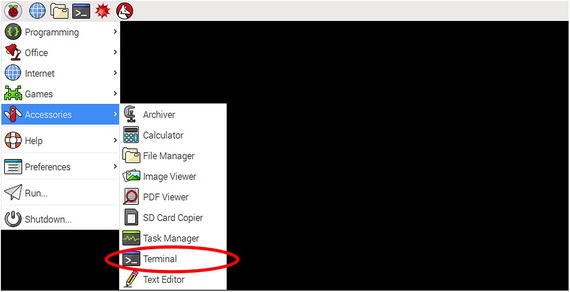
- 1.
Click the Raspberry Pi icon at the top of the screen. This opens an application list.
- 2.
- 3.
Type sudo raspi-config.
This opens the Raspberry Pi Software Configuration Tool, as shown in Figure 2-6.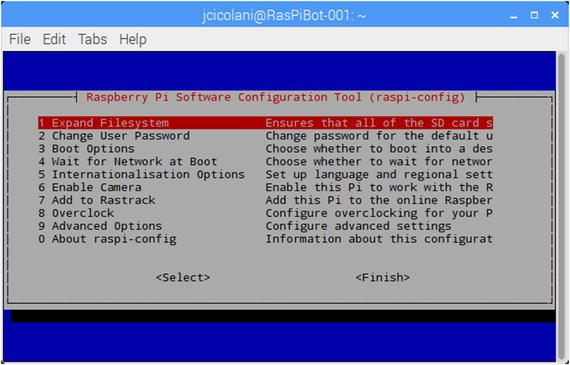 Figure 2-6
The raspi-config screen. Most OS-level options can be set here, including activating and deactivating services.
Newer versions of Raspbian automatically expand your file system the first time you start the Pi. Unless you are using an older version of Raspbian, you should be able to skip this next step and move on to changing the password.
- 4.
Make sure that Expand file system is highlighted.
- 5.
Press Enter. The system pops up a message about expanding the file system and asks you to reboot. (We will reboot later, after we’ve made most of our changes.)
Next, we’ll change the user password.
- 6.
Make sure that Change user password is highlighted.
- 7.
Press Enter. The system displays a message saying that you’re going to be prompted for a new password.
- 8.
Press Enter. This drops you into the terminal to enter the new password.
- 9.
Enter your new password and press Enter.
- 10.Confirm your new password and press Enter. This displays a confirmation that the password was successfully updated (see Figure 2-7).
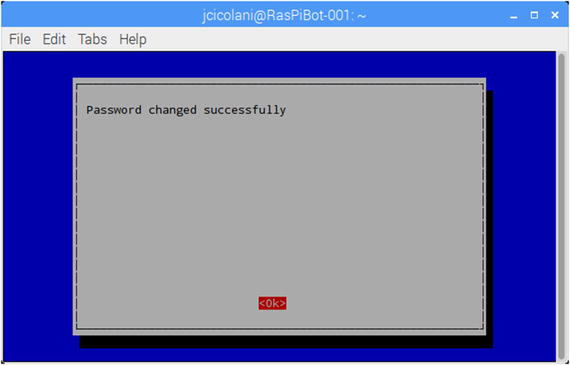 Figure 2-7
A password change confirmation in raspi-config
- 11.
Press Enter.
The next few steps activate some services that we’ll be using later.
We’ll start by changing the hostname of your Pi to something unique that is easier to find on the network. This becomes particularly important when you’re in a room with 20 other Raspberry Pis.
- 12.Make sure that advanced options is highlighted, and then press Enter. This displays the interface and other options (see Figure 2-8).
 Figure 2-8
raspi-config advanced options. Hostname and service activation is accessed here.
The hostname is how your Raspberry Pi appears on the network. You’ll want to give your Pi a unique name, especially when you consider how many of them may be on the network at any given time. The hostname should be both meaningful to the application and unique.
- 13.
Highlight Hostname and press Enter.
- 14.
A dialog box explains the requirements for a hostname. It must be only alphanumeric characters: no symbols, no hyphens, and no underscores. Press Enter to continue.
- 15.
Enter your new hostname and press Enter.
SSH allows us to access the Pi through a terminal window (SSH client) from another computer. On Windows, PuTTY is a very popular, free SSH client . SSH does not provide a GUI. All interactions are made using terminal commands. This is helpful if you want to quickly execute a program, install software, and so forth. As you become more familiar with the terminal, you will likely find yourself using SSH to connect for simple commands, while reserving VNC (remote desktop) for more involved tasks such as writing programs.
- 16.
Go back to the advanced options menu.
- 17.
Select Enable SSH and press Enter.
- 18.
Confirm that you want to enable SSH and press Enter.
- 19.
Press Enter again to return to the menu.
I2C is a serial communications protocol that is very popular in embedded systems such as the Pi, Arduino, and so forth. It allows for robust communication with multiple devices by using a number of pins. The motor control board that we will use communicates via I2C . (If you later choose to add other boards, such as a servo control board, it will also use I2C.) As long as the devices have different addresses, you can keep stacking them.
- 20.
Go back to the advanced options menu.
- 21.
Select Enable I2C and press Enter.
- 22.
Confirm that you want to enable SSH, and then press Enter.
- 23.
Press Enter again to return to the menu.
Because we also plan to use the Raspberry Pi headless (without a monitor, keyboard, or mouse attached), let’s set it up to boot into the console automatically. Don’t worry; it’s easy enough to launch the desktop GUI when you want to, as you will see.
- 24.
Go to boot options and press Enter.
- 25.
Select Console and press Enter. If you trust that you’ll be the only one accessing your Pi directly, you can choose Console Autologin . Autologin does not apply to remote sessions, just direct access with a keyboard and a monitor.
- 26.
With all of the settings updated, highlight Finish and press Enter.
- 27.
The Pi asks if you want to reboot. Select Yes and press Enter.
At this point, your Pi reboots. This may take a few minutes, especially if you did not install via NOOBS and the Pi has to expand your file system.
Remember, we set up the Pi to boot into the console by default. Since the next few steps are all done via the command line, we’ll not need to load the GUI. However, let’s do it anyway so that you can see how easy it is.
- 28.
Type startx and press Return.

You’re now in the GUI desktop.
- 1.
Click the programs menu (the raspberry in the upper-left corner).
- 2.
Click the power button.
- 3.
Select Exit to command line.
You should now be back to the command line.
Users
The default user on every installation of Raspbian is pi. Earlier, we changed the password to make it more secure. However, you probably don’t want to always log on as the pi user.
Remember when I said we’d start using the terminal more? Well, that starts now. The easiest way to create and manage users is through the command line. We’re going to walk through that process now.
Securing Root
In addition to the default user, pi, there is another default user on the Pi. This is the root user. The root user is, essentially, an administrative user that is used by the machine to execute low-level commands. This user has access to everything and can do anything because, well, it’s the machine. Unlike the default pi user, however, root does not have a default password. It has no password.
- 1.
Open a terminal window.
- 2.
Type sudo passwd root. (Note that passwd is the proper command and not a typo.)
- 3.
Enter the new password for the root user.
- 4.
Enter the password again to confirm.
Your root user is now secured, which is good because you’ll need it for the next step in the configuration.
Change the Default Username
- 1.
Log out of the pi user. You can do this through the menu system or by simply typing logout in a terminal.
- 2.
Log on with your—now secure—root user.
- 3.
Type
usermod -l <newname> pi<newname> is the new username that you chose. Do not include < or > in the command.
- 4.
To update the home directory name, type
usermod -m -d /home/<newname> <newname>Again, <newname> is the new username that you used in the previous step.
- 5.
Log out of the root user and log back in with your new username.
At this point, you have changed the default user credentials for both the default user and the root user. You have also changed the hostname. This is the minimum needed to secure your pi and your robot.
Your Raspberry Pi is now set up, configured, and ready for use. There is one more thing we’re going to want to do before we move on to the next chapter, and that is setting up your Pi to be headless.
Making a machine “headless” simply means configuring it so you no longer need to connect a monitor, a keyboard, and a mouse to it to operate it. This is generally done in two ways: with a KVM switch or by setting up remote access. On a mobile robot, connecting a KVM is not really an option. In fact, it would be little different from simply having everything connected to it. What we want to do is set up the Pi so that we can access it remotely over the network. But first, let’s make sure that you’re connected to your network.
Connecting to a Wireless Network
When you originally hooked up your Raspberry Pi, you had the option to connect an Ethernet cable. If you did this, then you are already on the network. You still want to connect to your wireless network, however. This allows you to remote into your robot while it’s on the move. You’ll be able to send it commands, update code, and even view the video feed from the webcam installed in Chapter 10.
- 1.
Log in to the GUI interface by typing startx.
- 2.Click the network icon at the top right of your screen. This icon looks like Figure 2-9.
 Figure 2-9
Network connection icon
- 3.
Select your wireless network from the list.
- 4.
Enter the security key for your network.
You should now be connected to your wireless network.
Going Headless
You’re not going to want to haul around an extra monitor, keyboard, and mouse while working through these workshops. To make your life much, much easier, let’s set it up so you can access the Pi headless.
Remote Access
There are two ways to get remote access . One method is to use SSH, which allows you to connect to a remote device using a terminal client. The other method is to set up a remote desktop.
Remote Desktop with xrdp
Let’s start with accessing the desktop remotely from another computer. The following instructions are for Windows users. Most modern Windows installations come with Remote Desktop Connection already installed, which is what we’ll use to connect to the Pi once it’s set up.
- 1.
Type sudo apt-get install tightvncserver.
- 2.
Complete the installation.
- 3.
Type sudo apt-get install xrdp.
When the installation is complete, you should be ready to go.
To get connected, do the following.
- 4.
On the Pi, type sudo ifconfig.
- 5.
Note the Internet address (inet addr) in the eth0 block if you are using an Ethernet cable, or the wlan0 block for Wi-Fi.
- 6.On your laptop, open Remote Desktop Connection. This displays the connection dialog box, as shown in Figure 2-10.
 Figure 2-10
Windows Remote Desktop Connection
- 7.
Enter the inet addr from your Pi.
- 8.
Click Connect.
You should see the remote desktop screen with the xrdp login form (see Figure 2-11).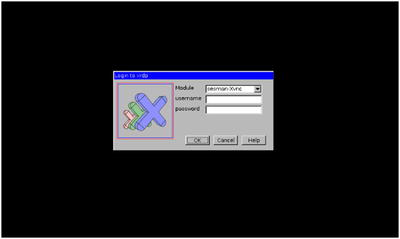 Figure 2-11
XRDP remote desktop login screen
- 9.
Enter your username and password.
- 10.Click OK. This opens the desktop from your Pi (see Figure 2-12).
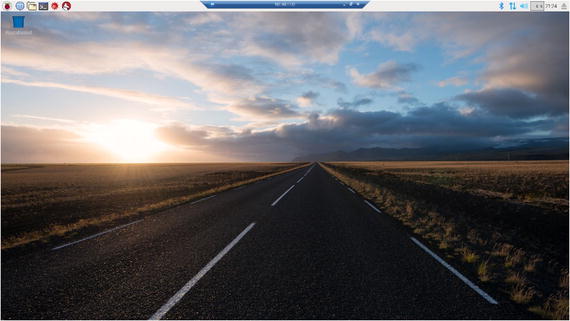 Figure 2-12
Default Raspbian desktop viewed through a remote desktop session
As long as the IP address of your Pi doesn’t change, you no longer need the keyboard, mouse, or monitor to use your Pi.
SSH with PuTTY
The most common SSH client is probably PuTTY. It’s free to use and can be downloaded from www.chiark.greenend.org.uk/~sgtatham/putty/download.html .
- 1.Open the PuTTY interface (see Figure 2-13).
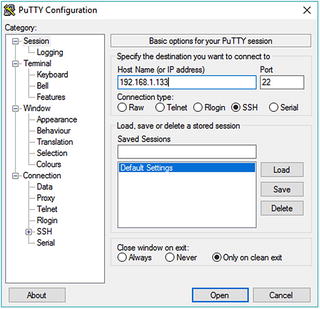 Figure 2-13
PuTTY configuration window
- 2.
Enter your Raspberry Pi’s IP address.
- 3.
Click Open.
- 4.You will likely get a security warning , as shown in Figure 2-14, but we know that this is the proper connection, so click Yes.
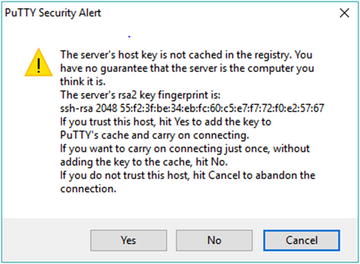 Figure 2-14
Security warning on first SSH connection with PuTTY
A terminal window opens, asking for your username and password.
- 5.
Enter your username and password. You should now see the terminal prompt, as shown in Figure 2-15.

Open SSH connection
Finding Your Device on a Network
To access your Pi remotely, you need to know its IP address on the network. Generally, a network switch retains a device’s IP from session to session; however, this isn’t guaranteed.
Finding your device’s IP address on the network can be tricky. If you are at home and have access to your router’s admin panel, this is probably the most straightforward way to find your device. Simply log on to your router, find the list of connected devices, and scroll down until you find the hostname of your Raspberry Pi.
If you need to find the IP address but are away from home, there are a few ways to do it. The easiest is to use an Nmap app on your phone. I use an app called Fing on my Android phone . Once the phone is connected to the local Wi-Fi network, the app scans the network and lists all the other devices on that network. You can just scroll down the list until you find your hostname.
If the network is new to you, your Raspberry Pi will not automatically connect to it. This situation makes it a little tricky. To make things easier, be prepared before you go out. I am a Windows user; if you are not, you need to look up the proper procedure for your OS. I do this operation with the laptop I have when traveling. It allows me to remote into the Pi long enough to connect to the local Wi-Fi and get the wlan0 IP address.
Keep in mind that the IP is assigned by the laptop. The IP you get at the end of this operation will likely not work from any other machine.
On a Windows 7 or later machine, you can perform the following steps to remote into your Pi directly to get its IP address. Make note of the IP address should you ever need to connect directly to the Pi to set up a new Wi-Fi connection. You will need a short Ethernet cable, which should be added to your kit or toolbox.
- 1.
Connect the Ethernet cable to your laptop.
- 2.
Connect the other end to the Ethernet port on your Pi.
- 3.
Open a terminal window on the Pi.
- 4.
Type sudo ifconfig.
- 5.
Locate the inet addr in the eth0 block.
- 6.
Open a terminal window on your laptop. You can do this by searching cmd in the Start menu.
- 7.
Type the following in the Windows terminal:
ping <your.Pis.IP.address><your.Pis.IP.address> is the eth0 IP address from your Pi.
- 8.
Open Remote Desktop Connection on your laptop.
- 9.
Enter the IP address from the Pi and press Enter.
You should now have a remote connection from your laptop directly to the Raspberry Pi. Make sure that you save this IP address where that you can find it later. Remote Desktop Connection should remember it, but it’s a good idea to also save it somewhere else.
Now whenever you are trying to connect to a new Wi-Fi network, you can use the Ethernet cable to remote into your Pi directly from your laptop. Once remoted in, simply select the network from the list of available networks and enter the passcode, if there is one.
Summary
The Raspberry Pi was designed for the hobbyist maker. The small Linux computer makes it very useful for a lot of different types of projects, but this means that you need to learn a little Linux. The developers at the Raspberry Pi Foundation provide an easy to use a version of Debian Linux called Raspbian.
We took the basic installation a step further by configuring remote access. This allows you to remotely access your robot through your network, which means the monitor and keyboard are no longer needed.