C H A P T E R 2
Planning and Installing SQL Server 2012
For some reason, during my time as an application development consultant, I (Rob Walters) ended up working on a few projects where I was writing an InstallShield or Windows Installer package for a client. As a former developer working in various environments, I have made my own hypothesis that, in general, whoever gets stuck writing install scripts must feel like the little kid who got picked last for a kickball team in fifth grade. There is nothing glamorous about setup. Your code is run only when the application is installed, updated, or removed. If my hypothesis is correct and writing setup scripts is not the most exciting task for developers, one can assume that, in general, the overall experience to the end user might not be optimal. After all, as a developer, why should you put much effort in something that is going to run only a few times in the life of the product?
The reason you, as a developer, should put a lot of effort into setup is that it’s the first impression of your product to the customer! A flimsy install might leave the impression that the rest of the product is shoddy, which may or may not be true. Setup is also incredibly complex with multiple requirements, including providing support for multiple operating systems and editions of SQL Server and for upgrading, repairing, and uninstalling. Getting all these right is a tough task.
Until SQL Server 2008, setting up and installing the product was an average experience at best. In general, the product would install most of the time, but there was massive room for improvement. SQL Server 2008 was part of the third generation of SQL Server products, and SQL Server 2012 builds on this great setup experience. This version contains the absolute best installation and configuration experience of any previous version of the product. The user interface is informative and intuitive, and on top of all that, there are wizards to help you perform advanced tasks such as setting up and removing cluster nodes.
In this chapter, we will discuss several aspects of planning and installing SQL Server:
- SQL Server editions and resource requirements
- Installation planning for SQL Server
- Step-by-step install of the evaluation edition of SQL Server 2012
To get the most out of this chapter, it is best to walk through an installation of the evaluation edition yourself. This edition is a free download and functions for 180 days. You can find it at the following URL: www.microsoft.com/sqlserver/en/us/get-sql-server/try-it.aspx.
Understanding the Editions
There are three main editions of SQL Server: Enterprise, Business Intelligence, and Standard. Beyond these, there are a variety of specialized editions: Developer, Express, and Evaluation edition. Before diving into the differences between each of these, it is important to first discuss 32- and 64-bit architectures, because each edition may or may not support your preferred hardware configuration.
Demystifying 32-Bit and 64-Bit Architectures
If you are relatively new to working with technology, you may have seen servers on the x86 or x64 or IA64 processor platform. If not, you will see that nomenclature once you read which platforms each SQL Server edition supports. Historically, x86 comes from the 86 part of the Intel 8086 chip. This chip design dates back the late 1970s and has been dramatically transformed over the years, increasing in performance and capabilities. Lately, the x86 in servers has been on 32-bit architecture. With 32-bit servers, one of the more significant limitations is the relatively small amount of addressable memory. Having large amounts of memory is good because it allows you to have more active connections and increases performance in memory-hungry applications like Analysis Services, SQL Server Integration Services, and the SQL Server database engine.
So, in a perfect world, manufacturers would give you a 64-bit chip to allow you to address greater amounts of memory. And they have provided 64 bits, just with some bumps in the road. Up until 64-bit chips, two main chip manufacturers supported the Windows operating system: AMD and Intel. In terms of market share, hardware vendors appeared to prefer Intel’s implementation of x86. When it was time for 64-bit, Intel veered off into a totally new direction, away from its popular x86 architecture. This new chipset was called Itanium, or IA64. AMD also wanted to produce a 64-bit chip, but it produced a chip that was just like the x86 except the instruction sets were 64-bit. In effect, AMD made a true 64-bit version of the popular x86 chip; it’s referred to as x86-64. In the end, hardware vendors and users of these chips found it much easier and quicker to leverage AMD’s implementation than Intel’s Itanium. This was because, with AMD, the vendors did not have to rewrite major parts of their implementations to run on a 64-bit platform. With the minimal success of its Itanium brand of processors, Intel was forced to make an x86-64 chip as well. Together, both AMD and Intel’s version of x86-64 are known to Microsoft as x64. Various editions of SQL Server support specific architectures, and chances are, if your company is buying new hardware, it’s probably 64-bit. SQL Server 2012 supports the x86 and x64 platforms. At the time of this writing, there is no planned support for the Itanium IA64 platform. Also note that if you are planning on installing SQL Server 2012 on 32-bit hardware, you will not be able to use addressable windowing extensions (AWE). This feature was introduced to allow SQL Server to use more than the 2GB memory normally capped by 32-bit operating systems.
Server Editions
Before SQL Server 2008, there was not much difference between the features in Standard edition and the ones in Enterprise edition. Enterprise edition traditionally has had features that focus on solving the needs of very large and highly available database systems. Features such as table partitioning, unlimited CPU usage, online indexing, and online restore are examples of enterprise features. If companies had unconstrained budgets, chances are they would probably just buy Enterprise edition and go on with life. In reality, most organizations are always under tight budget constraints, so companies were more likely to purchase Standard edition, which costs about one-fourth as much as Enterprise edition. Starting with SQL Server 2008, the differences between Standard and Enterprise editions are quite substantial. In fact, the changes added to the Standard edition of SQL Server 2012 are minimal. Most of the work has been placed in Enterprise edition and in a new edition called Business Intelligence edition. The feature sets work a lot like a Russian doll, where Standard edition is a subset of Business Intelligence edition, which is a subset of the Enterprise edition features.
Most of the key features, such as AlwaysOn Availability Groups and columnar indexing, are in Enterprise edition only. SQL Server Books Online has a great article called “Features Supported by the Editions of SQL Server 2012” at http://msdn.microsoft.com/en-us/library/cc645993(v=SQL.110).aspx. If you are asked to evaluate which edition to use, consider the capabilities that Enterprise edition offers, because it may be more economical to consolidate servers and applications and simply purchase a single Enterprise license.
Let’s take a look at these editions in detail.
Standard Edition
Standard edition is designed for departmental applications. This edition contains some basic business intelligence capabilities as well as the fundamental relational database features. Most of the enhancements to SQL Server are found in the other two editions; however, you will notice some minor improvements, such as native auditing support at the server instance level.
Business Intelligence Edition
Business Intelligence Edition contains all the functionality of Standard edition and includes a full suite of business intelligence capabilities including the new Power View feature. This edition contains functionality to integrate well with your SharePoint environment.
Enterprise Edition
Enterprise Edition is the most comprehensive offering. It includes all the mission-critical OLTP capabilities as well as end-to-end business intelligence capabilities. Unlike other database platform vendors, there are not any add-ons to SQL Server. When you choose Enterprise edition, you have everything that SQL Server has to offer.
Specialized Editions
Enterprise edition, Business Intelligence edition, and Standard edition are the core offerings for SQL Server. If those editions were all you could buy, you probably wouldn’t be too happy. There are situations where you need to have access to all the functionality of Enterprise edition but you can’t afford it. A development environment is a perfect example of when you might need all the features available. For this reason and others, several specialized editions are available. Each of these editions has some restrictions that are mentioned in the following subsections.
Developer Edition
Developer edition is really Enterprise edition with some extra development-oriented content and licensing restrictions on how it can be used. This edition is intended for users to build and test applications and is not allowed to be run as a production server. In the event you want to upgrade your Developer edition to Enterprise edition, this is also possible.
Express Edition
Express edition is Microsoft’s free version of SQL Server. A long time ago, Microsoft had a free version of a database called Microsoft Desktop Engine (MSDE). A major issue with MSDE was that there was no user interface, so it was very difficult to manage. Microsoft did away with MSDE and introduced the Express edition starting with SQL Server 2005. Functionally, Express edition is almost the same as Standard edition except that is limited on CPU and memory use. There are other differences, such as the absence of the SQL Server Agent job scheduler and a reduced replication story. After all, what do you expect for free?
There are a few more versions of Express. One is called Express with Advanced Services. The name is not really catchy, but it includes everything in Express plus a version of Reporting Services. The other is Express with Tools, which is the SQL Server database engine and SQL Server Management Studio Express version. You can also download just the SQL Server Management Studio Express version as a stand-alone install.
SQL Server Express LocalDB
SQL Server Express edition is a free version of SQL Server that is basically a throttled-down version of the full SQL Server engine. For SQL Server development, the idea was to include this free version for developers to use and learn with. One of the problems with SQL Server Express is it’s a heavyweight in a fight requiring a featherweight. SQL Server Express is a Windows Service and requires network configuration and attention.
For developers, there is something better in SQL Server 2012 called SQL Server Express LocalDB (LocalDB). LocalDB is a version of SQL Server that installs faster, has fewer prerequisites and doesn’t require management of a database instance. LocalDB is not an in-proc DLL that you bind to, rather it’s an application that runs in the user mode as a separate process. LocalDB is not appropriate for server-based or multiuser environments, because its opens the database files for exclusive use. It is, however, ideal for development environments since it’s fully supports T-SQL.
Evaluation Edition
The evaluation edition is a 180-day free version of Enterprise edition. You can download it for free from www.microsoft.com/sqlserver/en/us/get-sql-server/try-it.aspx. Note that at the end of the 180-day period, you will either have to upgrade to a paid edition or uninstall SQL Server.
SQL Server Terminology
Before we get too much in depth on describing how to install and use SQL Server, it is good to introduce some key concepts about this relational database at this point. In particular, you should understand the term instance as it is used with respect to SQL Server.
Prior to SQL Server 2000, you could have only one installation or instance of SQL Server installed on the server. You can think of an instance of SQL Server as a complete SQL Server installation including objects like system and user databases, logins, and SQL Server Agent jobs. Starting with SQL Server 2000, you can install multiple instances of SQL Server on the same server. These additional instances will simply listen for user connections on different ports. Since each instance is effectively a completely isolated database server, using multiple instances allows for easy application consolidation.
Planning Your Installation
If you are planning on installing SQL Server on your desktop to just play with it, you probably don’t create a plan, review it with other folks in your organization, and schedule a time to implement the plan. Chances are you load setup.exe and click the Next button a bunch of times until the wizard starts installing SQL Server.
Although installing SQL Server 2012 can be as simple as clicking a few buttons, it is a good idea to step back first and create an installation plan. This plan will help you answer questions that are critical to the success of the installation. Some of these questions are as follows: Do we meet the hardware requirements of SQL Server 2012? Are the systems engineering folks aware of our new installation of SQL Server? The last question is very important. In some organizations, measures are in place to automatically block network ports if new applications appear to be running on them. This is an effort to reduce the risk and damages of viruses. Always get the necessary people involved when planning an installation of SQL Server. These people include not only your database administrators but other folks from IT, such as the people who are responsible for the network and for the operating systems. The specific list depends on how your organization is structured.
Assessing the Environment
Most organizations have a good idea of all the servers that they currently have. However, the larger the organization, the more likely that there are instances of SQL Server that exist that may or may not be accounted for or managed by the DBA staff. That situation may come about for a variety of reasons, even some legitimate ones. In the end, as a DBA, it is a good idea to keep an active inventory of which servers and SQL instances you manage. Not only is this a best practice but it’s a good way to prevent you and your company from getting into legal trouble. There are a variety of tools that can help you with SQL Server instance discovery. Microsoft ships a tool called the Microsoft Assessment and Planning (MAP) Toolkit. This toolkit is not designed for just SQL Server; rather, it helps users simplify the planning process for migrating to Windows 8, Microsoft Office 2010, Windows Server 2008 R2, and other Microsoft products. You can find more information about this tool at www.microsoft.com/MAP.
With respect to SQL Server, the MAP tool will discover and inventory all the SQL Server instances in your organization. Data collected about each instance includes the version, edition, and current service pack applied. This tool also captures the hardware and platform details for computers that are running SQL Server instances, including determining whether the machines are virtual or physical. Figure 2-1 shows a screen shot of the MAP tool.
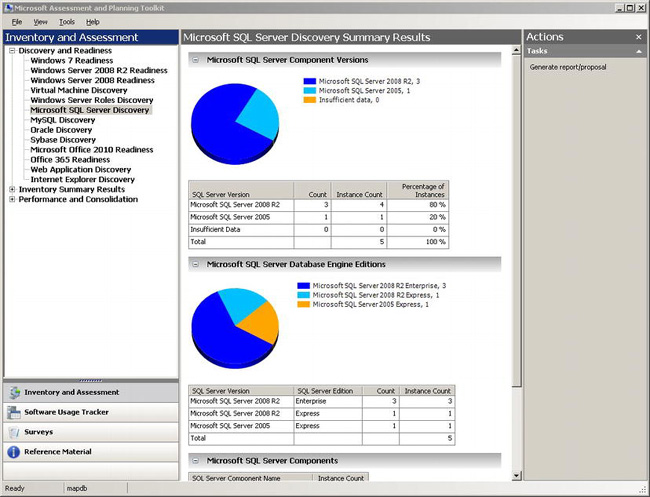
Figure 2-1. Microsoft SQL Server discovery summary
The MAP tool creates both a Word document and Excel workbook that are much more detailed than the report shown in Figure 2-1. Information gathered from this tool includes SQL Server service packs installed, editions, disk free space, database names, database sizes, users and much more. This tool is covered in greater depth in Chapter 16.
Choosing the Right Edition
Earlier, you read about the various editions available with SQL Server. Unless you know your organization is purchasing Enterprise edition, you need to determine whether the features and functionality you need are in any of the other versions. After all, there’s no need to spend money unnecessarily.
SQL Server Books Online offers a plethora of great information on SQL Server, including a nice table that lists which edition contains which of the key features within the product. You can find this “Features Supported by the Editions of SQL Server 2012” article at http://msdn.microsoft.com/en-us/library/cc645993(v=SQL.110).aspx.
Once your organization or team has decided which edition to use, you need to verify the hardware and software requirements for SQL Server.
Validating Hardware and Software Requirements
Going to college in the great state of Michigan, I had the opportunity to do an internship with an independent software vendor that was working on a project for one of the big three automobile manufacturers. I learned a lot from that experience, and it wasn’t just Visual Basic and COM development. Rather, it was what was learned from the water cooler discussions. One time, I overheard a few folks talking about an investigation into why brakes were wearing out much faster than they did when tested in their lab. Apparently, the vehicles running those brakes that had this problem all had aftermarket rims, and these rims couldn’t dissipate the heat that the brakes generated. The heat buildup caused the brakes to wear more quickly than with the stock rims. The moral of this story in relation to SQL Server is to check that the hardware you plan to install SQL Server on can support the requirements and thus provide a great end-user experience.
SQL Server Books Online does another great job going into detail on each of the editions in the article “Hardware and Software Requirements for Installing SQL Server 2012” at http://msdn.microsoft.com/en-us/library/ms143506(v=SQL.110).aspx. You can see from the article that the requirements vary between editions. Thus, it is important to consider the edition you plan to use.
In an enterprise environment, change happens. You’ll frequently be faced with new requirements and user demand. In the Enterprise edition of SQL Server, it is possible to hot-add memory and CPUs, provided both the hardware and the operating system support this capability. By being able to add memory and CPU without restarting the server or the SQL Server service, you can maintain high levels of availability for your database.
Installing SQL Server Evaluation Edition
In this section, we will perform the initial install of SQL Server, which simply installs the support files, including the .NET Framework and SQL Server Installation Center. If you already have SQL Server installed or choose not to install SQL Server at this time, you can skip this section. Throughout this book, the examples will use the evaluation edition of SQL Server.
![]() Note Developer and Enterprise editions provide the same capabilities as the evaluation edition. If you have either Developer or Enterprise edition available to you already, you can go ahead and use it rather than installing the evaluation edition.
Note Developer and Enterprise editions provide the same capabilities as the evaluation edition. If you have either Developer or Enterprise edition available to you already, you can go ahead and use it rather than installing the evaluation edition.
Step 1: Downloading SQL Server Evaluation Edition
You can download the evaluation edition from www.microsoft.com/sqlserver/en/us/get-sql-server/try-it.aspx. When you navigate to this link, you will have the option to download a 32-bit or 64-bit version.
You can download either a DVD image of the product or a single executable. Either one will work, and for the sake of simplicity, I’ll assume you chose the x64 executable. Once a selection is made, the download begins, and depending on your Internet connection speed, you may want to consider grabbing a drink. The download is more than 1GB.
Once you have your own copy of the 1GB executable, you are ready to run it. Upon execution, you are asked for a folder name. Once you provide this folder path, the installation application will take about five minutes to extract all the files within the single file archive and re-create the entire SQL Server installation directory structure. When this process is complete, you will be greeted with a simple Extraction Complete dialog box.
It is at this point where you are ready to actually run the installation of Setup.
Step 2: Understanding the SQL Server Installation Center
If you look at the files that are contained on the SQL Server setup media, you can see a readme.htm file. Readme files are provided with every release of the product and contain a lot of valuable information. In the SQL Server 2012 readme file, there are links to the Upgrade Advisor tool and to various SQL Server Books Online topics regarding installing SQL Server.
At this point, you are ready to begin installing SQL Server. As with most Microsoft products, a setup.exe executable is located in the root folder of the SQL Server media. This program will first verify that you have the correct .NET Framework version installed as well as other prerequisites. If it is determined that you are missing any of these prerequisites, setup.exe will install them for you at this time. You may be required to reboot the machine depending on which operating system and which prerequisites you have already installed.
Once the prerequisites are installed, running the setup.exe program will simply launch the SQL Server Installation Center dialog box. This small application is the graphical launch point for all kinds of setup tasks. Here, you can install a stand-alone instance of SQL Server or even add a node to an existing SQL Server cluster. The installation center consists of seven tabs, each providing values to an aspect of installing SQL Server. Let’s take a look at each of these tabs in more detail.
Planning Tab
The Planning tab (see Figure 2-2) is the first tab that is displayed when the SQL Server Installation Center is started.
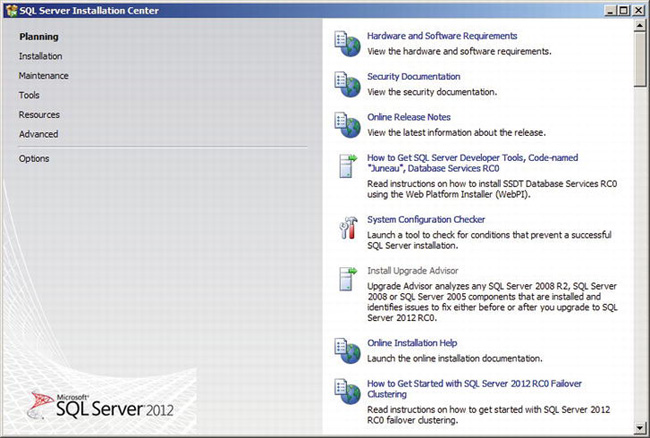
Figure 2-2. Planning tab of the SQL Server Installation Center
Previously in this chapter, we discussed issues to think about when you install SQL Server, such as figuring out whether your current hardware and software are compatible with SQL Server 2012. The Planning tab helps you plan your installation of SQL Server by making it easy to quickly access this kind of information. This tab also provides links to other important information, such as online release notes and online installation help. In addition to hyperlinks, there are two tools within this tab, the System Configuration Checker and the Upgrade Advisor. The System Configuration Checker (see Figure 2-3) will check the state of your server and determine whether Setup can proceed. Examples of these tests include determining whether your server needs to be restarted or whether you meet the minimum operation system version to install SQL Server.
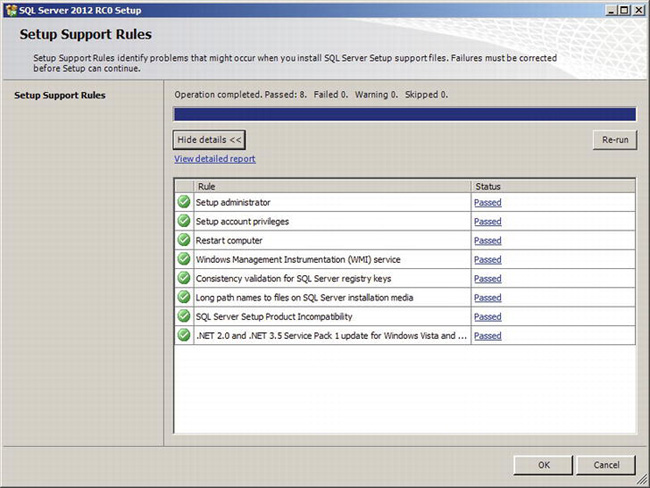
Figure 2-3. System Configuration Checker
There are other times within Setup where this System Configuration Checker will run for you. For example, when you are installing a stand-alone instance of SQL Server, this utility will be run at the beginning of that task.
The other tool on the Planning tab is the Upgrade Advisor. Use the Upgrade Advisor when you have an existing SQL Server installation and want to upgrade it to SQL Server 2012. The tool will check, from a syntactical standpoint, the integrity of your SQL Server installation. For example, if your application has referenced a deprecated stored procedure or function, this tool will tell you. Knowing and acting on this information before actually upgrading the server can save a lot of time and pain. This tool is discussed in more detail in the “Upgrading SQL Server” section of this chapter.
One of the last links on the Planning tab is the “How to get started with SQL Server 2012 Failover Clustering” link. Clustering is a big deal in most enterprise environments, and this link is an effort to help users with installing SQL Server on clustered servers.
Installation Tab
The Installation tab (see Figure 2-4) provides a series of wizards to help users install or upgrade SQL Server.
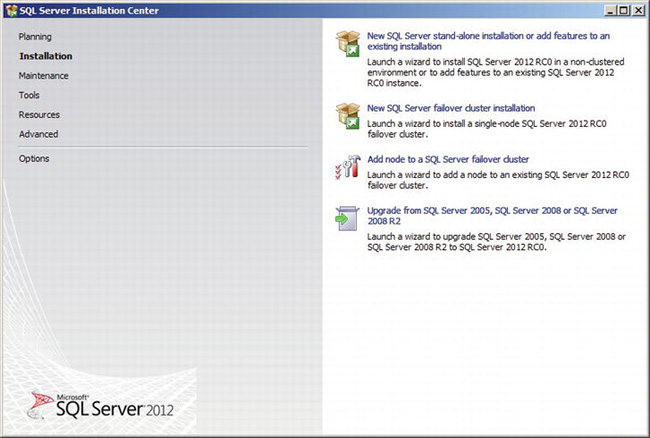
Figure 2-4. Installation tab of the SQL Server Installation Center
The Setup experience with SQL Server contains a lot of wizards in key areas. On the Installation tab, you can see links to launch wizards that help users. The first option, “New SQL Server stand-alone installation or add features to an existing installation,” is self-explanatory; it launches the wizard you will use later in this chapter to install your instance of SQL Server. The next option is “New SQL Server failover cluster installation.” The act of setting up and configuring a clustered SQL Server has traditionally been a tedious process. This version of SQL Server relieves some of the frustration by providing easy-to-use wizards to help the process along. Even common tasks, such as adding a node to a cluster, can be done using the “Add node to a SQL Server failover cluster” link, which also launches a wizard. There is even a wizard that will walk you through an upgrade of SQL Server 2005, SQL Server 2008, or SQL Server 2008 R2. This would be, you probably guessed it, the “Upgrade from SQL Server 2005, SQL Server 2008 or SQL Server 2008 R2” link.
Maintenance Tab
The Maintenance tab (see Figure 2-5) has four more features for you to enjoy.
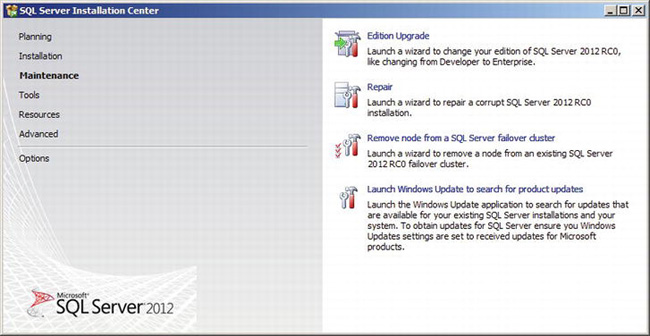
Figure 2-5. Maintenance tab in the SQL Server Installation Center
The Edition Upgrade Wizard allows you to upgrade an installation from a lower edition to a higher one. If you don’t know what is meant by “lower edition,” just think of how much each edition costs. For example, you can upgrade from Standard to Enterprise, but you cannot upgrade from Enterprise to Standard edition. This feature isn’t here just to up-sell you on the bigger and faster vehicle; it does have some use in the upgrade scenario. Although it is possible to upgrade directly from SQL Server 2005 Standard to SQL Server 2012 Enterprise, the best practice would be to upgrade to SQL Server 2012 Standard first and then perform this edition upgrade once your existing applications are verified.
The Repair Wizard is the second of the three wizards available on the Maintenance tab. It runs through and checks the integrity of the installation, making any necessary changes to get you back to the original installation. Use this wizard if you had a previously failed installation of SQL Server.
The “Remove node from a SQL Server failover cluster” wizard guides you in removing a node from a SQL Server cluster. This task was once a pain to perform, but this wizard makes node removal much easier in SQL Server 2012.
Searching for product updates within setup makes it easy to install the latest bits the first time. Although this check is performed when you install an instance of SQL, you can check for updates whenever you want using the, “Launch Windows Update to search for product updates” link.
Tools Tab
The Tools tab (see Figure 2-6) contains four tools that will help users in their installations of SQL Server.
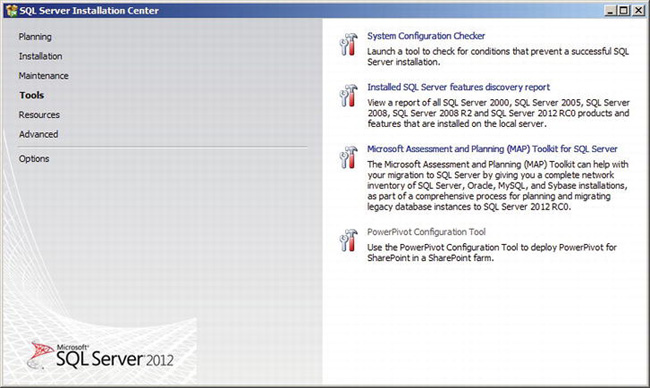
Figure 2-6. Tools tab in SQL Server Installation Center
The System Configuration Checker tool is the same one as was described on the Planning tab. The link to the tool is included on this tab also, just for convenience’s sake.
On some occasions, you may be installing SQL Server 20012 on a server that may already have components of SQL Server or other instances of SQL Server installed. The “Installed SQL Server features discovery report” option does a quick inventory of the SQL Server instances and components that are installed on the local server. The tool presents these findings in an HTML document format for easy reading.
The discovery report obtains this information only for the local server. However, it is possible to run a different utility—the MAP toolkit—to obtain this kind of inventory information across your enterprise. You’ll find an example of using the MAP toolkit in Chapter 16.
Finally, the PowerPivot Configuration Tool allows you to deploy PowerPivot into an existing SharePoint 2010 farm. PowerPivot for SharePoint enables the sharing of PowerPivot workbooks (created in Excel) via the SharePoint platform.
Resources Tab
The Resources tab (see Figure 2-7) contains a plethora of links to online resources related to SQL Server 2008.
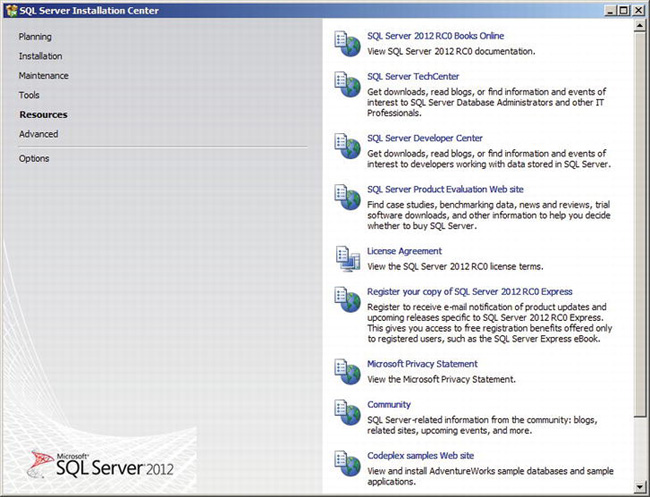
Figure 2-7. Resources tab in SQL Server Installation Center
SQL Server Books Online will be your best friend. Books Online contains an immense amount of SQL Server information. From T-SQL statement definitions to how-to articles, you will find yourself frequently referring to it. SQL Server Books online can always be accessed for free from the Web at http://msdn.microsoft.com/en-us/library/ms130214(v=SQL.110).aspx.
The other link on the Resources tab that is worth mentioning is the link to the CodePlex samples web site. In previous versions of SQL Server, samples were included on the install media. SQL Server 2012 does not include any samples; rather, all samples and example databases like AdventureWorks are available from CodePlex. The CodePlex web site isn’t just for SQL Server; it is actually a multiproduct open source project workspace (www.codeplex.com).
Advanced Tab
The Advanced tab (see Figure 2-8) contains links to wizards that will assist the user in special-case installations.
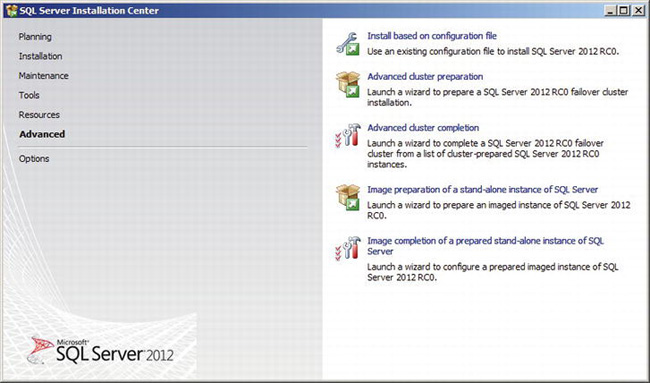
Figure 2-8. Advanced tab in SQL Server Installation Center
One of the more common techniques for installing SQL Server is to do it without a user interface (UI). This technique is called a scripted install and is very useful when you have to install multiple SQL Server instances. Imagine trying to run through the setup wizard on each one of your 20 SQL Server instances. Not only would that process take a long time but you would be spending a lot of time sitting at the server waiting for the installation to finish. Scripted installs leverage a configuration file that specifies all the properties you would have set while walking through the wizard. The end result is you don’t have to sit there and wait to click the Next button.
Creating the configuration file by hand is a bit tedious. A SQL Server Books Online how-to article called “How to: Install SQL Server 2012 Using a Configuration File” at http://msdn.microsoft.com/en-us/library/dd239405(v=SQL.110).aspx makes a few key points about using configuration files. The most important one is that you don’t have to sit and launch Notepad and write one of these configuration files from scratch. You can simply run through the setup wizard once and, instead of proceeding past the Ready to Install page, just copy the file path provided on this page and click Cancel. The file path is the location of a configuration file based on the options you selected in the wizard.
The “Image preparation of a stand-alone instance of SQL Server” option invokes a wizard that helps you create a Sysprep image of SQL Server. Sysprep is a tool that is used to help deploy images of system across multiple servers. Imagine if you had 30 brand new servers and you wanted to install Windows Server and SQL Server on all of them. This would take a lot of time. However, if we install one and then use Sysprep on that server, we could take that the resulting image and deploy it across the 29 other servers. The “Image completion of a prepared stand-alone instance of SQL Server” option invokes the wizard you run to finalize this Sysprep image. By “finalize,” we mean setting the specific computer name for that server and other instance specific information.
Once you have a configuration file, you can simply pass this file to Setup on the command line (setup.exe/ConfigurationFile=myCustomSQLInstall.ini) and come back when it’s finished.
Options Tab
The Options tab (see Figure 2-9) allows the user to select a processor architecture as well as the location of the installation media. This option is useful in a consolidation scenario where you want to install an x86 32-bit install on an x64 system. The x64 option is disabled because this screen shot was taken on a 32-bit virtual machine.
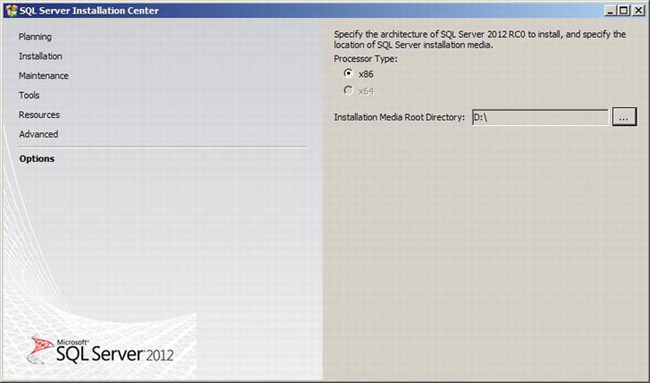
Figure 2-9. Options tab in SQL Server Installation Center
Step 3: Installing an Instance of SQL Server
Begin your installation of SQL Server by clicking the “New SQL Server stand-alone instance” link on the Installation tab of the SQL Server Installation Center. This link will launch a wizard that you can use to install a single instance of the SQL Server database engine. When you launch the wizard, Setup will run the System Configuration Checker tool, the same one that can be launched from the Tools tab. This checker will make sure that the server is in a state that can handle the installation of SQL Server. Some of the issues that could prevent an install include situations where the server is pending a reboot or the user is trying to install SQL Server on an unsupported operating system. Next, SQL Server will check for Product Updates and install SQL Server setup files.
After the check is performed, you will be asked for the product key. In the case of the evaluation edition, you will be asked either to enter the product key or to simply choose which free edition you want to install. To enable all the features in the product, make sure Enterprise Evaluation is selected in the “Specify a free edition” drop-down list.
Upon continuing the wizard, some additional SQL Server installation files will be installed; after that, you will be presented with the actual installation wizard. The first page of this wizard will be another system configuration check, which will check some different properties than the first configuration check. Once this completes, you are now ready to start telling the wizard exactly what you want.
Setup Role Page
SQL Server and its components like Analysis Services are not just their own products. They are sometimes integrated within other products like SharePoint 2010. It is the Setup Role Page shown in Figure 2-10, from which setup is asking you if you want to install all the SQL Server components, install the analysis services components within a SharePoint farm, or install everything with default options. For purposes of this chapter, we will keep the default radio button, SQL Server Feature Installation, selected.
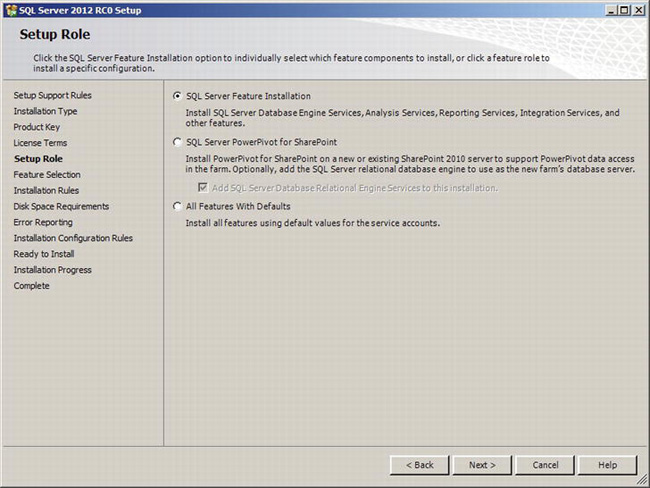
Figure 2-10. Setup Role page
Feature Selection Page
The Features Selection page (see Figure 2-11) allows you to specify which components of the product you want to install.
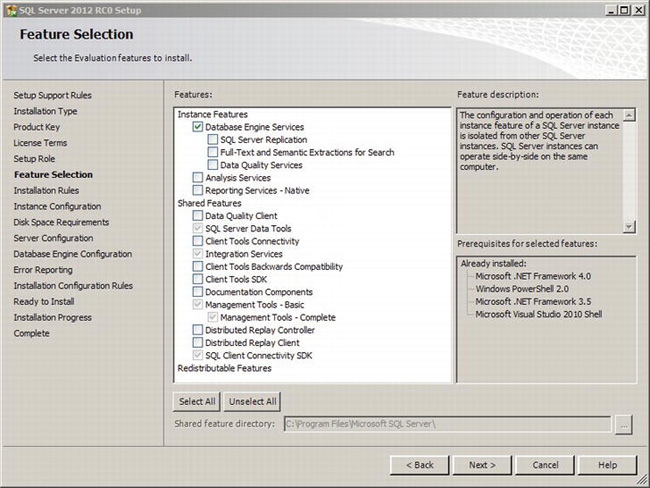
Figure 2-11. Feature Selection page
By selecting an instance feature, you are asking Setup to install a new instance of the database engine, Analysis Services engine, or Reporting Services. These options will install a new instance regardless of whether there is already one on the server. There are some components, though, that don’t require more than one instance on the server. These components are called shared components and include things like SQL Server Management Studio (would you really want two different copies of SQL Server Management Studio on the same server or client machine?). If you took a good look at Figure 2-11, you may have noticed that one of the items, Redistributable Features, does not have any items under it. This is by design, and it includes features like MSXML version 6.0 and Error and Usage Reporting.
For the purposes of our walkthrough, select Database Engine Services from the Instance Features node as well as the default selected shared features shown in the above figure.
Instance Configuration Page
The Instance Configuration page (see Figure 2-12) allows users to select which type of instance to install—either a default instance or a named one. Per server, there can be just one default instance. However, you can install multiple named instances. In fact, you can have up to 50 instances installed on a server. These instances could all be SQL Server 2012 or a mix of SQL Server 2005 and SQL Server 2008.
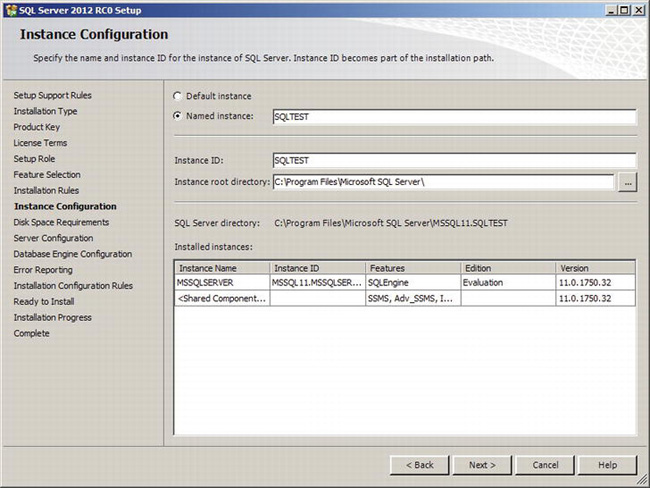
Figure 2-12. Instance Configuration page
There are some restrictions on the name of a named instance, including a 16-character limit and the inability to use SQL Server reserved words, such as default. These are all documented in the “Instance Configuration” article in SQL Server Books Online.
When SQL Server creates a new instance, it creates various registry key entries and folders within the file system. Since you can install more than one instance of the SQL Server database engine on a server, SQL Server needs to uniquely name these registry keys and directories. The instance ID is the text that will be used to help create the unique name for these objects. By default, the instance ID is the same as the instance name. The instance root directory is the folder that will contain the binaries for the SQL Server database engine.
If there were existing instances of SQL Server installed on this server, the Installed Instances grid would be populated with these. This grid is useful when it’s midnight and you can’t remember whether or not you installed the new instance on your server.
Disk Space Requirements Page
The Disk Space Requirements page simply summarizes how much disk space will be required to install the selected features. The space usage is broken up into space required on the system drive, space required in the shared feature folder, and space required by the instance directory itself. There are no options to select on this page; it is informative only.
Server Configuration Page
The Server Configuration page (see Figure 2-13) is one of the more important pages within this installation wizard.
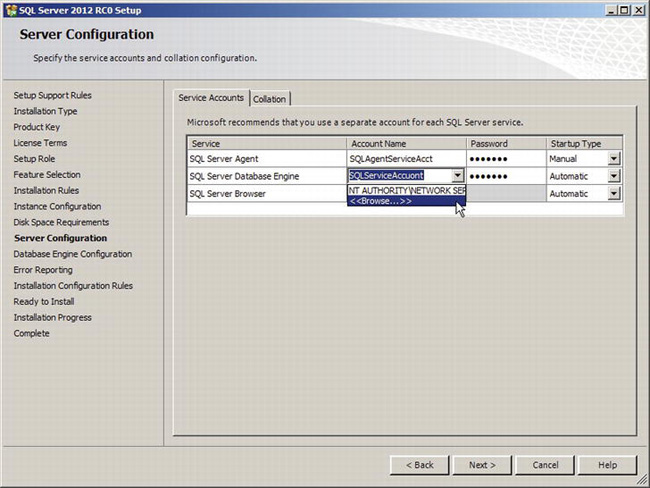
Figure 2-13. Server Configuration page
A service account can be built-in, like the Network Service account, or it can be a Windows User account. One thing to keep in mind is that whatever account is used for these services, that account has a high privilege. If you are not using Windows 7 or Windows Server 2008, you should refrain from using the built-in system accounts and instead use a regular domain user account.
The reason is that if your SQL Server instance is compromised and the attackers gain access to the sysadmin account, they are effectively running as whatever user is listed as the SQL Server service account. If you have only a single domain user account for SQL Server and a different one for other services, it would be much more difficult for attackers to obtain information from the other services. Similarly, if SQL Server is running under the Local System built-in account, that account has access to everything on the server. Thus, if your server is compromised and you are running under Local System, your whole server could be exposed to the attacker. If you are using Windows 7 or Windows Server 2008, you can use the Network Service account because it is more secure and easier to administrate than a domain account. The Service Accounts grid allows the user to specify a built-in account or a user account to use for each of the services that will be installed.
The Startup Type drop-down options are Automatic, Manual, or Disabled. This setting determines the state of the service upon a server reboot. Automatic means this service will be automatically started when the operating system starts. Manual means that an administrator will have to explicitly start the service. Disabled means that the service will not be available. A best practice is to set services that you know you will not use to either Manual or Disabled. By stopping or disabling a service, you are reducing the surface area for attack.
Next to the Service Accounts tab is the Collation tab. Collation is all about language support for SQL Server. A collation setting defines how SQL Server sorts and compares characters that are stored in non-Unicode data types. Image what should happen if you issued the statement SELECT * FROM Customers where State='MA' and your state column data within the table was stored in lowercase, as in ma. Depending on which collation you were using, this query should either return all the rows as expected or return nothing. The result depends on if the collation was case insensitive or case sensitive. For more information on using collations, check out the SQL Server Books Online topic “Working with Collations.”
Database Engine Configuration Page
The Database Engine Configuration page (see Figure 2-14) contains important security-related parameters that need to be addressed.
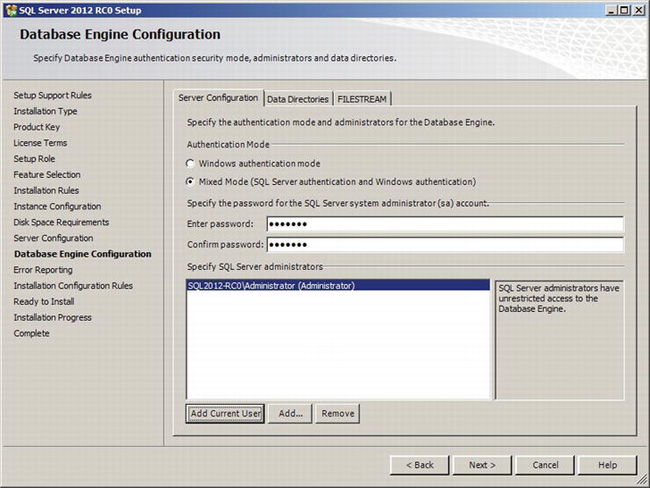
Figure 2-14. Database Engine Configuration page
This page in the wizard has three tabs: Account Provisioning, Data Directories, and FILESTREAM. The Account Provisioning tab allows you to define the kind of authentication mode SQL Server will support. If you select just Windows Authentication mode, only Windows users can connect to SQL Server. This situation is problematic if you can’t use Active Directory or the local user store in Windows. The other option in this case is Mixed Mode. In mixed mode, you can still have Windows-authenticated users connect, but you could also have a user credential that exists only within SQL Server. These kinds of principals are called SQL logins.
SQL logins are very helpful in heterogeneous environments when you have non-Microsoft clients connecting to SQL Server. SQL Server authenticated accounts are easier to set up and use, and for that reason, they are used within the examples throughout this book. Thus, you need to select the Mixed Mode radio button.
When SQL Server is installed, a few accounts are created before anyone connects to SQL Server. The SA account is the system administrator account and has access to everything within SQL Server. This is the highest privileged account, and its credentials should be protected. This tab allows you to enter a password for the SA account; be sure to provide a complex one.
The “Specify SQL Server administrators” list box contains all the users that you want to give system administrator access. For some customers, Windows administrator users who install SQL Server are not necessarily those who will manage it. In this case, the Windows administrators would simply add whomever the DBA will be in the “Specify SQL Server accounts” list box. For the purposes of our evaluation of SQL Server, just click the Add Current User button, and your Windows User account will be added as an administrator.
The Data Directories page (see Figure 2-15) within this wizard page is where you can specify the default folder paths of various databases within SQL Server.
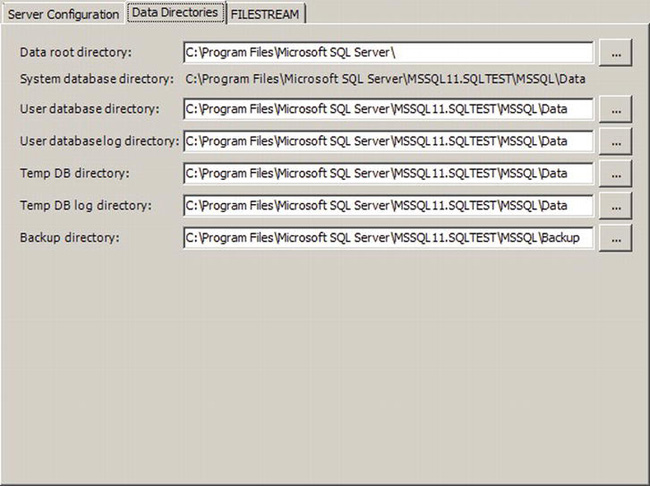
Figure 2-15. Data Directories tab on the Database Engine Configuration Wizard page
In this example, all of the directories are on the local C drive. For demonstration purposes, this is fine, but on a production system, it’s best to spread different database files on different physical hard drives. This is important for user databases but is equally important for a system database called tempdb, which is SQL Server’s scratch pad and is used by the server to sort data in queries and perform many other data-intensive operations. Thus, it is good to put tempdb on its own physical disk if possible.
The FILESTREAM tab is used to enable the Filestream feature, which allows users to exceed the 2-GB storage limit by placing the data on the file system. The Filestream feature manages the integrity of the file and ensures that no one can directly affect the data on the file system. As an added bonus, if you back up the database, the files stored and managed by the Filestream feature will also be included in the backup. You do not need to enable the Filestream feature at this time. If you want to enable it after you install SQL Server, you can do so using the SQL Server Configuration Manager. You can find details in the SQL Server Books Online article “How to: Enable FILESTREAM.”
Error and Usage Reporting Page
This page displays two options. The first option is to opt in to send error information to Microsoft. The other option is to send feature usage information anonymously to Microsoft. Although some may be hesitant to do this because they fear sending sensitive information over the Internet, this issue isn’t a concern, because these options do not send raw data. Rather, these options will send error codes and feature usage to Microsoft anonymously. This data is extremely valuable to the SQL Server product team because it can answer questions like “how often is this feature used?” In the end, by enabling these options, you will indirectly improve the user experience of the product.
Installation Rules Page
The Installation Rules page will perform another system configuration check, but this time, using yet a different set of rules. You specify parameters such as whether the WMI service is on and whether the file system is NTFS. There are no user-customizable actions on this page.
Ready to Install Page
The Ready to Install page (see Figure 2-16) is the page you have probably been waiting for. It gives a detailed summary of what Setup plans to do.
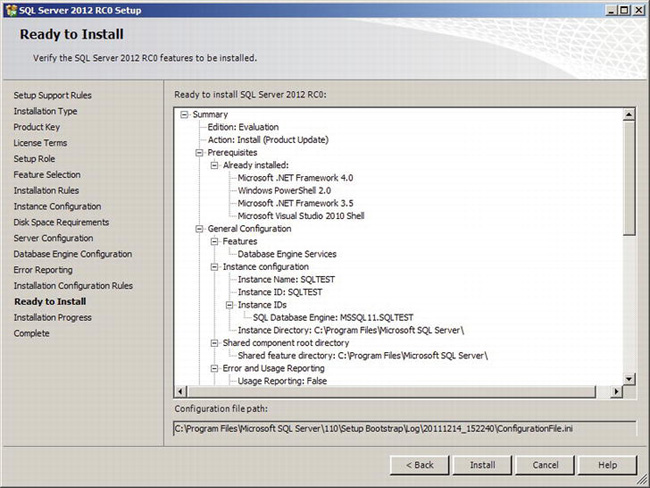
Figure 2-16. Ready to Install page
At this point, you could click the Install button and have the Setup application start performing the install, or you could obtain the installation script by locating the file at the bottom of the page. The “Configuration file path” setting points to a configuration file that is automatically created based on your selections on the previous wizard pages. If you wanted to perform a silent or remote install, you could now use this configuration file.
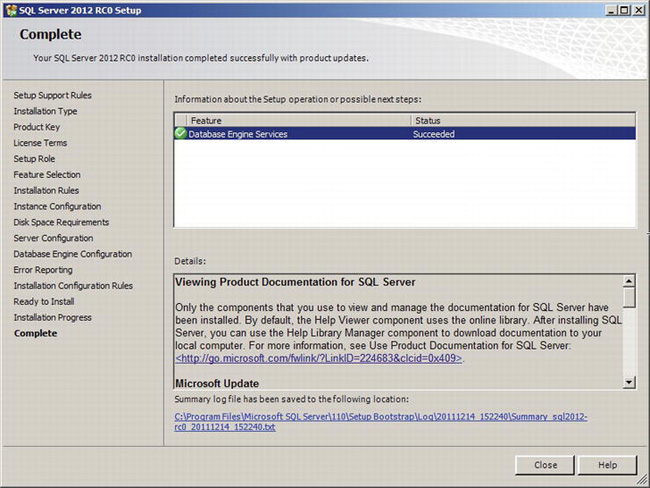
If you are following along with this installation, you can click the Install button now. This action will start the install process. The duration of installation depends on how many options you selected to be installed and what kind of platform you are installing onto. When Setup is complete, you will be presented with the Complete page. Here, you will find a link to the setup log file. If bad things happened in the setup and it failed, the setup summary log file is the first place to go to look into what might be wrong. If you ever call Microsoft product support for any installation issues, finding and sending this log will be one of the first tasks you will be asked to do. The Complete page (see Figure 2-17) shows the location of the setup log files.
Upgrading SQL Server
Chances are that if your organization has existing SQL Server implementations, you may eventually need to upgrade them. Each version of SQL Server (and almost any other software product) is officially supported for a limited number of years. Once this time is up (as it was in April 2008 for SQL Server 2000), customers can purchase extended support agreements. You can find detailed information on the life cycles of Microsoft products at www.microsoft.com/lifecycle.
Upgrading servers in your organization is probably not a spur-of-the-moment decision. A lot of planning should be done beforehand to make sure the upgrade goes smoothly. When thinking about upgrading a SQL Server database, it is important to first consider the following questions:
- Is the server hardware capable of running this new version of SQL Server? If you are planning on using the same hardware you were using to run SQL Server 2005, this may not be suitable for SQL Server 20012. Complete requirements can be found in the “Hardware and Software Installation Requirements for SQL Server 2012” article in SQL Server Books Online at
http://msdn.microsoft.com/en-us/library/ms143506(v=SQL.110).aspx.- Are you planning on using the right edition of SQL Server? A lot of the bright and shiny features of SQL Server 2012 are in the Enterprise edition. If you are currently running the Standard edition and want to upgrade because you want to leverage the new AlwaysOn Availability Groups feature, simply upgrading to SQL Server 2012 Standard edition will be disappointing. On the bright side, it’s very easy to upgrade editions within SQL Server’s Setup application. If this is your scenario and you wanted to go from SQL Server 2005 or SQL Server 2008 Standard edition to SQL Server 2012 Enterprise, the best practice is to go through the setup process and upgrade the server to SQL Server 2012 Standard first. Once SQL Server is upgraded, test your applications against it. When you’re satisfied, rerun Setup, and run the Edition Upgrade Wizard on the Maintenance tab of the SQL Server Installation Center. SQL Server Books online includes an article called “Features Supported by the Editions of SQL Server 2012” located at
http://msdn.microsoft.com/en-us/library/cc645993(v=SQL.110).aspxThis article has a table that lists the high-level features and which editions they’re available in.
![]() Note Other than feature availability between editions, the development interfaces are the same for all editions of SQL Server.
Note Other than feature availability between editions, the development interfaces are the same for all editions of SQL Server.
- Which upgrade strategy should you implement? When it comes time to actually perform the upgrade, you have two options to actually upgrade the bits on the server to SQL Server 2012. You can implement an in-place upgrade that’s basically running Setup and replacing the old SQL Server bits on the disk with the new SQL Server 2012 ones. Alternatively, you could do a side-by-side upgrade where you do not touch the old installation at all and instead install a new instance of SQL Server 2012. With this new instance, you will copy databases and objects from the old database into the new one. There are pros and cons to either one of these kinds of upgrades. An in-place upgrade is the fastest and least resource intensive, but it incurs more downtime of the server, and if something bad happens, it will take a long time to reinstall the old server version again. The side-by-side upgrade is resource intensive and more of a manual operation, but the benefit is you don’t have to move clients over until the new server is ready. If something bad happens on upgrade, there is no downtime.
- Are you using deprecated features? As new versions of SQL Server are released, sometimes an existing feature or functionality is no longer needed. Since users and third-party software developers may have extensively used the feature, Microsoft cannot simply remove the feature from the product upon upgrade to the newer version. This action would break the user’s applications and make the incentive of upgrading much less desirable. For this reason, Microsoft has a three-release deprecation policy.
Consider the
sp_renamedbstored procedure. This stored procedure’s functionality was replaced by the introduction of aMODIFY NAMEparameter in theALTER DATABASEstatement. Since having two ways of renaming a database is not desirable, Microsoft officially deprecated thesp_renamedbstored procedure starting in SQL Server 2005. This means that SQL Server 2012 will be the last version that this stored procedure exists in the product. So, if you don’t upgrade your scripts by this future version, they will not work anymore.Microsoft does a good job at warning users of these deprecated features; a SQL Server Books Online article lists all the deprecated features for the release. This article is called “Deprecated Database Engine Features in SQL Server 2012” and is located at
http://msdn.microsoft.com/en-us/library/ms143729(v=SQL.110).aspx.
Before you perform an upgrade, you can launch the free Upgrade Advisor from the Planning tab of the SQL Server Installation Center. This tool runs through your existing databases, SQL Server trace files, and T-SQL scripts and produces a report of issues that should be addressed before you upgrade. One of the issues the tool reports on is the use of deprecated features.
If, after you upgrade, you are still concerned that you may have some deprecated features being used, you can use the Windows Performance Monitor tool and monitor the SQL Server: Deprecated Features performance object counter. Figure 2-18 shows the Add Counters dialog box of the Windows Performance Monitor tool.

Figure 2-18. Windows Performance Monitor: Add Counters dialog box
In the Add Counters dialog box, you can collect specific deprecated features, or you can select “All instances” and collect any occurrence of a deprecated feature.
As you can see, there are a number of questions to ask and issues to deal with when upgrading. Your organization may also have additional standard operating procedures for upgrading servers that may involve the use of test servers and other processes.
Summary
64-bit installations of SQL Server are more often becoming the standard for SQL Server databases. Their large address space makes memory-intensive applications like SQL Server Analysis Services and SQL Server Integration Services work extremely well. Although using 64-bit hardware may be an acceptable standard for your organization, choosing which edition of SQL Server to use may be a political issue to solve. The key issue in this decision from a nontechnical standpoint is the cost differential between the Standard and Enterprise editions. This extra cost is negligible compared to the performance and productivity gains you get from Enterprise features such as Resource Governor and data compression.
When installing SQL Server, it’s best to have a plan. Without a plan, you may be ill prepared if bad things happen. Having a plan is even more critical when you are upgrading an existing SQL Server database with active user databases.
If you did not install SQL Server because of lack of time or hardware resources and want to quickly test it out, you can easily launch a Microsoft virtual lab on SQL Server 20012. These virtual labs teach many aspects of SQL Server including tasks relating to both DBAs and developers. The virtual labs are run through the web browser in a virtual server environment, so you are free to do whatever you choose to do. You can find the virtual labs at www.microsoft.com/sqlserver/en/us/learning-center/virtual-labs.aspx.
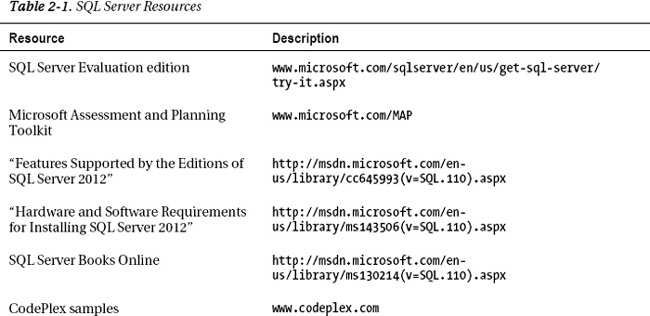
Finally, I’ve mentioned a number of URLs in this chapter that take you to various online resources such as Books Online, samples, and more. Table 2-1 lists these URLs and online resources in one place for convenient reference.