C H A P T E R 11
SQL Server Security
Understanding the SQL Server security model and how to effectively implement and manage a secure SQL environment is important for a DBA. If your employer’s data gets compromised, it’s not just your job that is lost; it could also affect the lives of many people outside your company. You have probably heard stories of hackers obtaining the credit card information of thousands of helpless consumers. All these thefts could have been prevented had proper security measures been in place. SQL Server comes with a well-tested security model that enables DBAs to delegate access control from the server level down to the column level and, with the help of native encryption capabilities, to the individual column entries. In this chapter, you will learn how users are authenticated and authorized within SQL Server, and you’ll learn some best practices to follow with respect to the security of your SQL Server instances.
Terminology
Before we dive deep into the security topic, it’s important to first define some key concepts. To help in this discussion, imagine the scenario where you want to access your valuables that are in a safety deposit box. Safety deposit boxes, if you’re not familiar, are metal boxes of different sizes that store valuables and are located in a vault at a bank. They usually require a key to open them. In addition, a bank will often ask for identification before allowing you to get your box.
Authentication
The bank needs to make sure you are who you claim you are. They do this by asking for identification, traditionally a driver’s license. This action is called authentication. SQL Server makes sure you are who you claim you are by asking for credentials. You give SQL Server credentials in one of two ways. You can give SQL Server a username and password combination. SQL Server will take a hash of the password you supplied and compare it with a hash of the password that is stored in its internal tables. If the two hashes match for the given username, you are authenticated. This type of authentication is known as SQL Server authentication.
The other way to authenticate to SQL Server is through Windows authentication. With this type, you do not need to type in a password; rather, since you are logged into Windows, SQL Server asks Windows to verify your identity via your Windows security token.
Authentication Mode
In an ideal world, you would use only Windows authentication. The main advantage with a pure Windows authentication environment is a streamlined administration experience—you don’t have to manage yet another set of credentials. To tell SQL Server what authentication modes to support, there is a server property called Server Authentication. It has one of two possible settings: Windows Authentication and SQL Server and Windows Authentication mode (which is also referred to as Mixed Mode). When SQL Server is in Windows Authentication mode, users will not be able to log in using SQL Server authentication. If Mixed Mode is selected, SQL Server will accept both Windows-authenticated and SQL Server–authenticated logins. Since it is easier to show examples using SQL Server–authenticated accounts than to create a Windows user, this book’s examples will use SQL Server in SQL Server and Windows Authentication mode. To see which authentication mode your server is using, launch the Server Properties dialog box in SSMS by selecting Properties from the context menu of a SQL Server instance. Click the Security page within the Server Properties dialog box to see the authentication mode setting, as shown in Figure 11-1.
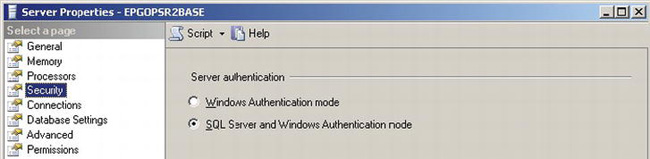
Figure 11-1. Portion of the Server Properties dialog box showing the Security page
Authorization
Getting back to the safety deposit box example, now that the bank has validated your identity using your driver’s license, you are given the box. The box is locked with a key. Possessing this key authorizes you to open the box. In SQL Server, just because you have authenticated yourself and have a SQL Server login account, you do not necessarily have access to items contained within the server. The DBA has to explicitly authorize a user’s access to objects within SQL Server. The DBA can grant access to one or more objects to a group of users or to a single user. You will learn more about granting permissions later in this chapter.
Server Instance vs. the Database
Databases within SQL Server are their own unique entities. SQL Server databases are designed to be easily detached from one server environment and reattached to another server without any extra work being done by a DBA. This concept is slightly different from what other database vendors implement, which is typically to marry the database and server instance more closely. With this independence come some additional security concepts to understand.
Databases have their own users called database users and their own roles called database roles. You will learn more about database roles later in this chapter. To authorize a SQL Server login access to a particular database, DBAs need to create a database user within the requested database, which maps to a SQL Server login. Database users are not shared among any databases on the server instance, but a single SQL Server login can map to one or more database users with each database user being in a different database.
![]() Note In SQL Server 2012, database users can be directly provisioned within the database without an associated SQL Server login. You can read more about this concept in the “Contained Databases” section of this chapter.
Note In SQL Server 2012, database users can be directly provisioned within the database without an associated SQL Server login. You can read more about this concept in the “Contained Databases” section of this chapter.
In Figure 11-2, there is a single SQL Server login called Howard_Login. This login is mapped to two different database users. In the Sales database, Howard_Login is mapped to Howard_Sales_User. In the HR database, Howard_Login is mapped to Howard_HR_User.
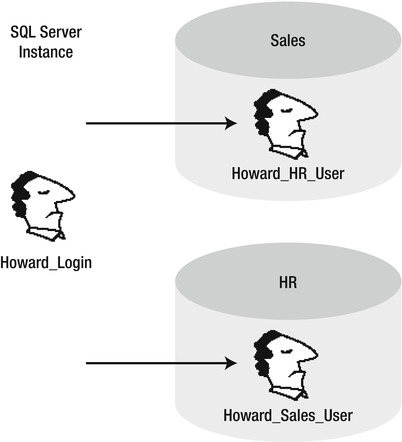
Figure 11-2. Representation of server login and database users
Since databases are their own unique entities, the permissions defined for Howard_Sales_User and Howard_HR_User can be different. In Figure 11-2’s scenario, Howard logs in to SQL Server just once. He then has access to both the Sales and HR databases, with whatever permissions he has been given on each of those.
SQL Server Instance Security
Now that you have been introduced to the difference between a server instance and database with respect to a database user, it is time to dive into more detail around the security at the server instance level. A SQL Server login is also known as a principal, which is a generic term used to describe any entity that can request server resources. You may see the word principal being used throughout other publications including SQL Server Books Online. Some other principals within SQL Server include server roles, database users, database user roles, and application roles. In the Windows world, a principal can be a Windows domain group, a local group, a domain user, or a local user.
Creating a SQL Server Login
To create a new SQL Server login from SQL Server Management Studio (SSMS), navigate down the Object Explorer tree to the Logins node, which is a child of the Security node. Right-click, and select the New Login context menu item. This will launch the Login – New dialog box, shown in Figure 11-3.
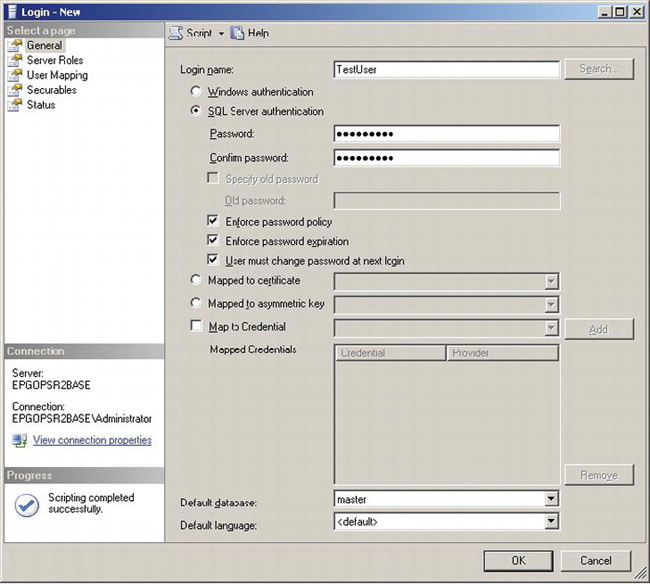
Figure 11-3. Login – New dialog box
The Login – New dialog box allows you to create four different types of logins. They are as follows: Windows authentication, SQL Server authentication, Mapped to certificate, and Mapped to asymmetric key. If you wanted to create a SQL Server login mapped to a Windows account, you select the “Windows authentication” radio button and type the Windows user account in the text box provided. This option does not require you to provide any password for the user. If you wanted to create a SQL Server–authenticated login, simply supply a login name and type a password. When you select the SQL Server Authentication radio button, you will notice three additional check boxes become available. “Enforce password policy” tells SQL Server to honor any Active Directory group policy configuration for passwords. “Enforce password expiration” tells SQL Server to remind users to change old passwords and to lock out expired logins. “Users must change password at next login” is self-explanatory. SSMS has a nice dialog box that pops up for the user if this option is selected and it’s the first time the user has logged into SQL Server. The two other options, “Mapped to certificate” and “Mapped to asymmetric key”, are used in advanced security scenarios like signing stored procedures.
SQL Server provides the ability to securely store credentials. These credentials are used for SQL Server Agent proxy accounts or for use with a cryptographic provider. The Map to Credential check box allows the DBA to add credentials that will be available to a given login for use with these specific features. If you are still wondering why you would ever want to store credentials to be used by a SQL Server login, consider this scenario. When you connect to SQL Server using SQL Server authentication, you have no identity to the Windows OS. If you want this SQL Server login to do something on the server that requires a Windows identity, using a credential solves the problem.
The dialog box in Figure 11-3 contains four other pages that have additional options. Using these other pages, you can add the login you are creating to server roles, map the login to database users, and configure other settings.
If you click OK on the General page, the login will be created. The T-SQL statement that creates a login is CREATE LOGIN. An example of creating the TestLo.gin login is as follows:
USE [master]

GO

CREATE LOGIN [TestLogin] WITH PASSWORD=N'PaSsWoRd!'

 MUST_CHANGE, DEFAULT_DATABASE=[master],

CHECK_EXPIRATION=ON, CHECK_POLICY=ON

GO
Server Roles
At the server instance level, there are nine fixed server roles that you can assign to a SQL Server login. Fixed means that you, as a DBA, cannot create your own server roles; rather, you have only the nine to choose from. In SQL Server 2012, database administrators can create their own server level roles. You will learn more about user-defined server roles later in this chapter. Assigning a principal to a server role allows that principal certain privileges within the SQL Server instance. Table 11-1 describes the nine fixed server roles.
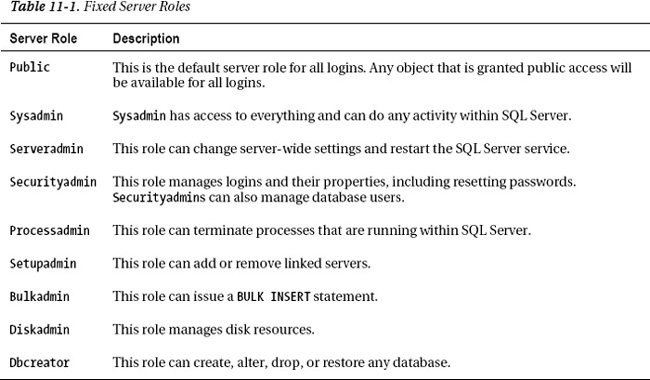
Before you start assigning logins to various roles, it is important to know that, in reality, you probably will use very few of these roles. The most popular is the sysadmin role. The functionality of these roles has been superceded with the introduction of server permissions. Server roles are still relevant to learn and use, because in some cases, it is not possible to create a SQL Server login with enough server permissions to mimic a server role.
To add a SQL Server login to a server role, you can use the Server Roles tab in the Login – New dialog box (shown earlier in Figure 11-3). To add roles to a SQL Server login using T-SQL, you can use the sp_addsrvrolemember system stored procedure. For example, to give the dbcreator role to the Test,Login login, you can use the following script:
USE [master]

GO

EXEC sys.sp_addsrvrolemember @loginame = N'TestLogin', @rolename = N'sysadmin'

GO
![]() Note It is not a best practice to arbitrarily give
Note It is not a best practice to arbitrarily give sysadmin access to SQL Server logins. Being a sysadmin is the highest elevated privilege within SQL Server, and its use should be highly discretionary.
Server Permissions
Before server permissions, if you wanted a login to be able to shut down the server, you needed to assign that login to the serveradmin role. Yet serveradmin imparts a number of other capabilities that you may not want to give that other user, such as the ability to change server-wide settings. With server permissions, you can now grant just the SHUTDOWN permission to a specific login, as shown in the following code:
USE master

GO

GRANT SHUTDOWN TO <login>

GO
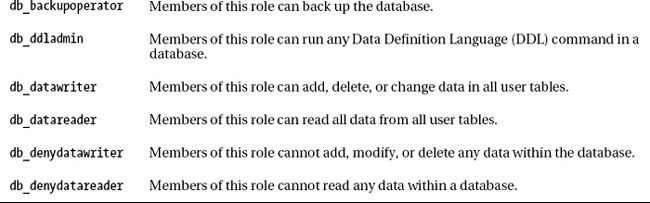
where <login> is the name of the SQL Server login that you want to grant the SHUTDOWN permission to. There are 30 permissions that can be granted at the server instance scope. Table 11-2 shows a complete list of these permissions.
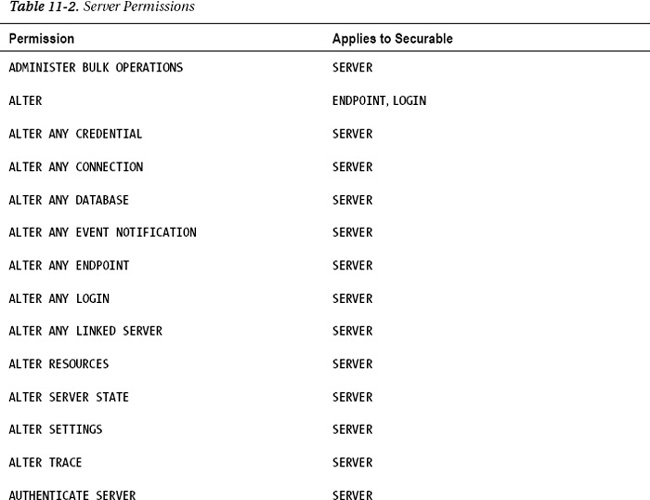
Each one of these permissions applies to one or more securables. A securable is a resource to which SQL Server regulates access. In Table 11-2, you can see that some securables are servers, some are logins, and some are endpoints. By using these permissions, you be very granular in what you allow other users to do.
Endpoints
An endpoint is a point of entry into SQL Server. Prior to SQL Server 2005, if you had a valid SQL Server login, you could connect via TCP/IP, shared memory, or any other protocol that was enabled on the server. With endpoints, you can now restrict what kinds of protocols a specific SQL Server login can connect by. Restricting available protocols reduces the area of attack for hackers. If you allow your sysadmin accounts to connect via shared memory only, you won’t have to worry that someone remote will try to connect as sysadmin over a network connection. Shared memory clients can connect to only those server instances that are on the local server, so you have to be physically sitting at the machine or within a remote desktop session. As a best practice (and if possible to do within your organization), consider locking down access to sysadmin accounts.
In addition to the transport protocol, endpoints specify the payload. Payloads define the type of traffic that is allowed. For example, if you can create an HTTP endpoint that listens to SOAP traffic and assign the CONNECT permission to a specific SQL Server login, that SQL Server login can then submit SOAP queries via HTTP to SQL Server. Endpoints are highly leveraged by two key components within SQL Server: Service Broker and database mirroring. When you set up these features within SQL Server, you may notice additional endpoints created.
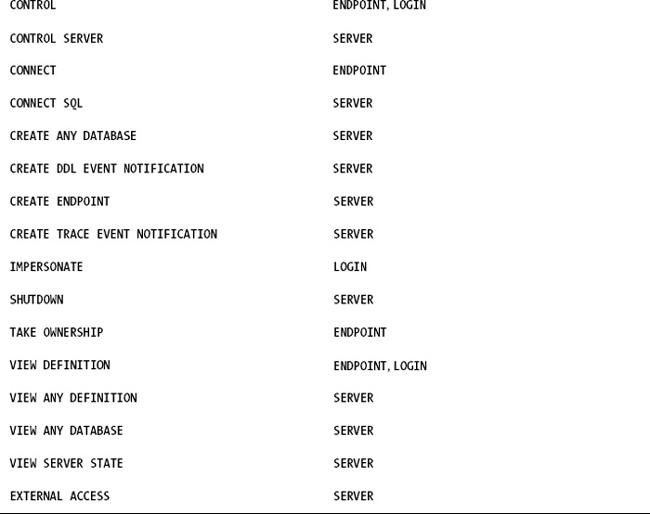
The sys.server_endpoints catalog view displays both system and user endpoints. Since there are no user-defined endpoints on the queried server, Table 11-3 simply shows the system endpoints that are available out of the box.
SELECT Name,Protocol_desc from sys.endpoints
The previous SELECT statement yields the information represented in Table 11-3.
By default, all SQL Server logins are granted CONNECT permissions to all the system endpoints listed in Table 11-3 with the exception of the dedicated administrator connection (DAC). The DAC is a special endpoint available only to members of the sysadmin role. It’s a special single-user connection that is designed for an administrator to connect if he or she cannot connect via the normal connection method to SQL Server. The DAC is useful if a particular process ID within SQL Server is consuming too many resources, which, in turn, prevents additional user connections. With DAC, an administrator can always connect and troubleshoot any issues.
To help illustrate the power of endpoints, let’s create a login, MyAppLogin, and allow it to connect only via shared memory. You do this by denying access to all the other protocols.
CREATE LOGIN MyAppLogin WITH PASSWORD='PaSsWoRd1'

GO

DENY CONNECT on ENDPOINT::[TSQL Default TCP] to MyAppLogin

GO
DENY CONNECT on ENDPOINT::[TSQL Default VIA] to MyAppLogin

GO

DENY CONNECT on ENDPOINT::[TSQL Named Pipes] to MyAppLogin

GO
You can test the ability to connect to SQL Server as MyAppLogin through SQL Server Management Studio. When you make a connection in SSMS, the connection dialog box has an Options button. Clicking that will allow you to select the Connection Properties tab. On this tab is a Network Protocol drop-down box. Here, you can force a certain protocol to be used when SSMS makes the connection to SQL. If you run the previous script and attempt to connect using TCP/IP with valid credentials, your connection request will fail. However, if you specify shared memory, the connection will succeed. This is illustrating the fact that you denied access to these endpoints for the MyAppLogin account.
Managing SQL Server logins and their memberships to each server role can be done using SQL Server Management Studio. There are also a number of system catalog views that help DBAs manage this information. For a complete list, read the “Security Catalog Views” article in SQL Server Books Online.
User-Defined Server Roles
SQL Server contains a plethora of permissions that a database administrator can assign to a particular login. In reality, once we have more than a few users managing permissions, this way becomes cumbersome. To address this, administrators can create a user-defined server role. These roles are defined at the SQL Server instance level, and specific server-level permissions can be assigned to a role. One scenario where user-defined server roles can be useful is when you have a requirement to give users elevated capability (such as the sysadmin role), but they only need a limited part of that role for thier jobs. With user-defined server roles, a system administrator can create a role that has specific elevated permissions like CONTROL SERVER. CONTROL SERVER is almost the same level as a sysadmin except that it obeys a DENY permission on an object. Given this, we can create user that has sysadmin-like access without being in the sysadmin role. If we wanted to prevent that user from modifying the server audits we can simply apply the DENY ALTER ANY SERVER AUDIT permission to the user-defined server role.
To illustrate user-defined server roles, let’s consider the scenario where we want to create a new user-defined role that will contains logins who are database administrators. We want to make sure this group cannot change any audits that are defined but can perform all the other duties that a sysadmin can. First, we create the server role by issuing the CREATE SERVER ROLE statement as follows:
CREATE SERVER ROLE [DBA Role]
Next, we define the permissions assigned to this new role and add the necessary DENY permissions to restrict the user from changing audits or impersonating the auditor.
GRANT CONTROL SERVER TO [DBA Role]

GO

DENY ALTER ANY SERVER AUDIT TO [DBA Role]

GO

DENY ALTER ANY LOGIN TO [DBA Role]

GO

DENY IMPERSONATE ON LOGIN::CorporateAuditor TO [DBA Role]

GO
To add a login to a user-defined server role we issue the ALTER SERVER ROLE statement as follows:
ALTER SERVER ROLE [DBA Role] ADD MEMBER [Julie]
Given these statements, if we assigned our database administrator, Julie, to the DBA Role role, she could perform any administrative function except being able to change the audit. Since we denied this role the ability to change logins, she can’t simply modify permissions on the group to give herself more privileges. Also, we denied the group the ability to change the server audits. This protects against a repudiation attack where the malicious user, or DBA Role member in this case, tried to cover up their tracks by tampering with the audit. Someone with CONTROL SERVER permission also has the ability to impersonate user accounts, thus, we want to ensure that this role doesn’t have the ability to change the audit via the auditor’s credentials, so we use DENY IMPERSONATE on the auditors login as well. The advantage with user-defined server roles is its flexibility when compared with the existing fixed server roles discussed earlier in this chapter. Now, organizations can create their own specific roles per their internal requirements.
Database Security
Database users are similar to SQL Server logins in that they are principals within the scope of a database. These users can be granted or denied specific permissions such as SELECT on a specific table. They can also be included in database roles. All database users are members of the public role. Thus, any permissions that are given to the public role will be in effect given to every database user.
Database Users
When you create a database, a few database users are created for you. One of them is dbo, which is the database owner; as the name implies, the role has permission to perform all activities within the database. Any member of the sysadmin fixed server role, who accesses a database is automatically mapped to the dbo user.
The guest database user is also always created. When SQL Server users log into a database where they do not have mappings, they are automatically mapped to the guest account. guest is created and is disabled by default. Thus, the default behavior for SQL Server logins that have no specific mapping is to not have any access at all to the database.
The sys and INFORMATION_SCHEMA views are created and used by SQL Server to provide you with views, dynamical management views, and catalog views of information about your database. An example of a catalog view is sys.database_princpals. This catalog view will show you information about database users and roles for the given database.
Schemas
When a database user is created, the user is assigned to a default schema. A schema is a logical collection of database objects. By grouping objects in a schema, a DBA can grant permissions to the schema that in turn would affect all the objects within the schema. If the user does not have a default schema, but the user is a member of a group that has a default schema, the default schema of the group will be used.
An Example of the “Wrong” Way
For example, assume you have two database users: DBAUser and DevUser. DBAUser is mapped to a SQL Server login who is a member of the sysadmin group. DevUser is a valid database user within the Accounting database. DevUser has no specific permissions granted, nor is it included in any database role other than public. The DBAUser user would like to give DevUser the ability to add tables to the Accounting database but is concerned about the security impact of this action.
The following script sets up the example I’m describing. It creates a database, a login, and a user named DevUser. Then the script grants the CREATE TABLE privilege to that user.
USE master

GO

CREATE DATABASE Accounting

GO

CREATE LOGIN DevLogin WITH PASSWORD='asdif983*#@YRfjndsgfD'

GO

USE Accounting

GO

CREATE USER DevUser FOR LOGIN DevLogin

GO

GRANT CREATE TABLE TO DevUser

GO
However, just having the CREATE TABLE privilege is not enough. If DevUser connected to SQL Server and tried to issue the following statement:
USE Accounting

GO

CREATE TABLE Customers

(id INT NOT NULL,

firstname VARCHAR(20) NOT NULL,

lastname VARCHAR(40) NOT NULL)

GO
then DevUser would receive the following error message:
Msg 2760, Level 16, State 1, Line 1


The specified schema name "dbo" either does not exist or you do not have permission to use

it.
Just because DevUser has the permission to create a table within the Accounting database doesn’t mean that user can start creating tables. The error message that comes back tells you that this user doesn’t have access to a schema called dbo. By default, database users that are created without a default schema specified are assigned the dbo schema.
In this example, since the administrator never granted DevUser access to the dbo schema, DevUser cannot create objects within that schema. At this point, DBAUser could issue the following statement to grant DevUser the ability to add a table to the dbo schema:
GRANT ALTER ON SCHEMA::dbo TO DevUser
The “Right” Way
Granting the ALTER permission on the dbo schema to DevUser enables that user to create the table. However, by granting ALTER on this schema, DevUser can intentionally or unintentionally affect all the other objects within the dbo schema. For this reason, it is a best practice to create schemas that serve a specific purpose and grant permissions only to those users who need them. To correct this example, let’s have the developer create their new Customers table in a schema called People. To start, the DBA will create the People schema and grant ALTER permissions to DevUser. The script is as follows:
CREATE SCHEMA People

GO

GRANT ALTER ON SCHEMA::People TO DevUser

GO
Now DevUser can issue the following statement to create the Customers table within the People schema:
USE Accounting

GO

CREATE TABLE [People.Customers]

(id INT NOT NULL,

firstname VARCHAR(20) NOT NULL,

lastname VARCHAR(40) NOT NULL)

GO
Four-Part Naming Convention
From the previous code sample, the table was created within the People schema. This can be seen by the two-part name People.Customers. You can create objects names using up to four parts. Formally the parts are as follows: Server.Database.Schema.Object.
![]() Note There is another capability within SQL Server that allows you to link two SQL Servers together from a query perspective. When you reference another SQL Server instance within a query, you can create that SQL Server instance as a linked server to the current SQL Server instance that you are using.
Note There is another capability within SQL Server that allows you to link two SQL Servers together from a query perspective. When you reference another SQL Server instance within a query, you can create that SQL Server instance as a linked server to the current SQL Server instance that you are using.
For example, if you had created a linked server to the SQLPRODUCTION_2 server, you could issue a T-SQL statement that would create a table on the SQLPRODUCTION_2 server as follows:
CREATE TABLE [SQLPRODUCTION_2.Accounting.People.Customers]
More commonly, statements are executed within the current server context, so the first part is rarely used. The current database context is also usually defined earlier in the script (via a USE statement or via the default database in the connection string), so the second part is also not as common within scripts.
Default Schema
Previously, you learned that by default database users that are created without a default schema specified are assigned the dbo schema. The exception to this is if the user is mapped to a Windows group and that group has a default schema defined.
As a DBA, you can assign the default schema at user creation time. An example script is as follows:
CREATE USER DevUser FOR LOGIN DevLogin

WITH DEFAULT_SCHEMA = People
You might think of this statement as assigning the default schema.
Reassigning Schema Ownership
Prior to SQL Server 2005, there were essentially two schemas: dbo and another named after the user. Thus, if DevUser created the Customers table within his or her user schema, the two-part name for the Customers table would be DevUser.Customers. The problem with having application schemas based on usernames is that such a schema prevents you from ever deleting the underlying user. If DevUser leaves the company, you are stuck maintaining that user because of the objects within the user’s schema. This behavior was a huge pain in the rear for many DBAs. And to circumvent the problem, the poor practice of creating all objects within the dbo schema came to be.
Since SQL Server 2005, you can now easily reassign the ownership of the schema, allowing you to drop the previous, underlying database user with ease. The following script will reassign the People schema to TestUser.
ALTER AUTHORIZATION ON SCHEMA::People TO TestUser
Having reassigned ownership of the People schema to TestUser, you may now drop DevUser.
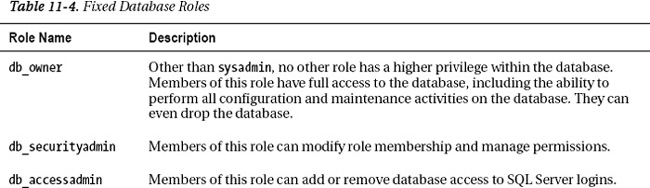
Fixed Database Roles
There are two kinds of database roles: fixed and flexible. Fixed roles cannot be deleted and are provided within every database. Table 11-4 lists fixed database roles.
![]() Note The
Note The msdb database contains additional fixed roles that are not found in any other database. These roles support the SQL Server Agent and SQL Server Integration Services features.
In addition to using the UI in SSMS, numerous stored procedures and functions help DBAs work with database roles. The article “Database-Level Roles” in SQL Server Books Online does a good job at enumerating this list.
These fixed roles serve to define a general permission within the database. For example, the following script grants DevUser the db_datareader permission using the sp_addrolemember system stored procedure:
USE [Accounting]

GO

EXEC sp_addrolemember N'db_datareader', N'DevUser'

GO
In this example, DevUser would be able to read any table within the database regardless of whether they had SELECT permission defined.
![]() Note There is an exception to this global grant behavior. If the DBA issued a
Note There is an exception to this global grant behavior. If the DBA issued a DENY statement against DevUser on a specific object, that object would no longer be accessible by DevUser.
The global behavior of fixed database roles addresses some scenarios; however, to reduce the surface area for attack, it’s better for you to grant specific permissions on objects to your users.
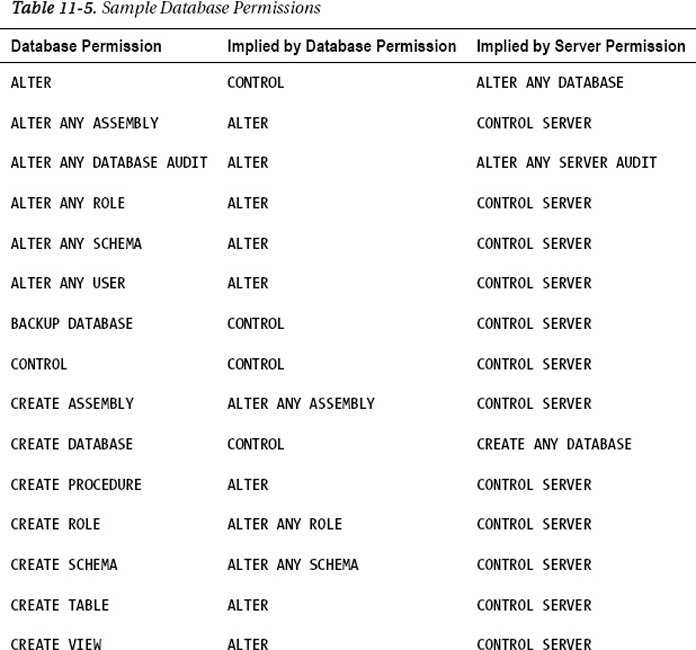
Database Permissions
If you are a database user in a database and are not a sysadmin or a member of the db_owner or db_datareader group, you will not be able to read any data within the database. To read data, an administrator needs to grant the user the SELECT permission. Similarly, if the user wants to add data to a table, they would need the INSERT permission. If the user wants to delete data, they would need the DELETE permission. There are many granular database permissions that you as an administrator can define for a given database user or role.
Also, there exists a permissions hierarchy within SQL Server. Some server-level permissions convey the rights of other permissions by implication. For example, if a database user is mapped to a login that was granted ALTER ANY SERVER AUDIT permission, this database user has the ALTER ANY DATABASE AUDIT permission even though that user might not have been explicitly given that permission. This implication also works within the scope of the database. For example, if a database user was granted ALTER ANY ASSEMBLY, the database user also has the CREATE ASSEMBLY permission, even without being explicitly given that permission. In both cases, ALTER ANY SERVER AUDIT and ALTER ANY ASSEMBLY are known as covering permissions.
SQL Server Books Online has an article called “GRANT Database Permission (Transact-SQL).” This article lists more than 60 possible database permissions and their covering database or server permissions. To help illustrate this concept, a sample of this list is shown in Table 11-5. Refer to the SQL Server Books Online article for the complete list.
With SQL Server, you can grant permission to a user, revoke an existing permission from a user, or deny permission from a user. To grant permission, you use the GRANT statement. An example of granting SELECT on the Customers table is as follows:
GRANT SELECT ON Customers TO BusinessAnalysts
If you wanted to remove this permission, you would use the REVOKE statement as follows:
REVOKE SELECT ON Customers TO BusinessAnalysts
What if you had a user Bob who was part of the BusinessAnalysts group and you did not want him to have the SELECT permission? You could use the DENY statement as follows:
DENY SELECT ON Customers to Bob
Bob would still have all the permissions defined for business analysts, but he would be denied from reading data from the Customers table.
Flexible Database Roles
If your database consisted of just a couple of users, it would be very easy for you to manage permission for these users directly. However, in the real world, DBAs manage lots of users and, more commonly, many different types of users. A developer will have different requirements than a business analyst. If your organization has 35 developers and 70 business analysts, you have a lot of permissions to manage. To alleviate this burden, you can create a database role, add database users or other roles to this new role, and assign permissions to the role. Now, any time you have new developers, all you have to do is add their usernames to the role, and they have all the necessary permissions.
To create a database role, use the CREATE ROLE statement, as shown here:
Here, you are creating a new role, Developers, and making the DevManager user the owner of this new role. As an owner, you can freely add and remove membership to the role.
To add users to the role, use the sp_addrolemember stored procedure as follows:
sp_addrolemember 'Developers', 'Bryan'
This assumes that there is a database user within the database named Bryan.
Once you defined a role, you can grant permission to the role using the GRANT statement as follows:
GRANT CREATE TABLE TO Developers
![]() Note Even though
Note Even though DevManager may be the owner of the Developers role, DevManager would still need the ability to grant the CREATE TABLE permission in order for the previous statement to work. To do this, the DBA would issue the GRANT statement with the WITH GRANT OPTION clause as follows:
GRANT CREATE TABLE TO DevManager WITH GRANT OPTION
Security Functions
Now that you know how to grant, revoke, and deny permissions, I’ll introduce a series of functions that are designed to help you in managing security. Although most of this information is available in SQL Server Management Studio dialog boxes, the following functions and catalog views are useful if you prefer to issue Transact-SQL statements instead of using the UI.
fn_my_permissions() Function
In the “Flexible Database Roles” section of this chapter, you created a role called Developers that included a database user called Bryan. You also granted CREATE TABLE permission to this role. If Bryan wanted to know what permissions he had within this database, he could use SQL Server Management Studio or simply leverage the fn_my_permissions function as follows:
SELECT * FROM fn_my_permissions(NULL, 'DATABASE'),
For Bryan, this query would return the information in Table 11-6.
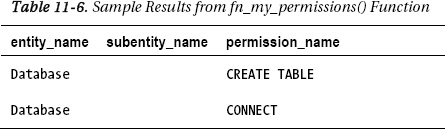
This function also works at the server instance level. By replacing the DATABASE word with SEVER, the function will return the server-level permissions that are granted to the login.
HAS_PERMS_BY_NAME Function
Previously in this chapter, you learned how some permissions convey the rights of other permissions by implication. You also learned that users can be members of roles, and these roles can be members of other roles. In the end, if you wanted to really know what permissions a user had on an object, it would be difficult to trace through all these layers of indirection. The function tells you whether the current context has a specific permission. For example, if developer Bryan wanted to know whether he had SELCT permission on the Customers table, he could issue the following query:
SELECT HAS_PERMS_BY_NAME('Customers', 'OBJECT', 'SELECT')
This function will return a 1 or 0, indicating a true or false value, respectively.
If you wanted to know whether another user had a specific permission, you would have to be a sysadmin or have IMPERSONATE permission for the user in question. Provided one of those conditions are satisfied, you could find out whether Bryan has the SELECT permission by issuing the following:
EXECUTE AS USER=’Bryan’

GO

SELECT HAS_PERMS_BY_NAME('Customers', 'OBJECT', 'SELECT')

GO
Contained Databases
Consider the case where you perform a database backup and restore it on a different server. Upon restoration, you may still need some additional objects in order for your application that is using the database to work properly. These objects may include SQL Server Agent jobs, SQL logins, linked server definitions, database mail configuration, replication setup, and a few others. Database administrators may have to create these objects before the database is useable. A contained database is a step toward alleviating this pain point. A contained database is the same as a traditional database with the exception that in addition to traditional database users you can create database users that are not mapped to any SQL login. This allows your database application to connect directly to the database without authenticating a login at the server level. Upon a failover, all you need is the database itself on the disaster recovery site, because the database contains the security information needed for the user. SQL Server 2012 introduces a partially contained database. A partially contained database is the same as a user-defined database except it also includes security information needed for authentication. In the scenario where you move a contained database, if your database leverages objects that exist outside the database such as agent jobs or linked servers, these objects would have to be created on the new server first before the database could be used on the new server.
Database movement is not the only use case for contained databases. Benefits for this feature revolve around separating the application development and management from the underlying database instance infrastructure needed to support it. A contained database makes administering applications easier, because there is no real dependency on the host instance.
To create a contained database you must first enable the “contained database authentication” system option as follows:
Sp_configure 'show advanced options', 1

RECONFIGURE

GO

Sp_configure 'contained database authentication', 1

RECONFIGURE WITH OVERRIDE

GO
Next, let’s create a sample database and set the containment of this database to partial.
CREATE DATABASE Customers

GO

ALTER DATABASE Customers SET CONTAINMENT=PARTIAL;
Now that our database is partially contained, we can create database users without associated SQL logins. These users can be created with a password or they can be Windows principals. If you use Windows principal users, they do not need any existing access to SQL Server. For this example, assume we have created a local Windows user named, "Bob" on the server, "ROB-DENALI-1". To create both a user with a password and a user from a Windows principal, we issue the following commands:
USE Customers

GO

CREATE USER [SalesRep1] WITH PASSWORD='pass@word1';

GO

CREATE USER [ROB-DENALI-1Bob];

GO
To test our containment, assume we logged into a Windows client under Bob’s credentials. Alternatively, you as a Windows administrator, can issue the RUNAS command and open a new command window under Bob’s context. To do this, you can type the following in a command prompt:
C:>RUNAS /USER:Bob "CMD.EXE"
Bob can now try to connect to SQL Server. Figure 11-4 shows a command shell window running under Bob’s security context depicting Bob’s attempt at connecting to SQL Server. Bob is using SQLCMD, which is the command line tool for connecting to SQL Server. In case you are not familiar with the command line switches, -E means connect via Windows Authentication, meaning connect as Bob in this case. -S . means the server name, and the period is an abbreviation for the local server. In the first attempt, notice that SQL Server failed to authenticate Bob.
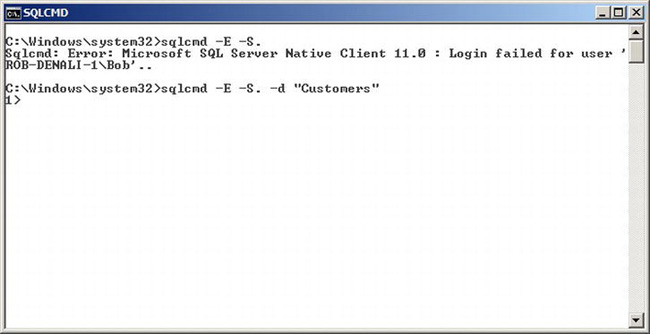
Figure 11-4. Using SQLCMD to connect to a contained database
This failure occurred, because we didn’t specify an initial database to connect to, so it was implied that we were trying to connect to the master database. Since Bob doesn’t exist as a SQL login in the master database, SQL Server rejected the connection request. In the second attempt at the sqlcmd command Bob explicitly states that he wishes to connect to the Customers database via the -d parameter in SQLCMD. Since Bob’s account is provisioned in the database, the connection succeeds. You can see SQLCMD gives us 1>, which is the SQLCMD command prompt with a successful connection. This example used SQLCMD, but you can use whatever application or method you normally use to connect to SQL Server. There are no specific connection requirements or restrictions for accessing a contained database.
Summary
The security model for SQL Server is focused around the concepts of server instances and databases. Logins are defined at the server instance level and, by default, have no access to any particular database. If you want a login to access a database, you will have to create a database user that maps to that login. With contained databases, you no longer have to create a login for a user to have access to a database. This allows for easy database movement and application administration. Roles make security management much easier, since instead of defining permissions for everyone, you can simply assign permissions to the role.
The current security model of SQL Server has been around for many years, encompassing multiple versions. SQL Server is a well-tested and well-trusted database platform. As your experience with SQL Server increases, you will undoubtedly use the concepts and functions described in this chapter.