C H A P T E R 10
Common Database Maintenance Tasks
Database administrators perform a variety of tasks. Depending on how your organization is structured, your own roles and responsibilities will most likely differ when compared to DBAs at other companies. However, there are a few common database maintenance tasks that every DBA should be familiar with, regardless of your position. This chapter will introduce you to the core DBA maintenance tasks, such as moving databases and data, and other routine maintenance tasks, like index reorganization.
Backing Up and Restoring Databases
The abilities to back up and restore a database are fundamental skills all DBAs need to know. They’re so important that a chapter in this book is devoted to each topic (Chapters 8 and 9). Keep in mind that a database backup is an online operation. This means that an end user can continue to make modifications to the database while the backup is being performed. Since a very large database backup will take time to complete, you may want to think about strategies for reducing the backup window. Backing up to disk is faster than backing up to tape. Features like backup compression also help reduce the amount of disk I/O that needs to be performed when creating or reading from the backup and thus will dramatically reduce the backup window.
Transaction logs contain all of the recent activity in the database and are used when restoring a database to a specific point in time. If you do not back up the transaction log, it will grow and eventually fill up your entire disk, causing you a lot of problems and potentially ending your job.
![]() Note Managing your transaction logs is critical, and a good start is to make sure they are being backed up. A transaction log backup will truncate the log, freeing up space to be used by future transactions.
Note Managing your transaction logs is critical, and a good start is to make sure they are being backed up. A transaction log backup will truncate the log, freeing up space to be used by future transactions.
If you are responsible for the operating system, make sure this is backed up. Also, the system databases, such as master and msdb, need to be backed up, because they contain SQL Server instance related information.
Finally, practicing your disaster recovery plan is important. Set up a test environment to practice a failover scenario. Determine how long this recovery actually took and verify that it met your companies SLAs.
Moving Data
Whether you are supporting the developer who is writing an application or are moving data out to a disaster recovery site, there will be a time when you need to move data around. Moving data can be done in a variety of ways, but there are three common ways to move an entire database.
Moving a Database Using the “Detach and Attach” Method
First, you can detach a database from an instance of SQL Server and attach it to another instance. One use case for the “detach and attach” method is when you want to move a database but do not have enough free disk space to make a copy. A real-life example is a customer who had a 1.7-TB database to upgrade from SQL Server 2005 to SQL Server 2008. The customer did not own enough physical disk storage to make a copy of the new database, so the only option was to install SQL Server 2008 on new hardware, attach to the existing LUN where the database was stored, and attach the database.
![]() Note When you attach a database to SQL Server, the database engine will update the database metadata to that of the version of the SQL Server This means that once you attach your database to a newer edition of SQL Server, you will not be able to attach it to any earlier version because the structure of the database will have changed.
Note When you attach a database to SQL Server, the database engine will update the database metadata to that of the version of the SQL Server This means that once you attach your database to a newer edition of SQL Server, you will not be able to attach it to any earlier version because the structure of the database will have changed.
You can detach a database via SSMS by right-clicking the database in Object Explorer and selecting Tasks and then Detach from the context menu. This will launch the Detach Database dialog shown in Figure 10-1.
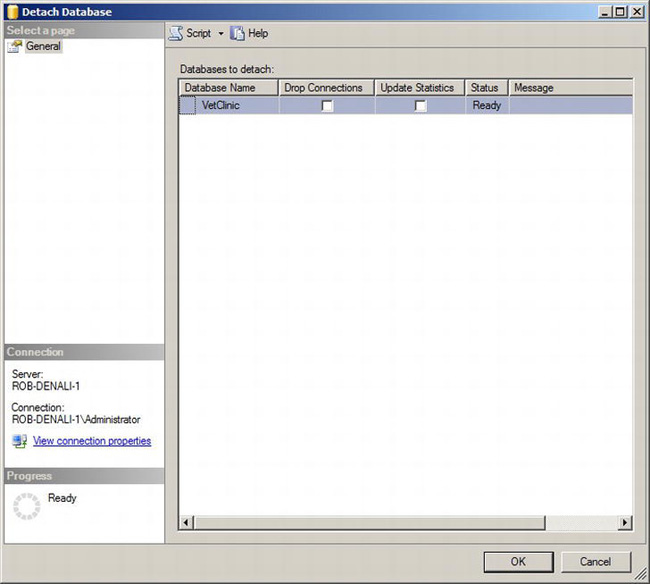
Figure 10-1. Detach Database dialog
If we simply click the OK button, the operation will fail if there are active user connections to this database. If we want to disconnect any users who are connected to the database, we can check the “Drop connections” check box. When this is checked, the dialog will first issue an ALTER DATABASE [Database Name] SET SINGLE_USER WITH ROLLBACK IMMEDIATE command to force the disconnect. If you are moving the database to a read-only location, you should check the update statistics check box so that information about the data and indexes is most current. This dialog uses the sp_detach_db stored procedure to perform the detach.
Now that the database is detached, it no longer shows up in Object Explorer. However, the database files still exist at the original location. In this scenario, we proceed by copying them to the server instance we wish to attach the database. Next, we connect to the destination server instance and launch the Attach Databases dialog by selecting Attach from the Databases node in Object Explorer. The Attach Databases dialog is shown in Figure 10-2.
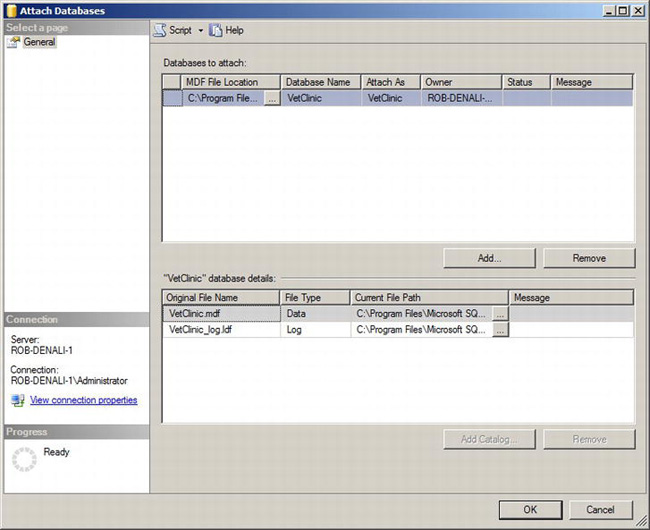
Figure 10-2. Attach Databases dialog
To attach a database navigate to the database files by clicking the Add button. When database files are selected, the dialog will populate the database details, as shown in the Figure 10-2. To attach the database, simply click OK, and the dialog will issue a CREATE DATABASE . . . FOR ATTACH statement that will perform the attachment.
Moving a Database Using the Copy Database Wizard
The Copy Database wizard allows you to copy databases and most of the objects that are outside of the database that the database may depend on. These objects are things like SQL Server login information and SQL Server Agent jobs. In this example, we are going to move the VetClinic database from the default instance to a named instance called DEV. To launch the Copy Database wizard select, Copy Database from the Tasks menu of the desired database. After the welcome screen page, the wizard will guide you through two additional pages where you enter the source and destination servers.
![]() Note Since the wizard creates a SQL Server Agent job to move the data, you will need SQL Server Agent running on the destination server. If you do not have SQL Server Agent running, you will receive an error message.
Note Since the wizard creates a SQL Server Agent job to move the data, you will need SQL Server Agent running on the destination server. If you do not have SQL Server Agent running, you will receive an error message.
The next page, shown in Figure 10-3, asks you how to transfer the database.
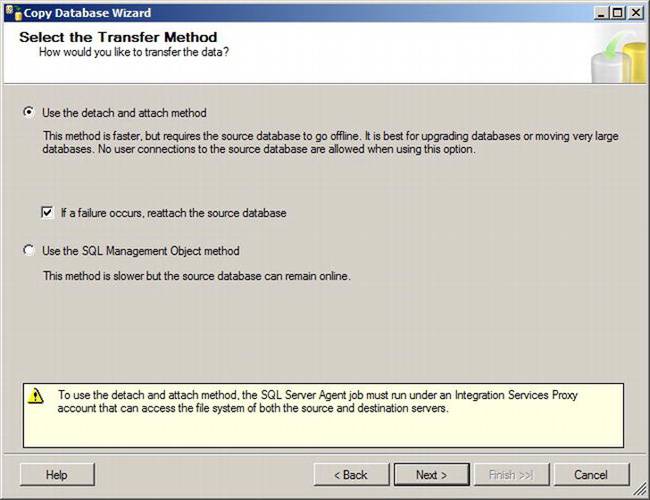
Figure 10-3. Select the Transfer Method page
There are two methods the wizard allows you use when moving databases. The first is the “detach and attach” method. This method uses the same idea that was described earlier in this chapter. The database is detached; a file copy occurs, and the database is attached to the new SQL Server instance. This option will disconnect any users that are connected to the database. If we cannot disconnect users, we have another option, and that is to use the SQL Management Object (SMO) method. Basically, you are using the SMO scriptor to script out the database and bulk copy the data from the source to the destination. SMO is a .NET API available for anyone to use to programmatically manage SQL Server. SSMS uses SMO extensively.
The next page in the wizard, shown in Figure 10-4, will allow us to select one or more databases to move or copy.
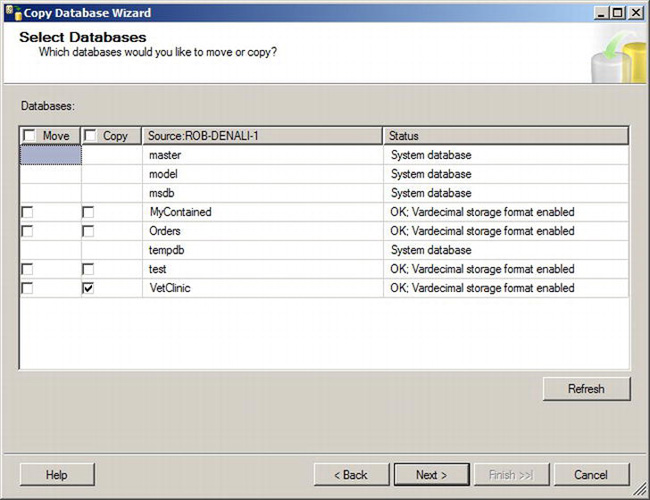
Figure 10-4. Select Databases page
The next page, shown in Figure 10-5, will allow you to specify the destination database configuration details.
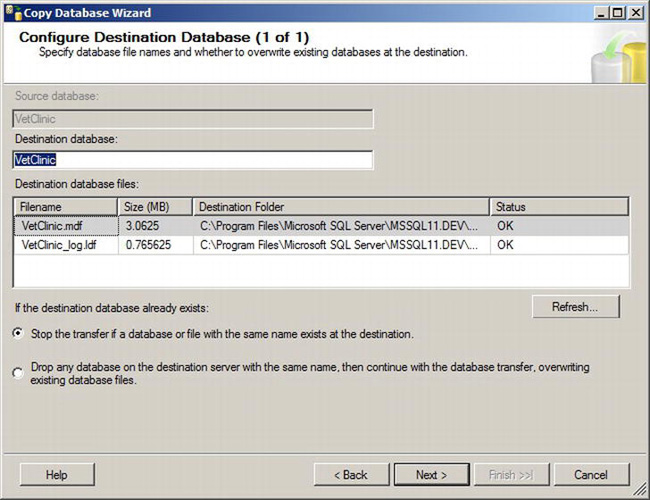
Figure 10-5. Configure Destination Database page
On this page, you can give the database a different name at the destination and optionally change the destination files and folders. In addition, you can specify what should happen if a database with the same name exists on the destination.
At this point, we have enough information about the database, but other objects not within the database that may need to be moved as well. The Select Server Objects page, shown in Figure 10-6, is the next page in the wizard, and it allows you to specify these objects. The most common objects to watch out for are SQL Logins. Database users of the copied database will be orphaned if you simply copy a database to a different server without moving any SQL Logins that are mapped to these database users.
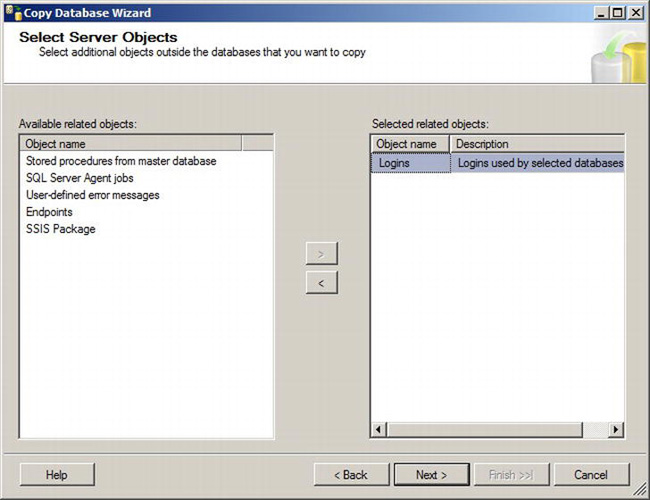
Figure 10-6. Select Server Objects page
This wizard creates a SQL Server Integration Services package that performs the actual work. The next page of the wizard, shown in Figure 10-7, shows the package configuration.
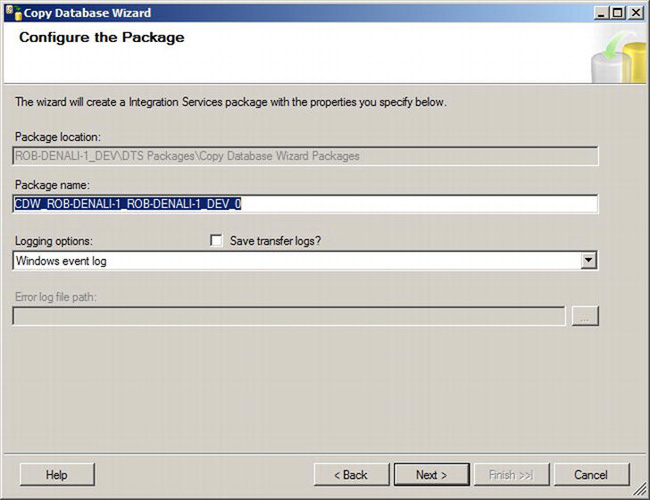
Figure 10-7. Package configuration
The next page in the wizard allows you to run the package now or schedule this copy for a specific time. After this page, the wizard provides you a summary.
Moving Data Using the Import and Export Wizard
The SQL Server Import and Export Wizard allows you to import or export data from SQL Server. The source or destination of these data include Microsoft Excel, Microsoft Access, Oracle, flat files, or any ODBC connection. In this example, we will load data from a text file into a table in our VetClinic database. The schema of the VetClinic includes a table called Pets that is defined with the following columns: pet_id, pet_name, pet_weight, and MicroChipID. We have a text file called dogs.txt that contains the following text:
pet_id,pet_name,pet_weight,MicroChipID

14,George,60,BN8XA

15,Betty,14,H73A1
To import data into the VetClinic database, select Import Data from the context menu of the VetClinic database in Object Explorer. This will launch the wizard, and the second page will ask for a data source. Selecting Flat File Source and entering the location of the dogs.txt file will populate the rest of the tabs within this page. The Choose a Data Source page is shown in Figure 10-8.
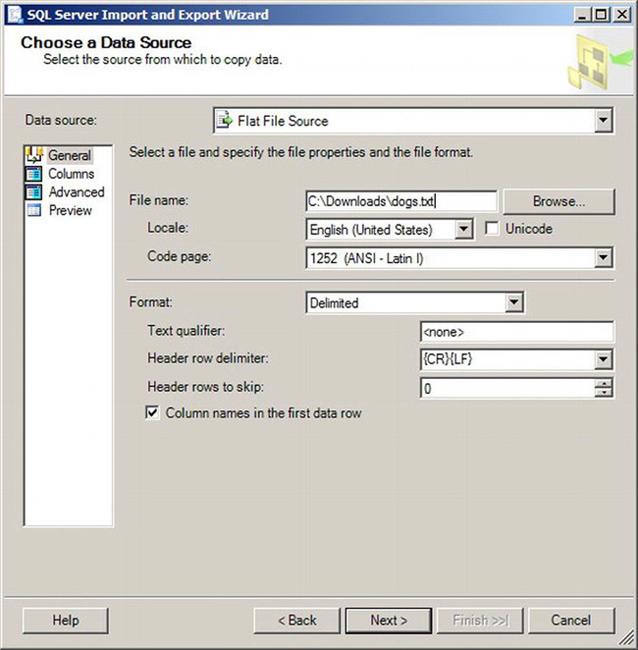
Figure 10-8. Choose a Data Source page
There are four tabs within this page: General, Columns, Advanced, and Preview. The General tab, which is shown in Figure 10-8, allows you to select the source file and any other information about the format of the text file such as if it had a header row or not. The Columns tab, shown in Figure 10-9, defines the rows and columns within the text file.
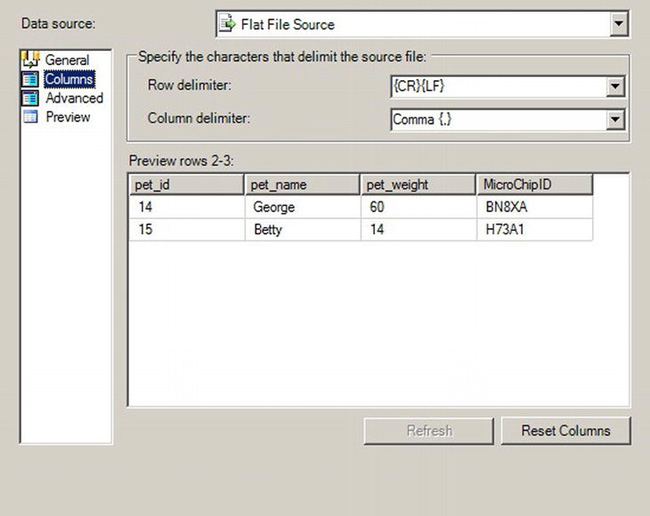
By default, the Columns tab selects a comma as the delimitor with a carriage return and line feed for the row delimiter. The Advanced tab, shown in Figure 10-10, is where you specify the data types that should be bound to the data you are importing.
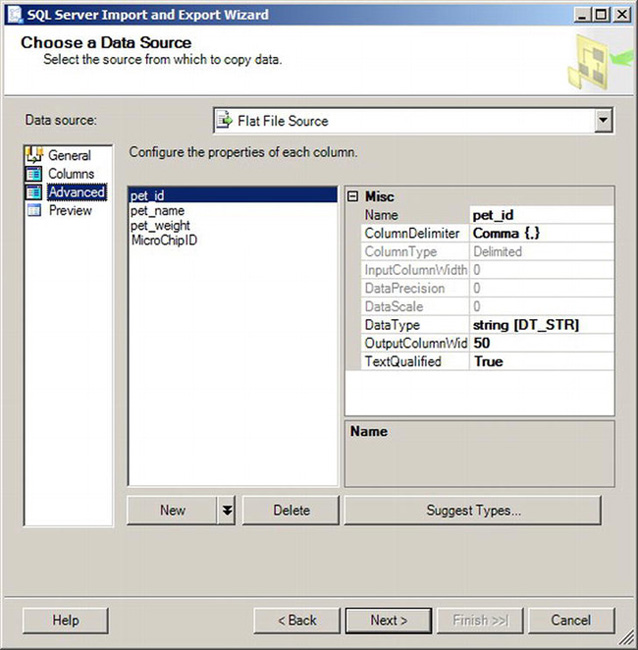
Instead of going through each and every column and figuring out which data type it should be, you can have the wizard suggest data types by clicking the Suggest Types button. This will launch the dialog shown in Figure 10-11.
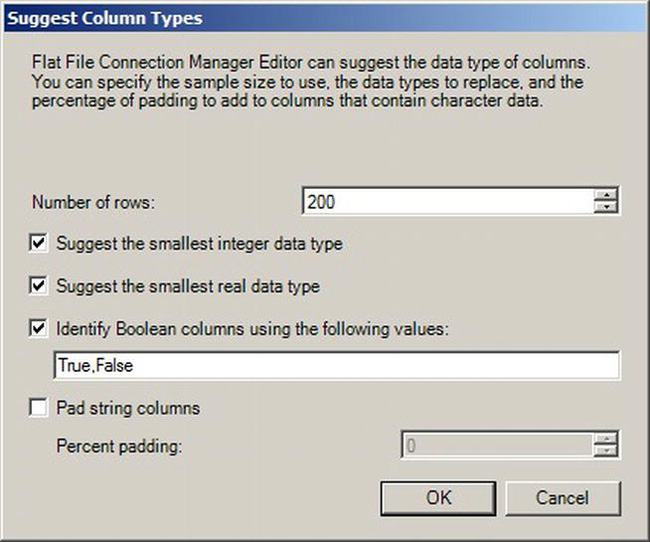
Figure 10-11. Suggest Column Types dialog
If you are inserting the data into an existing table, having the smallest data type isn’t as important, since the table schema is already defined. However, the option is useful when you are creating a new table to receive the data.
The Choose a Destination page in Figure 10-12 allows you to select a destination to write the data. Note that the destination does not have to be a SQL Server instance. The destination can be a flat file, an Oracle database, or any of the other destination type available. Since we want to append this data to the existing VetClinic database, we select VetClinic from the Database down-down box.
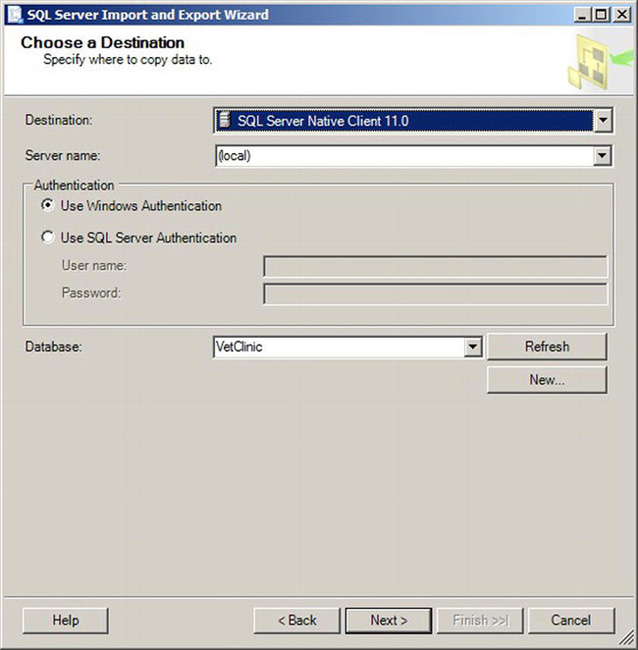
Figure 10-12. Choose a Destination page
Figure 10-13 shows the next page in the wizard, which prompts us to specify a destination table. We are prompted for a table, because we chose a database a destination. If we are appending data, we need to select the appropriate table; otherwise, our values will not map correctly. Once we do this, the bottom of the page will populate with a correct mapping, as shown in Figure 10-14.
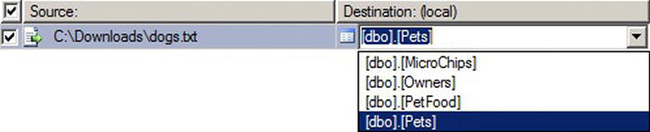
Figure 10-13. Destination table drop-down
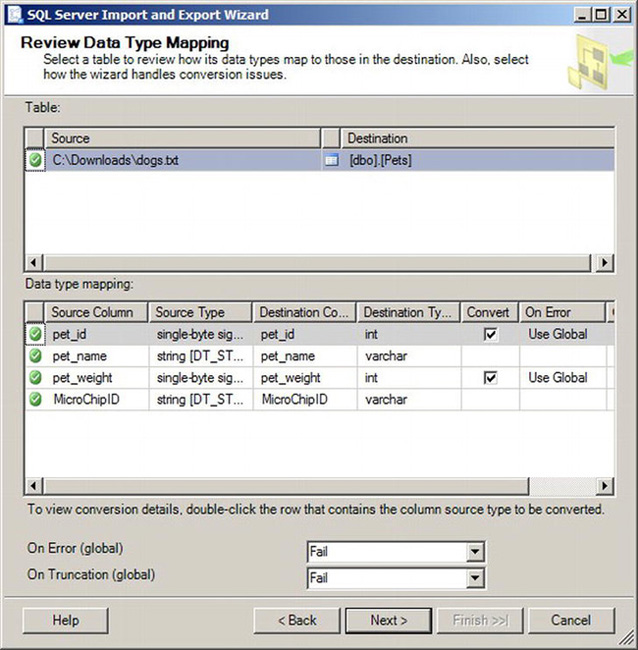
Figure 10-14. Data Type mapping page
The next pages in the wizard will allow you to import immediately or schedule the import to occur at a later time. If you run the import, you will see a status page that shows the results of the data movement. This status page is shown in Figure 10-15.
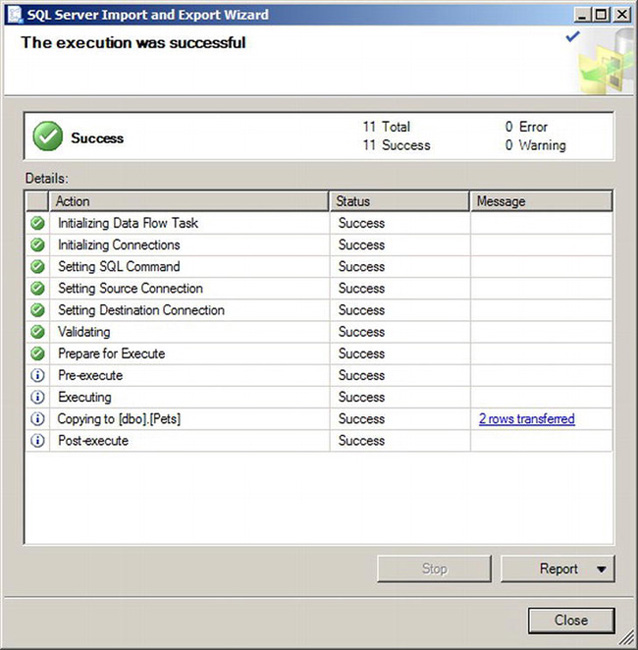
Figure 10-15. Execution status
Moving Data Using the Bulk Copy Program (BCP)
The Bulk Copy Program (BCP) is a command-line tool used to copy data between an instance of SQL Server and a data file. Where the Import and Export wizard can move data between multiple types of data sources, BCP only goes between SQL Server and a file. Issuing a BCP command without any parameters will give us a list of parameters. This list is shown in Figure 10-16.
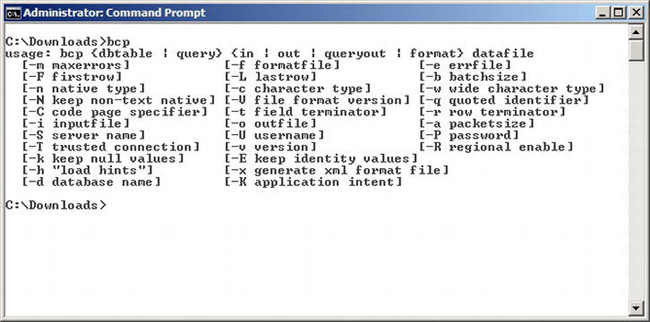
Figure 10-16. BCP.exe command line parameter list
Although its parameter list is relatively small, this little utility has been around for many iterations of SQL Server and is very powerful when used with the appropriate parameters. To move our data out of the database we can issue the following statement:
C:Demo>bcp VetClinic.dbo.Pets out Pets.dat -T -c


Starting copy...


15 rows copied.

Network packet size (bytes): 4096

Clock Time (ms.) Total     : 1      Average : (15000.00 rows per sec.)
Here, we are connected to the default instance using trusted security (the –T option) and outputting the data to a file called Pets.dat. If you use notepad to view the Pets.dat file, you will notice that it’s simply a plain text enumeration of the table, for example:
1    Zeus  185   398BF49

2    Lady  155   191ABBC

3    Deno  50   790AG441

4    Rex   44   CDD81322

5    Rover  15   A8719841

6    Roscoe 55   F5CAA29

7    Missy  67   B7C2A59

8    George 12   AA63BC5

9    Spot  34   CC8A674

10   Roxy  7    1A8AF59

11   Champ  95   81CB910

12   Penny  80   C710A6B

13   Fido  33   F82V

14   George 60   BN8XA

15   Betty  14   H73A1
To import data we can simply change IN to OUT and specify the destination server using the –S switch. For more information regarding BCP check out the SQL Server Books Online topic “bcp Utility” located at the following URL: http://msdn.microsoft.com/en-us/library/ms162802(v=SQL.110).aspx.
Checking Database Integrity
In SQL Server, a few key functions check the logical and physical integrity of the objects within the database. The most important function to be aware of is DBCC CHECKDB. “DBCC” is short for Database Console Command, and there are a number of DBCC commands that you will eventually use in your everyday DBA life. For a complete list see the article “DBCC (Transact-SQL)” located at the following URL: http://msdn.microsoft.com/en-us/library/ms188796.aspx.
DBCC CHECKDB checks the consistency of disk space allocation. When you issue a DBCC CHECKDB command, it actually executes three other DBCC commands: DBCC CHECKALLOC, DBCC CHECKTABLE, and DBCC CHECKCATALOG. Each of these can be executed individually as well, but if you issue DBCC CHECKDB, you are effectively already including them. Together, these commands check for issues like data purity where a value stored within the column falls outside the range of the data type defined for that column.
DBCC CHECKDB is a great tool to use as part of your maintenance routine for SQL Server databases. However, it is important to note the performance impacts that occur when you are running this command. DBCC CHECKDB may take a long time to run for very large databases and may use a lot of memory, CPU, and I/O bandwidth. DBCC CHECKDB makes heavy use of the tempdb database. All of these behaviors are expected because of the nature of what DBCC CHECKDB is doing to achieve its objective. Despite these issues with the command, there are some ways to mitigate. First, you could run this command with the parameter WITH PHYSICAL_ONLY. This only checks the physical structures of the database and does not check the internal logical structures. Alternatively, you could back up and restore the database on a separate system and then run the DBCC command. Although not a true representation of the production system, using a separate server is an option if your production system is maxed out already. Issuing a DBCC CEHCKDB (AdventureWorks2008R2) statement yields the following results, some of which are elided for brevity:
Service Broker Msg 9675, State 1: Message Types analyzed: 14.


Service Broker Msg 9676, State 1: Service Contracts analyzed: 6.


…


There are 1887 rows in 23 pages for object "sys.sysrscols".


DBCC results for 'sys.sysrowsets'.


There are 330 rows in 4 pages for object "sys.sysrowsets".


DBCC results for 'sys.sysclones'.


…
There are 181 rows in 2 pages for object "Person.vStateProvinceCountryRegion".


DBCC results for 'sys.xml_index_nodes_1765581328_256000'.


There are 195 rows in 3 pages for object "sys.xml_index_nodes_1765581328_256000".


DBCC results for 'Production.ScrapReason'.


There are 16 rows in 1 pages for object "Production.ScrapReason".


DBCC results for 'sys.xml_index_nodes_1765581328_256001'.


There are 301696 rows in 2151 pages for object "sys.xml_index_nodes_1765581328_256001".


DBCC results for 'sys.xml_index_nodes_526624919_256000'.


There are 9113 rows in 64 pages for object "sys.xml_index_nodes_526624919_256000".


DBCC results for 'HumanResources.Shift'.


…


There are 1764 rows in 70 pages for object "Production.vProductAndDescription".


DBCC results for 'sys.syscommittab'.


There are 0 rows in 0 pages for object "sys.syscommittab".


DBCC results for 'Sales.SalesTerritoryHistory'.


There are 17 rows in 1 pages for object "Sales.SalesTerritoryHistory".


CHECKDB found 0 allocation errors and 0 consistency errors in database

'AdventureWorks2008R2'.


DBCC execution completed. If DBCC printed error messages, contact your system administrator.
There are quite a few articles written on the subject of DBCC checks and very large databases. One such article is called “DBCC Checks and Terabyte-Scale Databases” located at the following URL: http://sqlcat.com/sqlcat/b/technicalnotes/archive/2009/08/13/dbcc-checks-and-terabyte-scale-databases.aspx.
Maintaining Indexes
If you have spent any time with relational databases, you have probably come in contact with indexes. Indexes are essential for driving peak query performance of SQL Server or any other relational database. Indexes conceptually work like the index of a book. If you picked up a technical reference book looking for more information on the SELECT T-SQL command, you would go to the index and look up the page number where this function is referenced. Without an index, you would have to go to every single page in the book to see if it has this information. If the book is large, this could take a really long time. Indexes are discussed in more detail in Chapter 5.
SQL Server has a number of different types of indexes that can be used to optimize query performance. For a complete list of indexes, take a look at the article “Indexes” available at http://msdn.microsoft.com/en-us/library/ms175049(v=SQL.110).aspx. The most common types of indexes you will encounter as a DBA will be clustered and nonclustered. The key difference between these two is how SQL Server stores the data when you create an index of these types. A clustered index stores the data rows in order based on the clustered index key. The order is implemented as a B-tree index structure. For a clustered index, the data is stored on disk in this structure and thus only one clustered index can be defined on a table. If you want to create another index on the table, you can define a nonclustered index. A nonclustered index does not change the data as it is physically stored within the database. You can have many nonclustered indexes defined on a table.
Detecting Fragmentation
As data is added, modified, and removed from the table, indexes that are defined become fragmented. This fragmentation occurs as a result of the data not being in the place where the index thinks it should be.
When a fragmentation occurs, SQL Server takes longer to scan through the data to find the value. The degree of fragmentation can be found using the DBCC SHOWCONTIG command. To illustrate this function, let’s create a test database, table, and sample data in the following script:
CREATE DATABASE Sales

GO

CREATE TABLE Customers (customer_id INT PRIMARY KEY,

customer_name CHAR(255) NOT NULL)

GO

INSERT INTO Customers VALUES(1,'user1')

GO

DECLARE @i INT

WHILE (@i<1000)

BEGIN

INSERT INTO Customers(customer_id,customer_name) VALUES(@i,'UserXXXX')


SET @i=@i+1

END

GO
We can issue the DBCC SHOWCONTIG command and pass the name of the table to look only at that table. If we omit the table name, the command will enumerate all indexes in the database. Here, we pass the name of the table that we’ve just created:
DBCC SHOWCONTIG('Customers')
This command yields the following results:
DBCC SHOWCONTIG scanning 'Customers' table...


Table: 'Customers' (2107154552); index ID: 1, database ID: 1


TABLE level scan performed.


- Pages Scanned................................: 36


- Extents Scanned..............................: 6


- Extent Switches..............................: 5


- Avg. Pages per Extent........................: 6.0


- Scan Density [Best Count:Actual Count].......: 83.33% [5:6]


- Logical Scan Fragmentation ..................: 5.56%


- Extent Scan Fragmentation ...................: 66.67%


- Avg. Bytes Free per Page.....................: 270.5


- Avg. Page Density (full).....................: 96.66%


DBCC execution completed. If DBCC printed error messages, contact your system administrator.
To interpret these results, you need to understand the concept of a database page. A page is the basic unit of I/O for the database. It consists of 8,096 bytes of information. SQL Server reserves 96 of those bytes for header information, which includes the page number, page type, the amount of free space on the page, and the allocation unit ID of the object that owns the page. An extent is a physically contiguous block of 8 pages. In our example, the data in the table is contained within 36 pages. Six extents were allocated to contain these 36 pages. In an ideal world, these six extents would all be right next to each other physically on disk such that when SQL Server was querying it could read all the pages sequentially.
The ideal sometimes happens, but over time, without any maintenance additional extents will be allocated to hold data, data will be removed from existing pages, and the number of switches required between the extents to access pages in the logical order of the index will increase. The Extent Switches property in the preceding output tells you this number and optimally should be equal to the number of extents minus 1. In our example, a value of 5 is optimal, because we have six extents.
Another important metric is Scan Density. Under ideal conditions, the best count is the same as the number of extent switches, assuming everything is linked contiguously on disk. Actual Count is the actual number of extent switches that were required for all the data given the current amount of fragmentation. Any best-over-actual ratio under 100 percent means some fragmentation exists. Typically, a value less than 40 percent indicates the need for defragmentation. The preceding output shows a ratio of 83.33 percent, so there is no compelling need to defragment.
Logical Scan Fragmentation is another item to look at. It shows the ratio of pages with a different physical order from the logical order. In this example, the Logical Scan Fragmentation is 5.56 percent. A percentage between 0 and 15 percent is acceptable. A database with a metric over 15 percent is a candidate for defragmentation. This counter gives an indication of a table’s fragmentation level. If a table is fragmented, you will suffer unnecessary disk I/O, which will affect end user query performance.
Defragmenting Indexes
The main command used to remove fragmentation is ALTER INDEX. ALTER INDEX WITH REBUILD will drop and re-create all the clustered indexes. When the command is used with the keyword ONLINE, SQL Server will build a new index on the side, and when the new index is ready to be used, it swaps out the old index with the new one allowing users to continue to use an index on their queries. This is good to use when you do not want to lock users out of the underlying tables that are part of the index. However, there is a performance cost when rebuilding an index, so it should only be done when necessary.
In our example, we don’t have a lot of data, so rebuilding of the index will be very fast, and we can issue the following statement:
ALTER INDEX PK__Customer__CD65CB85E1E35C48 ON Customers REBUILD
![]() Note The name of the primary key will be different for you as SQL Server randomly generates the name because we didn’t specify one. To list the indexes available on your table, execute
Note The name of the primary key will be different for you as SQL Server randomly generates the name because we didn’t specify one. To list the indexes available on your table, execute sp_helpindex 'Customers'. This will show you the name of the primary key index on the Customers table.
After the ALTER INDEX statement is issued, if you run another DBCC SHOWCONTIG statement you will see significant differences, as shown here:
DBCC SHOWCONTIG scanning 'Customers' table...


Table: 'Customers' (277576027); index ID: 1, database ID: 9


TABLE level scan performed.


- Pages Scanned................................: 34


- Extents Scanned..............................: 5


- Extent Switches..............................: 4


- Avg. Pages per Extent........................: 6.8
- Scan Density [Best Count:Actual Count].......: 100.00% [5:5]


- Logical Scan Fragmentation ..................: 0.00%


- Extent Scan Fragmentation ...................: 0.00%


- Avg. Bytes Free per Page.....................: 229.4


- Avg. Page Density (full).....................: 97.17%


DBCC execution completed. If DBCC printed error messages, contact your system administrator.
At this point, we have no fragmentation in the primary key index.
Distribution Statistics
SQL Server stores information on the distribution of data in columns and indexes. This information includes things like the number of rows of data and a distribution of data within a particular column. This data is used by the query optimizer to select the most efficient query plan for retrieving the data. As a DBA, you need to understand how statistics are used and also how to update them manually when needed.
Understanding Distribution Statistics
Two catalog views provide additional information about statistics; they are sys.stats and sys.indexes. If we join these two tables, we can get a simple list of the statistics created on the tables.
To illustrate statistics, let’s create a table that will include a lot of random numbers. The script to create this table is as follows:
CREATE TABLE LotsOfRandomNumbers

(number_generated INT,

seed INT,

random_number FLOAT)
Next, let’s fill the table with 100,000 random values with the following script:
DECLARE @i INT

DECLARE @RNF FLOAT

DECLARE @RNI INT

SET @i=0


WHILE (@i <= 100000)

BEGIN

SET @RNF = RAND(@i)

INSERT INTO LotsOfRandomNumbers VALUES((CAST(0x7FFFFFFF AS int) * @RNF),@i,@RNF )

SET @i=@i+1

END
Since we want the range of values to include all possible integers, we use CAST(0x7FFFFFF). Next, let’s create a nonclustered index on the number_generated column as follows:
CREATE NONCLUSTERED INDEX NC_number_generated ON dbo.LotsOfRandomNumbers(number_generated)
When we created the index, SQL Server created some statistics on the table that we could obtain by querying the sys.indexes and sys.stats tables. The following query joins these two catalog views into a simple result set that shows you a list of statistics created for the given table.
SELECT s.object_id,

  OBJECT_NAME(s.object_id) AS table_name,

  COL_NAME(s.object_id, sc.column_id) AS 'Column Name',

   s.Name AS 'Name of the statistics',

         s.auto_created as 'Is automatically created'

FROM sys.stats AS s

 INNER JOIN sys.stats_columns AS sc

 ON s.stats_id = sc.stats_id AND s.object_id = sc.object_id

WHERE s.object_id = OBJECT_ID( 'dbo.LotsOfRandomNumbers')
Issuing this query will result in the following:
object_id  table_name           Column Name       Name of the statistics   Is automatically

created


341576255  LotsOfRandomNumbers  number_generated  NC_number_generated      0
We created the index, which created the statistics; however, if we issued a query against this data that didn’t leverage the index, SQL Server would want to create some more statistics so that it could answer the query faster the next time. To demonstrate SQL Server creating statistics, issue the following query:
SELECT seed FROM LotsOfRandomNumbers WHERE random_number < .5
If you rerun the earlier query to report on statistics for the table, you will see the following result:
object_id  table_name           Column Name       Name of the statistics     Is

automatically created


341576255  LotsOfRandomNumbers  number_generated  NC_number_generated        0


341576255  LotsOfRandomNumbers  random_number     _WA_Sys_00000003_145C0A3F  1
SQL Server has created a statistic, _WA_Sys_00000003_145C0A3F, with information on the random_number column. SQL Server Management Studio also enumerates statistics for given objects and provides a lot of the same information you can get via T-SQL statements. If we expand the Statistics node under the LotsOfRandomNumbers table, we can see our two statistics created, as shown in Figure 10-17.
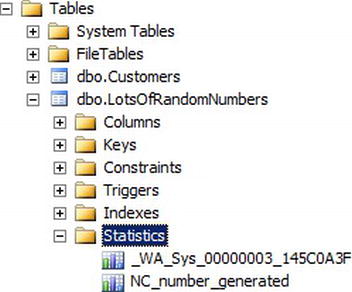
Figure 10-17. Statistics node in SSMS
You can view the properties of a statistic by selecting the statistic and choosing Properties from the context menu. This will launch the Statistics Properties dialog box shown in Figure 10-18.
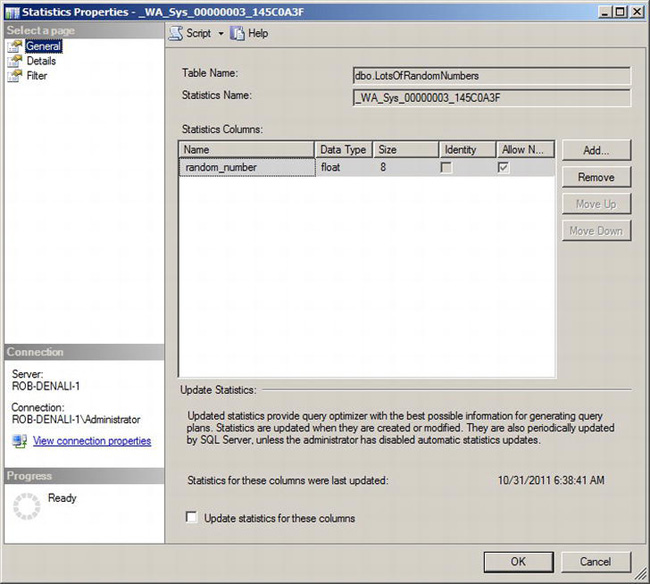
Figure 10-18. General tab of the Statistics Properties dialog box
From this panel, you can see the columns that are included, as well as an option to update the statistics. There are two database-level options related to statistics that are important: Auto Create Statistics and Auto Update Statistics. When we executed our previous script, SQL Server automatically created a new statistic for these data, because the Auto Create Statistics setting is true for the database.
Updating Statistics
When Auto Update Statistics is on, SQL Server will update statistics only when certain thresholds are met such as the number of rows in the table increase or decrease by 10 percent. Both of these database properties are enabled by default. Even though SQL Server will automatically update statistics, there may be cases when, according to SQL Server, the threshold hasn’t been met, but the statistics are out of date and causing query performance problems. This can occur when the number of rows stays about he same, but there are many updates, deletes, and inserts to the table. Also, if you have a very large table, it may take a long time to achieve 10 percent, thus you may want to manually update statistics. You can do this via SSMS manually by checking the box. Alternatively, you could issue an UPDATE STATISTICS T-SQL statement as follows:
UPDATE STATISTICS dbo.LotsOfRandomNumbers
This statement allows you more granularity in how much of the data to sample in obtaining the statistics. If you have a very large table, updating statistics may take quite a while, and you may be better off updating just a sample of the data. For example, you could update the statistic and have SQL Server only sample 25 percent of the data by issuing the following:
UPDATE STATISTICS dbo.LotsOfRandomNumbers WITH SAMPLE 25 PERCENT, ALL
Executing this command takes noticeably less time than the previous UPDATE STATISTICS command. Keep in mind though that the statistics will be less effective given the smaller sample size.
Creating Maintenance Plans
A maintenance plan is a workflow of database-maintenance–related tasks that you define to run on demand or at a specific time via the SQL Server Agent job scheduling service. You can easily create a plan using the Maintenance Plan Wizard. This wizard is designed to give you a head start in building out your maintenance plan. When you are finished with the wizard, the end result is a maintenance plan that you can go back to and modify as you see fit. To illustrate, let’s launch the Maintenance Plan Wizard from the Maintenance Plans container node under the Management node in Object Explorer. The first properties page will be Select Plan and is shown in Figure 10-19.
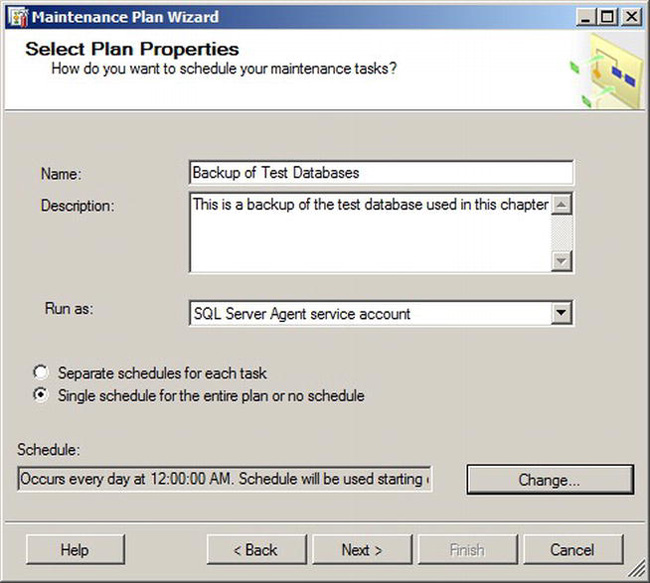
Figure 10-19. Select Plan Properties dialog
From this first page, we can specify if the tasks that we are defining should run on separate schedules or the same schedule. We can also specify which credentials should be used when the maintenance plan runs. The next page, shown in Figure 10-20, allows us to select which tasks should be included in this maintenance plan.
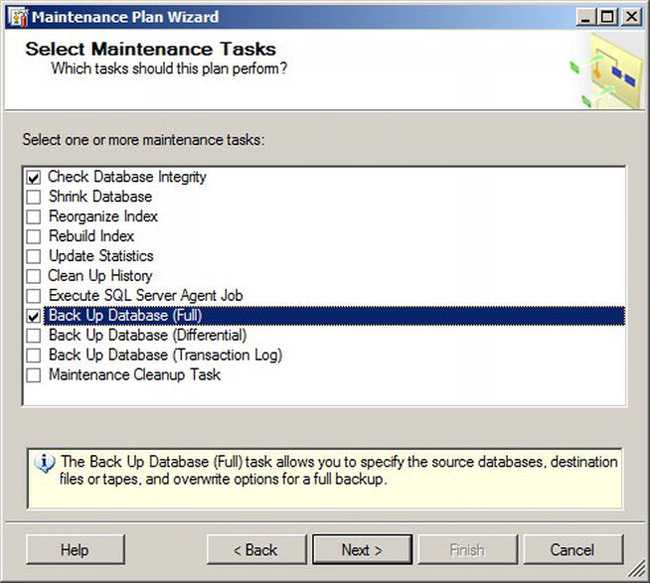
Figure 10-20. Select Maintenance Tasks page
Do not worry about adding the exact tasks you want the first time. When this wizard finishes, you can add, remove, and change tasks using the designer, which we will cover later in this section. For this demonstration, we will select the Check Database Integrity and Back Up Database (Full) tasks.
The next page in the wizard will allow you to change the order of execution of the tasks. By default, it checks the integrity first and then performs the database backup so there is no need to change the order for this particular example. The next two pages will ask us to provide details on the objects within the database that we wish to check the integrity of and back up. Figures 10-21 and 10-22 show the Check Database Integrity and Backup Database pages. Depending on which tasks you select, you will have a property page for each task selected.
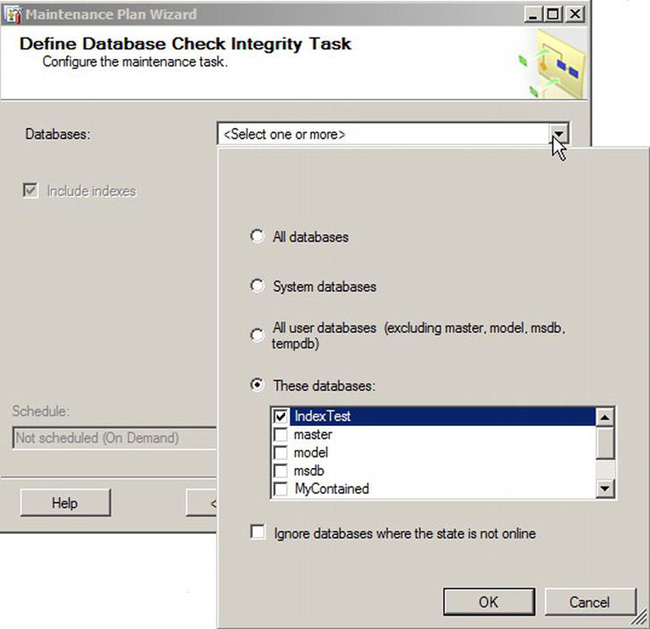
Figure 10-21. Check Database Integrity Task page
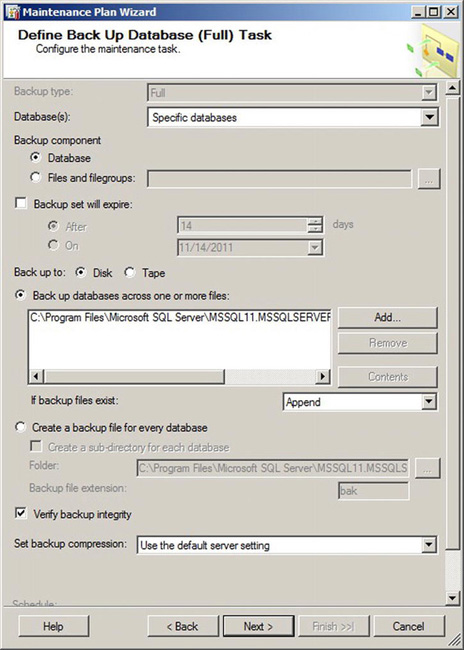
Figure 10-22. Full Database Backup task page
The next page in the wizard will ask you if you want to write a report of the maintenance plan execution. You also have the option of automatically sending this report via e-mail. Once we have completed the wizard, we can see our new maintenance plan by selecting Modify from the context menu of the maintenance plan we just created. This context menu is shown in Figure 10-23.
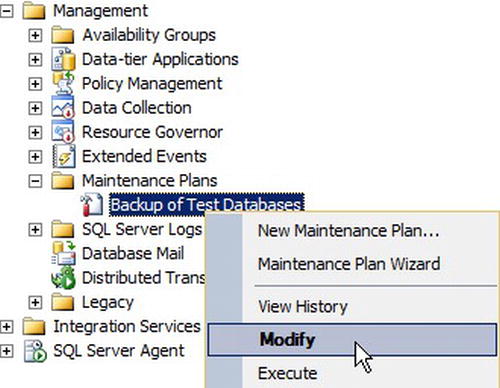
Figure 10-23. Context menu of the Backup of Test Databases maintenance plan
Modifying a maintenance plan will launch the maintenance plan designer in a document window within SQL Server management studio. From here, we can see a single subplan that was created by the wizard, as shown in Figure 10-24.
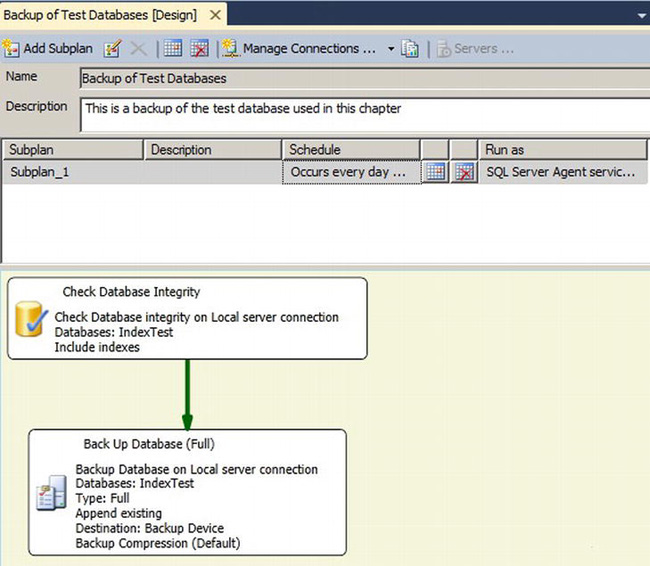
Figure 10-24. Maintenance Plan created by the Maintenance Plan Wizard
If we want to include additional tasks, we can simply drag and drop tasks onto the designer surface from the toolbox. If the toolbox is not shown in SSMS, you can select View Toolbox from the View menu. Here, you can see a bunch of maintenance tasks to include in the plan. By clicking and dragging, you can create a fairly complete maintenance plan, like the one shown in Figure 10-25.
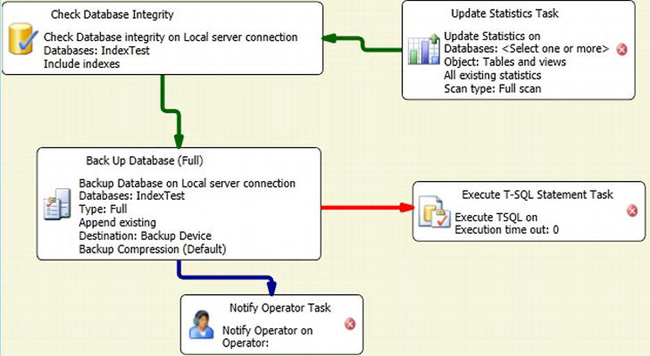
Figure 10-25. Maintenance plan showing additional tasks
The lines that join the tasks define the workflow for the plan, such as what path the task should take on failure or completion. Notice that Figure 10-25 has tasks with a red “X” icon. This tells you that more information is needed before the plan can successfully run. One of the pieces of information neeed is the server connection. By default, you are defining the maintenance plan to run against the current local server, but you can add remote servers to the list and have the maintenance plan perform the tasks against these servers. To add additional servers to run maintenance tasks against add them using the Manage Connections button.
Maintenance plans are an easy way to quickly define and implement your maintenance strategy. For more information read the article, “Maintenance Plans” located at http://msdn.microsoft.com/en-us/library/ms187658(v=SQL.110).aspx.
Scheduling Maintenance Tasks
SQL Server Agent is a Windows service that is installed when you install SQL Server itself. By default, it is not started, but if you want to leverage maintenance plans or features like Database Mail, you may need to start it. This can be done by connecting to the SQL Server instance, navigating to the SQL Server Agent node, and selecting Start from the context menu.
Previously, in Chapter 8, SQL Server Agent was discussed in depth as it relates to scheduling database backups. As a refresher, SQL Server Agent uses the concept of jobs and schedules. A job consists of one of more job steps. Each job step is a specific type. Types include T-SQL scripts, PowerShell scripts, and SQL Server Integration Services Package execution commands to name a few. You can define a job schedule and bind this schedule to run one or more jobs. DBAs use SQL Server Agent frequently to schedule routine maintenance of their SQL Server databases.
For more information on SQL Server Agent, check out the TechNet Webcast “SQL Agent in SQL Server 2005” located at https://msevents.microsoft.com/CUI/EventDetail.aspx?culture=en-US&EventID=1032275577&CountryCode=US. Although this webcast is based on SQL Server 2005, the core concepts are still the same with the latest version of SQL Server.
Creating Log Files
SQL Server creates a log file every time the server instance starts. It writes valuable information to this log file and is a great place to look at when you want to troubleshoot any issues with SQL Server. This information includes status from backup and restore operations, kernel messages, and server-level error messages. By default, the location of this error log is located in the following folder on the drive where your SQL Server instance is installed:
Program FilesMicrosoft SQL ServerMSSSQL.nMSSQLLOGERRORLOG
Although you could use a text editor to view these error log files, there is a more useful Log File Viewer dialog within SQL Server Management Studio that is optimized for loading this potentially large amount of information. To view the error log using SSMS, enumerate the SQL Server Error Logs node under the Management node for the selected SQL Server instance. This node is shown in Figure 10-26.

Figure 10-26. SQL Server Logs node in SSMS
To view the log, right-click the current log, and select View SQL Server Log. This will launch the Log File Viewer dialog shown in Figure 10-27.
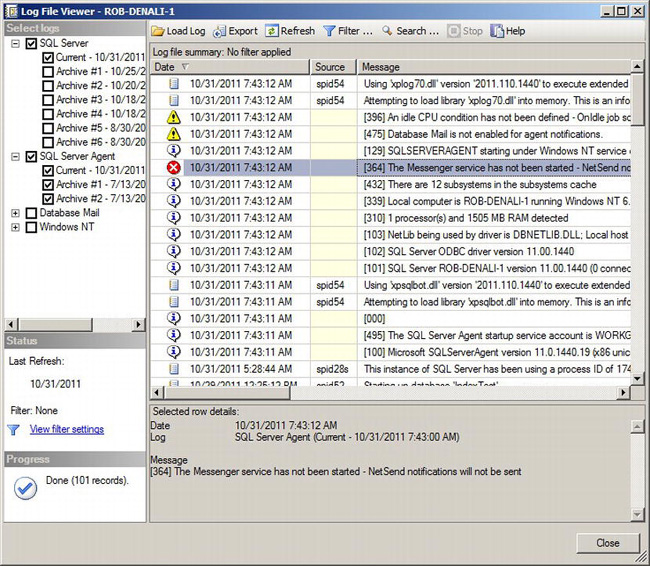
Figure 10-27. Log File Viewer dialog
This dialog will show you the current log file, because that is the node we launched it from in SSMS. The real power of this dialog is that we can add additional logs and look that the results in chronological time. For example, when we check the SQL Server Agent node, and all the SQL Server Agent logs are combined with the SQL Server engine logs. We can also add Windows NT logs by simply clicking the check box.
SQL Server keeps six log files with the file names ending in .1, .2, and so on. DBAs can force SQL Server to write to a new log file by issuing a sp_cycle_error_log command. However, under normal operating conditions, you usually do not need to do this unless you want to copy off the log to another location.
Summary
This chapter discussed some of the key maintenance tasks for DBAs. First, as a DBA, you sometimes move data. With SQL Server, there are a few ways to do this, each with its own pros and cons. Strategies that were discussed included moving data using the database “attach and detach” method, the Copy Database Wizard, and the Import and Export wizard. Next, this chapter covered the common maintenance tasks performed by database administrators. By far, the most common tasks for DBAs are backing up and restoring databases. These tasks are not covered in this chapter; rather, each has its own chapter in this book. Other common tasks that are the DBA’s responsibility include checking database integrity, maintaining indexes, and creating maintenance plans.
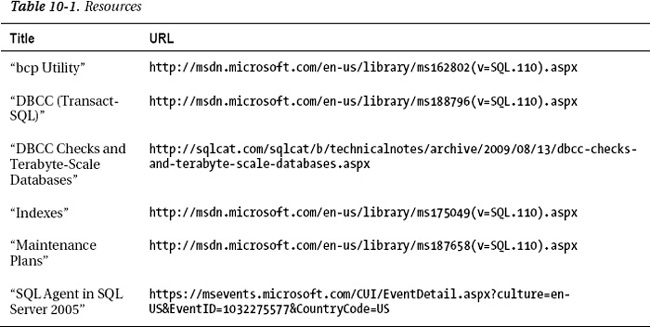
Table 10-1 lists some resources supporting the content discussed in this chapter.