C H A P T E R 8
Database Backup Strategies
SQL Server 2012 and the Windows platforms it runs on are very stable and safe technologies that can offer you years of uptime and service. However, things do go wrong: Software can have errors. Hardware can break. Users can make mistakes. Any of these reasons and hundreds of others can lead to a loss of data that’s important to you. To protect against the possibility of data loss, you’re going to want some method of creating a copy of your database to store separately for use in the event of an emergency. This is called backing up the database. It’s a fundamental task for people charged with administering databases and database servers to ensure that the databases in their charge get backed up appropriately.
There are a number of ways to back up your database, and each has its own strengths, weaknesses, and purpose. There are ways to back up only the parts of the database that have changed and ways to back up a record of the changes, called a log backup. SQL Server allows you to protect your backups with the same level of security that you protect your database, so you can encrypt backups. There are even ways in SQL Server 2012 to save space on backups by making the backup files smaller through compression. We’ll cover the following in this chapter:
- Types of database backups
- Backing up the logs
- Automating the backup process
- Encrypting the backup files for security
- Compressing backups to save space
- Designing a backup plan
Defining the Types of Backups
You can back up a database in a number of ways. The different backup methods can be used together, separately, or as part of a complicated pattern designed to protect your data in the way that is best for your environment. To back up your database, you can use the following:
- Full backups
- Differential backups
- File and filegroup backups
Each of these backups protects data in slightly different ways by making a protected copy of that data. All of these types of backup operations write your data out to a file. That file can be on a different disk on your server, on another server, on portable media such as thumb drives, or it can be a specialized backup system, such as a tape backup system that writes out to specialized media resembling old-fashioned cassette tapes (although tape backup through SQL Server has been deprecated in SQL Server 2012 and soon won’t be supported at all). Part of deciding on a backup strategy for your system is also picking the media, or what is called a physical backup device, on which to write your backup files.
When backups are run against the databases on your SQL Server 2012 instance, the users and applications connected to those databases are not interrupted. Most of the time, in fact, you will see minimum effects from running backups on reasonably active systems. If the system is under heavier loads, you might see significant performance degradation during some of the backup operations. Because backups don’t take the systems down or offline, your backups may be run fairly frequently because you don’t have to wait for all users to exit the system or kick the users off the system while you run backups. It’s still a good idea to run the most intrusive backup operations, such as full backups, during off-peak hours when the user load is less.
More often than not, you won’t be running backups manually. You will need to schedule the backup so that it occurs on an automated basis. The most common method of automation is using the scheduling process of SQL Server Agent. This is covered in detail in the “Automating the Backup Process” section.
To better understand which of the backup types might be applicable in your situation, we’ll describe each of them in more detail.
Full Backups
A full backup creates a complete copy of all the data, structures, and code that are contained within the database when the backup operation is run. This copy of the database is done at the lowest possible level within the system, so it’s not like running a query to retrieve data where some could be missed. All the data, all the code, and all the structure within the database will get backed up to the backup file. It is not possible for a successful backup to be taken of a database and miss data or change a stored procedure.
The full backup is the primary means of backing up a database. It’s the foundation from which other backup types will operate. It’s also the foundation from which a database restore (covered in Chapter 9) will be run. Because of this, no matter what other choices you make for backing up your data and logs, you must set up full backups to start.
A backup can be initiated through direct calls using the T-SQL scripting language or by having the graphical user interface (GUI) supplied with SQL Server 2012—SQL Server Management Studio (SSMS)—generate and run the T-SQL scripts for you.
Full Backup Using SQL Server Management Studio
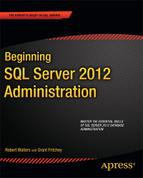
To initiate a backup in SSMS, connect to your SQL Server instance, and expand the Databases folder. Select the database you want to back up, and right-click that database. This opens a context menu. Navigate through the menu to Tasks and then select Back Up. This launches the Back Up Database window shown in Figure 8-1.
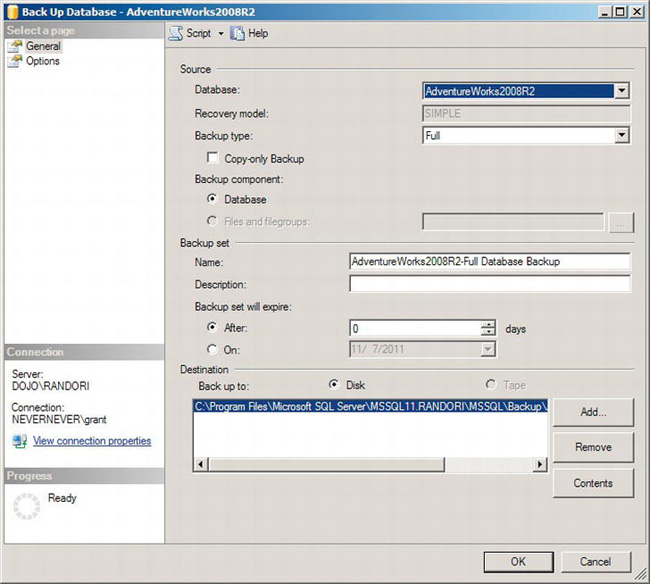
Figure 8-1. The Back Up Database window
There are two pages in the Back Up Database window that you can select on the left side of the screen. It opens on the default General page. The default values are the database you selected previously and a backup type of Full. The check box Copy Only Backup allows you to make a backup of the database that is separate from the normal chain of backups. We’ll describe that in more detail in the section “Backing Up the Logs.” You don’t need to modify anything in the Source section of the window to create a full backup.
The next section of the window, “Backup set,” is where you define the intended target of your backup. The options give you a full range of control over how you want to manage your backup. You can give it a name and a description to make it easier to understand the purpose and origin of the backup when you go to restore it (restoring is covered in detail in Chapter 9). You can also specify that a backup set expires after a certain number of days or on a specific date. For a simple backup operation, leave all these settings at the default values.
Finally, you need to specify a destination. You may have a default location already defined. If not, to add a location, click the Add button. This will open the Select Backup Destination dialog box, as shown in Figure 8-2.
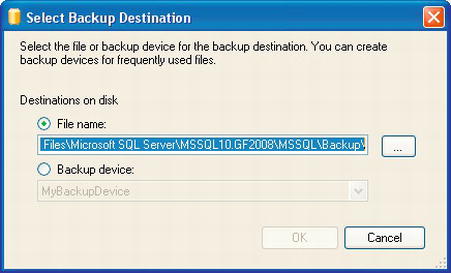
Figure 8-2. Select Backup Destination dialog box
You can select either a specific file location or a backup device. A backup device is a predefined file or a tape backup system that is available to your server. In the window shown in Figure 8-2, a specific file has not been defined. Click the ellipsis button (…), which will open the Locate Database Files window, shown in Figure 8-3.

Figure 8-3. Locate Database Files window
Here, you can define the path and file name for the backup. Clicking the OK button for each of these windows will close them and take you back to the Back Up Database window shown in Figure 8-1. The Destination field will show the file you specified.
There is an additional function you can take advantage of that entails using multiple files for backups. This is referred to as backup mirroring. For very large databases, usually larger than 1TB in size, using multiple files to perform the full backup can speed up the process because multiple disks are being used. If you do want to mirror the backup files, you can add additional files using the same process used to add one. Just remember, you will need all the files to be available to perform a restore of the database.
From here, you can run a backup. Operations running against the database can continue uninterrupted, as described earlier. The backup operation itself will take longer to run as the size of your database increases. In addition, you can run one backup after another, all pointed to a single file. Since the default options are in operation, a new backup will be created within the file each time you run the backup operation. By default, SSMS will not overwrite the file with each new backup; it will instead append the backup to the file along with the other backups in your backup set. If you would prefer to change this behavior, when the Back Up Database window is open, click the Options page option on the left side of the screen to see all the options available, as shown in Figure 8-4.
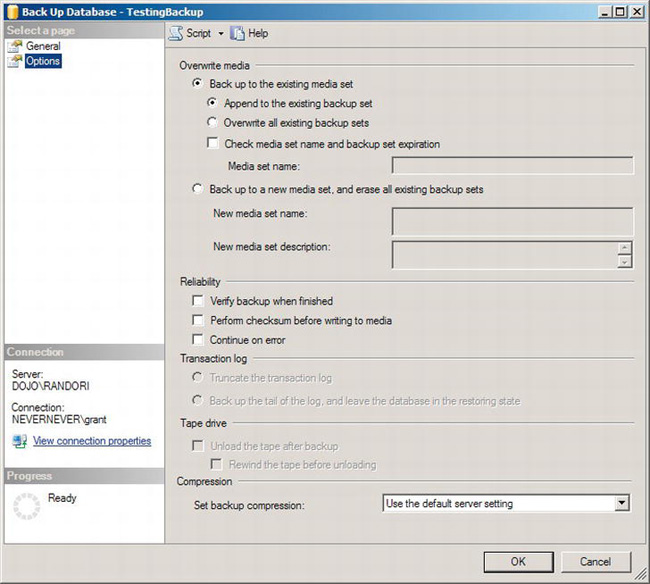
Figure 8-4. Back Up Database window’s Options page
As you can see, the default option is to add, or append, the backup you’re currently running to the existing file or device. The file or device in this context is referred to as a backup set. You can modify this so that instead it overwrites the file each time you run the backup. We prefer this methodology because it makes it easier to know exactly what is backed up where, visually. You don’t need to open a file and peruse backups within it to see which backups are available, when they were created, and so on. We’ll discuss looking through the backup sets in Chapter 9.
Other options that you should consider when running a backup include adding verification that the backup was done completely and correctly. You can do this by selecting the check box in the Reliability section of the Options page labeled “Verify backup when finished.” This is a function of the RESTORE command and will be covered in more detail in Chapter 9. You can also validate that everything written to disk is written correctly by using the “Perform checksum before writing to media” option. This adds additional overhead to the backup process, so for very large systems, it might not be desirable. However, it also adds a layer of protection and safety to the backup process, helping to ensure that your backups are valid. At the very bottom of the screen, you can also see the settings for using compression with your backups. Increasingly often, managing disk space and trying to optimize the use of disk space has become more common tasks. SQL Server offers a method to help with this when using backups by adding the ability to compress the backups as you create them. Compression is only available in the Developer, Standard, and Enterprise versions of SQL Server. The other options available here are not generally used when performing a standard full backup.
Full Backup Using T-SQL
Although you can perform all your backup operations through Management Studio, most DBAs use T-SQL instead. Running your backup operations through T-SQL enables you to automate backups through scripting, which increases the flexibility of the backup process. Even the backup operations in Management Studio use T-SQL under the covers. You can always see the T-SQL being issued by the Management Studio GUI by clicking the Script button visible at the top of the Backup Up Database window (shown earlier in Figures 8-1 and 8-4).
To use T-SQL to back up the database, open Management Studio, and connect to the server as outlined earlier. Now, open a T-SQL editing window by clicking the New Query button visible by default on the toolbar. This will open a new window that looks like a blank white screen with a cursor blinking in it; this is the T-SQL editing window. Type the following to generate a full backup of the AdventureWorks2012 database:
BACKUP DATABASE AdventureWorks2012

TO DISK = 'c:dataAdventureWorks2012.bak';
Clicking the Execute button will immediately back up the database to the disk location specified. You could also back up to a device. To do that, first you need to create a device. The following script creates a backup device that will allow you to back up to a file:
EXEC sp_addumpdevice

    @devtype = 'disk',

    @logicalname = 'MyBackupDevice',

    @physicalname = 'c:dataAdventureWorks2008.bak';
And then you can use the device in a backup as follows:
BACKUP DATABASE AdventureWorks2012

TO MyBackupDevice;
Although this process seems simple, it can quickly become somewhat more complicated. Normally, we back up to a file that includes the date or date and time so that we can keep more than one backup file for a given database within a folder. A complete full backup script that includes the ability to overwrite a file looks like this (--basicbackup in the code download):
DECLARE @BackupLocation NVARCHAR(100) ;

SET @BackupLocation = 'c:dataAdventureWorks2012_'

    + CONVERT(NVARCHAR(8), GETDATE(), 112) + '.bak' ;

BACKUP DATABASE AdventureWorks2012

TO DISK = @BackupLocation

WITH INIT ;
This command uses a variable, @BackupLocation, to define where we intend to store the backup file. We then get the current date and use the CONVERT function to turn into a format that looks like 'MMDDYYYY'. The output looks like this: c:dataAdventureWorks2012_20111116.bak.
To add in the additional validation offered by getting a checksum as the backup runs, we’ll need to modify the full backup script one more time (--fullbackup in the code download):
DECLARE @BackupLocation NVARCHAR(100) ;

SET @BackupLocation = 'c:dataAdventureWorks2012_'

    + CONVERT(NVARCHAR(8), GETDATE(), 112) + '.bak' ;

BACKUP DATABASE AdventureWorks2012

TO DISK = @BackupLocation

WITH INIT, CHECKSUM  ;
As we mentioned previously, compression for backups is becoming much more common. Adding compression through the command line is as easy as modifying the script to take it into account:
 DECLARE @BackupLocation NVARCHAR(100) ;

SET @BackupLocation = 'c:dataAdventureWorks2012_'

    + CONVERT(NVARCHAR(8), GETDATE(), 112) + '.bak' ;

BACKUP DATABASE AdventureWorks2012

TO DISK = @BackupLocation

WITH INIT,CHECKSUM, COMPRESSION, FORMAT ;
Two additional WITH words were added: COMPRESSION tells SQL Server that this backup is going to be compressed, and FORMAT makes SQL Server throw out the previously created file and reformat it completely, something necessary when switching from an uncompressed file to a compressed one or vice versa.
You are probably beginning to see the types of control you can exercise over your backup operations using T-SQL. For the rest of this chapter, with a few exceptions, we’ll focus on using T-SQL to perform the backup operations.
Differential Backups
As databases get bigger, the amount of time it takes to perform a full backup increases, so you may find that your databases are too big for frequent full backups. You could also find that the backup runs for so long that it’s running outside the off-hours you scheduled it for. Either or both of these combined could lead you to begin to use differential backups.
A differential backup is a process where only the changes since the last full backup are pulled from the database and backed up to the backup file or device. SQL Server places a marker in the database for the last time a full backup was run. This enables it to automatically track the changes that have been made since that backup. So, for example, if a full backup was run Sunday night and a differential backup was run on Monday night, only the data that had changed since the Sunday night backup would be included in Monday’s file. A differential backup always take the last full backup as its starting point, so if you run another differential on Tuesday night, that new differential will have all the data that had changed on Monday and Tuesday, since the last full backup was Sunday night. This means that differential backups will get bigger as the date of the original full backup goes further into the past. Just remember that you need to have the full backup as a baseline, or you won’t be able to restore the differential.
Creating a differential backup is not at all hard. The same basic syntax applies as for a full backup. Here is how a differential for the last full backup of AdventureWorks2008 could be created (--differential in the download):
DECLARE @BackupLocation NVARCHAR(100);

SET @BackupLocation = 'c:dataAdventureWorks2012_' +

CONVERT(NVARCHAR(8),GETDATE(),112) + '_diff.bak';

BACKUP DATABASE AdventureWorks2012

TO DISK = @BackupLocation

WITH INIT, CHECKSUM, DIFFERENTIAL;
Looking at the script, you can see the two changes that were made in bold. We added _diff to the file name so that we mark the differential backup files appropriately and because we don’t want to overwrite the full backup with a differential. If you accidentally did this and then tried to restore the database, your backup would be lost. The other change was in the WITH clause; the additional keyword DIFFERENTIAL changes the method of backup.
File and Filegroup Backups
For smaller databases, less than approximately 500GB in size, a full backup or a full backup with differentials should work just fine. As databases get bigger still, you might need to consider backing up only smaller parts of the database rather than backing up the entire database. You would still perform file or filegroup backups in conjunction with full backups. Backing up a file or a filegroup allows you to back up smaller pieces of the database, which means that the backup process runs faster. This approach does make the management of the backups more difficult. When you start backing up individual database files, you have to plan on restoring only individual files. This makes recovery operations much more difficult. However, the cost may be worth the benefit because it is possible to restore only the damaged file to a database, rather than restoring the entire database. Files can be stored in sets called filegroups. These can also be backed up individually from the database.
When a database is in simple recovery mode, the log data of completed transactions is not kept; you can perform a file backup only on those files that are marked read-only. You can only back up a file or filegroup of a database that has more than one filegroup in it.
To back up a file for a given database, you will need to know the logical file name, not the actual name, of the file you want to back up. When backing up a filegroup, you just need the name of the filegroup. You can get the logical file names for a database through the Database Properties window. Right-click the database in question, and select Properties from the pop-up menu. The Database Properties window will open. Click the Files tab to see the logical file names, as shown in Figure 8-5.
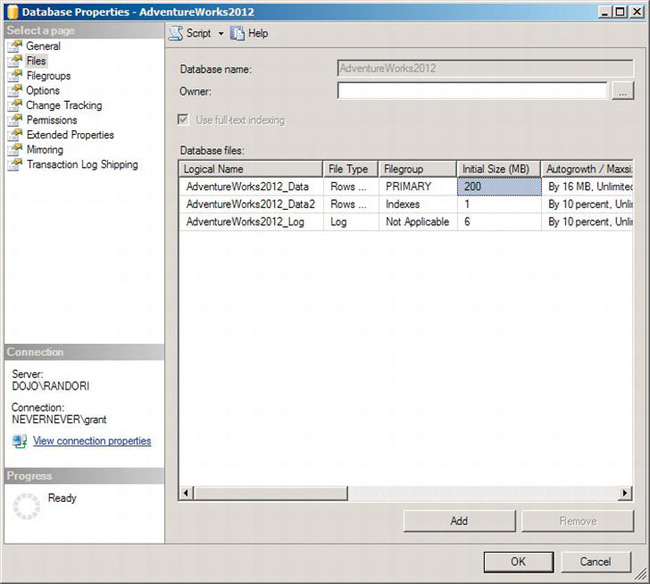
Figure 8-5. Database Properties window displaying the logical file names
Notice the Logical Name column in the “Database files” section of the window. Another way to get the information shown there is to go to the system management view sys.database_files and query it as follows:
SELECT  df.name

FROM    sys.database_files AS df;
Once you have the logical file name, you can use it in the backup script. Before a file backup of the AdventureWorks2012 database can be run, the database will need to be put into a recovery model other than simple. We’ll use the full recovery mode since that is the most commonly used in production systems:
ALTER DATABASE AdventureWorks2012

SET RECOVERY FULL ;
Now, you can run the file backup like this (filebackup.sql in the download):
BACKUP DATABASE AdventureWorks2012

FILE = 'AdventureWorks2012_DATA'

TO DISK = 'c:dataAdventureWorks2012_DATA.bak'

WITH INIT ;
This will back up just the file specified, AdventureWorks2012_DATA. If you want to back up multiple files in a file group, the syntax changes only slightly:
BACKUP DATABASE AdventureWorks2012

FILEGROUP = 'Primary'

TO DISK = 'c:dataAdventureWorks2012_Primary.bak'

WITH INIT;
This will back up as many files as there are within the filegroup as a single backup file. It’s important to remember that backing up files individually should be done only when necessary. A more standard approach is to use the more easily controlled mechanisms of the full backup.
A backup just marks a moment in time in the database. When you restore a backup, you restore to the point only when a backup was run. But your data is changing all day long. You can’t run full backups all day, and the differential or file backups help only so much. To capture the changes in data over the day, you need to put log backups to work.
Backing Up the Logs
As data is manipulated within the database, a record of the edits that have successfully completed is kept in the database log. These edits are wrapped by what are called transactions. A transaction can contain a series of data changes or just one. These transactions are what are stored within the log. The log is maintained by the system to allow for the recovery of the database in the event of some type of shutdown of the system. Not all data will be automatically recorded to the disk; some may be in memory, waiting its turn to get to the disk, but the completed transactions will always be in the logs.
The data in a log can be kept until the next time everything gets written out to disk, an event referred to as a checkpoint. Keeping the log information only until a checkpoint is referred to as the simple recovery model. It’s simple because to restore a database, you need only the backups, whether full, differential, or files. You can’t use the log data in the recovery in any way, so you will not be able to restore transactional data. That data will be lost forever in the event of a catastrophe. Simple recovery is almost never used in production systems and certainly wouldn’t be used in mission-critical systems.
The data in the log can be kept indefinitely, depending on disk space, until a special backup operation, called a log backup, is run. This approach of retaining the log is referred to as the full recovery model. There is also a recovery model called bulk logged; however, it behaves enough like full recovery for our purposes in this chapter that we’ll ignore it. It’s the full recovery model that allows for a more complete database recovery plan because the log allows for recovering to a point in time. Point-in-time recovery will be covered in detail in Chapter 9. Log backups are not cumulative. Each one captures the information in the log since the last log backup. As each backup is run, the entries backed up are removed. While the log is truncated internally, it doesn’t change in size. You can store log backups in individual files or as a backup set.
Initiating Fully Recovery Mode
To get started with log backups, first you need to set your database to the full recovery model. In Management Studio, right-click the database to bring up the context menu, and then select Properties. This will open the Database Properties window for the database in question. Select the Options page, and you will see something similar to Figure 8-6.
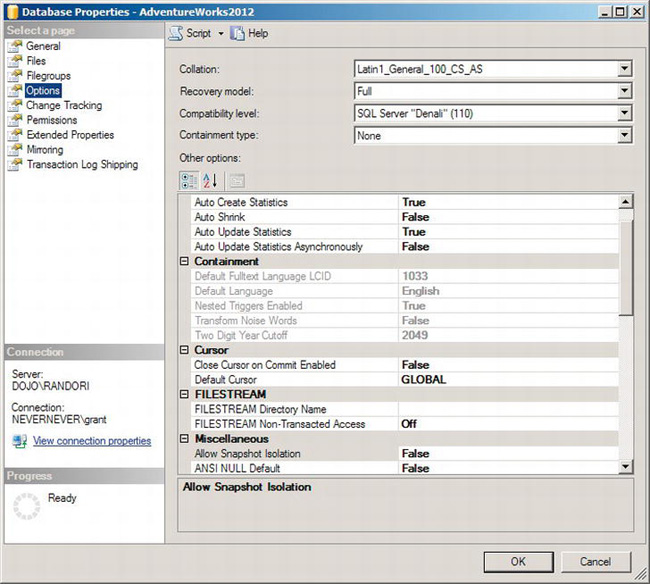
Figure 8-6. Database Properties window showing the Options page
Near the top of the page is a drop-down for the recovery model. Select Full from the list of three available models. Clicking the OK button will switch the database to the full recovery model. From this point forward, completed transactions will be kept in the log. Before you run out of disk space, it’s time to learn how to back up the log.
Log Backup Using Management Studio
To back up the log for the database using Management Studio, perform the same actions as for backing up a database to open the Backup Database window. Right-click the database in question, and then select Tasks from the context menu. Next select Backup from the new menu choices. After the Backup Database window opens, select Transaction Log from the “Backup type” drop-down list. You will then have a window that looks something like Figure 8-7.
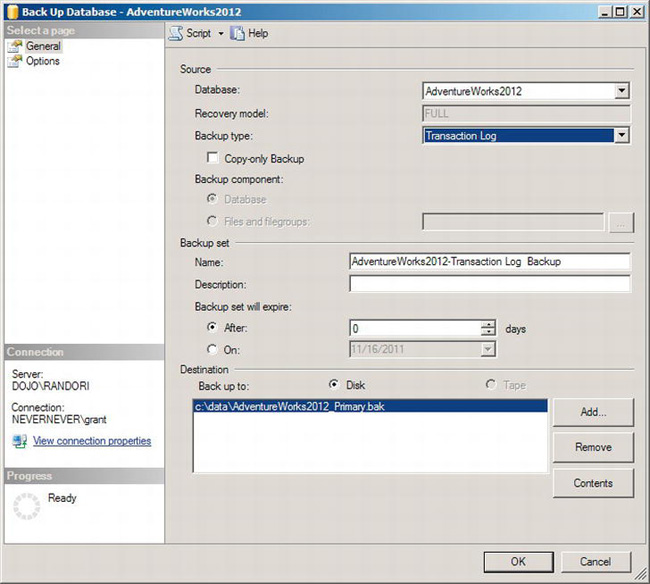
Figure 8-7. Back Up Database window ready for transaction log backup
To set the destination for the location you want to use, you may need to remove the most recently used location by clicking the Remove button. After that, you can click the Add button and select a disk or device to receive the backup file. The options are the same, and the Options page would look like it does in Figure 8-4. If you click OK, the log backup will run, and the log itself will be truncated, because all the entries that get backed up are removed.
Log Backup Using T-SQL
Just as the same mechanisms for backing up the log are used in Management Studio, the mechanisms in T-SQL look similar to those used for database backups. Open a query window in Management Studio, and type the following:
BACKUP LOG AdventureWorks2012

TO DISK = 'c:dataAdventureWorks2012_log.bak' ;
When you execute this, it will append the log backup to the previously created log backup file. You can use the same options such as INIT, used previously to create a new file for each backup, and dynamically name the files to assist in managing your log backup files.
Backing Up a Copy of the Database
Once you begin using incremental backups and log backups, the changes recorded by each of those other backup types are based on the last full backup. This is important to know because sometimes, you’re asked to make a backup of the database for testing, training, or some other purpose. You might want to back up a database prior to introducing new stored procedures or data structures or prior to an important data load. A full backup taken at this point in time would break the chain of backups; it would establish a new starting point for your log and incremental backup processes. To get around breaking the chain of backups, you can use the COPY_ONLY clause. A copy of the database or the log can be created, and neither method will affect the backup chain. To create a copy of the AdventureWorks2008 database, you would use the following syntax:
BACKUP DATABASE AdventureWorks2012

TO DISK = 'c:dataAdventureWorks2012_Copy.bak'

WITH COPY_ONLY ;
This backup is just like any other backup, whether a full or log backup. It’s just that the process of taking the copy-only backup doesn’t affect the other backup types. Restoring a copy-only backup is the same as restoring any other backup (restores are covered in detail in Chapter 9).
Automating the Backup Process
Now that you have an understanding of the basics of database and log backups, you’re going to want to automate the backup process. You’ll have to decide the best schedule for your system to get maximum coverage through the various backup methods available to you. There are numerous for running processes automatically on Windows Server systems; some are built in, and some are available through third-party resources. SQL Server comes with its own scheduling software that we’ll focus on using here, SQL Server Agent. Agent runs separately from the SQL Server software, yet it’s an integral part of the SQL Server system.
To see SQL Server Agent, open SQL Server Management Studio, and connect to the server as previously explained. Once connected, you will see an icon at the bottom of the Object Explorer window, which is visible by default, labeled SQL Server Agent. If you have not configured the Agent to run automatically, you’ll need to start it. Right-click the icon, and select Start from the context menu. Expanding this icon will show the information available as part of SQL Server Agent, as shown in Figure 8-8.
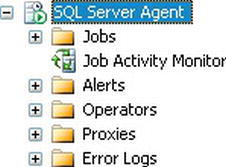
Figure 8-8. SQL Server Agent viewed through Management Studio
A number of options are available in SQL Server Agent, but we’re concerned only with Jobs in this chapter. You can expand the Jobs folder and see any jobs that have already been created on your server. To create a new one to schedule backups, right-click the Jobs folder, and select New Job from the pop-up menu. This will open the New Job window, shown in Figure 8-9.
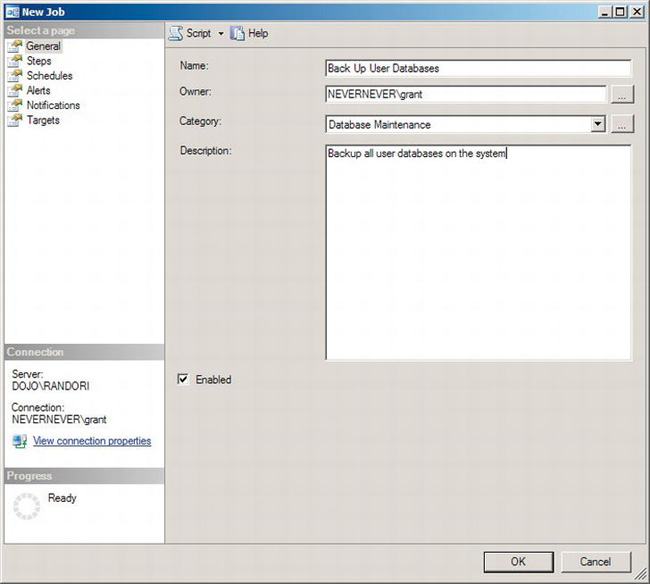
Figure 8-9. New Job window showing the General page
You can see a list of possible pages on the left and details regarding the page you have selected on the right. It opens by default on the General page. At the top of the window on every page is the opportunity to generate a script from the job by clicking the Script button; you can also open Books Online by clicking the Help button. In this window, you can also define a name for the job. The name should describe exactly what functions you expect the job to perform. In this case, type Backup User Databases. You also pick the owner of the job. The owner of the job defines the default user that the job will run as. You need to be careful that the user you pick has the appropriate privileges on the SQL Server system and on any of the drives, file shares, or backup devices you will be using in this automated job to back up your databases. We’re setting the owner as sa, which means this job will run, by default, as the system administrator. You can also define a category, which will help you manage the various jobs that you create. We’ve selected Database Maintenance from the drop-down menu. You can also provide a more detailed description of the job that you are creating. Finally, you can set the entire job to be enabled or not through the Enabled check box. When you’ve completed defining the information on the General page, don’t click the OK button because that will create the job, and this job doesn’t do anything yet.
Click the Steps page on the left, which will change the New Job window to look like Figure 8-10.
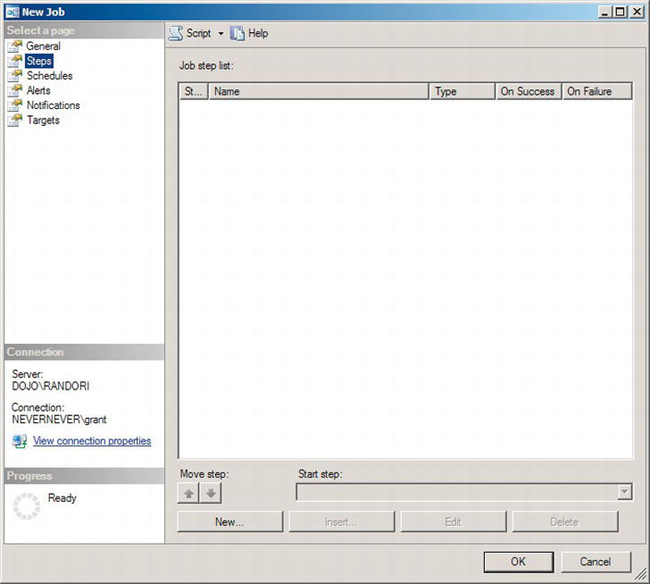
Figure 8-10. New Job window showing the Steps page
Since no steps have been created yet, nothing is displayed in this window. When steps have been created, this window will allow you to manipulate those steps by rearranging the order using the Move Step arrows and defining which step is the first step through the “Start step” drop-down box. You can add a step by clicking the New button or by clicking the Insert button when you have at least one step created. You can edit a script by clicking the Edit button or by double-clicking the step. Finally, you can delete a script through the Delete button.
Click the New button at this time to create a new step. This will open the New Job Step window visible in Figure 8-11.
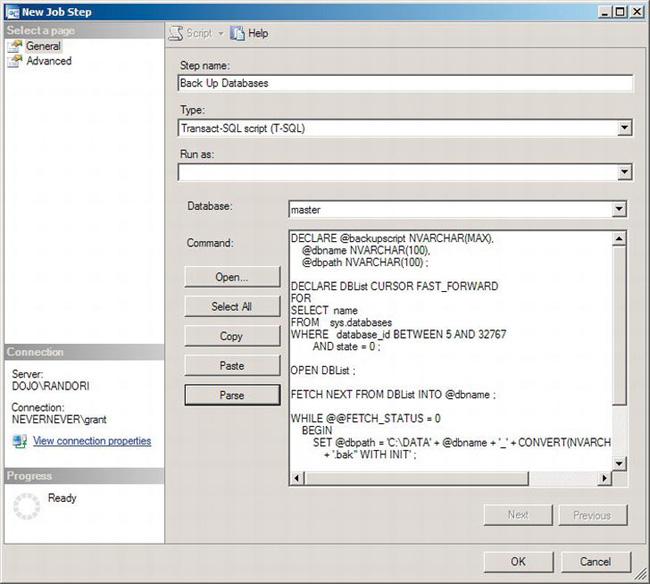
Figure 8-11. New Job Step window
In the New Job Step window, you will give each step a step name by typing it into the appropriate box. We chose Back Up Databases as the name of this step. You also have to define the type of command that the step represents. A large number of server-related subsystem types are available, but in this instance, you can use the default, which is “Transact-SQL script (T-SQL)”. You have the option of changing the context under which this step is run; meaning which system user the step is executed as, by manipulating the “Run as” drop-down list. No changes were necessary for this step. You then pick the database where the script will run. Since we’re running a query that will back up all the user databases in the system, we need to run it from the master database where information that relates to the entire system is stored. Finally, you have to supply it with a command. You can type it in, open it from a file, or paste it in. You can parse the script to verify that it will run correctly. Here is the script used to back up all the user databases in the system (--backupalldatabases in the download):
--very simple query to back up user databases

DECLARE @backupscript NVARCHAR(MAX),

    @dbname NVARCHAR(100),

    @dbpath NVARCHAR(100) ;


DECLARE DBList CURSOR FAST_FORWARD

FOR

SELECT  name

FROM    sys.databases

WHERE   database_id BETWEEN 5 AND 32767

        AND state = 0 ;


OPEN DBList ;


FETCH NEXT FROM DBList INTO @dbname ;


WHILE @@FETCH_STATUS = 0

    BEGIN

        SET @dbpath = 'C:DATA' + @dbname + '_' + CONVERT(NVARCHAR, GETDATE(), 112)

            + '.bak'' WITH INIT' ;

        BACKUP DATABASE @dbname TO DISK = @dbpath WITH INIT, CHECKSUM ;

        FETCH NEXT FROM DBList INTO @dbname ;

    END


CLOSE DBList ;

DEALLOCATE DBList ;
This script retrieves a list of databases from the system catalog view sys.databases. It eliminates the four basic system databases using their database IDs, and it makes sure that the databases it is backing up are online by checking that state = 0. It loads this list into a cursor and steps through the rows of the list, backing up the user databases one at a time.
Some other options are available in the New Job Step window. You can access them by clicking the Advanced page. The options this makes available are visible in Figure 8-12.
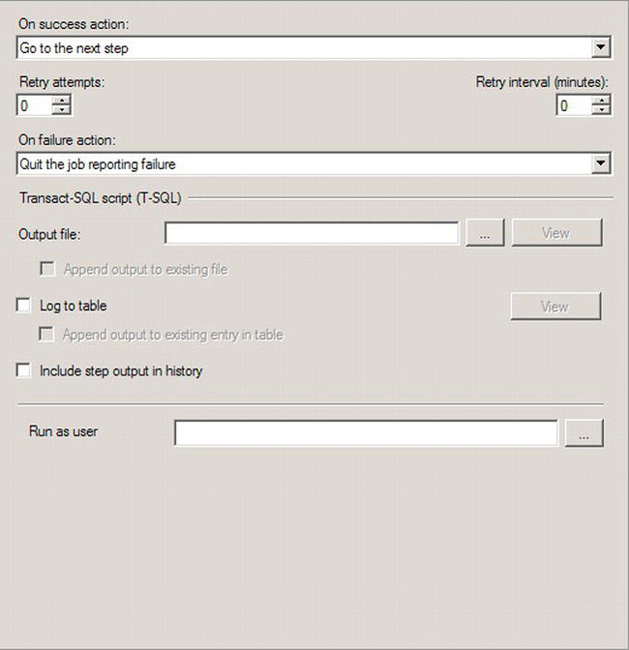
Figure 8-12. New Job Step displaying the Advanced page
The first thing visible at the top of the Advanced page is a flow control action. This allows you to control the behavior of jobs with multiple steps. By changing the “On success action” setting using the drop-down menu, you can control the next action. These are the values available and what they do:
- Go to the next step: This will cause the next step in order in a multistep job to be executed.
- Quit the job reporting success: This will prevent the following steps, if any, from being executed and will show the job as having been successfully completed.
- Quit the job reporting failure: This will prevent the following steps, if any, from being executed, but this will show the job as having failed to successfully complete.
For a single-step job like this, the default will work just fine. If the step were to fail to execute, you can have it automatically attempt to run again a defined set of times by changing the “Retry attempts” value to something greater than 0. You can have the retry wait a certain number of minutes by changing “Retry interval (minutes)” to a value greater than 0. If the number of retries has been exhausted or the step is not set to retry and it does fail, the next flow control point is encountered, “On failure action.” The drop-down has the same choices as the “On Success action” list, and they perform the same functions. They’re just in a different order and respond to a failure of the step rather than a success. Since this is a T-SQL script, the section Transact-SQL script (T-SQL) is enabled. The first value is an output file, which will enable you to log the events that occurred during the execution of this step. In the case of the backup script, it will show all the databases backed up, or it will show any errors that occurred during the backup. You can create a new file every time it executes or have it add the data to an existing file, if any, by selecting the “Append output to existing file” check box. You can direct the output to a table in a database directly for later access. This will place additional load on your server to write and maintain the table. A job writes certain data, such as whether it succeeded, how long it took, and when it was run, to a log called the history. You can decide to have the output of the step included with the job history. This can make the history larger and hard to read, so we don’t recommend it.
With the step finally defined, click the OK button. This will write it back to the job, and you will then see it in the New Job window, as shown in Figure 8-13.
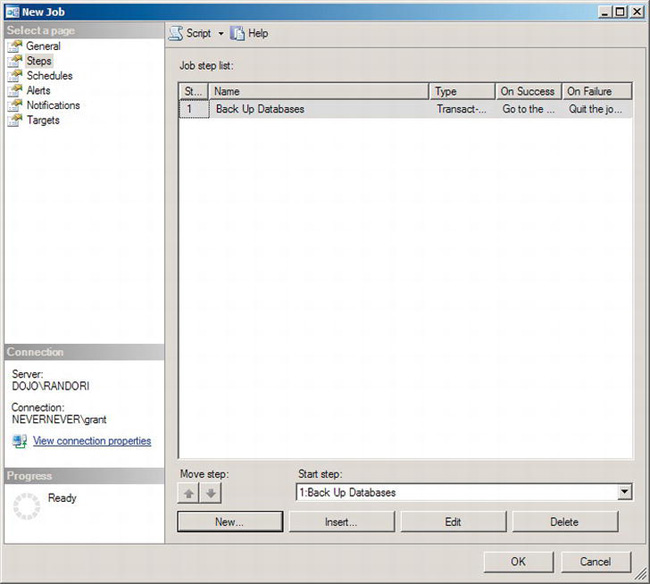
Figure 8-13. New Job window showing the Steps page with a step visible
The window has changed, and you can see that the step has a number and has been defined as the start step for the job. You can add other steps as needed to this job, but in this instance, this is the only step needed.
Click the Schedules page to determine when this automatic process will be run. The Schedules page will be empty, as the Steps page was before. You can create more than one schedule for a job so that it runs at varying times depending on the needs of your system. To create a new schedule, click the New button. You can also pick from a list of existing schedules. This allows you to create one schedule that, for example, executes once a week at 2 a.m. on a Sunday and apply that schedule to multiple jobs, all of which you want to start at 2 a.m. on a Sunday. However, it can be problematic to start lots of jobs at the same time. You can edit schedules on the list by clicking the Edit button. You can remove schedules from the list by clicking the Remove button. To practice defining a new schedule, click the New button. Figure 8-14 shows the New Job Schedule window that opens.
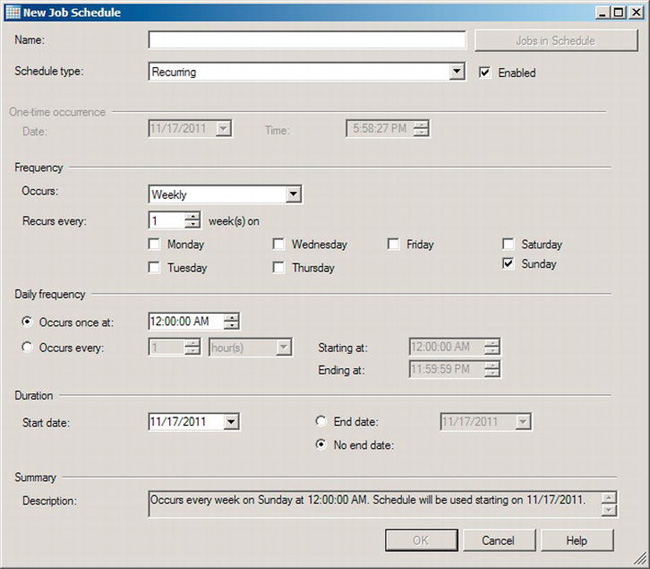
Figure 8-14. New Job Schedule window
To begin defining a new schedule, you have to give it a name, in this case Weekly. You then select from the “Schedule type” drop-down, which allows any of the following:
- Recurring: Runs on a schedule over and over as determined by the rest of the options defined in the Job Schedule window.
- Start automatically when SQL Server Agent starts: This will run any jobs associated when the SQL Server Agent service is started, usually just after SQL Server starts up.
- Start whenever the CPUs become idle: When all the CPUs on the system are no longer under load, this Agent job will be started.
- One time: Depending on the rest of the options defined, this will execute once and then never again.
If job is a one-time occurrence, that section would be enabled, and you could define a date and time for it to execute. This is a recurring job, so the Frequency section is enabled. The first option you have to choose is the frequency definition of the occurrence by selecting from the Occurs list:
- Daily
- Weekly
- Monthly
You can then pick the frequency of the occurrence. In this case, it’s running every week on Sunday, but it could run on multiple days in the week with a varying number of weeks separating each execution. You then determine the daily frequency. In this case, it’s executing once at 2 a.m., but you could have it run multiple times by choosing the “Occurs every” radio button. If this is selected, you need to determine the intervals between occurrences in hours, minutes, or seconds. And you can determine a start and stop time for multiple occurrences within the day or days that the schedule is firing. You can determine the day on which the process begins to run by selecting the Start date. You can also define a time for the job to stop running by defining an end date. In this case, you select the “No end date” radio button. This job will run once a week on Sunday at 2 a.m. and continue to do so until you do something about it. Click OK to close the New Job Schedule window.
You will now see that the Schedules page has the schedule that you just finished defining, as shown in Figure 8-15.
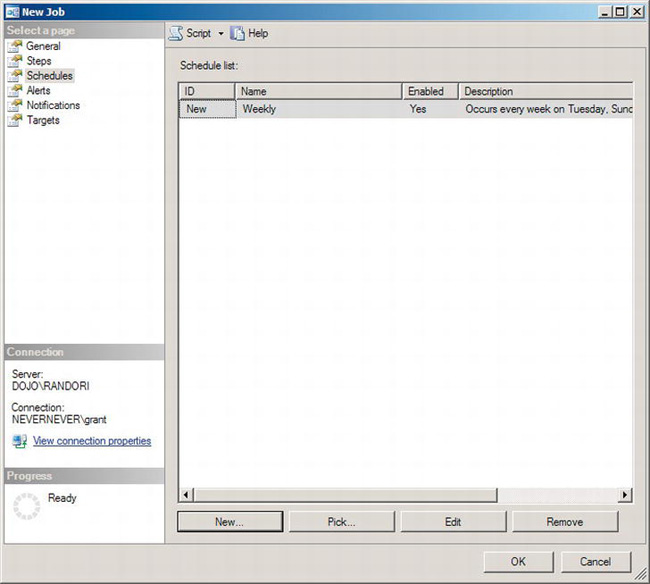
Figure 8-15. New Job window showing a schedule in the Schedules page
There are other pages available to the job—namely, Alerts, Notifications, and Targets—but they are outside the scope of this definition. With the completion of the schedule, you now have everything you need to back up your user databases once a week automatically. Click the OK button.
You can see the job you created by clicking the Jobs folder in the Object Explorer window just like the one shown in Figure 8-16.

Figure 8-16. List of jobs in the Object Explorer window
You can execute the job manually too by right-clicking the job and selecting the “Start Job at step” option. This will open a window with the steps on display. Just accept the default, the first step, and click OK. The job will start executing. Otherwise, it will execute based on the schedule defined.
Encrypting Backup Files for Security
SQL Server 2008 introduced the ability to encrypt your data using transparent data encryption (TDE). The idea behind this new tool is that you can encrypt the database without having to modify applications or change structures within your database. You would use this because it makes it impossible for someone to simply steal a copy of your disk and then have access to all your data. When a database has TDE enabled, the backups are also secured. With TDE, the encryption of the data as it’s written to the database and the decryption of the data as it comes back out both happen in real time at a very low level (namely, at the page level) within the system. Pages are how data is stored on the disk, so as data is read or written on the disk, it goes through this decryption or encryption process prior to the information getting into memory or being sent to your application.
Once a database has been set to be encrypted, any backups of that database are also encrypted, automatically, through the use of certificates (a certificate is a security object that is generated, either by an external source or by SQL Server).
![]() Note You should test with a blank or dummy database until you understand thoroughly how encryption works. If you encrypt a production database and lose the key or password, you won’t be able to retrieve them.
Note You should test with a blank or dummy database until you understand thoroughly how encryption works. If you encrypt a production database and lose the key or password, you won’t be able to retrieve them.
The syntax for backing up the database doesn’t change. To see encrypted backups in action, use the following script to enable encryption on a test database. In the following example, we’re using the AdventureWorksLT database (—transparent data encryption in the download):
USE master ;

GO

CREATE MASTER KEY ENCRYPTION BY PASSWORD = 'Chapter8Backup' ;

GO

CREATE CERTIFICATE Chapter8Certificate WITH SUBJECT = 'Chapter 8 Certificate' ;

GO

USE EncryptionTest ;

GO

CREATE DATABASE ENCRYPTION KEY WITH ALGORITHM = AES_128 ENCRYPTION BY SERVER

    CERTIFICATE Chapter8Certificate ;

GO

ALTER DATABASE EncryptionTest

SET ENCRYPTION ON ;

GO
Once this script is run, the database is encrypted. It’s very important that you have a backup copy of the certificate and the private key that protects the certificate for use when restoring this database (covered in detail in Chapter 9). To back up the certificate and the private key, use the following script (backupcertificate.sql in the download):
USE [master] ;

GO

BACKUP CERTIFICATE Chapter8Certificate TO FILE =

'c:dataChapter8Certificate'

WITH PRIVATE KEY (FILE = 'c:datapkChapter8Certificate',

ENCRYPTION BY PASSWORD = 'Chapter8Backup') ;
You can run a normal backup to back up the database, because just as the encryption and decryption of the data are invisible to the users as they query the data, it’s invisible to you as you manipulate backups. This will work just fine:
BACKUP DATABASE EncryptionTest

TO DISK = 'c:dataEncryptionTest.bak' ;
The real work begins when you go to restore an encrypted backup. Read Chapter 9 for details.
Compressing Backups to Save Space
Backups can take up quite a bit of space. You may have more than one full backup of databases in your system stored on disk. Besides that, you could have multiple incremental backups for several of those databases. The log backups also take up quite a bit of room. Basically, it all adds up. Although disk drives are cheap and getting cheaper, you’re unlikely to have an unlimited supply at hand. You also have to consider the time it takes to bring a new drive or mount point online, configure it, modify the backups to use it, and so on. Lots of time and money are being spent in maintaining these backup files. What if you could just make them smaller? SQL Server 2008 Enterprise introduced a mechanism for compressing backup files.
SQL Server 2012 Enterprise, Standard, and Developer editions support native backup compression. Compression can save you a lot of disk space. Because the backups are smaller and because writing the backup is the longest part of the backup process, the backup will be performed faster. Unfortunately, there is no free lunch here. You gain this at the sacrifice of processing power. Supporting the backup compression process places an added load on the CPUs of your system. There are a couple of other restrictions on the use of backup compression:
- A backup with compression cannot be in the same backup set as uncompressed backups.
- Older versions of SQL Server, prior to SQL Server 2008, cannot read compressed backups. All editions of SQL Server can restore a compressed backup file (restores are covered in detail in Chapter 9).
Backup compression is disabled by default, so it’s necessary to turn it on before you use it. Making compression automatically available is very common on all enterprise systems, and we recommend it. You can enable backup compression on the server, which means that all database backups have compression enabled by default. To enable compression on the server, you need to change the server options. You can do this through a T-SQL command like this:
EXEC sp_configure

    'backup compression default',

    '1' ;

RECONFIGURE WITH OVERRIDE ;
The command sp_configure allows you to change server options. In this case, the query is changing the option backup compression default. It’s setting the value to 1, which means true. If you wanted to turn backup compression off, you would set the value to 0.
You also have the ability to set the backup compression through SQL Server Management Studio. After connecting to the server, right-click the server in the Object Explorer window. This will open the Server Properties window. Select the Database Settings page, and you will see something similar to Figure 8-17.
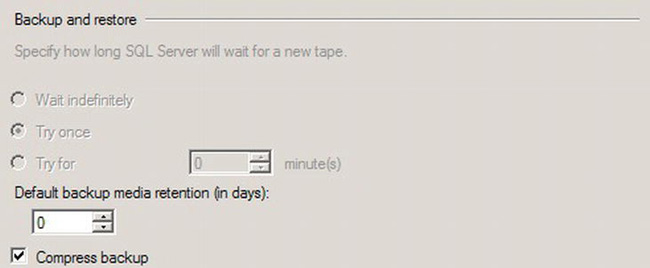
Figure 8-17. Server Properties window with Database Settings page displayed
You can enable or disable backup compression by selecting or deselecting the “Compress backup” option. Backup compression is enabled in Figure 8-17.
You can enable or disable compression directly during a single backup using T-SQL. You only need to introduce another WITH command to the T-SQL statement. Since the database is set to run compressed backups by default, you can use this command to back up the AdventureWorks2012 database without compression:
BACKUP DATABASE AdventureWorks2012

TO DISK = 'c:dataAdventureWorks2012_uncompressed.bak'

WITH INIT, NO_COMPRESSION ;
If you have previously enabled default compression using one of the two mechanisms described earlier, use it again to make sure default compression is disabled. Now, you can run a backup with compression using this command:
BACKUP DATABASE AdventureWorks2012

TO DISK = 'c:dataAdventureWorks2012_compressed.bak'

WITH INIT, COMPRESSION ;
For these two databases, the uncompressed file was 71767KB, and the compressed file was 14218KB for a compression ratio just slightly over 5:1. This is a real cost savings for data storage.
Backup compression should not be combined with other database compression schemes, such as row or page compression. Because the data is already compressed, you won’t realize any space savings by compressing it again, but you will incur the overhead of processing the data in the attempt to compress it further. If you’re encrypting your databases, you may see very little compression because the information stored inside an encrypted database doesn’t have the kinds of simple patterns that compress well.
Designing a Backup Plan
With a more complete understanding of the options available to protect your databases through backups, you now need to design a backup plan. The driving factors behind a backup plan are very seldom technical. The business has to provide information defining the service-level agreement (SLA) for the implementation of a backup plan. The information you need to gather from the business includes the following:
- Which databases or servers are vital to the business? You should compile a list of servers and/or databases that your company determines to be vital to the continuity of the business itself. Those databases must then be as protected as possible. This is where you need to spend most of your time and effort.
- What regulatory requirements might affect backups? Some businesses operate under highly regulated rules that define the criteria for data, security, retention, and change management. The regulations defined will affect which processes you use with your backup plan.
- How long you need to keep the data? Simply having yesterday’s backup is frequently not enough for most businesses. You may need to keep a week or two available for immediate access. You’ll need to take this into account for your storage needs.
- Do you need to encrypt the backups? Just having the database protected isn’t enough; you may need to protect the backup too.
- Are there are industry or government regulations regarding backups? You may have specific requirements outside your control that you must meet with your backup processes.
- How much data can the company afford to lose? Of course, the answer is zero, but there’s usually a number of minutes that the company can live with. This will help you determine log backup schedules.
Once you’ve gathered all this information, and probably more, from the business, you’ll need to examine your environment to ensure you can meet those requirements:
- Disk storage: Do you have the capacity to keep the backups you need without compression? How about with compression?
- SQL Server edition: Can you support the needs of the business on Standard edition, or do you need to get a copy of Enterprise?
- Schedule: Do you have lighter periods of time when you can run the backups to avoid any slowdowns for the users?
After you’ve determined that you have the technology in place to support the SLA for the business, you need to design a backup plan to support the SLA.
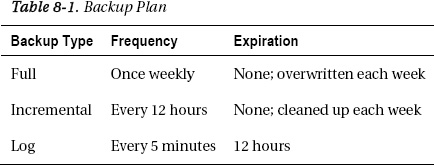
As an example, imagine a medium-sized database at about 200GB. The business has determined that the data in this database needs as much protection as you can provide through backup processes. The system is an online transaction processing (OLTP) system that modifies, deletes, or inserts 3GB to 5GB of data each day. You need to keep about a week’s worth of data online. The business principals agree that they could deal with a five-minute data loss if they must.
To start with, 200GB will take a little while to back up on your system. Because of this, you decide to run one full backup a week, every Sunday. You can set up an Agent job to back up this database once a week. Because this satisfies the week of data online, you decide to overwrite the backup each week.
Since you need to be able to recover down to as close as possible to any kind of crash, but with no more than a five-minute data loss, you will need more backups. You couldn’t run an entire week’s worth of log backups. Instead, since you need to worry only about 3GB to 5GB of data changing each day, for a maximum of 35GB in a week, you decide to run an incremental backup every 12 hours during the week starting 12 hours after the full backup and ending 12 hours before. To track these backups over time, you create a new incremental backup with the date and time in the name to make recovering the as easy as possible. You can create a second Agent job to manage this operation.
Finally, to get as close to the five-minute limit as you can, you set the recovery model of the database to the full model. Since you need to keep only 12 hours of log available, you set the log backups to go to a single backup set with a 12-hour expiration so that it cleans itself out. Once the log is being kept, you need to set up a log backup routine to run every five minutes. All this data is a little more than you want to keep on your drives, so you enable compression. You’ll need to create one other job that cleans out last week’s incremental backups, because you chose to keep the files separate from a backup set. You now have a backup plan that looks something like the one in Table 8-1; it shows the type of backup being done followed by the frequency, and if there is an expiration for the backup, it outlines when that should occur.
There are other ways that this backup process could be laid out. It really depends on your system and the needs of your business. And that’s just one database on one server. You may have multiple backup plans for different databases on a single server or a common plan for all databases. It’s really up to the needs defined by your business.
Summary
Backups are a vital part of protecting the data that runs your business. Because of all the different types of backups, you have a lot of flexibility and power in establishing a backup plan that meets the needs of your business. You need a full backup as the foundation from which you can build more sophisticated backup routines. Remember that losing a backup of a database, even a well-secured database, could cause data loss unless the backup itself is encrypted. Data compression helps with speed and storage but comes at the cost of tying up the CPU.
As important as backups are, they’re useless unless you know how to restore them. Chapter 9 shows how to get the data from your backups.