
WHAT YOU WILL LEARN IN THIS CHAPTER:
So far in the book we have covered many of the different components that can be included within a SharePoint site. We are going to dedicate this chapter to understanding the container that you are building the objects within. We are going to look at several key concepts that should help you pull all the pieces together. We will be looking at the creation process for new site collections and sites, as well as providing you the information to know when to create each one.
Site collections and sites are the containers that you use to hold all of the content you are storing within SharePoint. A site collection can contain many sites, and each site within the site collection can contain many lists and libraries. Beyond the fact that site collections contain sites, there are specific characteristics of a site collection that should be understood. By knowing these differences, you will be better equipped to make a decision when creating new content.
When you think of site collection, you should think of the term boundary. Whenever you create a site collection, you are in essence creating a boundary within your SharePoint farm. This boundary is a container for content and can have specific settings configured that will apply to all sites within the container. Following are some of those key settings that are applied at the site collection level:
Site Collection Administrator: This configuration allows you to determine which users can have full administrative rights within the site collection.
Web Parts: This gallery contains all of the web parts that can be used within the site collection. If you want to add a web part to a web (subsite), then it must be added at the site collection level.
List Templates: This gallery stores all the different list templates that can be used within the site collection. Whenever you save a list as a template within the site collection, it is saved to this location.
Themes: This gallery contains all of the themes that can be used within the site collection. You can configure what theme you want to use on each site; however, custom themes can only be added at the site collection level.
Solutions: This gallery contains all of the custom solutions that can be used within the site collection. This includes all custom site templates. Whenever you save a site as a template, it will be stored within this Solutions gallery.
Workflows: This page provides a list of all the workflows within the site collection, including their status (active, inactive).
Search Settings: For each site collection, the search settings are configured at the site collection level and then are applied to all sites within the site collection. These settings include scopes, search center location, keywords, best bets, and any FAST search settings.
Recycle Bin: This is the site collection recycle bin, which allows you to restore content that has been deleted within the site collection. There are both an end-user recycle bin and a recycle bin that has been created to store content that has been deleted from the end-user recycle bin.
Site Collection Features: This is the location where you enable and disable site collection features. This is basically a way to allow behaviors within the site collection. If you activate features here, you are enabling sites to also activate the features.
Site Hierarchy: From this location, you can view and drill down through the hierarchy of the site collection. This will show you all of the subsites created and provide you with a link to manage them (open their settings page).
Site Collection Navigation: This configuration setting will allow you to enable/disable navigation within the site collection. This configuration page will also allow you to disable security trimming of the navigation and to disable/enable audiences for the site collection.
Audit Settings: These settings will allow you to configure what items can be audited within the site, as well as a link to generate and review the audit reports.
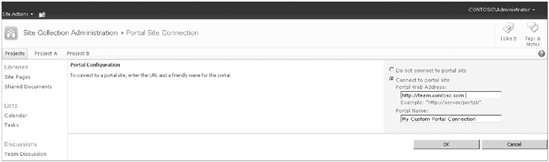
Portal Site Connection: This page will allow you to configure a portal connection. This connection will be displayed as the topmost link for the site. This can be configured to any link and is often used to link one site collection to another site collection. Using this approach will allow users a way to seamlessly navigate to a new location, as if it were part of the current location.
Site Collection Management Policies: From this location you can import, create and configure management policies that apply to the entire site collection. An example of this is creating a retention policy for all content within the site collection.
Content Type Publishing: This screen will allow you to view all of the content type hubs that are pushing data to your site collection. You will be able to force a refresh for all content types on the next update, view the error log, and view the hubs.
Publishing Features: These features allow you configure the different elements of publishing, including the variations and the translatable columns.
Suggested Content Browser Locations: This configuration allows you to add links to locations were you want to direct users to look when adding assets (images, media files) to their pages. Think of this as a shortcut so that they don't have to remember where the assets are located. This setting also helps reduce the possibility of the same content being uploaded multiple times.
SharePoint Designer Settings: This link allows you to enable and disable certain functionality that is available in SharePoint Designer. For instance, you can allow users to create custom workflows but disable their ability to create custom master pages.
Visual Upgrade: If your upgrade from 2007 takes advantage of the visual upgrade features, then this is where you can configure the site collection to use the new updated 2010 user interface.
Help Collections: From this screen, you can configure what help collections are available within the site collection. By default, as new features are activated, the corresponding help collections are enabled.
Site Collection Analytic Reports: This link allows you to view reports that show the usage data for the site collection.
Reviewing this list should give you an idea of the various configuration settings that are available across the site collection. These settings are configured once and then consumed by all webs within the site collection. These settings can also help you determine when you would create a site collection versus a web. For instance, you would want to create two separate site collections if you had two different teams, both of which needed to create templates and neither of which wanted to see the other team's templates. However, you could create a single site collection if you wanted all the teams to inherit the same navigation, list templates, and site templates.
So far, we have covered the different settings that you can configure at the various site levels, but we haven't really covered some of the administrative features that would play a part in determining whether to create a site collection versus a web. While it is likely that your administrators will have put procedures in place to help you determine what to create, it is also very helpful for you to understand these concepts so that you can be proactive in managing your content.
Site Quotas: These are configured at the site collection level and apply a restriction to all content within the site collection. This means that you could potentially have one web within the site collection that uses all of the quota allotment. If you know the quota size at the onset you can use that to determine if you want to create a web or a new site collection.
Database Size: As you are adding content to your site, it is ultimately being stored within a SQL database. While it is possible to create a dedicated database for your site collection, it is not possible to store content from your site collection across multiple databases. This means that you want to be sure to only grow your site collection to a size that is manageable at the database level. The database size recommendation for SharePoint 2010 is 200 GB; however, it is likely that your administrators have a database size that they would like to limit your site collections to. They can use quotas to help control the growth of the site collection; however, if you are aware of the limitations up front, then you can design a site structure that meets your needs as well as adheres to the guidelines created by your server administration team.
Now that you have a better understanding of the site collection boundaries, you should have most of the information needed to help determine if you should create site collections or webs. I say most, because sometimes the decision to create a site as a web is not really a black-and-white decision. In fact, it is often gray and cloudy! In many cases, you could go either way and, in many cases, whichever way you choose could potentially have an impact in one way or another. Let's review an example that shows how gray the choice can be at times. In this scenario, you have a need to collaborate on our internal projects. Here are some of the requirements:
Each team needs to work using the approach presented by your internal Project Management Office (PMO). Each team will need to store a large amount of content, including documents and media files.
Each team will need to have some flexibility so that they can extend the model provided by the PMO. (This means the template may contain 2–3 lists, but they need the ability to create additional lists).
The PMO wants to create reports that roll up data from all project sites.
In this scenario, there are a few things that stick out; first you want to use a common template among the project sites, so that leads you to creating a custom template within a site collection and then creating a site for each of the project sites. This will also allow you to easily create rollups of data from within the site collection (we will be covering this later in the chapter), but what do you do to accommodate for all of the large files that each of the project sites will need? Since you know you are going to be dealing with large amounts of data, you need to consider a few things. How many projects will you be doing in the next six months, next year, or next two years? At this point, you will need to make a few decisions about how to best separate the data. Could you do several site collections and group like projects together? Could you create a site collection for each year of projects? Do you create a site collection per project? The answer to these questions is "it depends." At this point, you are really making a management decision. You will need to look at your scenario and determine the best solution for you and your team. If you decide to manage multiple site collections, then managing SQL and database sizing will be easier. If you decided to create one site collection, then you will need to be careful with your site collection size and be sure to have a plan in place, in case you end up needing to store more content. Keep in mind that each team will likely come to a different conclusion as to what solution is best for them. This is common and, as long as you are following best practices for storage and configuration, the actual hierarchy can be flexible enough to meet your specific needs.
TRY IT OUT: Create a Site Collection
In the first Try It Out, you are going to be creating a site collection. To create a site collection, you need to have access to the Central Administration configuration site. If you do not have access, you will need to talk with your SharePoint administrator. It is also possible that your site administrator has configured a custom site collection creation process that allows you to create site collections without having access to Central Administration.
Open the Central Administration Site.
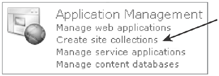
Select the Create Site Collections link within the Application Management grouping, as shown in the Figure 8-1.
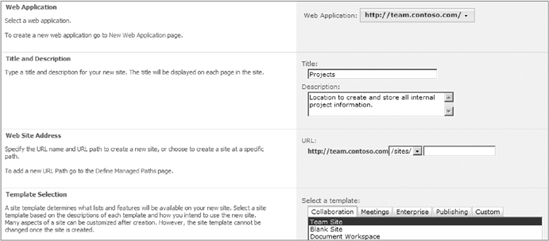
Enter the following properties for the new site collection and then click OK. An example is shown in Figure 8-2.
Web Application: Accept the default option, unless directed otherwise by your server administrator
Title: Projects
Description: Location to create and store all internal project information
URL: /sites/projects
Template Selection: Team Site
Primary Site Collection Administrator: Your username
Quota Template: No Quota
Note
The user that you enter as the primary site collection administrator will be the user that is notified by the system when something needs attention. This can include site access requests and quote notifications. This user will have full control to the site collection.
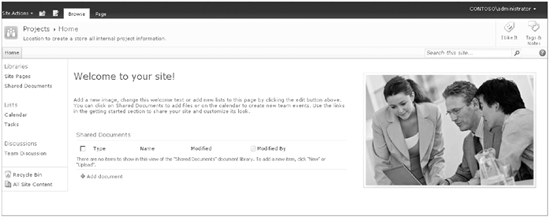
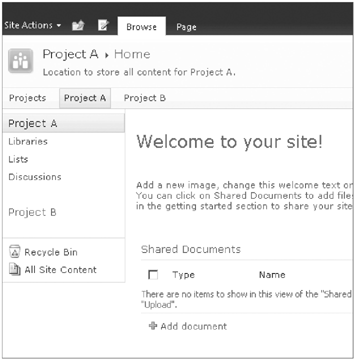
On the Top-Level Site Successfully Created page, click the link to open the new site collection. Your site should look similar to the site in Figure 8-3.
How It Works
When you create a site collection in Central Administration, you provide all of the details for your site collection, and then the site is provisioned for you and a link is returned.
TRY IT OUT: Create a Web (Subsite)
In this Try It Out, you are going to create a web within your projects site collection. This will allow us to start to build a site hierarchy that can be used for the remaining chapter examples.
Open the Projects Site Collection that you created in the previous example.
Navigate to the Site Settings Page by selecting the Site Actions menu and the Site Settings Option.
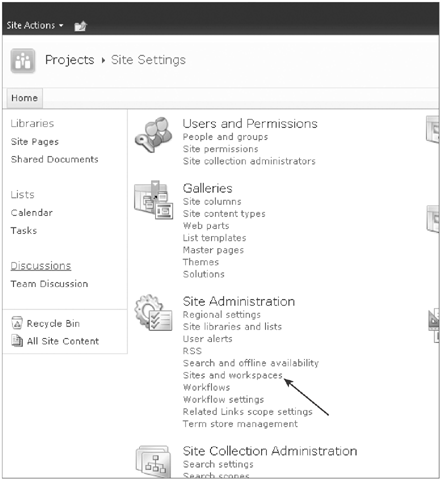
In the Site Administration group, select the Sites and workspaces link, as shown in Figure 8-4.
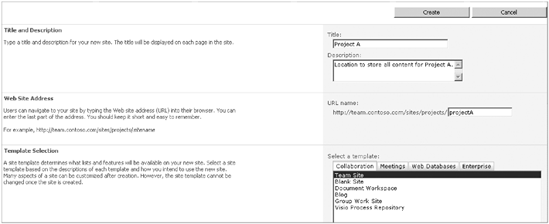
Select the Create option at the top of the page, enter the following properties for the site, and then select Create. An example is shown in Figure 8-5:
Title: Project A
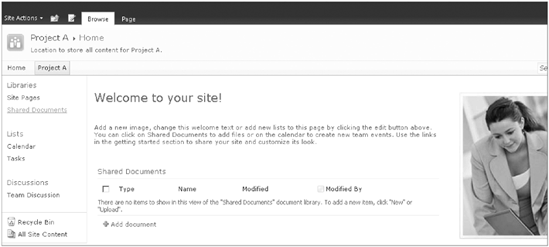
Description: Location to store all content for Project A
URL: /sites/projects/projectA
Template Selection: Team Site
Permissions: Use same permissions as parent site
Display on the Quick Launch of the parent site?: Yes
Display on the top link bar of the parent site?: Yes
Use the top link bar from the parent site?: Yes
Don't worry if you don't understand all of these configuration options at this point in the chapter. You will be working through them later in the chapter, and by the time you reach the end, you will be familiar with how they all work together.
Once the web (subsite) has been created, you will be redirected to the new site. Your screen should look similar to the one displayed in Figure 8-6.
How It Works
When you enter the data for the new site, the site is created within the site collection. Since you are creating the site from within a site collection, it is created within that site collection.
Now that you have created a site collection and a web, we are going to focus on some of the things that you can do to manage them. We are going to be covering several different areas, and it is good to remember that each of these is available based on the type of licensing that you have configured. We are going to focus on the key things that are done to manage a site, including:
Activating/deactivating features
Creating content
Managing permissions
Site analytics
Managing navigation
Working with themes and master pages
Working with content across webs
These are pretty extensive topics, some of which have a chapter dedicated to them within this book. For those sections, we will cover things at a high level and tell you to refer to the other various chapters for greater detail.
Note
We are just getting started with site collections. If you are wondering about the progression, it will start with creating site collections and webs, adding content and configuring them, and then saving them as templates. Along the way we will also be covering all of the default templates and working with content offline. Feel free to jump around the chapter to the sections that pertain the most to your specific needs.
Features are a way within SharePoint to turn on or turn off certain functionality. Some common examples include the SharePoint Enterprise Features and SharePoint Publishing Features. By default, each of the templates provided by Microsoft has different features activated. This means that if you create a site using the Enterprise Wiki template, different features are activated by default than if you had used the Team template. This doesn't mean that you can't use the additional features, it just means that you first have to activate them. You can think of features like a light switch. When you want to see the functionality, you simply activate the feature. If you do not want to see it any longer, then you can deactivate the feature. Features can be activated at the site collection level and the web (subsite) level. When you activate features at the site collection level, you are basically allowing them to be used within the site collection. When you activate them at the web level, you are saying you want to use the feature on that site. The features can only be activated at the web level if they have been activated for the site collection.
Note
The publishing features come preactivated on the Publishing sites and Enterprise sites and will have an impact on how pages are created and stored, including the home page. You can still activate the publishing features on other site collections, but this will not move the home page to the pages folder. You would need to create a new home page in the pages folder and then set that page to be the home page for the site.
TRY IT OUT: Activating Site Collection Features
Throughout the remainder of the Try It Outs in this section, we will be covering some topics that include additional features to those currently activated in the test site collection that you created earlier. In this example, you will activate some additional features on the site collection.
Open the Projects Site Collection that you created in the previous example.
Navigate to the Site Settings Page by selecting the Site Actions menu and the Site Settings Option.
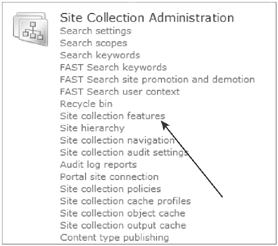
In the Site Collection Administration group, select the Site collection features link, as shown in Figure 8-7.
Next to the following features, select the Activate Button.
Navigate back to the Site Settings page. You should notice that there are now several additional management links on this page.
How It Works
When you activate the site collection features, additional lists, libraries, and web parts are made available for use within the site collection. You will notice that as you activate features, additional items become available for configuration.
Once a site is created, typically the first thing you need to do is to customize it to match your requirements. While Microsoft does a great job providing you with templates to get started, it is unlikely that you will be able to use the template as is without making modifications. We covered how to create lists and libraries in earlier chapters, but it is likely that you are wondering if there is an easy way to view all of the different types of content within your site. There are several different ways that you can view the content within a site collection, including those discussed in the following sections.
This is a page that is accessed from the site actions menu and displays all of the lists and libraries within your site. You can also see all of the webs (subsites) within the collection; however, you can't see the webs lists and libraries.
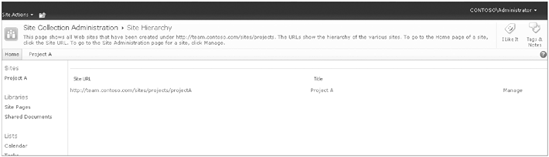
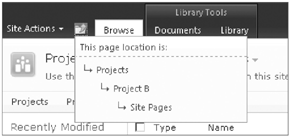
This link can be accessed from the root site in the site collection. It provides a view of all of the webs (subsites) in the site collection, as well as a link to easily navigate to their site settings page. An example of this page is shown in Figure 8-8.
When the publishing feature has been activated, an additional link is provided in the Site Administration section that allows you to see a tree view of the content within the site collection. From this view, you can easily create content, move content, and configure the content behavior (general settings, advanced settings, and permissions). This is a valuable tool that provides a quick way to work with content within the site collection. It is highly recommended that you take advantage of using this feature when creating and managing your content. An example of this page is shown in Figure 8-9.
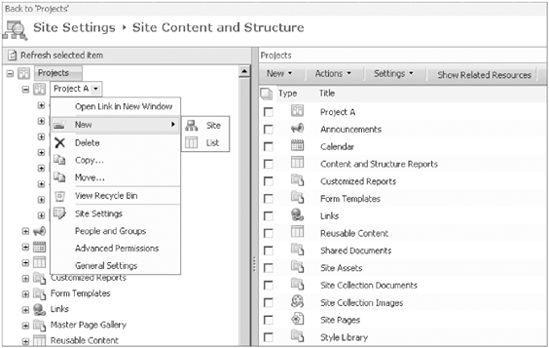
TRY IT OUT: Create and Move a Site from the Content and Structure Page
In this example, you are going to use the Content and Structure page to create a new project site. You are going to create the site as a project site under Project A and then decide to move the site so that it is a sibling to Project A instead of a child. While it might not be common in the real world to create a site and immediately move it, it is common to move a site. So, we will just combine the two operations within one exercise.
Open the Projects Site Collection that was created in the previous example.
Navigate to the Site Settings Page by selecting the Site Actions menu and the Site Settings Option.
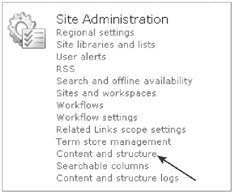
In the Site Administration group, select the Content and structure link. An example of this is shown in Figure 8-10.
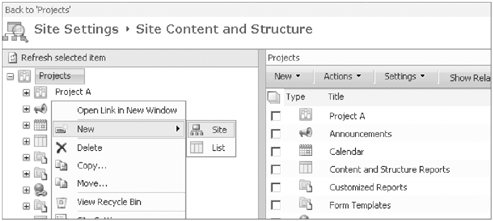
Select the drop-down menu next to Project A. Select the arrow next to the word New and then select Site. An example of this is shown in Figure 8-11.
When the create page loads, enter the following properties for the site and then click Create:
Title: Project B
Description: Location to store all content for Project B.
URL: /sites/projects/projectA/projectB
Template Selection: Team Site
Permissions: Use same permissions as parent site
Display on the Quick Launch of the parent site?: Yes
Use the top link bar from the parent site?: Yes
Select OK and you will be redirected to the Content and Structure page. You should now see Project B listed under Project A.
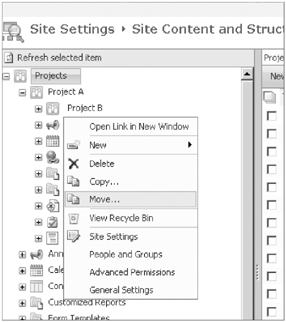
Now that you have the site created, you would like to move the site so that it is under projects. Remember that you could have created the site directly under projects; we are just using this as an example so that you understand the process for moving sites.
Select the drop-down next to Project B and select the Move option, as shown in Figure 8-12.
Select Projects within the Move dialog and then click OK, as shown in Figure 8-13.
Once the site has been moved, you will be redirected to the Content and Site Structure page. Keep in mind that this move also updates the URL of the site, so if any users had the link saved, they will need to have the updated link to access the site.
How It Works
The Content and Site Structure page gives you an easy way to quickly work with and configure the content within your site collections. As seen is this example, you can easily create content and then move content around. In the example, you moved a site from one location to another, but you should also note that you can move lists from one location to another, and you can also move list content from one list to another (providing that the lists support the same content types). This is a very powerful tool that can help you manage your site collections, and it is recommended that you spend some time exploring this tool in detail.

Since there is a whole chapter dedicated to managing permissions, we won't spend much time on it here. You will have noticed that when you create new sites, you are given the option to inherit permissions or to create unique permissions. So far, you have been inheriting permissions. Many times for subsites it is likely that you will want to inherit the permissions of the parent site. However, if you are working with a site that needs restricted permissions or a site that you aren't ready for everyone to access yet, then you will likely need to choose the option that allows for unique permissions. Keep in mind that this is something that can be reconfigured at a later date. Let's look at this example. You have a web that you want to create, but you want to first spend some time configuring and designing it before you open it up to the larger audience. In this example, you could create the web with unique permissions and then, once all of your configuration has been completed, you can go into the site and set the site to inherit the permissions of the parent site.
SharePoint Designer is a design tool that can be used to customize and configure SharePoint sites. The typical progression of SharePoint development is to start with what you can do within the browser, then what you can do within SharePoint Designer, and finally what you can do with custom code solutions. SharePoint Designer is a very powerful tool that can be leveraged to do many great things, including the configuration of SharePoint workflows. However, like any good tool, it must be monitored to ensure that it is not abused and that it is being used in a way that adheres to the governance policies in place. It is likely that you will want your designers to be able to do certain tasks in SharePoint Designer but not others. When this is the case, you can restrict their access to SharePoint Designer by using the configuration options available within the site collection. To access this configuration, go to the site settings page and select the SharePoint Designer Settings under the Site Collection Administration Group. From this screen, you will be able to enable/disable particular feature sets within SharePoint Designer. By default, you will inherit the settings configured by your farm administrator. This means that if the farm administrator has disabled settings, you would have to go to them to get them enabled again. Figure 8-14 shows the different configuration options that you have available.

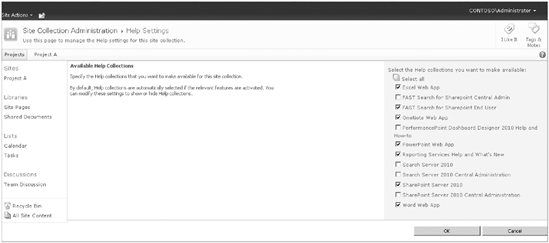
You may have noticed a link at the bottom of the Site Collection Settings called Help Settings. If you click this link, you will see that you can select different help catalogs to include in the SharePoint help for the site. This means that you can enable and disable the content that users will be searching for help. As you activate features within the site collection, they will automatically be enabled within this help catalog. You can also create a custom help catalog for your users and then load the catalog with help entries. To do this, you will need to activate the Custom Site Collection Help site collection feature. Once this is activated, a Site Collection Help library will be created for you. Within this library, you can then create content that can be included within the custom catalog. Once you create the catalog, you will see it as an option to be enabled within the Help Settings. Figure 8-15 shows an example of this page, which contains the available help collections.
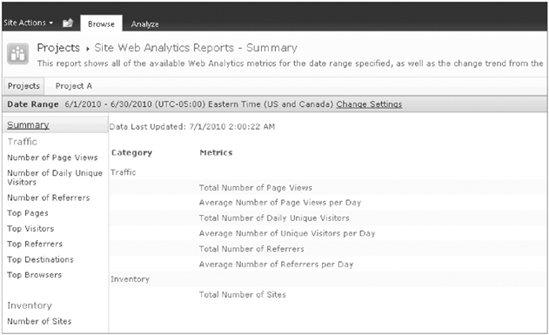
One thing that will be important to you as you manage your sites is the ability to understand how the site is being used. Are users accessing the site consistently? When they access the site, what pages are they viewing? Having all of this information easily accessible will help you make modifications to your site that improve its usability and functionality. Out of the box, SharePoint provides several reports that provide information about the usage within the site and within the site collection. You can access these reports through the Site Web Analytics and the Site Collection Web Analytic reports in the Site Actions section of the Site Settings page. Figure 8-16 shows a sample of one of these report pages.
As you can see from this page, there are several different reports available as links in the Quick Launch toolbar. There is also a link at the top of the page that allows you to Change the Settings. Once this link is clicked, you will see several configurable options for both date and scope. You can also create alerts and reports so that you can be notified when certain criteria is met within the web analytic reports.
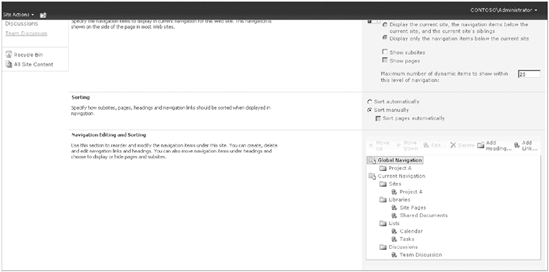
Within each site and site collection, you have the ability to control the navigation. Navigation includes two regions on the page, the top bar or global navigation region and the Quick Launch or Current navigation area. This is one of those areas where you will see different options based on the features that you have activated, including the names for the areas. For instance, if you only have the standard features activated, then the link to modify the navigation settings is called Top Link Bar and the navigation settings page will look something like Figure 8-17.
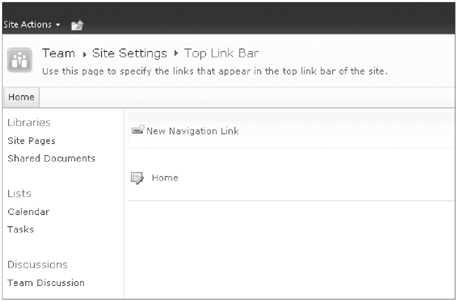
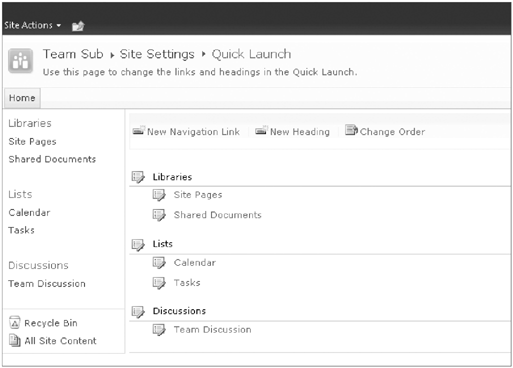
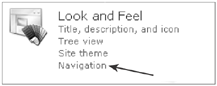
From this Top Link Bar management page, you will be able to modify the tabs across the top of the page. You will be able to create new links, and if you are a working from a web, you will be able to inherit the parent links. To manage the Quick Launch links, you will need to select the Quick Launch link under the Look and Feel section of the site settings page. From here, you will be able to create new content links and reorder the existing links. Figure 8-18 gives an example of this management page.
Once the publishing features have been activated, you will be able to manage both sets of links using the Navigation link under the Look and Feel section of the site settings page. This screen will allow you to manage both sets of links in one single location and will also allow you to configure an automatic sort order and provide an option that allows you to automatically show pages and subsites. Figure 8-19 provides a view of this management page.
When working with webs in a publishing site collection, you will notice a few additional options for inheritance. Each of these options is explained here:
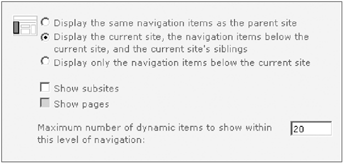
Display the same navigation items as the parent site: This option will only display the current navigation of the parent site. This means that if you create lists within the current site and select to add them to the Quick Launch toolbar, they will not be displayed.
Display the current site, the navigation items below the current site, and the current site's siblings: This option will show the site's information as well as all the site's siblings. A site's sibling is a site that is at the same level in hierarchy as the current site. In the examples from this chapter, Project A and Project B would be considered sibling sites.
Display only the navigation items below the current site: This option will only display Quick Launch content for the current site collection.
TRY IT OUT: Modify the Navigation for the Projects Site Collection
In this Try It Out, you are going to modify the navigation settings for the Project site collection that you created in previous examples. You are going to configure the global navigation settings for the top-level site.
Open the Projects Site Collection that you created in the previous example.
Navigate to the Site Settings Page by selecting the Site Actions menu and the Site Settings Option.
In the Look and Feel group, select the Navigation link, as shown in Figure 8-20.
In the Global Navigation section, select the option to Show subsites. Notice that your two subsites are now listed below in the Navigation Editing and Sorting section and then click OK, as shown in Figure 8-21.
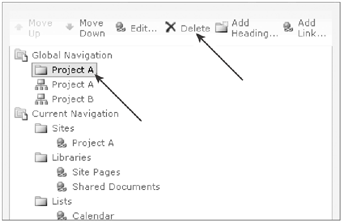
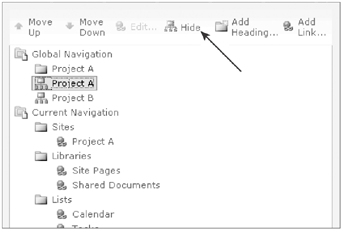
You will also notice that Project A is listed twice. Once as a header (denoted by the folder icon) and once as a site (denoted by the site icon). This is because of the order of operations you worked through in the examples. You initially created the site without having any of the publishing features activated. Because of this, when you created Project A and selected the option to add it to the parent site's top navigation, it was created as a header. Once you have activated the publishing features, additional features are made available; however, the work you have already configured is not overwritten. This is something that is important to understand because it is likely that, as you are configuring solutions within SharePoint, you will start with a certain set of features and then activate additional features as you develop your final solution. In this example, you can simply delete the header link.
Highlight the Project A Header link and select the Delete option. An example of this is shown in Figure 8-22.
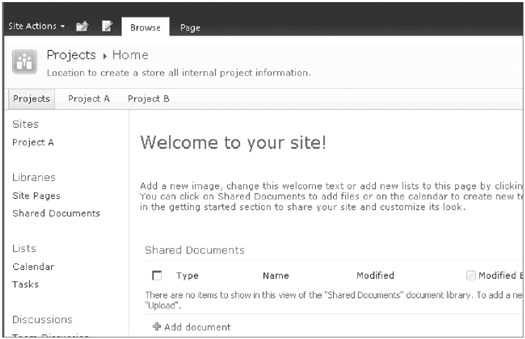
Now that you have modified the global navigation, you should see both project sites listed as tabs across the top of your home page. This is shown in Figure 8-23.
All new subsites that are created will also have tabs created. If there is a certain site that you do not want to be displayed as a tab, then you can select the site in the configuration page and select the Hide option. As you can see in Figure 8-24, the Hide option is displayed in the top of the menu structure.
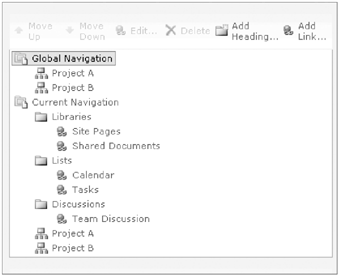
Next you will want to configure the current navigation so that the subsites are displayed. Return to the Navigations settings page, and select the subsites option under the Current Navigation options, as shown in Figure 8-25.
You should again notice extra links in the Current Navigation settings. There is a Header called Sites and a link called Project A. Since you are now using the publishing features, these two items can be deleted. Once you have completed deleting the items, your finished configuration should look similar to the Figure 8-26. Click OK to save your changes.

How It Works
When you choose to use the same global navigation as the parent site, you are in essence just copying the navigation structure. Whatever configuration changes made at the top will be visible within your site as well.
TRY IT OUT: Modify the Current Navigation for Project A
In this Try It Out, you are going to modify the current navigation settings for the Project A site. You are going to configure the site so that both the current and sibling quick launch are displayed within the site.
Open the Project A Site that was created in the previous example.
Navigate to the Site Settings Page by selecting the Site Actions menu and the Site Settings Option.
In the Look and Feel group, select the Navigation link.
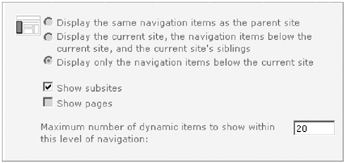
In the Current Navigation section, select the Display the current site, the navigation items below the current site and the site's siblings option, and then Click OK. An example of this is shown in Figure 8-27.
Once you navigate back to the Project A home page, you should see the content from the existing site, as well as the link to the sibling site, Project B. Figure 8-28 shows an example of this.
How It Works
By selecting this display for the current navigation, you are saying that you want to group your content at a high level, but list categories, and that you also want to see a link displayed on the site that will take you to all other sites that are at the same level of the site hierarchy.
There are few more things we should note about navigation before moving on. The first thing has to do with security trimming. Security trimming is a great SharePoint buzzword that means you only see content that you have access to. This is a great concept, and many people who want to build solutions want to take advantage of this option. One thing to note about navigation, however, is that only links generated and added to SharePoint by SharePoint are security trimmed. This means that if you add a global navigation link to a different site collection, all users will see that link, regardless of the permissions to the site. If users click on the link from within your site but don't have access to the site collection, they will be prompted for credentials. This can become very frustrating for users, especially if they are used to only seeing links that they have access to.
Note
One option to get around the issues of unwanted items showing up in the navigation would be to instead use a redirect page. You could create a redirect page and then apply permissions to that page. That way, only a user who had access to that page would see the link in the navigation.
Another thing to note about navigation is that, in this release of the product, Microsoft has included some additional settings that let you control the overall behavior of navigation. When publishing has been activated, these settings can be accessed through the Site Collection Administration section on the site settings page. They allow you to enable or disable the following navigation options:
Navigation Enabled: If you disable this option, all navigation bars will be hidden on the page.
Security Trimming: If you disable this option, all navigation links will be visible to all users, regardless of their access permissions to those links. If they try to navigate to a link that they don't have access to, they will be prompted for authentication.
Audience Targeting: If you disable this link, audience targeting will not be able to be used for navigation links.
The final thing that we will cover in the navigation section is a reminder to remember the small navigation options that can make a big difference:
Portal Site Connection
Breadcrumbs
Breadcrumbs provide a way for users to easily navigate through the tree structure that they are working within. From any level within the site structure, they can use the breadcrumbs to navigate to a different level within the site collection. An example of this is shown in Figure 8-29.
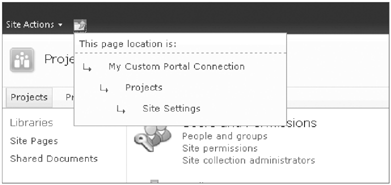
The Portal Site Connection is a configurable option within the Site Collection that provides a way for you to create a link as the topmost link displayed in the breadcrumbs. You configure this option from the Site Collection Administration group on the site settings page. Figures 8-30 and 8-31 show the configuration screen for this option, as well as the breadcrumb that displays the custom portal connection.
As you start working with site collections and sites, a question that is bound to come up is "How do I display data from one site on another site?" If the two sites exist within the same site collection, this can easily be done by using the Content Query web part (CQWP). If the two sites are not within the same site collection, then you must create a custom solution. This can be created using SharePoint Designer or by creating a custom web part.
Note
Examples that cover the configuration of the CQWP can be found in Chapters 7 and 11.
When a site is first created, a template must be assigned to the new site. Templates are basically preconfigured sites that have certain characteristics. Some templates are designed specifically with a team process in mind; others are designed for the purpose of publishing content to the masses; and yet others are designed for the storage of data. As a solution developer, you will need to understand the templates available to you, so that you can make the best selection to get you started. There are really no right or wrong reasons when you pick a certain template over another; you just need to understand what it is you are trying to accomplish and then pick the best tool available to help you get there.
Just as with many other things in this chapter, there is a breakdown between what templates are available for a site collection top site and the webs (subsites). We will first be covering the site collection top-level site templates. Site collections are created either from the Central Administration management site or from a custom process.
Note
It is likely that your organization has a process developed whereby you are able to request that new site collections be created. This process is likely very different from organization to organization, so be sure to review your governance team's site creation policies and procedures so that you can understand how this process works in your organization.
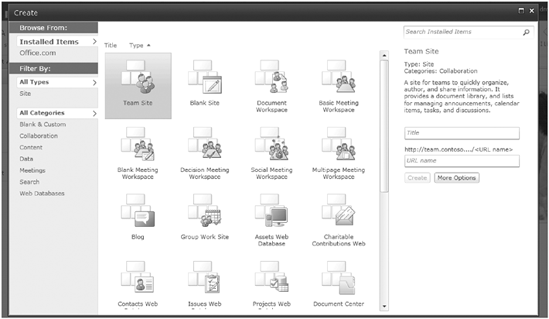
In Central Administration, when the option to create a new site collection is selected, a template selection panel is displayed where users are able to select the type of site template they would like to use for their site. Depending on your farms licensing, there are up to five different categories of sites available, including:
The templates in the collaboration category are designed to help you create an environment where users can easily share, build, and collaborate on content. The table that follows describes the specific templates that are available:
TEMPLATE | DESCRIPTION | YOU MIGHT USE THIS WHEN... |
|---|---|---|
Team Site | A site for teams to quickly organize, author, and share information. It provides a document library, and lists for managing announcements, calendar items, tasks, and discussions. | You have a team that needs to share general content. By default, several lists and libraries are preconfigured for you. A team could take this template and immediately have everything they need to get started. |
Blank Site | A blank site for you to customize based on your requirements. | When none of the templates work the way you want, you can start with this blank template and build the site as you need to. |
Document Workspace | A site for colleagues to work together on a document. It provides a document library for storing the primary document and supporting files, a tasks list for assigning to-do items, and a links list for resources related to the document. | This is a site that is designed to help you create a document. This would be ideal for the team that was working together to generate a final proposal. This site could store all of the supporting documentation and meeting notes that were needed in the creation of the final document. |
A site for a person or team to post ideas, observations, and expertise that site visitors can comment on. | When you want to create a blog to post information. This could be used within a team, used for the entire organization, or even presented through the external website. | |
Group Work Site | This template provides a groupware solution that enables teams to create, organize, and share information quickly and easily. It includes Group Calendar, Circulation, Phone-Call Memo, the document library, and the other basic lists. | When you have a team that is working closely together and you want to manage their location (e.g., Out of the Office, In Office, Vacation). This template also comes preconfigured with some calendar and scheduling tools that allow you to quickly work together as a team on project calls and discussions. This template would be ideal for a fast-moving team with a high volume of content that is being shared. |
Visio Process Repository | A site for teams to quickly view, share, and store Visio process diagrams. It provides a versioned document library for storing process diagrams, and lists for managing announcements, tasks, and review discussions. | When you have a team that is creating a collaborating on multiple Visio diagrams. This site collection comes preconfigured with a library and Visio content types as well as a discussion board. |
The next section of templates pertains to the creation of meeting workspaces. These templates are designed specifically with meetings in mind. There is a way to track the meeting minutes, meeting issues, and meeting documents. The list below represents the different styles of templates available for the meetings:
Basic Meeting Workspace
Blank Meeting Workspace
Decision Meeting Workspace
Social Meeting Workspace
Multipage Meeting Workspace
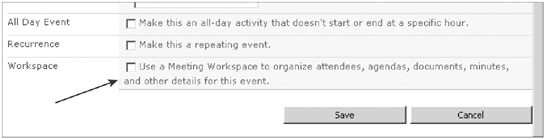
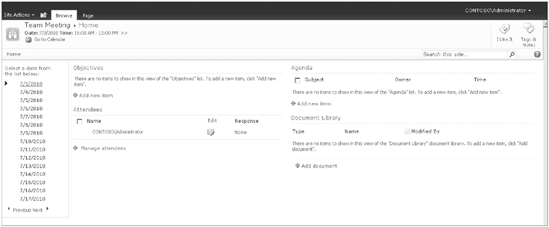
These templates can be configured to support single meetings or recurring meetings. You can create the template as a top-level site collection or web, but you can also create these sites from directly within a calendar list. Within the new item form in the calendar list, you will see an option to store the meeting information within a meeting workspace. If you select this option, then you will be asked to select a template to use to store your meeting minutes. Figure 8-32 shows this option within a new calendar item, and Figure 8-33 shows an example of a meeting workspace that is associated with a recurring weekly meeting.
The Enterprise templates provide the templates needed to implement the Enterprise features within SharePoint. Typically, these site collection templates will be used by the system administrators when they are configuring the farm. In some cases, your environment may have multiple sites collections that use these templates; however, it is likely that they will still be configured by one of the administrators. The table below describes each of the available templates.
TEMPLATE | DESCRIPTION |
|---|---|
A site to centrally manage documents in your enterprise. | |
This template creates a site designed for records management. Records managers can configure the routing table to direct incoming files to specific locations. The site also lets you manage whether records can be deleted or modified after they are added to the repository. | |
A site used for hosting PowerPoint broadcasts. Presenters can connect to this site and create a link for remote viewers to watch a slide show in a web browser. | |
A site for presenting the Business Intelligence Center. | |
A site for delivering the search experience. The welcome page includes a search box with two tabs: one for general searches, and another for searches for information about people. You can add and customize tabs to focus on other search scopes or result types. | |
A site used for hosting personal sites (My Sites) and the public People Profile page. This template needs to be provisioned only once per User Profile Service Application, please consult the documentation for details. | |
A site for delivering the search experience. The site includes pages for search results and advanced searches. | |
A site for delivering the FAST search experience. The welcome page includes a search box with two tabs: one for general searches and another for searches for information about people. You can add and customize tabs to focus on other search scopes or result types. |
The publishing templates are templates that are preconfigured to take advantage of the rich content management features across the development of site pages. There are two different publishing templates to choose from:
These templates come configured with all of the publishing features activated and ready for use. Out of the box, they allow you to create pages from preconfigured page layouts and allow you to publish these pages through an approval workflow.
The final section of templates is Custom Templates. Out of the box, only one template is included in this section:
<Select template later....>
This template allows the person creating the site to provision the site with no template selected. The first time that one of the site administrators tries to access the site, they will be presented with a set of templates that they can pick from. This allows someone to provision a site collection for a user without having to select a specific template for them.
When you are working within a site collection, the templates available for creating additional webs depend on the features that you have activated. As you activate additional features, additional templates become available. To create a new site you can select the New Site link from the Site Actions menu. Once selected, a pop-up will be displayed that shows all of the different templates available. An example of this is displayed in Figure 8-34.
The listing of available templates includes many different templates in addition to the ones discussed earlier in the chapter, including the following:
Assets Web Database
Charitable Contributions Web Database
Contacts Web Database
Issues Web Database
Projects Web Database
These templates, called Web Databases templates, are configured to be used with Access Services. When you create a site with these templates you are creating a site that contains an access database and that uses Access Services web parts to display the site data. Figure 8-35 shows an example of one of these site templates.

Now that we have covered the different templates available out of the box, it is time to cover the process of creating your own custom templates. A site template is basically a preconfigured site that you can use as a starting point for any new site. You start the process of creating a site template by building a site that you can use as the base template or by saving an existing site as a template. Once the site has been saved as a template, it will appear as an option for anything within the site collection that is creating a new site. When you save a site as a template you can either choose to include the content as part of the template or not include the content. There are limitations in the size of templates, so be sure that if you are planning to include content in your template that you first verify the size limitations with your governance team.
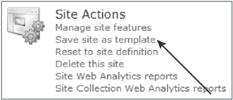
The option to save a site as a template is located in the Site Settings page in the Site Actions grouping. It is important to note that you will only see the Save site as template link when the site you are working within can be saved as a template. Some sites, including those that enable publishing within the site, do not support the Save as Template option.
TRY IT OUT: Save Project A Site as a Template
In this Try It Out, you are going to modify the Project A site and then save the site as a template. You are then going to create a new site called Project C that uses your new template.
Open the Project A Site that was created in the previous example.
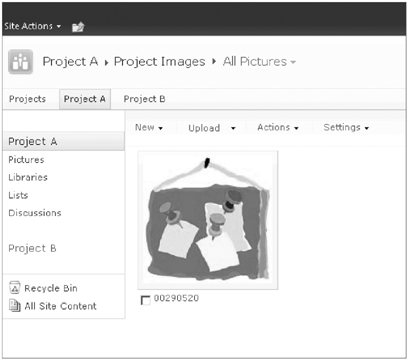
Create a new image library within this site and upload several images to the library. If you need instructions on how to create an image library, refer to Chapter 3. Figure 8-36 is a screenshot of the library page within my Project A site.
Open the Site Settings page for Project Site A, and select the "Save site as template" link in the Site Actions group. An example of this is shown in Figure 8-37.
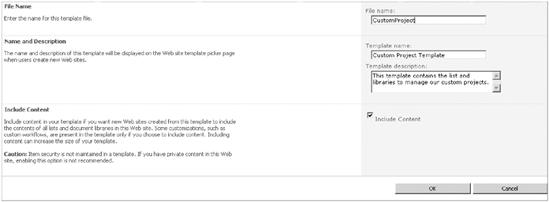
As shown in Figure 8-38, Enter the following information to save the site as a template, and then click OK:
File name: CustomProject
Template name: Custom Project Template
Template description: This template contains the list and libraries to manage our custom projects.
Include Content: Yes
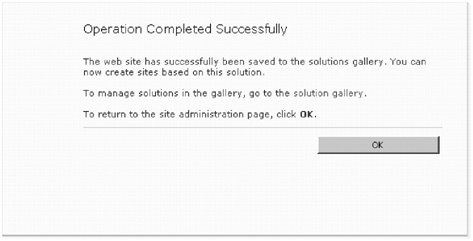
Click OK on the pop-up screen (Figure 8-39) that confirms your site template was created.
Open the Projects Site Collection that was created in the previous example.
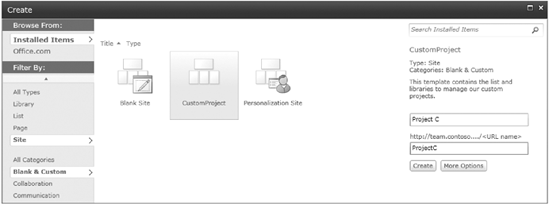
From the Site Actions Menu, select the New Site link.
In the create dialog, select the Blank & Custom filter. Notice that if you select the Custom Project template, the description you entered above is displayed on the right side of the dialog. Figure 8-40 shows an example of this.
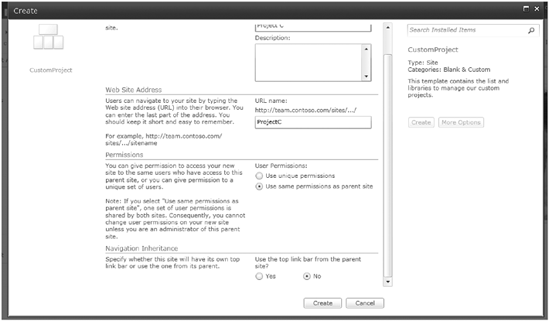
Enter the following title and URL for your new site and then select the More Options button:
Title: Project C
URL: ProjectC
Notice that when selecting more options we have the ability to manage permissions and to inherit navigation. We will accept the defaults and click Create, as shown in Figure 8-41.
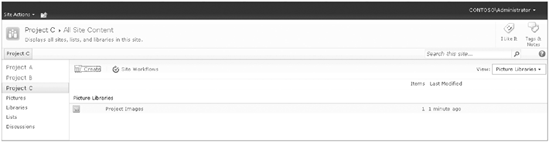
Once you are redirected to the new Projects C site, you will want to verify that your template was used. To do this, you can check to see that your custom library and content are included in the site.
From the Project C home page, select the Pictures link in the current navigation. Notice in Figure 8-42 that your list, Project Images, is included and is showing that there is one item in the list.
How It Works
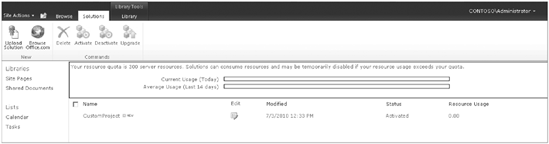
When you saved your site as a template, the configurations and content were saved to the site Solutions gallery and made available for use within the site collection. When you created a new site, the new site was based on the site within the Solutions gallery.
When a template is created it is stored as a .wsp file within the Solutions gallery. This gallery can be accessed through the Solutions Gallery link in the Galleries section of the Site Settings page and is shown in Figure 8-43.
This Solutions gallery is basically a list that contains solutions that are used within the site collection. Because it is a library, you are able to upload additional solutions. This means that you can move templates between different site collections simply by saving them locally and then uploading them to a different site collections Solutions gallery.
One final area that I wanted to cover within the Templates section is the idea of creating a template that can be used to create new site collections. This is a question that comes up often; however, there is no solution that is available to power users to fill this request. If you have a need to use a custom template for your top-level sites, you will need to work with your system administrators and developers to determine the approach that is best for you. The approach could include several different options, including:
Importing Global Templates
Creating Custom Site Definitions
Creating Custom Features
All of these topics go beyond the scope of this book; however, it is good for you to be aware of them. Your system administrators and developers should be able to work with you to determine the best approach to meet your particular requirements.
One question that comes up repeatedly during the discussions about SharePoint is the need to work with your SharePoint site content offline, in a disconnected state. When the manager of sales is offsite, he still needs access to the sales dashboards, and when a team member has to spend two days traveling to get to a meeting, she will need access to the content during the travel times.
SharePoint Workspace provides this functionality and is available with a Microsoft Office Professional Plus license key. Users who have this client application installed will be able to connect with their SharePoint sites and download a local copy of the site. This copy will be synched with the live site on a regular basis to ensure that the content store locally remains current. When users are offline, they will be able to make changes to the content, and then that content will be synched to the live site when they are able to connect again.
TRY IT OUT: Connect to a Site Using SharePoint Workspace
In this example, you are going to open the SharePoint Workspace client application and connect it to your Projects site collection.
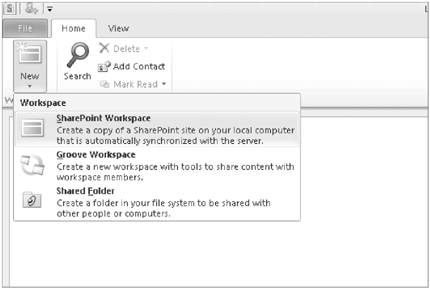
From the windows start menu, open the Microsoft SharePoint Workspace 2010 client application.
From the Ribbon, select the SharePoint Workspace option within the New drop-down. An example of this is shown in Figure 8-44.
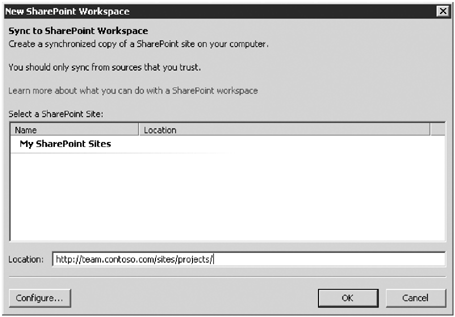
Enter the URL for your projects site collection in the dialog, and click OK, as shown in Figure 8-45.
A status dialog will be displayed that will display the progress of the site being created locally. When the dialog shows that progress is completed, click the Open Workspace button.
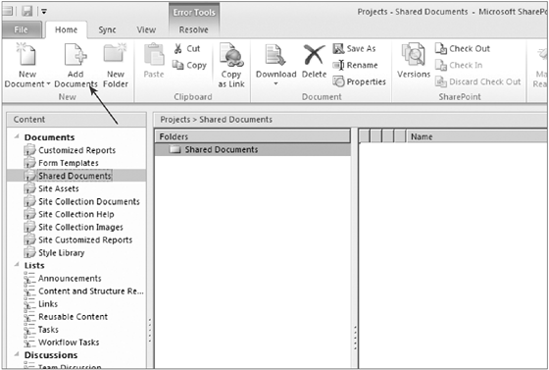
Select the Shared Documents library and click the Add Documents button on the Ribbon, as shown in Figure 8-46.
Upload any document to the library. Once you complete this action, open the site in the browser and verify the document has been added.
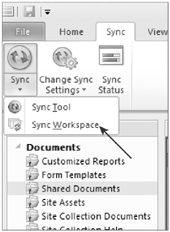
Select the Sync Ribbon toolbar, and the under the Sync menu, select the option to Sync Workspace as shown in Figure 8-47.
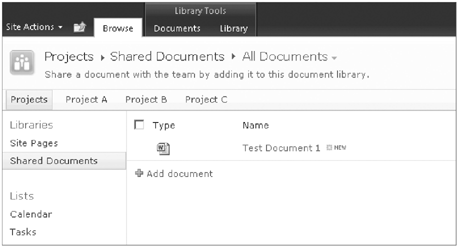
When the sync status (bottom right) shows as completed, close the client application and open the site in the browser. You should now see your document uploaded into the shared documents library. An example of this is shown in Figure 8-48.
Keep in mind that, for this demo, you remained connected to the server at all times, and you forced a manual sync. This was simply to show you the functionality. Under normal circumstances, the workspace would synch on a consistent basis.
How It Works
When you connect a SharePoint Workspace to a SharePoint site, you are creating a local copy of the content. This copy will be synched on a regular basis with the live site so that the content remains current. Whenever you are offline, this local copy can be used to provide access to the site content. Once you are online again, the changes you made in the workspace will be synched with the live site.
In this chapter, you have covered many different configuration options for creating site collections and sites. After reading through this chapter, you should be familiar with the following concepts:
The differences between sites collections and webs (subsites)
The different templates available for use out of the box
How to create and configure your own custom site templates
How to work offline with site content