
WHAT YOU WILL LEARN IN THIS CHAPTER:
In the previous two chapters, we discussed the basics of creating collaboration sites and working with web parts to extend those sites, bringing users rich features that will help them to more easily store, share, and find people, processes, and information within their organization.
In this chapter, we will delve into the world of user experience and the role branding plays in its success. More specifically, we will attempt to uncover the layers of a successful brand strategy and unleash the secrets leading to mass user adoption, the ultimate compliment and purpose of any brand.
Finally in this chapter, we will dive into a slightly more technical side of SharePoint branding, working with master pages where you will learn how to leverage this out-of-the-box feature to build a consistent user interface in tune with corporate brand standards.
The reasons to brand are many and may differ slightly from organization to organization, but there are a few consistent underlying motivations across the board, and that is where we will focus our attention.
Most organizations strive to build a trusted image that encompasses the core values and general purpose the organization represents. That image or brand is often broken down into a set of tools, patterns, and practices that, when combined and used consistently, build a common experience that people begin to remember, identify with, and ultimately trust.
This subliminal trust is the key to a positive user experience, which ultimately leads to user adoption. Successful user adoption means the sale of products or services in most common scenarios, but in our case things are slightly different. You are not selling a product or service; you are selling the usage tool, namely "SharePoint 2010" as a better way to work, collaborate, and communicate.
Microsoft has helped develop a trust in the SharePoint platform that having a unified infrastructure upon which to build business applications will ultimately make organizations more efficient. To make this possible, however, an organization needs to ensure that its employees adopt the tool and use it frequently to best leverage the investment. Simply deploying SharePoint (or any tool) and demanding usage by employees is not enough. This is where branding experts come in. This is why organizations brand their SharePoint portals, to ensure that the portal falls in line with other tools, patterns, and practices used across the organization. Essentially, by branding you are building a more familiar and better user experience, which will lead to greater user adoption and, ultimately, a more successful deployment. Users will become less focused on the technology aspect of the tool and see the application as an integrated portion of their business.
The payoff is more effective sharing of people, processes, and information, leading to a more efficient organization overall.
As with most things there are best practices for enhancing the user experience. These best practices are the lessons learned as a result of several iterations of the SharePoint platform (2001, 2003, 2007, and now 2010). Several years of implementing different tactics and listening to the feedback from users has yielded many different points of view, but there are a few that keep coming up time and time again, and those are the practices we will focus on.
Likely the most significant best practice for enhancing user experience is one that is not specific to SharePoint but rather relates to the mentality with which you should approach most any project, and that is "KISS," or "Keep it simple, stupid." To quote Albert Einstein; "Everything should be made as simple as possible, but not simpler." This should apply to every level of your branding initiative, from your plan, to your tactics, to your execution. The simpler your roadmap, the less risk that is involved, and similarly the easier things are to use, the better experience your users will have and subsequently the faster users will adopt your tools.
Another common best practice and general rule of thumb when it comes to branding is consistency. People are creatures of habit, and few feel positive toward a lot of change in their day-to-day activities. For this reason, it is imperative that you align your branding initiatives with tools, patterns, and practices already in place. For example, if users currently store the majority of their documents in a shared folder called G-Drive, then to keep things consistent for the user, you might want to consider naming your new store, such as a SharePoint document library, G-Drive. While as a general rule, more descriptive names are better, by limiting the amount of change you are introducing to how employees do their work you will create a sense of familiarity across current practices and applications, and ultimately users will have a better experience.
Follow existing brand guidelines. Some organizations feel that because the intranet is not publicly available, all rules go out the door. Unfortunately, this could do more harm than good when it comes to user experience and, ultimately, user adoption. If your corporate color scheme is made up of blues, then stick with blues on your intranet. If your main heading fonts are Helvetica and standard copy is Verdana, then keep those also. If your users click your logo in the top left to return to the home page, then don't change that either; the more familiar the practices and processes are, the better the experience will be for the users of the system.
Stick with best practices for web design; after all, SharePoint is a web-based platform. Keep your user interface easy to navigate, and ensure you use easy-to-read typography and colors (no yellow on red!).
Less is more. Having all of your organization's information at your fingertips and presented within a single page might seem like a good idea, but it is much better to stick with the information that is important to your users and getting their job done. That way your page will not be cluttered, and you can focus on what is important.
A common requirement most organizations have is to have their company logo displayed predominantly within the site's primary navigation area. Each site within SharePoint has a setting to allow site administrators to specify a custom image to be displayed in the header of their site. If you apply this setting to the top-level site within your site collection it will be applied to all subsites as well if an alternate image is not specified. We will review the process for setting the site image in the next Try It Out.
TRY IT OUT: Associate a Custom Logo with Site
From the top-level site of your site collection, select View All Site Content from the Site Actions menu.
Select the Style Library.
Upload the
AWlogo.pngfile to this library using the method described in Chapter 2 of this book.Once the file is uploaded, select the file and click the Publish button on the Documents tab of the Ribbon. This will ensure that the file can be viewed by all users of the site.
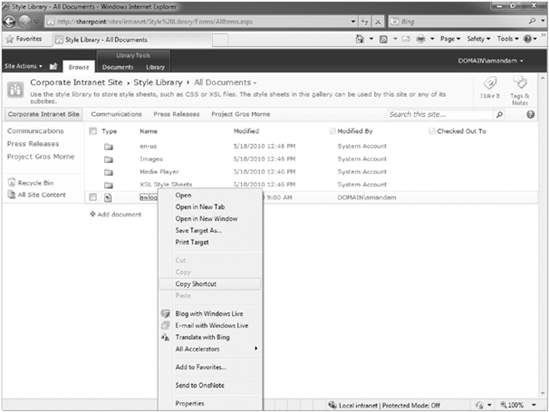
Right-click on the awlogo file and select the Copy Shortcut option, as shown in Figure 9-1. This will add the address of the image to your clipboard.
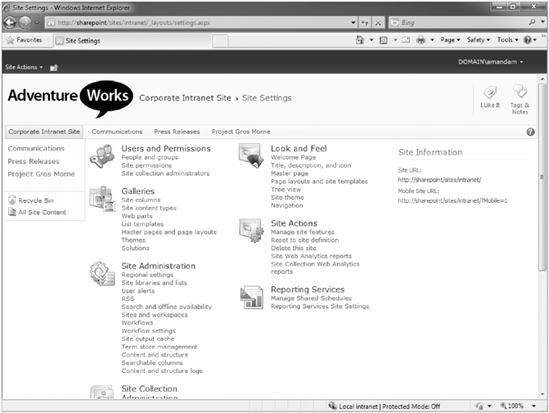
Select Site Settings from the Site Actions menu.
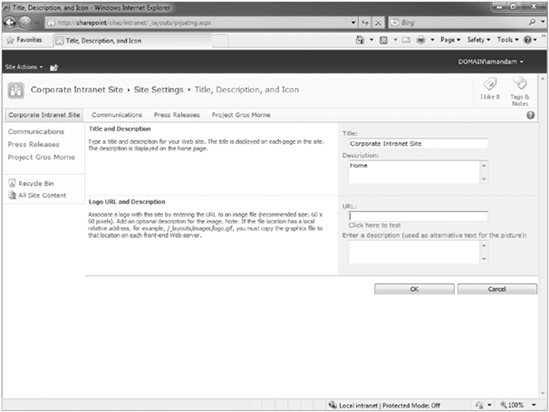
Select the Title, Description, and Icon link from the Look and Feel group of links. You will be redirected to the Title, Description, and Icon page, as shown in Figure 9-2.
Paste the address copied in step 5 into the URL field by selecting in the field and clicking Ctrl+V.
Click the link below the URL field to test the URL.
Click OK. The page will refresh and your image will be displayed in the header of your site, as shown in Figure 9-3.
How It Works
When you configure your top-level site with a logo as detailed in this Try It Out, you will notice that all pages of your site and associated subsites display the image in the top-left corner of the page. Clicking on this image will return you to the home page of whatever site you are currently on. You may further customize your site logo to appear in different locations or contain a hyperlink to return you to the home page of the top-level site of the site collection by editing the master page. We will review this type of customization later in this chapter.
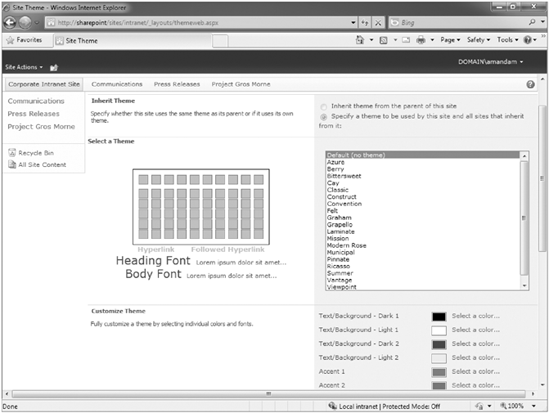
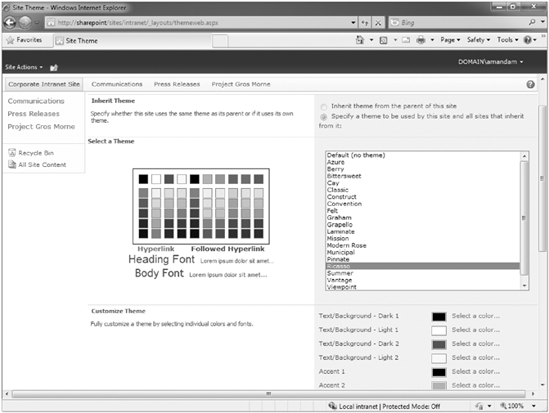
Themes are a feature within SharePoint that allow you to make basic color scheme and font changes to visual elements within your site. Themes have evolved in SharePoint 2010 considerably from previous versions of SharePoint. In earlier versions of SharePoint, only users who were skilled in the use of CSS were able to create or modify themes within a SharePoint environment. SharePoint 2010 offers a built-in Theme Designer tool that provides users, with the appropriate privileges, the ability to apply existing themes or create new themes to suit their own requirements. Figure 9-4 displays the Theme Designer tool that is available on each SharePoint site to site owners or designers.
If you are familiar with the Theme Designer tools that were introduced as part of applications such as Microsoft PowerPoint and Word 2007, then you will likely notice some similarities. In fact, themes you create within the Microsoft client applications can be exported and reused within your SharePoint sites. This will help in scenarios where a company's color scheme has already been defined for tools such as PowerPoint. However, if you do not wish to take such an approach, you may elect to simply apply an existing theme or create a new theme in SharePoint directly, using the steps in the next Try It Out.
TRY IT OUT: Apply a Theme to an Existing SharePoint Site
In this Try It Out, you will apply an out-of-the-box SharePoint theme to the Corporate Intranet site that was created in Chapter 1 of this book. If you did not complete the exercises in Chapter 1, you can follow these steps to apply a theme to any site.
From your Corporate Intranet site, select Site Settings from the Site Actions menu.
Select Site Theme from the Look and Feel group of administrative links. You will be redirected to the Theme Designer tool.
Select the Ricasso theme, as shown in Figure 9-5.
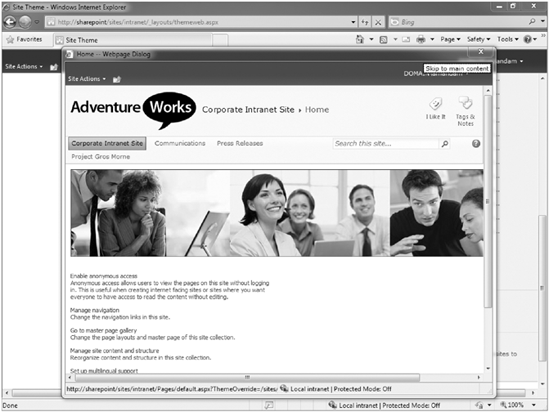
Click the Preview button. A new window will appear, as shown in Figure 9-6, displaying a preview of your site with the Ricasso theme applied.
Close the pop-up window.
Select the option to "Apply the selected theme to this site and reset all subsites to inherit this setting." You will be returned to the Site Settings page of your site, and the new theme will be applied.
How It Works
From the theme designer tool, you can select from either of the existing themes. When you select a theme, an image appears to the left, as shown in Figure 9-5, to give you a high-level preview of the theme's color scheme. However, to see exactly how your site will look with the theme you have selected applied, you selected the Preview option, which opened the site in a new window with the theme applied.
By selecting the option to apply the selected theme to the current site and reset all subsites below it, you applied the theme to more than one site. If you wish to apply the same theme to every site in your site collection, you select this setting when applying the theme to the top-level site of a site collection.
In the next Try It Out, you will customize an existing theme further to suit your specific preferences.
TRY IT OUT: Customize an Existing Theme
From your Corporate Intranet site, select Site Settings from the Site Actions menu.
Select Site Theme from the Look and Feel group of administrative links. You will be redirected to the Theme Designer tool.
From the customize theme area of the page, select Verdana for the Heading Font and Body Font.
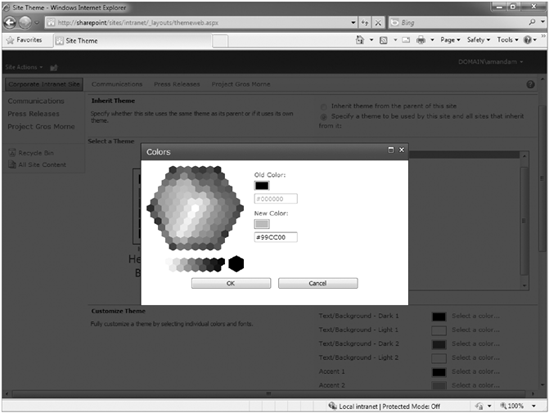
For Accent 1, click the Select a Color link. A color picker interface will open as shown in Figure 9-7.
Select a color of your choice from the color picker, and click OK.
For Accent 2, click the Select a Color link.
Enter #99CC00 in the New Color text box, as shown in Figure 9-8.
Make additional color selections as required.
Click the Preview button to view your site with the new theme applied.
Close the Preview window.
Select the option to "Apply the selected theme to this site only."
Click the Apply button.

How It Works
In this Try It Out, you started with an existing theme applied and then customized the theme to suit your needs. To change the colors of the theme, you used the built-in color selection feature. Using this feature did not require any code changes. When selecting colors, you had a choice between selecting them from the color picker or entering a hexadecimal code for a color that is not represented within the color picker.
When creating a theme, it is important to place usability and the user experience of your site's members ahead of your own personal color preferences. Just because you really like a particular color scheme and combination does not necessarily mean that the content and navigation are easily readable by others. So when designing your themes, keep these following tips in mind:
Avoid using light text on a light background or dark text on a dark background. Text should always be very easy to read, and selecting contrasting colors is important. Most users will find it hard to read text if the chosen color does not stand out strongly from the background color that is applied to an area. This is particularly true for users who may be color blind or have a visual impairment or disability.
If you select a custom font for either the Heading Font or Body Font, be sure to select a font that is commonly used, easy to read, and likely to be installed on the systems of users of your site. Common choices include Verdana, Arial, Tahoma, Helvetica, and Times New Roman.
It may be difficult to identify which areas of the site are represented by the different Accent colors identified in the Theme Designer tool. Take some time to set all Accent choices to a common color such as white. Then one by one, apply a color to an Accent choice and apply the theme to the site. You should then navigate around the site to identify which areas of the site were affected by the change. This will help you easily identify which areas are affected by which changes and will subsequently allow you to make better choices when setting your theme accent colors.
Themes allow for the basic modification of site visual elements without requiring any modifications to code or knowledge of style sheets. These are intended for use in scenarios where slight changes to the visual look and feel are required without the need for advanced styling techniques such as background images or layout changes. Themes are most appropriate for shared environments and collaborative scenarios where strict brand guidelines may not exist and long-term management requirements are low. They require very little effort to create and deploy; however, there are limitations on the number of changes you can apply.
For more complicated scenarios where strict brand guidelines exist or where long-term changes must be accommodated in a well-defined and governed process, applying customizations to master pages and style sheets are recommended as it allows for more flexible and consistent changes to be applied in a unified fashion across all sites. We describe these types of customizations in detail in the following section.
Master pages are one of the most powerful tools in your arsenal when it comes to branding your portal and building a consistent user interface. Before we begin, it is important to note that this requires some basic web development knowledge, as this is a slightly more technical aspect of branding involving code.
Note
To edit the master pages, you will make use of SharePoint Designer 2010, a free download from Microsoft available at the following URLs:
Download 32-Bit SharePoint Designer 2010:
www.microsoft.com/downloads/details.aspx?displaylang=en&FamilyI
D=d88a1505-849b-4587-b854-a7054ee28d66
Download 64-Bit SharePoint Designer 2010:
www.microsoft.com/downloads/details.aspx?familyid=566D3F55-
77A5-4298-BB9C-F55F096B125D&displaylang=en
A master page is essentially a template that defines the chrome of your site. The chrome refers mainly to the parts of a site that are shared across all pages, items such as a top or side navigation bar or the header and footer. In a nutshell, by using master pages you can make SharePoint look less like SharePoint and more like any regular website. In fact, there is really nothing that can be done on a regular website that cannot be done in SharePoint, a common misconception.
Using master pages drastically reduces efforts associated with branding in the future, as it will allow you to make sweeping changes to the look and feel of all pages in your site by modifying a single file, the master page.
Master pages work in conjunction with another type of template called a "page layout" to produce the page that you see in the browser after clicking on a link. A page layout is to content what the master page is to the User Interface chrome. A page layout allows you to customize the look and feel of content on your page.
For example, when you click on a link called products in the navigation menu, a process takes place in the background. The master page and page layout associated with the products page merge and form a single page, products.aspx, which is then presented to the user. This framework gives you immense flexibility in both the chrome and the content of your website, offering true separation of your presentation from the content of your site.
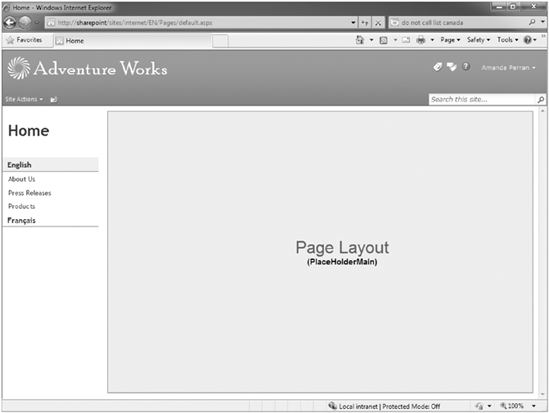
The master page contains a variety of controls and placeholders. The controls remain consistent across pages and are usually used for items such as the global navigation, current navigation, and search, while the placeholders allow page layouts to inject content or controls. This is done by matching IDs with Content Place Holders in the master page with Content Controls in the page layout. For example, if you request a page that has a Content Place Holder with an ID="productmap", and the page layout associated with the page you requested has a Content Control with an ID="productmap", the content contained in the page layout's Content Control with the ID="productmap" will automatically override anything in the master page's Content Place Holder, and that is the content that will be displayed to the user. The most common example of this is the Content Place Holder in the master page with the ID="PlaceHolderMain". This is where the page layout is inserted and basically means this is where all your content is inserted, as shown in Figure 9-9.
For more detailed information on working with page layouts, refer to Chapter 13.
The presentation of items on a master page is controlled by a combination of XHTML and Cascading Style Sheets. Presentation refers to things such as the colors, fonts, and placement of items on a page.
By default, a file-system-based style sheet (CoreV4.CSS) is applied to new sites, but you can override this by using an out-of-the-box feature called Alternate CSS. The Alternate CSS is applied after the default style sheet and hence overrides any identical selectors (Classes and IDs). The alternate CSS, while still a style sheet, should not be confused with themes, which we discussed earlier in this chapter. Later in this chapter, you will be guided through the process of applying and editing both the master page and an alternate style sheet.
As is the case with any project involving the modification of files and code, there are best practices to follow to mitigate any risks associated with upgrades or patches and to ensure your site is running smoothly.
There are several rules of thumb to follow when branding SharePoint. Some of the more important ones are:
Never modify the out-of-the-box files as this can lead to complications during patches or upgrades. Instead, make a copy of a file and modify the copy.
When modifying master pages, never remove placeholders. If you prefer not to have a certain control displayed, simply hide it using CSS or use the more common practice of hiding it at the bottom of your page in an ASP panel that is set to
HIDDEN.Always store files in the correct locations. Some of the rich features of SharePoint, such as browsing to files, work better and faster when the files are in a location (or path) that is selected by default.
Some of the more common file locations you will be using are:
Master Pages: Master pages (and page layouts) are stored in the Master Pages and Page Layouts gallery, which is accessible by selecting Site Settings from the Site Actions menu and Selecting Master Pages and Page Layouts from the Galleries group of links. The Master page is also accessible via the left-hand menu when editing your site in SharePoint Designer 2010 under the Master Pages folder.
Alternate CSS: Always store your style sheets in the style library. In cases where you are managing multiple brands within a single collection, it is strongly recommended that you create a folder per site within the style library to house the CSS to make it easier to identify for future editing. It will also make it easier to store images specific to that site and style sheet. The style library is accessible via Site Actions, View all Site Content.
Images: In most scenarios, images are used in two specific ways:
Images that are shared and used within content, photos, or headers, for example. These images should be stored in the site collection images library.
Images that are used specifically with the style sheet such as background images. These images are most effective when stored with your style sheet. It is recommended that you create an images folder inside the folder you created to store your CSS; this will make referencing your images via the CSS much easier.
TRY IT OUT: Creating a New Master Page and Adding It to the Master Page Gallery
The marketing department has informed you that a new corporate look and feel is required for the company intranet. After researching the various options you have decided to have your intranet shadow your public-facing website to create a more familiar atmosphere for users and, hopefully, aid in the user adoption process. To do this, you have decided to embrace branding of a master page and alternate style sheet.
Before you begin, best practices dictate that you should create a copy of an existing master page rather than modifying a default. To do this, select Site Settings from the Site Actions menu. The Site Settings page appears.
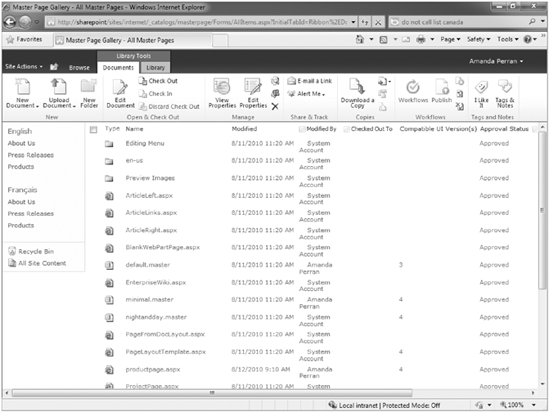
From the Galleries group of links, select Master Pages and Page Layouts. The Master Page gallery will appear, as shown in Figure 9-10.
Find V4.master in the list and select it. Select Download a Copy from the Documents tab of the Ribbon.
Download the file to your desktop and save it as V5.master.
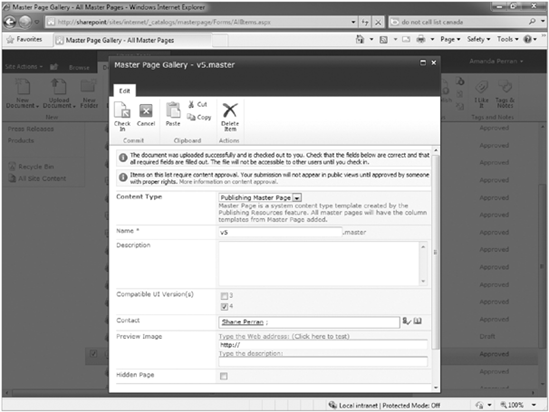
Return to the Master Page and Page Layouts gallery via your browser and select Upload Document from the Documents tab of the Ribbon.
Upload V5.master, completing the metadata as shown in Figure 9-11.
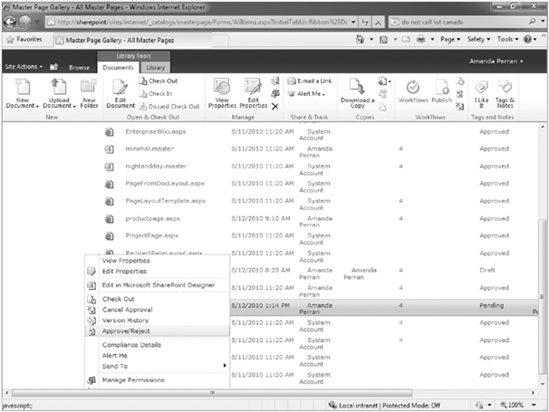
Remember to always check in the file, publish, and approve a new major version. You can check in, publish a major version, and approve it using either the Ribbon or the drop-down menu associated with the file, as shown in Figure 9-12. You are now ready to apply your new master page to the site and begin modifying it.
How It Works
In this example, you set the stage for branding your intranet by creating a copy of an existing master page in the Master Pages and Page Layouts gallery. This master page will then be applied to your site and subsequently be accessible in SharePoint Designer 2010, where it will be modified.
This helps to ensure that the default master pages remain untouched. This is of particular importance during upgrades or patches, where the risk is highest for default file replacement.
TRY IT OUT: Creating a New Style Sheet and Adding It to the Style Library
To best separate the presentation such as layout and colors from your master page markup, you will be using a cascading style sheet. Best practices dictate that your style sheet should be stored in the style library.
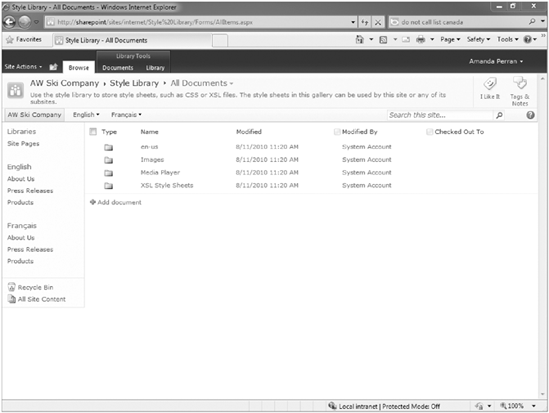
From the top level of your site collection, select View all Site Content from the Site Actions menu. The View all Site Content page appears.
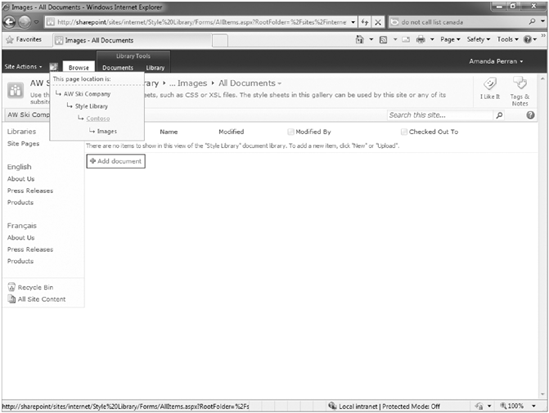
From the Document Libraries heading, select Style Library to enter the style libraries. The style library will appear, as shown in Figure 9-13.
Select New Folder from the Documents tab of the Ribbon.
Name your new folder Contoso, and click Save.
Enter the Contoso folder by clicking on it in the list.
While inside the Contoso folder, select New Folder from the Ribbon. Name your folder Images and click Save. This is where you will store images such as backgrounds used in your CSS.
Using the breadcrumb navigation, as shown in Figure 9-14, return to the Contoso folder.
While inside the Contoso folder, select the Add document link. The Upload Document dialog appears.
Under Upload Document, click Browse. The Browse dialog appears.
Browse to the location of the materials associated with this chapter and select your
MyFirstStyles.CSSstyle sheet. Click OK to upload the style sheet.Select the Check In option from the Ribbon. The page will refresh.
Select the
MyFirstStyles.cssfile, and click the Publish option from the Documents tab of the Ribbon to publish a major version of the file. This will be required for end users to see your branding styles.
How It Works
In this example, you set the stage to use the Alternate CSS feature to control the look and feel of your master page by creating a new style sheet and uploading it to the style library, where it can be applied to your site and subsequently be accessible in SharePoint Designer 2010, where it will be modified.
This helps to ensure that the default style sheet remains untouched. This is of particular importance during upgrades or patches, where the risk is highest for default file replacement.
TRY IT OUT: Applying Your Master Page and Alternate Style Sheet
The master page and Alternate CSS are so closely linked that they are applied in the same place. You will commonly find yourself applying a new master page and an alternate style sheet at the same time. For that reason we have combined applying them into a single exercise.
From the top level of your site collection, select Site Settings from the Site Actions menu. The Site Settings page appears.
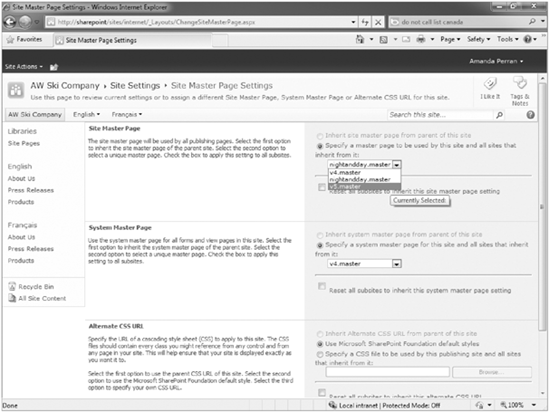
From the Look and Feel section, select Master Page. This is the area where you will apply both your new master page and alternate style sheet.
From the Site Master Page section, select V5.master from the drop-down menu, as shown in Figure 9-15.
Note
If you forgot to publish a major version and approve it when you uploaded your master page, you will receive a warning and will have to go back and do that before continuing. You can do that by selecting to the Master Page and Page Layouts section of the Site Settings area and then hovering over V5.master to expose the menu items and selecting Publish a Major Version. After publishing it, you will need to repeat the process, this time selecting Approve/Reject and finally selecting Approve from the dialog that appears. Once that process is complete, start at step 1 of this exercise again. Otherwise, continue to step 4.
Select the checkbox labeled "Reset all subsites to inherit this site master page setting."
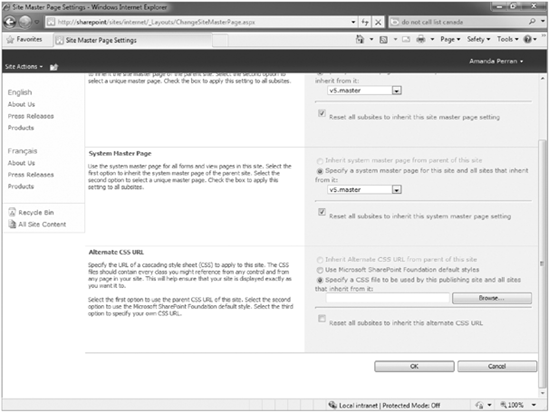
From the System Master Page section, select V5.master from the drop-down and select the checkbox labeled "Reset all subsites to inherit this system master page setting."
From the Alternate CSS URL section, select the option Select a CSS file to be used by this publishing site and all sites that inherit from it, as shown in Figure 9-16.
Click the Browse button; the Browse dialog appears.
From the left of the Browse dialog, select Style Library. The style library appears on the right of the dialog.
Enter the Contoso library, where you stored your style sheet, by clicking on it.
Select MyFirstStyles.CSS, and then select OK.
Select the checkbox labeled "Reset all subsites to inherit this alternate CSS URL."
Click OK. You have applied your master page and alternate style sheet to the site and are now ready to begin modifying the look and feel accordingly using SharePoint Designer 2010.
How It Works
In this exercise, you applied a custom master page and an alternate style sheet to a site. These files will override the default look and feel of the site, allowing you to transform the out-of-the-box SharePoint site into a vibrant intranet that is more in line with corporate brand standards used on your public-facing website. Now that you have applied the master page and style sheet, you can connect to the site using SharePoint Designer 2010 and make the changes required.
TRY IT OUT: Modifying Your Custom Master Page and Alternate Style Sheet Using SharePoint Designer 2010
With the stage set as best practices would prescribe for branding your portal, you are now ready to dig into the more technical parts, dealing with the markup of the master page and style sheet. To do this, you will be connecting to your site using SharePoint Designer 2010.
Open SharePoint Designer 2010.
Under File, Sites, Select Open Site. The Open Site dialog appears.
Type the URL of your site in the Name area of the dialog window and click OK. SharePoint Designer 2010 will connect to your site.
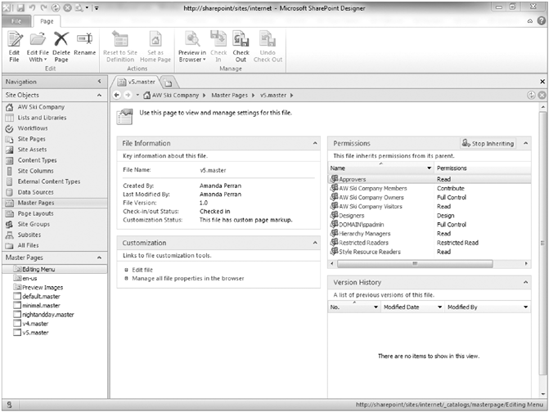
From the left-hand menu under Site Objects, select Master Pages. The master pages library is displayed to the right.
Click V5.master. The V5.master options page appears, as shown in Figure 9-17.
Under Customization, select Edit file. When prompted to check out, choose Yes. The master page opens, as shown in Figure 9-18.
Select All Files from the left-hand menu. The All Files window appears to the right.
Select Style Library and then Contoso. The Contoso folder contents appear, exposing your style sheet.
Select
MyFirstStyles.CSS.The MyFirstStyles.CSS options page appears.Under Customization, select Edit File. When prompted to check out, choose Yes. The style sheet opens.
Select the tab at the top of the window for your style sheet, and add the following code:
.bluecontentarea
{
background-color:#99CCFF;
padding:20px;
}
Save your changes.
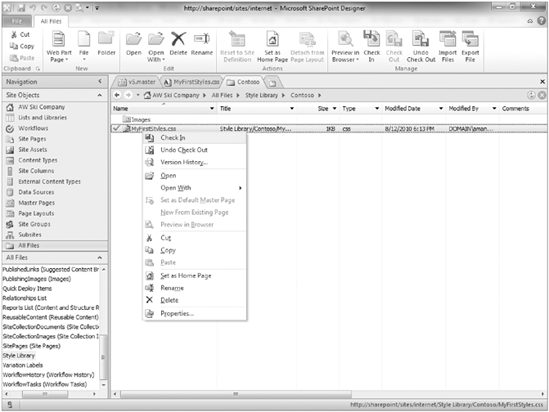
From the All Files location, select the Style Library and then Contoso folder, and right-click on your style sheet to expose the menu options, as shown in Figure 9-19.
Choose Check In. The Check In dialog box appears.
Select Publish a Major Version, and click OK.
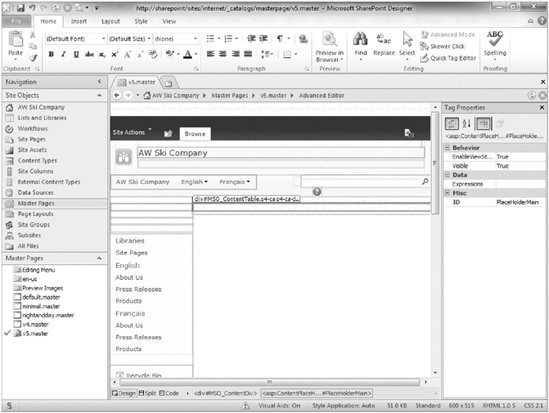
From the top tabs on the right, select V5.master. Ensure that you are in code view. The Code View tab is located at the bottom of the page; click it if you are not already in code view.
Locate the following code in the master page. This is where Page Layout (Content) for your page is inserted.
<asp:ContentPlaceHolder id="PlaceHolderMain" runat="server">
</asp:ContentPlaceHolder>
As a simple example, you will change the background of the Content area to blue. To do this, you will replace the preceding code with the following:
<div class="bluecontentarea">
<asp:ContentPlaceHolder id="PlaceHolderMain" runat="server">
</asp:ContentPlaceHolder>
</div>
Select Master Pages Library from the Site Objects menu on the left.
Right-click on V5.master, and select Check In from the menu. Click OK.
Choose Check In. The Check In dialog window appears.
Select Publish a Major Version and click OK.
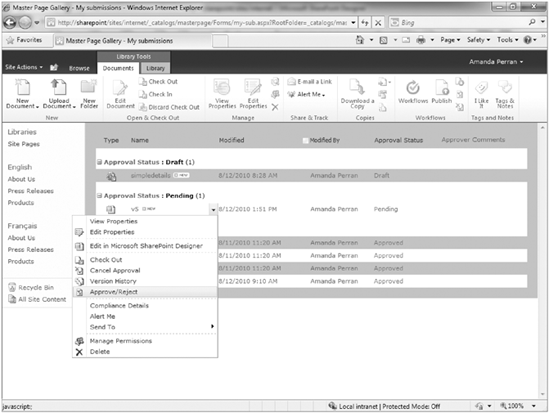
Finally, select Approve/Reject from the drop-down menu, as shown in Figure 9-20. This will launch the content approval interface.
Select Approved and click OK.
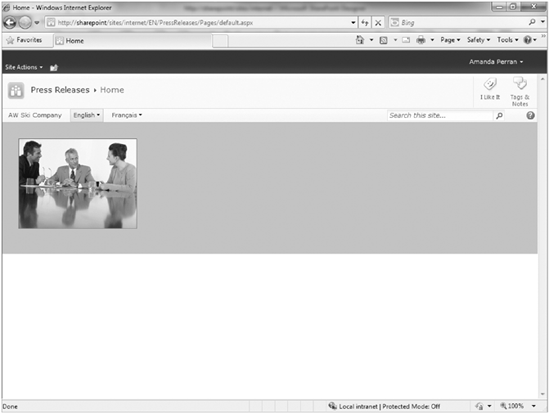
If you view your site in the browser, you will notice that the content area has changed and now has a blue background, as shown in Figure 9-21. This is a very basic example, but it is also the basis of how you modify your style sheet and master page to create a more visually appealing site. Your design will dictate how you build your style sheet and master page.
How It Works
In this example, you connected to your site using SharePoint Designer 2010 to access the master page and style sheet that you uploaded via the browser previously. Using a combination of XHTML, CSS, and some modification of the control properties visible in the code of each control, you can completely transform your intranet site from a plain vanilla SharePoint site into a more aesthetically pleasing work of art—a site more in tune with corporate brand standards.
In this chapter, you delved into the world of corporate branding and how that applies to the SharePoint world. This chapter touched on many facets of a successful brand strategy, starting with the purpose of branding, which we concluded was ultimately to drive user adoption by creating a better user experience.
After reading this chapter, you should now have a working knowledge of the following branding components:
Best practices for branding and creating positive user experiences in SharePoint
SharePoint themes
Master pages and style sheets
Using SharePoint Designer for the modification of branding related files