
WHAT YOU WILL LEARN IN THIS CHAPTER:
The key activities related to a document library such as the creation, uploading, and updating of files
The core functionality available related to tracking unique versions of files
Features available within the various library templates in SharePoint 2010
In this chapter, you discover the magic behind document collaboration: the document library. Document libraries allow you to create, store, manage, and collaborate on documents. SharePoint has a variety of library templates, each designed to allow maximum efficiency when you work with particular types of documents. This chapter discusses the major elements of a document library and steps you through some of the different library templates and how you can use them to manage the documents crucial to business operations.
In Chapter 4, you will learn how to configure the properties and features of a document library to fit your business needs. This chapter focuses on interacting with document libraries that have been previously created or configured.
If you want to, you can think of a document library as a Windows file folder but better. Like folders, libraries act as document storage, but they also store the document's metadata or version history (more about these a little later), which folders do not. Also, Windows file folders lend themselves to user personalization in that they may stay on a user's drive or be labeled differently from another user's folder, which leads to inefficiency. You don't encounter this in libraries, which act as central stores, shared across an organization or team. SharePoint also offers collaboration features that go well beyond the traditional file-sharing techniques that you may have used in the past. Also, because SharePoint stores lists and libraries in a database rather than the file system, it is arguably more secure, more efficient, and enables more sophisticated document workflow and content management scenarios. Users are only able to see files that they have been granted access to which only exposes relevant files to their role and improves the ease by which information can be found.
Note
While we often refer to the storage of documents in SharePoint libraries, it is important to know that you can store a variety of file types, including presentations, images, forms, and spreadsheets. You can store virtually any file type in a SharePoint library as long as the file type has not been added to the Blocked File Types listing.
Metadata information: Document libraries have metadata columns for attaching information, such as document owner or status, to the document and, thus, tailoring it to your corporate practices. Metadata is useful for running searches on documents, which you learn more about in Chapter 17. Users with appropriate permissions can quickly and easily create extra metadata columns to describe the contents of a library. In fact, SharePoint document libraries offer many of the same features of lists that you explored in Chapter 2, such as rows, columns, and views.
Document protection: Documents in libraries are protected by a check-in and check-out feature, which ensures that only one user at a time can edit a document. Later in this chapter, you learn about the various methods available for working with documents in this manner.
Document history: Libraries keep a document audit trail, known as version history. This feature allows you to easily and quickly revert to a previously saved version of the document, directly from the browser. The version history feature will track changes that are made to the document's content as well as its metadata. Depending on which site template you are using, this feature may need to be enabled prior to its availability for use. The process for doing so is described later in this chapter.
Major and minor versions: While both lists and libraries support versioning of information, document libraries support minor and major versions. Major versions are published files that are accessible to all site users, whereas the minor versions are files in a draft state that typically only a document's author or members of an approver's group can access.
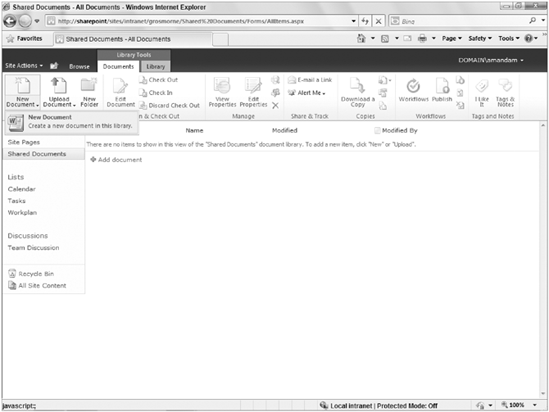
On the surface, a document library view page, shown in Figure 3-1, looks very similar to a list with a few additions, including:
Upload button: Located on the Ribbon, this button supports the uploading of single or multiple files to the library.
Open with Explorer button: Located on theRibbon, clicking this button will open the library in a Windows Explorer type folder. Using this option, you can drag and drop files into folders, delete multiple files at once, and create new folders the same way you would when interacting with a standard Windows file folder. This feature requires the use of Internet Explorer 7.0 or later.
Copies: Unique to the document library, this section of buttons provides you with the ability to interact with the document by downloading a copy of it, sending it to another location, creating a document workspace, or managing copies of the file within the system. We will cover these actions later in this chapter.
Both employees and organizations benefit from SharePoint libraries. Organizations commonly roll out SharePoint to help ensure that documents are stored in a secure system where access, versioning, templates, columns, and content are controlled. From a user's perspective, creating and managing documents in a library is a simple process. You start by creating a document that is based on the latest version of a template. You can also easily upload single or multiple files to a location that is shared by other members of your team.
This section has a series of Try It Outs that walk you through many of the actions available within document libraries. Before you start, however, you need to understand the various document templates, shown in the following table, that can be created by clicking the New button within a document library. The obvious purpose of these templates is to start with blank document or files; however, you can also create custom templates that help your company to maintain a consistent look and feel for common document types. For example, you can have a sales proposal presentation template that contains important elements, such as your company's name, logo, and website information on every slide. Associating this template with the sales team document library allows an account manager to launch a presentation containing these elements with a single click.
How It Works
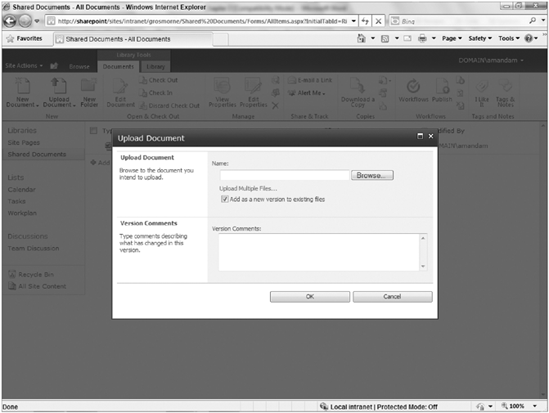
When you upload in step 4, you are presented with a standard file-open dialog box from which you can navigate to and select the file. After selecting your file and clicking OK, your document is transferred to the document library and, if applicable, you are prompted to enter any metadata that your document library requires. When uploading the file, you may have noticed the checkbox in Figure 3-2 to add the file as a new version to existing files. By selecting this box, any files that exist in the library that contain the same file name will be overwritten by the newly uploaded file. If version history is enabled in the library, the previous version of the file will be accessible through the version history.
TRY IT OUT: Upload Multiple Documents to a Document Library
The previous Try It Out works great if you only need to upload a single document to the document library. In the next example, we will review the process for uploading multiple files at once.
From the main page of your project team site, select the Shared Documents link from the side navigation bar.
Expand the Upload Document menu item and select the option to Upload Multiple Documents. The Upload Multiple Documents prompt will appear as shown in Figure 3-4.
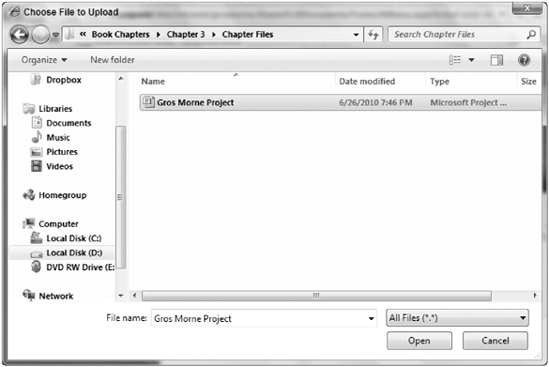
When uploading multiple files, you may drag and drop your files directly into the shaded area or click Browse for files instead hyperlink. In this example, you will click the hyperlink to browse to the location of the resources for this chapter.
Select the Project Charter, GrosMorneProject, and Project Budget files from the chapter resources and click Open. To select multiple files at once, you can hold down the Ctrl key while selecting each file.
Click OK to upload your documents.
Your progress will be displayed as shown in Figure 3-5. Click Done to complete the process.
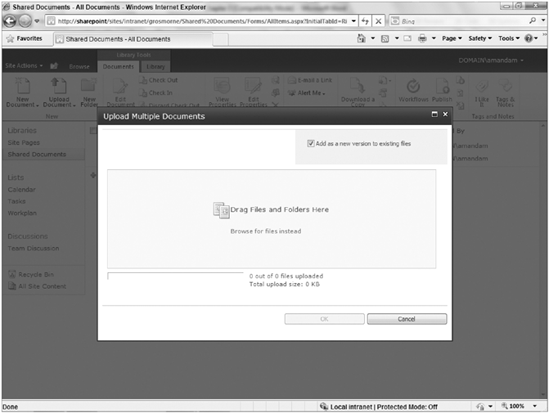
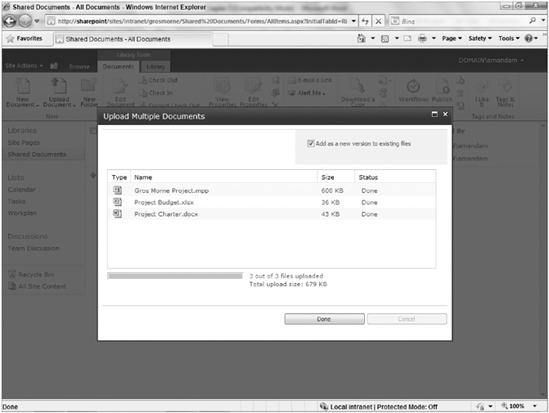
The default setting when you upload multiple files is to overwrite any files that already have the same name. You can change this by deselecting the Overwrite Existing Files checkbox. If you do wish to overwrite the existing files with a new version of the file, you leave the file selected. As a result, the project plan uploaded in the last Try It Out is overwritten by the copy you upload in this exercise.
TRY IT OUT: Edit a Document Library View in Datasheet Mode
One important thing to remember when uploading files in bulk is that you are not prompted to complete the metadata for each item. Incomplete metadata can negatively impact searches that users perform to locate your documents. If you have to meet a deadline and can't fill in metadata information during the upload, remember to return to the library afterward and do so. The most efficient way to update multiple items at once is to use the Edit in Datasheet command. This command, which is shown in the following steps, allows you to update document metadata in a manner similar to updating a spreadsheet in Excel.
From the main page of your project team site, select the Shared Documents link from the side navigation bar.
Select the Library tab from the Ribbon.
Select the Datasheet view.
Update columns as necessary. An example of how this could look in a customized library with metadata is shown in Figure 3-6.
Note
We will review adding metadata to lists and libraries in Chapter 4. On your current team site, you may not have any metadata available yet to update.
When changes are complete, you can click Standard View from the Library tab of the Ribbon to return to the original view.

How It Works
In this example, you temporarily changed a standard document library view to a datasheet view. This allows updates to be made to the metadata associated with all documents within your document library. Editing a datasheet view is very similar to completing information within a spreadsheet application and is, therefore, ideal for occasions where a team member must update metadata in bulk. While you can create views that are always in datasheet mode, you can edit any standard list view in datasheet mode as shown here.
You now know how to create documents within your libraries as well as how to upload documents and update the metadata associated with them. Next is to understand how to update documents that are already in a library.
Your document's lifecycle will probably require you to perform updates and edits over time. You can quickly open and edit any document inside its document library via either of the following methods:
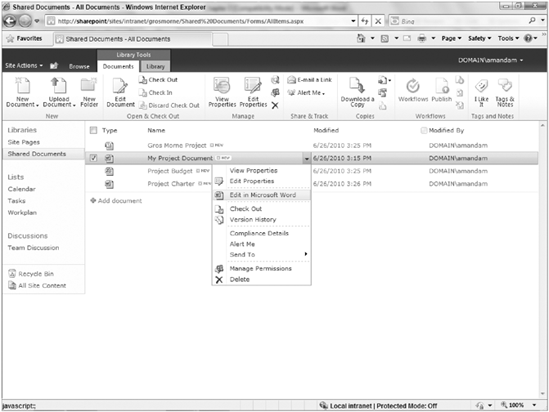
Via the contextual menu: Hover over an item in a library to expose a contextual menu and then select the down arrow. Select Edit in Microsoft Word (or other application if applicable) from the list of menu options, as shown in Figure 3-7. You have several other options, such as Edit Properties, which edits the metadata, or View Properties, where you can view additional information associated with the document.
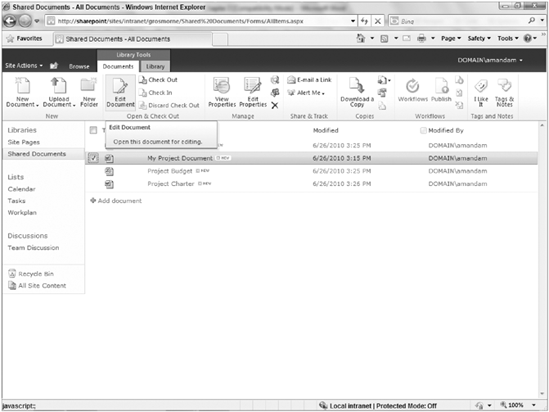
Select an item in a document library and click the Edit Document item from the Ribbon as shown in Figure 3-8. The associated application opens so you can begin editing.
Obviously, the collaborating often requires that people work on the same document; however, this can lead to version conflict. For example, if you work on a document but leave the office for an extended period of time, another user can make changes to your document that conflict with your version or upload an older version of the document that could lead to confusion or lost work. When you resume your work, you definitely will notice changes but not necessarily know why or how the document was changed.
To minimize frustration, instead of directly editing the document via the contextual menu or from the document library, you can select the Check In/Check Out options beforehand. Checking out a document locks it so that others can view the last published version but cannot edit it or upload a version of the document, until you check the document back in.
The next three Try It Outs cover how to check out and check in a document, either from the SharePoint library or from an Office application, such as Word. The Check In/Check Out feature has the added benefit of allowing you to work offline while the file is in the checked-out stage. This means you can perform changes away from the office and these changes will be placed in the library when you check the document back in. In the last Try It Out, you learn how to send your colleagues notification so that they're aware of the changes you've made to a document.
Note
SharePoint's Check In/Check Out feature is controlled as part of library versioning. To configure and customize the settings for this feature, see Chapter 4.
TRY IT OUT: Check Out a Document
Checking out a document greatly reduces the chances of version conflicts because only one person can make changes to the document at a time. When a document is checked out, only the user who checked it out can edit the document. The following example shows you how to check out an item from a document library.
From the main page of your project team site, select the Shared Documents link from the side navigation bar.
Select the checkbox to the left of My Project Document. This will select the file and enable specific features that will be available for interacting with this document on the Ribbon.
Select the Check Out option from the Documents tab of the Ribbon. You receive a message informing you that you are about to check out a document, as shown in Figure 3-9.
Do not select the Use my local drafts folder checkbox.
Click OK to check the document out. The document icon to the left of the document name changes to a document with a green arrow next to it, as shown in Figure 3-10.

How It Works
When you check a document out from a library, it becomes locked and reserved to you for editing. Other members of your team may still open the file; however, they will be unable to make changes to it. When other team members view the document, they will not see the changes you are making until the document has been checked into the library again.
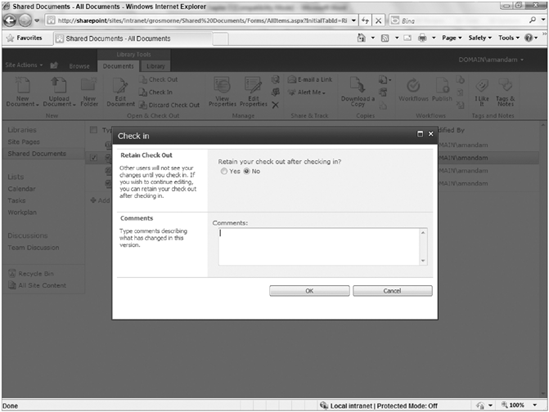
TRY IT OUT: Check In a Document
After you make changes to your checked-out document, you need to check it back in. This creates a new version, complete with your changes, and makes the document available for others to check out. The check-in process is very similar to the check-out process, but you have the additional option of checking in changes while keeping the document checked out. This means that others can see changes you've made so far but that you can continue working on the document. It is best practice to include comments when checking a document in so that others understand what changes you made. Comments are visible in the version history, which makes tracking down problems easier in the future. The following steps show this process:
From the Shared Documents library, select the checkbox to the left of My Project Document.
Select the Check In option from the Documents tab of the Ribbon. You receive a message informing you that you are about to check in a document, as shown in Figure 3-11.
Select No for the option to Retain your check out after checking in. This is the default selection.
Enter notes into the comments field to describe the changes you made to the document.
Click OK to complete the check-in process.
TRY IT OUT: Check In a Document from a Microsoft Office Application
If you are editing a document with Microsoft Office Word, instead of saving your changes, closing the document, going back to the browser and checking in your document, you can check the document back in straight from the application to cut out some steps. This functionality is only available in Microsoft Office 2007 client applications or later. All other applications and previous versions of Microsoft Office require you to check in the document using the SharePoint interface via the browser.
The following steps show you how to check in a document using Word, but they are similar to when you would check in a document in Excel or PowerPoint. Before you perform these steps, you should check out the My Project Document from your Shared Documents library following the steps described in a previous Try It Out. Checking a document in using the Microsoft Office Word client application has the same effect as checking it in via the browser (shown in the last Try It Out).
From the Shared Documents library, select the checkbox to the left of My Project Document.
Select the Edit Document option from the Documents tab of the Ribbon.
You will receive a prompt to confirm that you wish to open the document. Click OK to continue.
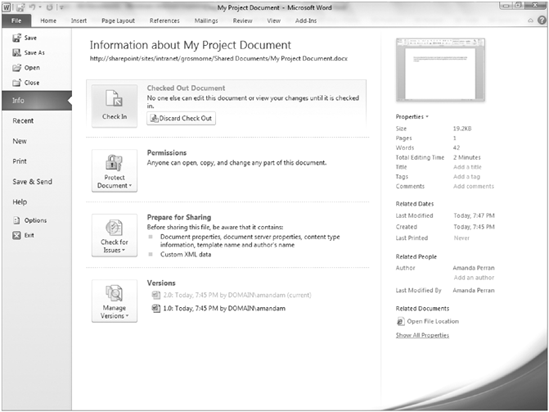
Make the desired changes to your document. You may need to click the Edit button that appears at the top of your document to enable edit mode. When it is complete, switch to the File tab of the Ribbon, as shown in Figure 3-12.
Click the Check In option.
Enter comments describing the changes made to the document, and click OK.
Close the document. Your file is now checked back into the library, and your latest changes are available to members of your team.
TRY IT OUT: Work Offline on a SharePoint Document
To this point, the Try It Outs in this section have dealt with checking a document in or out and working with it on a computer that is connected to a network. As mentioned previously, you have the option of checking out a document and working offline by saving it to your local drafts folder, which is automatically created the first time you check out and save a document. SharePoint creates a physical copy that you can edit away from the office. When you check a document back in via the browser or through Microsoft Word using the steps shown in the previous Try It Outs, the offline copy of the document is synchronized with and uploaded to the document library so that your changes become available to team members.
Note
SharePoint 2010 has multiple methods for working offline with content, including connecting a list library to Microsoft Outlook as shown in Chapter 2 or connecting to an entire library or site using Microsoft SharePoint Workspace. We will review connecting a document library in SharePoint workspace in the next Try It Out.
From the Shared Documents library, select the checkbox to the left of My Project Document.
Select the Check Out option from the Documents tab of the Ribbon. You receive a message informing you that you are about to check out a document.
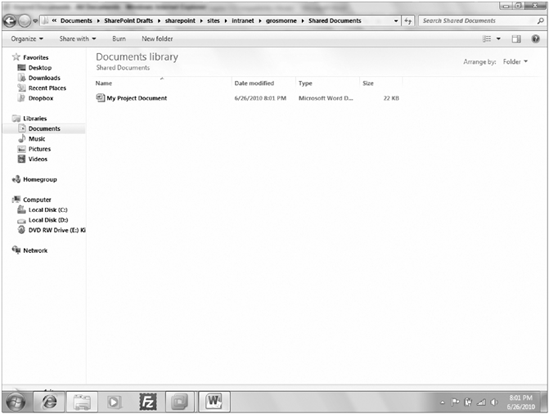
Select the Use my local drafts folder checkbox.
Click OK to check the document out. The document is downloaded to a SharePoint Drafts folder located within the Documents folder of your computer, as shown in Figure 3-13.
TRY IT OUT: Connect to a Document Library with SharePoint Workspace
In addition to the method described previously for working offline on a single document, you may elect to connect an entire library to your computer through Microsoft SharePoint Workspace, a client application that synchronizes with SharePoint. In the following example, you will connect your Shared Documents library from your project team site to SharePoint Workspace.
Note
You must have the SharePoint Workspace client installed on your computer to complete this exercise.
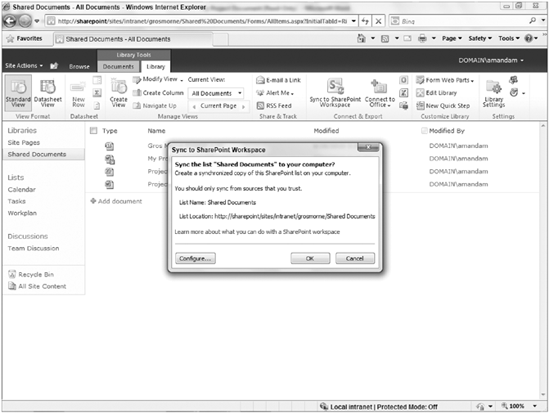
From the Shared Documents library, click the Library tab on the Ribbon.
Select the Sync to SharePoint Workspace menu option. The SharePoint Workspace application will open.
Note
If this is the first time you are using SharePoint Workspace, you will be required to create a new account. This process will just take a few minutes, and you will be asked to provide your name and email address.
The sync to SharePoint workspace dialog will appear as shown in Figure 3-14. Click the OK button to confirm that you wish to complete the operations.
A synchronization window will appear showing the progress as documents are downloaded from your library for the first time. When the operation has completed, click the Open Workspace link.
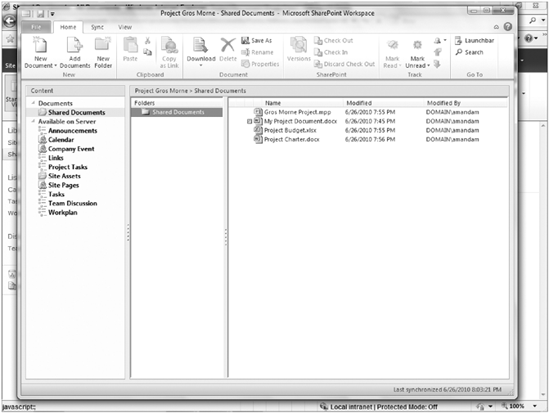
SharePoint Workspace will launch a window displaying all the documents from your document library, as shown in Figure 3-15.
How It Works
Once a document library has been synchronized with SharePoint Workspace, you will have the ability to interact and edit the documents as if you were in the browser. Activities such as Checking Out, Checking In and Editing a Document are available within the SharePoint Workspace Ribbon. In addition, new files can be created and added using this application. You may make these changes remotely while not connected to the network and changes will be automatically synchronized back to the SharePoint document library the next time you launch the application while connected to the network.
You may notice in Figure 3-15, that other lists and libraries from your site are listed in the side panel. You may also right-click on each of these to open the lists or libraries from the site within SharePoint Workspace or the browser.
TRY IT OUT: Send an Email Link of a Document to Others
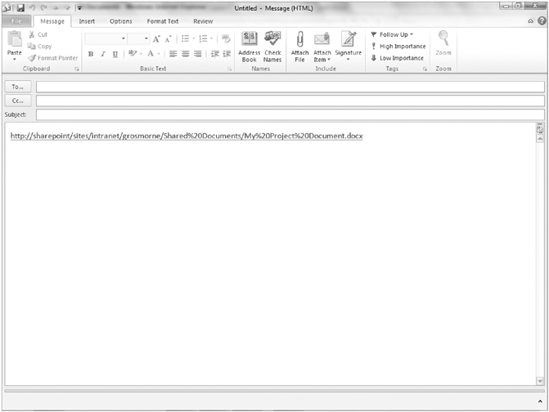
After uploading or updating a document, you commonly want to share your changes with other team members so that they may review, collaborate, or make their own changes. In the past, this involved opening your email, writing a detailed message to your coworkers informing them of your intention to share a document, attaching the document, and finally sending it. Unfortunately, attaching a document can lead to duplicate files because team members tend to save versions of the document from the email message to their desktop or local drive. This, of course, makes change management and document control very difficult.
SharePoint bypasses this confusion by allowing you to send an email with a link that directs colleagues to your document on the library. This informs team members of your updates without removing the file from the document management system.
From the Shared Documents library, select your My Project Document file and click the Documents tab of the Ribbon.
Select the Email a Link menu option.
Your email client will launch. A prepopulated email with a link to your document will appear, as shown in Figure 3-16.
Fill in the email addresses to which you want to send the link.
Fill in the subject and a brief message.
Click Send.
Imagine working all night on a document and saving your changes to your team's collaborative location, only to have a team member overwrite your document with an older version of the document. For a collaborative team, multiple versions of a single document or overwritten files can translate into lost work and frustration. That's why most organizations implement a document audit trail, which helps users understand when changes were made and why. SharePoint's Version History option allows you to view this trail as well as restore previous versions if you catch errors or omissions in the active version. If versions after a certain date are in doubt, you can restore the document to point where you know the information is accurate and relevant. In addition, having a version history can help organizations identify exactly what a document looked like at an exact point in time.
In the upcoming exercises, you learn how to enable version history tracking on a library and how to view the version history related to a document and optionally restore a previous version of a document as the active version.
Note
In Chapter 4, you will learn how you can customize version history settings of a document library.
TRY IT OUT: Enable Version History Tracking on a Document Library
Some libraries may now have version history tracking enabled upon creation. Therefore, a user with permissions to manage the list will be required to enable this setting. In the case of the Gros Morne Project site, because it was created based on the Team Site template, the Shared Documents library must be configured to track version history.
From the Shared Documents library, click the Library tab on the Ribbon.
Select the Library Settings menu option. You will be redirected to a page where all the settings related to the Shared Documents library are managed.
Note
We will explore the settings displayed on this page in greater detail in Chapter 4.
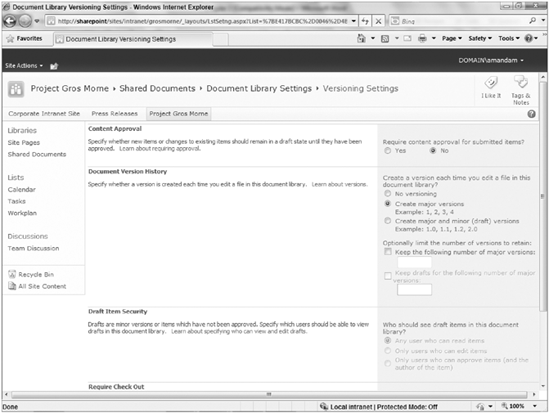
Select the Versioning settings link. The Version settings page will appear.
Select the option to Create major versions, as shown in Figure 3-17.
Click OK. You will be returned to the Shared Documents library settings page. Click Shared Documents from the side navigation or breadcrumb menu to return to the library.
Now that your library has been configured to track version history, it is recommended that you make multiple edits to your My Project Document file and add comments upon check in prior to completing the next exercise.
TRY IT OUT: Review a Document's Version History
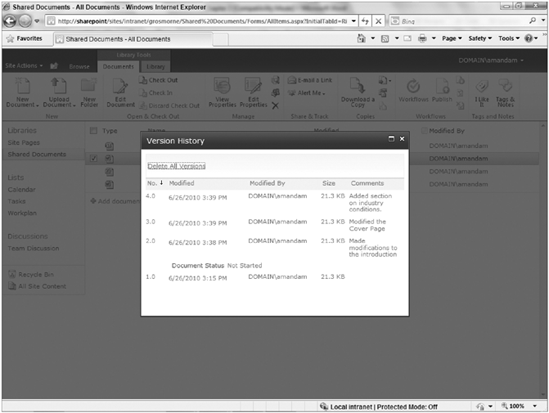
SharePoint updates a document's version history each time a user changes or saves the document. Imagine that while you were away from the office someone made changes to your document that you either were not satisfied with or wanted clarification on. You can visit the version history of the document and review the various versions and associated comments to determine what changes were made. In addition, you may find it useful to review versions of a document to find out what information was published and is available to users of the SharePoint site or via the File tab of the Ribbon menu of your document.
From the Shared Documents library, click the Documents tab of the Ribbon.
Select your My Project Document file.
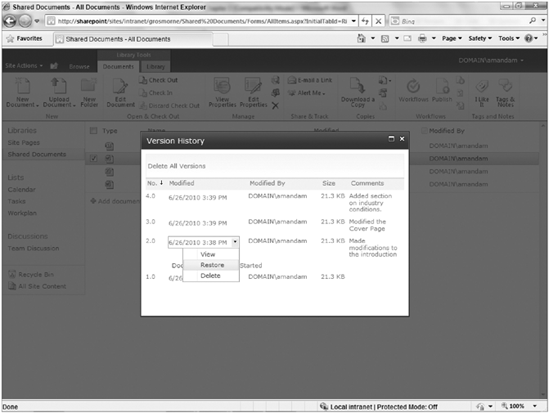
Select the Version History option from the Document tab of the Ribbon. The Version History window will appear as shown in Figure 3-18.
Click on the date and time of a version to preview it. The version of the document will open for you to review in the associated application.
TRY IT OUT: Restore a Previous Version of a Document
When multiple team members work on a document, on occasion they may need to revert to a previous version of the document. This may be necessary because unwanted changes were made or just to perform a what-if analysis to see how changes impact a report. With SharePoint, you can easily follow a document's entire version history and, if need be, restore a previous version of the document by following these steps.
From your My Project Document's Version History window, hover over a previous version to expose the actions menu, as shown in Figure 3-19.
Select the Restore option from the menu. You are prompted with a message informing you that you are about to replace the current version of the document with the one you have selected.
Click OK.
How It Works
When you restore a previous version of a document, the document reverts to reflect that state of the document, and it becomes the new current version of the document. The restoration of a document does not overwrite or delete previous versions. Instead, it creates a completely new version within the library. For example, if you view a listing of a document's versions, you may see that there are five versions of the document. If you were to restore version 2.0, then a new version would be created called 6.0. All previous versions would remain unaffected.
So far this chapter has generically referred to libraries as document libraries. However, SharePoint actually has various library types, just as it has multiple varieties of lists. Libraries are generally defined by what you place in them. Once you create your library from the appropriate template, you can have others access the library and add content to it. Chapter 4 shows how to create and customize new lists and libraries; however, in this section, you learn about the features and functions of each so that you select the proper library for your team. The SharePoint library templates are described in the following list:
Document libraries: This library stores the majority of documents and files in a SharePoint site and is the most common type of document library created.
Form libraries: You use this template to create libraries that store InfoPath form data and templates. You may use this to store submitted forms, such as purchase requests or status reports created using the Microsoft InfoPath client application or Forms Services.
We will review this library and InfoPath in greater detail in Chapter 12.
Wiki page libraries: You use this kind of library for wiki pages, which are collaborative web pages that teams use to share information in a highly interactive and less structured environment. This is perfect for storing a knowledge base or FAQ section.
Picture libraries: This library is for sharing photos and images in a collaborative environment. This library uses columns and properties to define images, and has special thumbnail views of the stored files. It's ideal for storing team member photos or your company's logos.
Asset libraries: This library is for sharing rich media assets such as images, audio, and video. When an asset library is created, it is preconfigured with metadata and settings required for sharing rich media files.
Slide libraries: You use this library to share PowerPoint presentation slides. Users can upload slides to the library so that other users can browse for slides and use them in new presentations. This template works well for teams that are responsible for creating presentations and want a central gallery from which to select the latest slides and information.
Data connection libraries: These libraries store trusted data connection information that link SharePoint with documents created using InfoPath or Excel. We will explore this library type further in Chapter 12 and 16.
Report library: This specialized template creates libraries that store spreadsheets and dashboards as part of the business intelligence capabilities of SharePoint Server 2010. You would use this template to create a location for reporting that would allow business managers to publish spreadsheets to others that could be viewed via the browser and that would hide any protected information from users. This type of library will be discussed in Chapter 16 along with business intelligence, because this template type is specific to that feature of SharePoint.
Document libraries can store just about any kind of file and are at the center of SharePoint's file-sharing and collaboration features. The anatomy of a document library is very similar to a list and includes the following elements:
File Item: From Chapter 2, you know that the primary element of a list is an item. Likewise, the primary element of a document library is a file. Most organizations collaborate using Microsoft Office documents (Word, Excel, and PowerPoint) or other common formats, such as PDF, HTML, or JPEG. Document libraries support just about any file type, assuming that an administrator has not explicitly blocked it.
Columns: The column types available for lists are also available for document libraries. Depending on what template you select, certain columns may already be created for you. Most libraries share a common set of columns; however, special templates, such as the image library and assets library, contain additional columns such as image size and copyright. You can create additional columns at any time if you have the appropriate rights to the site.
Note
You can find out how to add new columns to a library in Chapter 4.
Views: Similar to lists, document libraries display their items in views. The default view for a document library is the All Documents view, which shows all documents stored within the library in groups of 30 in the following columns:
Document Type: Displays an icon representing the document's file type.
Name: The file name of the document.
Modified: The date and time the document was last modified.
Modified By: The name of the user that last modified the document linked directly to their user profile or MySite.
Note
Users with the appropriate rights can create custom views at any time. This activity will be explored in Chapter 4.
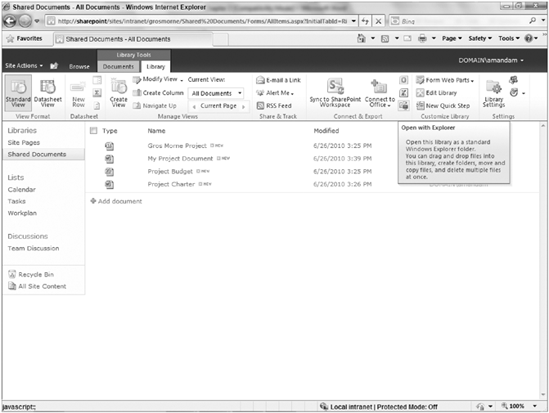
TRY IT OUT: Open a Document Library in Windows Explorer
In addition to the All Documents view, you can open a document library in Windows Explorer via the Ribbon. This allows you to interact with your library with the usual Windows behaviors, including dragging and dropping content. In the following example, you open a Shared Documents library in Windows Explorer and create a new folder within it called Project Documentation. Instead of creating a new folder and uploading the documents via the SharePoint browser interface, you open the document library in a Windows Explorer view and create a new folder. You then move the existing files into the folder in the same manner you would if you were working in a folder on your computer.
From the main page of your team site, click the Shared Documents link on the side navigation bar.
Select the Open with Explorer menu option.
A new window opens listing the entire contents of your Shared Documents library in a Windows Explorer view, as shown in Figure 3-20. Right-click the window and create a new folder called Project Documentation.
Select the files you have created in the Shared Documents library and drag them into the Project Documentation folder.
Form libraries are special types of libraries that store InfoPath forms. Microsoft InfoPath is an application that allows you to collect and share data via highly customizable electronic forms. You can use this application to create form templates that reflect their data collection needs without requiring code or special development skills. The application makes it very easy for business users to craft an electronic form that suits their needs by dragging and dropping form elements onto a page. Users can complete InfoPath forms using either the InfoPath application or via the browser using the Enterprise Edition of SharePoint Server 2010.
You can promote data stored in InfoPath forms to the library so that you display the data in views. This gives you more advanced reporting options on the data contained in multiple forms. You might find it advantageous, for example, to create an InfoPath form to collect data from your portal users instead of using standard list functionality because with InfoPath, you can do the following:
Connect to external data sources such as databases, SharePoint lists, or web services to either retrieve or submit data
Customize the interface in ways not possible using standard lists via the browser
Use code to extend forms to provide additional functionality and enhancements related to more complex data calculations or routing
We will explore InfoPath forms and the libraries they are stored in in Chapter 12.
With wikis, a very popular collaborative tool for group sharing and editing content, you can add, edit, or remove web page content in an open and informal manner without following a restrictive editing or approval process. Users can edit wikis using SharePoint's built-in content editor without knowing a special language. Because of the informality and lack of restriction, wiki pages are a more inviting way for team members to record their experiences and goals.
SharePoint has an option for creating either an entire site to act as a wiki or just a wiki document library within a site:
A wiki site: Useful for a technical support team's knowledge base or a training department's tips and tricks documentation. Any collaborative site in SharePoint can be transitioned into a wiki site using a special feature that transforms the main page of the site into a wiki page. We will review wiki sites further in Chapter 8.
A wiki document library: Provides collaboration tool for planning and sharing ideas around specific operational events. This is illustrated in the next Try It Out.
The next two Try It Outs show how to create a wiki document library as well as how to create a new wiki page.
TRY IT OUT: Create a Wiki Library
In this example, you create a wiki document library in your site to brainstorm for ideas for your project. The wiki page library has special features that allow you to share and publish wiki content pages within a single location. Team members can create these pages around a specific topic or set of topics.
From the main page of your team site, select the All Site Content link from the side navigation bar.
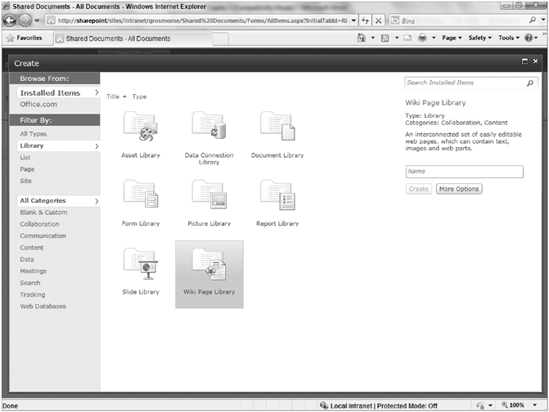
Click Create. A window will appear listing the various templates available to create lists and libraries from.
Filter the listing by selecting the Library link from the left side of the window.
Select Wiki Page Library from the list of Library types, as shown in Figure 3-21.
Click the More Options button.
Enter a name and description for the library. For this example, enter Project Wiki for the name and the following for the description:
This wiki will be used to track information related to initial planning around scope, milestones, and timelines related to the Gros Morne project.
Click Yes to display the library on the site's Quick Launch navigation bar.
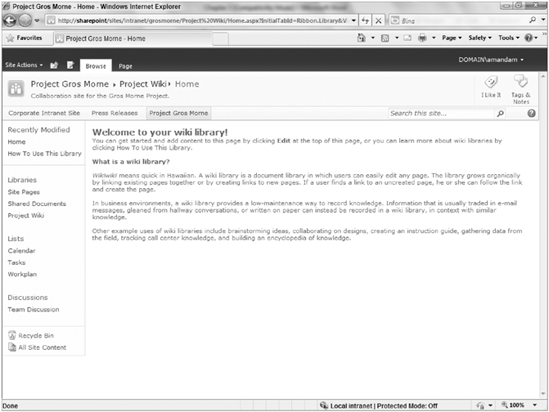
Click Create. The wiki library will be created and you will be redirected to the home wiki page, as shown in Figure 3-22.
TRY IT OUT: Create a Wiki Page
In addition to editing existing content, users can create new pages. The following example demonstrates how easily you can create new wiki pages within a wiki library so that team members can share information about what they have learned regarding a common topic, such as a new technology (SharePoint). In addition, members can leave notes on topics they would like to learn more about as an invitation for others to provide content.
From the main page of your team site, select Project Wiki from the side navigation bar.
Select the Page tab of the Ribbon.
Click the Edit menu option.
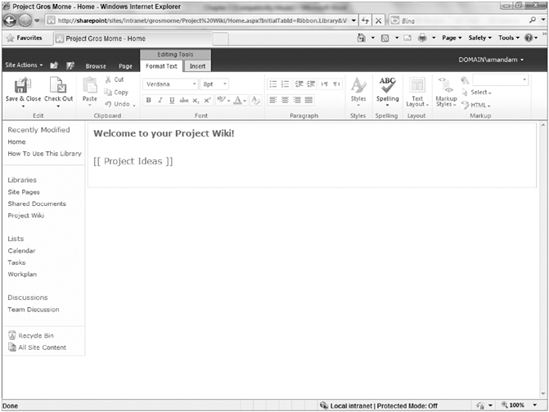
Remove the existing content from the page and add a Welcome to Your Project Wiki heading.
Below the welcome message, type the words Project Ideas between two square brackets on each side of the phrase, as shown in Figure 3-23.
Click the Save and Close menu option.
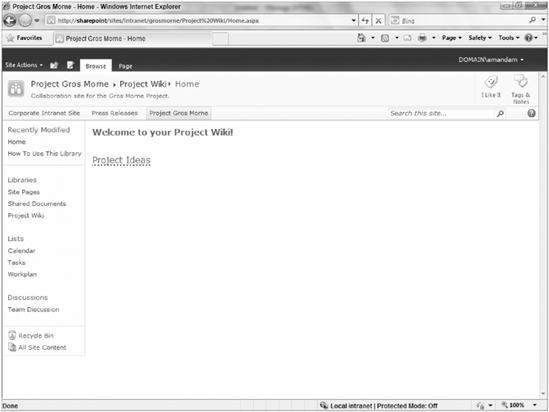
The page will refresh and the Project Ideas phrase will be displayed as a link with a dashed line underneath as shown in Figure 3-24. Click the link.
A dialog will appear stating that the page does not exist. Click Create to create the new page in the wiki page library.
You will be redirected to your new page. Add content as necessary, and when you have finished, add the word home in between the double brackets shown at the top of the page in Figure 3-23.
Click the Save and Close menu option.
When the page refreshes, you will see that the word home now appears as a link and by clicking it, you can return to the home page of your wiki library.
How It Works
Wiki pages are both easy to edit and simple to create. New pages can be created on the fly by putting the name of the page in between double square brackets as follows:
[[ page name ]]
To link to an existing page, the same technique can be used by placing the name of the existing page between the square brackets.
Although document libraries can store just about any file type, in some cases it's better to have a library that caters to a specific file format. Such is the case with the Picture Library template, which efficiently displays pictures and images because it includes a thumbnail preview feature. This is an invaluable feature for locating the correct image in a large collection of images.
This next series of Try It Outs demonstrates the features that make the Picture library unique. In the first Try It Out, you create a picture library using the Picture Library template. In the second Try It Out, you upload pictures into the newly created library to simulate a person sharing images with his or her team. In doing so, you will see first-hand the unique commands it offers in its menu. These commands are listed in the following table.
MENU ITEM | DESCRIPTION |
|---|---|
Edits the selected images in a compatible editing tool | |
Delete | Deletes the selected images from the picture library |
Download | Downloads all selected images to the user's computer |
Inserts pictures into an email or document | |
Opens a new window displaying a slide show of images within library |
In the third Try It Out, you act as someone taking images from the library. You download files and see the picture library's unique options. When you download a file, you can change the size of your image. You can also change its format to one of the following:
You can also apply one of three subviews of a primary view. These subviews are:
Details: This updates metadata associated with a file stored in a picture library.
Thumbnails: You can use this to preview images in a thumbnail type view.
Filmstrip: This view previews a larger version of the image within the browser window.
TRY IT OUT: Create a Picture Library
From the main page of your team site, click the All Site Content link from the side navigation bar.
Click Create. A window will appear listing the various templates available to create lists and libraries from.
Filter the listing by clicking the Library link on the left side of the window.
Select Picture Library from the list of Library types.
Enter Project Pictures for the Library name.
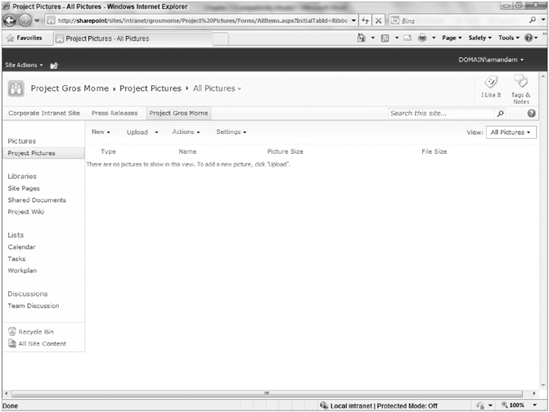
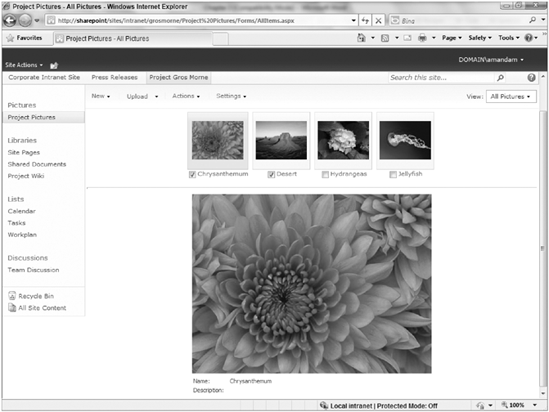
Click Create. The picture library will be created, and you will be redirected to the default view of the library, as shown in Figure 3-25.
TRY IT OUT: Upload Multiple Images to a Picture Library
When you uploaded the files in the Try It Out "Upload Multiple Documents to a Document Library," you used the browser interface. The interface you use in this Try It Out has unique functionality for managing images. You can either upload web-optimized versions of the images or upload the files in their original format. Once the files are uploaded, you can return to your library to view the images.
To identify the differences between the Picture template and the standard document library, the following steps have you upload some images into the newly created library.
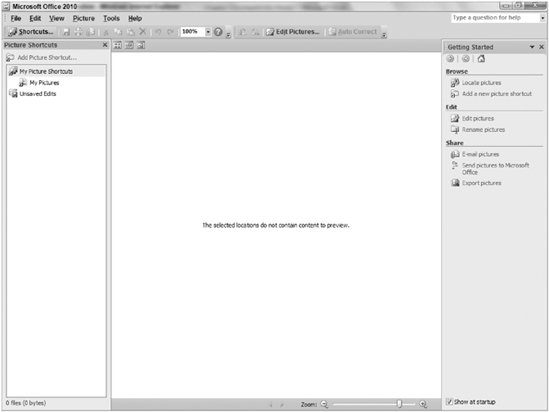
From the Project Pictures library, select Upload Multiple Pictures from the Upload toolbar menu. The Microsoft Office Picture Manager opens, as shown in Figure 3-26
Select Add Picture Shortcut, and browse to the Project Images folder you downloaded as part of this chapter's resource materials.
When the correct folder is selected, click the Add button.
Select all the images from the folder. You can select multiple items by holding down the Ctrl button while you select items.
Click the Upload and Close button located at the top of the application window.
The Office Picture Manager application will close. Select the Go Back to "Project Pictures" link to return to your image library.
How It Works
Although this library may look like all other document libraries you've created so far in this chapter, take a close look at the Actions menu shown in Figure 3-27. On this menu, you will notice the links described in the table at the beginning of this section. Take some time to interact with each of the actions to become familiar with what they can do.
TRY IT OUT: Download Pictures from a Picture Library
To demonstrate how the various picture library menu items work, the next example shows you how to select multiple images from a picture library for downloading. In the previous Try It Out, files in the SharePoint library were in the JPEG format. However, when you select the advanced download options in this Try It Out, you can change the format of the downloaded images. You could have kept the file in its original format or you could have selected another format. The various formats were discussed in the introduction to this section. In addition, you can select a different size for the files and send them to a document instead of downloading them directly as files to your computer. Finally, you can apply subviews to the primary view of your download.
From the Project Pictures library, select the first two images in the list.
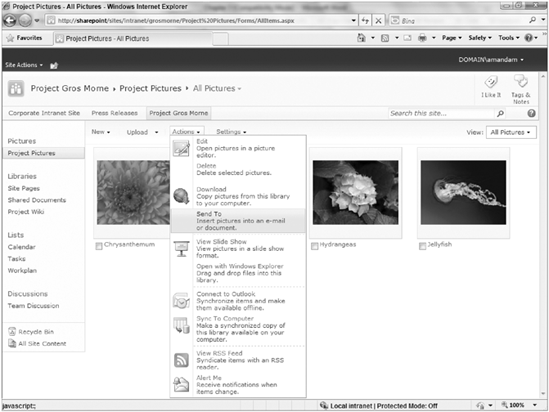
Select the Download option from the Actions menu. You will be redirected to a page displaying the selected files, as shown in Figure 3-28.
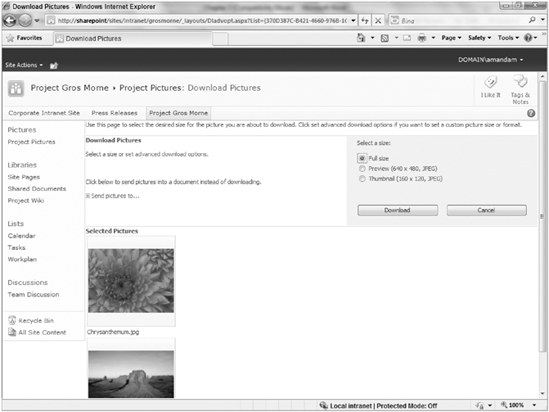
Click the set advanced download options link.
From the File Format drop-down menu, select Graphic Interchange Format (*.gif).
For the picture size, select custom width and height and specify 640 × 480. This may already be the default value.
Click the Download button. The Download Pictures window, shown in Figure 3-29, appears, prompting you for a location for the images.
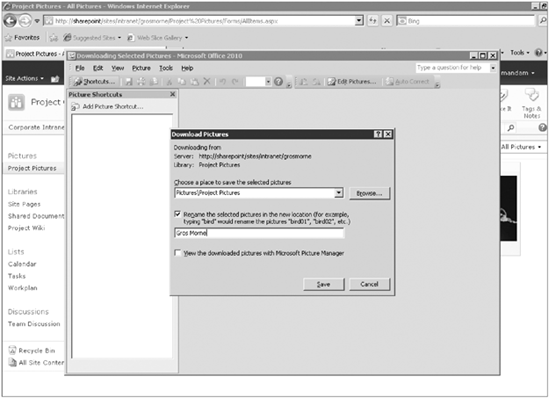
Select a folder on your computer to store the files in.
Check the checkbox to rename the pictures in the new location and enter a name for the picture. For this example, you can enter Gros Morne for the name.
Click Save.
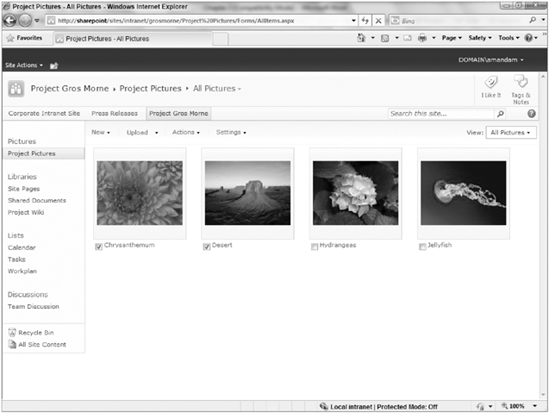
To apply subviews to a primary view, hover your cursor over the All Pictures view in the View Selection box and click Details to update the metadata associated with the image, click Thumbnails to see a preview of the image, as shown in Figure 3-30, or click Filmstrip to preview a larger version of the image in the browser window, as shown in Figure 3-31.
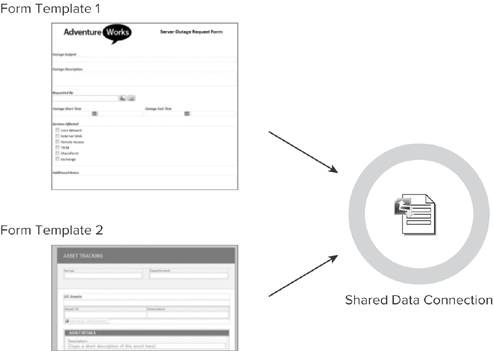
Microsoft Office applications, such as Excel and InfoPath, have great built-in support for data connectivity to external sources such as databases, web services, and even SharePoint sites. Traditionally, this meant that you managed data connections on an individual usage basis. Therefore, every time you connected to the data source, you needed to define the connection within the file or settings. This often made it very cumbersome to embed external data into files and subsequently make changes to the data source or file. For example, it might seem logical to use a SharePoint customer list in your InfoPath forms any time that you wanted to display a listing of customer names. To do this, however, you would need to create a data connection within your form template each time you wanted to include customer information.
If you later decided to move your SharePoint list to another location or add new columns, in order to have the changes updated within your InfoPath form, you would have to go back into each form template and update the settings.
Data connection libraries solve the cumbersome connection dilemma of how to deal with past versions by allowing you to create data connection files. These Universal Data Connection (UDC) files contain all the connection settings applicable to the data source and usage scenario. Therefore, instead of specifying the connection settings in each of your form templates, you save the connection settings as a file and have your form templates point directly to this file, as shown in Figure 3-32. When you do this, making changes to a single file updates multiple templates.
Note
In Chapters 12 and 16, you work in greater detail with data connections. These chapters have specific examples of how beneficial data connection files can be and how you can store them centrally in a data connection library.
Because PowerPoint presentations are a common way for members of an organization to communicate, companies generally produce, deliver, and store presentations in large quantities. Unfortunately, the sheer quantity can cause the following issues:
Duplicated work: Because individuals are seldom aware of a fellow colleague's work, there is very little reuse of information.
Outdated material: Duplicated material across many locations means that an individual is more likely to grab an outdated presentation or present the wrong version of a presentation. This can lead to miscommunication of objectives or performance.
Inconsistent presentation: Depending who creates a presentation and what their interpretation of the content is, an organization may encounter company-wide inconsistencies in how data is presented to customers, partners, and other important stakeholders.
For these reasons, many organizations try to standardize how information is presented. SharePoint offers a unique method for consolidating presentation information that encourages users to share slide content.
The slide library template in SharePoint allows authors to upload slides to a library where other team members can view them. The following Try It Outs show you how to address these issues and, by doing so, help reduce duplicate efforts while protecting the quality and integrity of your organization's presentations. First, you learn how to upload a presentation to a slide library. You next create a new presentation in the library, and then update a presentation to incorporate corrections to a source slide.
TRY IT OUT: Create a Slide Library
From the main page of your team site, click the All Site Content link from the side navigation bar.
Click Create. A window will appear, listing the various templates available to create lists and libraries from.
Filter the listing by clicking the Library link on the left side of the window.
Select Slide Library from the list of Library types.
Click Create.
Enter Project Slides for the Library name and the following text for the description:
A consolidated library containing all presentation content related to our project.
Click Yes to create a version each time you edit a file in this slide library.
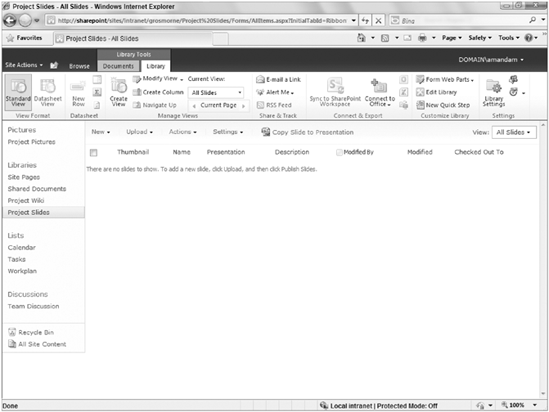
Click Create. Your new library will be created, and you will be redirected to the default view, as shown in Figure 3-33.
TRY IT OUT: Upload a Presentation to a Slide Library
In the following example, you upload a presentation to a slide library so that it can be converted to individual slides that other team members can use.
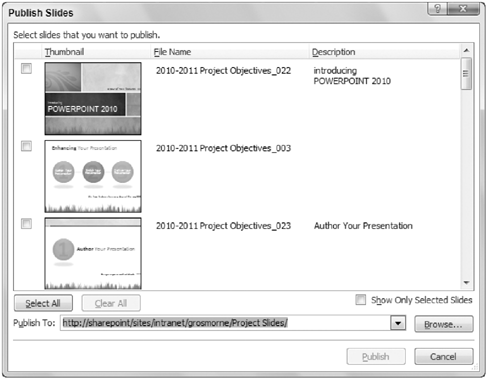
From the Project Slides library, select Publish Slides from the Upload Menu.
Locate the presentation named "2010-2011Project Objectives" from the downloaded resources for this chapter (these are located on
www.wrox.com), and click Open. The PowerPoint application will open. A publishing window, shown on Figure 3-34, lists all the slides available for upload from the selected presentation.Click the Select All button and click the Publish button.
Your slides will be published to the Project Slides library, and when the process is complete will look similar to Figure 3-35.
How It Works
This process is noticeably different from uploading a standard document to a document library because slide libraries can accept individual slides rather than a complete presentation. Although this exercise had you upload all the slides in a presentation, the interface that appeared in step 2 during the upload process allows you to select individual slides. Once you click the Publish button in step 3, a status bar indicates where you are in the upload process. Depending on how many slides you've selected, this process may take a few minutes.
While each slide of the presentation contains a metadata field from the original presentation, you can treat them as individual files. In fact, the next example shows you how to create a new presentation based on slides in your library.

TRY IT OUT: Create a Presentation from a Slide Library
You can create a new presentation using slides from multiple presentations. This example shows how to create a new presentation based on the slides available in a slide library. In addition to creating a new presentation, you can add slides to an existing presentation. This is ideal for a situation where you are creating a new presentation and you want to add a slide to represent content that has been used previously in a presentation or perhaps want to present content from a standardized slide.
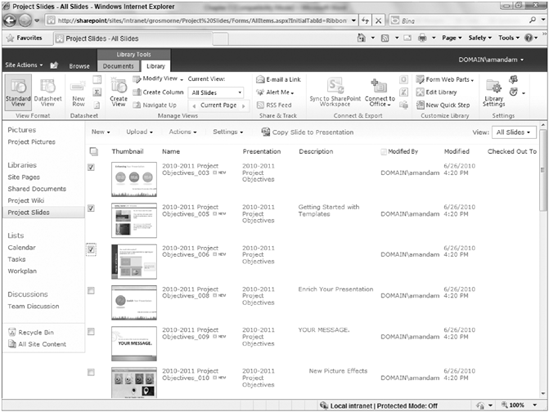
From the Project Slides library, select the first, second, and third slides from the library's All Slides view, as shown in Figure 3-36.
Click the Copy Slide to Presentation toolbar button.
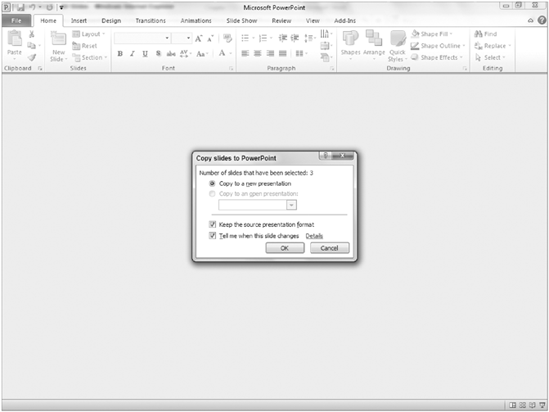
Select Copy to a New Presentation.
Select Keep Source Presentation Format. This will retain the formatting and background styles of your existing presentation.
Select the Tell me when this slide changes option, as shown in Figure 3-37.
Click the OK button. A new presentation will open in PowerPoint, containing the slides you had selected.
How It Works
In Step 5, you selected the Tell me when this slide changes option, which means that you are notified whenever someone updates the source slides. Keeping slides connected to the library ensures that presentations always contain the most relevant and updated information. However, synchronization is not automatic. This is actually good because you never want to change the content of an important document without first reviewing the changes or consider the impact. Also, for archiving reasons, you may want to view a presentation as it was presented, and you have no need for updated data once a presentation is made. For example, if you plan to give a presentation discussing a team's performance over a period of time, you may want to know when source slides are updated in the library, but once you deliver the presentation, there is no need to change the content.
This chapter discussed document collaboration in a team environment and then detailed the benefits and pitfalls arising from managing a single document with multiple editors. Things to remember about this chapter:
SharePoint's library feature enables you to create, store, and manage your documents from a central location.
Document libraries let you track a variety of different types of information. It is the most common type of SharePoint library.
SharePoint also offers you libraries that are for a specific type of file or information and has templates to create these libraries, including InfoPath form data, images and pictures, Excel spreadsheets for browser-based reporting and dashboards, data connection files, and media and presentation slides.
Throughout this chapter, you looked at the ways that a user can interact with document libraries and the content within them. In Chapter 4, you will take a deeper look at customizing libraries along with lists to suit specific needs your organization might have.