
WHAT YOU WILL LEARN IN THIS CHAPTER:
Specific reasons for customizing a SharePoint list or library
Best practices for creating business elements
Examples of working with list-centric columns and site columns
The various types of views available in SharePoint and best practices related to creating them
Working with list and document templates
The previous two chapters discussed how to use lists and libraries in their most basic format. SharePoint has some great templates that will address the most common collaborative scenarios; however, your information and sharing needs may require something different. In such cases, you can customize lists, libraries, and associated components so that they better address those needs. When you customize SharePoint to more closely reflect business practices and processes, users can focus on their jobs instead of working harder or around an ill-fitting tool. This chapter shows you how to customize both lists and libraries. Many of the examples use the term list to describe both lists and libraries because anything that you can do to a list, you can also apply to a document library.
After reading this chapter, you should feel comfortable taking a specific list or library template and customizing it to suit your specific needs. You should also understand the steps and value associated with adding your custom list to the central list of templates so that teams and users can benefit from your customization efforts.
Information is not very useful if it is disorganized and hard to find. Traditionally, electronic documents are stored in a file system consisting of folders and subfolders, often many levels deep. In computer lingo, this is often called a tree structure. You create the document tree according to your needs or whims, and then you share it with your associates. However, they may not understand your organizational approach and so may have difficulty finding documents in your folder structure. For example, you may have a folder for each city in your territory, and within each city folder, folders for your customers in that city. In each customer folder, you store project specifications, statements of work, proposals, project status reports, and other documents related to that customer. What if an associate simply wants a list of the current project status reports for all of your customers, however? This is pretty hard to get because status reports are scattered throughout your folder structure.
This example shows the major limitation of using the file system to share documents: Because you only have one way to organize and categorize information, you must develop a system in advance that is useful for everyone, and that usually results in a compromise that no one wants. Further, once you choose a folder structure, it may become both difficult to change and difficult to teach to others.
With SharePoint, you can associate a great deal of information with documents by using standard and custom list columns. For example, you can customize a library to attach the information shown in the following table to each document.
COLUMN NAME | COLUMN TYPE | VALUES |
|---|---|---|
Document Status | Choice | Not Started In Progress In Review Final Draft |
Client | Lookup | Look up to title column from Clients list |
Project | Lookup | Look up to title column from Projects list |
Project Type | Lookup | Look up to title column from a Project Categories list |
Due Date | Date and time | [due date] |
Assigned to | People or group | [person or group] |
Owner | People or group | [owner] |
With standard file shares, it's impossible to store this information and have it easily associated with a specific document. However, with SharePoint, you simply add columns to the document library. By capturing the appropriate information, your associates can search and view the document library in the ways they prefer. For example, one colleague might search for projects by client, while another might search by author. Through the use of metadata and views, you can create reusable reports to allow your colleagues to find information more efficiently.
Once you recognize trends in how your team searches for documents, you can create custom views to match the most popular search criteria. For example, if users frequently search for documents assigned to them for review, you can create a view that displays a list of documents that have been assigned to the current user, and you can even sort the list in the order in which they are due. With custom columns and views, SharePoint takes you out of the restricted world of file sharing and into a multidimensional world where each of your associates can see your documents in the most appropriate way.
In this section, you learn the best practices that ensure your SharePoint site offers the maximum value to your organization based on the customizations that you implement. This is an important consideration because the right customizations can make your site user-friendly and efficient, while the wrong ones can make data entry burdensome and can cause user confusion.
When you design an information system for your team to use for sharing and managing content, remember that your changes should add value; changes should make the system easier to use and the information simple and intuitive to find.
You can identify what adds value by familiarizing yourself with the information goals of team members and site users:
Hold meetings or send questionnaires to gather information on users' frustration points.
From these discussions, create a list of problems that you need to address.
Rank and prioritize the list based on the number of people who are affected and the productivity impact they experience because of the issues.
Look at how SharePoint lists and libraries can improve the situation. For example, if people have a difficult time finding documents created during a specific timeframe, you can create views that filter and sort documents based on when they were completed.
When you create additional columns and views to your lists, follow similar rules in each situation. The more consistency you create within the environment, the more unified and intuitive the experience will be for the users:
A column that describes the status of a list item or document should offer the user consistent choices. If you use a certain set of status values for one list or library, use the same for all other lists and libraries. Do not use values such as "Not Started," "In Progress," and "In Review" in one location and then use completely different values to represent the same type of information elsewhere.
If you start creating custom views, offer some level of standardization, such as consistent ordering and sorting of columns based on the type of information you're presenting.
Have you ever been asked to complete a task without a receiving a clear explanation of what was required of you? If so, then you probably understand how frustrating completing forms and column values in SharePoint can be for your users if you do not offer good descriptions and guidelines for defining specific items. If users are unsure about what information you are asking for, they are highly likely to provide less than optimal information. Giving users clear direction will result in them entering the information you want into the system. It is always a good practice to use the description field when creating custom columns in SharePoint.
A column is an element of information that describes an item on a SharePoint site. In some cases, the item may be an event, a company, or a task; in other cases, it may be a document, a web page, or a business form. In SharePoint, any content stored in a list or library is considered an item. No matter what the actual item is, columns provide a great way to further define and organize information beyond what is available via titles or folders.
Defining information effectively is a key reason you use SharePoint. Therefore, you may need to add new columns to define the various list and library items. For example, you can add a column to track document status to a document library so that users can easily identify a document's current state strictly by looking at its properties rather than making an assumption or asking the author directly. This is called a list-centric column, and you will learn to create one in the next Try It Out.
You may hear people describe columns as metadata or properties of an item. As described in Chapter 2, metadata is essentially information about information. In the case of a document, metadata is information that describes the document, such as its status, owner, or due date. A single document might have multiple metadata values because quite often there are many things to describe about a document. When you design or change an information environment, you should understand what content is stored within the site and what people will need to know about it.
TRY IT OUT: Create a Column
In this example, you create a column for a project documentation library so that business users can track the status of project-related documents, such as user manuals, planning documents and training presentations. Because you do not want users to enter just any value for status, you provide a list of common choices. This example assumes that you require a choice column that allows you to specify the release status of documents in a document library as Alpha, Beta, or Final Release. A choice column, one of several column types, gives users a list of values from which to select and presents them in a drop-down menu. The remaining column types are discussed in the next section.
You will continue to work within the Project Team site created within the first Try It Out in Chapter 2. If you did not complete this exercise, it is recommended that you quickly return to that example and create a site, based upon the Team Site template, called "Gros Morne Project."
From the main page of your Project Gros Morne site, select Shared Documents from the side navigation bar.
Select the Library tab from the Ribbon.
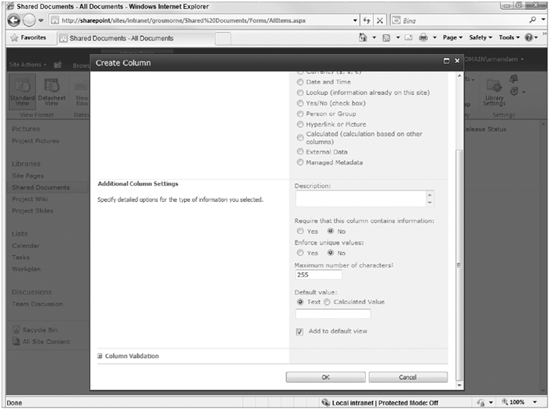
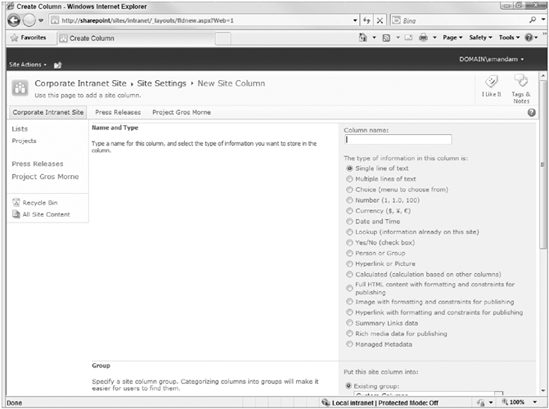
From the Manage Views section of the Library tab, select Create Column. The Create Column window will appear as shown in Figure 4-1.
Enter the following properties for your column:
PROPERTY
VALUE
Column Name
Release Status
The type of information that is in this column
Choice (menu to choose from)
Description
This column contains the current release stage of the document.
Yes
Enforce Unique Values
No
Typae each choice on a separate line
Alpha
Beta
Final
Display choices using
Radio Buttons
Allow Fill-in Choices
No
Default Value
Alpha
Click OK to complete the creation of your new column.

How It Works
In the preceding example, you are creating a new column that will appear whenever users are uploading or editing documents within your shared documents library. Because you selected the Choice column type, the users will have a predefined list of values to select from. You specified that the column required information; this means that a user cannot check a document into the library unless this value is specified. By making certain important columns required, you can help ensure that all documents have this value specified, which will make it easier for users to locate the files within the library.
You specified that the choices be displayed as radio buttons. This will ensure that, as users complete the metadata form when uploading or editing a file, they will see what the available values to select are directly within the form, as shown in Figure 4-2. This is a suitable choice when you have just a few values. If you have a large number of items in your selection list, a drop-down menu may be more suitable.
Chapter 2 discussed the different types of data that you can store in a column at a high level. This section looks even more deeply at the types of columns you can have in SharePoint, and discusses some of the various customization options that exist with them. In the "Create a Column" Try It Out you just completed, you selected a Choice column type to collect information from a radio button control, but you have other options at your disposal. At the end of this section, the "Change the Order of Columns on a List" Try It Out shows you how to reorder the columns of a list to make them more user-friendly.
Virtually every list starts with the Single Line of Text column type, possibly the most commonly used within SharePoint lists, as its primary or title column. When creating a Single Line of Text column, you have very few options for customization, as you can see from Figure 4-3. However, you can select whether the column is required or optional. You can also limit the number of characters that a user can enter to prevent users from entering unnecessary data in a column. There is also the option to specify a default value, which users can enter manually or which you can allow SharePoint to calculate.

The final customization option is to apply Column Validation formulas to help ensure that as users specify values, they adhere to specific rules such as number of characters or other business logic that may apply.
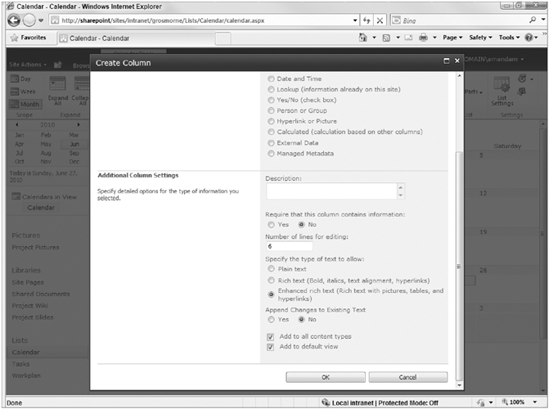
A Multiple Lines of Text column type has multiple configuration options, shown in Figure 4-4. As with other columns, you can specify whether the column is required and enter a description that tells users what information to complete.
Because this column allows a variable amount of text, you can specify how many lines the field should display when users complete the information. You should give users plenty of space for situations where you expect them to enter a great deal of data; the size gives users a visual cue of how much information you want them to enter. For example, if the column is for a mailing address, three or four lines should be acceptable. However, if the column is for background information on a customer, you may want to provide at least 25.
The Multiple Lines of Text has more advanced formatting options than most other columns, including the following:
Plain Text: Most appropriate for scenarios where no special formatting is required, such as in the example of a mailing address.
Rich Text: Users can format the text using the Rich Text Editor, which is ideal when users input a larger amount of text that doesn't have specially formatted elements, such as tables or pictures but may require some formatting and text alignment. You select this for notes and comments related to an item.
Enhanced Text: Allows your users to add images, tables, and hyperlink elements to the column via the Advanced List Text Editor. This format is ideal for article body columns in an announcements list or employee biography content columns.
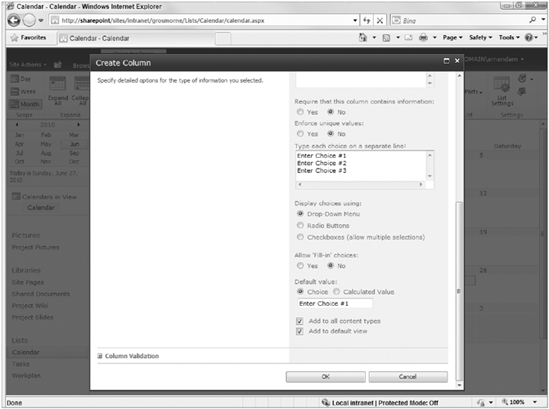
The Choice column allows a site manager to define a list of values from which a user can select, as shown in Figure 4-5. As with other columns, you can specify whether the column is required and enter a description that serves as an aid to users as they complete the information.
You enter all values by placing each value on a separate line. Users see this as a drop-down list, a set of radio buttons, or a series of checkboxes. A drop-down list or set of radio buttons means users can only select one option, while checkboxes allow them to select more than one item from the list of values. You can also specify whether users can fill in their own item if an appropriate value does not appear in the list, which is great if you want users to enter exceptional values. For example, you may have a survey list that collects information on preferences for the next company social. You may offer a set list of locations and then have an option that allows users to enter suggestions for a location.
As with the Single Line of Text, you can also include a default value from the list of choices or have the default value calculated. In cases where you are making a choice column a required field for a list, it's best not to specify a default value because users may accidentally forget to specify the value and the default selected item is then saved. By not specifying a default value, you can enforce the selection of an item, which ensures the information entered into the list is accurate. For example, if you are required to give users a choice of whether information is confidential or public in a list or library, it would not be wise to set either choice as the default value because you would want the user to think about their selection and pick the right option.
Similarly to the Single Line of Text column type, the Choice column type supports Column Validation.
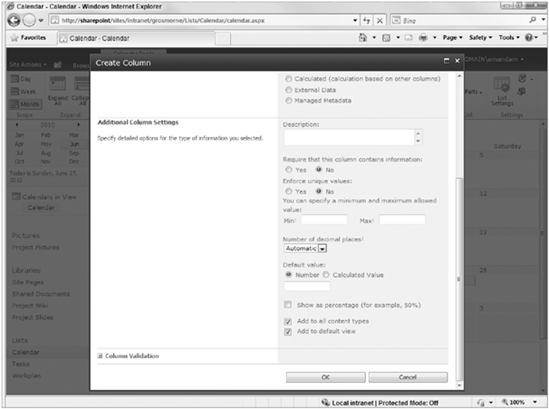
A Number column has pretty simple customization options, as shown in Figure 4-6, but is extremely useful in many lists because it's helpful for calculations or reporting.
You can make a Number column either required or optional. You may specify an allowed range of numbers that users can enter. For example, if you have a column to represent a user's rating of an item, you can have a minimum value of 1 and a maximum of 10. You can also configure a column to display a specific number of decimal places or percentage value regardless of the format a person uses to enter the information. As with some of the previous examples, you may select a default or calculated value for your column as well as configure column validation rules.
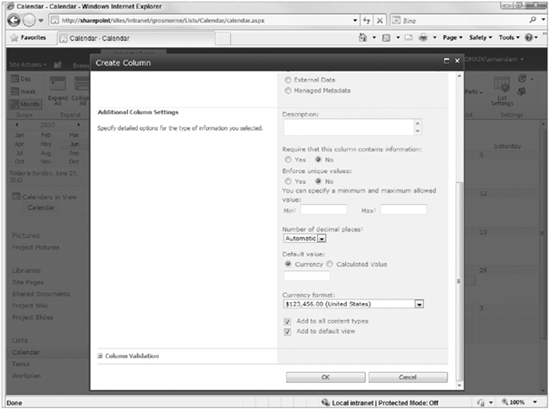
A Currency column has the same customization options as the Number column type with one addition, as shown in Figure 4-7.
The Currency column enables a user to specify the regional format in which the data displays, such as $150,000.00 for the United States or £150,000.00 for the United Kingdom. There is no direct link between the regional setting and currency exchange rates.
You may need to add columns containing date and time information because many of the items you track in a list have some level of time relevance, such as a due date, start date, finish date, or completion date. In fact, every list has Date and Time columns for tracking when an item was created or last modified.
Beyond the options that determine whether this column is required and that add a description, you can have the column display as only a date or a time value. Time values are particularly useful if you intend to display your list information in a daily calendar view or if you define details on events, such as meetings or appointments.
You also have a few choices for displaying a default value such as no value, the current date, or a specific date, as shown in Figure 4-8. So, if you have a list where users submit requests, you can select Today's Date as the default value for a column called "Request Date." This reduces the amount of user entry and lets you accurately determine when a user submitted a request.
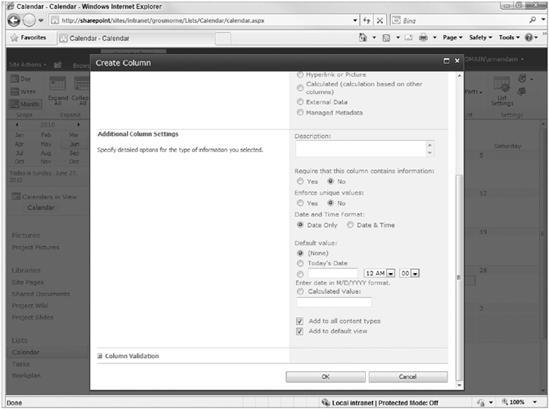
As with previously described columns, you can create a calculated value for a date column. This is useful if you are setting a value such as the default due date for an item. In that case, you may select the default value as [today] + 7, which sets the value to a week past the current date. As with some of the previous examples, you may configure column validation rules on a Date and Time column.
A Lookup column is very similar to a Choice column because it supplies users with a set of predefined values for a column. The advantage is that you can point it to another list on the site and, thus, create more dynamic list values. This is better than storing all the values as a static property of the column because users update the list as part of normal business operations. For example, if you have a customer list, it's unrealistic for a site manager to constantly log in and change a list column's properties each time a company acquires a new customer. Instead, you can have this column point to a centralized customer list that those closest to the business operations can maintain. The new customer's name would then automatically appear as a value in the column as soon as the centralized customer list is updated. In addition to selecting the list and column that the Lookup column uses to display data, site managers can configure the column so that users can select multiple values for a list, as shown in Figure 4-9.
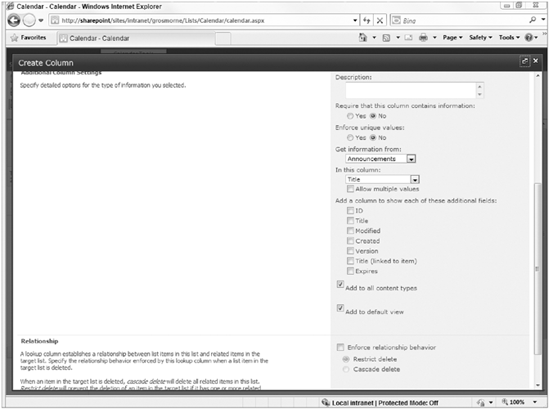
Another powerful feature of the Lookup list is that site managers can configure the list to display additional properties of the item that was selected within the list. As an example, if a user selects Customer XYZ, the customer's address and phone number may also be displayed within the list item along with the customer's name. The site manager may also elect to have customer data deleted from the list if the customer is removed from the system or restrict the deletion in to preserve the original data.
A Yes/No column type is essentially a checkbox column that defines whether an item meets a specific criteria item. For example, this type of column can designate whether an item is displayed on the main page of a SharePoint site, or whether an item is active. The primary configuration option when defining a Yes/No column is determining whether the default value should be selected or unselected.
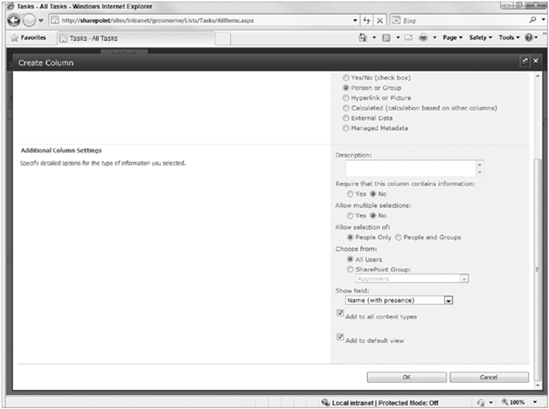
The Person or Group column is ideal for assigning ownership of an item or personalizing the display of data to users of a list. Besides the usual determination of whether to make the column required or to add a description, you have the option of selecting multiple items, which allows you to assign a single task to multiple people. In fact, for a tasks list, the Assigned To column is based on the Person or Group column type.
You can allow the selection of groups of people rather than individuals. For example, you can create a task and assign it to the Technical Support group. Then any member of the Technical Support group can complete the request rather than rely on users to specify which technician should complete the task.
You have the added option of defining whether a person from this column is drawn from the list of all users or from a single SharePoint group, which is useful if you want to have an Assigned To column to represent who should review the document next. Because only those with approval rights should be reviewing items, it may make sense to specify that only members of the Approvers SharePoint site group be assigned to the column.
Your final customization option involves how the information is displayed. You can have the person identified by a variety of personal profile properties, including display name, email address, and job title. An example of the configuration options for the Person or Group column type is shown in Figure 4-10.
This column offers very little from a customization perspective beyond specifying whether the item is required, but it does offer one significant attribute. You can format the URL of the item as either a web address that users can click to open or as a picture that is displayed as a thumbnail.
There are other column types, such as Audiences and Business Data, which are covered in greater detail in later chapters of this book. See Chapters 9 and 12 for details.
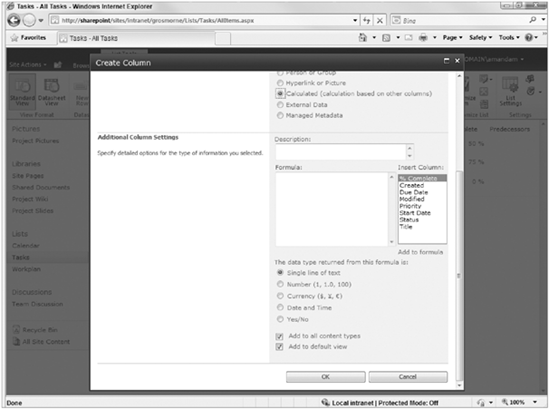
This special column type allows a site manager to define a formula that will automatically determine the value of a column without requiring a user's input. This formula can be based upon other columns within the list. An example of such a formula is [Items Sold] × [Price], which would calculate the total revenue associated with a list item that represents a customer sale. As shown in Figure 4-11, the available columns to reference in your formula are displayed for your ease of use.
Based upon the Business Connectivity Services feature of SharePoint Server, the External Data column type allows a site manager to reference an external business system as the lookup location for a column's values. For example, if your company has a customer relationship management system, all customer data may exist in this system. Therefore, it would not make sense to export and replicate that information in SharePoint. Instead, you could create a column that looks up that external business system and points to the Customer database for its values. We will explore this feature further in Chapter 15.
New features in SharePoint Server 2010 are the Managed Metadata column type and Term Store. These features help provide a more robust and centrally managed metadata system than standard column types. Managed Metadata columns can support hierarchical information as well as large volumes of choices. We will explore this feature further in Chapter 14.
TRY IT OUT: Change the Order of Columns on a List
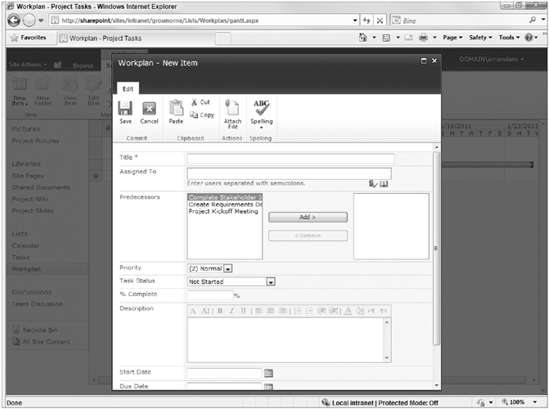
Once you have defined a list or library with the columns you wish to track, you may at times realize that you would prefer to have the columns appear in a form in a slightly different order. Figure 4-12 displays the new item form for a standard Project Tasks list.

After reviewing the form, you decide that it would be more appropriate to move the location of the Assigned To column to just below the title. The following steps in this Try It Out can be repeated on any list or library type.
From the main page of your Project Gros Morne site, select Workplan from the side navigation bar.
Note
If you did not complete all the exercises in Chapter 2, this exercise can be performed using any standard Project Tasks list.
Select the List tab from the Ribbon.
Select the List Settings menu option. You will be redirected to the List Settings page.
Scroll to the Content Types section of the page. Select the Task content type.
Select the Column Order link. You will be redirected to the Column Order page as shown in Figure 4-13.
Change the Position from Top value for the Assigned To column from 6 to 2.
Click OK.
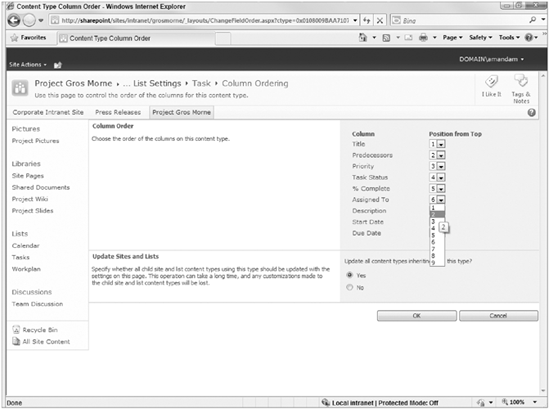
By changing the Column Order, users will now see the order as displayed in Figure 4-14 when filling out a new item within the Workplan list.
So far, all examples in this chapter have been limited to creating a column for a list or library, but you can associate the information for a single list with multiple lists. For example, for a column that defines customers, you commonly associate a customer's name with items from multiple lists and libraries. Because the steps for creating a suitable customer list are somewhat time-consuming, it's inefficient to reproduce the column in each list where you want to associate client information. Instead, you can create what is known as a site column, which makes a column available to all sites and subsites. Generally speaking, if many lists will use your column at all levels of a corporate intranet or portal, you should create it at the top-level site of a site collection. This makes the site column available on all sites throughout the site collection.
A site column may only be relevant to a specific division or team. In that case, you may want to only create the column on the divisional site itself. It will still be available to all lists within that site and all sites below it; however, it will not be listed under the Available Site columns for the other subsites within the site collection.
Note
It's important to consider where to place site columns in order to ensure that the organization gets optimal use of this shared feature. This will be discussed later in Chapter 6.
The next two Try It Outs show you how to create a site column as well as how to add a site column to a list.
TRY IT OUT: Create a Site Column
In the "Create a Column" Try It Out, you learned how to create a list-centric column. This Try It Out walks you through creating a site column within the central gallery of columns so that it can later be used by multiple lists with a site and its subsites. For this example, you create the site column that holds all the regions in which an organization has a presence. Because you want to ensure that your column is available to the maximum number of sites in your intranet, you create it at the very top level of your site collection.
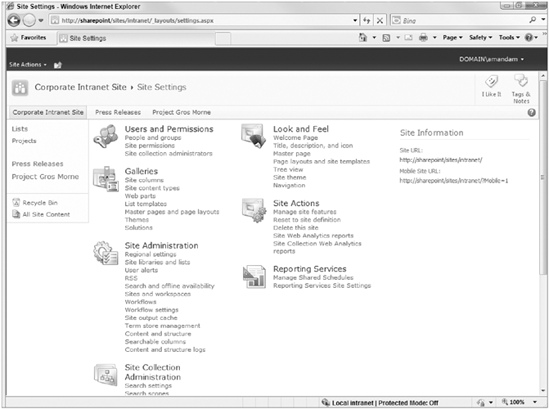
From the top-level site of your site collection (the site created in Chapter 1 called Corporate Intranet Site), select Site Settings from the Site Actions menu. You will be redirected to the Site Settings page for the site collection, as shown in Figure 4-15.
Select the Site columns option from the Galleries section. SharePoint presents you with a wide range of preexisting site columns, which are good starting points. It is always a good practice to search this listing to ensure that a similar column does not already exist.
Click Create from the toolbar. The Create Column window will appear as shown in Figure 4-16. You may notice some differences in this window over Figure 4-1. We will discuss these differences within the How It Works following this exercise.
Give the site column a name. This example uses the name Corporate Regions.
Select the Choice (menu to choose from) option as the type of information in this column.
To better organize your site columns, you can choose a group for your Site Column. You can create a custom group for your custom Site Columns. To do this, select New Group, and type Corporate Columns in the field provided.
In the Additional Column Settings section, enter the following properties:
PROPERTY
VALUE
This is a list of regions in which your organization has offices.
Yes
No
Canada
United States
Europe
Asia
Africa
Drop-Down Menu
No
Default Value
Leave this field blank
Click OK. Your Site Column is now available to share and use across all lists and libraries throughout your site collection.
How It Works
Now, when users add a list item that is utilizing this site column, they are required to select a region from this list of choices. If you want update the region choices available in your site column, you can return to the site column gallery to edit your column. In addition to the previous selection options, you also see a new checkbox that allows you to update all lists and libraries using this site column, so that they include your changes.
Thus, you can update a large number of lists to accommodate a change in your organization from one single location. As you accumulate more and more lists and libraries, this valuable feature becomes more powerful and offers great time savings.
You may have noticed that the Create Column screen for the site column you created in the previous example offered additional choices for column type. These included:
Full HTML content with formatting and constraints for publishing
Image with formatting and constraints for publishing
Hyperlink with formatting and constraints for publishing
Summary Links data
Rich media data for publishing
These columns are for the Publishing capabilities of SharePoint Server, which will be explored as part of Chapter 13. In addition, you will notice that you cannot create site columns based on External data. This option is only available on list-centric columns.
TRY IT OUT: Add a Site Column to a List
The previous example guided you through creating a new site column. You can now use this site column on any list or library in your site collection. This saves you the time and energy required to recreate list-centric columns. The following example guides you through the process of attaching a site column to a list or library. Instead of creating a column on the list from scratch, you add an existing site column to the list. The steps for doing so are considerably easier, and future updates to the column properties can be streamlined and rolled out to all lists from a single location.
As you add site columns to a list, they become fields that users are required to fill out as they add list items. Most organizations like to enforce a standard set of required items that users must complete on lists and libraries, such as Owner or Status. Based on this methodology, an organization can create a site column for each type of information it wants to enforce and then reuse this column on all lists and libraries throughout the site collection. This greatly reduces the amount of maintenance.
From the main page of your Project Gros Morne site, select the Shared Documents library from the side navigation.
Select the Library Settings menu option. You will be redirected to the Library Settings page.
Scroll to the Columns section of the page.
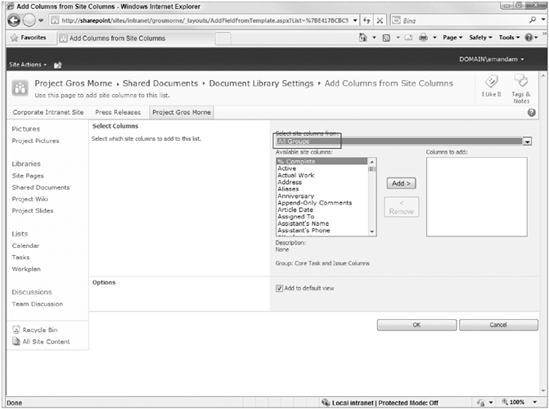
Select the option to Add from existing site columns. You will be redirected to the Add Columns from Site Columns page, as shown in Figure 4-17.
Select the Corporate Columns group from the "Select site columns from" drop-down.
Click OK.
Now when you edit the properties of an existing file within the Shared Documents library, you will see the Region column appear as a required value.
Now that you can create list-centric columns and site columns, it's important to understand when to use each. Although it's tempting to create a site column for everything and thus make it accessible to everyone, remember the following:
List-centric columns: Some column types are only relevant for a specific list and only clutter the site column gallery for all other users and usage scenarios. For example, a software development team's issue list may have a column that tracks whether a client called about an application bug or feature request and that column isn't appropriate for any other list or site. Or, a column may contain important data that should not be shared with the entire organization, such as manually entered items or data from an external business system. In either of these cases, it's more appropriate to create a column that is attached to a single list.
Site columns: These are more appropriate for information that you want to associate a column with multiple lists. You would use a site column to ensure that there is consistency in how a column is configured. Because you create the column once and it's placed in a central gallery for others to reuse, you save time and effort.
Note
Global elements, such as workflow templates and content types also use site columns. This is discussed in later chapters of this book.
In Chapters 2 and 3, you read how both lists and libraries can contain views. A view basically displays the information about a list in different ways. Some views display all the items in the list, while others show specific items based on their properties or metadata values. Every list has at least one view, and SharePoint 2010 offers six view types: standard, datasheet, calendar, Gantt, Access, and SharePoint Designer. You can customize these SharePoint views to quickly find relevant information. Imagine opening the telephone book and having it display only the numbers that are relevant to you. That's the type of flexibility you have with a custom view. The following examples guide you through the basics of setting up the views available with SharePoint.
This section goes deeper into what views are. You learn the different types of views as well as how to use them effectively:
You start by setting up the standard view. The Try It Out that accompanies this section also shows how to select a view, once you create it. The method for displaying a view is the same regardless of the type of view that you create. Therefore, the rest of this chapter assumes that you'll use one of these methods whenever you select a view for a list.
You then work your way through setting up a Gantt, calendar, and datasheet view as well as how to create a view based on an existing view. All these views are configured directly through your browser.
You learn how to work with an Access view, which essentially lets you combine the best aspects of SharePoint and Microsoft Access.
You will learn how to create a SharePoint Designer view, which allows for more flexible choices in how data is presented.
Because the standard view is the most common view type and because it has so many elements, this section details those elements. You then get an opportunity to create a standard view in a Try It Out.
View Name: The name that is displayed in a drop-down menu of views associated with each list. When specifying a view name, be specific so that users can clearly identify the unique nature of each view. For example, "Grouped By Status" communicates that all items are grouped together based on their status values. It is also recommended that you be concise with your naming, as longer names will not fit into the view drop-down as easily as shorter names.
Default View Selection: Defines the default view for a list. This view appears first whenever a user visits the specific list or library.
View Audience: When you create a view, you can make it either a personal or public view. A personal view is only available to its creator in the drop-down list of views. However, it does not have any specific security applied to it. Personal views are ideal if your list is for administration purposes and of no value to others. All users can see a shared view in the View selection drop-down associated with a list.
Column Selection: You must select which columns are displayed in your view and specify their relative positions from the left. When you specify the position of a single column, all other columns automatically adjust their position.
Sort Order: You can select up to two columns by which items in the list are sorted. Sort order can either be ascending (A to Z) or descending (Z to A).
Filter: You can customize a view by defining the items that are displayed, based on specific column values or properties. You first select a column from the drop-down list and specify a rule so that only items that meet your criteria are displayed in the view. You can add up to 10 filter rules for a single view.
Inline Editing: You can specify whether an edit icon should be displayed within each row of the view. This makes it easier for a user to quickly update an item that exists within a list. When you click on the Edit Icon, any editable fields within the view will be enabled. An example of this is displayed within Figure 4-18.
Tabular View: You can specify whether checkboxes should be enabled on the view. When you allow checkboxes on a view, users can select multiple items to perform bulk actions such as Delete or Check Out.
Group By: Because views can quite often contain a large amount of information, SharePoint allows you to group up to two columns of similar items together. The first column acts as a parent item and the second as a child of the parent. For example, you can group a task list by "Project" and then by "Assigned To." This allows users to see a report of all tasks grouped first by the project name and then by each person to whom the tasks are assigned.
Totals: For numerical columns, it's beneficial to display total values for all your items. These might be the sum, average, or standard deviation of all items in a view or group. For other columns, the total value is useful to display the number of items in a view or group by selecting Count.
Style: Depending on your presentation requirements, you can select a style for your view. For example, you may select "Newsletter, No Lines" for a plain view of items in a list, or "Boxed" to display items in a series of rectangular boxes. Take a few minutes to try out each view style so that you can familiarize yourself with the options that are the most appropriate choice for your views.
Folders: In a list or library, folders organize items or documents. However, you may not want to show folders for a particular view. Instead, you can show items that meet specific criteria, regardless of their folder location. For example, if you have 10 layers of folders in your document library and you want to view all documents associated with a specific project, rather than manually clicking through the various levels of folders, you can create a custom view that displays items with no folders that gives a complete listing of all documents that meet your criteria in a single level. No additional clicks are required.
Item Limit: For performance reasons, you commonly may only want to display a specific number of items; for example, it's not very efficient to display 10,000 documents in a single view, but groups of 30 may be more beneficial. In fact, the all items view for most lists display items in groups of 30 by default. In other cases, you may want to limit the number of items to a goal number and display them to meet a criterion. For example, you may want to show the last 25 documents that have been added to a library. You first sort the view by either the created or modified date in descending order. You then specify the limit for the view to be 25 items.
Mobile: When creating or editing a view, you can select whether it is enabled for mobile access. A mobile view is one that is suitable for access from a device such as a cell phone or PDA. Many of the user interface elements, such as tables and images that would typically be seen via a standard browser, are left out of these views. Only views that are public views can be created as mobile views. When creating a mobile view, you are given an option to limit the number of items that are displayed. Because mobile devices typically have smaller screens, it is recommended that you use a smaller value. By default, this value is 3.
TRY IT OUT: Create a Standard View
By sorting, filtering, and grouping the columns of metadata, SharePoint can display the contents of a list in a personalized way, one that is directly relevant to the information you want to see. This is particularly useful when you have lists shared across an organization, or when you have large lists. For this Try It Out, you will sort items in the project tasks list by their due date so that items appear in the order in which they need to be responded to. In addition, you create the view with a special filter that will only display items assigned to the current user.
From the main page of your Project Gros Morne site, select the Workplan list from the side navigation.
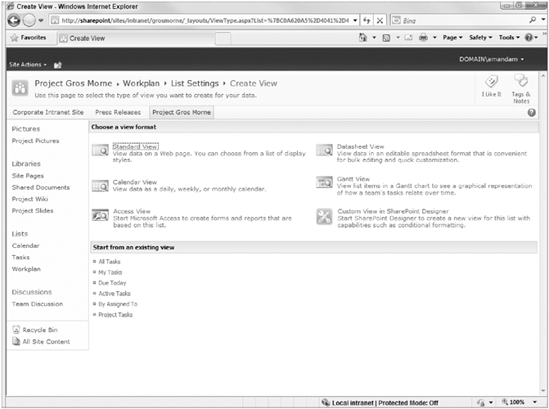
Select the Create View menu option. You will be redirected to the Create View page, where a choice of view types will be displayed, as shown in Figure 4-19.
Select Standard View. The page will refresh to display options relevant to a standard view.
Define the view as follows:
VIEW PROPERTY
VALUE
View Name
My Upcoming Tasks
Make this the default view
No
View Audience
Create a Public View
Columns
Attachments
Title (linked to item with edit menu)
Start Date
Due Date
% Complete
Sort
Due Date (Show items in ascending order)
Filter (Show Items only when the following values are true)
Assigned to
is equal to
[me]
Inline Editing
Enabled
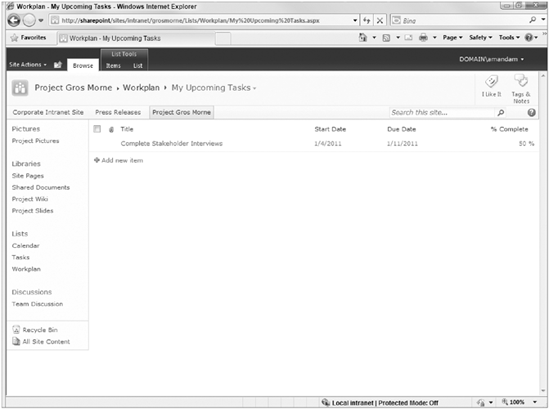
Click the OK button. You will be redirected to a page displaying your new view, as shown in Figure 4-20.
How It Works
In the preceding example, you created a custom view that only displayed items assigned to the current user. This was achieved by using a special property on the filter, known as [me] on the Assigned to column. Whenever a column is of the Person or Group type, you can personalize the view by using the [me] property and only the items in the list where the current user's name is selected within the Person or Group field will be displayed. In addition to filtering the view, you specified a sort order that displays items according to their due date. This is practical since users will see the items that are due the soonest at the very top of their list. This results in a sense of priority for the items that must be completed first.
This section deals with setting up three specialized views that SharePoint has to offer:
Gantt view: This view displays a graphical representation of tasks and how they are progressing over time. It gives you a clear picture of how a project or task is evolving at a glance, and helps you easily identity bottlenecks in the process. We explored this view as it was associated with the Project Tasks within Chapter 2. However, this view type can be used on any list or library type as long as there is date-based information to reference. For many small teams, the Gantt chart view is the ideal solution for managing and reporting a project. This particular view is a big hit with project and resource managers who need to track how tasks are evolving and give updated status reports to an executive team.
Calendar view: Allows you to create a daily, weekly, or monthly view of your data. We reviewed this view in Chapter 2 as it was associated with the Calendar list type. However, a calendar view can be created on any list or library.
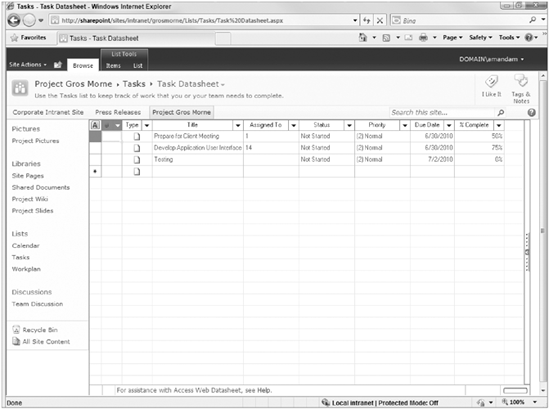
Datasheet view: This view gives you a spreadsheet-like view of your data, very similar to an Excel spreadsheet. This view is particularly useful when you want to customize multiple columns of data. We explored updating a datasheet view in Chapter 3.
In addition to showing you how to set up these views, this section also has a Try It Out that shows you how to create a view based on an existing view. This is particularly useful when you have columns that are similar but with slightly different requirements.
TRY IT OUT: Create a Gantt View
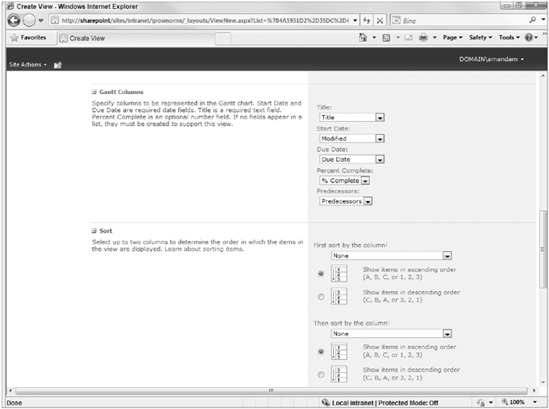
When configuring a Gantt view, you must select a start and end date. Based on this elapsed time and the percentage of the task complete, SharePoint can calculate a graphical representation of how things are progressing. The following steps enable you to get starting using the Gantt view.
From the main page of your project team site, select the Tasks list from the side navigation bar.
Select the Create View menu option from the List tab of the Ribbon.
Select the Gantt View type. You will be redirected to the Create View page.
Define the view as follows:
VIEW PROPERTY
VALUE
View Name
Task Tracking
Make this the default view
No
View Audience
Create a Public View
Columns
Attachments
Title (linked to item with edit menu)
Start Date
Due Date
% Complete
For the Gantt Columns section, which appears as shown in Figure 4-21, enter the values as follows:
GANTT COLUMN
VALUE
Title
Title
Start Date
Start Date
Due Date
Due Date
Percent Complete
% Complete
Predecessors
Predecessors
Click the OK button to complete the view. You will be directed to a page displaying the new view.
TRY IT OUT: Create a Calendar View
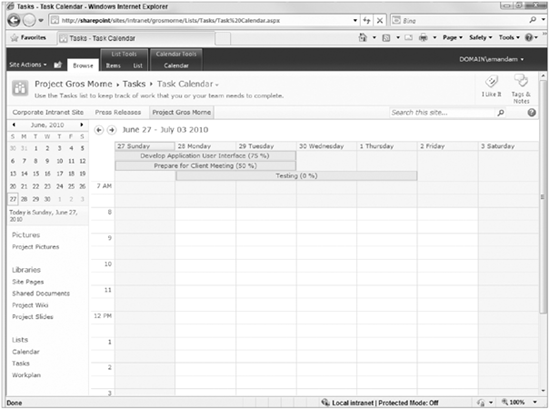
This view allows you to move back and forth between months, add tasks to your calendar, and even connect your calendar to Outlook, a familiar interface for managing calendars. The following steps walk you through setting up the calendar view on your Tasks list.
From your Tasks list, select the Create View option from the Ribbon.
Select the Calendar View type.
Define the view as follows:
VIEW PROPERTY
VALUE
View Name
Task Calendar
Make this the default view
No
View Audience
Create a Public View
Time Interval (Begin)
Start Date
Time Interval (End)
Due Date
Month View Title
Title
Week View Title
Title
Week View Sub Heading
% Complete
Day View Title
Title
Day View Sub Heading
% Complete
Default Scope
Week
Click OK to complete the view. You will be directed to a page displaying the new view. An example is shown in Figure 4-22.
TRY IT OUT: Create a View Based on an Existing View
In some situations, a single list or library may contain multiple views that are similar but have slight differences to meet specific information requirements. Instead of creating each new view from scratch, you can use a particular view as a starting point and slightly alter it to meet your needs.
Each time you add a new view to a list, it appears in the Start from Existing View section in the Create View window. Selecting one of these views generates a view based on the filtering, sorting, and metadata columns of the existing view. This saves you time and helps you efficiently customize views to meet your needs. By creating a starting point, you can reuse this view to minimize your efforts for all remaining views for the list. You can also think of customization using an existing view as a way to create structure because it acts as a template for displaying common components.
From your Tasks list, select the Create View option from the Ribbon.
Below the listed view types is the Start from Existing View heading with any views currently available for your list. Select an existing view from which to start building your custom view. For this example, select the Tasks Tracking view.
You will then need to specify a view name as well as define any unique properties of the view that did not exist in the previous view. For example, select the option to Filter based on tasks that are assigned to the current user using the method described in "Create a Standard View."
Click OK to complete the view.
SharePoint offers some great functionality for working with Microsoft Access. As discussed in Chapter 2, you can now link many of the lists in SharePoint to an Access database. This makes offline data available and allows you to synchronize data. In addition, Access provides reports and forms that are not available using a browser. By creating an Access view for a list, you gain all the advantages of Access's reporting functionality as well as having information stored in a central secured online store such as SharePoint.
TRY IT OUT: Create an Access View for a List
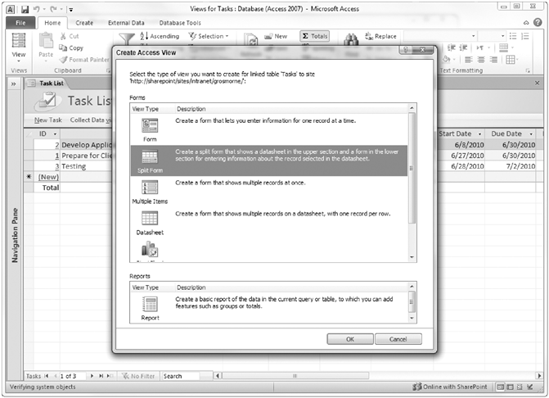
In this example, you give the interface that displays your SharePoint lists more flexibility and options by creating an Access view. To do so, you export data from the list to an Access database, which creates a more advanced view for entering and updating the data. This example uses the Split Form view so that users can see details of selected individual records as well as update items simply by typing into the datasheet. Once you complete your edits, a copy of your Access database is saved back to the SharePoint site so that other users can access the created views and reports.
From your Tasks list, select the Create View option from the Ribbon.
Select the Access View type. Access will open on your computer.
You will be prompted for a save location for the views. Select a location on your local computer.
You will then be asked to specify the type of view that you wish to create. Select the Split Form view type, as shown in Figure 4-24.
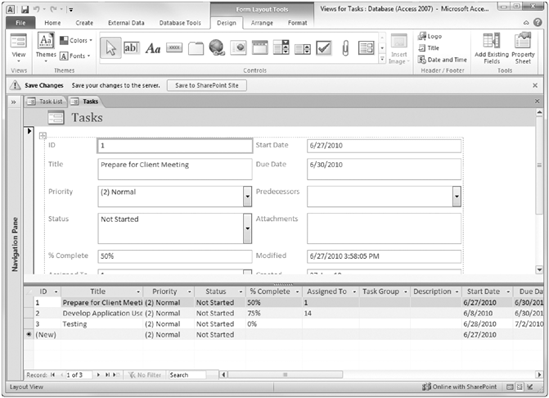
Click OK. An Access view opens with a single item list view form and a datasheet view. You can enter data into the datasheet view or form view.
When you finish entering or viewing your data, click the Publish to SharePoint Site button just below the top menu bar of the Access application, as shown in Figure 4-25. If this is your first time saving the Access database back to SharePoint, you are requested to identify a save location for the database.
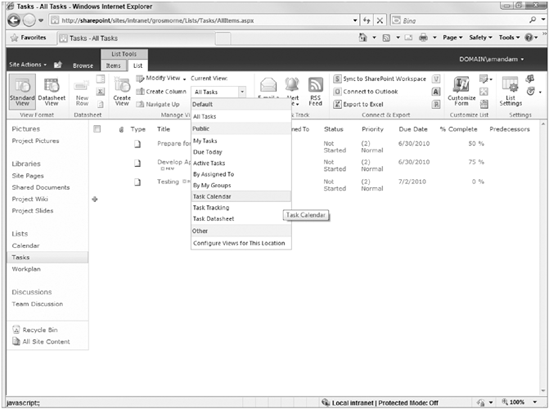
TRY IT OUT: Select a View from a List
In the previous examples, you have created a number of custom views. In this example, you will select a view that you have created from your Task list. This same process will apply for switching views on all list types.
Expand the drop-down below Current View in the Manage Views section, as shown in Figure 4-26.
Select the view of your choice. The page will be refreshed and your selected view will be displayed.
Chapter 2 detailed the various SharePoint list templates, which are ideal for creating a list that you want to modify or customize to suit your team's or your individual needs. However, you may need to create a list where no existing template can serve as a starting point. This, of course, involves creating a custom list and defining all the columns and views from scratch. This section first introduces all the basic skills you need to create a custom list, including how to create a list and then finally how to make that list a template so that you don't have to repeat work.
Once you have list customization basics under your belt, you learn about versioning items in SharePoint so that you can modify either list items or documents, and save each updated item as a specific version. Certain customization options are unique to document library environments and do not apply to a list in exactly the same way. Finally, you will learn how associate a custom document template with a library. This helps standardize the documents that your company uses to create various memos, procedures, and processes.
As you create a column within a list or library, think about what information users need about the item or how they may need to view the item. For example, if you are responsible for creating a centralized listing of projects, you may ask users the following questions:
What are the active projects on which the organization is working?
Are the projects running on a schedule?
Who are the primary contacts or project managers associated with each project?
What is the project background, and what are the primary deliverables from the project team?
Who is the client for whom the project is being completed?
Using the information from these questions, you can accurately create a custom list featuring the appropriate columns and views. In cases where you intend to have multiple lists for the same subject matter within an organization, you should plan the details out in the beginning, create the list, and then save the list as a template for reuse by others. This reduces the amount of repetitive work you or your team will need to perform.
The following series of Try It Outs illustrate how to work with a custom list or library. In the first Try It Out, you create a custom list with specific columns to track a project. The second Try It Out shows you how to save the list or library as a template so that others can use your work. Finally, in the last Try It Out, you see how to save the template to a gallery so that others can view and use it.
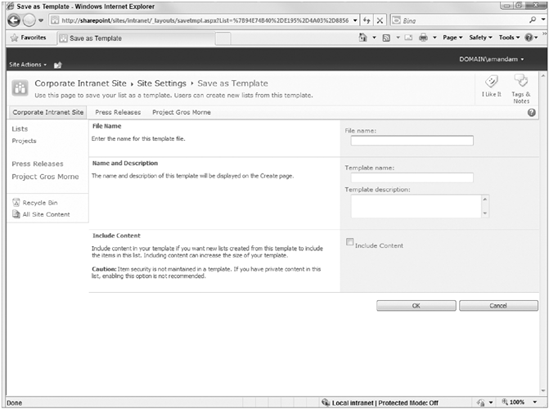
TRY IT OUT: Save a List as a Template
Once your list is complete, members of your organization can use it. You may even want to save the list as a template so that other teams can use it as a starting point in the future rather than repeating all the steps you took to create this list in the last Try It Out. Follow these steps to save a list or library as a template.
From your Projects list created in the previous Try It Out, select List Settings from the Lists tab of the Ribbon. You will be redirected to the Lists Settings page.
From the Permissions and Management group of links, select the option to Save list as template. The Save as Template page will appear as shown in Figure 4-27.
Complete the templates properties as follows:
PROPERTY
VALUE
File name
Projects
Template name
Project Listing
Template description
Centralized list template for tracking project status. Includes Active Projects view.
Include Content
Do not select
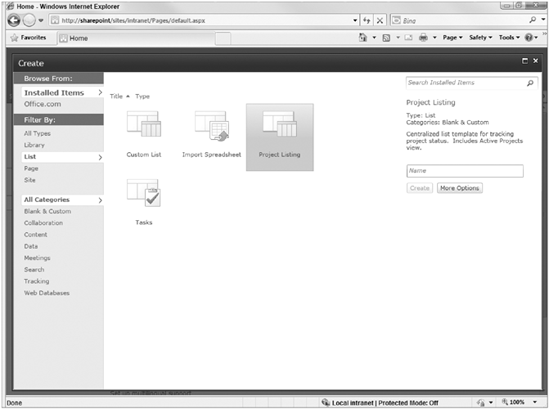
Click OK to create your template. You will receive a message confirming that the operation has completed successfully. Your template will be saved in the central list gallery for your site collection. The list will now appear to users when creating new lists on the list creation page, as shown in Figure 4-28.
As briefly explored in Chapter 3, items in SharePoint can be versioned. This means that as you modify either list items or documents, SharePoint saves each iteration as a specific version. This allows users to revisit a previous version of an item or even to track how something changes over time. To make this functionality available, you must enable versioning on the list or library.
Certain customization options are unique to a document library environment and do not apply in exactly the same way to a list. In Chapter 3, when you enabled the document version history creation on the library, you had the following choices for how to store the versions:
Major version: This is considered the same as a published version of a document. Over the life of a key organizational document, a site admin is more concerned with a previous major version of a document rather than the minor versions that show specific iterations of the document's creation or modification. You can limit the number of major versions that are retained. This is useful, particularly for libraries, where documents are fairly large in size and change very seldom.
Minor version: This is an iteration of the document while in draft mode. This is helpful for scenarios where many people must do work on a document before it is published to the entire organization. Each time a user works on the document and saves it, SharePoint creates a new minor version. However, for long-term editing purposes, the minor versions are not as relevant.
Check in and check out: Instead of making this feature optional for users, you can require that all documents be checked out before users can edit them. This provides a greater level of control in the editing process.
You can enable versions on lists as well as document libraries. However in a list, there is no concept of major and minor versions.
When you create a document library, you are asked to select the document template that will be associated with the library by default. An example of this is shown later in Figure 4-29. This association does not affect what type of documents you can store in a library but instead determines the type of file that is created when a user clicks the New button on the Document Library toolbar. The choice of templates to select from includes:
When customizing a SharePoint site, the goal is to implement elements that encourage reuse and standardization. If you want to use a document library to store sales presentations, it's a good idea to associate the standard organizational template for sales presentations with the library so that the New button generates a blank presentation that users can then customize and use for their own purposes.
In cases where you have a document, such as a Word file containing your company's logo or letterhead, you may want to use that as the default document template. Another common example is an Excel spreadsheet containing the fields and calculations needed for a report that users often create when in the document library.
You have three ways to associate a custom document template with a document library:
Edit the template directly and save the changes: This is most appropriate where an existing template already exists. However, it's not practical if you already have a standard organizational template available.
Upload the template to a specific location and change the URL: In this case, you change the URL for the document library template to point to the new location. This is appropriate if you have a single location with multiple templates already, or you may want to have the document template associated with more than one document library. This method is explored in the next Try It Out.
Give your template the filename of template.doc and upload it to the Forms folder of the document library: When you do this, you are prompted to overwrite the existing template. This is suitable for situations where you have an existing template, but you only want to associate it with a single document library.
Create a custom content type and associate your template with the content type: This is a preferred method in many scenarios. which we will review in detail in Chapter 6.
TRY IT OUT: Associate a Custom Document Template with a Library by Changing the URL
From the main page of the Project Gros Morne site, select All Site Content from the side navigation.
Click on the Site Assets link.
Click the Add document link. The Upload Document dialog appears.
Click the Browse button and navigate to the location of the resource files for this chapter.
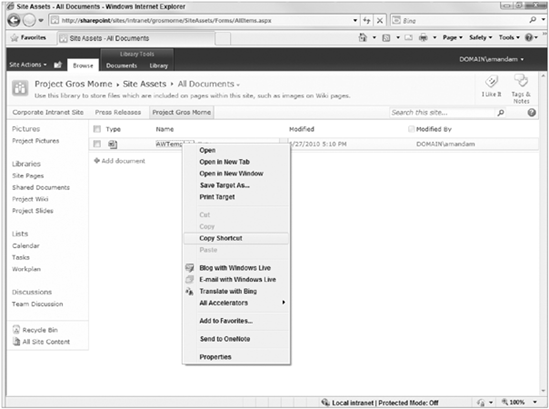
When the
AWTemplate.docxfile is selected, click OK to complete the upload. You will be returned to the Site Assets library where your file will be listed.Right-click on the AWTemplate file, as shown in Figure 4-29, and select the Copy Shortcut link.
Click on the Shared Documents library from the side navigation bar.
Select Library Settings from the Ribbon.
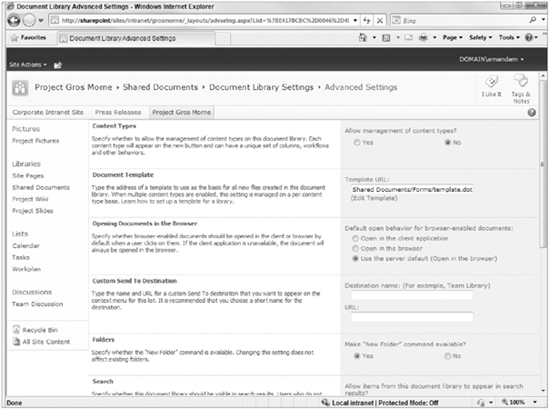
Select the Advanced Settings link. You will be redirected to the Advanced Settings page, as shown in Figure 4-30.
Update the Template URL field by clearing out the current value and pasting (Ctrl+V) the URL you copied in step 6.
Click OK.
Return to the shared documents library and create a new document using the method described in Chapter 3. You will notice that the file will open with a customized template.
This chapter discussed how to customize column types and views that are associated with lists and libraries. From it, you learned the following:
The advantages of creating a work environment that more closely reflects the users' actual business activities. By customizing SharePoint to operate in accordance with common business processes, users can focus more on their specific work duties rather than on technology. However, it is always important to remember not to overcustomize. You should only implement changes that offer value to the business and operational environment.
The types of columns that you can create in SharePoint and their specific configuration alternatives. Understanding what is possible from a configuration perspective is a key element in recognizing the appropriate customization approach.
The difference between a list-centric column and a site column. Unlike list-centric columns that you must manually create on every single list in which they appear, site columns are stored in a central gallery on a SharePoint site and are available for use on all lists and libraries of the current site and each site below it.
The various view types in SharePoint and the process for creating each. This included some special view types in SharePoint, such as the Gantt view and Access views, which help provide a greater level of presentation to a standard SharePoint list.
The importance of working with your stakeholders to gain an understanding of their specific needs for information on specific subject areas. You then discovered how you can take all the concepts covered in this chapter to create a completely customized list in SharePoint, composed of multiple custom columns and a custom view that can address those needs.