
WHAT YOU WILL LEARN IN THIS CHAPTER
Web parts are one of the primary means by which content is displayed in SharePoint. A web part may display static content, a view of a list or library, the interface for a business application, or virtually anything else. This chapter explains which web parts are available in SharePoint, how to arrange them on your pages, and how to connect them together to create rich, composite user interfaces.
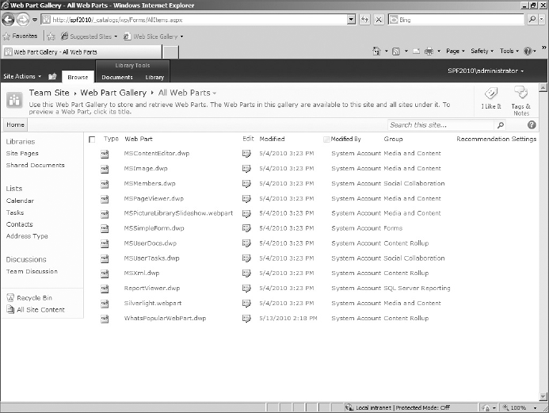
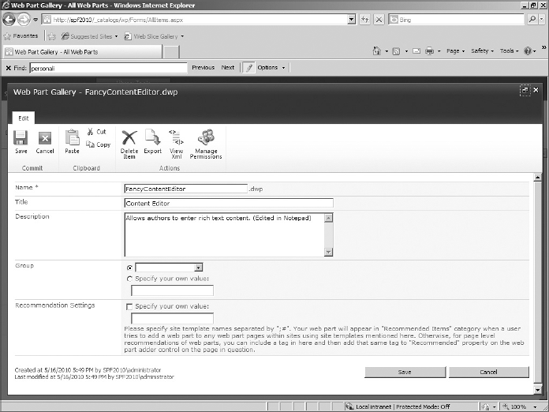
The Web Part Gallery is a special, hidden document library that contains the list of allowable web parts for the site collection. In Figure 10-1, you can see the Web Part Gallery contents as they appear in the browser. To display the Web Part Gallery in the browser, choose Site Actions
The available web parts are different depending on the edition of SharePoint and the SharePoint features that have been activated. You can also export web parts from your SharePoint sites and upload them into the Web Part Gallery. That technique will be covered later in the chapter.
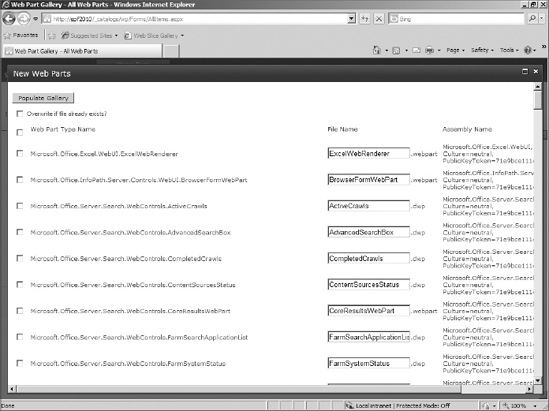
You can also add additional web parts by choosing the Documents tab from the ribbon and clicking New Document. SharePoint then checks its web.config file to see which web parts have been authorized to run in the web application and displays the dialog shown in Figure 10-2. To add one or more of the web parts to the Web Part Gallery, select the appropriate checkboxes and click the Populate Gallery button.
Some of the key web parts are:
List View Web Part—One of the most common SharePoint web parts, it is almost never shown by this name. That's because when a new list or library is created, a List View Web Part with the same name is created to go with it. Most standard list types include a hidden summary view that the automatic web part uses by default. You can edit the properties of the current view, or you can replace it with any existing view of the list or library. More about this web part was covered in Chapter 8, "XSLT Data Views and Forms."
Page Viewer Web Part—Enables you to add content from another location to a page. This content can be another web page (or web application), a file share, or even an individual document and is typically displayed in an
IFRAMEon the current page.Note
If the content cannot be rendered in an
IFRAMEin the user's browser, a popup window may be opened automatically to display it.Form Web Part—Enables you to add HTML form field elements and other content to a page.
Content Editor Web Part—Enables you to insert virtually any valid HTML into a page. Although it is often used for static rich text, this web part also allows client-side scripts.
XML Web Part—Enables you to display and style XML data. Both the XML data and the XSL styling can be statically entered in the web part, or read from an external source. This allows for flexible presentation of many kinds of information.
Data View/Form Web Part—Not available for insertion directly from the web interface. It can be added only through SharePoint Designer and is one of the most powerful tools in your arsenal. Several chapters later in the book are dedicated to showing you how to use the amazing Data View Web Part. More about this web part was covered in Chapter 8, "XSLT Data Views and Forms."
To add a web part to a page, you must first create or open a web part page in SharePoint Designer. To see the list of pages in a site, click Site Pages in the Navigation bar on the left. The screen shown in Figure 10-3 appears.
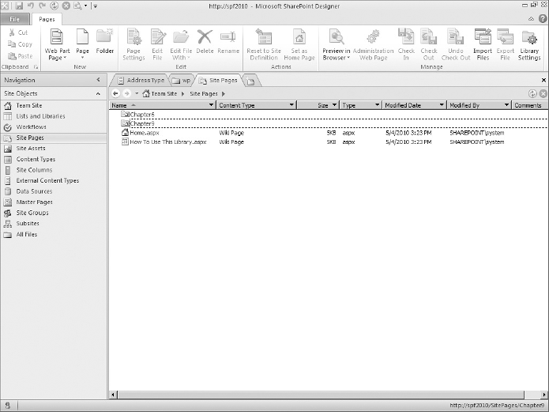
Site Pages is actually a document library that is automatically added when the site is first created. You can also create pages in document libraries and in the folders of the site directly. To create pages directly in the site's folders, click All Files in the Navigation bar on the left.
Note
The advantage of storing your pages in document libraries is that they are treated like any other document in SharePoint. That means you can use versions, content approval, custom permissions, and workflows to manage them. This functionality is the basis of all content management websites.
To create a web part page, click the Web Part Page button in the ribbon. The layout choices shown in Figure 10-4 appear. Hover over any of the choices to display a tooltip describing the arrangement of the web part zones.

After you choose the best layout option, SharePoint Designer adds a web part page with that layout to your library. The page will first be named Untitled1.aspx, so be sure to rename it before editing it. To edit the page, choose the file and click the Edit Page button in the ribbon. The two modes for editing pages are normal and advanced. Choose normal editing when you simply want to manage the web parts on a page. Choose advanced editing when you want to alter the layout of the page drastically. You need to choose advanced editing mode when you want to add or remove the web part zones on the page.
Warning
Editing pages in advanced mode causes the pages to become customized, which negatively impacts performance. Avoid using that option if the site will have a high volume of web traffic. The reason performance is affected is that your page will originally be read from the web server's file system, and after customization, it is detached from the site definition and stored in the content database. From that point forward, the page is read from the content database, which is much slower than reading it from the file system.
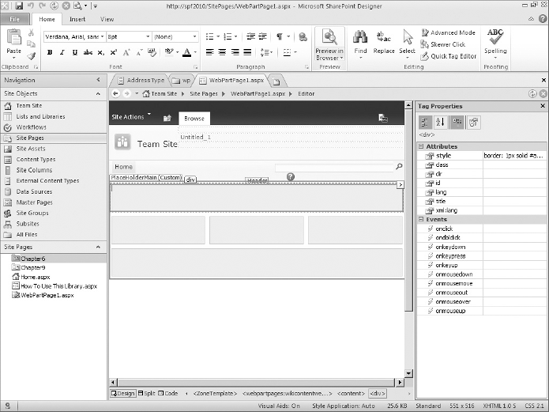
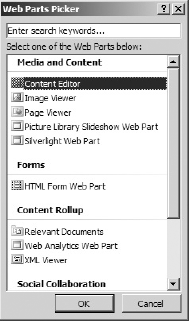
Figure 10-5 shows the page in normal edit mode. Notice the gray areas of the page. These gray areas are web part zones. Web part zones are the only places where you can position web parts. To add a web part to a zone, position the cursor inside the destination zone, and from the ribbon, choose the Insert tab and select Web Part. SharePoint Designer displays a list of web parts that you can choose. If you have many web parts in your site's Web Part Gallery, you can choose More Web Parts at the bottom of the list to display the dialog in Figure 10-6.
You can also insert web parts to display and manipulate data in lists and libraries by clicking one of the buttons in the Insert tab
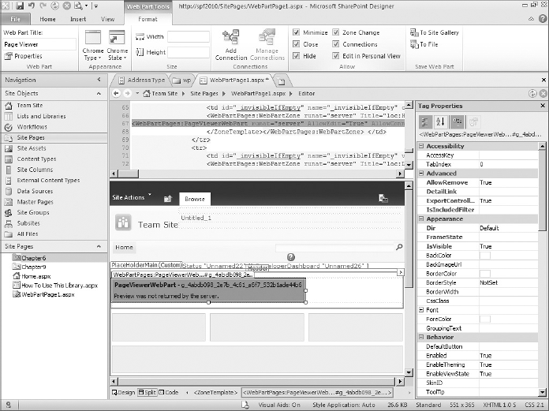
After you add a web part to the zone, a new tab named Format appears in the ribbon. The Format tab allows you to change the appearance and custom properties of the web part. You can see the Format tab in Figure 10-7. The web part in the figure is the Page Viewer Web Part, which you can use to display a web page from another website.
The following table explains the different settings you can change via the Format tab in the ribbon:
NAME | DESCRIPTION |
|---|---|
This is the text displayed at the top of the web part. | |
A web part's chrome is the combination of its surrounding border and title bar. This setting allows you to change which part, if any, of the chrome is displayed. | |
This option controls whether the web part is expanded or collapsed. | |
Width/Height | Controls the size of the web part. If you leave it blank, the web part will be sized automatically. |
Minimize | The web part can be minimized by the user. |
Close | The web part can be closed by the user. |
Hide | The web part can be made invisible by the user. This means that the web part is invisible unless the page is being edited. |
The web part can be moved between web part zones by the user. | |
The user can add or remove web part connections. | |
The user can edit the web part's properties if he edits the page in personal mode. This is covered later in the chapter. |
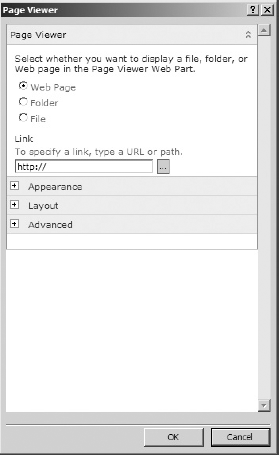
Clicking the Properties button in the ribbon displays a dialog similar to the one shown in Figure 10-8. This dialog allows you to edit the properties that are specific to that type of web part. You can see the different options for the URL to display and the type of link that the URL represents.
The Save Web Part section in the ribbon has two options for exporting the configuration of the web part's properties. You can choose to save the configuration to the Web Part Gallery or to a file. If you export to a file, you can upload it to any other site's Web Part Gallery, provided that the destination site has that web part installed and has been configured to allow it to be used.
Note
If a page is giving you a web part error or someone has accidently closed a web part, you can use Web Part Page Maintenance to remove the offending web part or restore the closed web part. To use Web Part Page Maintenance, navigate your browser to your ShaerPoint site and choose Page tab
Personalization is a functionality in SharePoint that allows users to customize the configuration of web parts for their own use. Normally, users will see the shared view of a page. When a page is in shared view, any modifications are seen by everyone. To modify the shared view of a page, the user must have Design permission for the site.
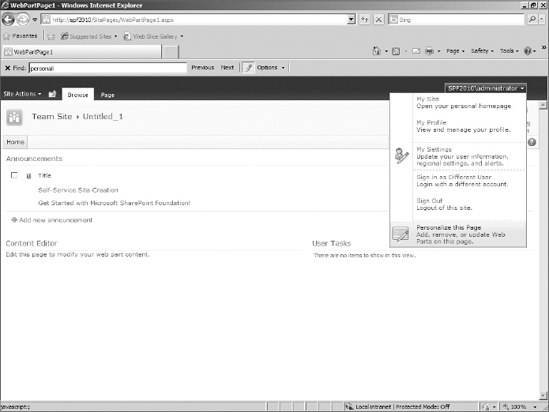
When a page is in personal view, users can modify the page, but those modifications are only seen by the individual user. SharePoint stores personalized web part configurations separately for each user. To place a web part page into personal view, choose Personalize this Page from the personal menu as shown in Figure 10-9. To revert to shared view, choose Show Shared View from the same menu. You can also remove your personalizations by choosing Reset Page Content.
One reason you may want to use the personal view is to accommodate web part configurations that would only have value for yourself. Examples include web parts that would display your own stock portfolio or a rollup of blogs that are of interest to you.
Personalize a Web Part Page
In this activity, you personalize a web part page and compare the differences between the shared and personal view of the page.
Navigate your browser to your SharePoint site.
Click Site Pages on the Navigation bar on the left.
Click
MyWebPartPage2.aspxthat you created in a previous activity.Click your name in the upper-right corner of the screen.
Select Personalize this Page from the menu.
Hover your mouse over the title of the HTML Form Web Part, and click the black down arrow to display the web part menu.
Choose Edit My Web Part from the menu.
Notice the following message at the top of the web part properties pane to the right: "The custom properties of the Form Web Part are not available in personal view."
Click the Add a Web Part hyperlink in the Middle Column web part zone.
Choose Media and Content

Click the open the tool pane hyperlink in the Page Viewer web part.
Enter
http://www.microsoft.comin the Link textbox in the Page Viewer properties pane on the right.Click the OK button.
Drag each web part to a different web part zone.
Save your changes by clicking the Page tab in the ribbon and clicking Stop Editing.
Switch to the shared view of the page by clicking your name in the upper-right corner of the screen and selecting Show Shared View from the menu.
Notice that the Page Viewer Web Part is not on the page and the web parts have returned to their original positions.
Return to the home page of your site by clicking the Browse tab and then the Home tab from the ribbon.
Click Site Pages on the Navigation bar on the left.
Click
MyWebPartPage2.aspxthat you created in a previous activity.Notice that the personal view appears automatically.
From the ribbon, click the Page tab and select Edit Properties.
Click the "Open Web Part Page in maintenance view" hyperlink.
Notice that the list contains the web parts that are on the web part page.
Notice the new column, Personalized, added at the end of the list.
Click the Switch to shared view hyperlink.
Click the Go Back to Web Part Page hyperlink.
Remove all personalizations by clicking your name in the upper-right corner of the screen and selecting Reset Page Content from the menu.
Click OK in the confirmation dialog box.
How It Works
When you personalize a web part page, SharePoint stores your changes in the content database separately from the shared view of the page and loads your personal view whenever you access the page. When you were in personal view, you saw that some web parts, including the HTML Form Web Part, only allowed the Appearance and Layout settings to be changed. The developer of the web part decides which properties can be changed in the web part properties pane and which properties can be personalized. Though you may be restricted from modifying the custom settings of some web parts, you can still minimize, close, and move them around the page. Additionally, you can add your own web parts and configure them to suit your needs.
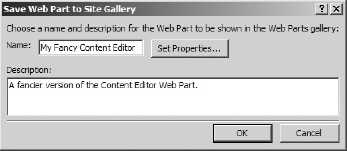
As previously mentioned, you can export the configuration of your web parts. This feature is very useful when you need to add the same web part to multiple pages with the same configuration. To export a web part, open a web part page in SharePoint Designer. Then, select a web part and from the Format tab, click the To Site Gallery button. As shown in the dialog in Figure 10-10, you can enter a name and description for the web part. You should always give a unique name for the web part to avoid confusion for other users. Also, you can click the Set Properties button to modify the new web part's properties before saving it to the Web Part Gallery.
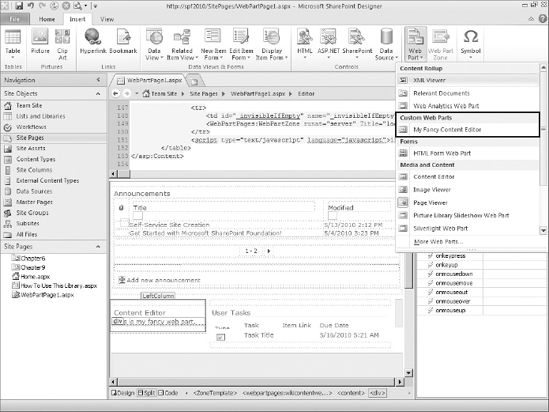
When you click the OK button, the web part is saved to the Web Part Gallery. You can see the exported web part in the menu shown in Figure 10-11. When that web part is added to a page using the browser or SharePoint Designer, it will be automatically configured.
You can also export the web part to a file by choosing the Format tab and clicking the To File button. A File Save dialog appears, allowing you to choose the location and name to save the web part configuration. Configuration files can have either the .webpart or .dwp file extension. If you open the web part file, you will see XML like the file shown in Figure 10-12.
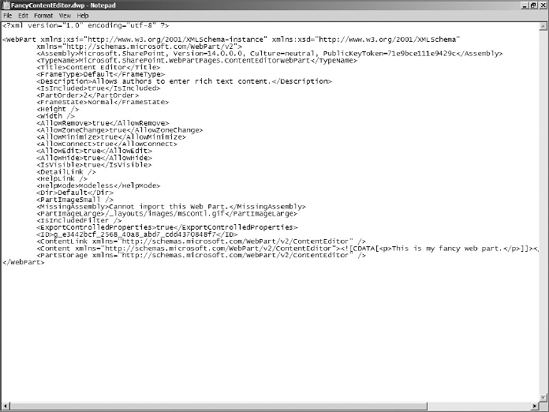
If you are careful, you can modify this file, thereby changing the properties of the web part before you upload it to the Web Part Gallery. If you are planning to edit these files routinely, purchasing XML editing software that will validate your file, rather than using Notepad, would be a good idea.
Note
If you rename the web part file to have an .XML file extension, you can open it in Internet Explorer as a quick check to see if your XML is properly formatted. If the file is valid XML, Internet Explorer will show you the contents of the file. Otherwise, Internet Explorer will display an error and indicate which part of the file is causing the problem.
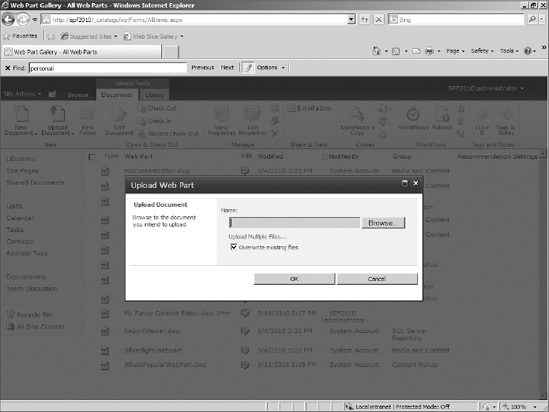
To upload the web part file, you must navigate your browser to the Web Part Gallery by choosing Site Actions
Warning
Be sure to change the filename of the web part file so it is different from the other web parts in the Web Part Gallery or you may overwrite an out-of-the-box web part.
After the web part uploads, the dialog shown in Figure 10-14 appears. In this dialog, you can change the name, title, and description of your web part. You can also add the web part to a group to make it easy to find. If you don't choose a group, the web part will be added to the Custom Web Parts group. After you click the Save button, the web part becomes available for use in the browser and SharePoint Designer.
Export a Web Part Using the Browser
In this activity, you export a web part and reuse it in the same site.
Navigate your browser to your SharePoint site.
Click Site Pages on the Navigation bar on the left.
Click
MyWebPartPage.aspxthat you created in a previous activity.Hover your mouse over the title of the Content Editor Web Part and click the black down arrow to display the web part menu.
Choose Export from the menu.
When the File Download dialog appears, save the file to your desktop.
Select Site Settings from the Site Actions menu.
Click the Web Parts hyperlink under the Galleries section.
From the ribbon, select the Documents tab and click Upload Document.
Click the Browse button and select the web part file you exported to your desktop.
Click the OK button to upload the web part.
When the Web Part Gallery dialog appears, enter Hello World in the Name and Title textboxes.
Delete the text from the Description textbox.
Click the Save button from the ribbon.
Return to the home page of your site by choosing Browse tab and then the Home tab from the ribbon.
Click Site Pages on the Navigation bar on the left.
Click
MyWebPartPage2.aspxthat you created in a previous activity.Place the page in edit mode by choosing the Page tab and clicking Edit Page from the ribbon.
Click the Add a Web Part hyperlink in the Header web part zone.
Select Miscellaneous
Notice that the Content Editor Web Part was added to the Header web part zone and was already configured with the same settings as the web part that was exported.
Save your changes by choosing the Page tab and clicking Stop Editing from the ribbon.
How It Works
When you exported the web part, an XML file was generated that contained all the exportable settings of the web part. Uploading the web part file to the Web Part Gallery adds a new web part with the preconfigured settings. Adding the new web part to a page automatically configures it with those settings. You can even upload the file to a Web Part Gallery in another site as long as the web part has been installed and has been configured to allow the web part to be used.
Export a Web Part Using SharePoint Designer
In this activity, you export a web part and reuse it in the same site.
Open SharePoint Designer from your Start menu.
Click the Open Site button.
When the Open Site dialog appears, enter the URL to your site in the Site name textbox and click the OK button.
If a Windows Security dialog appears, enter your username and password for the SharePoint site and click the OK button.
After the site opens, select Site Pages from the Navigation bar on the left.
Click
MyWebPartPage2.aspxthat you created in a previous activity.Click the Image Viewer Web Part located in the Left Column web part zone.
Export the web part to the Web Part Gallery by choosing the Format tab and clicking the To Site Gallery button.
When the Save Web Part to Site Gallery dialog appears, enter the following values:
FIELD
NAME
DESCRIPTION
Value
My Image
A preconfigured Image Viewer Web Part
Click the Set Properties button.
Notice that the Image Viewer properties dialog is the same as the dialog shown when you click the Properties button on the Format tab in the ribbon.
Click Cancel to close the Image Viewer properties dialog.
Click OK to save the web part to the Web Part Gallery.
Click Site Pages in the Navigation bar on the left.
Click
MyWebPartPage.aspxthat you created in a previous activity.Click the space under the Site Users Web Part located in the Middle Column web part zone.
Insert the new My Image Web Part by clicking the Insert tab from the ribbon and choosing Web Part
Click the Save button in the Quick Launch bar at the top of the screen.
Preview the page by selecting the Home tab from the ribbon and clicking Preview in Browser.
Notice that the new web part is present on the screen, already configured with the image.
How It Works
The web part export functionality in SharePoint works in a way similar to the functionality in the browser. Both allow you to export a web part with its configuration settings. However, the SharePoint Designer experience is much simpler and allows you to change the exported web part's settings without affecting the existing web part on the page. You can still export the web part to a file as the browser does, but you would only need to do that when you want to reuse the web part in a different site collection.
SharePoint is quickly becoming the "glue" that ties together the disparate back-end systems of any enterprise. With web parts, you can expose those back-end systems through a simple, consistent user interface. Additionally, you can tie these web parts together, thereby tying the back-end systems themselves together, as will be shown in the next section.
One of the most powerful features of web parts is their ability to exchange data with each other via web part connections. A web part connection is a link between two web parts on the same page. Web parts can exchange a single value or multiple values. For multiple values, the data is exchanged via a row-like structure or a table-like structure. Exchanging a single value is the most common scenario, though.
To create a web part connection, open a web page in SharePoint Designer and ensure it has two or more web parts. Select the web part that will provide the data to the other web part, and from the ribbon, choose the Format tab and click the Add Connection button. The Web Part Connections Wizard shown in Figure 10-15 launches.
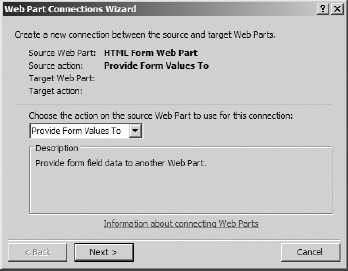
In the first step of the wizard, you can choose whether the web part will provide data or receive data from the other web part. Because the web part chosen in Figure 10-15 is an HTML Form Web Part, which only provides data, only the option to provide form values appears in the drop-down list. When you click the Next button, the dialog in Figure 10-16 appears.
In the second step of the wizard, you can either connect to a web part on this current page or another page in the site. When you choose the second option, you can click the Browse button to find the page you want. After you have selected an option, click the Next button to display the next step in the wizard, shown in Figure 10-17.
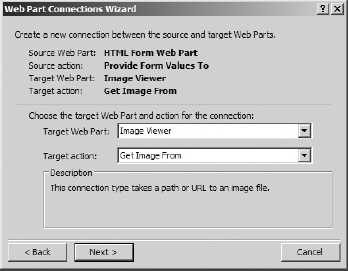
In this step, you select the target web part from the first drop-down list and the target property from the second drop-down list. In this example, the target web part and property are the Image Viewer and Image URL. That means that the first web part will provide the Image Viewer web part the value it needs to display its image. Click the Next button to display the step shown in Figure 10-18.

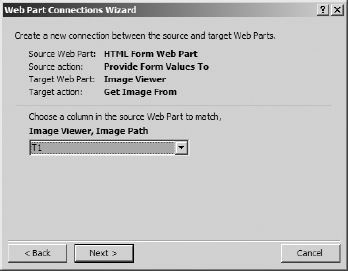
In this step, you must select the property from the source web part that will provide the value for the property on the destination web part. The first web part is the HTML Form Web Part, which allows you to add HTML and JavaScript to a web page without using a tool such as SharePoint Designer. By default, it contains the following HTML:
<div onkeydown="javascript:if (event.keyCode == 13) _SFSUBMIT_">
<input type="text" name="T1"/>
<input type="button" value="Go" onclick="javascript:_SFSUBMIT_"/>
</div>
Any input elements in the code snippet will appear in the drop-down list shown in Figure 10-18. In this case, only the input element named T1 appears, which is selected in Figure 10-18. Click Next to display the final confirmation step, and, finally, click Finish to create the web part connection.
Note
In the browser, clicking the OK or Apply button on any arbitrary screen will save your changes. In SharePoint Designer, you will almost always have to click the Save button in the Quick Launch bar at the top of the screen to save your changes.
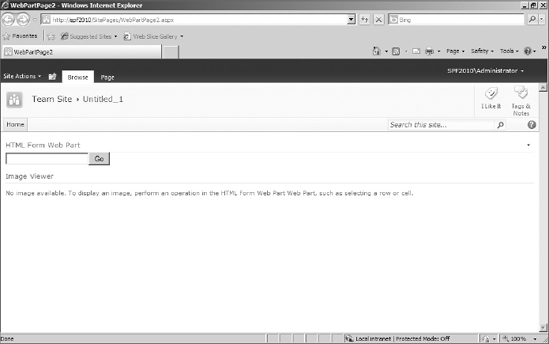
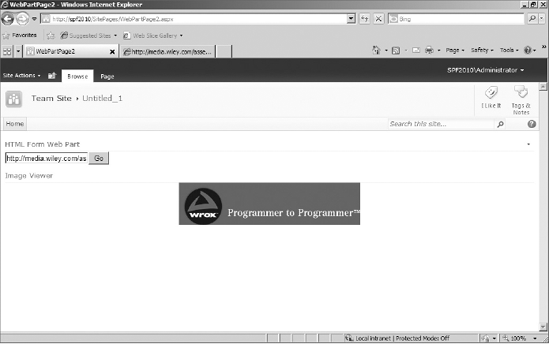
After you save your page, from the ribbon, click the Home tab and click Preview in Browser to test your web part connection. In Figure 10-19, you can see the web page with the two web parts. If you enter any valid URL for an image in the textbox and click the Go button, the Image Viewer will display the image you entered. In Figure 10-20, you can see the Wrox logo after its location was entered in the textbox.
Create a Web Part Connection Using the Browser
In this activity, you connect three web parts using the browser.
Navigate your browser to your SharePoint site.
Click More Options from the Site Actions menu.
When the Create dialog appears, select Custom List from the list.
Enter Departments in the Name textbox, and click the Create button.
Add a new item by selecting the Items tab from the ribbon and clicking New Item.
Enter Information Technology in the Title textbox and click the Save button.
Repeat Steps 5 and 6 using the following data to create more items:
TITLE
Human Resources
Operations
Sales
Marketing
Click More Options from the Site Actions menu.
When the Create dialog appears, select Tasks from the list.
Enter Departmental Tasks in the Name textbox, and click the Create button.
After the list is created, select the List tab from the ribbon and click Create Column.
Enter the following information and click the OK button at the bottom of the screen:
FIELD
VALUE
Column name
Department
Type
Lookup
Get information from
Departments
In this column
Title
Repeat Steps 5 and 6 using the following data to create new items:
TITLE
STATUS
DEPARTMENT
Upgrade to Exchange 2010
Not Started
Information Technology
Send out employee satisfaction surveys
Completed
Information Technology
Put together sales kits
Not Started
Marketing
Attend industry conference
In Progress
Sales
Calculate commissions
Not Started
Sales
Click More Options from the Site Actions menu.
When the Create dialog appears, select Web Part Page from the list, and click the Create button.
Enter MyWebPartConnectionsPage in the Name textbox and keep the default layout selected in the Layout listbox.
Select Site Pages from the Document Library drop-down list.
Click the Create button.
When the newly created web part page loads, click the Add a Web Part link in the Left Column web part zone.
Select Lists and Libraries
Click the Add a Web Part link in the Middle Column web part zone.
Select Lists and Libraries
Hover the mouse over the title of the Departmental Tasks web part, and select Edit Web Part from the web part menu.
Click the Edit the current view hyperlink in the web part properties pane to the right.
Select the Department checkbox, and click the OK button.
Place the page into edit mode by selecting the Page tab from the ribbon and clicking Edit Page.
Click the Add a Web Part link in the Header web part zone.
Select Forms
Hover the mouse over the title of the HTML Form Web Part, click the black down arrow, and select Edit Web Part from the web part menu.
Click the Source Editor button in the web part properties pane.
When the Text Editor dialog appears, replace the existing code with the following snippet of HTML:
<div onkeydown="javascript:if (event.keyCode == 13) _SFSUBMIT_">
<select name="T1">
<option value="Not Started">Not Started</option>
<option value="In Progress">In Progress</option>
<option value="Completed">Completed</option>
<option value="Deferred">Deferred</option>
<option value="Waiting on someone else">Waiting on someone else</option>
</select>
<input type="button" value="Go" onclick="javascript:_SFSUBMIT_"/>
</div>
Hover the mouse over the title of the Departments web part, click the black down arrow, and select Connections
When the Choose Connection dialog appears, ensure Get Filter Values From is selected in the Connection Type drop-down list, and click the Configure button.
Enter the following values and click the Finish button:
FIELD
VALUE
Provider Field Name
ID
Consumer Field Name
Department
Hover the mouse over the title of the HTML Form web part, click the black down arrow, and select Connections
When the Choose Connection dialog appears, ensure Get Filter Values From is selected in the Connection Type drop-down list, and click the Configure button.
Enter the following values and click the Finish button:
FIELD
VALUE
Provider Field Name
T1
Consumer Field Name
Status
Save your changes by selecting the Page tab from the ribbon and clicking Stop Editing.
Click the select arrows in the Departments web part. Notice how the Departmental Tasks Web Part changes based on the department selected.
Click the select arrow next to the Information Technology department.
Select each value from the drop-down list and click the Go button in the HTML Form Web Part. Notice that the Departmental Tasks Web Part is filtered even further.
Select Not Started from the drop-down list in the HTML Form Web Part, and click the Go button.
Click the select arrows in the Departments Web Part. Notice how the Departmental Tasks Web Part changes based on the department selected.
How It Works
This activity is a one of the most common examples of web part connections: you get data from source A and filter it using data from source B or from user input. When you added the lists to the web part page, a web part was created for each list using the list's default view. Afterward, the two web parts could be connected with the Departments Web Part filtering the Departmental Tasks Web Part on the Department column. The lookup column from the Departmental Tasks list to the Departments list is not actually required to make the web part connection. A text column could have been used, but using a lookup column to a list or a choice column instead to enforce the domain integrity of that column is a best practice.
The HTML Form Web Part was added to the page to supply an additional filter on the Status column. This showed that a web part can have more than one web part connection and that a List View Web Part can have more than one filter supplied to it. At the end of the activity, you use the HTML Form and Departments Web Parts alternately to show that the web parts and the filter values they supplied operated independently. Though the two data web parts in this activity were both lists, the next activity will show that any data web part can both provide and consume filters via web part connections.
Create a Web Part Connection Using SharePoint Designer
In this activity, you connect three web parts using SharePoint Designer.
Before you start this activity, you must finish the Setup databases activity from Chapter 7, "Data Sources and External Content Types."
Open SharePoint Designer from your Start menu.
Click the Open Site button.
When the Open Site dialog appears, enter the URL to your site in the Site name textbox, and click the OK button.
If a Windows Security dialog appears, enter your username and password for the SharePoint site, and click the OK button.
After the site opens, select Data Sources from the Navigation bar on the left.
Click the Database Connection button on the ribbon.
Click the General tab and enter Categories in the Name textbox.
Click the Source tab and click the Configure Database Connection button.
When the Configure Database Connection dialog appears, specify the following values specific to your environment and click Next:
Server Name
User name
Password
Click OK when the warning dialog appears.
Select AdventureWorks from the Database drop-down list.
Select ProductCategory from the table list box.
Click the Finish button to close the Configure Database Connection dialog.
Click the Sort button.
When the Sort dialog appears, select Name from the Available fields list box, and click the Add button.
Click the OK button to close the Sort dialog.
Click the OK button to close the Data Source Properties dialog.
Repeat Steps 6–17 using the following values:
DATA SOURCE NAME
TABLE NAME
Subcategories
ProductSubcategory
Products
Product
Select Site Pages from the Navigation bar on the left.
Click the Web Part Page button from the ribbon and choose the middle image in the first row.
After the new page appears in the Site Pages library, change its name to MyWebPartConnectionsPage2.aspx. Be sure to end the filename with the
.aspxfile extension or the page will not work properly.After SharePoint Designer renames the page, click the Edit File button from the ribbon.
When the page loads, click inside the top gray box.
From the ribbon, click the Insert tab and choose Data View
Click inside the middle gray box in the second row.
Select the Insert tab from the ribbon and choose Data View
Click inside the bottom gray box.
Select the Insert tab from the ribbon and choose Data View
Click the Categories Web Part, select the Web Part tab, and click Add Connection.
When the Web Part Connections Wizard loads, ensure Send Row of Data To is selected in the drop-down list and click Next.
Ensure the Connect to a Web Part on this page is selected, and click Next.
Enter the following values and click Next:
FIELD
VALUE
Target Web Part
Subcategories
Target action
Get Filter Values From
Assign ProductCategoryID in the Categories column to ProductCategoryID in the Subcategories column, and click Next.
Select Name from the drop-down list and select the Indicate current selection using checkbox.
Select the ProductCategoryID checkbox and click OK.
Click Next.
Click Finish to close the Web Part Connections Wizard.
Click the Subcategories Web Part, select Web Part tab from the ribbon, and click Add Connection.
When the Web Part Connections Wizard loads, ensure Send Row of Data To is selected in the drop-down list and click Next.
Ensure the Connect to a Web Part on this page is selected, and click Next.
Enter the following values and click Next:
FIELD
VALUE
Target Web Part
Products
Target action
Get Filter Values From
Assign ProductSubcategoryID in the Categories column to ProductSubcategoryID in the Subcategories column and click Next.
Select Name from the drop-down list and select the Indicate current selection using checkbox.
Select the ProductSubcategoryID checkbox and click OK.
Click Next.
Click Finish to close the Web Part Connections Wizard.
Click the Save button in the Quick Launch bar at the top of the screen.
Test your page by selecting the Home tab from the ribbon and clicking Preview in Browser.
Click Clothing inside the Categories Web Part.
Click Gloves inside the Subcategories Web Part.
Notice that the contents of the Subcategories and Products Web Parts change depending on the filters selected.
How It Works
In this activity, you saw how three web parts can be connected in a chain where each web part filters the next. The ProductCategory, ProductSubcategory, and Product tables from the AdventureWorks database were good candidates for this exercise because they already had columns in common due to the foreign key relationships between the tables. When you inserted the data connections for the tables into the web part zones, data view web parts were added to the page. Those web parts can both provide and consume data from web part connections. To reflect the database relationships between the tables, the web parts were connected in a daisy chain where the Categories Web Part filtered the Subcategories Web Part, which, in turn, filtered the Products Web Part.
When you previewed the page in the browser, you may have noticed that the web parts were already filtered. The first row in the Categories and Subcategories Web Parts was automatically selected. Though all of these web parts were of the same type, you can connect any number and type of web parts.
This section of the chapter gives you some ideas for applying what you have learned so far. Two of the more common uses for web parts beyond simple web portals are dashboards for reporting and workspaces that revolve around a single task or job function.
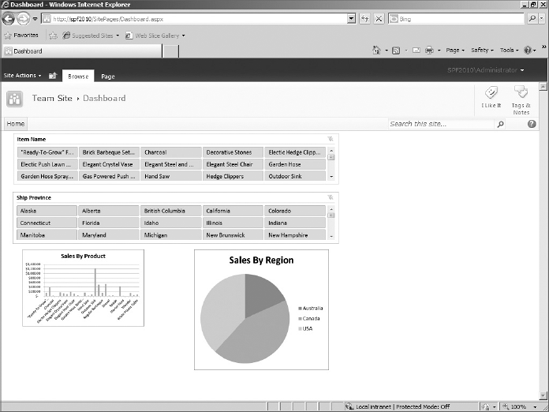
In Figure 10-21, you can see an example of a dashboard. The Item Name and Ship Province Web Parts filter the data used to create the bar and pie charts at the bottom of the screen. In this type of dashboard, the user can manipulate the filters to examine the data from different perspectives. You can create dashboards from any number or type of web parts, but the key is to display charts and graphs rather than tables or lengthy paragraphs. The end result should allow the user to take the "pulse" of the company or department at a glance.
Task-centric workspaces are websites that revolve around a particular job function or repetitive task. If you were to create such a site for a user who worked in a call center, the web pages would be populated with web parts that tied the various back-end systems together in one place. Call center users likely need to use a ticketing system for tracking calls, a customer relationship management system for recording ongoing customer interactions, and a searchable knowledge base of information to help the customer. SharePoint gives you the power to bring those systems together so users have one place to go for their information needs. No longer will users have to open several applications on their desktop and constantly switch between them to get their jobs done.
This chapter explains how you can customize the user interface of SharePoint using web parts. SharePoint provides many web parts out of the box and a massive community exists providing free and for-sale web parts for your use. With web parts, you can quickly create workspaces for knowledge workers and dashboards for managers and executives. In the next chapter, you learn the basics of workflows and how they can extend SharePoint with powerful capabilities.