
WHAT YOU WILL LEARN IN THIS CHAPTER
SharePoint 2010 comes in two flavors, SharePoint Foundation and SharePoint Server. This chapter covers the pages found in SharePoint Foundation. The goal of this chapter is to give you the conceptual and technical fundamentals required to customize your SharePoint site. The assumption is that you have a basic understanding of HTML, CSS, and web development concepts.
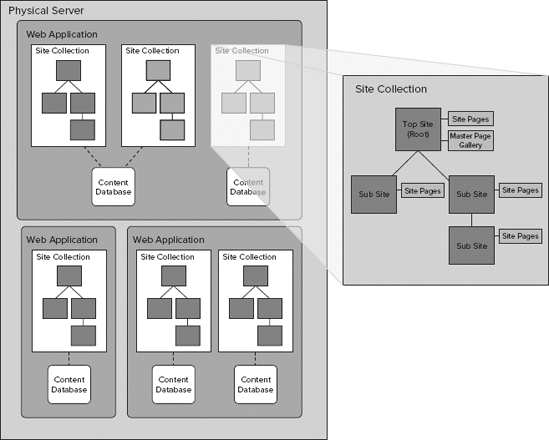
A basic understanding of SharePoint site architecture will help you understand the nuts and bolts of SharePoint pages. The entry point to a SharePoint site is a web application, which is the highest level "container" for sites and has common services and features available to all sites within it. Within a web application is at least one site collection. A site collection is a group of sites that share properties for managing content and user permissions. The top-level or root site within a site collection is where you manage many administrative functions and store common files used in all sub sites.
Figure 3-1 illustrates the site hierarchy in SharePoint and highlights the libraries discussed in this chapter. SharePoint pages can be stored in any document library.
If you have a background in web design and development, you are familiar with physical web pages that you can edit directly using page editing software or Notepad. This type of site is fine for very small sites. Larger sites with more than a few pages are inefficient and cumbersome to maintain because of the redundant structural and behavioral instructions repeated in each page.
In contrast, SharePoint manages web content efficiently by storing content separately from structural and behavioral instructions. That way, only one physical copy of the page file is required.
The physical pages that live in the SharePoint file system serve as the master blueprint for any page inheriting from it. You should think of these as the "sacred originals that should never be touched." These "sacred originals," along with other information that helps define your site, form a master template called a site definition. This site definition lives on the hard disk of each file server (or web front end), and is used to build each actual SharePoint site that a user creates.
Most pages on a SharePoint site are assembled from a combination of these "sacred original" physical pages, and instance data for the page that lives in the content database. Content such as page content, HTML, and most scripts and styles live in this database and not on the file system.
Construction of the page takes place when the browser requests it. That means that when you look at a SharePoint page in your browser, a physical version of that web page does not exist. It blows your mind, doesn't it?
Figure 3-2 shows the process by which a page is assembled by a SharePoint server.

Note
For more details about how SharePoint is physically structured, see Appendix B.
Two core types of pages are in SharePoint 2010: application pages and site pages. Understanding the differences between the two types of pages can save you a few headaches. This chapter focuses on site pages as used in SharePoint Foundation 2010. SharePoint Server 2010 also includes special site pages, called publishing pages, with extra features specifically for managing large amounts of web content. These will covered in detail in Chapter 4, but keep in mind that everything covered in this chapter also applies to publishing pages.
Application pages are more like traditional web pages, in that they are stored directly on the file system of the web front-end, and are complete in themselves. While they will reflect the styles you apply to your site (see Chapter 5), you do not otherwise have any ability to edit these pages through SharePoint Designer.
Site pages are pages that users edit, add web parts to, and can create and customize through the browser or with tools such as SharePoint Designer. Site pages are stored in the site collection's content database.
Most SharePoint pages have the following key characteristics:
They use an ASP.NET master page that contains SharePoint-related placeholders that provide the majority of the page's look and feel.
One of these placeholders,
PlaceHolderMain, contains the actual instance information for the page. Within that placeholder is the magic that makes each page type unique.
The Web Part Page is the primary page for presenting web parts, libraries, and lists. If you have a need for unstructured content such as text and images, you should plan to use a wiki page, which you will learn about later in this chapter.
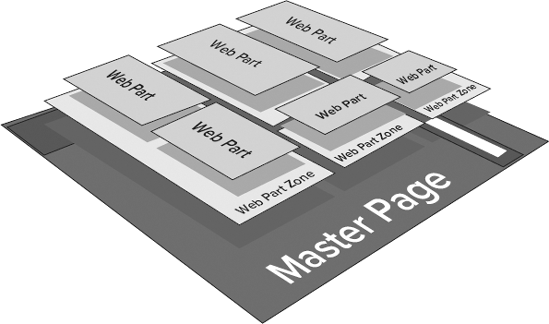
Web part pages organize content through web part zones. A web part zone is a predefined area for adding web parts. You can create web part pages using the browser or with SharePoint Designer.
As you can see in Figure 3-3, web parts sit in web part zones that are part of a page template known in SharePoint as the master page. You will learn more about Master Pages in detail later in this chapter.
Users with appropriate permissions can create new pages and add, configure, or remove web parts through the web interface. You may ask why you would need to create a new Web Part Page in SharePoint Designer instead of the browser. With SharePoint Designer, you can do much more than you can through the browser. You can customize the content areas or create custom web parts called Data View Web Parts, which are covered in Chapter 8, "XSLT Data Views and Forms."
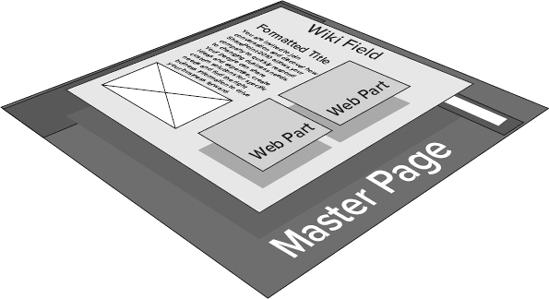
Wiki pages are a specialized version of the standard Web Part page and incorporate the wiki concept, which is collaborative and "living" because it continually changes through input from multiple users. Like Web Part pages, wiki pages have several pre-defined layouts, with different zone patterns. Unlike Web Part pages, these wiki content zones allow both rich text and web parts to be freely intermingled. Figure 3-4 illustrates the freeform layout of a wiki page. You can add web parts, images, and text directly to the rich content area or wiki field.
If you have worked with previous versions of SharePoint, you may be pleasantly surprised when you create your first collaboration site in SharePoint 2010. Instead of the boxy, data-driven presentation that was standard in team sites, you will be working with a new type of page, the Wiki Page. MOSS 2007 and WSS 3.0 had a separate site type called a wiki. SharePoint 2010 removes Wiki as a site type but incorporates much-enhanced wiki functionality directly in the standard team site template.
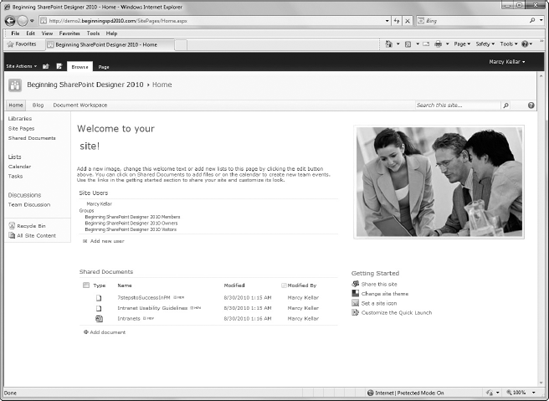
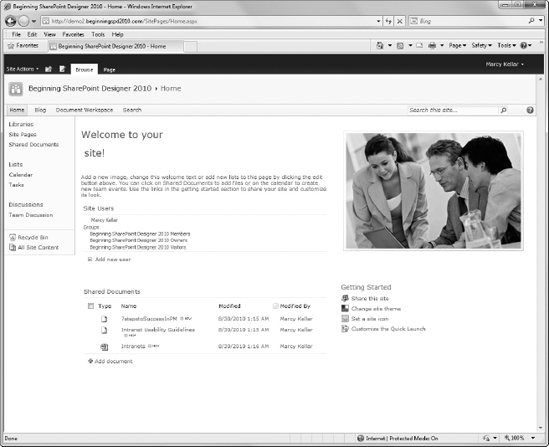
Seen below in Figure 3-5 is the Welcome Page, a wiki page used as the home page of a team site.
Because Microsoft understood that there was a need for unstructured collaboration, you can make the Welcome Page the home page of any site template in SharePoint. You can activate this feature in the Site Features section of the Site Settings page.
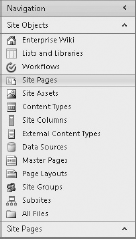
Although you can create additional Wiki libraries with any name, by default, SharePoint 2010 team sites create one called Site Pages. (Yes, it can easily be confused with the generic idea of "site pages" described earlier in the chapter. The builders of SharePoint have a penchant for using general terms to name specific objects....) You can find these site pages in SharePoint Designer under the Site Objects menu, as shown in Figure 3-6.
In the root of each list and library is the Forms folder. In this folder is a collection of pages used for entering and displaying the information in that list. These pages are called view pages, yet they are also web part pages.
End users can create view pages through the web interface, but unlike the generic web part pages mentioned earlier, view pages are both edited and created in SharePoint Designer.
Figure 3-7 shows a list view page for a Shared Documents Library as seen in the browser.
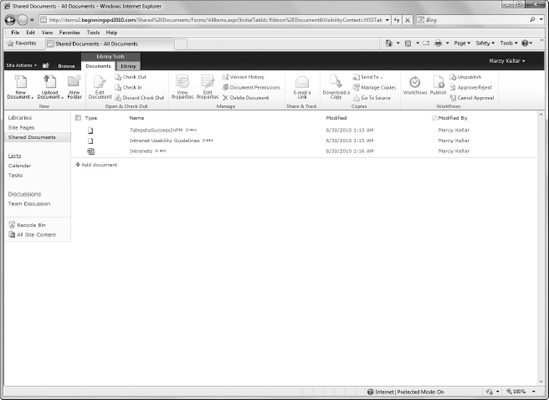
View pages typically contain HTML controls to display or edit a list item. For more information about creating a view page, see Chapter 8, "XSLT Data Views and Forms."
By default, most SharePoint content pages, regardless of type, are based upon the "sacred original" site definition file plus instance information pulled from the content database. When you edit such a page in SharePoint Designer and save it, the link to its site definition file is broken. A copy of the site definition file is merged with its instance information and the result is then stored in the content database. Such a page is called a customized page.
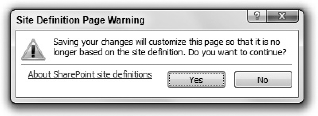
When this happens, SharePoint gives you the warning shown in Figure 3-8 before breaking the link.
You can restore the link to the site definition file by right-clicking the page in SharePoint Designer and selecting "Reset to Site Definition" from the context menu. This will re-establish the link, but it will also leave any content you have added to web part or content zones within the page intact. Additionally, the customized file is renamed and stored in the same folder for backup reasons.
Master pages are responsible for the consistent structural elements of a SharePoint page. The headings, navigation, footers, and logos that are consistent throughout many pages are contained in the master page.
Master pages provide a special type of control called a ContentPlaceHolder. Content placeholders are areas of replaceable content on the master page. In the code, they are book-ended by the following: <asp:ContentPlaceHolder>.
Although a master page may define many ContentPlaceHolder controls, a page does not have to implement a corresponding content control. You can think of these controls as little television screens: the content may change, but it is always delivered through the same little box.
The most common ContentPlaceHolder control is PlaceHolderMain, which displays the main body of the page. Other ContentPlaceHolder controls include PlaceHolderLeftNavBar, which contains the Quick Launch bar on the left side of the page, PlaceHolderTopNavBar, which contains the Top Navigation tabs at the top of the page, and PlaceHolderSearchArea, which contains the page's search controls. Depending on whether you are using SharePoint Foundation 2010 versus SharePoint Server 2010, your master pages may have many more additional ContentPlaceHolder controls.
When you create a new page in your site, the page will automatically inherit its basic layout and structure from the site's master page. Optionally, a page can contain one or more Content controls to specify the content to display in the corresponding ContentPlaceHolder controls provided by the master page. For instance, if you want to display the text "Hello, World!" in your page, you add the following code to your page:
<asp:Content ContentPlaceHolderId="PlaceHolderMain" runat="server">
    Hello, World!
</asp:Content>
When the page is requested from the server, the master page is loaded, which provides the ContentPlaceHolder controls for the page, and the page provides the Content controls to specify the content. In the previous code snippet, "Hello, World!" would appear in the main body of the page because the Content control's ContentPlaceHolderId attribute was set to PlaceHolderMain. The value of the ContentPlaceHolderId attribute must match the ID attribute of one of the master page's ContentPlaceHolder controls or the page will not load, leaving the user with a friendly, but uninformative error message.
Warning
Do not delete any ContentPlaceHolder controls from your master pages. You will get an error if a page that references a missing ContentPlaceHolder control is requested from the server. If you want to hide a single ContentPlaceHolder control, simply set its Visible attribute to False.
You can use Content controls for more than just content; you can use them to hide content as well. If you want to hide the search controls from a particular page in your site, add an empty Content control to the page and set its ContentPlaceHolderId attribute to PlaceHolderSearchArea. When the page loads, the "blank" content of the empty Content control replaces the default search controls that appear on the page.
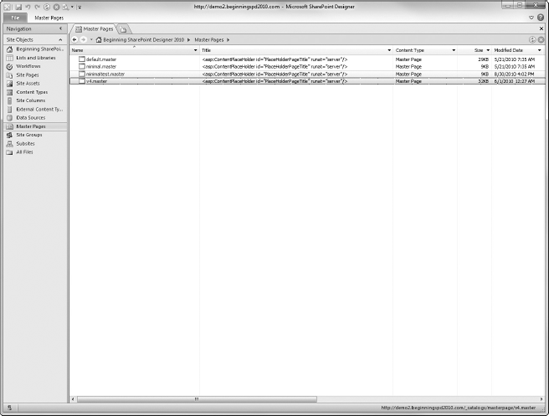
Master pages are stored in a special Master Page Gallery library located within each site collection in the /_catalogs/masterpage directory. This library is accessible from the Site Collection Settings page as well as in SharePoint Designer, as shown in Figure 3-9.
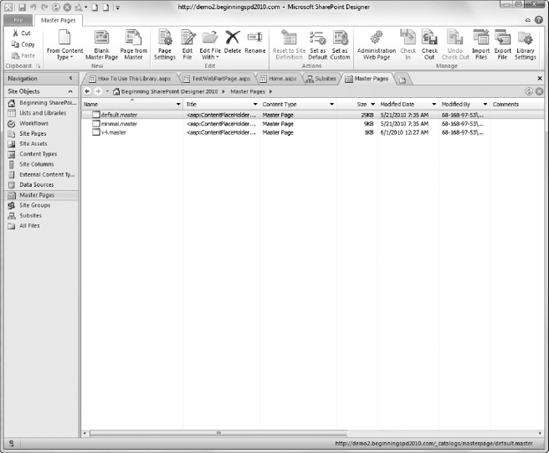
Only one gallery exists per site collection and it is automatically populated when a new site collection is provisioned. Master pages cannot be shared across site collections, but a root site can share its master pages with the other sites in its site collection.
There are many master pages available in SharePoint Foundation Server. SharePoint provides a variety of master pages: v4.master, default.master, minimal.master, simple.master, and MWSDefaultv4.master. Another master page, nightandday.master is available in SharePoint Server 2010. It has slightly different content placeholders specializing in managing web content and is discussed in detail in Chapter 4.
v4.master, shown in Figure 3-10, is the default master page for most non-publishing sites in SharePoint 2010. It is also the default system master page in both SharePoint Foundation and SharePoint Server.
The default.master page in SharePoint 2010 should look familiar to you if you worked with SharePoint 2007. Both visually and in the code, this master page looks like the default.master page seen in collaboration sites in SharePoint 2007, the previous version of SharePoint. Use this master page if you are using or require a legacy (2007) interface for your site and you will not be using the ribbon.
The inclusion of this master page in SharePoint Foundation and SharePoint Server ensures that upgrading from SharePoint 2007 to SharePoint 2010 is an easy process. It is automatically used when you upgrade a SharePoint 2007 site to SharePoint 2010. Although it does not include the ribbon, you could add the ribbon and other SharePoint 2010 user interface content placeholders.
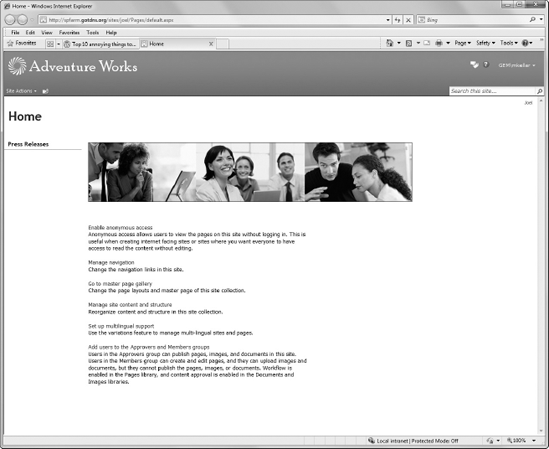
As shown in Figure 3-11, when default.master is applied to a SharePoint 2010 team site, the look and feel transforms to the familiar "baby blue" branding of SharePoint 2007.

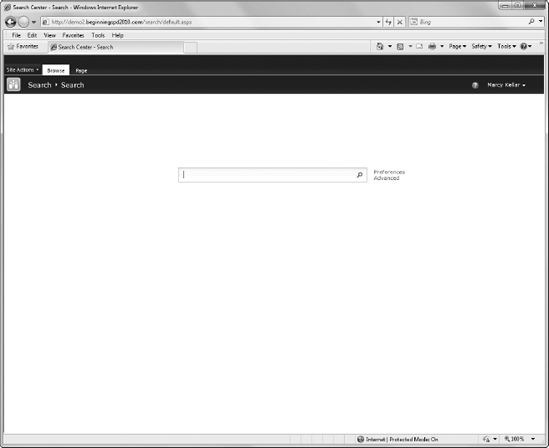
The minimal.master page is best suited for pages with minimal branding and navigation. The minimal.master is used with search pages and Office web applications. Because this master page does not include the ribbon or navigation, you should use it for pages that require a lot of real estate.
Figure 3-12 shows a search page with minimal.master applied.
Note
The search pages use different master pages from the rest of your site. If you customize your site, you will need to create a new master page based on the minimal master page. This way, you can add a reference to your custom styling in the minimal.master, which is the master page that search pages use.
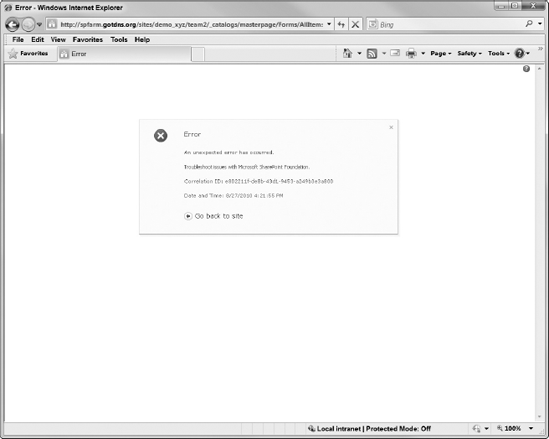
simple.master is the master page used for error and login pages. It lives in the file system and is not available in the master page gallery. If you are creating a custom login or error page, you will want to use the simple.master page. Figure 3-13 shows an error page with simple.master applied.
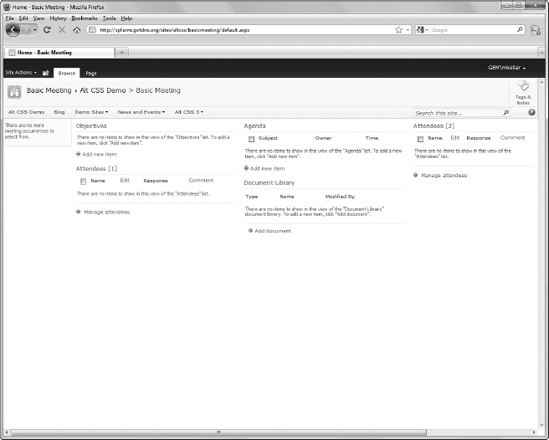
The MWSDefaultv4.master is found in the master page gallery of meeting workspace sites. It is almost identical to the v4.master with the exception of a couple of content placeholders such as the MeetingNavigator, shown in the left navigation area in Figure 3-14.
The nightandday.master page, seen below in Figure 3-15, is only available in SharePoint Server 2010. It contains controls specialized for publishing web content management. You learn more about this master page in Chapter 4.
There are more master pages included in SharePoint Foundation Server and SharePoint Server 2010, such as legacy (SharePoint 2007) master pages for managing application pages for non-UI upgraded sites. Master pages such as applicationV4.master and mysite.master are for specific types of scenarios or sites, live in the file system, and are customized using development tools and techniques.
The v4.master page is included in every site in both SharePoint Foundation and SharePoint Server 2010. It can be used with publishing sites and non-publishing sites. You learned earlier that master pages contain HTML, CSS, SharePoint controls, and ContentPlaceholder controls.
It is a best practice to make a copy of a default master page and make changes in the copy rather than directly in the original file, v4.master. This protects your work from being overwritten by software patches.
You can create a copy of v4.master with either the browser or SharePoint Designer. If you use SharePoint Designer, don't copy the file and paste it back into the gallery. You should create a completely new master page in order to break all ties from the original file. In SharePoint Designer 2010, a new function is available that allows you to import and export files.
Importing and Exporting Master Pages
In this exercise, you will use SharePoint Designer to export v4.master to your desktop, rename it, and then import it as a copy into your SharePoint site.
Open SharePoint Designer.
Click the Open Site button.
When the Open Site dialog appears, enter the URL to your site in the Site name textbox and click the OK button.
If prompted, enter password for the SharePoint site and click the OK button.
Select Master Pages from the Navigation bar on the left.
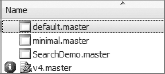
Select the
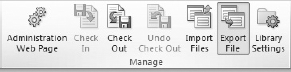
v4.masterso that it is highlighted by clicking once on its name, as shown in Figure 3-16.Click the Export button on the right, as shown in Figure 3-17.
A Save dialog box appears.
Save the file as v4Demo.master.
Select the Import Files button from the Master Pages ribbon.
When the Import dialog appears, click Add File.
In the Add File to Import List dialog, browse to v4Demo.master and select the file.
Click OK.
How It Works
When you exported the v4.master page out of SharePoint, it became a copy of the original master page. The original still exists in the master page gallery. By importing it back in as a renamed file, you have created a new master page that has all of the same code as the original v4.master.
If you make changes directly to v4.master and try to save the file, you will receive the warning message seen earlier in the chapter in Figure 3-8. Although editing a default master page should not be part of a permanent solution, it can be a fast way to help you troubleshoot or test a change.
When you change a default file from the site definition, SharePoint Designer provides an indicator that the file is changed from the original site definition with a blue icon to the left of the file, shown in Figure 3-18.
You can always revert to the original file by right-clicking the customized file and selecting "Reset to Site Definition" from the context menu. The Site Definition Page Warning dialog box will appear, as shown in Figure 3-19.

Click Yes and SharePoint will re-link the file to its site definition file. For backup reasons, a copy of the customized file is renamed and stored in the same folder.
You may find that modifying the default master pages is too constraining for your needs. If this is the case, you can create a custom master page for more flexibility. A custom master page is created from your own HTML and then required code and content placeholders are added in appropriate areas. Before you decide to implement a custom master page in your site, consider the following points:
Testing Time — Microsoft already tested the functionality and user experience of default SharePoint master pages. If you create your own master page, you will need to identify key areas of functionality (i.e., adding web parts, adding new calendar entries, etc...).
Loss of Default Functionality — Your custom markup may change the way default components of SharePoint work (i.e., the ribbon scroll or the page editing experience). Identifying these areas early and communicating the risk of losing functionality to decision makers is critical to your project's success.
As previously mentioned, a master page must have all of the required content placeholders in the code, even if you are not going to use them. The following table lists the required placeholders, their placement in the document flow, and their descriptions:
Some of the required placeholders may not be necessary for your design, so what do you do with them? Hide them! Include them inside an <asp:Panel> control you add to the page and set the control's Visible attribute to False as shown in the following code snippet. Since the <asp:Panel> control is not visible, the ContentPlaceHolder controls within it and their corresponding Content controls will not be rendered to the browser.
<!--Hidden Placeholders -->
<asp:Panel visible="false" runat="server">
<!-- Top Nav -->
<asp:ContentPlaceHolder id="PlaceHolderHorizontalNav" runat="server"/>
<asp:ContentPlaceHolder id="PlaceHolderTopNavBar" runat="server"/>
<!-- Left Nav -->
<asp:ContentPlaceHolder id="PlaceHolderQuickLaunchTop" runat="server"/>
<asp:ContentPlaceHolder id="PlaceHolderQuickLaunchBottom" runat="server"/>
<asp:ContentPlaceHolder id="PlaceHolderLeftNavBarDataSource" runat="server" />
<asp:ContentPlaceHolder id="PlaceHolderCalendarNavigator" runat ="server" />
<asp:ContentPlaceHolder id="PlaceHolderLeftNavBarTop" runat="server" />
<!-- For adding CSS to child pages -->
<asp:ContentPlaceHolder id="PlaceHolderBodyAreaClass" runat ="server"/>
<asp:ContentPlaceHolder id="PlaceHolderTitleAreaClass" runat ="server"/>
<!-- Required for Legacy UI -->
<asp:ContentPlaceHolder id="PlaceHolderSiteName" runat="server"/>
<asp:ContentPlaceHolder ID="PlaceHolderPageImage" runat="server"/>
<asp:ContentPlaceHolder ID="PlaceHolderTitleLeftBorder" runat="server"/>
<asp:ContentPlaceHolder id="PlaceHolderMiniConsole" runat="server"/>
<asp:ContentPlaceHolder id="PlaceHolderTitleRightMargin" runat="server"/>
<asp:ContentPlaceHolder ID="PlaceHolderTitleAreaSeparator" runat="server"/>
<asp:ContentPlaceHolder ID="PlaceHolderNavSpacer" runat="server"/>
<asp:ContentPlaceHolder id="PlaceHolderLeftNavBarBorder" runat="server"/>
<asp:ContentPlaceHolder ID="PlaceHolderBodyLeftBorder" runat="server"/>
<asp:ContentPlaceHolder id="PlaceHolderBodyRightMargin" runat="server" />

</asp:Panel>
There are several required controls for a SharePoint master page to function. When you create a custom master page or are troubleshooting any errors with a modified master page, make sure that these controls are in place.
PLACEMENT | CONTROL | DESCRIPTION |
|---|---|---|
Controls routing commands to page components such as the ribbon and toolbars. | ||
<head> | ||
Manages all of the ECMAScript functions on the page and their ability to communicate back to the server without refreshing the page in the browser. |
Note
ECMAScript is the name of the official standard from which Microsoft Jscript and JavaScript are derived.
It is inevitable, as you are learning the ins and outs of customizing with SharePoint Designer, that you will break a master page. Broken master pages are not actually broken; rather, they cannot be rendered in the browser. Use the following list of the most common problems to help you troubleshoot broken master pages.
Required Content Placeholders — You must have all required content placeholders in the code of the master page even if you are not using them.
Typos — Be sure to copy and paste code from an existing, working master page instead of typing the code manually. This ensures you do not introduce a typo. If you are copying and pasting code from a browser, such as example code you find on the Internet, paste the code into Notepad first to remove any error-causing formatting. Then, copy and paste the code from Notepad into the destination master page. Notepad is usually available from the Accessories folder on your Start menu.
Duplicate Content Placeholders — Duplicate content placeholders are easy to spot in SharePoint Designer, as well as the browser, since an error will be generated when the page is loaded in either application.
Note
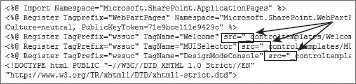
Opening master pages outside of a SharePoint environment can change the contents of the master page. When this happens, you will receive an error. Often the error is due to a typo in the first few lines of code in the master page. In Figure 3-20, the references to content template pages are incorrect because they are missing the leading tilde and forward slash
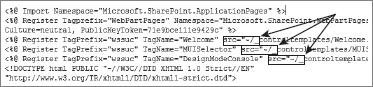
(~/).Adding ~/ after the quotation mark to make
src="_look likesrc="~/_will fix this error and allow you to open your pages without error. The corrected code is shown in Figure 3-21.
Regardless of your role, as you work with SharePoint, you will encounter requests to change the look and feel of your site. It takes time and practice to understand whether user interface requests are a big effort or a minor change.
The following scenarios and exercises are meant to give you experience in three different types of user interface requests. Each solution has its own set of issues depending on browser and content requirements.
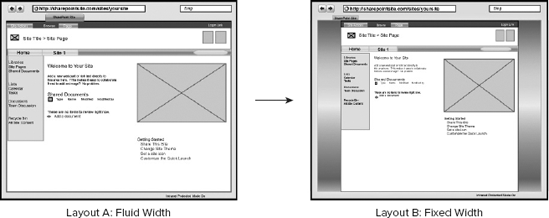
In Figure 3-22, the out-of-the-box layout of the v4.master is represented by Layout A. A common user interface change request is to optimize a site for a target screen resolution (usually 1024 pixels by 768 pixels, the most common screen resolution). This changes the layout of a site so that pages are fixed and centered as shown in Layout B.
Note
A fixed-width design is a layout optimized for a target screen resolution. It is generally used to control the presentation of content regardless of the size of a user's window. There are several benefits to using this type of layout:
Readability — A fixed width shortens lines of text and makes reading easier.
Consistency — Content placement is predictable regardless of browser size. A controlled space allows for the communication of content relationships.
Aesthetics — It simply looks good.
A fixed-width design can be beneficial with managed content but can be troublesome when applied to collaboration sites because it can impact the intended functionality.
User Adoption — Users will be responsible for choosing appropriate sizes for content. If users are not comfortable making design decisions, they may choose to collaborate through e-mail or by phone instead of through the SharePoint site.
Design strength — Any solution that fixes the width of the page impacts the out-of-the-box SharePoint functionality, including the scrolling of the ribbon, browser compatibility, and the behavior of large content.
Fix the Width of a Master Page
In this activity, you will add an embedded style sheet that will fix the width of pages inheriting from this master page.
Open a team site in SharePoint Designer.
Select the Master Pages section of Site Objects.
Create a new master page by following the steps you used to create v4Demo.master.
Instead of naming the file
v4Demo.master, name itFixedWidthv4.master.Right-click on the file and select "Set as Default Master Page."
Right click on the file and select "Edit File in Advanced Mode." Add the following embedded style sheet into the master page just before the closing
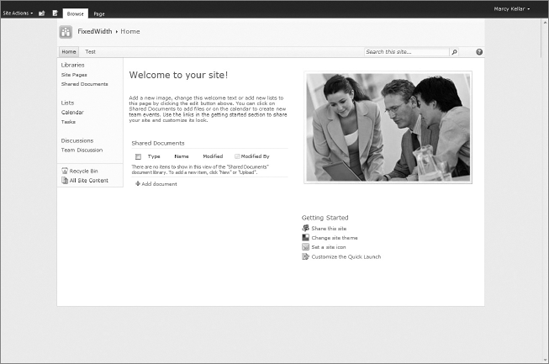
</head>tag:<style type="text/css"> /*fixed width */ #s4-workspace > div,#s4-bodyContainer > div,body #s4-titlerow > div{ width:1000px; margin:0 auto; float:none; padding:0; } body #s4-mainarea{ /*make main area have background of white and add a border */ background:#fff; border:1px solid #ddd; border-top:0px; min-height:580px; /*contain content in all browsers but IE7 */ display:table; } /*add padding back to title table*/ .s4-title-inner{ padding:0 0 0 5px; } /*background color of site*/ #s4-workspace { background:#efefef /*none*/; } /*body container */ #s4-bodyContainer{ position:relative; width:100%; } /*fix overhanging tables*/ .ms-v4propertysheetspacing {margin:0;} </style>Navigate to your browser and preview your changes in the browser to see your site is fixed-width, as shown in Figure 3-23.
How It Works
This exercise illustrates how quickly you can implement significant changes to all pages in your site with only a few steps in SharePoint Designer. When you apply this master page as the default master page to your site, all content pages are displayed with a fixed width. If you also want the system or application pages to have a fixed width, you can right-click and select, "set as custom master page."
This particular scenario will be encountered often by those asked to redesign a SharePoint site. You should note that this solution works differently in different browsers and can be affected by the content in your site, such as list views with multiple columns. One of the attributes used to contain content that extends outside of the defined width, "display:table" is not recognized by Internet Explorer 7.
Note
FixedWidth.master is available for download from the Wrox site and includes additional styling with CSS comments.
In this scenario, the search control needs to be moved to a new location within the master page.
Move the Search Box to a New Location
In this exercise, you will relocate the search controls by moving the PlaceHolderSearchArea content placeholder to a new location within the master page.
Open SharePoint Designer from your Start menu and click the Open Site button.
When the Open Site dialog appears, enter the URL to your site in the Site name textbox and click the OK button.
If prompted, enter the password for the SharePoint site and click the OK button.
Select Master Pages from the Navigation bar on the left.
Create a new master page by following the steps you used to create
v4Demo.master.Instead of naming the master page
V4Demo.master, name itSearchDemo.master.Right-click the file and select Set as Default Master Page.
Right-click the file and select Edit File in Advanced Mode.
Locate
<td class="s4-titletext">.Add the following code after the closing tag of
<td class="s4-titletext">:<td class="customSearch" valign="middle" style="padding:0 5px;"> </td>
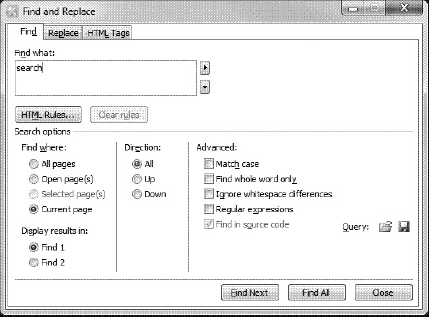
Next, you will grab the search control. Although you can see the search box in the Design View of SharePoint Designer, you will want to verify that you have the right control and HTML before moving it. The next steps walk you through a common activity when editing master pages, finding the correct content. Using the Find and Replace dialog is a common yet invaluable method to find elements and styles in SharePoint Designer.
If you are not already in Split View, select Split from the View tab of the ribbon and place your cursor inside the code window.
Use the shortcut key Ctrl+F to open the Find and Replace dialog.
To find the search content control, type the word "search" in the "Find What" field, as shown in Figure 3-24.
Click the Find All button.
The results of your search are displayed below the page editor in the Find1 window.
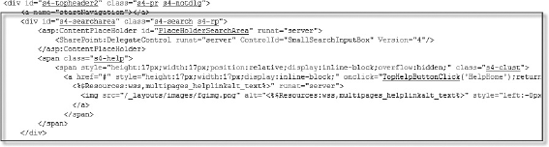
Double-click on the
ContentPlaceHoldercontrol whoseIDattribute is set toPlaceholderSearchAreain the Find1 box and your cursor will jump to the location of the search control in the code window, as shown in Figure 3-25.Select the following code and copy with Ctrl+C:
<asp:ContentPlaceHolder id="PlaceHolderSearchArea" runat="server">
<SharePoint:DelegateControl runat="server" ControlId="SmallSearchInputBox"
Version="4"/>
</asp:ContentPlaceHolder>
Paste the copied code inside the
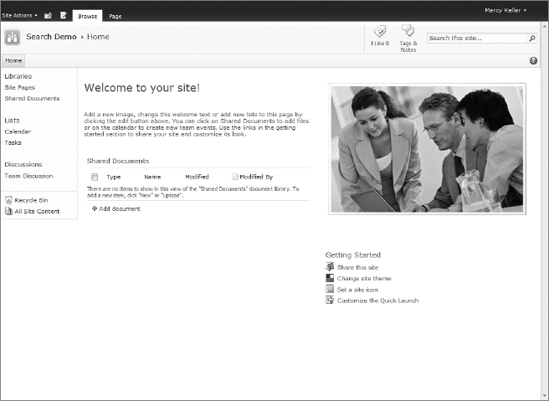
<td class="customSearch">tag.Save and Check in the file.
Navigate to the site's URL and preview your changes in the browser.
Notice the search controls have moved from the top navigation bar to the header, as shown in Figure 3-26.
How It Works
You can move placeholders around a master page. In this example, you moved the default search box to a new location. With minimal styling and structure changes, you were able to move the search box.
The following example fulfills another common design request. Although you will learn more about CSS styles in Chapter 5, you may be asked to update your master page to reference external CSS files. For this example, an external style sheet and images are provided at the Wrox download site. A reference to the style sheet simply needs to be added to the master page so that the top navigation's tabs are styled with rounded top corners.
Add CSS Registration to a Master Page
In this exercise, you will create the external style sheet with the styling for the rounded navigation.
Note
This example requires two images. You can download the source code and images from the Wrox Download page at http://www.wrox.com.
Open SharePoint Designer from your Start menu.
Click the Open Site button.
When the Open Site dialog appears, enter the URL to your site in the Site name textbox and click the OK button.
If a Windows Security dialog appears, enter your username and password for the SharePoint site and click the OK button.
Select Master Pages from the Navigation bar on the left.
Create a new master page by following the steps you used to create v4Demo.master earlier in this chapter.
Name the new master page
NavDemo.master.Right-click the file and select Edit File in Advanced Mode.
Add the following to the end of the
<head>tag:<SharePoint:CssRegistration name="<% $SPUrl:~sitecollection/Style Library/SPDDemo/css/roundednav.css %>" After="corev4.css" runat="server"/>
Check in
NavDemo.master.Right-click
NavDemo.masterand select "Set as Default Master."Open a browser window and navigate to the site.
Select All Files from the Navigation bar on the left.
Double-click on the Style Library folder.
Place your mouse in the library and right-click.
Right-click Add

Select New
Name the folder
SPDDemo.In the
SPDDemofolder, place your mouse in the library and right-click.Select New
Name the folder CSS.
Double-click the folder and right-click.
Select New
Rename the new Untitled_1.css file to roundednav.css.
Add the following code into the roundednav.css file:
/*----Top Nav---------------- */
.s4-tn {min-height:34px;}
/*allow nav item to be taller than 15px*/
.s4-tn LI.static > .menu-item{height:auto;}

/*Transform top nav links to uppercase
and give top links bg color */
body #s4-topheader2{ background:#fff repeat-x left 0px; border-bottom:transparent;border-top:transparent; } /*bottom border of nav bar*/ .s4-tn {border-bottom: 5px solid #016c9b;} .s4-tn > .horizontal { /*move horizontal nav to the right by 20 px*/ margin-left:20px; } /*keep nav from wrapping */ .menu-horizontal{min-width:790px;} /*If you define nav styles and don't define them in dynamic children selectors, dynamic will inherit the style */ .s4-tn li.static > .menu-item{ border:0; border:none; color:#efefef; display:inline-block; min-width:70px; height:36px; padding:0px; margin:0px; vertical-align:middle; white-space:nowrap; text-align:center; font-size:19px; white-space:nowrap; padding-top:12px; } .s4-toplinks .s4-tn > .menu-item.text { padding:6px 24px 0 24px;} /*nav link hover and nav header hover*/ .s4-tn li.static > a:hover, .s4-tn li.static > .dynamic-children:hover{ display:block; background:transparent none; color:#fff; text-decoration:none; } /*rounded nav*/ .s4-toplinks .s4-tn .static > li { background:url("../images/tl.png") no-repeat scroll 0 0 #79BBEC; color:#efefef } .s4-toplinks .s4-tn .static > li > .menu-item{ background:url("../images/tr.png") no-repeat scroll top right ; }/*Rounded nav selected (left) background color goes here*/ .s4-toplinks .s4-tn .static > li.selected { background:url("../images/tl.png") no-repeat scroll 0 0 #efefef; color:#5893CF } /*Rounded nav selected (right)*/ .s4-toplinks .s4-tn .static > li.selected > .menu-item{ background:url("../images/tr.png") no-repeat scroll top right ; color:#5893CF } .s4-toplinks .s4-tn .static > li.selected > a:hover { color:#fff; } .s4-toplinks .s4-tn ul.static > li.dynamic-children .menu-item-text , .s4-toplinks .s4-tn ul.static > li.static .menu-item-text{ padding: 0 33px; } /*arrows in tabs with dynamic children*/ .menu-horizontal span.dynamic-children SPAN.additional-background { background-position:90% ; } .menu-horizontal a.dynamic-children SPAN.additional-background { background-position:90%; } /*flyout navigation */ .s4-tn ul.dynamic{ background:#A2CFEC; margin:5px 0 0 10px; background-color:#A2CFEC; border:1px solid #44A0E5; } .s4-tn li.dynamic a{padding:5px;color:#1987DC;} .s4-toplinks .s4-tn ul.dynamic .menu-item .menu-item-text { padding: 5px 8px!important; } .s4-tn li.dynamic > .menu-item{ padding:3px 12px; font-size:12px; white-space:nowrap; border-bottom:none; font-weight:normal; color:#003B55; font-family:Verdana; min-width:150px; }.s4-tn li.dynamic {border-bottom:1px #88C7F0 solid;} .s4-tn li.dynamic > a:hover{ font-weight:400; display:block; background-color:#C7E2F3; color:#1E6592; }Save and Check in your CSS file.
Using the browser, navigate to the site you customized.
Press F5 to refresh the browser and your site should like Figure 3-27.
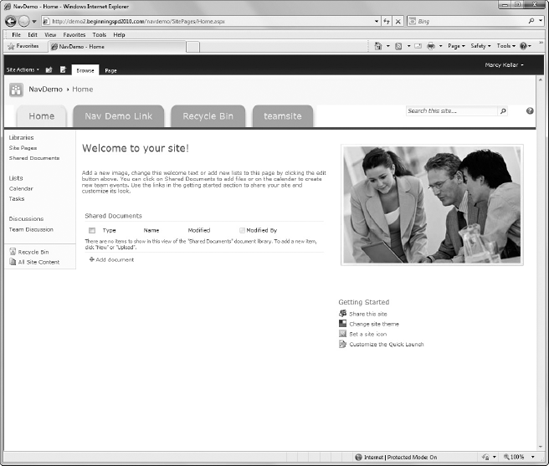
How It Works
When you added the <SharePoint:CSSRegistration> control to the master page, SharePoint created a reference link to the external CSS file, navdemo.css. Because you changed the After property to corev4.css, navdemo.css will load after corev4.css, which contains default SharePoint styling, and override any conflicting styles in corev4.css.
This chapter explained how a typical SharePoint Page is constructed. You saw the power of Master Pages to change the look and feel of your site. You also found out:
How to edit and apply master pages.
You can change the way SharePoint looks from the out-of-the-box style.
Points to consider when creating a custom master page.
This is only the first step in understanding how to customize the look and feel of your SharePoint 2010 site with SharePoint Designer. In the next chapter, you will learn about Web Content Management and the Publishing pages of SharePoint 2010.