
WHAT YOU WILL LEARN IN THIS CHAPTER
Chapter 11 laid out the fundamentals of SharePoint Designer 2010 workflows. Building on that knowledge, this chapter shows how SharePoint Designer 2010 integrates with Visio 2010 and InfoPath 2010 to provide a complete solution to model the workflows and design dynamic user interfaces.
The last part of this chapter dives into strategies of packaging and deploying reusable workflows and shows how you can scale out your workflows to be used throughout your company.
The Microsoft Visio application has served a great role in the past, helping to visualize complex information such as network diagrams, maps, and floor plans. Now, the same functionality comes to SharePoint 2010. The designer surface for Visio 2010 can be used to model and visualize your workflows
A business or process analyst who understands business processes would be the ideal candidate for using this functionality. The analyst might prefer to use this method to sketch out the model of the workflow and then hand it to an IT professional or an owner of a SharePoint site to automate the processes in SharePoint. On the flip side, when an IT professional or site owner receives a workflow created in Visio, the visual nature of the workflow makes its intent self-evident and becomes a sort of contract of what is agreed to be the scope of the processes being implemented.
The following sections explain how the built-in functionality in Visio 2010 facilitates the workflow modeling in SharePoint 2010.
In SharePoint Designer 2007 days, there was no way to visualize workflows created in the workflow designer environment. When the workflows became complicated, getting a bird's-eye view of how all the workflow pieces fit together was very difficult. To solve this problem, SharePoint Designer and Visio teams joined forces. Microsoft Visio Premium 2010 ships with the SharePoint workflow stencils, containing the shapes for all standard workflow activities—conditions and actions (the Standard and Professional versions of Visio do not have this functionality)—that you can use to design a workflow. Then, you can export this workflow in a format that's understood by and imported in SharePoint Designer 2010.
When you start the Visio Premium 2010 application, you can find the Microsoft SharePoint Workflow template under the Flowchart template category. Upon selecting this template, the stencils showing the workflow shapes appear as shown in Figure 12-1.
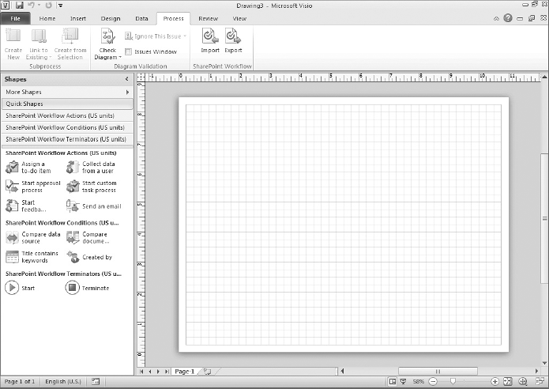
Three stencils contain the workflow shapes:
You must place the Start and Terminate objects in the SharePoint Workflow Terminators stencil on the design surface to designate the starting and ending points of the workflow design. Then, you can place conditions and actions in the middle of these terminators as needed to design the workflow logic. The design interface in Visio 2010 expands automatically to another page if more space is needed for the design. Visio 2010's features, such as themes and auto alignment, can be utilized for enhancing the look and feel of the workflow diagram as needed.
No support exists in Visio 2010 for creating logical workflow steps or configuring the rules of each condition and action placed in the designer environment. These things are taken care of after you import the workflow in SharePoint Designer 2010. Also, when building a SharePoint workflow, you can only utilize the shapes in the stencils mentioned earlier. Non-SharePoint shapes from other stencils in Visio 2010 are not supported and produce an error when you try to export the final workflow.
After you finish building the workflow, you must validate it. The Process tab (see Figure 12-2) in Visio 2010 provides the option to check your diagram for any logical errors.
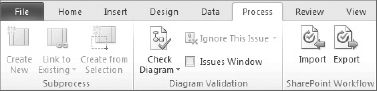
The Check Diagram button works with built-in rules for SharePoint workflow functionality that check the validity of the diagram. This allows the diagram designer to check for any common errors, such as loose connectors in the workflow.
The following exercise walks you through building a workflow in Visio 2010, then validating it and exporting it.
Create a Workflow in Visio 2010
In this exercise, you create a workflow using Visio Premium 2010 and export it. This workflow is a slight variation of a workflow you created in Chapter 11 using SharePoint Designer 2010.
Start Microsoft Visio Premium 2010.
From the Backstage of Visio, click the Flowchart template category.
Choose the Microsoft SharePoint Workflow template and click the Create button.
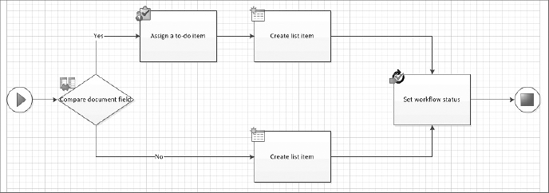
The Quick Shapes stencil should be visible. Drag the Start terminator onto the far left side of the Visio drawing. Now drag the Terminate terminator onto the far right side of the Visio drawing. The workflow components will go between these two terminators.
Click on the SharePoint Workflow Conditions stencil.
Drag the Compare document field shape on the Visio drawing surface right after the Start terminator.
Click on the SharePoint Workflow Actions stencil.
Drag the Assign a to-do item action in front of, but a little higher than, the compare condition.
Drag a Create list item action in front of the Assign a to-do item action.
Drag another Create list item action right below the other Create List Item action.
Drag the Set workflow status action right behind the Terminate terminator.
Now, to start drawing connections between the activities, click the Connector button on the toolbar.
Hover the mouse over the Start terminator until a small red square appears at one of the corners of the object. Then left-click on the square and, while holding down the mouse button, hover over the Compare document field until a small red square appears at one of the corners of that condition. When it does, let the mouse button go to create the connection between the two objects.
Use the same connecting technique to create one connection between the Compare document condition to the Assign a to-do item action at the top and another connection between the Compare document condition to the Create list item action at the bottom.
Connect the Assign a to-do item action to the Create list item action in front of it.
Create a connection from one of the Create list item actions to the Set workflow status action. Create a connection from the other Create list item action to the Set workflow status action.
Create a connection between the Set workflow status action and the Terminate terminator.
The connections coming out of the condition, Compare document field, need to be labeled. Right-click on the top connection, and select Yes from the pop-up menu. Now right-click on the bottom connection and select No.
Your workflow should look similar to the one shown in Figure 12-3.
Click on the Process tab in the ribbon. To check the diagram and make sure no errors exist, click on the Check Diagram button. If the workflow is valid, you will see a pop-up dialog telling you that no issues were found. If issues are found, you will see an Issues task pane displayed below the design surface. You must read and fix these errors before moving on to the next step.
Click on the Export button. Using the Export Workflow window that appears, save the workflow anywhere on your hard drive. To follow along this example, name the file Process Events.vwi. You use this file in the next exercise.
How It Works
In the preceding exercise, you built a workflow diagram using Visio's workflow shapes. The connector tool lets you connect these shapes to define how the execution will proceed in the workflow. Then, the workflow is checked for any common errors such as loose connections or unlabeled conditional objects. Lastly, you package the workflow and export it as a VWI file.
The VWI extension stands for Visio Workflow Interchange. This type of file is understood both by Visio Premium 2010 and SharePoint Designer 2010. Within, it contains the workflow rules and the Visio diagram. This file is actually a packaged ZIP file. In fact, if you temporarily changed the extension of the file to .zip, you could double-click on it to open it and see its contents, as shown in Figure 12-4.
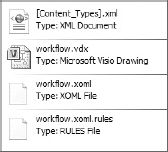
Make sure to change the file extension back to .vwi if you plan to import this file into SharePoint Designer 2010 as discussed in the next section.
Both Visio Premium 2010 and SharePoint Designer 2010 applications can import and export the VWI file. This section discusses how the workflow in the VWI file is handled within SharePoint Designer 2010.
To start the workflow import process in SharePoint Designer 2010, go to Workflows in the navigation pane and click the Import from Visio button in the ribbon. This starts up the Import Wizard that asks you to browse to the VWI file that you would like to import. After selecting the file, choose the type of workflow to import it as. The choices you have are List or Reusable Workflows, so you can choose either to attach this workflow to any list or library on this site directly or import it as a reusable workflow and choose a base content type for it.
The following Try It Out shows the import process in SharePoint Designer 2010.
Import the Visio 2010–Built Workflow into SharePoint Designer 2010
In this exercise, you import the workflow that you exported from Visio 2010 in the last exercise into SharePoint Designer 2010 and attach it to a list.
Open a typical Team Site in SharePoint Designer 2010, and click on the Workflow section in the navigation pane.
Click on the Import from Visio button on the ribbon.
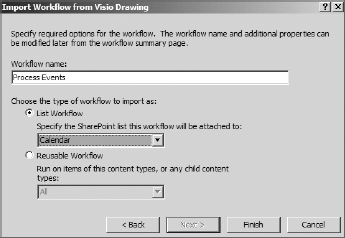
In the Import Workflow from Visio Drawing dialog that appears, click on Browse and browse to the location of the
Process Events.vwifile. Select the file and click on the Open button.Click the Next button, and you'll be asked to choose the type of workflow to import, as shown in Figure 12-5. Choose the Calendar list from the List Workflow drop-down as shown in Figure 12-5 and click Finish. You should now see your workflow in the workflow design environment.
How It Works
The Visio Workflow Interchange file contains the information required by the SharePoint Designer 2010 workflow engine to import it and show it in the workflow designer environment. The workflow actions can then be configured further in SharePoint Designer 2010 as the next section shows.
You must configure the actions and conditions in a workflow in SharePoint Designer 2010. The exercise in the last section showed how to import a workflow into SharePoint Designer 2010. After importing the workflow, you can use the workflow elements in the workflow designer environment (discussed in Chapter 11) to further enhance the workflow. The following exercise provides an example of configuring the imported workflow.
Configure the Workflow with Rules and Publish It
In this exercise, you configure the workflow with logic that you imported in the last exercise. Then, you publish it to the Calendar list. The intent of this workflow is to monitor the Calendar list, and, if a Birthday or Anniversary type of event is created, assign an appropriate task and start a discussion thread on that topic.
You start out with the imported workflow that looks like the one in Figure 12-6.
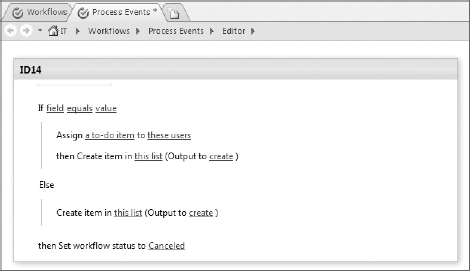
Click the current step name (it should start with letters ID and then a number), and change it to Process the Calendar Item.
Click Field link and from the drop-down, select Category. Click Value link and then select Get-together from the drop-down.
Click a To-do item link and from the Task Wizard that appears, create the task Arrange for Catering. Click the These users link and assign this task to any member of the site.
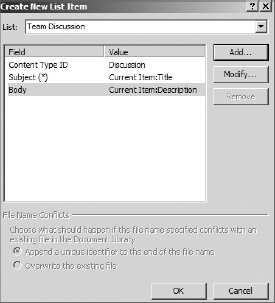
Click this List link on the next action item. In the Create New List Item dialog that appears, choose the Team Discussion list from the drop-down. Click the Subject (*) field and then click Modify. In the dialog that appears, click fx. In the lookup dialog, click Field from the source drop-down and select Title. Click OK on the opened dialog boxes to get back to the Create New List Item dialog. Click the Add button and, in the dialog that appears, select the Body field in the first drop-down. Click fx, and in the lookup dialog, click Field from the source drop-down, select Description, and then click OK. The dialog should now look like the one in Figure 12-7.
Click OK in the Create List Item dialog to get back to the workflow designer interface.
Click on create and from the drop-down that appears, click Create a new variable. The Edit Variable dialog appears. Name the variable DiscussionID and click OK.
Click right below the Create Item action to place the cursor there and then click the parallel Block button on the ribbon. Now select the Create Item action and click the Move Down button on the ribbon to move this action in the parallel block. Do the same with Assign a to-do item action to move it down inside the parallel block.
In the Create Item action below the Else condition, click this list link. In the Create New List Item dialog, choose the Announcements list from the drop-down. Click the Title (*) field and then click Modify. In the dialog that appears, click fx. In the lookup dialog, click Field from the source drop-down and select Title. Click OK on the opened dialog boxes to get back to the Create New List Item dialog. Click the Add button and, in the dialog that appears, select the Body field in the first drop-down. Click fx and, in the lookup dialog, click Field from the source drop-down and select Description. Click OK on all opened dialog boxes to get back to the workflow designer interface.
Click on create and, from the drop-down that appears, click Create a new variable. The Edit Variable dialog appears. Name the variable AnnouncementID and click OK.
In the Set workflow status action, click the Canceled status and type in Done.
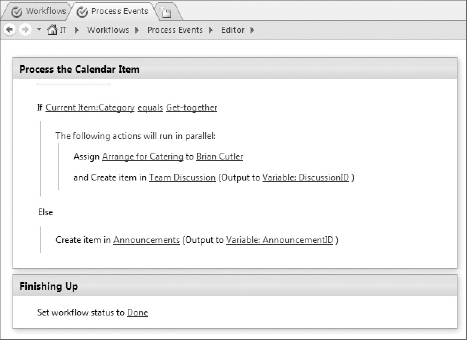
Click below the step on the workflow design surface and then click the Step button on the ribbon to create a new step. Name the step Finishing Up.
Select the Set workflow status action and click Move Down to move it within the Finishing Up step. Your workflow should now look similar to the one shown in Figure 12-8.
Check the workflow for any errors by clicking on the Check for Errors button. If errors exist, fix them before proceeding.
Click the Workflow Settings button on the ribbon and, on the Settings page, select the checkbox for Start workflow automatically when an item is created. Save the workflow by clicking on the Save button.
Click the Publish button to publish the workflow to the Calendar list.
The exercise starts out with an imported workflow. You configure the rules just as in any other workflow. Then, you create the additional step and use a parallel block to run a couple of actions in parallel. When this workflow is published, SharePoint treats it just like a workflow that would have originated in SharePoint Designer 2010.
Visio Services, a new feature of SharePoint 2010, provides Visio functionality at the server level. Visio Services lets you view Visio diagrams in the browser without the need for the Visio application on your client machine.
Visio Services is integrated into the SharePoint workflow functionality. Users can view the visual status of any running workflow that has the Visio visualization turned on. A Visio 2010 diagram of your workflow is automatically created and displayed in a Visio 2010 web part on the workflow status page. This visualization shows the exact status of the current stage of the workflow. For this functionality to work, SharePoint server must be running Visio graphics services (controlled through SharePoint Central Administration). An image of a sample Visio visualization is shown in Figure 12-9.
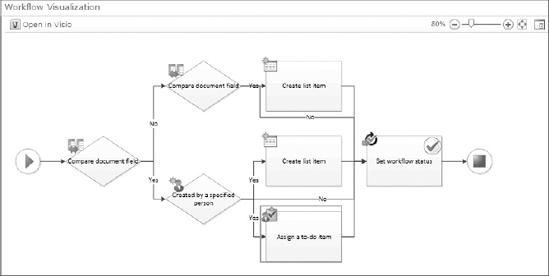
The Visio diagram renders in full fidelity in the browser if the machine being used has Microsoft Silverlight installed. If it does not, then the diagram renders in PNG format.
The visualization of a workflow has to be turned on individually for each workflow that you want Visio Services to process. In the workflow settings page of a workflow is a checkbox labeled "Show workflow visualization on status page." This checkbox must be selected before the workflow is published for the visualization to be generated as part of the workflow history page.
The next exercise shows how to configure the visualization of SharePoint Designer 2010 workflows.
Visualize SharePoint Designer 2010 Workflows
In this exercise, you turn on the Visio workflow visualization of the workflow you created in the last exercise. Then, you execute the workflow and observe the status in Visio.
In SharePoint Designer 2010, click on Workflows in the navigation pane. Open the Process Events workflow you created in the last exercise.
While at the summary page of the workflow, click on the checkbox for Show workflow visualization on status page.
Click the Publish button to republish the workflow to the Calendar list.
Now, to see the visualization, you must run the workflow. Navigate to the Calendar list in the browser.
Click the Events tab and then click the New Event button to start creating a new event.
Set the Title to "Celebrating Jim's Birthday." Set the Description to "Let's get together in the Wrigley conference room to celebrate Jim's Birthday." Set the Category to Get-together. Click Save to save the event.
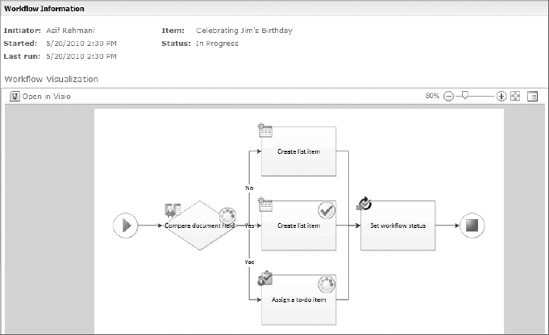
Now, click the event you just created on the calendar. Click the Workflows button. You should see that the Process Events workflow is In Progress. Click the In Progress link and you should see the workflow visualization come up on the workflow history page, as displayed in Figure 12-10. You can also open this diagram in Visio by clicking on the Open in Visio link.
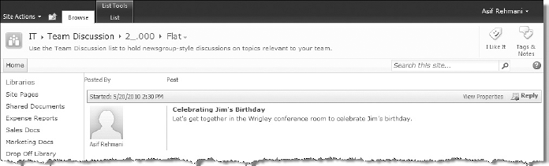
According to the diagram, a list item has been created and a task has been assigned waiting to be acted on. Navigate to the Team Discussions list; you should see a new discussion thread (see Figure 12-11) with the same information as the calendar item.
Now, click on the Tasks list and you should see a task assignment titled Arrange for Catering. Click on the task and you should see the workflow task form. Click on the Complete Task button.
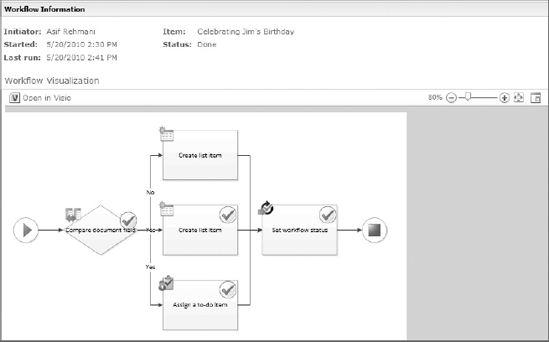
Return to the Calendar list and, as before, navigate to the workflow page of the event. This time, the workflow should have the status of Done. Click on it to get to the workflow history page. You should see the workflow visualization, as shown in Figure 12-12.
All the activities in the workflow have been completed as depicted in the visualization.
Visio Graphics Services (part of SharePoint Server Enterprise) provides the visualization for the running workflow directly in the workflow history page. The visualization shows up with Silverlight (if installed). Otherwise, it will render as HTML.
The workflow settings page for every list and reusable workflow has an Export to Visio button on the ribbon. This means that you can export the design of any list or reusable workflow (site workflows are not supported by this functionality) to visualize in Visio Premium 2010. When importing a workflow in Visio 2010, if the workflow file is already open in Visio 2010, the diagram will be updated to show any changes made in SharePoint Designer 2010. If the diagram file is not open, it will make a new diagram based on the workflow.
One of the advantages of taking the workflow to Visio 2010 is to visualize the processes better. You might want to store the workflow as a Visio diagram so that the visual depiction of the workflow processes is communicated to all stakeholders and so that everyone is clear on what is being implemented.
You can make as many roundtrips as you want between SharePoint Designer 2010 and Visio Premium 2010 with no loss of data or functionality. In other words, none of the rules, steps, variables, and all other configured workflow elements are lost going back and forth between the two applications.
The SharePoint object model provides the ability to create new workflow activities using Visual Studio. You can also buy activities from third-party vendors and plug them into SharePoint. The question then becomes: if new activities are designed and installed in SharePoint, and then used in a workflow that's imported in Visio Premium 2010, how will these activities surface? The answer is that Visio 2010 will show these custom activities as generic box shapes, because it will not know how else to present them. However, the good news is that you will not lose any configurations made to them in SharePoint Designer 2010.
Microsoft InfoPath 2010 provides a robust and powerful environment in which to create electronic forms. Chapter 9 is devoted to discussing how InfoPath 2010 works and the integration points of InfoPath in SharePoint. This section discusses InfoPath form integration within SharePoint Designer 2010 workflows.
SharePoint Designer 2010 workflows make ample use of forms to interact and gather data from users. These forms are created automatically by a workflow at the time it is published. SharePoint Designer 2010 generates three types of workflows automatically:
Initiation form—This form is presented to the user when the workflow is started manually on a list or library item. If any initiation form parameters are declared for the workflow, then they show up on this form. The user must then provide input. If no initiation form parameters are declared, then the form only contains a Start and a Cancel button.
Task form—Workflows often contain actions that create tasks in the Tasks list on the site. When users interact with these tasks, they are presented with this form. If custom form fields are defined for the task in the workflow, then these fields appear on the task form.
Association form—A reusable workflow makes use of association columns (fields). These columns (or fields) are added to the list when the workflow is added to that list. An association form enables you to associate fields with a reusable workflow so that the fields will be available when you design and run the workflow.
Note
Initiation forms, form parameters, and association columns are all topics covered in Chapter 11.
When you publish a workflow in SharePoint Designer 2010, the appropriate forms automatically get generated. You can modify workflow forms after they already exist as part of the workflow. These forms cannot be generated from scratch starting from InfoPath. These forms are visible in the Forms section of the workflow settings page, as shown in Figure 12-13. The XSN extension on these forms clearly indicates that these are InfoPath forms.

To modify these forms, click on the appropriate form to open it in InfoPath 2010. You can take advantage of all the features of InfoPath 2010 (for example, page layout design, data validation, conditional formatting, and more) to enhance this form further. When you are done with your enhancements, simply click the File button and then the Quick Publish button to publish the form back to the workflow from which it came.
The next exercise walks you through customizing a workflow form in InfoPath 2010.
Customize a SharePoint Designer 2010 Workflow Form in InfoPath 2010
In this exercise, you modify the initiation form of the workflow created in the last exercise.
In SharePoint Designer 2010, click on Workflows in the navigation pane. Open the Process Events workflow you created in an earlier exercise.
While at the summary page of the workflow, if the checkbox for starting the workflow automatically is selected, deselect it and click the Publish button to republish the workflow.
Click the
Process Events.xsnfile in the Forms section. InfoPath should open the form.Click on the Start button, and using the Properties tab in the ribbon, change the Label of the control to Process.
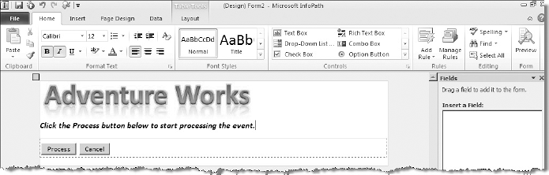
Place your cursor in the table cell above the buttons. Click the Insert tab and then click the Picture button on the ribbon. Look for and select a picture (something that can work as a logo) on your hard drive. Click the Insert button to insert it on the form.
After the picture is inserted on the form, press Enter on your keyboard to put your cursor right under it. Type in Click the Process button below to start processing the event. Using the Home tab on the ribbon, enhance the font (bold, italicize) as you want to enhance this message.
Your form should now look something like the one shown in Figure 12-14.
Click the File button on the ribbon. Then click on the Quick Publish button. You should get a message to save the form before it is published. Click OK and save it somewhere on your hard drive. A message appears that your form template was published successfully.
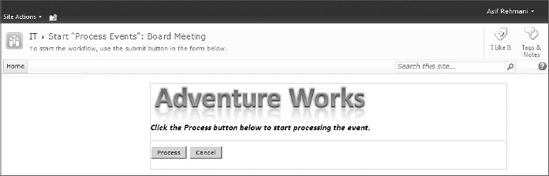
Open the Internet browser and navigate to your site. Click on the Calendar list and enter a new event titled Board Meeting.
After the event is created, click on it to open it, and then click the Workflows button. When you see the Process Events workflow, go ahead and click on it. Now, you should see the form that you just modified in InfoPath (see Figure 12-15).
Click the Process button and the workflow should start.
How It Works
InfoPath 2010 has a direct tie in to the workflow packages created by SharePoint Designer 2010. Once the form is modified in InfoPath 2010, it can be easily published back to the workflow where it originated from.
For all of this functionality to work as described in the preceding exercise, you need the InfoPath 2010 application on the client machine to modify your forms. Also, at the server level, you must be running SharePoint Server (Standard or Enterprise). If you are running SharePoint Foundation 2010, the workflow forms that get generated in SharePoint Designer 2010 are ASPX forms, which means these are ASP.NET forms that can be modified within SharePoint Designer 2010, but not in InfoPath 2010. To see the differences between customizing a form using InfoPath 2010 and SharePoint Designer 2010, you can watch the videos at www.sharepoint-videos.com.
SharePoint Server ships with five built-in workflow templates: Approval, Collect Feedback, Collect Signatures, Disposition Approval, and Three-State. You can start using these directly in your Internet browser by accessing them through any list or library's workflow settings page.
Three of the most popular built-in workflows (Approval, Collect Feedback, Collect Signatures) are built as declarative globally reusable workflows in team sites. An additional workflow called Publishing Approval, similar to Approval workflow, is available when you are working in publishing sites to approve publishing pages. These workflows are available to be fully customized, using SharePoint Designer 2010, by the owner of the top-level site of the site collection.
Note
If you make changes directly to a built-in workflow, you are modifying that workflow for everyone in the site collection. That means that your built-in workflows in this site collection would work differently from the ones in other site collections, thus potentially confusing your end users running the same name workflows, but getting different results in two different site collections.
To avoid this situation, you can make a copy of the workfl ow instead and give it a unique name before modifying it and publishing it to be used globally throughout the site collection.
You can also copy any of these workflows and create a new one with your own custom modifications. You can do this within any site of the site collection. In SharePoint Designer 2010, select the workflow you want to copy and click the Copy and Modify button on the ribbon. This creates a reusable workflow local to that site. After you have made the modifications, then publish the workflow to the site.
The three globally reusable workflow templates mentioned earlier are available throughout the site collection. You can also create new globally reusable workflows. However, you must have Full Control permission at the top-level site to make this happen.
You can publish any reusable workflow at the top-level site as a globally reusable workflow by going to the workflow settings page and clicking on the Publish Globally button on the ribbon. Publishing a workflow globally places it in the Global workflows catalog, making it reusable on every site within the site collection and visible to all users.
The following exercise shows how you can create a globally reusable workflow.
Create a Globally Reusable Workflow
In this exercise, you take a reusable workflow and convert it into a globally reusable workflow.
Start SharePoint Designer 2010 and open the top-level site of the site collection.
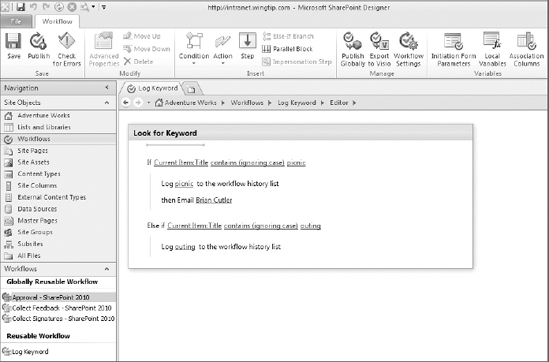
Use the skills you learned in Chapter 11 to create a simple, reusable workflow with the base content type of All. A sample workflow, named Log Keyword, is depicted in Figure 12-16.
Click the Save button to save the workflow, and then click the Publish Globally button on the ribbon. An information dialog appears, stating that publishing the workflow globally will make it available all throughout the site collection. Acknowledge the message by clicking on the OK button.
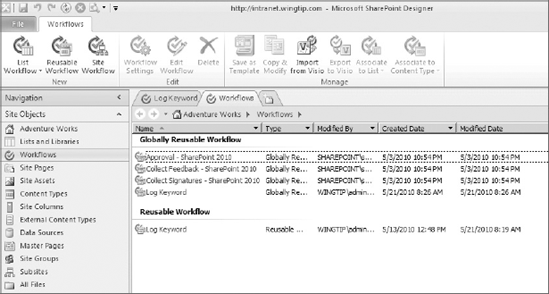
After the workflow finishes publishing, verify it by clicking Workflows in the navigation pane. You should see that your reusable workflow now shows up in the Globally Reusable Workflow section as well (see Figure 12-17).
Open your Internet browser and navigate to a subsite in this site collection.
You can pick any list or library to test this scenario. For this example, pick the Links list.
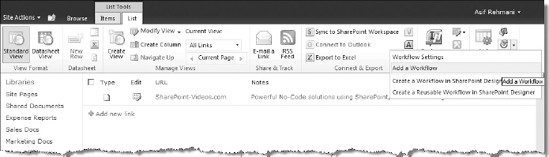
Click the List tab, click the drop-down for workflow settings, and click the Add a Workflow choice, as shown in Figure 12-18.
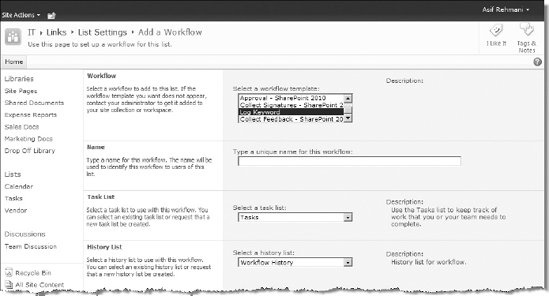
The Add a Workflow screen should show your workflow template in the Select a Workflow template text area (see Figure 12-19).
You can now use this global workflow template like all other built-in templates.
How It Works
When you publish a reusable workflow globally, a copy of the workflow is made. The original workflow still remains at the site level and can be used independently of the newly created globally reusable workflow.
Two of the three built-in global workflows that you can customize are built with actions available under the Actions button, as shown in the following table:
ACTION | BUILT-IN WORKFLOW |
|---|---|
Start Approval Process | Approval |
Start Feedback Process | Collect Feedback |
The third workflow, Collect Signatures, uses a slight variation of the Start Feedback Process action. Also, another action, Start Document Set Approval Process, has the process design that's based on the Start Approval Process action, with the exception that this action works on whole document sets instead of a single document.
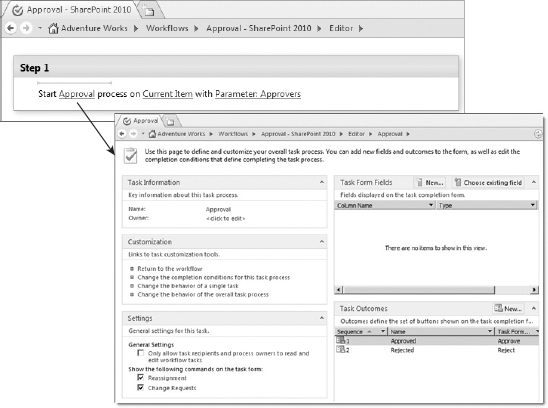
These workflows are all completely event-driven, and all the important events in the workflows are available to be customized within the Workflow Editor using the Task Process Designer. Think of the Task Process Designer as a workflow designer within a workflow designer. Each task in the process or the process as a whole can be customized using the Task Process Designer. Figure 12-20 shows the Workflow Editor interface of the Approval workflow. It also shows the Task Process Designer environment that you can enter by clicking on the Approval link in Start Approval Process action.
The next exercise walks you through copying the Approval workflow and customizing it and deploying it onto a site.
Copy and Change the Approval Workflow at a Subsite
In this exercise, you copy the built-in Approval workflow to a subsite and then modify the activities to your needs.
Open or create a team site anywhere under the top-level site of the site collection. Open this subsite in SharePoint Designer 2010, and click on the Workflow section in the navigation pane.
Click on the Approval - SharePoint 2010 workflow. A dialog appears, informing you that it is read-only and to ask whether you want to make a copy of the workflow. Click Yes.
Name the workflow AW Approval, and leave the base content type selection to All.
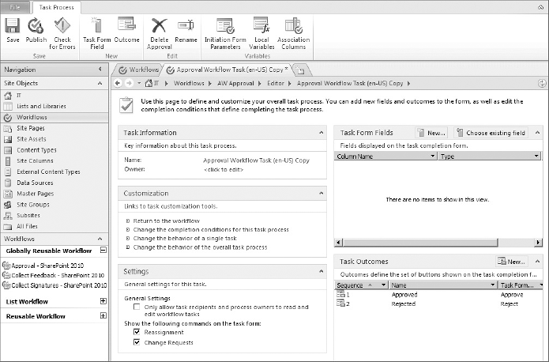
When the workflow designer surface appears, click on Approval Workflow Task to enter the Task Process Designer environment that's shown in Figure 12-21.
Click on the link "Change the behavior of the overall task process."
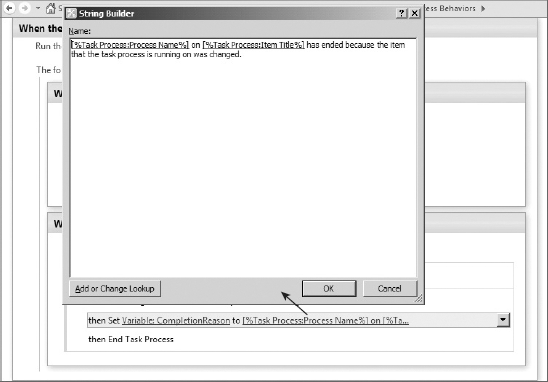
Find the When the Task Process is Running step and then find the "When the Item is Changed" substep. Under the wording "Wait for change in item that the task process is running on," click on the
[%Task Process:Process Name%]...link; a dialog box appears as shown in Figure 12-22.Append the following wording at the end of the message in the dialog: The process needs to be restarted so all approvers can see the change and approve it. Click OK.
Now look for the When the Task Process Completes step. Under the step, look for and click on the link in the Log action to change the message.
In the String Builder dialog that appears, append the following text: Check out the workflow status field to see whether the process completed successfully. Click OK.
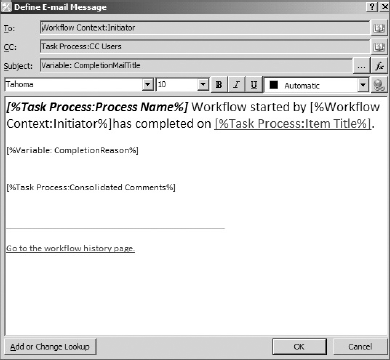
Find and click the link in the Email action under the Else branch to modify the e-mail message that gets sent out to the initiator of the workflow.
Change the wording of the e-mail as desired. A sample change is shown in Figure 12-23. Click OK.
Check the workflow for errors (click the Check for Errors button on the ribbon) and if no errors are found, click the Publish button to publish the workflow.
Click Workflows in the navigation pane and you should now see the AW Approval workflow in the Reusable Workflow section.
How It Works
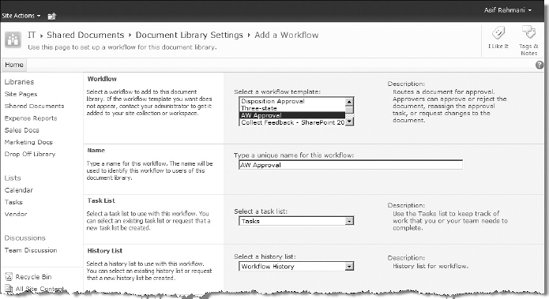
The AW Approval workflow created in the preceding exercise now acts just like any other reusable workflow on the site. To use it, an administrator of the site would go to the Add a Workflow screen for any list or library on the site. The AW Approval should be readily available at this location as a workflow template to be used (see Figure 12-24). This workflow will behave just like the original built-in Approval workflow. The only changes are the textual ones made in the preceding exercise.
In the preceding sections, you learned how to create reusable workflows that you can use within a site or even publish globally so they can be used throughout the site collection. SharePoint Designer 2010 also supports exporting a reusable workflow as a package so that it can be deployed to another site collection or further extended using Visual Studio.
Packaging up a reusable workflow is a simple one-step process executed from the workflow settings page of the reusable workflow. At this page, clicking on the Save as Template button on the ribbon packages up the reusable workflow in a WSP file (SharePoint solution package) and automatically stores it in the Site Assets library of the site, as shown in Figure 12-25.

After you have the file in the Site Assets library, you can export it to your hard drive or file share to transport it as necessary. In SharePoint Designer 2010, click Site Assets in the navigation pane. You can select the WSP file (if the WSP file is not there, refresh the page) and click the Export File button on the ribbon to start the export process.
The following sections explain what you can do with this WSP file after you export it.
A file with a .wsp extension is referred to as a SharePoint solution file in SharePoint. This file is usually generated by developers and bundles within it components such as features, site definitions, and more.
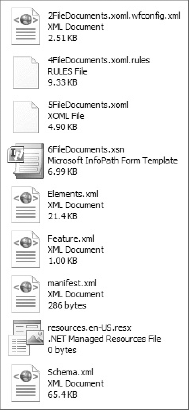
SharePoint Designer 2010 also has the capability to produce a SharePoint solution file containing a reusable workflow, as shown in the previous section. This file has a .cab-based format but a .wsp file extension. In fact, if you change the file extension of a WSP file (containing a workflow) to CAB temporarily and then double-click on it to open it, you will see the contents of this package are similar to what's shown in Figure 12-26.
You can use the WSP solution file to transfer reusable workflows created in one site collection to another. For example, workflows created in a development environment can be packaged and then deployed to the production environment.
The following exercise walks you through the process of packaging up a reusable workflow as a WSP file and then deploying it to another site collection.
Deploy a Reusable Workflow to Another Site Collection
In this exercise, you package a reusable workflow and then deploy it to another site collection. Then, you use that workflow in that site collection.
Start SharePoint Designer 2010 and open a team site.
Use the skills you learned in Chapter 11 to create a simple reusable workflow with the base content type of All. Hint: You can use the simple Log Keyword workflow created and used in an earlier exercise in this chapter.
While the workflow is selected (either in the main Workflows page or at the Workflow Settings page of the workflow), click the Save as Template button on the ribbon. You should see a dialog box informing you that the workflow template has been saved to the Site Assets library.
Click on Site Assets in the navigation pane. You should see your workflow template (if you don't, refresh the screen).
Highlight the workflow and click the Export File button on the ribbon. Save this solution file somewhere on your computer.
Using your Internet browser, open the top-level site of another site collection that you have access to as a site collection administrator.
Go to the Site Settings page and click on Solutions under the Galleries section.
Now at the Solution Gallery, click the Solutions tab and then click the Upload Solution button.
Browse to the location of the solution file you exported earlier to your computer and select it to be uploaded. Click the OK button in the Upload Document dialog.
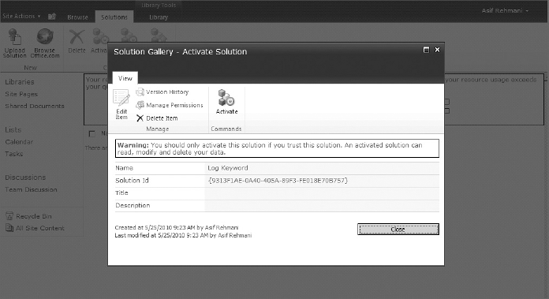
You should now see the Activate Solution dialog, as shown in Figure .2-27
Click the Activate button in the dialog. Your workflow is now activated and available within this site collection.
Navigate to the Site Settings page of any site within the site collection. Click the Manage site features link under the Site Action section.
You should see your workflow template as a feature on this page, as shown in Figure 12-28. Click the Activate button to activate it. This workflow is now available on the site as a reusable workflow.

How It Works
The Solution Gallery of a site collection holds the WSP solution files. In the preceding exercise, the workflow solution package is deployed to this gallery. Then, the package is activated to make it available as a site feature in the site collection. Each individual site owner can then choose to activate the feature in the site to enable the reusable workflow. If the feature is activated, the workflow will behave much as any other reusable workflow on the site.
Visual Studio 2010 provides a project template named Import Reusable Workflow. This project understands the structure of the packaged WSP file containing the reusable workflow and lets you point to and import the solution file into the Visual Studio environment, as shown in Figure 12-29.
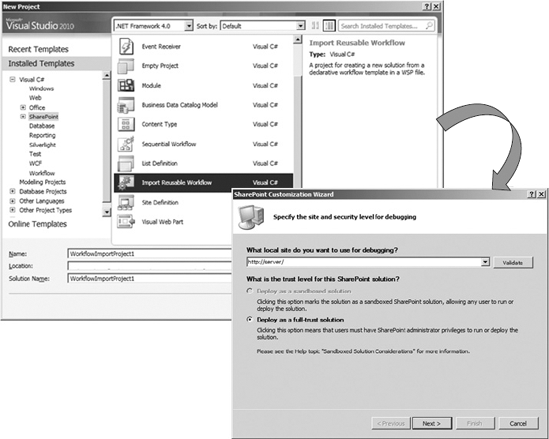
The story here is that a site administrator or a designer would create the reusable workflow initially in SharePoint Designer 2010, package it up into a solution file, and then pass it on to a developer, who can import it into Visual Studio and extend it as necessary with code. This process is also detailed in an MSDN article located at http://msdn.microsoft.com/en-us/library/ee231580.aspx.
In concept, this is a great idea and provides hope for a rapid development solution that involves the business owner and the developer working side by side. However, before moving forward with this idea, consider the following facts:
A single action in SharePoint Designer 2010 may render as dozens of activities in Visual Studio 2010.
Workflows with large numbers of activities in Visual Studio 2010 are not easily manageable. The design surface just isn't designed to manage workflows of 100 activities or more, so it seems a bit unwieldy.
Workflows transitioned to Visual Studio 2010 cannot be run as declarative workflows any longer and, therefore, must be deployed as farm solutions.
A much larger discussion can be had here from a developer's perspective as to the pros and cons of using this method. Because this is not a book focused on SharePoint development, the discussion of this methodology stops here. You are encouraged to experiment within this area to determine whether this functionality could be useful for your needs.
This chapter exposed you to the advanced workflow features in SharePoint Designer 2010. You learned how Microsoft Visio, InfoPath, and SharePoint Designer teams have joined forces together to enable these systems to build workflows and interactive forms, and to visualize running processes.
Business analysts can use Visio Premium 2010 to model the processes in a workflow then pass it on to developers or power users, who can import these processes into SharePoint Designer 2010 and configure the workflow further. Also, Visio Services plays a major part in being able to visualize the path and history of a workflow. Furthermore, InfoPath is used by form designers to extend the functionality provided in the default forms that the workflows in SharePoint Designer 2010 create automatically.
The second part of the chapter discussed the opportunities to package up and deploy reusable workflows in a variety of ways—global to a site collection, exported to another site collection, and imported in Visual Studio. This is a major step in making your workflows truly scale throughout your enterprise systems.
Quite a bit of knowledge was presented in the last two chapters on workflows. Nevertheless, the author advises you to continue the journey and keep learning and discovering new ways that you can take advantage of the workflow systems available in SharePoint 2010.