
This chapter switches gears a bit to talk about an application called Microsoft Office InfoPath 2010. InfoPath, which is a form generation tool that has been part of the Office suite since 2003, has become an integral part of the SharePoint products and technologies. In this chapter, you discover how you can use InfoPath easily and efficiently to manage SharePoint list and library forms. You also learn about the InfoPath Form web part that ships with SharePoint Server 2010 Enterprise and lets you expose InfoPath forms alongside your other SharePoint components.
When InfoPath 2003 was released as part of Office 2003, it was ahead of its time, because it was the only product within the Office suite that utilized the power of XML in its inner workings. An InfoPath form is based completely on an XML schema and offers structural editing of the XML data. It is the most appropriate platform for gathering data in the Microsoft Office suite of applications, and the user interface provided is very much like Microsoft Word, so the ramp-up time for a new form designer is minimized. You can build dynamic data-driven forms without needing a programming background.
The latest revision of the product is Microsoft InfoPath 2010. The fluent interface (ribbon) has been introduced in the product, which now provides it a consistent look and feel with the other Office products. Two InfoPath applications are available — Microsoft InfoPath Designer 2010 and Microsoft InfoPath Filler 2010. Designer is used by the form designers to design the form, whereas the Filler is used by the end users to fill out a form and save it. In addition to filling out the form in the Filler, you can also allow end users to fill out forms using the browser, provided that you have the enterprise license of SharePoint Server 2010, which ships with the needed component, Forms Server, to serve up the forms. InfoPath 2010 web browser forms are compliant with Web Content Accessibility Guidelines 2.0 (WCAG 2.0) and are fully XHTML 1.0 compliant. To find more information on the enterprise licensing of SharePoint Server go to http://sharepoint2010.microsoft.com.
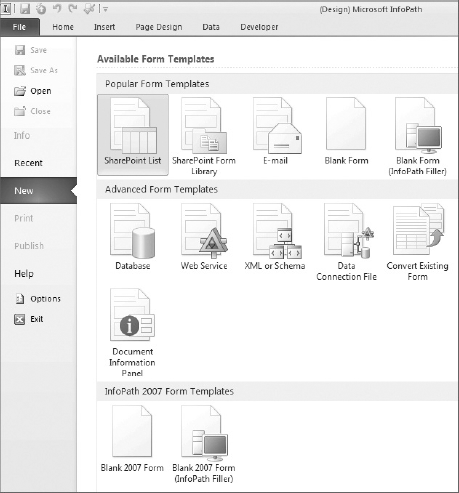
A form designer uses InfoPath to create form templates for end users to fill out. After opening the InfoPath Designer application, the first decision that a form designer must make is to choose the type of form template. The Backstage screen of Designer helps with this process. As is apparent in Figure 9-1, you can choose from many form templates.
You can utilize InfoPath Designer to edit SharePoint list or library forms. This chapter provides an example of this functionality later. You can utilize InfoPath completely independent of SharePoint by creating template forms that can be used on their own. You can place form templates on a network share or on an intranet from where users can obtain and fill out the forms. In addition, you can send forms directly to people's inboxes, where they can fill out the form within the Microsoft Outlook 2010 environment and submit it back to the person who sent them the form.
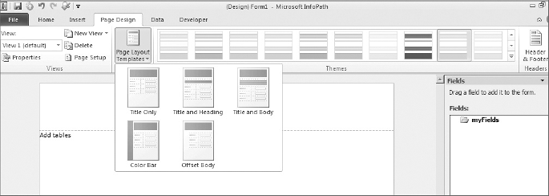
The Designer environment provides a quick and easy interface to get started building your forms. Assuming you start by using the Blank Form template, which starts you out by providing just an empty table, you can quickly decide on a page layout for your form by selecting the Page Design tab and picking a Page Layout template. Then pick a theme for your form by selecting from the provided theme choices. Figure 9-2 shows the page layout templates and a brief view of the available themes.
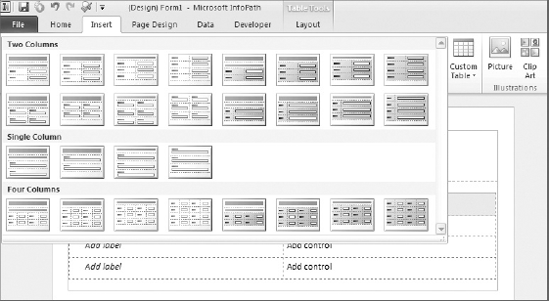
Form templates generally consist of labels and controls through which you want to accept user input. These elements are best arranged in a table. By clicking on the Insert tab, you see a number of choices for table styles, as shown in Figure 9-3. Pick the style(s) that best suits your need.
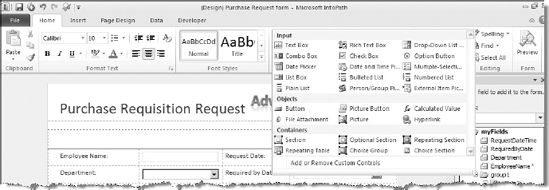
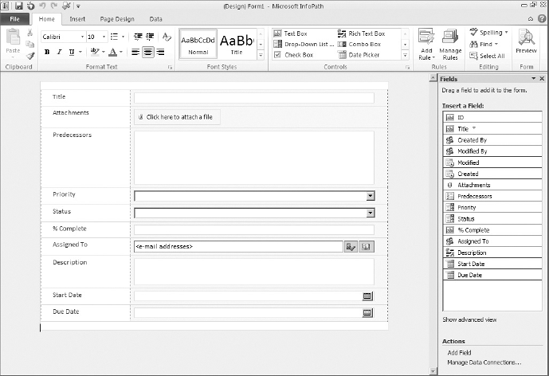
The next step in creating the form is to populate it with descriptive text and the controls needed for the form. You insert the text and labels simply by typing them directly onto the appropriate places in the form. The controls for the form are available through the Home tab. This is where the true design power of InfoPath forms are realized, because you can use a variety of controls as the designer. As Figure 9-4 shows, controls such as text box, drop-down list, date picker, button, repeating table, and more are all available in the Home tab, ready to be placed on the form. Just place your cursor at the place you want the control to appear and click on the control to insert it in the form template.
The form template is aware of the controls placed on it and their associated properties. The form designer can access controls by their name and use them as needed, so a best practice to follow is immediately to name all the controls on the form. You access a control's name and other properties by first clicking on a control and then using the Control Tools tab that appears in the ribbon. The Fields task pane on the right side of the screen reflects that change.
After a form template design meets a designer's required specifications for what the form is intended to accomplish, the next step is to manage the dynamic aspects of the form by using proper validation and formatting rules. This aspect of the form is discussed in the next section.
The InfoPath Designer environment allows you the use of a rules engine with which you can decide how your form and the controls on the form should behave in response to the data that the end user provides. Three types of rules can be created using the rules management interface:
Validation — Validate the entered data in controls.
Formatting — Change formatting of a control based upon defined condition criteria.
Action — Perform an action (such as setting a field's value or submitting data) based upon defined condition criteria.
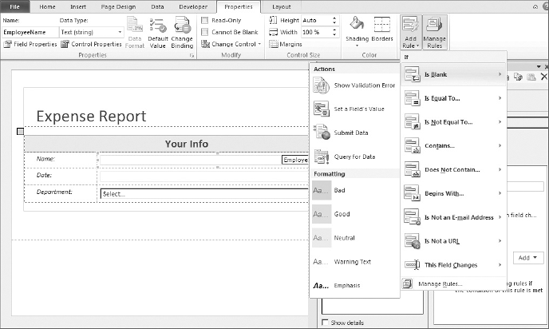
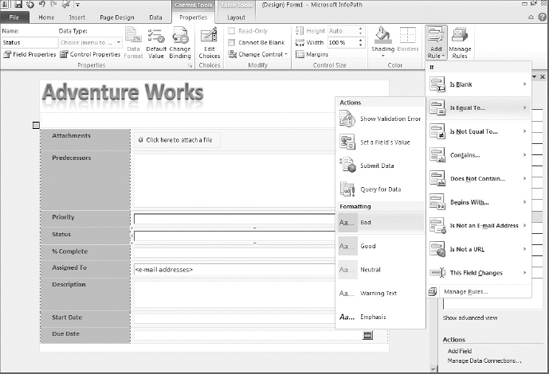
You can quickly start incorporating rules in your form by using quick rules. These are a set of pre-built rules that help validate your data and make forms more dynamic. Simply click on the control that you want to set a rule upon, click the Add Rule button in the ribbon, and then select the condition and subsequent action from the list of options that appear. Figure 9-5 shows a snapshot of these rules in Figure 9-5.
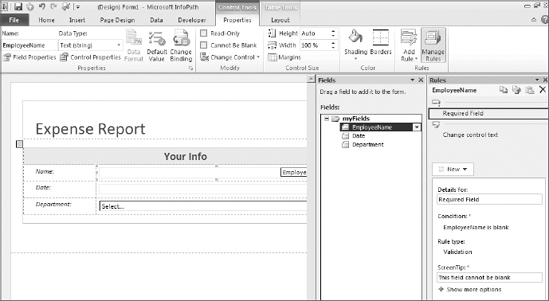
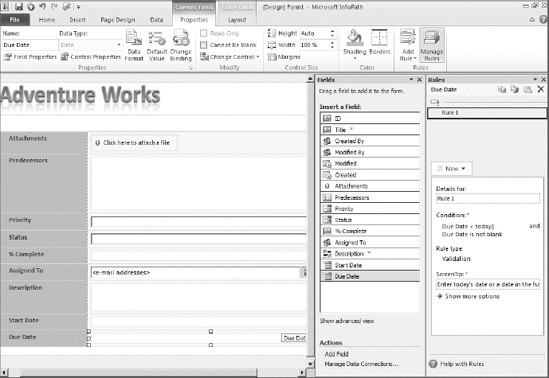
Think of quick rules as a wizard to get you started. You can start instead from scratch by clicking on the Manage Rules button on the ribbon, which displays the Rules task pane on the right, to manage rules. The same task pane also appears after you have picked a quick rule, and lets you manage the properties of that rule further (such as changing its name) as needed. You can configure as many rules as needed for the control. The control's rules appear on this task pane when you place the control in context by clicking on it. You created a new rule by clicking on the New button in the Rules task pane and selecting the appropriate type of rule. A rule is set up much like a mini-workflow in which you define a condition and then a subsequent action for which the condition becomes true. For example, designate a field as required to contain content, so that, if the field is blank and the user tries to submit the form, it shows a validation error. An example of a formatting rule would be to check a field's value with the value of another field to determine whether they are the same, and to change the background color of one or both fields to red to signify when they are not. Figure 9-6 shows a couple of configured rules for a control.
In a typical form created for business use, you might need to create numerous rules for the controls. A very useful functionality available is the ability to copy and paste rules from one control to another. To copy single or multiple rules, simply select them and click on the copy icon that appears within the Rules task pane. Then select the control to which you want to paste the rule(s), and click on the paste icon in the Rules task pane. All of your rules along with their defined logic are copied to the new control saving you lots of time and effort.
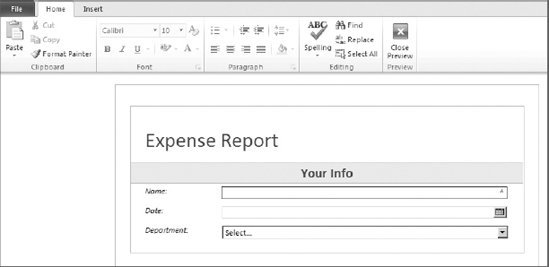
The end goal is for you to publish the form template to a location where users can access it and fill it out with their data. Publishing is covered later in this chapter. Before publishing your form, using the Preview button on the Home tab of the ribbon to preview your form and run through its logic is always a good idea. Figure 9-7 shows how the preview screen looks.
InfoPath can make data connections to various data repositories. Depending on what you want the form to do, you can set up data connections for either retrieving data or submitting it to a data source. This section focuses on the receiving part of the equation. The Data tab (see Figure 9-8) within the InfoPath client displays the various repositories of external data you can use.

Following is a list of external data connections you can create:
You can create each of these connections very simply by following the wizard that appears after you select your data source type. Just because an option to connect to non-SQL databases does not exist in the user interface does not mean that it is not possible. You can use web services to connect to any non-SQL databases (provided that those databases expose web services to consume).
A query data connection gets data from the external data source, which you can then bind to any fields within the form. You see an example of making a connection to a SharePoint list and binding that information to a combo box later in this chapter.
An InfoPath form template is saved as an .xsn file. When you publish the form, this file becomes accessible to the end users and works very much like a Microsoft Word document template (.dotx file). The user opens the file and fills out the required information on the form. When the user decides to save or submit the form, it gets saved as an .xml file containing all the user-provided data and a pointer to the original .xsn file used to create this instance.
Publishing and sharing the InfoPath form using SharePoint is recommended. SharePoint framework provides a multitude of built-in options to support the form processes. If your SharePoint instance is running with enterprise client access licenses then the only thing that the users need is the browser to fill out the forms. If SharePoint Server standard licensing or just SharePoint Foundation is deployed, then the end user needs the InfoPath Filler application to fill out the forms. When the form template is published to the form library in SharePoint, the users can take advantage of all the base features available within every library, such as versioning, check-in/check-out, and the ability to attach workflows to the library. The form library provides a superset of features available in a document library. In addition to all the base features of a typical library, a form library is recognized inherently by InfoPath, which can publish forms directly to it. You see an example demonstrating this process later in this chapter. An added benefit of hosting the forms in a form library is that it contains a special built-in view called Merge View that lets you merge the information of multiple instances of the filled-out forms that are hosted in the library.
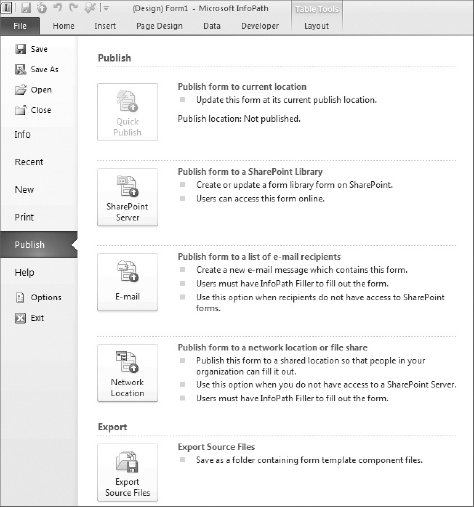
The publishing options are available through the Publish option on the File tab in the ribbon as shown in Figure 9-9.
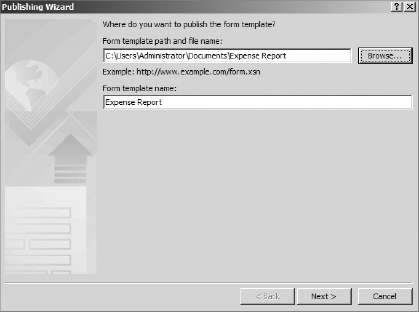
In addition to publishing to the SharePoint Server, you can also publish the InfoPath form template directly via e-mail to user's inboxes or place it on a network location that's accessible to the intended audience. Both of these options require that users filling out the form have the InfoPath Filler application available to them on their computer. The process to publish the form to a network share is the simplest available within the Designer environment. It entails just pointing to the location where the .xsn file needs to be saved. After the file is published to that location, you can notify your users (via e-mail or otherwise) to fill out the forms using this template. Figure 9-10 shows the wizard screen that you use to define the location and name of the form.
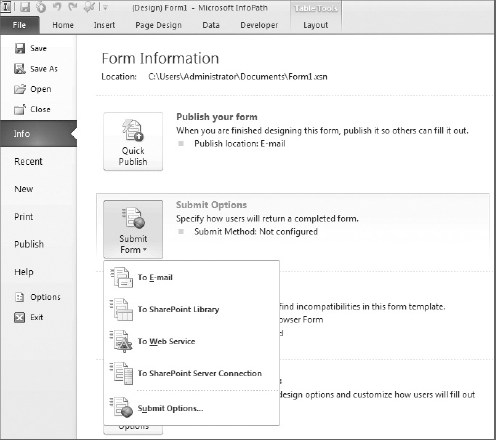
In a scenario where, for example, you want to collect some information from your users quickly, you can send them an e-mail with the form prominently displayed in the body of the e-mail. As long as the user has InfoPath on his computer, he will see the form ready to be filled out. The E-mail button in the Publish screen starts up the e-mail client and guides the form designer through the process of sending the form. When the end user receives the e-mail, all he will then need to do is to fill out the form directly in the e-mail client application and submit it. The form designer must configure the submission process of InfoPath beforehand for this process to work. It can be configured automatically to submit the form to a variety of places, including sending the form back through e-mail, sending it to a library or to a predefined connection in SharePoint, and submitting to a web service. The submission options are available through the Info selection under the File tab as Figure 9-11 shows.
The information in the preceding sections provide enough guidance to get you started with Microsoft InfoPath 2010. However, by no measure is it an exhaustive list of features available within InfoPath 2010. Learning this product further by picking up a good book that's dedicated to this subject is definitely advisable. Because no books are published on InfoPath 2010 just yet, I advise going through a good InfoPath 2007 book, such as Designing Forms for Microsoft Office InfoPath and Forms Services by Scott Roberts and Hagen Green (Addison-Wesley, 2007). This book provides you a good basis for the internals of this product and opens your mind to the possibilities of what is achievable with this platform.
When you use a list template in SharePoint to create a new list, it automatically deploys a number of forms for viewing, editing, and creating items in that list. You are not limited to these forms and are allowed to create new forms for users to interact with list data. Chapter 8 discusses and demonstrates the way to create new list forms using SharePoint Designer 2010. You can use those methods with any version of SharePoint. However, if you have the SharePoint Server enterprise license, you have an additional option to customize your list forms using InfoPath 2010.
The earlier sections in this chapter explained the power of InfoPath and declared it as a preferred tool for form generation and manipulation in SharePoint. This section demonstrates how you can use this tool to create robust SharePoint list forms.
Building list forms is a new functionality in InfoPath 2010. Earlier versions of InfoPath did not let you create SharePoint list forms. Because InfoPath is the preferred Microsoft tool for form generation, letting this powerful tool generate forms for SharePoint lists and libraries as well just makes sense. In the previous versions of InfoPath, you could use it to create SharePoint library forms (discussed later in this chapter). Now the additional functionality for creating SharePoint list forms has been integrated into the platform. The list form creation process can be instantiated from within InfoPath by choosing the SharePoint List form template, or you can start directly from a SharePoint list as demonstrated in the next exercise.
Create a SharePoint List Form Using InfoPath
In this exercise, you will create a new form for the Tasks list using InfoPath.
Open a team site in SharePoint Designer 2010. Click on Lists and Libraries in the navigation pane and then click on Tasks list to get to its summary page.
Look for and click on the Design Forms in InfoPath button in the ribbon. Select the Task choice from the drop-down list. InfoPath opens, showing you the list form, as displayed in Figure 9-12.
Place your cursor in the first line of the form, click on the Insert tab in the ribbon, and click the Picture button.
Select and browse to a picture on your computer that you want to insert at the top of the form (for example, a company or department logo). After the picture is on the form, you can resize it as you need.
Drag the Title text box to right after the picture. It should automatically settle underneath the picture. Now while having this text box selected, click on the Home tab and change the font properties to Arial Black font, size 14 and Bold.
Click on the Title label that's now below the text box. Because you don't need this row anymore, click the Layout tab in the Table Tools menu and then click Delete

Click and drag to highlight all the labels in the first column of the form table (that is, Attachments, Predecessors, and so on). Using the Home tab, set the font to Bold. Then click on the Layout tab and use the Shading button to set the shading to a light gray.
How It Works
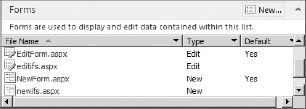
When you modify a list form using InfoPath, a new set of forms are created and placed side by side with the original forms for the list. You can easily identify these new forms because they all have the suffix ifs as shown in Figure 9-13.
This new set of forms contains an InfoPath form web part within it; the FormLocation property of this form web part is automatically set to point to the list with which the web part is associated. When the end user performs an action on the list that requires one of the list forms, the new list forms appear in place of the originals.
Enhance a List Form with Conditional Formatting and Validation Rules then Publish It Back to the Library
In this exercise, you enhance the form that you created in the previous exercise with conditional formatting and validation logic. Then you publish the form back to the Tasks list.
Open the InfoPath form from the last exercise.
Click on the Status drop-down field. Click on the Properties tab then click the Edit Choices button to display the drop-down list choices. Make note of the available choices (that is, Not Started, In Progress, Completed, and so on). Click Cancel to dismiss the dialog.
While the Status field is still selected, click on Add Rule in the ribbon and then select Is Equal To
In the Rule Details dialog that appears, type in Not Started in the text box (it might be already filled in when the dialog appears) and then click OK. Your first conditional formatting rule for this field is complete. Verify it in the Rules task pane that appears.
Using the same method in steps 3 and 4, create two new rules. For the first rule click Add Rule in the ribbon and select Is Equal To
Click on the Description text field on the form. Click on the Properties tab and then select the Cannot Be Blank checkbox.
Click on the Due Date calendar control in the form. Click Add Rule
Click on the File tab and then the Quick Publish button to publish the form back to the list. A Publish dialog appears with confirmation of successful publishing of the form. Click OK to acknowledge it.
Navigate to the Tasks list in your site using the browser. Click on the Add New Item link. The newly created form appears.
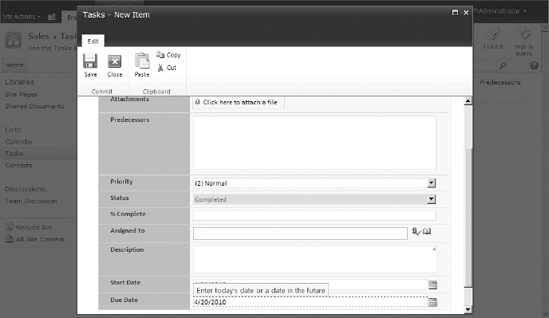
Test out the functionality of the new form by changing the Status field; the background color should change accordingly. Also note that if you put a date in the past for Due Date, the control will be surrounded by dashed red lines. When you hover over this control, the pop-up dialog will state that you need to enter today's date or a date in the future, as shown in Figure 9-16.
How It Works
The built-in Rules engine in InfoPath is used to make the form truly dynamic and robust. Once configured, each rule becomes a part of the form itself. These rules will apply to the form logic no matter where the form is eventually used.
The Quick Publish functionality facilitates a quick deployment to wherever the form was published previously.
Note
You can use both SharePoint Designer 2010 and InfoPath 2010 for creating SharePoint list forms. Chapter 8 details how to do this using SharePoint Designer, and the preceding section in this chapter lays out the options that are available in InfoPath. Which one should you use? Well, if you don't have the SharePoint Server Enterprise license then the only choice you have is SharePoint Designer for this functionality. On the other hand, if you do have access to the InfoPath application and you have SharePoint Server Enterprise deployed in your environment, then Microsoft recommends that you utilize the inherent power of InfoPath to create your SharePoint list forms.
As proof that InfoPath is a more robust platform for this functionality, you create a new form for the same Tasks list using SharePoint Designer in Chapter 8 and using InfoPath in Chapter 9. As you may have noticed, both platforms provide powerful interfaces for list form manipulation. However, InfoPath has a leg up in this process because it provides an easy-to-use Microsoft Word–like interface that form designers can use to create their forms. In addition, using InfoPath form designers can easily implement rules logic to validate and conditionally format data. Also, you can surface your forms on any SharePoint page using the provided InfoPath form web part, as shown in the next section.
The InfoPath form web part has been introduced as a new web part in SharePoint Server 2010. You need the SharePoint Server Enterprise license to have access to this web part in the web part gallery. InfoPath forms have been capable of being displayed in the browser for many years now using InfoPath Forms Services. Nevertheless, many users have wished that they could encapsulate their forms within a web part that they can then deploy to any SharePoint page. Well, this capability is now possible with the InfoPath form web part!
Back in SharePoint Server 2007, users who wanted to host their InfoPath forms on Web pages had to utilize the XmlFormView control and write code in Visual Studio. You can now accomplish the same goal without writing a single line of code using the InfoPath form web part. The InfoPath form web part works by hosting any already-published InfoPath form on the site. The two types of forms that it can consume are the following:
An InfoPath browser form that is published to a form library (covered later in the chapter).
A form associated with a SharePoint list that has been customized by using InfoPath Designer 2010.
You can configure all common web part properties, such as the title, appearance, and behavior of the web part, directly from the web part properties task pane in the browser. You can also connect the InfoPath form web part to other web parts on the page to send or receive data.
The following exercise shows an example of how to use this web part to show a SharePoint list form.
Consume a SharePoint List Form within an InfoPath Form Web Part
In this exercise, you use the Tasks list view form you created in the preceding exercise with the InfoPath form web part. You use SharePoint Designer 2010 to deploy and configure the web part.
In SharePoint Designer 2010, navigate to Lists and Libraries in the navigation pane and then click on the Tasks list to get to its summary page.
Click on the All Tasks view to open it. An XSLT List View web part showing the Tasks list appears.
Click to place the cursor at the absolute bottom row of the Main web part zone (a
divtag appears when you click there).Click the Insert tab. Click Web Part
While the InfoPath Form web part is still selected, click on the Format tab then click the Add Connection button.
In the Web Part Connections wizard that appears, click the drop-down arrow and select Get Form From. Click Next.
Choose to connect to a web part on this page and click Next.
Select Tasks as the Target Web Part, click Next, and then click Finish. Click the Save icon to save the view page.
Navigate to the Tasks list in the browser. If you don't already have any items in the Tasks list, add a couple of items there.
Click on one of the double-pointed arrows that appear under the Select column in the list. It shows you the corresponding form, as shown in Figure 9-17.
How It Works
An InfoPath form web part is automatically aware of the InfoPath forms that exist on the site in which the web part is deployed. The preceding example shows how to use this web part using SharePoint Designer 2010. When you configure this web part in the browser, it displays all the lists and libraries that have at least one InfoPath form attached to them. When you choose the list or library of interest, the drop-down below it displays all the available forms on that list. Upon your picking the desired form, the web part encapsulates the form within it.
All SharePoint libraries require at least one document template to be associated with them. For example, when you create a document library, you have the option of choosing Word, PowerPoint, Excel, or other applications to be the default document template for the library. When a user clicks on the New Document button in the library, he is then presented with the appropriate document template.
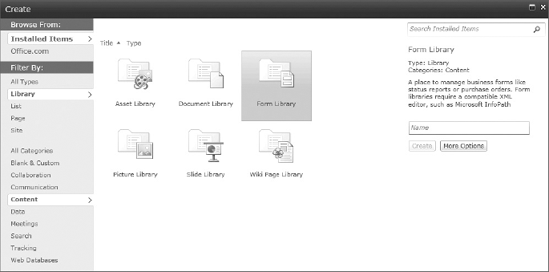
InfoPath can also serve as the default document template for a library. The special type of a library that is created to host InfoPath form templates is a form library. Figure 9-18 shows the form library in the Create dialog.
Form libraries have been around since SharePoint 2003 and have served as a place to hold and manage forms. The InfoPath environment inherently understands form libraries in SharePoint. The form publishing process in InfoPath can either create a new form library or publish a form to an existing form library. The following sections detail the process of creating an InfoPath form and publishing it to a new form library.
The first decision you have to make when creating a new InfoPath form template for a library is to choose the appropriate template with which to start. You can start from scratch, if you like, using the Blank Form template, and then choose the design layout for the form, add controls, create rules, and apply formatting. Or you can start with the built-in SharePoint Form Library template that starts you off with a built-in layout that you can then customize to your needs. The following exercise uses the Form Library template as the starting point.
Create an InfoPath Form Using the SharePoint Form Library Template
In this exercise, you create an InfoPath form that you will later publish to a form library.
Start Microsoft InfoPath Designer 2010. When the Backstage appears, pick the SharePoint Form Library template and click the Design Form button.
Click the Insert tab and then click the Picture button. Browse to any picture you want on your computer, and select it to insert it into the form. Change the alignment of the picture so that it appears to the right of the title of form.
You can type labels directly on the form, and controls are available on the Home tab. Enter the following labels and controls on the form (delete any extra rows and tables on the form):
Employee Name:
Text Box
Request Date:
Date and Time picker
Department:
Combo Box
Required by Date:
Date picker
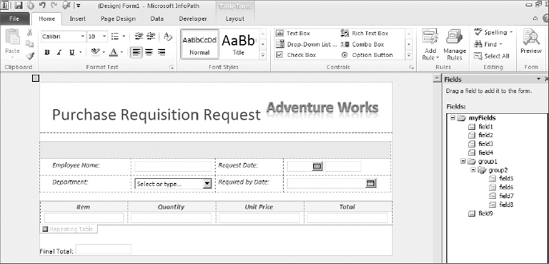
Place a Repeating Table control (four columns) below the table with all the controls. Name the column headers Item, Quantity, Unit Price, and Total.
Below the repeating table, enter a Final Total label followed by a text box. The form should now look something like the one shown in Figure 9-19.
Optional: If you want, you can use the Page Design tab and pick a different theme for your form.
How It Works
The built in form library template is used in the exercise above to get a quick start in designing the form template. The blank form template can also be used to start from scratch and build your form structure as needed. As the controls are placed on the form, the form's schema is automatically being built and is visible in the Fields task pane.
Now that you've created the shell for the InfoPath form template, the next step is to enhance it using validation and conditional formatting techniques.
Enhance the InfoPath Form with Validation and Conditional Formatting
In this exercise, you start with the Purchase Requisition Request form you created in the preceding exercise and enhance it with conditional formatting and validation rules.
Open the Purchase Requisition Request form.
Click in the Employee Name text box. Click on the Properties tab and change the name of the field to EmployeeName. Select the Cannot Be Blank checkbox to ensure this becomes a required field.
Click on the Request Date's date and time picker control and using the Properties tab, change the control's name to RequestDateTime. Click on the Default Value button and then click the fx button in the dialog that appears. Now in the Insert Formula dialog, click Insert Function and select the now function (now function is also available under the Date and Time category). Click OK in the dialog boxes that have opened to return to the form.
Click in the Required by Date field and using the Properties tab, change its name to RequiredByDate. Now from the Home tab, click the Add Rule button and select Is Before
Now modify the fields in the Repeating Table (that's the table with four columns that you added in a previous exercise). Select and change the Item text box name to Item.
Click the Quantity text box in the Repeating Table and using the Properties tab, change its name to Quantity. Change the Data Type to Whole Number.
Click the Unit Price text box in the Repeating Table and using the Properties tab, change its name to UnitPrice. Change the Data Type to Decimal. Click the Data Format button and change the format to the Currency symbol.
Click the Total text box and using the Properties tab, change its name to Total. Change the Data Type to Decimal and Data Format to the Currency symbol. Click the Default Value button and then click the fx button in the dialog that appears. Use the Insert Field or Group button to first insert the Quantity field and then the UnitPrice field. Enter an asterisk (*) in between the two fields so the final formula looks like this:
Quantity * UnitPrice
Click OK in all open dialog boxes to return to the form.
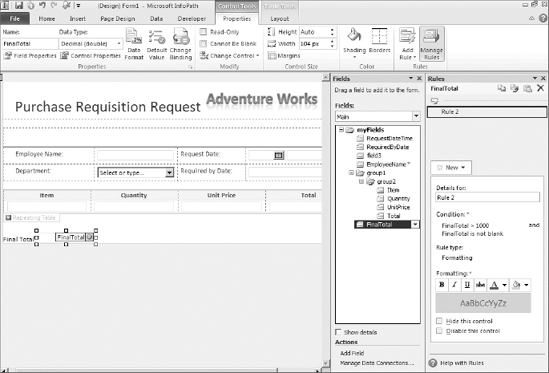
Click the Final Total text box and using the Properties tab, change its name to FinalTotal. Change the Data Type to Decimal and Data Format to the Currency symbol. Click the Default Value button then click the fx button in the dialog that appears. Click the Insert Function button, pick the sum function, and then click OK. Double-click the link that says "double click to insert field" and then pick the Total field from the Select a Field or Group dialog that shows all fields. Click OK to return to the form.
While the FinalTotal text box is still selected, click the Add Rule button and choose Is Greater Than
Your form should look like the one shown in Figure 9-20.
How It Works
Each InfoPath control supports multiple ways to validate data input. This exercise demonstrated that you can use pre-defined data types, data validation and also conditional formatting rules to guide data input by the user.
The last thing to do before publishing the preceding form is to populate it with external data. As discussed earlier in the chapter, you can fetch the data from many places. The next exercise shows how you can obtain data from a SharePoint list to populate in your form.
Fetch SharePoint List Data into the InfoPath Form
In this exercise, you first create a SharePoint list and then you use the Purchase Requisition Request InfoPath form to pull data from that list.
Using SharePoint Designer 2010, open a team site.
Click on Lists and Libraries, and then using the ribbon, click SharePoint List Custom List. In the Create list or document library dialog that appears, name the new list Departments.
Click on the Departments link that shows up to go to the list's summary page. Click the Edit List Columns link there. When you see the Title field, right-click it and rename it Department Name. Save the list changes.
Navigate to the Departments list in the browser. Add the following list items as new departments: IT, Sales, Marketing.
Open the Purchase Requisition Request form in InfoPath.
Click on the Data tab and then click the From SharePoint List button.
In the Data Connection wizard that opens, enter the URL of your team site where the Departments list resides and then click Next. On the screen that appears, choose Departments and then click Next. On the next screen that appears, choose Department Name and then click Next. On the next two screens click Next, and then click Finish.
Click on the Department combo box and name it Department. Click on the Edit Choices button. In the Combo Box Properties dialog that appears, click the option button to Get choices from an external data source. The Departments data source appears. Click the button by the Entries field and find and select the Department Name field. Click OK in the open dialog boxes to return to the form.
Click on the Home tab and then click the Preview button. In the warning dialog that appears, click Yes. The form now appears. Click the Department combo box, and the list of departments appear as shown in Figure 9-21.
Save the form to any location on your hard drive.
How It Works
Connections that are created in InfoPath 2010 get stored with the InfoPath form template as secondary connections. You can create as many secondary connections as you need in the form. The data from these connections is available to be used anywhere within the form. The preceding exercise demonstrated how to make the connection to the Departments SharePoint list and then use the data from that list in the Department combo box control within the InfoPath form. Because the data received is all in XML form, XPath is utilized to traverse that data and point to the node of interest that contains the data needed to populate the combo box.
Publishing InfoPath forms to form libraries is the recommended way to share these forms with users. Because a form library is just an enhanced version of the document library, it takes advantage of all the library features, as well. For example, security at the library, folder, and item levels is available to be set as needed. Check-in/check-out and versioning functionality is available for all forms that would be hosted in the form library, and because all content in SharePoint is stored in the content databases, the forms would be securely stored there as well.
Publishing an InfoPath Form to a Form Library
In this exercise, you publish the Purchase Requisition Request form, created in an earlier exercise, to a form library.
Open the Purchase Requisition Request form in InfoPath.
Click on the File tab and then click Publish. Click on the SharePoint Server button on the Publish screen.
In the Publishing wizard that appears, enter the URL of any team site where you want to publish this form and click Next.
On the screen that appears, select the option to publish to a form library and click Next.
On the screen that appears, select the option to create a new library and click Next.
On the next screen that you see, name your form library Purchase Requests and click Next.
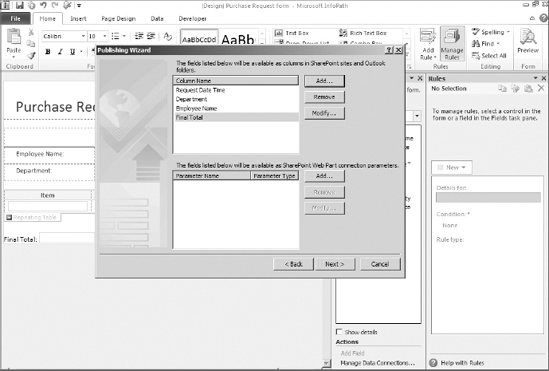
On the next screen that appears, you choose fields to be promoted as columns in the library. Use the Add button to choose and add the following fields: RequestDateTime, Department, EmployeeName, and FinalTotal. Your screen should like Figure 9-22.
Click Next and then click Publish.
When the publish process is complete, select the Open this form library checkbox that appears and click Close.
You should now see the Purchase Requests form library. Click on Add document and the Purchase Requisition Request form appears in the browser.
Fill out the form with some sample values and check for the following things:
Employee Name should be required.
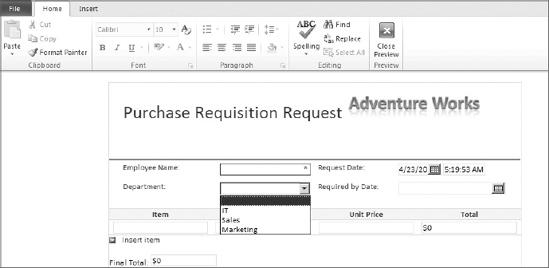
The Department combo box should have all the choices from the Departments list. In addition, you can type in a Department directly.
Request Date should automatically be filled with the current date and time.
Required by Date has to be in the future, otherwise the field's borders appear in red dots.
The Total field in the Repeating Table should automatically provide the total purchase value for each item in the table.
The Final Total field should provide the sum of values in the Total field. Also, if this value surpasses $1,000, the font and background should appear in shades of red.
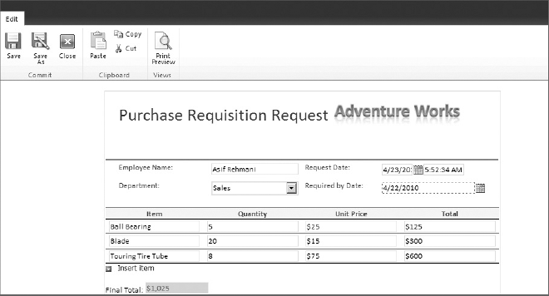
Figure 9-23 shows the form filled out with some test values.
Correct any errors that appear in the form data and click on the Save button. Provide a name for the file in the Save As dialog that appears and then click on Save.
When back at the form, click on the Close button. The form should now appear as a new item in the library and all the fields that you promoted as columns should show the form values as metadata on the list, as shown in Figure 9-24.
How It Works
The default functionality of a form library is to try to open the InfoPath form in the browser. If it is unable to render the form in the browser, then it will automatically try to open the form in the InfoPath application on the computer, and if InfoPath is not installed on the computer, it will show an error to the user.

In addition to merely storing the forms in the form library, you can use them to participate in workflows. Form libraries, just like all other libraries in SharePoint, can have workflows associated with them. One of the ways workflows can be initiated is when a new form is created in the library. Workflows attached to the library can then take advantage of all column information in the library, including the columns that are displaying InfoPath form data. In effect, you can use the form data within your workflows, which makes for an extremely powerful solution. You can use SharePoint Designer 2010 to create workflows and attach them to a library. Chapters 11 and 12 cover these workflows.
In addition to the functionality of "saving" the form to your library, you also have the option to set up the "submit" functionality on your form. You can utilize the submit settings to submit the form to one or more locations, such as a web service and a form library. The submit function is the recommended option to have available for end users. Setting up the submit function requires quite a few more steps and is out of the scope of this chapter; however, you can see the submit functionality in action if you want in a demo presented at www.sharepoint-videos.com.
Microsoft InfoPath 2010 is Microsoft's preferred tool for form design and generation. With the release of SharePoint 2010, InfoPath has now become a critical component of the SharePoint products and technologies family. It is a robust platform that can be used to create dynamic forms for SharePoint lists and libraries.