
Ubuntu has been shown to have a lot of really useful productivity tools. But it is also home to fantastic entertainment options as well. While the rest of this book focuses on getting things done, this chapter is all about enjoying your computer and getting the most out of your personal media—purchased movies, music, podcasts, and so on. It even covers a few basic suggestions about gaming, whether you are nostalgic for the past or looking forward to the next big retail game.
In addition to sitting back and watching a movie or listening to music, most of us are media creators as well. If we don’t have dedicated digital cameras, we all have cell phones that take photos and videos. Our music CDs have to be copied to the computer, or the old digital songs we purchased need to be converted to a compatible format for our new music players. Videos can be transferred to DVD to make them easier for nontechnical friends to watch. And photos can always be made more impressive with a little bit of patience and a bit of color adjustment and cropping. We’ll look at a few good ways to get started.
Play DVDs and Media Files
By default, Ubuntu comes with the software needed to play a couple dozen media formats. And the included media player is basic and does an adequate job at letting you watch videos. But there are dozens more compression formats for video and audio, and each of them has various statuses as far as patent and licensing. Unfortunately, this precludes Ubuntu from shipping with full support, because the laws governing such things vary from country to country.
Ubuntu can install support for most formats, and its media player will detect when an unsupported file type is loaded and attempt to search for the software package needed to play back the media. However, there’s one way to simply install support for most all formats at once. You can simply install the “Ubuntu Restricted Extras” package from the Ubuntu software repositories. This will install support for not only multimedia packages but also additional software such as Adobe Flash Player and Microsoft “core Web” fonts that are allowed to be downloaded from the Internet, but not allowed to be shipped on a disc. Other than a prompt to agree to the Microsoft TrueType Core Web Fonts EULA, installation is automated, but can take some time to download before installation.
Make sure that there are no uppercase letters and that all punctuation is correct, and then press the Enter key. Ubuntu will provide a list of additional software that will be installed along with the software. Simply press Enter at the confirmation prompt to accept the default of “Yes,” and Ubuntu will download and install the software.
When you get a gray and purple package configuration screen with the TrueType core fonts for the Web EULA , you can continue to the acceptance prompt by pressing Tab, and then Enter. If you accept the EULA from the previous screen, simply press the left arrow key to highlight “<Yes>” and then press Enter. If you highlight “<No>” and press Enter, then the fonts will not be installed but all other software will be. You will also see a similar screen giving you a command to type to configure libdvd-pkg. Just press Enter to dismiss this screen, and pressing Enter on the next screen with “<Yes>” highlighted will ensure that you receive DVD decryption updates in the future. You will see a progress bar at the bottom of the screen while the software is being installed. Once installation is finished, you will see the command prompt again.

A screenshot of the ubuntubook terminal with various codes.
It looks complex, but the hard part of downloading and installing DVD decryption is done for you

A screenshot of the video m k v file titled Tears of Steel in the V L C media player.
VLC can play almost any media and supports video discs, subtitles, and more
VLC has many options, but for most videos you won’t need to do much more than start playback. The menus are very comprehensive, and you can also right-click the video screen to adjust options specific to the current media being played. Double-clicking the video playback area or pressing the “F” key will toggle in and out of full-screen mode, and this is probably the most useful feature in general. To open a media file, you can drag and drop it onto the VLC window, and Media ➤ Open File... can be used to pick specific files, or Media ➤ Open Disc... can be used to open DVD discs. While Blu-ray is listed as a disc type, commercial Blu-ray playback is difficult to set up and is unreliable due to the content protection system used for most titles.
You may want to set up VLC to be your default media player, and this is easily accomplished, but the setting can be difficult to find. The simplest way is to click the System menu in the top right corner of the screen and choose “Settings.” Scroll down on the left panel until you see “Default Applications,” and click on that. Then, you can click “VLC media player ” from the drop-down menu next to “Video.” VLC is so versatile that I always set this up for myself as one of the first things I do on a new Ubuntu computer. I also often select it as the default for “Music” as well, so that I can listen to a single music file I click on, and keep Rhythmbox for a full music album experience.
Regardless of which default media player you choose, you can always open a media file in a specific player by right-clicking on the file and then choosing “Open With.” Ubuntu will display installed applications that can open the selected media file.
By installing Ubuntu Restricted Extras , you prepare your computer to work with almost any video or audio file you might encounter. All of the various libraries are installed so that most Ubuntu programs will automatically detect and use them, and you’ll never have to worry about finding a “codec pack” that you have to download from an untrusted website. VLC is optional but is the easiest way to play DVDs and other video files. The next time you’re ready to relax with some entertainment, you’ll be able to sit back and enjoy your content without worrying about which format the files are in.
Organize Your CD and Digital Music Collection Using Rhythmbox
Music is an important part of many of our lives, and over the years there have been many ways to enjoy it, from vinyl records to 8 tracks to audio cassette tapes to CDs. The digital realm has also seen just as many format changes. MP3 is the most ubiquitous format, yet FLAC and Ogg Vorbis are the de facto Free archival and playback formats. Ogg Opus is even higher quality for music, Windows prefers Windows Media Audio format, and Apple and Nintendo media players prefer AAC. Ubuntu happily supports all of these digital formats so that you can enjoy your music no matter where or when you received them.

A screenshot of the Rhythmbox library window with a list of songs of the artist Jonathan Coulton. All This Time is highlighted in the playlist.
Rhythmbox is a one-stop solution for your music listening needs
As a music player, Rhythmbox is fairly basic. When launched, it shows your music library stored in your Music folder (see Figure 4-3). The bottom of the window shows previous track, play/pause, and next track buttons as well as repeat and playlist shuffle options, along with the current playing audio file and a progress indicator that you can drag to skip through the song. On the left side of the window under “Library,” you can see various music sources as well as saved playlists. To the right of the header bar, the search icon can be used to narrow down the listed audio files. If the Play Queue is empty, the Play button will begin playing the tracks displayed on this screen. The artist and album list can also be used to show specific tracks.

A screenshot of the calendar window with the date fifth September highlighted in the year 2022 on the right. The song All This Time by Jonathan Coulton plays on the left.
The Sound Indicator gives you fast access to your music while you work
Copy Audio CDs to Your Computer
Rhythmbox can play audio CDs that are located in your computer’s optical drive tray, but it can also copy your music off your CDs and to your computer for more convenient playback. Each of these activities can be activated in the same place.

A screenshot of the Rhythmbox window with a list of songs from the album titled best concert ever. It features the artist Jonathan Coulton.
Rhythmbox downloads CD track information from the Internet when available
If you want to copy CD music to your computer, you can use the “Extract” button. First, make sure any tracks you wish to copy have been selected by checking the check box next to them. You can also edit the album information that will be saved to the digital music files when they are created. Highlighting a track by clicking on it and then clicking the title, artist, or genre a second time will allow you to edit the track details before you begin the copy. Once you are ready to begin copying tracks to your computer, click the overflow menu button (“…”) and then click the “Extract” button. Rhythmbox will display the copying progress at the bottom of the window, and you will be able to monitor this even when you switch to other music sources such as the Play Queue, your music library, and so on. You can click the “Stop” button to the right of the progress indicator to discard the current track and stop copying files.
By default, Rhythmbox compresses copied audio using the Ogg Vorbis audio format . This is a high-quality audio codec that is more efficient than MP3 , but not as widely supported. By using Edit ➤ Preferences in the Rhythmbox menu, then clicking the “Music” tab, you can change the preferred format by clicking the drop-down menu. You will be able to encode to Ogg Vorbis, Ogg Opus, and FLAC; and if you’ve installed Ubuntu Restricted Extras as described earlier in this chapter, you will also be able to choose MPEG Layer 3 Audio (MP3 ) and MPEG 4 Audio formats as well. Any changes you make to this setting will be used for future copies you make from CDs.
MP3 has the widest range of compatibility with other computers and devices, Ogg Opus has the highest quality of lossy formats, and FLAC is the Free Lossless Audio Codec that saves space without losing any audio information during compression. FLAC is a great way to back up your CDs, and you can also combine the programs Sound Juicer and Sound Converter, available in Ubuntu Software, to create FLAC backups of your music and convert these master files into audio more suitable for your devices. In the future, you can convert from FLAC into new formats without having to use your original media, which can be very useful if you keep your original media in storage.
Listen to Podcasts
Podcasts are on-demand audio programs that can be subscribed to. This lets your music player, phone, or computer check for new episodes on a regular basis and download them automatically so that you can listen to new episodes at your leisure. Podcasts can be found on any topic, and most are free. They make any commute melt away and are an incredible resource for learning, news, and entertainment.
Rhythmbox also allows you to subscribe to and listen to podcasts so you can listen to them at your computer. Clicking the “Podcasts” category under Library will show you a list of all podcasts you have subscribed to. A podcast “subscription” means that your computer will periodically check for new episodes and download them and does not refer to payment. Podcasts are listed at the top of the window, and you can select all available podcast feeds or click on individual titles to filter the episode list at the bottom of the window. Clicking the “Add” button will allow you to search for new podcasts (see Figure 4-6). Clicking the “Update” button will check all podcasts for new episodes immediately.

A screenshot of the Rhythmbox window with a list of episodes for the podcast Bad Voltage.
You can easily search, preview, and subscribe to new podcasts
Rhythmbox will download the latest episode of a newly subscribed podcast, and you can double-click an episode to begin downloading and playing it. Right-clicking an episode will allow you to download or delete a particular episode, and right-clicking on a podcast feed at the top of the window will allow you to update or delete that feed.
Back Up and Create Music CDs Using Brasero
Optical media such as audio CDs and CD-ROMs were an amazing change in a world where audio cassette tapes needed to be played back in sequence and flipped over halfway through, and hard drives were measured in dozens of megabytes. They delivered high-quality audio and large amounts of data in a small, portable format. However, optical discs are fragile, and recordable discs may only have a lifetime of 2–10 years of reliable storage. Hard drive space is now measured in terabytes, and new recordable discs are cheap. Making backup copies of CDs and creating custom music mixes to keep in the car is just good sense. In Ubuntu, Brasero will help you keep your data safe. It can be installed from Ubuntu Software.
Backing Up a Music CD
There are two ways to back up CDs . The first is to copy the audio off of the disc and store it for later playback. Rhythmbox or Sound Juicer is better suited for this task. The other way is to copy the entire contents of the CD to a hard drive or a blank recordable disc. This is where Brasero excels.
When you first launch Brasero, it gives you five options. We’ll look at four of these options in this chapter.
To back up a disc, click the “Disc copy” button. A smaller window will appear and allow you to choose an audio disc to back up from one of your computer’s optical drives. Then, you will be able to choose a destination for the information. Brasero will default to a new disc in the same burner, and you will be prompted to replace the original disc with blank media when necessary. If you have two optical drives, you can place a blank disc in the second drive and copy from one drive to another. This does not save time, but it does allow the copy to complete without further intervention.
If you are copying to blank media, you can click the “Properties” button to change the burning settings. You can lower the burning speed if your drive is having trouble burning copies, and if you have an audio CD player that is having trouble with copied discs, lowering the speed can often improve performance in that player. You also have the option of using burnproof, which combines data caching and your optical drive’s positioning to prevent slow data transfer from causing a burn failure. “Simulate before burning” goes through the burning process with the laser turned off and is only useful with a slow hard drive or an oversized disc. Because your computer will be used to store the original disc’s data before they are written to the blank media, you can choose a storage location for the resulting temporary files. By default, they are stored in the /tmp folder, which is the usual location for temporary data files. Once you are ready to begin the copy, you can click the “Copy” button to create an image and burn it to a new disc. If you click “Make Several Copies,” then Brasero will display a prompt after the first copy has been burned, and you can either insert additional blank discs to make more copies or end the copying process.
If you are copying to an image file, the Properties button will allow you to choose a file name and save location as well as a disc format type. You can choose between cdrdao format (which allows for an exact duplicate made including CD-Text and other subchannel information); and bin/cue format, which are the most common formats; and readcd/readom format, which is used by certain Linux tools . Unless you have a specific requirement, the default cdrdao format is a good choice. Brasero requires additional software for the cdrdao and cue formats, and will prompt you to install them if needed. Once the image is complete, Brasero will display a confirmation. You can then back up the image file just like any other file and burn the image to a blank disc in the future.
Burning a Disc Image to Blank Media
If you have a disc image that you would like to burn to a blank disc , then after launching Brasero, you’ll click the “Burn image” button. Click the button that says “Click here to select a disc image,” and find the image you wish to burn. When you insert blank media, Brasero will display the media type and capacity and allow you to choose a specific disc if you have more than one inserted into more than one optical drive. The Properties button allows you to change your burning settings, and in addition to the preferences described in the previous section, the “Leave the disc open to add other files later” option allows you to create a multisession disc if you want to add more data later. This is compatible with most computer optical drives but usually causes noncomputer audio players to be unable to read the disc until the disc is “closed.”
Clicking “Burn” and “Burn Several Copies” functions identically to the “Disc copy” procedure described in the last session.
Creating a Music CD
Creating a new music CD from existing audio files is quick and easy. There are two ways to create music CDs. The first is to create a traditional audio CD that will play in most audio players, and the other is to create a data CD filled with MP3 files that can be played on other computers and in special players. Because MP3 files are heavily compressed, an “MP3 CD” can hold six times more audio than a traditional audio CD. Some players can also read Ogg Vorbis format files as well. Check your playback devices for format compatibility.

A screenshot of the new data disc project window with a list of Ogg Vorbis audio files.
Creating a music disc is simple: traditional on the left, MP3 data CD on the right
You can right-click the Files launcher icon and choose “Music” to open your music folder immediately, and copying files to the disc is as easy as dragging them to the Brasero window. For traditional audio CDs, Brasero will copy the album title of the first track you copy as the disc name. For either type of disc, you can change this by editing the title field under the track/file list. As you add files, Brasero will show how many more minutes of audio can be added to the current audio disc, or how much space is remaining on the data disc. The same files are used in Figure 4-6 on an audio CD and a data CD to illustrate the capacity difference.
For audio CDs, the track information will be written to the disc as CD-TEXT information if your optical drives support it. For audio players that support CD-TEXT , it can display the album and current track names during playback. You can select any track, and then click the track or artist name to edit this information without changing the original file. You can also use the toolbar to add a 2-second pause between two tracks, or split a selected audio file into multiple tracks.
Once your disc is prepared, you can either create an image file to be burned later or burn directly to a disc. The drop-down menu under the disc name will allow you to choose between these options. You will be prompted for an image location and file name or for burn preferences before your audio files are converted and the disc is created. These options are as described earlier, except that only the bin/cue image format is available for image file creation.
As storage technology changes, audio continues to be delivered in new and more convenient formats. Whether you now purchase your audio on disc or via digital download or record your own audio to share with others, Brasero allows you to create and back up music discs that protect your original purchases and are compatible with audio players of all descriptions.
Create Video DVDs Using DevedeNG
Video streaming is becoming more and more ubiquitous, and smart TVs and set-top media appliances are increasingly able to play common video formats directly. But video DVD still remains a useful format to share videos in. DevedeNG can create simple DVDs with optional menus in minutes.
Launching DevedeNG displays the Disc type selection window. DevedeNG supports several video disc formats. Most are not very common anymore but are available if you have older video playback devices. “Video DVD” is usually the most useful option.

A screenshot of the devede N G window that lists the big buck bunny video file, and its duration.
DevedeNG’s main menu lets you set up the disc structure and add video files
The first step is to choose your default format. If you live in an area that uses ATSC such as North America or most of South America, choose NTSC. If you live in an area that uses DVB, choose PAL. Most modern players and televisions support both formats, but playback quality can be slightly degraded if your source files differ significantly in framerate.

A screenshot of the file details and general options dialog box of the big buck bunny video file in devede N G.
You can control how each file is added to a title
Each tab has advanced options that are available to explore, but are not usually necessary. You can specify whether to divide the file into 5-minute chapters for easier seeking on the player in the “General” tab and rotate or force letterboxing or stretching for video content that is in a different aspect ratio than the DVD on the “Video options tab.” On the “Subtitles” tab, you can add subtitles, and DevedeNG supports several common formats, some of which you can create yourself with software available in Ubuntu Software. DVD subtitles can be enabled or disabled by the video players, but you can use the “Force Subtitles” to configure subtitles to show by default. This setting is commonly used when a file has partial subtitles for dialog which is in a different language than the rest of the title. The “Actions” tab lets you choose what happens after the current title is finished, so you can go back to the DVD menu, go to the next title, or simply play the video in a continuous loop. The other options are fairly esoteric and shouldn’t be necessary unless you are looking for something specific. Clicking “Apply” saves the current title’s settings.
The “Disc usage” section allows you to see how much space you have remaining on the disc. You can use the “Media size” drop-down menu to select various disc sizes, and “Adjust disc usage” will increase video quality settings if you have not filled the disc, or decrease them if you are slightly over your disc capacity. You’ll want to click this button after making changes to your video files or menus, and just before clicking “Forward.”
The default menus are meant to be simple, but there are several options that can be changed. You can click “Menu options” to see a menu preview and adjust options such as the menu title, font, font size, color, shadow, background image, background audio, and more. These can be adjusted to your satisfaction, and “Preview menu” will show you your changes. You can press “OK” to save your changes or “Cancel” to abandon them. The “Disc startup options” section has an option “Jump to the first title at startup” to prevent the menu from being seen unless the viewer presses the “menu” button on the DVD remote or once the first title ends if the ending action is set to “Stop reproduction/show disc menu.”
Once you are ready to create your DVD, click the “Adjust disc usage” button to optimize your video quality settings, and then click the “Forward” button. After you choose a location and file name and click “OK,” DevedeNG will create a DVD image in ISO format that will allow you to create a disc using Brasero’s “Burn image” function or right-clicking the image in Files and choosing “Write to Disc....” During the disc creation process, DevedeNG will convert your video files to the proper format for DVD, and this can take a very long time depending on the source videos and your computer’s speed. If you want to run the conversion process overnight, you can check the “Shutdown computer when disc is done” option to save electricity.
Creating DVDs can be a very convenient way to share video files with friends and family, especially with longer video files. DevedeNG makes the process of creating a video disc with menus and multiple titles manageable.
Organize and Edit Your Photos Using Shotwell
One really exciting advance in technology is the spread of digital cameras. From cell phones to iPods to Nintendo handheld videogame systems, cameras are on many of the electronics we buy. The advent of digital photography was exciting for the amateur photographer. No film costs! You could take lots of photos and save the good ones later. This trend continues today with cell phone cameras in every pocket. But this also makes organizing and enhancing photos even more important today. Luckily, Ubuntu comes with Shotwell , a digital photo manager that makes importing and adjusting photos easier than ever.
The first time you run Shotwell, it will offer to import the photos in your Pictures folder. This loads the photos into your library, but Shotwell will not automatically add new photos that are added to your Pictures directory. This keeps your photo library from becoming cluttered, but you can import more photos by dragging them to the Shotwell window or via the File ➤ Import From Folder menu option. You can also use the Edit ➤ Preference menu option to enable the “Watch library directory for new files” setting so that Shotwell automatically adds new photos to your library. Shotwell sorts your photos into events based on their internal timestamps, and this is the primary method for managing your photo library. The events are listed in a sidebar on the left, and clicking an event shows photo thumbnails on the right side of the window (see Figure 4-10).
Importing Photos
When you plug in a camera, Shotwell will automatically detect it and list it under “Cameras” in the sidebar. You can click on a camera to view the photos on the device and import the selected or all photos using the toolbar buttons at the bottom of the window. Shotwell keeps track of photos that have already been imported so you can filter them with the “Hide photos already imported” option, and once an import is complete, it will ask you whether or not you wish to delete the successfully imported photos from your camera or keep them on the camera. If any of the photos were shot in RAW mode, Shotwell will automatically “develop” them in addition to copying the RAW image data . This allows Shotwell to make photo adjustments while retaining your ability to use advanced photo editing software such as GIMP or Darktable to develop and edit the RAW photos if desired.
If you prefer to connect your camera’s memory card directly to your computer, simply insert the card into your computer’s card reader. Ubuntu will detect and mount the card as a folder, and you can use the Files window to drag and drop photos onto the Shotwell menu or use Shotwell’s File ➤ Import From Folder menu option to select a folder and begin importing photos.
Managing Events

A screenshot of the Shotwell window with a list of photographs.
Shotwell groups photo into events and displays them for easy browsing
Events are named by date, and you can right-click an event on the left sidebar or double-click the event name to rename any event. You can move a photo from one event to another by dragging its thumbnail onto the new event. Events are sorted based on the earliest photo they contain, but you can use View ➤ Sort Events from the menu to choose whether the list should be Ascending (earliest event first) or the default of Descending (most recent event first).
Clicking the “All Events” item under the Events section of the library will show a list of events with a “key photo” as the thumbnail. This is the first photo in the event, but you can right-click any photo in an event and choose “Make Key Photo for Event” to change this. In the Events menu if you wish to merge two events, simply click one event and then hold Ctrl while clicking the other events to merge. The toolbar at the bottom of the screen contains a “Merge Events” button that will activate, and you can also right-click any of the selected events and choose “Merge Events” from the pop-up menu that appears.
Events in Shotwell cannot be empty, so deleting or moving the last photo in an event will cause the event to disappear. Because you cannot create an empty event, you can simply select one or more photos from your Library or any event and use Ctrl+N, or the Events ➤ New Event menu option to move those photos into a newly created event.
Working with Photos
Individual photos can be viewed in the library or each event, and you can use the zoom slider at the bottom right-hand corner of the screen to adjust the size of the thumbnails, or use the plus (+) and minus (-) keys. Clicking on a photo selects it, and the bottom-left corner of the screen displays basic information about the selected photo. Double-clicking a photo zooms in on it and allows for more editing options. You can also press Enter while a photo is selected to zoom in on it. In this zoomed in view, the left and right arrow keys move to the previous and next photo in the event as do the “Back” and “Forward” buttons at the right of the toolbar, and Esc returns to the thumbnail view.
Shotwell can help you keep track of photos, and you can apply a five-star rating to each one. Selecting a photo and pressing 1–5 will assign the same number of stars to the photo. Pressing 0 will remove the rating. Pressing 9 will mark a photo as “rejected” and hide it from view. You can also right-click a photo and use the “Set Rating” menu to rate any photo. The View ➤ Filter Photos menu option allows you to filter photos by rating, and can be used to show only highly rated photos or to make rejected photos visible again. This can help you choose which photos to keep or edit if you have a large number of photos from an event. In addition to rating photos, you can add tags to help you group photos across events. Simply select a photo and use the Tags ➤ Add Tags menu or press Ctrl+T. A tag window will appear, and you can add one or more tags separated by commas. Once you have defined a tag, you can add the tag to new photos by dragging a photo to the tag in the sidebar.
Editing Photos
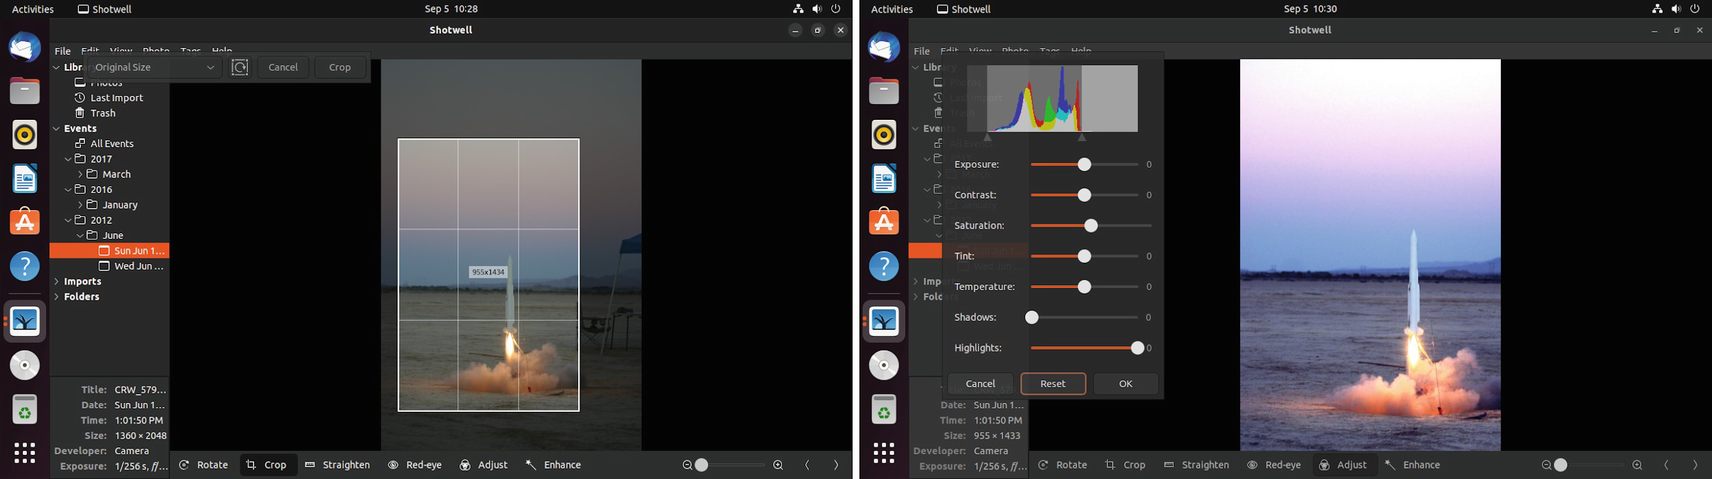
2 screenshots of the Shotwell window. The one on the left has the crop overlay in a photograph, while the one on the right has the options for exposure, contrast, saturation, tint, temperature, shadows, and highlights for the cropped image.
Cropping and enhancing a photo can be done in seconds
The “Rotate” button allows you to rotate a photo clockwise in 90-degree intervals, and pressing Ctrl while you click the button will rotate the photo in a counterclockwise direction instead. In the thumbnail view, you can select multiple photos by pressing Ctrl while clicking each photo, and the rotate tool will affect all selected photos at once.
The “Crop” button will allow you to adjust the photo’s aspect ratio and composition by zooming in on a specific portion of the photo and discarding the rest. An overlay appears when you click the crop tool, and the drop-down menu allows you to choose various aspect ratios, and the “Pivot” button to the right will toggle the cropping reticule between portrait (tall) and landscape (wide) mode. The “Crop” button commits the change.
The “Straighten” tool allows a photo to be rotated 15 degrees in either direction and will crop the photo slightly to maintain its original aspect ratio. After clicking on this tool, you can use the slider along with the grid overlay to rotate the photo by eye, or you can find an edge that represents a horizontal line, click the mouse on one end of the edge, and drag the pointer until the dotted line matches the angle of the edge. Releasing the left mouse button will rotate the photo up to 15 degrees from its original orientation, and you can continue adjusting the rotation using the mouse or the slider if needed. The “Reset” button will remove the current rotation, and pressing the “Straighten” button will apply the new rotation to the photo.
The “Red-eye” button allows you to reduce or remove any “red-eye” effect in a photo caused by light from a camera flash bouncing off the retina of a human’s eye. You can adjust each eye individually, and clicking on the tool will show a small circle you drag onto an affected eye. The size slider adjusts the size of the circle, and clicking “Apply” will remove the red-eye effect from the photo. Simply repeat these steps for each affected eye in the photo.
The “Adjust” tool gives you quick control over the color of the photo. The histogram shows you the color range of the photo, and you can slide the sliders to stretch the photo’s color range. This produces more contrast in the photo and can often greatly improve a photo’s contrast and visibility. The other sliders adjust a color attribute of the photo to help you enhance the photo, and once you are happy with the adjustments you have made, you can click “OK.” The “Enhance” tool automatically adjusts the histogram and the shadows sliders, and you can use this tool as a starting point and click “Adjust” to view and change the adjustments.
Shotwell is a nondestructive editor , and this means that your original photos are not modified, but the edits made are stored in Shotwell’s database and applied to the photos in real time. This means that your Pictures folder will not contain any of the changes you make in Shotwell, but it also offers several advantages.
Unlike editors that save over the original photo, subsequent edits do not degrade the quality of the photo, so you can continue to refine the look of a photo until you are happy with it. You can view the original photo by holding the Shift key, and you can also revert all changes and restore any photo to its original appearance. Simply right-clicking a photo or clicking the Photo menu and choosing “Revert to original photo” will undo all changes applied to the photo in Shotwell.
You can also apply the color adjustments you’ve made to one photo to others as well. To do so, select a photo, then use the Photo ➤ Copy Color Adjustments menu option, or press Shift+Ctrl+C to copy the adjustments to the clipboard. Then, you can zoom in on a photo or select one or more photos and use Photo ➤ Paste Color Adjustments or press Shift+Ctrl+V to apply those adjustments to the selected photos. This allows you to keep a consistent look across your photos whether you are adjusting for lighting conditions or artistic style.
Sharing Photos
Because Shotwell does not modify your original files, you will need to export photos before you can share the edited photos with others. You can select photos and use the File ➤ Export menu option to choose whether to export original unmodified or edited photos or choose the photo format such as JPG or PNG, exported resolution, and more. You might lower the resolution before sharing via email or the Web, for example. You can also use the File ➤ Send To... menu option to export a photo and send it to your email client.
Shotwell can also publish your photos directly to a web photo service such as Facebook or Flickr, and even publish videos to YouTube. If you have integrated an online account for one of these services with Ubuntu (see Chapter 3), it will appear as an option when you select photos and use the File ➤ Publish menu option or press Shift+Ctrl+P. The exact process is slightly different for each service, so be sure to follow the onscreen instructions to complete the publishing process.
Advanced Photo Editing Using GIMP and Darktable
As mentioned before, Shotwell can’t replace more advanced photo editing tools . And while it does reduce the need for more advanced software, it works alongside them as well. Under Shotwell’s Edit ➤ Preferences menu option is an “External Editors” tab. There you can set an external photo editor and an external RAW editor. The drop-down menus will list all photo editors installed on your system. Once you have defined the external editors, you can right-click a photo and choose “Open With External Editor,” or where RAW images are available, “Open With RAW Editor” becomes an additional option.
Advanced photo editing is far beyond the scope of this book, but there are two excellent choices that I can recommend to start out with, both available through Ubuntu Software.

A screenshot of the GIMP window with a photograph of raccoons. It has various editing options on the left and right.
GIMP allows for advanced photo editing that rivals professional retail software
When a camera saves a JPG file, the data from the sensor is very heavily processed; however, a RAW image file is aptly named because it contains the raw data captured by the camera’s sensor. These data need to be “developed” before they can be used with most other software, and just as a film negative offers so many possibilities to a photographer, a RAW image can be exposed, sharpened, and adjusted in ways a compressed JPG cannot. GIMP can import RAW files for several popular camera models.
The second suggestion, for “external RAW editor,” is the program Darktable available in Ubuntu Software, which is comparable to Adobe Lightroom, and allows for complex filters and settings to be applied to RAW image data before it is exported for normal use. This software is complex but powerful, and is the best place to start if you are an experienced photographer familiar with other RAW manipulation software.
With cameras being so common and storage space being so cheap, we all have the ability to create a virtual avalanche of photos, and this can make it hard to find just the right ones to highlight an event or share with others. Shotwell makes it easy to keep your photos organized and make simple adjustments to satisfy most everyday photo needs.
Record and Process Audio Using Audacity
Audio editing can be a bit tricky. It seems like it should be fairly simple, but unlike a photo that we can see, audio can be difficult to visualize. Fortunately, Audacity is a powerful multitrack editor that can be used to record live audio as well as edit, mix, and process existing audio files as well. Audacity can be used for anything from removing pauses from a recording to removing vocals from a song.

A screenshot of the Artificial Heart Background Vox window with various options and 3 audio waveforms.
Audacity is a powerful multitrack editor that’s good for both quick and advanced projects
The toolbar is complex, but each button can be hovered over with the mouse pointer until a tool tip appears that shows the button’s function and shortcut key. For example, the large round buttons are “pause,” “play,” “stop,” “beginning of track,” “end of track,” and “record.” The tool tips also show keyboard shortcuts; for example, hovering over the “play” button shows you that you can press the spacebar to begin playback.
Clicking on a track places the cursor at that time index. When you click the “play” button or press the spacebar, audio playback starts at the cursor position. When you press the button again, the cursor doesn’t move. This lets you use the spacebar to listen to a point in time and determine if it’s the right spot without having to place the cursor again. Clicking and dragging the cursor over part of a track will select that audio. You can use the “Zoom In” and “Zoom Out” toolbar buttons to adjust the view to make positioning the cursor easier. Pressing the spacebar with a selection will play only the selected audio to help you select the right audio. You can drag the beginning and end of the selection to adjust the start and stop times. Once you are happy with the amount of audio that you have selected, you can delete, cut, copy, or paste the selection just as you can with text.
Recording audio is as simple as clicking the “record” button or pressing R. Audacity will begin recording audio in a new track at the current cursor position. Audacity shows a live input and output volume level in the toolbar during recording. If you want to add audio to the current track instead of creating a new track, pressing Shift+R will add audio to the end of the existing track. Audacity will play the other tracks in sync with the recording, so it is possible to record a lead track in time with a background track, for example. The View ➤ Show Clipping menu option will highlight any clipped audio in red, so that you can quickly identify poorly recorded audio.
Audacity comes with many filters and audio effects, and the Effect menu lists all of them. The Help menu has a link to Audacity’s manual online, and the “Editing” section lists all effects alphabetically and also groups them by function. You can use this to learn how to use effects properly. The manual also includes many practical tutorials that you can use to learn audio editing techniques in general.
While recording audio takes time and practice, Audacity is the best tool for the job. From recording a short voice memo to editing recorded music and building podcasts, Audacity’s track editor and effects and plug-in architecture make it easy to work with audio on Ubuntu.
Play MIDI Files
MIDI files are digital instructions that describe music, and while the standard was originally invented so that electric musical instruments could communicate and control one another, the same information is capable of storing musical instructions very efficiently. While the standard is alive and well in the music industry, MIDI files had a brief popular heyday as a way to share music on the computer before actual sound recordings were feasible. Today, MIDI is still useful as a way to generate music from sheet music—as with the Mutopia Project—or to enjoy the soundtracks of classic video games.
MIDI files can be used to control actual hardware. Modern player pianos use MIDI instructions instead of paper rolls to play back a performance by a professional pianist. Sound cards used to have dedicated electronic synthesis hardware, but this is now rare except in professional equipment. Ubuntu has a software MIDI renderer called Timidity that can interpret MIDI instructions and generate high-quality audio.
Press Enter, then enter your password and type and press Enter again. You’ll be prompted to confirm the software installation. Press Enter to accept the default of “Yes.” Ubuntu will download and install Timidity and a general MIDI sound font.
Once Timidity is installed, double-clicking a MIDI file will open it in Videos, and the player will use Timidity for its audio playback. Other software that utilizes MIDI playback such as DOSBox or Rosegarden will also automatically detect and utilize Timidity.
MIDI files may not be commonly used for casual playback, but they are still popular among certain music cultures and are easy to find on the Web. By installing Timidity on your computer, you will find that yet another means of entertainment opens up to you.
Explore the Universe Using Stellarium
Stargazing is a pastime that has existed for as long as humans have lived on Earth. The universe has inspired stories and legends from the most ancient records all the way to science fiction novels and movies in the present day, not to mention the intense study through manned and unmanned scientific undertakings. Before the spread of electricity, the night sky was a bright, almost living thing, and on moonless nights the Milky Way galaxy itself was bright enough to see by and cast a shadow on the ground. With the massive amount of light pollution in cities, most of us have to plan a trip to get a dark, starry night sky (and if you haven’t had the galaxy cast your shadow, I highly recommend it!). But whether we’re planning ahead or just want to virtually study the sky, Stellarium is a virtual 3D planetarium application that re-creates the visible universe around us with stunning graphics.

A photograph of the night sky with the marked stars Alpha Scorpiids, Antares, and May Librids. There is an options overlay on the top right.
Stellarium simulates a beautiful, realistic view of the sky
The interface is pretty easy to use. The bottom-left corner of the screen has two bars that appear when you touch the left or bottom edge of the screen with your mouse cursor. On the left is quick access to various configuration and settings, and on the bottom gives you access to various display settings. Placing your mouse over each icon brings up a tool tip that gives the icon name and shortcut key. The left toolbar is the most important if you want to set up Stellarium to match your local conditions. Clicking the “Location window” icon or pressing F6 brings up the location window, where you can set your current location on Earth (or over 120 other planets and stars). This influences the position of the stars above the horizon and can be used to plan optimal viewing positions and times for real stargazing , not to mention virtual field trips across the galaxy.

A screenshot of the View window with options for stars, planets, and satellites, as well as atmosphere and shooting stars under the Sky tab.
Stellarium’s viewing options are worthy of any planetarium
There are five tabs with various options, many of which have tool tips which appear when you hover the mouse cursor over them. Most notable on this page is the light pollution setting, which allows Stellarium to simulate light pollution. You can enter the Bortle Dark Sky Scale number for your location manually, and Stellarium includes light pollution values in its location database. You can use this light pollution index data for an accurate representation of your star visibility or adjust it to see how the sky would look under different lighting conditions.
The “DSO” tab determines which deep sky objects are shown. The “Markings” tab allows you to toggle various landmarks that can help you visualize the sky, from sky orientation markings to constellation lines, labels, and art. You can also change the projection type used to display the sky. The “Landscape” tab allows you to select various images for the ground. The default landscape is an empty field in Guéreins, France, where the developer of Stellarium lives, but there are other interesting landscapes representing various Earth environments as well as the Moon and other planets. You can also create your own landscape if you have a favorite location. The “Starlore” tab allows you to load different information from different sky cultures, and can be a fascinating way to study ancient legends about the universe. Each culture has its own star names, constellation lines, and constellation art that provide a unique way of looking at the universe around us.
The bottom toolbar is mostly dedicated to toggling specific common settings, and can be used to toggle the display of constellation lines, the atmosphere, ground fog, and so on. Each icon has a tool tip that names the setting and provides a shortcut key where available. For instance, pressing A toggles atmosphere visibility. A blue daytime sky suddenly becomes stark and dazzling without the atmosphere to scatter the sun’s light and block out the other stars. Pressing F toggles visible ground fog that simulates poor visibility near the horizon and G toggles the actual landscape, allowing you to view the sky that is still below the horizon. Ocular view simulates the view through telescope or binocular optics—including magnification, field of view, and mirroring—so it is especially useful for planning targets during stargazing trips .

2 side-by-side screenshots of Saturn and the Moon with their descriptions and information.
Stellarium simulates real-world events such as planetary positioning and eclipses
For exploration, the “Search” icon in the left toolbar (also accessible through F3 or Ctrl+F) will quickly find and center the view and track planets, stars, and other objects. Stellarium actually simulates the position of astronomical objects, so you can see the position of the rings of Saturn as visible from Earth, or watch the moons of Jupiter orbit around the gas giant. Stellarium even shows the shadows they cast as they go by. This also means that eclipses are shown in real time. You can use the bottom toolbar to change the passage of time to observe lunar libration, for instance, where the moon’s face appears to wobble as it orbits the Earth. Changing the speed of time is also a great way to view sunsets and watch the stars begin to appear in the sky. You can even activate a “Night Mode” that changes the interface to black and red to help preserve night vision.
Stellarium is a wonderful example of professional, high-quality software that satisfies both amateur and professional uses. Observing the sky through software not only helps astronomical study but can also make real trips into nature to study the stars much more rewarding.
Play Legacy PC Games
Linux has a justified reputation for lacking support for games , and this has taken a long time to change. While Ubuntu comes with simple games such as Aisleriot Solitaire and Mines by default, professional and indie game support is increasing all the time. The historic lack of games also leads to the development of emulation software to allow older games designed for other operating systems to run under Linux as well. Even with hundreds of free and open source games available through Ubuntu Software and commercial games beginning to add support for Ubuntu, there are a lot of classic games that are worth revisiting, and “retro gaming ” has seen a resurgence in popularity. More importantly, system emulation allows older games from the 1980s and 1990s that you have purchased and still have on CD or floppy disk to still be enjoyed on modern hardware.
A few older games have been rereleased for free, such as the first two games in The Elder Scrolls series by Bethesda Softworks , and other games that were distributed as “shareware”—games that were available to try before purchasing—are still frequently available, such as early Apogee and ID Software games that still feature iconic gameplay. Some game genres, such as adventure games, are now rare or nonexistent when it comes to new releases even though they were once extremely popular.
It is beyond the scope of this book to detail how to transfer data from legacy storage formats and configure emulators, and finding legal sources for legacy software can be difficult, although online auction sites such as eBay can be very effective. But if you are familiar with DOS and adventure games and still have the installation media for your old games, configuring DOSBox will be part of the fun. Others may want to stick with newer software. But even when it comes to purchasing legacy games, there are some nice alternatives to auction sites as well.
Purchase Legacy Games from GOG.com
The resurgence in “retro gaming ” and interest in forgotten classics led to the founding of a company named Good Old Games in 2008, which later changed its name to GOG.com . The company wanted to make it easy to experience legacy games on modern computer hardware and operating systems as well as support the rights owners of older games. After initial sales success, they were able to negotiate distribution rights for more and more legacy games. As a bonus for classic game enthusiasts, many games include extras such as scanned manuals, original artwork, desktop wallpapers, and game soundtracks.
Many older games that were updated to run under Windows actually run under DOSBox or ScummVM with carefully optimized configurations. Because GOG.com sells games without digital rights management, many of these games can be installed on Windows or via Wine, and the installed files can be copied to Ubuntu for use directly with DOSBox or ScummVM without Wine. GOG.com also supports Ubuntu, and an ever-expanding collection of software can be purchased and downloaded and installed with a few simple clicks.
When you download a game from GOG.com , be sure to select “Save File” when Firefox prompts you to save the installer. The game will be provided in the form of an install script that will be saved to your Downloads folder. If you open Files and double-click the install script, it will be opened in a text editor. This is a security feature in Ubuntu. To run the installer without the Terminal, you will have to make two simple changes.
The first change will allow Files to run an executable script by double-clicking it. To do this, run Files and then choose Edit ➤ Preferences from the menu, and click the “Behavior” tab. In the “Executable Text Files” section, select “Ask each time.” You will only have to make this change once on your computer, and it still offers a measure of security against inadvertently running scripts.
The second change will be done once for each download. In Files, right-click the downloaded install script and choose “Properties.” Click the “Permissions” tab, and next to “Execute:,” check the “Allow executing file as program” option and click the “Close” button on the title bar. Now you double-click the installer, and Files will prompt you whether you want to run the script or display its contents. Click the “Run” button and follow the onscreen prompts to install your game. Once the installation is finished, you will be able to run the game from the Applications list in the future.
GOG.com offers a small number of games for free, some of which support Ubuntu. This is a good way to see how easy installation is before purchasing other titles and get a feel for how older graphics and sound work on your computer. For more information, visit their website at www.gog.com /.
Run DOS Games and Software Using DOSBox
Many classic PC games were released for MS-DOS. With computer hardware being very limited in the 1980s, DOS was a single-user operating system that provided programs with direct access to hardware, and games usually did interact directly with hardware, which is no longer allowed on modern operating systems that strictly control direct hardware access to accommodate many programs running simultaneously. Luckily, modern hardware is powerful enough to emulate legacy hardware and software, and the emulated environment provided by DOSBox is indistinguishable to programs running inside. DOSBox is built to emulate a legacy IBM PC-compatible computer running DOS specifically for the purpose of running games, although this means that many older nongame applications run as well.
From Ubuntu Software, search for and install “DOSBox Emulator .” Once DOSBox is launched from the application grid, it displays a window with a startup message and a DOS command prompt. The Z: drive is an emulated drive that contains various DOS utilities such as the MOUNT command which lets you make a folder on your computer accessible via a DOS drive letter. Note that DOSBox uses the older term “directory” to refer to folders. The INTRO command, which can be run by typing “intro” at the prompt and pressing Enter, provides more information about special commands and also offers some examples to show you how to begin.

2 side-by-side screenshots of the DOS box window. One has the file details while the other has the start menu for the video game Commander Keen in Goodbye Galaxy.
From setting up a game and playing, DOSBox provides an authentic experience
Because DOS games typically expected unshared access to a CPU that ran anywhere from 8 to 133 MHz and modern computers typically run at 2 or 3 GHz, DOSBox limits the emulated CPU speed. You can press Ctrl+F11 to slow down DOSBox or Ctrl+F12 to speed it up if a DOS game is running at a poor speed. This can affect performance of other applications running under Ubuntu. Clicking the mouse inside the DOSBox window will also “capture” mouse input. If you need to use the mouse in Ubuntu without exiting DOSBox, you can press Ctrl+F10 to release the mouse. You can also toggle full-screen mode by pressing Alt+Enter. Once your game is finished, you can type EXIT at the DOS prompt and press Enter to quit DOSBox.
In addition to the INTRO command, the DOSBox website contains detailed documentation that describes various disk, video, input, networking, and game compatibility notes, so it is the best place to get tips if you cannot get a game running. You can also edit your DOSBox configuration file in ~/.dosbox/dosbox-0.74-3.conf to display graphics with various other options such as different scalers (to increase the graphics size or smooth jagged edges or to emulate old effects such as RGB monitor artifacts or scanlines). For more detailed information, visit www.dosbox.com/wiki/ .
Play Adventure Games Using ScummVM
Adventure games started out as interactive books where the play would read a description and then type in a simple one- or two-word command to interact with the story. They typically focus on exploration and puzzle solving while a story unfolds around your character, and the play experience is unique. As computer graphics improved, adventure games began to display graphics and use the mouse. Graphical presentation became more elaborate, and the genre peaked in the 1990s when CD-ROMs became common and digitized voice and video could be included. Unfortunately, this drove production costs up and the genre soon ceased to be profitable. Aside from certain notable exceptions, adventure games are rare today.
ScummVM is a software project that can read the graphic and audio assets of classic adventure games and interpret their scripting languages. This allows many classic games to be enjoyed on Ubuntu, and several games have been released free of charge by their rights holders. Ubuntu Software contains both ScummVM and four popular adventure games that were once available at retail: Beneath a Steel Sky, Flight of the Amazon Queen, Lure of the Temptress, and Dráscula: The Vampire Strikes Back.

2 screenshots of the Scumm V M ubuntu software install window and a 2 D side scroller video game on the right.
Ubuntu includes four free, formerly retail adventure games in its repositories
Each game engine has its own shortcut keys, which are often the only way to access important features such as loading and saving the game. For instance, in Beneath a Steel Sky, F5 accesses the game’s menu. Left-clicking a named object will cause your character to examine it, and right-clicking causes your character to use or interact with it. ScummVM also has its own global menu, which can be accessed via Ctrl+F5. The documentation at ScummVM’s website details specific commands (called “hotkeys” in the documentation) for many popular games, if you do not still have the game’s documentation. In windowed mode, Ctrl+Alt+- and Ctrl+Alt++ will scale the graphics to be larger or smaller, pressing Alt-Enter toggles full-screen mode, and Ctrl+Q quits the current game.
You can copy supported adventure games that you own from their installation media to a folder and add the game to ScummVM . Some games may need additional steps to run properly, which are usually listed in the ScummVM documentation online. You can find more free adventure games and additional notes about specific games and their controls at the ScummVM website at www.scummvm.org/ .
Play Commercial Games Using Steam
The most convenient way to install commercial games on Ubuntu is often via Valve Software’s Steam client. Steam was conceived as a way for Valve Software to sell games directly to players and keep their software up-to-date, and quickly became one of the easiest ways to purchase and manage a computer gaming library. Valve worked on making a dedicated operating system that will power PC-based gaming consoles, called SteamOS . First built on Debian similar to the way Ubuntu is, Valve started encouraging game developers to make games available for Ubuntu so that they would be compatible with SteamOS-based systems in the future. Several years later, Valve also started contributing to Wine via an intermediary step called “Proton ,” and now approximately 80% of the entire Steam library runs on Ubuntu. Now Valve has released a Linux-based system called the Steam Deck . Any game purchased through Steam can be played on any supported operating system, so if you’ve purchased games via Steam for Windows or Mac, you will find that many are available on Ubuntu as well. Notable exceptions are certain online multiplayer games that utilize anticheat software to protect the online experience. Still, several anticheat software providers have pledged support for Linux . If a game is advertised as compatible with the Steam Deck , it should run on your desktop with Ubuntu as well.

A screenshot of the Steam library window of the video game Kerbal Space Program.
Steam makes buying and playing thousands of games easy
Summary
Ubuntu turns your computer into a multimedia powerhouse. You can enjoy music and videos and back up your media collection. Ubuntu has the tools you need to create your own music, photos, and video, whether you snap occasional pictures with your phone or are a professional photographer. And Ubuntu Software and Steam allow you to explore new worlds—whether observing the virtual skies in Stellarium or mastering orbital mechanics in Kerbal Space Program through Steam. Ubuntu is powerful and flexible enough to balance work and play.