
You’ll find that your daily use of Ubuntu is pretty straightforward and simple. You’ll run applications; get work done; relax with games, movies, or other entertainment; and generally be productive. And as you become more comfortable with Ubuntu, you’ll explore Ubuntu Software and expand what you can do with your computer. The possibilities are truly endless.
As you settle in with Ubuntu, there are a lot of more advanced or technical tasks that will help you experience the full potential of your computing experience. When you search the Internet for answers to questions, these solutions will often direct you to install software from the command line. Occasionally you’ll want to use software that is built for Ubuntu but not included in the default repositories. Having become familiar with the Unity interface, you might want to try other desktop environments without actually reinstalling the entire operating system on your computer. This chapter will cover various ways to take control of your computing experience. You won’t need to perform these tasks every day, but knowing about them can save you a lot of time when you need them.
Managing Running Processes
As you work with multiple applications , you’ll find that Ubuntu handles multitasking very well in general. When your system slows down or a single application begins to freeze, you may need to look at what processes are running and how much of your computer’s resources they are taking up. While you saw a useful command-line tool called top in the previous chapter, GNOME System Monitor provides a powerful, easy-to-use graphical version, and it offers additional information about your system resources.
A process is an application (program) or part of an application. When you run an application, Ubuntu loads the program data into memory and begins scheduling it to run. Ubuntu will manage how much time and memory each application receives so that many programs running at once are able to share the available resources. GNOME System Monitor summarizes how your computer is being utilized. You can launch it from the Activities overview.
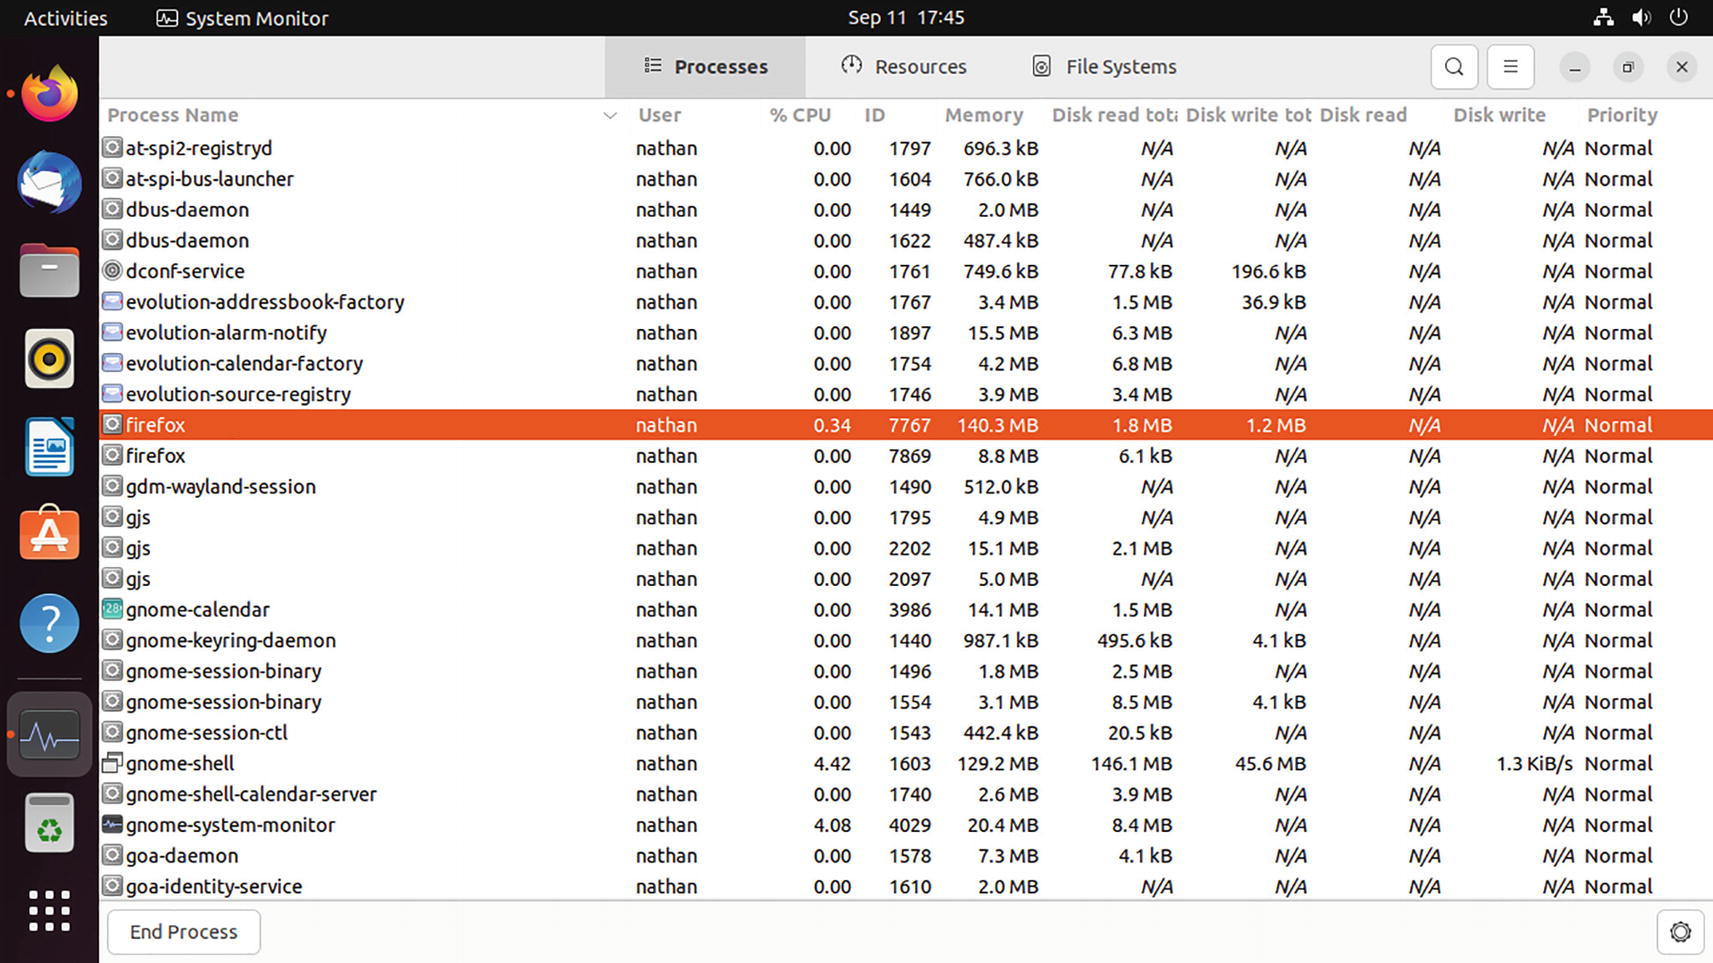
A screenshot of the system monitor displays the processes. The window lists the process name and related data in 10 columns. The row with the Firefox process is highlighted.
System Monitor shows you what’s running and how it affects your computer
Right-clicking a process brings up a context menu with several different options related to process management. The bottom section of the menu mirrors the operations we discussed in Chapter 5. Stopping a process suspends it so that it stops running until it receives a signal to continue. Ending a process sends a request to the process to finish up and cleanly exit, whereas killing a process causes Ubuntu to stop executing the process and clear its memory for other use. As before, it’s better to end a process unless it’s completely unresponsive and doesn’t react to end requests, because killing a running process can lead to lost or corrupted data. Changing a process’s priority will instruct Ubuntu to schedule more or less CPU time for it when system resources are limited. You can use this to make a process run faster or more smoothly, or to ensure a long-running process such as a video conversion doesn’t slow down the rest of the system if you don’t mind the time it takes to finish a task.
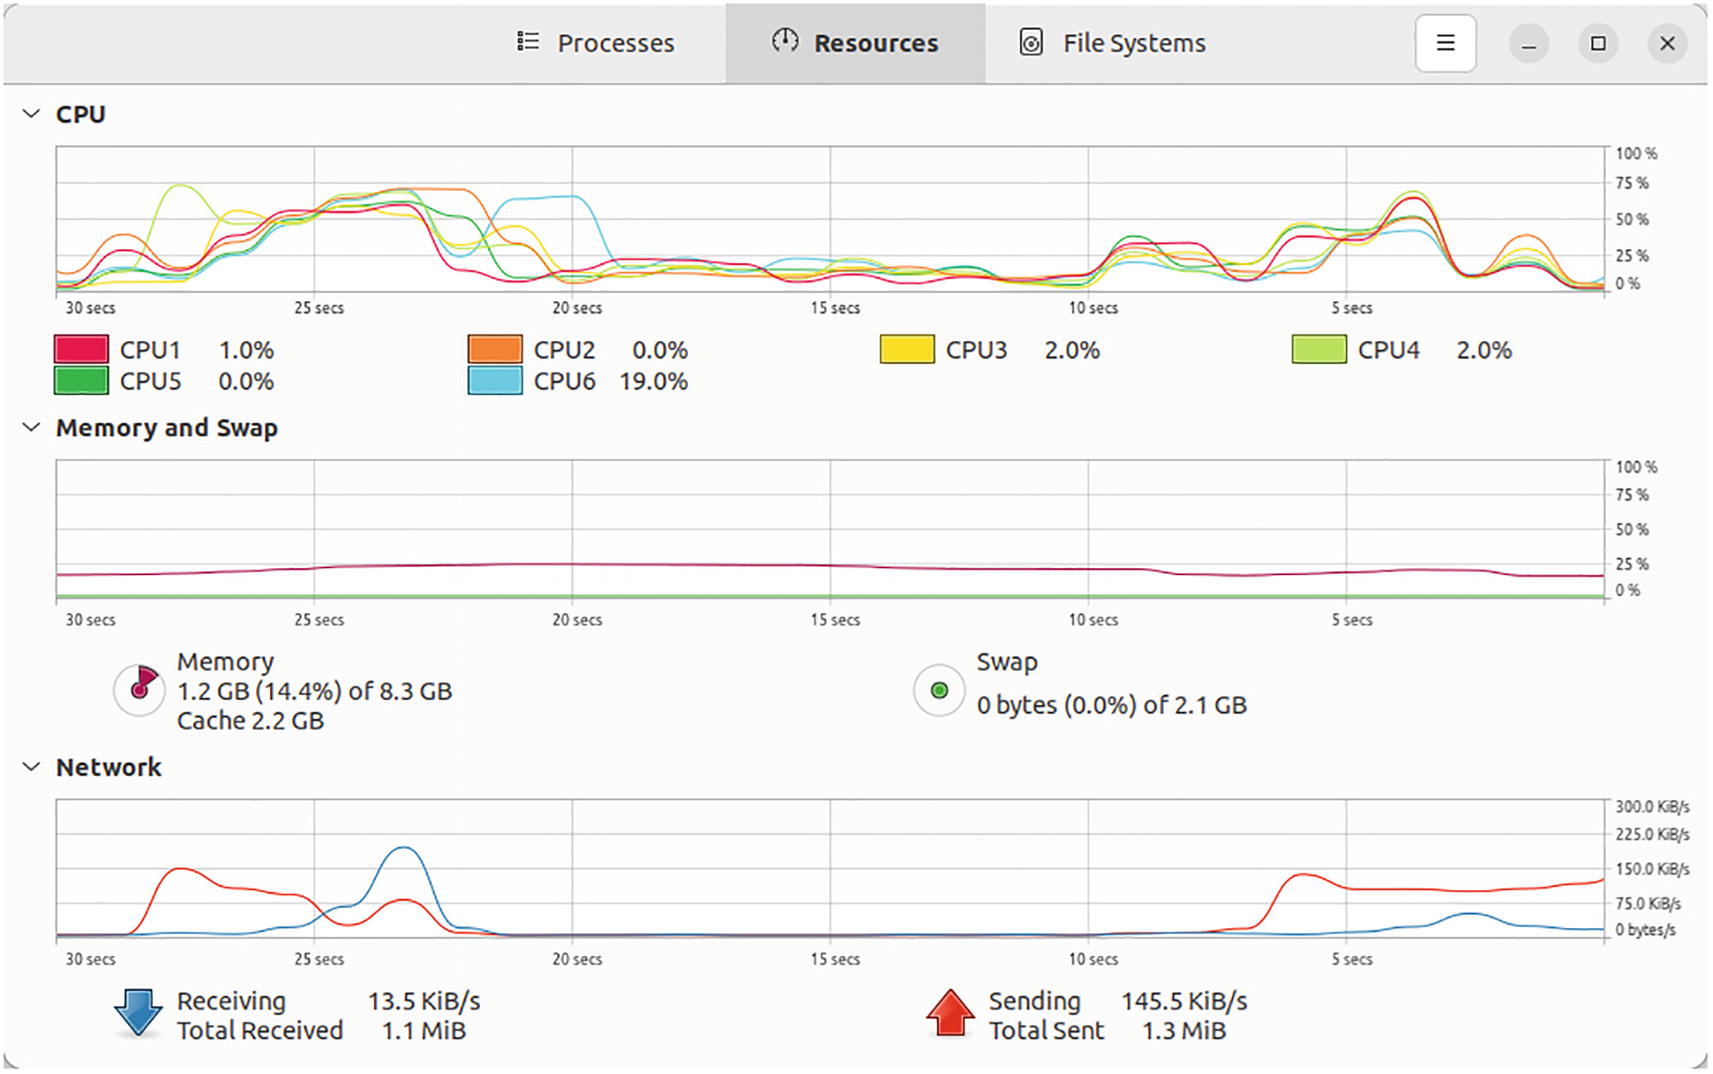
A screenshot of the resources tab has 3 line graphs. C P U has a mixed trend of highs and lows, memory and swap mostly have a constant line, and the network moves straight with peaks on both ends.
The Resources tab shows your computer usage over the last 60 seconds
The “File Systems” tab shows you a quick overview of the file systems that are mounted and in use. From their device name and mount point to their size and a breakdown of available and used capacity, this can be a quick look at what disks and partitions are being used and how much space you have available.
GNOME System Monitor gives you an up-to-the-second look at how your computer is being used and how your resources are being utilized. You can use this information to close programs you aren’t using to speed up your system, change the priority of running programs, or decide whether you need to buy extra memory or storage space for your computer. This system utility will keep you in the know for when you want a comprehensive overview of your computer’s performance.
Managing Disks and Thumb Drives
You will be able to use Ubuntu to read and write to most disks you use with your computer, but sometimes you will need to set up a blank disk or repartition or reformat a disk. Ubuntu makes this easy with Disks utility . This utility provides a way to view the layout of each drive in your computer, manage file systems and formats, and view the status and health information of each drive.

A screenshot of the Disks application has information on the hard disk. The left panel highlights the 550 Gigabyte hard disk and the related data are presented on the right.
Disks provides a quick overview of drive details and data allocation
This menu also lets you open the SMART Data & Self-Tests window, which shows the current health of the drive and lets you start the drive’s internal self-tests. The Drive Settings option lets you change power-saving preferences that can affect the energy usage of your drive as well as performance. You should not change these settings from the defaults unless you understand each option and its effects clearly. The “Power Off...” option saves any data waiting to be written the selected disk and disconnects the drive, telling it to power itself off. You can safely remove an external drive once it disappears from the Devices list on the left.
Partitions are displayed as rectangles proportionate to their size, but very small partitions are not shown to scale. Any partition that is mounted (in use) will have a small media control-like “play” icon that looks like a triangle in the bottom right-hand corner. System boot partitions will also have a small star icon in the corner. You should not unmount or edit system partitions while the system is running. If you do need to change or resize these partitions, you can boot from your Ubuntu install media and use Disks to make any necessary changes.
Underneath the partition map, you may see a “Mount selected partition” (triangle) or “Unmount selected partition” (square) icon, a “Create partition in unallocated space” (plus) icon, an “Additional partition options” (gear) icon, and, far to the right, a red “Delete selected partition” (minus) icon. Select a partition by clicking on it. If the partition contains a file system, you can use the mount and unmount icons to change whether the file system is available to use. If the file system is not in use, you can delete the partition or use the “Additional partitions” button to edit the file system or format the partition.
Formatting a partition allows you to choose between three file system formats. FAT is compatible with practically all devices and operating systems, but no single file can be over 4.3 GB in size. NTFS is used by Windows and lacks the file size limitation of FAT but cannot be written to by OS X without additional software. Ext4 is compatible with most Linux systems, and despite the label, it is perfectly fine to use Ext4 on removable drives, although they will only be readable on another Linux system. The “Encrypted” option creates an Ext4 filesystem inside an encrypted LUKS container. Ubuntu will prompt you for the decryption password each time you mount the encrypted filesystem. You can use the “Other” option to specify a specific filesystem type if you need something different for a special purpose. Ubuntu should be able to read every format listed, but won’t have the software necessary to create every new file system by default. For instance, exFAT is very popular for large USB disks used on Windows and for some game consoles. Ubuntu can use disks already formatted with exFAT, but can’t create new exFAT file systems without additional software.
If you want to format disks with the exFAT file system, you’ll need to install the utilities to do that by running “sudo apt install exfatprogs” in a Terminal. See “Installing Software from the Command Line” below for more detailed instructions.
Disks displays your computer’s attached disks and enables the most common disk operations as well as a large number of very technical options, such as complex formatting, changing file system mount parameters, and adjusting performance characteristics. While caution should be used when working with drives containing important data, Disks is a powerful tool that can be used for anything from simple formatting to working to rescue or repair a computer’s drives while booted from the Ubuntu install media.
Using Multiple Workspaces
Monitors feature much higher resolutions than in days gone by. The advent of high-definition television has made a resolution of 1,920 by 1,080 pixels standard, and now 3840x2160 “4K” monitors are popular. Just 25 years ago, 640 x 480 and 800 x 600 were far more common. Special features, such as “virtual desktops ,” were developed to help deal with limited screen space. In Ubuntu, this feature is called “workspaces” and is a standard part of your desktop.
When you run graphical applications, they display in one or more windows. As you arrange windows on the screen, they fill up your computer’s desktop. You can set up a desktop to work for a specific task, but when you switch to a different task, you need to rearrange your windows again. This can be inefficient if you are constantly rotating between tasks. Ubuntu automatically provides you a new workspace whenever you need one. These additional workspaces extend to the right in a horizontal row.

A screenshot of the activities overview screen. It displays applications in use that include a calculator and Libre office writer.
The Activities overview shows you your current and all active workspaces
If you only have one active workspace , you will see the edge of an additional workspace on the right side of your screen. You can drag any open window to the edge of the screen to move it to the new workspace. If you have more than one active workspace, you will see a small thumbnail view of all workspaces under the search field. You can click these thumbnails to change your active workspace. You can also drag windows from your current workspace onto any of the other workspace thumbnails.
Ubuntu manages your workspaces automatically. You will always have an empty workspace to the right of all your workspaces that you can begin using at any time, and any empty workspace will be removed automatically. Workspaces are organizational in nature and do not take up significant memory or other resources, so you can use as few or as many as you find convenient.
Everyone has a favorite way to use multiple workspaces, but one popular use is to use each workspace to perform different categories of tasks. For example, if you’re planning a day of working at the computer, you might set up one workspace with your word processor and web browser, a second workspace with your email client, a third workspace with Rhythmbox for background music, and the last workspace with Solitaire or Mines for your periodic breaks. With each workspace focused on a different activity, you can take a break by switching to a workspace. When you’re ready to resume work, you can switch back to your first workspace, and all your applications are running and arranged just the way you had them. This can greatly increase your productivity—as long as you’re honest about the time you spend on your “work break” workspace! Don’t forget that there’s no need to use every workspace just because they’re there. You can use only two or three if you like.

A screenshot of the activities window. It has workspaces in a series with multiple applications and icons.
The application grid lets you instantly switch between workspaces by clicking on them
The Unity Dock will show all running applications, but the Alt+Tab window switcher will only show applications on your current workspace. Clicking the Launcher icon for an application on another workspace will automatically switch you to its active workspace, with a sliding animation that helps you keep track of which workspace is active. This gives you a nice balance: workspaces simplify Alt+Tab switching as you focus on a task, while the Dock gives you instant access to everything running on your computer. If you want quick keyboard access to all applications on all workspaces, the Super+Tab application will show everything running on your computer.
There are additional ways to move an application to other workspaces as well as dragging and dropping them in the Activities overview. You can also right-click the title bar of any window and choose from several options. “Always on Visible Workspace” will place the window in the same location on all workspaces. “Move to Workspace Left/Right” lets you move a window to an adjacent workspace. This is a good way of setting up workspaces when you’ve already been working in a single workspace for a while but want to change your workflow to start using the others.
Once you get accustomed to working with multiple workspaces, you can switch between them even faster by pressing and holding Ctrl and Alt and pressing the left or right arrow key. Ubuntu will show a small indicator of your workspaces as your view slides to the new one. Holding Shift while you press Ctrl and Alt will bring the active window with you to the new workspace. This keyboard shortcut is a little more obscure but can be useful when moving a window around after your workspaces are set up.

A screenshot of the settings application. The panel on the left highlights the multitasking option that opens selectable radio buttons for multi-monitor and application switching on the right.
You can adjust workspace multitasking to better suit your preferences
By default, only your primary display is affected by workspaces. This leaves your secondary displays alone as you switch between workspaces. This is incredibly useful if, for instance, you are using a secondary display for reference during research, or possibly for watching video while you work on your primary display. But you may find it more valuable to treat all of your monitors as a single workspace. For that, open Settings, click Multitasking on the left, and then scroll down to the Multi-Monitor section. You can choose between “Workspace on primary display only” and “Workspaces on all displays.” Try out each setting for yourself.
Workspaces are an advanced feature that you can use for even greater productivity on Ubuntu. Not only do they simplify application switching and multitasking, but they can help you optimize your workflow as you move from task to task—making you more efficient as you focus on work and reducing your downtime between tasks.
Installing Alternate Desktop Environments
One of the most compelling things about Ubuntu and Linux in general is the amount of customization that is available. By installing different software on top of the kernel, you can create an operating system that suits your needs perfectly. Even the default Ubuntu graphical interface is just one option out of dozens that you can change to suit your personal preferences. Ubuntu is available in the form of several “flavors” that share a core Ubuntu system but have different desktop environments built on top. Each desktop flavor has a different interface and default application selection suited for various preferences or tasks. While a brief overview of many of the officially supported desktop flavors is available in Chapter 1, you can use Ubuntu Software to add software from any desktop environment to any Ubuntu system. All applications run in all desktop environments, and each user can choose a different desktop environment.
Desktop environments from Ubuntu flavors can be installed by package name
Ubuntu Flavor | Desktop Environment | Package name |
|---|---|---|
Ubuntu | GNOME with a custom Ubuntu session | ubuntu-desktop |
Kubuntu | KDE Plasma Workspace | kde-standard |
Xubuntu | XFCE Desktop Environment | xubuntu-desktop |
Lubuntu | LXDE | lubuntu-desktop |
GNOME | Ubuntu with the GNOME session | gnome-session |
Ubuntu MATE | MATE Desktop Environment | ubuntu-mate-desktop |
Ubuntu Unity | GNOME with the Unity interface | ubuntu-unity-desktop |
Ubuntu Studio | KDE with media creation tools | ubuntu-studio-installer(run separately) |

A screenshot of a window with multiple lines of code. The code runs an installation process in the Ubuntu system with the progress percentage at the bottom.
Kubuntu and KDE can be installed like any other application with just one terminal command

A screenshot of the login screen of Ubuntu. It displays the username, an entry field for the password, and the logo at the bottom.
You can choose between installed desktop environments before you log in
All software on your computer is available regardless of which desktop environment you run, so you can experiment to see which interfaces you prefer. You may even want to install several desktop environments, evaluate them, and then perform a clean install of that Ubuntu flavor on your system. Regardless, changing your desktop interface and the entire look and feel of your Ubuntu system is as simple and straightforward as installing any other software.
Installing Software from the Command Line
One of the best things about Ubuntu is that it includes thousands and thousands of software packages. Even software that isn’t included in a default install can be quickly and easily added to an existing system and receive updates through Ubuntu’s Software Updater utility. This is one of Ubuntu’s greatest strengths, because a default installation can be customized, but still kept easily up to date. I’ve mentioned that many programs leverage the strengths and capabilities of other programs, and Ubuntu Software is no different. Ubuntu is built using a software packaging system that was created for Debian long ago. And while all of the software in the Ubuntu archives has been compiled specifically for Ubuntu, the tools used to install and manage the installed software on an Ubuntu system are the same: dpkg and apt.
An even newer technology used in Ubuntu is snap packages. Snap packages allow you to install software in a safe, confined manner that is separate from your main Ubuntu system without any additional effort on your part. Snaps are an especially safe and convenient way to try new software because they have security confinement and automatic updates but do not carry the risk of conflicting with preinstalled software. This means that third-party developers can package software for Ubuntu and deliver updates right to your computer without the risk of requiring the third-party developer to have administrative access to your computer while their application is being installed.
The following sections will talk about software that is included with Ubuntu as Debian packages. Instructions for working with snap packages will follow afterward.
Understanding Ubuntu’s Software Collection
The Debian package tool (dpkg) is used to install and uninstall Debian packages on a Debian-based operating system like Ubuntu. However, the Advanced Package Tool (apt) also manages keeping track of what packages are installed on the system, checking for updated packages, downloading newer packages and any additional packages they need to run, and downloading them from the Internet and making sure they haven’t been tampered with. Then, it runs dpkg to do the actual installation. The end result is that we can learn how to use apt instead of working with dpkg directly.
We would normally use Ubuntu Software to install software from the Ubuntu archives. But installing software on the command line is especially efficient. While the end result is identical, it is much easier to explain how to install software on the command line. For that reason, it is extremely common to see command-line instructions given in online tutorials. That makes it important to understand what is happening when an article or online solution asks you to open a terminal window and run commands to install software.
Ubuntu software is contained in a variety of software repositories. A repository is a list of available software packages and their relationship to other packages, along with the packages themselves. Ubuntu can use this list to download and install new software packages as well as determine when installed packages have been updated. The software in Ubuntu’s repository is separated into various groups: main, restricted, universe, and multiverse. The “main” group contains the core Ubuntu software that is directly supported by Canonical. This includes the default desktop as well as the most important server software. The “restricted” group has firmware and other software that isn’t Free Software or Open Source and is distributed by Ubuntu and Canonical to help ensure that Ubuntu can run on a variety of hardware. The “universe” group is filled with community-supported software, and “multiverse” is software that may not be fully redistributable because of software license or patent issues.
Each Ubuntu release has three repositories. One uses the release’s short codename (e.g., “jammy” for 22.04 LTS), which is an archive of Ubuntu as it existed at the moment of that release. The matching repository, “jammy-updates,” contains any packages that have been updated since 22.04 LTS was released. The last repository, “jammy-security,” contains updated packages that have been updated because of security issues. Each repository contains software from all four groups. Because apt combines these lists of software packages into one database, you can use apt to install and upgrade any software that is included in Ubuntu regardless of where it comes from.
While most online instructions still use apt-get, apt-cache, and other tools, this book prefers the apt command—introduced in Ubuntu 14.04 LTS—because it has color-coded output and a progress bar that is easier to read for command-line newcomers. The two commands produce the same end result, although apt-get has more advanced options. The use of apt-get in online instructions may be a sign it is out of date!
Keeping Software Up to Date
Ubuntu will check each of its repositories and only download package lists that have changed since the last time the command was run. Once this is finished, you can upgrade or install new software. The Ubuntu updates repository only keeps the latest couple of updates to any single package, so if an upgrade or install fails with a “Package not found” error on a computer that hasn’t been turned on in a while, running apt update before repeating the upgrade or install command will often succeed.
“Y” is the default option, so pressing Enter will begin the upgrade. Ubuntu will download all of the listed packages from its software repositories, and install them, with a progress bar printed at the bottom of the screen. Once it is complete, your system will be up to date.
Occasionally, apt will say that certain packages are being held back. This happens when certain packages must be removed and replaced with newer versions with new names. This isn’t common but occasionally happens with certain system libraries. You can run “sudo apt full-upgrade” or “sudo apt-get dist-upgrade” to install the held-back packages. If apt reports that a lot of packages are going to be removed, and it doesn’t look like most of them are being replaced with similarly named versions, it’s worth stopping and checking online for any issues, or simply waiting another day to check for updates and try again.
Searching for Software
There are nearly 70,000 software packages in Ubuntu 22.04.1 LTS, and finding new software to install can be difficult. Sometimes a package name is the same as the application title, such as “thunderbird” or “inkscape .” But sometimes a package name is different, such as “nethack-console.” Using the command line to install an application is the quickest method when you know the exact package name, but apt can also be used to find software as well.
Every package has a name and a short and long description, which is part of the information stored in the Ubuntu repositories. Using the commands “apt search” will search the names and descriptions in the package database on your computer and will print a list of package names and their short descriptions. For more information on any package, you can run “apt show” followed by a package name. This displays a lot of information, including the installed size and the package’s long description. This allows you to narrow down a package name for software you wish to install. Using the command line to search for applications is more bare-bones, but is much faster than using Ubuntu Software.
I can clearly see from the “Installed” field that LibreOffice Writer 7.3.5 is installed. The “Candidate” field tells me the latest version that Ubuntu wants to install. Because it’s the same as the installed version, I know that my browser is the latest available in the Ubuntu repository. The version table shows me that LibreOffice Writer 7.3.5 was included in jammy-updates. Because it isn’t in jammy-security, I know it there haven’t been any serious security issues since the release of Ubuntu 22.04 LTS and the fixes are bug-related. I should install it unless I have a good reason not to. And I can also see from the last two lines that Ubuntu 22.04 LTS originally shipped with LibreOffice Writer 7.3.2.
The “Installed” field clearly indicates with “(none)” that FocusWriter is not installed on the computer and that using apt or Ubuntu Software to install it will result in FocusWriter 1.7.6-2 being installed.
Installing New Software
Installing software from the Ubuntu repository is simple on the command line. If you know exactly what you want to install, you can start the process in mere seconds. The command “apt install” will automatically download the latest version of a package along with any additional packages it requires, and install them in the most efficient order.
This tells us that 15 extra packages will be installed. Pressing Enter will begin the download and installation. If you wanted to know more about the additional packages, you could type “n” and press Enter, and then run “apt show libqt5printsupport5” for example. Using “apt show” reveals that it helps applications provide printing support. apt also listed three other suggested packages that work with FocusWriter or offer additional functionality. Suggested packages are not installed by default, but they can offer additional functionality, and you can install them manually. If installing a package would require the removal of software, those package names would also be listed. Altogether, apt will download 19 MB of packages, and once they are uncompressed, installed, and configured, they will use 59 MB of disk space. This also takes into account any software that may be upgraded, replaced, or removed by apt.
Installing more than one package at a time is as easy as listing more than one package on the command line. When I install Ubuntu on a new computer, one of the first things I do is run “sudo apt install gimp inkscape vlc ubuntu-restricted-extras”. By directly asking Ubuntu to install these packages, I save a lot of time over opening Ubuntu Software, searching for each one by name, and clicking “Install.”
Occasionally, you may want to download packages now but not install them until later. You can do this by running “sudo apt -d install [packagename]” or “sudo apt -d upgrade”. The “-d” option tells apt to download the packages but skip installing them. The next time you run a command to upgrade or install those packages, they will not be downloaded again unless a newer version has been released.
Removing Software
Removing software is just as simple as installing it. The command “apt remove” uninstalls software packages and frees up disk space. When you run this command, it deletes the application and associated system files. It doesn’t typically delete any configuration data in your home folder. This means that you can still back up this information, and should you reinstall the software again in the future, your old settings will still be used. If you want to completely remove a package and its configuration files, you can use the command “apt purge [packagename]”. This will leave no trace of the specified software on your computer.
Ubuntu’s basic software management tool apt is an easy-to-use and powerful way of managing your computer’s software at all steps: searching, downloading, installing, upgrading, and removing. This technology lays a foundation for Ubuntu’s ease of use and reliable security and bug fixes. By working with these tools directly, you can save yourself time and quickly install and remove software so that you can get to work.
Working with Snap Packages
In addition to Ubuntu’s software repositories , Ubuntu Software also grants access to a large collection of software from the Snap Store. This is an online service provided by Canonical that lets third-party developers and software enthusiasts package their software so that it can be used in every Ubuntu still supported by Ubuntu and Canonical—instead of requiring a separate package for each version of Ubuntu the developer wants to support. When a snap package is installed from the Snap Store either in Ubuntu Software or on the command line, Ubuntu will automatically check for and install updates several times a day.
Working with snap packages on the command line is easy, because unlike Debian packages which have a list of other software and libraries they need to run, snap packages include everything they need to function. This means that searching, installing, and removing snaps is much simpler than working with Debian packages .
First, to find a snap, you can run “snap find [search term]” to search the Snap Store’s catalog. This searches snap package names, software titles, and descriptions to return a list of snap packages. For example, if I run “snap find skype”, I might get the following result:
To find out more about a snap package, you can run “snap info [snap package]”:
This tells me several things. For instance, now I know that Firefox is a web browser. Second, I know that the publisher is Mozilla. The green check mark next to the publisher name means that Canonical has verified that the publisher’s identity. Some snap packages are created by community members, not the original software developer.
If you already have a snap installed, you will see “refresh-date” above “channels,” and this will tell you the last time the snap was installed or updated on your computer. The last line, “installed,” will tell you what version of the snap you have on your computer, and you can compare that with the latest versions listed in each channel.
The “channels” information is more interesting. The Snap Store has the ability to track several different versions of a program. This means that if a developer sets it up, you can install specific versions of the software. Firefox has a “latest” track and an “esr” (extended support release) track. Each track has four channels: stable, candidate, beta, and edge. Most software only publishes to the stable channel, but some use the other channels as well. Typically, “edge” is the latest version of their software built with the latest development work, “beta” is software that’s been tested and is shaping up, “candidate” is software that is expected to be stable but needs final testing, and “stable” is the actual, tested release.
Firefox has two tracks. The “esr” track is an older version of Firefox that is very stable and is only receiving security updates. The “latest” track is for the latest release, and Mozilla uses the “stable” channel for final releases, the “beta” channel for the next version of Firefox being developed and finalized, and the “edge” channel for the next version after that. You can install the version of Firefox that works best for your computer usage, and you can also easily install an upcoming version of Firefox, try it out, and keep it or move back to the stable version without risking any instability to the rest of your Ubuntu system.
To install a snap from the Snap Store, you simply type “snap install [packagename]”, and Ubuntu will download the snap package, install it, set up any access it needs to your computer via “snap interfaces,” and then check for new updates periodically. If you installed a desktop application, the application will be available from the application grid as well as the command line.
If you want a specific version of a snap, you can specify that before you install. “snap install --beta [packagename]” will install from the beta channel of a snap. If you want to install a specific track, you can specify it directly. For example, to run the latest Firefox ESR release, you would run “snap install --channel=esr/stable firefox”.
Sometimes a snap will use many tracks. For example, the Nextcloud snap is a rather sophisticated server all bundled up in a single snap. It has tracks for each of its major versions, and the “latest” track is slow to update, sometimes taking weeks, in the name of stability. But if you want to receive maintenance updates but stay on a specific version until you decide to change versions with the “snap refresh” command, you can install a specific track.
If a snap is already installed, you can check for updates at any time. Sometimes you will be notified that an update is available for a snap, but it is running. But Ubuntu doesn’t automatically monitor your running applications so that it can install the update once you close it. Instead, if you want to update your snaps on demand, you can close the application and run “snap refresh”. This will search for updates to all of your installed snaps (unless they are currently running) and download and update them. If you only want to update a single snap, you can do that as well by running “snap install [packagename]” when it is not running.
If you want to change tracks or channels for an installed snap, the “refresh” command can do that, too. “snap --channel=esr/stable firefox” will switch your computer’s version of Firefox to the ESR release, for example, and then begin using that track and channel for updates.
Ubuntu keeps the last version of a snap around in case an update causes trouble. If a snap update doesn’t work on your computer, you can run “snap revert [packagename]” and the snap and its program data will immediately revert to the previously installed version. Ubuntu will continue monitoring the snap for updates and will update once the latest version is replaced.
Removing snapped software is simple as well. “snap remove [packagename]” will make a compressed snapshot of the snap and your snap data. Ubuntu will keep this snapshot for 31 days. If you later find that you want to restore a snap and all of its data, you can run “snap restore [packagename]”, and everything will be restored. If you do not want a snapshot to be created for purposes of disk space or otherwise, you can run “snap remove --purge [packagename]”, and Ubuntu will not create a snapshot.
Lastly, snaps are isolated from your Ubuntu system for your security. This means that aside from being able to request basic features via “slots” (such as desktop integration or access to your home folder), snaps cannot automatically request access to more advanced slots (such as the ability to monitor what is running on your computer or to access removable drives on your computer). However, you can grant access to these either in Ubuntu Software (which is the most convenient method) or on the command line.
In the end, snaps provide a secure way to install third-party applications that will run on Ubuntu in a manner that allows you to manage what resources it can access, much like you would with a mobile app on your cell phone. This provides the latest software, directly from the developers, no matter what version of Ubuntu you are running, without the risk of conflicts with other software on your Ubuntu system, which means that you can continue getting the latest software even if you are using an older version of Ubuntu. This helps you get the most out of your Ubuntu system, on your own schedule and terms.
Expand Your Software Options
Ubuntu comes with a wide array of software—nearly 80,000 packages at your disposal, thanks to large software repositories. Sometimes, it’s not enough. Ubuntu’s update policy means that major versions of software are locked in a couple of months before release and the Ubuntu repositories only see minor maintenance or security updates to ensure stability. LibreOffice 7.3.2 was included in Ubuntu 22.04 LTS and received updates up to 7.3.5. Ubuntu won’t receive further updates of LibreOffice even though the current version at the time of publication is 7.4.0. Other software was not able to be packaged for Ubuntu for various reasons. Some weren’t available or stable enough to include during Ubuntu 22.04 LTS’s development cycle. Others are released directly by third-party software manufacturers. When an application makes an Ubuntu package repository available, you can add the repository to your system and gain access to the included software.
A third-party Ubuntu repository will have two components. The first is a link to the repository, and the other is a GPG encryption key to sign the packages and ensure a package hasn’t been corrupted or tampered with. With this information you can add the repository to your software sources and interact with it using Ubuntu Software and apt. Ubuntu’s Launchpad project also offers a feature called “Personal Package Archives.” This service allows developers to create Ubuntu packages for testing or updates outside of the Ubuntu release process and is slightly easier to add because Ubuntu can import the signing key automatically.

A screenshot of the software and updates window. A popup dialog box of software properties highlights the entry field for the A P T line.
Software sources can be added automatically or by hand
Once you’ve entered that into the field, click “Add Source.” Ubuntu will ask you to enter your password to confirm your request. Once you click the “Authenticate” button, Ubuntu will add the repository to your system. Next, you will need to add the repository’s signing key. If the repository maintainer uses one, it should be available in the same place as the repository information. For example, Oracle provides a link to the signing key on the Linux download page as part of repository setup instructions. Download this key with your web browser and go back to the Software & Updates window and click the “Authentication” tab. Click the “Import Key File…,” select the .asc file you downloaded and click “OK.” Ubuntu will add the key, and when you click “Close,” you will receive a prompt that says “The information about available software is out-of-date.” Click the “Reload” button, and Ubuntu will update its software list, including the new source you just added.
Once the Software & Updates window closes, you can install packages in the new repository using Ubuntu Software, Software Updater, or apt just like any other package. VirtualBox is now available in an additional “virtualbox-5.1” package that can be installed. If Ubuntu 16.04 LTS’s older “virtualbox” package containing version 5.0 was installed before, virtualbox-5.1 will replace the older software so that they do not conflict.
When you add a software source to Ubuntu, you are giving the source maintainer full control of your computer because the setup scripts in the packaging run with superuser rights and malicious software could be masquerading as something useful or could replace any other software on your system. Make sure you trust the source before adding it to your computer.
When you upgrade to a new major release of Ubuntu , these additional software sources are automatically disabled because there is no guarantee that they are compatible with the newer version of Ubuntu. You can contact the repository maintainer or carefully test the software on the newer version of Ubuntu and reenable each source on an individual basis. Sometimes you can use the “Edit” button to update the release name, from “jammy” to “kinetic,” for instance, if you were upgrading to Ubuntu 22.10. If the new source is not available for the newer version of Ubuntu, the currently installed packages will remain but will not update until their availability changes.
Ubuntu is able to receive updates to the software it provides, but is also flexible enough to receive updates from other sources as well. Used with caution, this is the perfect way to keep up with updates to Chrome, Steam, VirtualBox, and many other software projects.
Creating Application Launchers for Programs
Sometimes you might have written a script or found an interactive command-line application that you want to be able to launch using the Activities overview or pin to the Ubuntu Dock. While some command-line applications (such as Elinks) are available in the Activities list after installation, the vast majority of command-line applications do not show up in Activities. Other software that isn’t available through Ubuntu’s package management runs in place but without a desktop launcher. Most software without a launcher will never be missed, but if you want to set up a custom icon, you can do so by creating a “.desktop” file.
A .desktop file is a text configuration file that describes a program to a desktop environment. Most modern desktop environments automatically detect .desktop files in either a system folder or a per-user folder. To demonstrate, let’s create a script named “spacedrive” that generates a pulsing white noise similar to a starship engine. Then, we’ll create an application launcher file so we can run it using GNOME Shell instead of the command line.
Press Enter, then enter your password and type press Enter again. You’ll be prompted to confirm the software installation. Press Enter to accept the default of “Yes.” Ubuntu will download and install SoX and the libraries its needs to playback sound.
Save that in your ~/bin folder with the name “spacedrive”. In Files, open the “bin” folder and right-click “spacedrive ”, and then choose Properties from the pop-up menu. Click the “Permissions” tab, and click the “Allow executing file as program” check box until it has a check mark in it, then close the “spacedrive Properties” window. If you have created this script correctly, you can launch Terminal from the Dash and type “spacedrive” and press Enter. You should hear gently pulsing white noise with a status and volume indicator. This will continue to play until you press Ctrl+C in the Terminal window.
Save this to your Desktop folder with the name “spacedrive.desktop ”. On your desktop, you will see the file appear with a faded icon of a NASA space shuttle and a red X in the corner. If you try to run it, you will receive an error that says the application launcher does not have the right permissions to be launched. Right-click the file and choose “Properties,” and go to the “Permissions” tab and allow the file to be executed as a program as you did with the “spacedrive” script. Then, right-click the file again and select “Allow Launching.” The file icon will become clear, and the label will change from “spacedrive.desktop” to “spacedrive.” The file name has not actually changed, but its appearance on the desktop has. You have now created an application launcher.
To make the file available in the application grid, you can move it to the ~/.local/share/applications folder. It will immediately be available in the Dash, and you can even drag it to your Launcher at the left side of the screen. Once the script is running, pressing Ctrl+C or closing the terminal window will end the sound effect.
The .desktop file follows a specific format, but you should be able to modify the spacedrive.desktop file to suit your own needs. The “Name” line will be the way your application appears in the Dash and Launcher, and the “Comment” line is used for extra search keywords by Unity and often shows up as a tool tip when hovering your mouse over a menu item in other desktop environments. The “Exec” line should be the exact path and filename you use to run the script or command from a command prompt. If the application is in your path (such as applications installed by the package manager or items in your “bin” folder), you can specify just the name, but if they are outside your path, you must give the full path, for example, “/home/nathan/bin/spacedrive”.
The “Icon” line is optional and can point to any file. If no path or file extension is given, Ubuntu looks in /usr/share/pixmaps for a matching file and adds the right extension. The “Terminal” line indicates whether or not to display a terminal window, and can be either “true” or “false.” If the application is graphical or runs without interaction, you will probably make this “false.” If you need to interact with the script or command, you will want to make this “true.”
Having a shortcut for a favorite command or script can be a huge convenience. Using simple .desktop files can allow for custom launchers that range from the simple to the complex, and come in handy—especially when you are working between with software that doesn’t use Ubuntu’s software management.
Working with Virtual Machines

A screenshot of the virtual box window. A popup manager window highlights the running application, Ubuntu Book 3 with the system information window on the right.
This Ubuntu 22.04.1 LTS virtual machine was the model for this book
A virtual machine is a simulated computer that runs like a program. Once created, it behaves just like a real computer. You can define how much memory it has, create virtual disks and define their sizes, and connect virtual and real hardware to the virtual machine. While a virtual machine uses your computer’s CPU, memory, and disk space, it is isolated from the rest of your computer. In fact, the first thing you do after you turn on a new virtual machine for the first time is install an operating system—just like a new physical machine. Because of the way they share resources, the computer running VirtualBox is called the “host” computer, and the virtual machine inside VirtualBox is called the “guest” machine.
To work with VirtualBox, you can install it from Ubuntu Software, or use apt to install the package “virtualbox.” If you want to use the latest version available from Oracle, you can use the earlier section “Expand your software options” as a guide to adding Oracle’s VirtualBox repository to your system. When this book was written, “virtualbox-6.1” was the latest version of VirtualBox, but check the official website at www.virtualbox.org/ for updated instructions. Only members of the “vboxusers” group on your system will be able to run VirtualBox. The install process should automatically add your user account to the group, but you will need to manually add other users to this group before they can run VirtualBox, too. The first time you install VirtualBox on an Ubuntu computer, you will need to log out of Ubuntu and log back in so that the “vboxusers” group permissions take effect. Then, you will be able to launch VirtualBox through the application grid.
Creating a Virtual Machine

A screenshot of the Oracle V M virtual box manager window. It has a welcome page with the highlighted tools section.
VirtualBox guides you through each step of the creation process
Next, you can create a virtual hard drive for the machine. The recommended size is once again based on the minimum requirements of the virtual machine. Once you choose whether to create a new virtual hard drive, a “Create Virtual Hard Drive” wizard appears and guides you through the process. Unless you have a specific need for a different format, you can safely create a VDI (VirtualBox Disk Image) format disk. If you create a “dynamically allocated” drive, then the drive file size will start at 2.1 MB regardless of the virtual capacity and will only grow when written to. A “fixed size” virtual drive file will be as large as the capacity you choose on the next screen. It can be useful if you are working with a virtual machine that will save a lot of data, because it can be faster to write to, and you won’t cause the host operating system to run out of disk space unexpectedly. Once you create the disk drive, the wizard will close, and you will be back at the main VirtualBox window with the details of your new virtual machine displayed on the right of the window.
Some operating systems rely on 3D acceleration to display their user interface. Both Windows Vista and later along with Ubuntu 12.10 and later will be much faster with 3D acceleration enabled. You can select a virtual machine and click the “Display” settings header, and then enable the “Enable 3D Acceleration” feature. If you will install Windows on the virtual machine, you can also select “Enable 2D Acceleration .” Once you install the VirtualBox Guest Additions, your virtual machine will function much more smoothly. See the dedicated section for more details.
Running Your Virtual Machine
Selecting a virtual machine and clicking the “Start” button on the toolbar will virtually power on the machine. A display window will appear to server as the virtual machine’s monitor. You can type and use the mouse inside the window. Both the Ubuntu and Windows installers recognize the virtual mouse, so you’ll be able to click inside the display window at any time. If you are not running an operating system that supports the virtual mouse, the virtual machine will “capture” the mouse when you click inside the window. This can also happen with the keyboard. To free both the mouse and the keyboard, press the Right Ctrl key.

A screenshot of the Oracle V M virtual box manager window. Ubuntu is highlighted on the left panel and a popup window provides a drop-down menu to select a start-up disk.
Just like a real computer, you have to install an operating system on a virtual machine
Once you have installed an operating system, a virtual machine is almost identical to using a physical machine. You can close the virtual machine window to power off the virtual machine, although if the guest operating system allows for an automatic shutdown, you should always use it instead of forcing a power off. Your virtual machine has audio, video, and network, and storage hardware, and if the guest operating system supports USB, you can connect USB devices plugged into your host machine directly to the guest machine’s USB ports by using the Devices > USB Devices menu and clicking on the desired device. Once your guest machine is finished with the device, you can detach the device from your virtual machine the same way. It automatically reattaches to your host machine.
VirtualBox has a dizzying array of options and features, and if you are used to building computers, you can customize much of the virtual hardware. In the main VirtualBox window, you can right-click on a virtual machine and choose “Settings” from the pop-up menu. Most settings have a tool tip that appears when you hover your mouse over them. These tips not only explain the option but often offer advice on avoiding configuration problems.
The VirtualBox manual is comprehensive and explains all of the settings, considerations when installing specific guest operating systems, and will help you get the most out of this highly complex software. Clicking the “Help ➤ Contents” menu item will bring up the manual.
Installing Guest Additions
The guest operating system in a virtual machine is isolated from the host operating system and runs completely independently. This is both a great advantage and a disadvantage. Only virtualized hardware and devices can be used on the guest machine, and features like 3D acceleration and the clipboard and folders cannot be shared. VirtualBox comes with a set of guest additions that can be installed on the guest operating system to add virtualized hardware drivers that allow the guest machine to communicate with the host machine and better share resources.
Once you have installed a guest operating system in your virtual machine, you can insert the Virtual Guest Additions CD into the virtual machine. This is not a physical CD but can be inserted with the “Devices ➤ Insert Guest Additions CD image…” menu item when the operating system is running. The guest operating system should ask if you want to run the software on the CD. Choose yes, authorize the system changes, and the installer will appear. On Windows guests, this will look like a typical program installer, and you will be able to choose whether to install 3D acceleration. Follow the onscreen prompts to install the guest additions. On Ubuntu and other Linux operating systems, a terminal window will appear and show the installation progress. If it doesn’t, open the CD in Files, right-click the file window and click “Open in Terminal,” and run “sudo VBoxLinuxAddtions.run”. If the installer complains about needing additional software to build the kernel modules, run “sudo apt install build-essential” and then rerun VBoxLinuxAdditions.run. Once installation has completed, you can close the windows, eject the CD, and restart the guest machine to fully enable the guest additions. More detailed and up-to-date instructions for installation and guest operating system compatibility are available in the VirtualBox manual. When VirtualBox is upgraded on the host OS, the guest additions should be updated on your guest OSes as well. Your guest operating system will notify you if a newer update is available, and you can simply repeat the installation process. The installer will remove the old additions and replace them with the new ones.
Guest additions offer many benefits. The keyboard and mouse will no longer be “captured” by the virtual machine, and your virtual machine will have access to more graphics modes, including the ability to automatically adjust to the virtual machine window being resized. On Windows and Linux, you can also enable “Seamless Mode,” which removes the guest operating system’s desktop background. This allows you to work with the guest application windows as though they were running on your host system. While this has some restrictions, it can greatly simplify switching between applications on the host and guest machines. Guest additions even allow for the sharing of clipboard data and folders between the host and guest, and VirtualBox 5.0 added direct drag-and-drop support for small- to medium-sized files. Once again, the VirtualBox manual will have more details as well as the latest updates on functionality.
For operating systems that rely on 3D acceleration to display their user interface, you should ensure that 3D acceleration enabled in the virtual machine settings. While the virtual machine is powered off, select the virtual machine and click the “Display” settings header, and then enable the “Enable 3D Acceleration” feature. For Windows guest machines, you can also select “Enable 2D Acceleration.” Graphics acceleration will speed up the interface and also allow you to play many 3D accelerated games inside the virtual machine.
VirtualBox allows you to work in multiple operating systems at the same time. With the installation of guest additions, you can expand those operating systems to provide better access to your physical hardware and offer extra convenience features that make working with wildly different software much more pleasant.
Recommended Uses
You can try different operating systems. If you wanted to work with Windows, or a different flavor of Ubuntu, you can safely test the install process and user experience by trying it in a virtual machine first. If you love Ubuntu but have one or two Windows applications that won’t run under Wine, you can run them in Windows with a virtual machine without having to dual boot.
You can run older or newer operating systems. Do you have old DOS games or are just feeling nostalgic? You can create a virtual machine and install MS-DOS or FreeDOS. Do you want to see what Ubuntu looked like a decade ago? You can install Ubuntu 6.06 LTS as a guest operating system. The computer this book was written on always ran the latest versions of Ubuntu during writing, but three virtual machines running Ubuntu 22.04.1 LTS, Windows 11, and macOS helped ensure that all screenshots and instructions were taken from a clean, freshly installed operating system that will match your experiences (see Figure 6-10).
You can experiment. Snapshots save your machine’s state so you can revert if things go wrong. Test upgrades or recovery processes. You can build a virtual machine with extra storage, or floppy drives, or two network cards.
You can learn. Ever wanted to run an Ubuntu server? You can use a virtual machine to install Ubuntu Server and use your host operating system’s web browser to look up learning and reference material. You can run two virtual machines side by side to communicate. You can write programs and run commands and upgrade operating systems without risking your data or your computer’s stability.
Being able to create and destroy virtual computers in seconds is the ultimate power user tool. Whether you set up different virtual machines to handle various tasks or you occasionally create machines to test something before deleting them, the only limit is your imagination.
Summary
There are always tips, tricks, and shortcuts that perform tasks faster or in more specific manners. Being a power user isn’t about knowing every secret, but learning these features and using them when they help (and ignoring them when they don’t!) is part of the process of becoming a power user. Not everyone will use every single feature or program in this chapter, but choosing the ones that work for you will help you accomplish more with Ubuntu, be more efficient, and achieve more with your computer.