Chapter 5
UDK Bots
In this chapter we will cover UDK bots. Bots are basically computer-controlled enemies. They are important because, unless the game is a completely multiplayer, you will generally need some bots to make the game interesting and challenging.
First an overview of bots is given. This is followed by a discussion of bot Artificial Intelligence path finding and the different methods that the UDK uses which are pathnodes and navigation meshes. Finally, using weapons with bots is covered along with how players and bots can take damage from their weapons. Hands-on examples are given to illustrate these concepts including:
- How to create a bot and have it follow the player using Pathnodes
- How to create a bot and have it follow the player using Navmesh
- How to move a bot to a point in the world specified by the Player
- How to equip a bot with a weapon
- How a bot and a player can take damage from a weapon
UDK Bot Overview
A UDK bot is basically a 3D animated object, or “robot”, with built-in artificial intelligence features that allow for such things like finding a path to another object in the game world and then being able to move to that object along that path. For example, let’s say you are in control of a squad of computer-controlled soldiers or bots. You can indicate the location that you want the bots to move to by touching the screen on your iOS device. The bots then calculate the path to that location and in the process avoid obstacles that would block their way. The code to find this path is already built into the base UDK code and is what we will discuss in this chapter. Other things, such as when to fire weapons and who or what to fire at under what circumstances, must be programmed separately.
There are certain classes within the UDK base code and functions within those classes that must be used in order to create a working bot. In order to create a bot with custom user-defined behavior, a custom bot controller must be created. Bot controllers are similar to player controllers except that there will be no player input in determining a bot’s behavior. Think of the controller as the bot’s brain. Once a custom bot controller has been created then the controller must possess the bot’s pawn in order to connect the bot’s brain which is the controller to the bot’s body which is the bot’s pawn. The way we connect the two is simple. We use the Possess() function located in the bot controller to connect the brain to the body. This is covered in detail in a later section in this chapter.
Bot Related Classes
The UDK has a couple of built-in classes that handle bots. They are the AIController class and the UDKBot class. The definitions of these classes are as follows.
class AIController extends Controller

    native(AI);


class UDKBot extends AIController

    native;
Note that both classes are defined as native which means that part of the class is implemented in C/C++ instead of UnrealScript. Native classes should not be altered. Native classes have a portion of their code implemented elsewhere in C/C++ and are not designed to be altered by the UDK user. In order to create a custom bot controller we must derive a new class from the UDKBot class. The following declares a new custom class called BotCustomController that derives from the UDKBot class.
class BotCustomController extends UDKBot;
It is in this new custom bot controller class that code can be placed to give the bot custom behavior. This new controller class will inherit the built in pathfinding abilities of the Controller class. The Controller class is the base class for controllers.
Key Bot Related Functions
There are some key functions that are essential to basic bot AI.
- LatentWhatToDoNext() – This function is declared in a state and is used to transition to the WhatToDoNext() function. The importance of using this function is that game time passes at least one clock tick before the actual bot decision making code in ExecuteWhatToDoNext() is executed. This prevents a critical timing error from occurring. See the example below.
auto state Initial

{

    Begin:

    LatentWhatToDoNext();

} - WhatToDoNext() – This function is called by LatentWhatToDoNext() and calls ExecuteWhatToDoNext() on the next game tick if the DecisionComponent.bTriggered is set to true. See the following example.
event WhatToDoNext()

{

    DecisionComponent.bTriggered = true;

} - ExecuteWhatToDoNext() – This function is the main decision making function for your bot. It is in this function that your bot will decide which state to transition to based on the current state it is in and other programmer defined factors.
The following is example code from a bot that basically is designed to loop continuously in the
FollowTargetstate forever. If the bot is in theInitialstate then it goes into theFollowTargetstate. Otherwise if it is in theFollowTargetstate it goes back into theFollowTargetstate.protected event ExecuteWhatToDoNext()
{
if (IsInState('Initial'))
{
GotoState('FollowTarget', 'Begin'),
}
else
{
GotoState('FollowTarget', 'Begin'),
}
}
The bottom line is that these functions form the basic decision making loop that is needed for the bot AI. At the end of each state block the following process occurs:
- The
LatentWhatToDoNext()function is called. - It in turn calls the
WhatToDoNext()function. - Finally,
WhatToDoNext()then calls theExecuteWhatToDoNext()function.
The ExecuteWhatToDoNext() function is the main decision making function for the bot where the bot can be put into a different state through the GotoState() function.
Possession
In terms of the AI controller there are several important functions. Before the bot can control its pawn you will need to assign the pawn to the controller. You do this through the Possess() function that is declared in the Controller class. The Possess() function takes a reference to a Pawn that is to be assigned to this controller as the first parameter and the second parameter is true if this involves a vehicle transition. The PossessedBy() function of the Pawn is also called. The function declaration is as seen below.
The UnPossess() function is called to release the Pawn from the controller and the pawn’s UnPossessed() function is also called. See Listing 5–1.
Listing 5–1. Spawning and Possessing a Bot
Var Controller BotController;
Var Pawn BotPawn;
function SpawningBot(Vector SpawnLocation)
{
BotController = Spawn(class'BotCoverController',,,SpawnLocation);
BotPawn = Spawn(class'BotCoverPawn',,,SpawnLocation);
BotController.Possess(BotPawn,false);
}
The code in Listing 5–1 dynamically creates a new controller and a new pawn using the Spawn() function at SpawnLocation in the 3d world. The pawn is then assigned to the controller using the Possess() function.
Path Finding
Path finding is the process of a computer controlled bot determining the path from its current location to a target destination location in the game world. In this process obstacles must be taken into account and avoided. There are two ways that the UDK can handle this. One is through the use of path nodes and the other is through the use of a navigation mesh.
Path Nodes
In order to use the path nodes method of path finding you must place path nodes using the Unreal Editor on areas in the level that your bot will have access to. If an area has no path nodes then the bot may not be able to walk through that area.
The following Figure 5–1 illustrates how to set up a level to usepathnodes. The key here is that all the areas you want a bot to have access to must be reachable directly or indirectly from a network of pathnodes. If an area is blocked off by an obstacle and there is no pathnode to that area then the bot will not be able to go to that area. Blocking off parts of your game world from bots might actually be preferred if you have a special area in your game that only the player should be allowed access to.
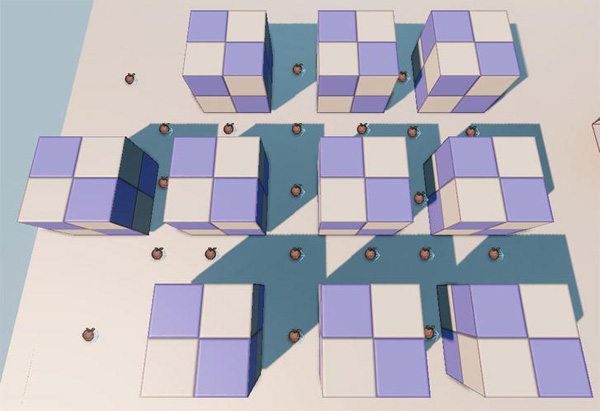
Figure 5–1. Pathfinding by pathnodes
Navigation Mesh
In order to use the navigation mesh you must put a pylon just above the area you want the bot to be able to navigate using the Unreal Editor.
One advantage of using a navigation mesh is that it automatically calculates all available paths around obstacles unlike the path nodes method where you need to manually put path nodes around the obstacles to ensure that the bot is able to walk through that area. Also, when a game level changes all you need to do if you use the navigation mesh method is to rebuild the AI Paths. With the path node method you may need to rearrange your path nodes and perhaps add more path nodes manually to adjust for the changes in the level.
The Figure 5–2 illustrates the use of the navigation mesh for pathfinding the same area as in Figure 5–1. The graphic with the P is the pylon and the screen capture was performed after the AI paths were built. The lines you see in the level are part of the navigation mesh.

Figure 5–2. Pathfinding by Navigation Mesh
Hands-On Example: Creating a bot and having it follow you using Path Nodes.
In this example we will create a new level in the Unreal Editor full of obstacles. We will then place path nodes in the level so as to provide a path for our bot through these obstacles. We will then give the bot the ability to follow the player as the player walks around the level. The bot will continue to follow the player and avoid the obstacles using the path node method of path finding. In terms of bot movement navigation meshes can produce smoother more natural movement around corners and around obstacles than pathnodes.
In this example, we create a new game type, a player controller, player pawn, player weapon, player weapon projectile, weapon inventory manager a controller, and a pawn for our bot. For our player pawn we will use a third-person viewpoint. For those who need a review of vectors and trigonometry please see Chapter 8. There is also a detailed section in Chapter 8 that explains the math behind the third person camera positioning.
Creating the Level
The first thing to do is to create the level with the obstacles.
- Open the Unreal Editor and select the Content Browser.
- First we need obstacles. What we need is a static mesh with a collision model to place into the level. Type Cube into the search box and check the Static Meshes checkbox under the Object Type heading on the top part of the Content Browser.
- A static mesh called Cube should appear in the preview pane of the Content Browser. Select the Cube by clicking on it.
- Find an empty space on the level and add the Cube static mesh to the level by right-clicking and selecting the Add Static Mesh option.
- Repeat step 4 until there are a significant number of Cubes in the level.
- Pick a cube and place pathnodes all around it. Right-click on the area you want to add a path node to and select Add Actor
 Add Path Node to add the path node. See Figure 5–3.
 - Next you need to add path nodes to all the areas between the Cubes and other areas that you want your bot have access to. Repeat step 6 for all the cubes in the level.
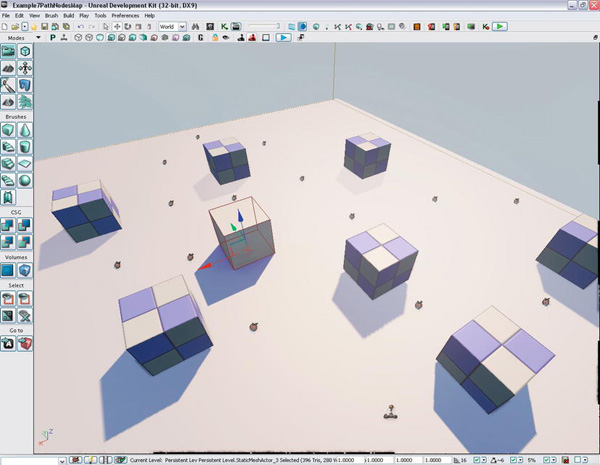
Figure 5–3. Creating a level with Cube static meshes and path nodes
- You now need to build the AI paths for this level by selecting Build AI Paths from the Unreal Editor menu. All the path nodes are now connected into one single network. You don’t need to add the pathnodes in any specific order.
- Once the AI has been successfully built then you can save your level.
- Try to run this level on the Mobile Game Previewer by selecting Play On Mobile Previewer. The level should appear without the pathnode graphics. The pathnodes are only visible in the editor and not the actual game level.
Creating the Game Type
Next, we need to start creating the code for this example. In the default source directory C:UDKUDK-2011-06DevelopmentSrc, create a new directory called ExampleCh5 and under that create a new directory called Classes. You will put all your UnrealScript code into this new Classes directory.
Enter the following code (Listing 5–2) in a new file called ExampleCh5Game.uc and save the file. We will build examples using this game type for all the examples in this chapter.
Listing 5–2. Game Type class for Chapter 5
class ExampleCh5Game extends FrameworkGame;event OnEngineHasLoaded()
{
WorldInfo.Game.Broadcast(self,"ExampleCh5Game Type Active - Engine Has Loaded
!!!!");
}
function bool PreventDeath(Pawn KilledPawn, Controller Killer, class<DamageType>
DamageType, vector HitLocation)
{
return true;
}
static event class<GameInfo> SetGameType(string MapName, string Options, string Portal)
{
return super.SetGameType(MapName, Options, Portal);
}
defaultproperties
{
PlayerControllerClass=class'ExampleCh5.ExampleCh5PC'
DefaultPawnClass=class'ExampleCh5.JazzPawnDamage'
HUDType=class'UDKBase.UDKHUD'
bRestartLevel=false
bWaitingToStartMatch=true
bDelayedStart=false
}
Most of the above code should be familiar to you by now. The key differences have been highlighted. When the game starts up a message should be displayed indicating that the new game type ExampleCh5Game has been started. There is also a new PlayerControllerClass and DefaultPawnClass specified.
Creating the Player Controller and Player Pawn
Next, we need to create a custom player pawn which is called JazzPawnDamage as shown in Listing 5–3.
The view of this pawn is the third person as defined by the CalcCamera() function. If you need a more detailed explanation of the math involved please check out Chapter 8. This pawn is called JazzPawnDamage because later in this chapter we will add the ability of this pawn to process damage through the addition of a TakeDamage() function. Also refer to Chapter 3 if you need a review of weapons and pawns.
Listing 5–3. JazzPawnDamage custom player pawn.
class JazzPawnDamage extends SimplePawn;
var float CamOffsetDistance;
var int CamAngle;
var Inventory MainGun;
var vector InitialLocation;
simulated singular event Rotator GetBaseAimRotation()
{
local rotator TempRot;
TempRot = Rotation;
TempRot.Pitch = 0;
SetRotation(TempRot);
return TempRot;
}
function AddGunToSocket(Name SocketName)
{
local Vector SocketLocation;
local Rotator SocketRotation;
if (Mesh != None)
{
if (Mesh.GetSocketByName(SocketName) != None)
{
Mesh.GetSocketWorldLocationAndRotation(SocketName, SocketLocation,
SocketRotation);
MainGun.SetRotation(SocketRotation);
MainGun.SetBase(Self,, Mesh, SocketName);
}
else
{
WorldInfo.Game.Broadcast(self,"!!!!!!SOCKET NAME NOT FOUND!!!!!");
}
}
else
{
WorldInfo.Game.Broadcast(self,"!!!!!!MESH NOT FOUND!!!!!");
}
}
function AddDefaultInventory()
{
MainGun = InvManager.CreateInventory(class'JazzWeaponDamage'),
MainGun.SetHidden(false);
AddGunToSocket('Weapon_R'),
Weapon(MainGun).FireOffset = vect(0,0,-70);
}
simulated function bool CalcCamera( float fDeltaTime, out vector out_CamLoc, out rotator
out_CamRot, out float out_FOV )
{
local vector BackVector;
local vector UpVector;
local float CamDistanceHorizontal;
local float CamDistanceVertical;
// Set Camera Location
CamDistanceHorizontal = CamOffsetDistance * cos(CamAngle * UnrRotToRad);
CamDistanceVertical = CamOffsetDistance * sin(CamAngle * UnrRotToRad);
BackVector = -Normal(Vector(Rotation)) * CamDistanceHorizontal;
UpVector = vect(0,0,1) * CamDistanceVertical;
out_CamLoc = Location + BackVector + UpVector;
// Set Camera Rotation
out_CamRot.pitch = -CamAngle;
out_CamRot.yaw = Rotation.yaw;
out_CamRot.roll = Rotation.roll;
return true;
}
defaultproperties
{
Begin Object Class=SkeletalMeshComponent Name=JazzMesh
SkeletalMesh=SkeletalMesh'KismetGame_Assets.Anims.SK_Jazz'
AnimSets(0)=AnimSet'KismetGame_Assets.Anims.SK_Jazz_Anims'
AnimTreeTemplate=AnimTree'KismetGame_Assets.Anims.Jazz_AnimTree'
BlockRigidBody=true
CollideActors=true
End Object
Mesh = JazzMesh; // Set The mesh for this object
Components.Add(JazzMesh); // Attach this mesh to this Actor
CamAngle=3000;
CamOffsetDistance= 484.0
InventoryManagerClass=class'ExampleCh5.WeaponsCh5IM1'
}
Most of the code should be familiar to you with key changes highlighted in bold type. InitialLocation holds the starting location of the player’s pawn and is used to reset the player to its starting location when the player dies. This is needed later in this chapter where we show you how the player and the bot can both take damage from each other’s weapons.
Next, we need to create a player controller for this example. The player controller is shown in Listing 5–4. The main difference between this player controller and others in past examples is that this one spawns a bot right above the player’s starting location.
Listing 5–4. The ExampleCh5PC Player Controller
class ExampleCh5PC extends SimplePC;
var Controller FollowBot;
Var Pawn FollowPawn;
var bool BotSpawned;
var Actor BotTarget;
function SpawnBot(Vector SpawnLocation)
{
SpawnLocation.z = SpawnLocation.z + 500;
FollowBot = Spawn(class'BotController',,,SpawnLocation);
FollowPawn = Spawn(class'BotPawn',,,SpawnLocation);
FollowBot.Possess(FollowPawn,false);
BotController(FollowBot).CurrentGoal = Pawn;
BotPawn(Followpawn).InitialLocation = SpawnLocation;
FollowPawn.SetPhysics(PHYS_Falling);
BotSpawned = true;
}
function bool SwipeZoneCallback(MobileInputZone Zone,
float DeltaTime,
int Handle,
EZoneTouchEvent EventType,
Vector2D TouchLocation)
{
local bool retval;
retval = true;
if (EventType == ZoneEvent_Touch)
{
WorldInfo.Game.Broadcast(self,"You touched the screen at = "
@ TouchLocation.x @ " , "
@ TouchLocation.y @ ", Zone Touched = "
@ Zone);
// Start Firing pawn's weapon
StartFire(0);
}
else
if(EventType == ZoneEvent_Update)
{
}
else
if (EventType == ZoneEvent_UnTouch)
{
// Stop Firing Pawn's weapon
StopFire(0);
}
return retval;
}
function SetupZones()
{
Super.SetupZones();
// If we have a game class, configure the zones
if (MPI != None && WorldInfo.GRI.GameClass != none)
{
LocalPlayer(Player).ViewportClient.GetViewportSize(ViewportSize);
if (FreeLookZone != none)
{
FreeLookZone.OnProcessInputDelegate = SwipeZoneCallback;
}
}
}
function PlayerTick(float DeltaTime)
{
Super.PlayerTick(DeltaTime);
if (!BotSpawned)
{
SpawnBot(Pawn.Location);
BotSpawned = true;
JazzPawnDamage(Pawn).InitialLocation = Pawn.Location;
}
}
defaultproperties
{
BotSpawned=false
}
The main additions to this player controller from previous examples are the SpawnBot() function that dynamically creates a new bot and the PlayerTick() function which is used to call the SpawnBot() function when the player first begins the level.
The SpawnBot() function creates a bot above the spawn location input. It creates a new BotController and new BotPawn and has the BotController possess the BotPawn which activates the bot AI. The Actor that the bot follows around is set to the player’s pawn in this function. The initial location of the bot’s pawn is also saved. The physics model of the bot’s pawn is also set to PHYS_Falling which makes the pawn fall to the ground from its spawn point high in the air.
The PlayerTick() function is called continuously throughout the game as long as the player is alive. Here, if this is the first time this function is called then we create our bot and save the initial location of the Player.
Creating the Player Weapon, Weapon Inventory Manager, and Projectile
Next we need to create a new weapon class called JazzWeaponDamage. See Listing 5–5. We have discussed weapons before in Chapter 3. This weapon is called JazzWeaponDamage because later in this chapter will add code to this weapon’s projectile class to cause damage to what it hits.
The actual graphic of this weapon is set in the SkeletalMesh variable. The general category of ammunition this weapon fires is EWFT_Projectile which launches another 3d mesh object that you can actually see. The variable FireInterval is the time in seconds between projectile firings.
Listing 5–5. JazzWeaponDamage class
class JazzWeaponDamage extends Weapon;
defaultproperties
{
Begin Object Class=SkeletalMeshComponent Name=FirstPersonMesh
SkeletalMesh=SkeletalMesh'KismetGame_Assets.Anims.SK_JazzGun'
End Object
Mesh=FirstPersonMesh
Components.Add(FirstPersonMesh);
Begin Object Class=SkeletalMeshComponent Name=PickupMesh
SkeletalMesh=SkeletalMesh'KismetGame_Assets.Anims.SK_JazzGun'
End Object
DroppedPickupMesh=PickupMesh
PickupFactoryMesh=PickupMesh
WeaponFireTypes(0)=EWFT_Projectile
WeaponFireTypes(1)=EWFT_NONE
WeaponProjectiles(0)=class'JazzBulletDamage'
WeaponProjectiles(1)=class'JazzBulletDamage'
FiringStatesArray(0)=WeaponFiring
FireInterval(0)=0.25
Spread(0)=0
}
Most of this weapon code should look familiar to you. The main change is that this weapon code uses a custom projectile called JazzBulletDamage. See Listing 5–6.
Listing 5–6. JazzBulletDamage projectile class
class JazzBulletDamage extends Projectile;
simulated function Explode(vector HitLocation, vector HitNormal)
{
}
function Init( Vector Direction )
{
local vector NewDir;
NewDir = Normal(Vector(InstigatorController.Pawn.Rotation));
Velocity = Speed * NewDir;
}
defaultproperties
{
Begin Object Class=StaticMeshComponent Name=Bullet
StaticMesh=StaticMesh'EngineMeshes.Sphere'
Scale3D=(X=0.050000,Y=0.050000,Z=0.05000)
End Object
Components.Add(Bullet)
Begin Object Class=ParticleSystemComponent Name=BulletTrail
Template=ParticleSystem'Castle_Assets.FX.P_FX_Fire_SubUV_01'
End Object
Components.Add(BulletTrail)
MaxSpeed=+05000.000000
Speed=+05000.000000
}
This code should also look familiar. This projectile class is basically the same as one in Chapter 3 that uses spheres as projectiles. Please refer to the Figure 3-5 in Chapter 3 for a visual of this kind of projectile.
This class will need to be modified in order to give damage to the object it hits. We do that later in this chapter in the example of how the player and bot give and take damage. We introduce it here to provide a good foundation to start on.
Finally, there is the inventory manager class. See Listing 5–7.
Listing 5–7. WeaponsCh5IM1 class to manage weapon inventory
class WeaponsCh5IM1 extends InventoryManager;
defaultproperties
{
PendingFire(0)=0
PendingFire(1)=0
}
Creating the Bot Controller and Bot Pawn
Next, we need to create the pawn for our bot. See Listing 5–8 below. This class is basically the same as pawns covered in Chapter 3, but with a collision component added. Again we are using the Jazz Jackrabbit 3d skeletal mesh asset for the bot’s physical presence in the game.
Listing 5–8. BotPawn class
class BotPawn extends SimplePawn;
var vector InitialLocation;
defaultproperties
{
// Jazz Mesh Object
Begin Object Class=SkeletalMeshComponent Name=JazzMesh
SkeletalMesh=SkeletalMesh'KismetGame_Assets.Anims.SK_Jazz'
AnimSets(0)=AnimSet'KismetGame_Assets.Anims.SK_Jazz_Anims'
AnimTreeTemplate=AnimTree'KismetGame_Assets.Anims.Jazz_AnimTree'
BlockRigidBody=true
CollideActors=true
End Object
Mesh = JazzMesh;
Components.Add(JazzMesh);
// Collision Component for This actor
Begin Object Class=CylinderComponent NAME=CollisionCylinder2
CollideActors=true
CollisionRadius=+25.000000
CollisionHeight=+60.000000
End Object
CollisionComponent=CollisionCylinder2
CylinderComponent=CollisionCylinder2
Components.Add(CollisionCylinder2)
}
This pawn is represented by the Jazz Jackrabbit skeletal mesh like in previous examples. The main difference here is the addition of the collision cylinder that is defined by the CylinderComponent class and named CollisionCylinder2. This cylinder is set as the CollisionComponent of this Pawn as well as being attached to this pawn by way of being added to the Components array. Creating this collision component and attaching it to the bot’s pawn is essential for path finding to work. Figure 5–4 shows the difference between the bot’s pawn collision cylinder which is 60 units in height shown on the left and the player’s pawn collision cylinder which by default is 44.
NOTE: Experimentally I found that for the navigation mesh method of pathfinding we may need the taller collision cylinder. The default height for a collision cylinder for a Pawn is set to 78 units of height. Since our Jazz JackRabbit asset is much shorter than this about half the size we may need to create a taller collision cylinder in order for the navigation mesh method to work correctly.

Figure 5–4. Collision cylinder for bot pawn and player pawn
Now, we need to create the BotController class. This class controls the bot’s pawn and contains the bot’s artificial intelligence. See Listing 5–9.
The key part of this class involves the actual pathfinding code located in the FollowTarget state. The critical steps to path finding using path nodes are as follows:
- If the bot has a valid goal then the
FindPathToward()function attempts to find a path to this goal using the path node network in the level and saves the first node in this path to the variable TempGoal. - If the bot can reach the goal directly without having to go around an obstacle then the
MoveTo()function is called to move the bot directly to the location of the goal. TheMoveTo()function does no path finding. - If not then the bot must move toward the temporary actor generated by the
FindPathToward()function in step 1 that it can reach directly via the MoveToward() function. TheMoveToward()function moves the bot toward the actor saved in the TempGoal variable. - If there is no valid path generated from the
FindPathToward()function then an error is generated.
Listing 5–9. BotController class
class BotController extends UDKBot;
var Actor CurrentGoal;
var Vector TempDest;
var float FollowDistance;
var Actor TempGoal;
// Path Nodes
state FollowTarget
{
Begin:
// Move Bot to Target
if (CurrentGoal != None)
{
TempGoal = FindPathToward(CurrentGoal);
if (ActorReachable(CurrentGoal))
{
MoveTo(CurrentGoal.Location, ,FollowDistance);
}
else
if (TempGoal != None)
{
MoveToward(TempGoal);
}
else
{
//give up because the nav mesh failed to find a path
`warn("PATCHNODES failed to find a path!");
WorldInfo.Game.Broadcast(self,"PATHNODES failed to find a path!, CurrentGoal
= " @ CurrentGoal);
MoveTo(Pawn.Location);
}
}
LatentWhatToDoNext();
}
auto state Initial
{
Begin:
LatentWhatToDoNext();
}
event WhatToDoNext()
{
DecisionComponent.bTriggered = true;
}
protected event ExecuteWhatToDoNext()

{

    if (IsInState('Initial'))

    {

        GotoState('FollowTarget', 'Begin'),

    }

    else

    {

        GotoState('FollowTarget', 'Begin'),

    }

}
defaultproperties
{
CurrentGoal = None;
FollowDistance = 700;
}
Configuring the new Game Type
Next, we need to configure this new game type for compilation and playing on the mobile previewer. In order to configure this for compilation we need to add in the following line to the UDKEngine.ini configuration file located at C:UDKUDK-2011-06UDKGameConfig if you are using the June 2011 UDK. If you are using a different UDK version then your base directory will be different.
UDKEngine.ini
[UnrealEd.EditorEngine]
ModEditPackages=ExampleCh5
In order to configure this new game type to play correctly with the mobile input controls on the mobile previewer we need to add in the following lines to the Mobile-UDKGame.ini file in the same directory.
Mobile-UDKGame.ini
[ExampleCh5.ExampleCh5Game]
RequiredMobileInputConfigs=(GroupName="UberGroup",RequireZoneNames=("UberStickMoveZone",
"UberStickLookZone","UberLookZone"))
Bring up the Unreal Frontend and compile your scripts.
Running the new Game Type
After a successful compilation bring up the Unreal Editor and load in your level that you created for this example. Set your game type to ExampleCh5Game by selecting View ![]() World Properties from the main menu to bring up the World Properties window and then selecting this game type as the Default Game Type under the Game Type category. You should see something like in Figure 5–5.
World Properties from the main menu to bring up the World Properties window and then selecting this game type as the Default Game Type under the Game Type category. You should see something like in Figure 5–5.
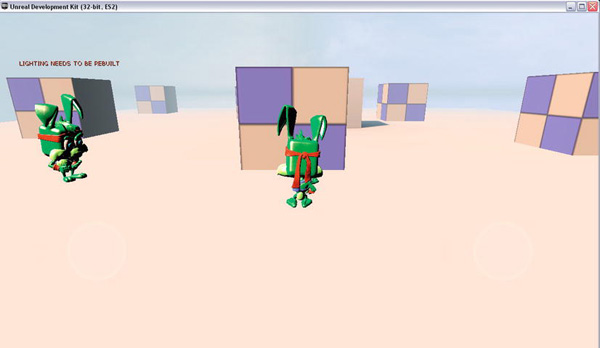
Figure 5–5. Bot following the player around via path nodes
The bot should now follow you around the level using the path node method of path finding.
Hands-On Example: Creating a bot and having it follow you using a Navigation Mesh
In this example we will demonstrate how a bot can use a navigation mesh as a pathfinding method. The two key elements in creating a bot that uses a navigation mesh are creating a navigation mesh on the level and a bot controller that uses the navigation mesh to move around the level. In this hands-on example, we show you how to do both.
For this example, you can reuse much of the code from the pathnode example, so we will refer you back to the relevant listings in the preceding section instead of repeating all the code here.
Creating a Level
Load in the level you created in the previous example and save it as a new map such as Example5–2NavMeshMap to indicate that this map will use navigation mesh. Now, it’s time to start making some changes to our new map.
- Delete all the path nodes that you added previously to the level. To delete the node you can click on it and press the Delete key.
- Now place a pylon at the center of your level by right-clicking and selecting Add Actor Add Pylon. Make sure the Pylon is just above the surface of the level and is not inside another object.
- Select Build AI paths from the main Unreal Editor menu to build the new AI paths using the navigation mesh method. The resulting navigation mesh that is generated should look similar to Figure 5–6.

- Save the map.
Creating the Pieces of the Game
As indicated above, many parts of this example use the same code as in the pathnode example. Follow the same steps you did in that example. Here is the specific sequence and relevant code listings:
- Create the game type (see Listing 5–2).
- Create the player’s pawn (see Listing 5–3).
- Create the player controller (see Listing 5–4).
- Create the player weapon, the weapon inventory manager, and the projectile (see Listing 5–5).
- Create the pawn for the bot (see Listing 5–6).
Creating the BotController
Next, we need to create the controller for our bot. This is the class in which we will implement the navigation mesh pathfinding method. In this section, we’ll look at the general navigation mesh method and then go through the relevant code step by step.
Navigation Mesh Method
The function GeneratePathTo() actually generates a path to an Actor using the navigation mesh method of pathfinding. The FollowTarget state uses this function to help implement the behavior of following the player around the level.
In the FollowTarget state the general path finding method is:
- If there is a valid goal (a valid Actor which to move toward), then generate a path to that goal using the navigation mesh method.
- If a path is found to that location, then check to see if the goal is directly accessible.
NOTE: If a location is directly accessible then we actually don’t use any pathfinding at all but use the MoveTo() function that moves the Pawn to a location directly.
- If it is directly accessible, then use the
MoveTo()function to move the bot to that location. - If the goal is not directly accessible, then move to an intermediate point that was found using the navigation mesh path finding method in Step 1.
- If a path is not found in step 1, then output an error message. This message is displayed in the mobile previewer for debugging purposes.
The above steps are repeated as long as the bot remains in the FollowTarget state. Eventually, the goal actor will be reachable directly but if it is not then intermediate points determined by the navigation mesh pathfinding method will be used.
The intermediate points are retrieved from the NavigationHandle variable through the GetNextMoveLocation() function. Then MoveTo() is called to move the bot to this intermediate point which will be directly reachable.
For the navigation mesh method most of the pathfinding is done through the Navigationhandle class.
Implementing a Navigation Mesh
The code in this section is a complete listing of how you would implement a navigation mesh in the bot’s controller. You can also refer to the downloadable source code for this book. The code listings in this section are presented sequentially.
The GeneratePathTo() function uses the navigation mesh method implemented in the NavigationHandle variable to find a path to the input Goal Actor variable from the current location of the bot’s pawn. See Listing 5–10.
Listing 5–10. The GeneratePathTo function for the Navigation Mesh
class BotController extends UDKBot;
var Actor CurrentGoal;
var Vector TempDest;
var float FollowDistance;
var Actor TempGoal;
event bool GeneratePathTo(Actor Goal, optional float WithinDistance, optional bool
bAllowPartialPath)
{
if( NavigationHandle == None )
return FALSE;
// Clear cache and constraints (ignore recycling for the moment)
NavigationHandle.PathConstraintList = none;
NavigationHandle.PathGoalList = none;
class'NavMeshPath_Toward'.static.TowardGoal( NavigationHandle, Goal );
class'NavMeshGoal_At'.static.AtActor( NavigationHandle, Goal, WithinDistance,
bAllowPartialPath );
return NavigationHandle.FindPath();
}
First we make sure that there is a valid NavigationHandle and return false if not. Then we clear any old path information that may be cached and clear any path constraints that may limit our path choices. We then find the actual path to the Goal.
The previous listing concentrated on the GeneratePathTo() function which does the actual navigation mesh pathfinding. Listing 5–11 is the rest of the bot’s controller code and uses this function for pathfinding.
Listing 5–11. The remaining controller code for the bot
state FollowTarget
{
Begin:
WorldInfo.Game.Broadcast(self,"BotController-USING NAVMESH FOR FOLLOWTARGET STATE");
// Move Bot to Target
if (CurrentGoal != None)
{
if(GeneratePathTo(CurrentGoal))
{
NavigationHandle.SetFinalDestination(CurrentGoal.Location);
if( NavigationHandle.ActorReachable(CurrentGoal) )
{
// then move directly to the actor
MoveTo(CurrentGoal.Location, ,FollowDistance);
}
else
{
// move to the first node on the path
if( NavigationHandle.GetNextMoveLocation(TempDest,
Pawn.GetCollisionRadius()) )
{
// suggest move preparation will return TRUE when the edge's
// logic is getting the bot to the edge point
// FALSE if we should run there ourselves
if (!NavigationHandle.SuggestMovePreparation(TempDest,self))
{
MoveTo(TempDest);
}
}
}
}
else
{
//give up because the nav mesh failed to find a path
`warn("FindNavMeshPath failed to find a path!");
WorldInfo.Game.Broadcast(self,"FindNavMeshPath failed to find a path!,
CurrentGoal = " @ CurrentGoal);
MoveTo(Pawn.Location);
}
}
LatentWhatToDoNext();
}
auto state Initial
{
Begin:
LatentWhatToDoNext();
}
event WhatToDoNext()
{
DecisionComponent.bTriggered = true;
}
protected event ExecuteWhatToDoNext()
{
if (IsInState('Initial'))
{
GotoState('FollowTarget', 'Begin'),
}
else
{
GotoState('FollowTarget', 'Begin'),
}
}
defaultproperties
{
CurrentGoal = None;
FollowDistance = 700;
}
The key parts of this listing:
- The
FollowTargetstate implements the bot’s pathfinding behavior explained at the beginning of this section. - The
Initialstate is the state the bot starts out in. Theautokeyword sets this state as the default state when the bot controller is first created. - The
WhatToDoNext()function is called from within theLatentWhatToDoNext()function. IfDecisionComponent.bTriggeredis set to true then then theExecuteWhatToDoNext()function is called next. - The ExecuteWhatToDoNext() function is the main decision making block for the bot’s AI. Here we can test for conditions and move to different states based on these conditions.
The main differences between this version of the BotController and the version in the pathnode example are that the old path nodes pathfinding code has been deleted, and the functions GeneratePathTo() and FollowTarget() have been added. The new FollowTarget() function that contains navigation mesh pathfinding code replaces the old FollowTarget() function.
Configuring the Game Type
Configuring this game type for this example is the same as for the previous example. Please refer to the previous example to configure this game type if you haven’t already.
Running the Game
Make sure to compile your source code using the Unreal Frontend. After a successful compilation bring up the Unreal Editor. Load in your level map that is set up for the navigation mesh path finding method. Double-check the game type is set to ExampleCh5Game and run the game on the mobile previewer. You should be able to move around the obstacles and have the bot follow you around. See Figure 5–7.
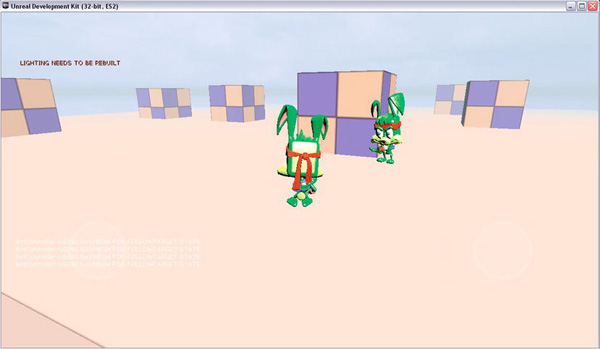
Figure 5–7. Using the navigation mesh for path finding
Hands-On Example: Moving a Bot to a point in the world specified by the Player
In this example we will add the ability of the player to touch the screen and have the bot move to that location in the game level. In addition a sphere will be displayed at the location the player touches as an indicator of where the bot should move to.
The concepts in this chapter can be applied to both the pathnode and navigation mesh methods of pathfinding. First a botmarker which is basically a 3d mesh asset will be created in the game world. We then move the bot toward this asset using a path finding method.
Creating the BotMarker
First we need to create a new class for the bot marker that will represent the bot’s goal location. See Listing 5–12.
Listing 5–12. Creating the BotMarker Class
class BotMarker extends Actor;
event Touch(Actor Other, PrimitiveComponent OtherComp, vector HitLocation, vector
HitNormal)
{
//WorldInfo.Game.Broadcast(self,"BotMarker Has Been Touched");
}
defaultproperties
{
Begin Object Class=StaticMeshComponent Name=StaticMeshComponent0
StaticMesh=StaticMesh'EngineMeshes.Sphere'
Scale3D=(X=0.250000,Y=0.250000,Z=0.25000)
End Object
Components.Add(StaticMeshComponent0)
Begin Object Class=CylinderComponent NAME=CollisionCylinder
CollideActors=true
CollisionRadius=+0040.000000
CollisionHeight=+0040.000000
End Object
CollisionComponent=CollisionCylinder
Components.Add(CollisionCylinder)
bCollideActors=true
}
The BotMarker’s physical appearance will be a sphere. The 3d mesh asset to use for this marker is set in the StaticMesh variable located in the defaultproperties block in the StaticMeshComponent0 object. It is also scaled down to 25% its original size via the Scale3D variable.
Adding to the Player Controller
Next, you need to add some code to the player controller. What is added are the PickActor() and the ExecuteBotMoveCommand() functions. The purpose of these functions is to allow the player to touch a location in the game world and have a bot move to that location.
The process of directing the bot to where the user has touched is as follows:
- When the user touches the iOS screen, the
PickActor()function is called to determine theHitLocationin the 3d game world that the user’s touch points to. - The
ExecuteBotMoveCommand()function is then called to execute the bot’s move to this touched location. First the bot marker is created if one does not already exist. Then it is placed at the location of the user’s touch in the game world. Next, theCurrentGoalof the bot is set to the bot marker. This will now make the bot follow a path toward where the user has touched. The bot will now instead of following the player it will go to the marker.
Listing 5–13 provides the full code for the modified player controller including the old code. The new code is highlighted in bold.
Listing 5–13. The Modified ExampleCh5PC class
class ExampleCh5PC extends SimplePC;
var Controller FollowBot;
Var Pawn FollowPawn;
var bool BotSpawned;
var Actor BotTarget;
var float PickDistance;
function Actor PickActor(Vector2D PickLocation, out Vector HitLocation, out TraceHitInfo
HitInfo)
{
local Vector TouchOrigin, TouchDir;
local Vector HitNormal;
local Actor PickedActor;
local vector Extent;
//Transform absolute screen coordinates to relative coordinates
PickLocation.X = PickLocation.X / ViewportSize.X;
PickLocation.Y = PickLocation.Y / ViewportSize.Y;
//Transform to world coordinates to get pick ray
LocalPlayer(Player).Deproject(PickLocation, TouchOrigin, TouchDir);
//Perform trace to find touched actor
Extent = vect(0,0,0);
PickedActor = Trace(HitLocation,
HitNormal,
TouchOrigin + (TouchDir * PickDistance),
TouchOrigin,
True,
Extent,
HitInfo);
//Return the touched actor for good measure
return PickedActor;
}
reliable server function ExecuteBotMoveCommand(Vector HitLocation)
{
// 1. Set AttackMove Target Marker
Hitlocation.z += 50; // Add offset to help bot navigate to point
If (BotTarget == None)
{
WorldInfo.Game.Broadcast(None,"Creating New Move Marker!!!!!!!!");
BotTarget = Spawn(class'BotMarker',,,HitLocation);
}
else
{
BotTarget.SetLocation(HitLocation);
}
// 2. Send Move Command to bot along with target location
BotController(FollowBot).CurrentGoal = BotTarget;
BotController(FollowBot).FollowDistance = 75;
}
function SpawnBot(Vector SpawnLocation)
{
SpawnLocation.z = SpawnLocation.z + 500;
FollowBot = Spawn(class'BotController',,,SpawnLocation);
FollowPawn = Spawn(class'BotPawn',,,SpawnLocation);
FollowBot.Possess(FollowPawn,false);
BotController(FollowBot).CurrentGoal = Pawn;
BotPawn(Followpawn).InitialLocation = SpawnLocation;
FollowPawn.SetPhysics(PHYS_Falling);
BotSpawned = true;
}
function bool SwipeZoneCallback(MobileInputZone Zone,
float DeltaTime,
int Handle,
EZoneTouchEvent EventType,
Vector2D TouchLocation)
{
local bool retval;
local Vector HitLocation;
local TraceHitInfo HitInfo;
retval = true;
if (EventType == ZoneEvent_Touch)
{
WorldInfo.Game.Broadcast(self,"You touched the screen at = "
@ TouchLocation.x @ " , "
@ TouchLocation.y @ ", Zone Touched = "
@ Zone);
// Start Firing pawn's weapon
StartFire(0);
// Code for Setting Bot WayPoint
PickActor(TouchLocation, HitLocation, HitInfo);
ExecuteBotMoveCommand(HitLocation);
}
else
if(EventType == ZoneEvent_Update)
{
}
else
if (EventType == ZoneEvent_UnTouch)
{
// Stop Firing Pawn's weapon
StopFire(0);
}
return retval;
}
function SetupZones()
{
Super.SetupZones();
// If we have a game class, configure the zones
if (MPI != None && WorldInfo.GRI.GameClass != none)
{
LocalPlayer(Player).ViewportClient.GetViewportSize(ViewportSize);
if (FreeLookZone != none)
{
FreeLookZone.OnProcessInputDelegate = SwipeZoneCallback;
}
}
}
function PlayerTick(float DeltaTime)
{
Super.PlayerTick(DeltaTime);
if (!BotSpawned)
{
SpawnBot(Pawn.Location);
BotSpawned = true;
JazzPawnDamage(Pawn).InitialLocation = Pawn.Location;
}
}
defaultproperties
{
BotSpawned=false
PickDistance = 10000
}
Note that enabling the ability for the player to direct bots like in this example can be useful in many situations in which the player needs to coordinate the behavior of multiple bots. For example, it would be applicable to a game where the player is a squad leader and controls the actions of soldiers (bots) in his unit. The player would direct the bots to perform various actions such as attack a specific target.
Running the Game
Bring up the Unreal Frontend and compile your code. Next, bring up the Unreal Editor and load in the level map with the navigation mesh. Run the game on the mobile previewer. The bot should follow you around by default. Click on an empty area where the bot can walk to and the sphere BotMarker should appear there. The bot should then walk to this sphere. See Figure 5–8.
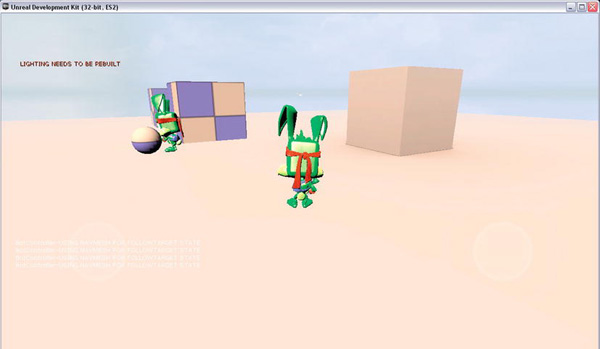
Figure 5–8. Directing your bot to the marker which is indicated by a sphere
Hands-On Example: Equipping your bot with a weapon and Taking Damage
In this example, we will again build on the previous examples and equip the bot with a working weapon and modify the code so that both the player and bot can take damage from each other’s weapons.
Modifying the Bot’s Pawn to Add a Weapon
We must add code to the bot’s pawn BotPawn to add a weapon. See Listing 5–14. The code in bold is the new code.
The code for adding a weapon to the bot should look familiar from the sections on Weapons in Chapter 3. You add weapons to a bot by adding it to the bot’s pawn. This is exactly the same as adding a weapon to a pawn owned by a player. The AddGunToSocket() function attaches the weapon mesh to the pawn. The AddDefaultInventory() function creates the weapon and adds it into the pawn’s inventory. We have also added the variable JazzHitSound that holds a sound effect that is played when the bot is hit.
The function that processes damage to this pawn and adjusts the bot’s health is TakeDamage(). TakeDamage() also resets the bot’s position to the bot’s start position if the bot’s health becomes less than or equal to 0. The bot’s health is then restored to 100.
Listing 5–14. Modifying the BotPawn class
class BotPawn extends SimplePawn;
var Inventory MainGun;
var SoundCue JazzHitSound;
var vector InitialLocation;
event TakeDamage(int Damage, Controller InstigatedBy, vector HitLocation, vector
Momentum, class<DamageType> DamageType, optional TraceHitInfo HitInfo, optional Actor
DamageCauser)
{
PlaySound(JazzHitSound);
Health = Health - Damage;
WorldInfo.Game.Broadcast(self,self @ " Has Taken Damage IN TAKEDAMAGE, HEALTH = " @
Health);
if (Health <= 0)
{
SetLocation(InitialLocation);
SetPhysics(PHYS_Falling);
Health = 100;
}
}
function AddGunToSocket(Name SocketName)
{
local Vector SocketLocation;
local Rotator SocketRotation;
if (Mesh != None)
{
if (Mesh.GetSocketByName(SocketName) != None)
{
Mesh.GetSocketWorldLocationAndRotation(SocketName, SocketLocation,
SocketRotation);
MainGun.SetRotation(SocketRotation);
MainGun.SetBase(Self,, Mesh, SocketName);
}
else
{
WorldInfo.Game.Broadcast(self,"!!!!!!SOCKET NAME NOT FOUND!!!!!");
}
}
else
{
WorldInfo.Game.Broadcast(self,"!!!!!!MESH NOT FOUND!!!!!");
}
}
function AddDefaultInventory()
{
MainGun = InvManager.CreateInventory(class'JazzWeapon2Damage'),
MainGun.SetHidden(false);
AddGunToSocket('Weapon_R'),
Weapon(MainGun).FireOffset = vect(0,13,-70);
}
defaultproperties
{
// Jazz Mesh Object
Begin Object Class=SkeletalMeshComponent Name=JazzMesh
SkeletalMesh=SkeletalMesh'KismetGame_Assets.Anims.SK_Jazz'
AnimSets(0)=AnimSet'KismetGame_Assets.Anims.SK_Jazz_Anims'
AnimTreeTemplate=AnimTree'KismetGame_Assets.Anims.Jazz_AnimTree'
BlockRigidBody=true
CollideActors=true
End Object
Mesh = JazzMesh;
Components.Add(JazzMesh);
// Collision Component for This actor
Begin Object Class=CylinderComponent NAME=CollisionCylinder2
CollideActors=true
CollisionRadius=+25.000000
CollisionHeight=+60.000000 //Nav Mesh
End Object
CollisionComponent=CollisionCylinder2
CylinderComponent=CollisionCylinder2
Components.Add(CollisionCylinder2)
JazzHitSound = SoundCue'KismetGame_Assets.Sounds.Jazz_Death_Cue'
InventoryManagerClass=class'ExampleCh5.WeaponsCh5IM1'
}
Creating the Bot’s Weapon and Projectile
Next, we need to create the bot’s weapon which is JazzWeapon2Damage. See Listing 5–15.
Listing 5–15. Creating the JazzWeapon2Damage class
class JazzWeapon2Damage extends Weapon;
defaultproperties
{
Begin Object Class=SkeletalMeshComponent Name=FirstPersonMesh
SkeletalMesh=SkeletalMesh'KismetGame_Assets.Anims.SK_JazzGun'
End Object
Mesh=FirstPersonMesh
Components.Add(FirstPersonMesh);
Begin Object Class=SkeletalMeshComponent Name=PickupMesh
SkeletalMesh=SkeletalMesh'KismetGame_Assets.Anims.SK_JazzGun'
End Object
DroppedPickupMesh=PickupMesh
PickupFactoryMesh=PickupMesh
WeaponFireTypes(0)=EWFT_Projectile
WeaponFireTypes(1)=EWFT_NONE
WeaponProjectiles(0)=class'JazzBullet2Damage'
WeaponProjectiles(1)=class'JazzBullet2Damage'
FiringStatesArray(0)=WeaponFiring
FireInterval(0)=0.25
Spread(0)=0
}This new class uses the custom projectiles of class JazzBullet2Damage which is shown in Listing 5–16.
Listing 5–16. JazzBullet2Damage projectile class
class JazzBullet2Damage extends Projectile;
simulated singular event Touch(Actor Other, PrimitiveComponent OtherComp, vector
HitLocation, vector HitNormal)
{
Other.TakeDamage(33, InstigatorController, HitLocation, -HitNormal, None);
}
simulated function Explode(vector HitLocation, vector HitNormal)
{
SetPhysics(Phys_Falling);
}
function Init( Vector Direction )
{
super.Init(Direction);
RandSpin(90000);
}
defaultproperties
{
Begin Object Class=StaticMeshComponent Name=Bullet
StaticMesh=StaticMesh'Castle_Assets.Meshes.SM_RiverRock_01'
Scale3D=(X=0.300000,Y=0.30000,Z=0.3000)
End Object
Components.Add(Bullet)
Begin Object Class=ParticleSystemComponent Name=BulletTrail
Template=ParticleSystem'Castle_Assets.FX.P_FX_Fire_SubUV_01'
End Object
Components.Add(BulletTrail)
    MaxSpeed=+05000.000000

    Speed=+05000.000000

}
The new function introduced here is the Touch() function which is called whenever this actor touches another actor. In this function the projectile calls the TakeDamage() function of the object it hits.
The other key elements in this code:
- The
SetPhysics()function sets the physics model of this projectile toPhys_Fallingin which objects fall realistically according to gravity. - The
StaticMeshvariable refers to the 3d mesh to be used as the projectile graphic. - The
Scale3Dvariable sizes theStaticMeshwith 1.0 representing normal size. - The
Templatevariable holds what type of particle emitter to attach to the projectile. Currently it is set to a fire emitter with gives the impression that the projectile is on fire. - The
MaxSpeedvariable sets the maximum speed the projectile will move. SetMaxSpeedto 0 for no limit on projectile speed. - The
Speedvariable sets the initial speed of the projectile
Modifying the Player Controller
Next, we need to add in the following code that is in bold for the player controller ExampleCh5PC (see Listing 5–17). The new code will add in the weapon to the bot’s pawn and fire the bot’s weapon when the player touches the screen. For a full listing for the player controller please download the full source code.
Listing 5–17. Adding in code to ExampleCh5PC
function SpawnBot(Vector SpawnLocation)

{

    SpawnLocation.z = SpawnLocation.z + 500;

    FollowBot = Spawn(class'BotController',,,SpawnLocation);

    FollowPawn = Spawn(class'BotPawn',,,SpawnLocation);

    FollowBot.Possess(FollowPawn,false);

    BotController(FollowBot).CurrentGoal = Pawn;

    Botpawn(FollowPawn).AddDefaultInventory();

    BotPawn(Followpawn).InitialLocation = SpawnLocation;

    FollowPawn.SetPhysics(PHYS_Falling);

    BotSpawned = true;

}


function bool SwipeZoneCallback(MobileInputZone Zone,

                                float DeltaTime,

                                int Handle,

                                EZoneTouchEvent EventType,

                                Vector2D TouchLocation)

{

    local bool retval;

    local Vector HitLocation;

    local TraceHitInfo HitInfo;


    retval = true;

    if (EventType == ZoneEvent_Touch)

    {

        WorldInfo.Game.Broadcast(self,"You touched the screen at = "

                                        @ TouchLocation.x @ " , "

                                        @ TouchLocation.y @ ", Zone Touched = "

                                        @ Zone);
        // Start Firing pawn's weapon

        StartFire(0);


        // Start Firing the Bot's Weapon

        FollowBot.Pawn.StartFire(0);


        // Code for Setting Bot WayPoint

        PickActor(TouchLocation, HitLocation, HitInfo);

        ExecuteBotMoveCommand(HitLocation);

    }

    else

    if(EventType == ZoneEvent_Update)

    {


    }

    else

    if (EventType == ZoneEvent_UnTouch)

    {

        // Stop Firing Pawn's weapon

        StopFire(0);


        // Stop Firing the Bot's weapon

        FollowBot.Pawn.StopFire(0);

    }

    return retval;

}
In the SpawnBot() function we added the line of code to add in the bot pawn’s default inventory which includes a weapon when the bot is created. Also in the SwipeZoneCallback() function we added code to start and stop the firing of the bot’s weapon for testing purposes. When the player fires his weapon the bot will fire its weapon.
Modifying the Player’s Pawn to take Damage.
Next, we need to add in some more code to the player pawn JazzPawnDamage (see Listing 5–18). The code in bold is the new code that must be added. For a full listing of this class with both the new and old code in it please download the full source code.
Listing 5–18. Modifying JazzPawnDamage to take Damage
var SoundCue PawnHitSound;


event TakeDamage(int Damage, Controller InstigatedBy, vector HitLocation, vector

Momentum, class<DamageType> DamageType, optional TraceHitInfo HitInfo, optional Actor

DamageCauser)

{

    PlaySound(PawnHitSound);

    Health = Health - Damage;

    WorldInfo.Game.Broadcast(self,self @ " Has Taken Damage IN TAKEDAMAGE, HEALTH = " @

Health);


    if (Health <= 0)

    {

        SetLocation(InitialLocation);

        SetPhysics(PHYS_Falling);

        Health = 100;

    }

}

defaultproperties

{

    Begin Object Class=SkeletalMeshComponent Name=JazzMesh

        SkeletalMesh=SkeletalMesh'KismetGame_Assets.Anims.SK_Jazz'

        AnimSets(0)=AnimSet'KismetGame_Assets.Anims.SK_Jazz_Anims'

        AnimTreeTemplate=AnimTree'KismetGame_Assets.Anims.Jazz_AnimTree'

        BlockRigidBody=true

        CollideActors=true

    End Object

    Mesh = JazzMesh; // Set The mesh for this object

    Components.Add(JazzMesh); // Attach this mesh to this Actor


    CamAngle=3000;

    CamOffsetDistance= 484.0


    InventoryManagerClass=class'ExampleCh5.WeaponsCh5IM1'


    PawnHitSound =

SoundCue'A_Character_CorruptEnigma_Cue.Mean_Efforts.A_Effort_EnigmaMean_Death_Cue'

}
The new function TakeDamage() processes damage from projectiles. Also, it resets the player’s position to the player’s start position if the player’s health becomes less than or equal 0. Health is then reset to 100.
Also, a sound effect is played whenever the pawn is hit.
Modifying the Player’s Weapon to Give Damage
Next, we need to add code to the projectiles coming out of the player’s weapon in JazzBulletDamage (see Listing 5–19). The additional code is in bold print. You can see the full updated JazzBulletDamage class in the source code.
Listing 5–19. Making additions to JazzBulletDamage
simulated singular event Touch(Actor Other, PrimitiveComponent OtherComp, vector

HitLocation, vector HitNormal)

{

    Other.TakeDamage(33, InstigatorController, HitLocation, -HitNormal, None);

}
The Touch() function damages the object it has hit by calling that object’s TakeDamage() function. The value 33 is the amount of damage to cause to the object that touches this projectile.
Running the Game
Bring up the Unreal Frontend and compile your scripts. Bring up the Unreal Editor and run the game on the Mobile Previewer. See Figures 5–9 and 5–10.

Figure 5–9. Your bot firing its weapon

Figure 5–10. Your bot falling just after dying and then being reset to its start position
Summary
In this chapter we discussed bots. We started off with a basic overview of bots. Then we discussed Artificial Intelligence path finding using bots. We covered and demonstrated how to set up a bot to follow the player using both path nodes and the navigation mesh methods of path finding. Next, we showed you how to have the player direct a bot to a specific location in the world. Finally, we demonstrated how you could add a weapon to your bot and have the player and the bot take damage from each other’s weapons. In the following Chapter 6, we will cover sound effects, create moving gates and platforms using Kismet, and create a Heads Up Display. Then in Chapter 7, we pull everything together to create a basic game framework using enemy computer controlled bots and focus on key elements in developing exceptional gameplay.