Chapter 6
Environment: Sounds, Kismet, and HUD
In this chapter, we will cover several key topics for your gaming environment. These include sound, moving elements like platforms and gates, and information displays. These constitute the last pieces before we move to an actual gameplay example in the next chapter.
Sounds in the UDK are generated through Sound Cues that can combine sound data with functions that alter or process sound effects like looping and attenuation. In a hands-on example we show you how to add sounds to a weapon through the weapon's projectile class. This is followed by a brief discussion of Kismet and Matinee with respect to moving objects including platforms and locked gates. Finally, the Unreal Heads Up Display, or HUD, is covered and a hands-on example is given that displays important items like the player's score, lives left, and current health.
UDK Sound Cues
In this section we will cover Sound Cues. First we will give you an overview of the Sound Cue Editor and its major features such as attenuation and sound looping. Next, we will show you how to place Sound Cues in a level using the Unreal Editor. We then show you how to use UnrealScript to play a Sound Cue dynamically from within a program. In the next chapter, we present a hands-on example that uses the information and code presented here.
Overview of the UDK Sound Cue Editor
The Sound Cue Editor is where you can create new Sound Cues as well as modify existing Sound Cues. Sound Cues consist of one or more SoundNodeWave items (which hold the actual sound data) and sound operators which alter the final sound that is output. We won't describe every aspect of the Sound Cue Editor but touch on the key points that are needed to give you a basic working knowledge of Sound Cues.
NOTE: Since Sound Cues are based on sound files of .wav format, any program that can capture and save or convert sounds to .wav format can be used to create audio data for Sound Cues. You can import .wav files by pressing the Import button located in the Content Browser. One program to record and save sound files in .wav format is Audacity which is a free, public-domain program.
Attenuation
Search for the Sound Cue called A_Powerup_UDamage_SpawnCue in the Content Browser by typing its name into the asset search box. Also check the Sound Cues checkbox under Object Types ![]() Favorites to make sure only Sound Cues are shown in the Preview Pane. Right-click on the item and select Edit Using Sound Cue Editor. This should bring up the Sound Cue Editor. See Figure 6–1.
Favorites to make sure only Sound Cues are shown in the Preview Pane. Right-click on the item and select Edit Using Sound Cue Editor. This should bring up the Sound Cue Editor. See Figure 6–1.
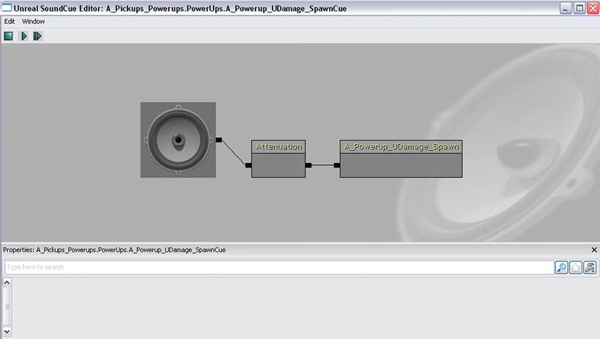
Figure 6–1. Sound Cue for A_Powerup_UDamage_SpawnCue
This Sound Cue uses attenuation. Attenuation allows your sound to fade away according to the distance from the sound's source in the game world. For example, when a car is on fire, the sound of the fire naturally fades away with a greater distance from the fire. In the UDK the sound cue Vehicle_Damage_FireLoop_Cue uses attenuation to simulate this real-world situation.
Click the Attenuation node to bring up the attenuation properties. See Figure 6–2.
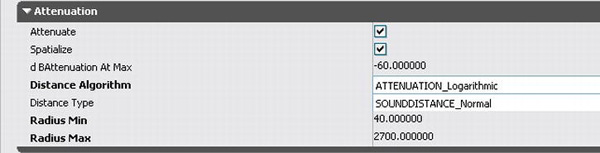
Figure 6–2. Attenuation properties
The most important properties are the Distance Algorithm, Radius Min, and Radius Max.
- Distance Algorithm—Determines exactly how the sound decreases with distance from the source. You probably should experiment with this to determine your personal preference. Options include ATTENUATION_Linear, ATTENUATION_Logarithmic, ATTENUATION_Inverse, ATTENUATION_LogReverse, and ATTENUATION_NaturalSound
- Radius Min—Sound will start to attenuate or decrease starting at this distance from the sound source. Up to this radius the sound volume will be normal.
- Radius Max—Sound will attenuate between Radius Min and this value. At Radius Max the sound volume is zero.
Looping
Looping is the repetition of the same sound. This is appropriate for sounds that must be played continuously forever or for a short period of time. For example, the sound of the ocean hitting the shore can be played continuously if you are near a beach. Another example would be to play the sound of an alarm four times to indicate that an intruder has breached an area in your game world.
Now, search for Vehicle_Damage_FireLoop_Cue by typing that asset name into the search box. Right-click on the item in the preview pane and select Edit Using Sound Cue Editor to bring up the Sound Cue Editor. The set up of the Sound Cue is shown in Figure 6–3.

Figure 6–3. Sound Cue for Vehicle_Damage_FireLoop_Cue
This Sound Cue uses both attenuation and looping to modify the behavior of the output sound. Click on the Looping node. The looping properties should be displayed as in Figure 6–4.

Figure 6–4. Looping properties
There are three values in the Looping node:
- Loop Indefinitely—If this is checked then the sound loops forever regardless of the values of Loop Count Min or Loop Count Max
- Loop Count Min—The minimum number of times to play this sound in a loop.
- Loop Count Max—The maximum number of times to play this sound in a loop.
Random
The random node's purpose is to play different variations of the same general sound so that the listener does not find the sound repetitive. A good example is background noises like insects and other environmental noises.
An example of a Sound Cue that uses a Random Node to select random sounds to play back is the S_BulletImpact_01_Cue. Type this into the search box and right-click on the asset in the preview pane and bring it up into the Sound Cue Editor. The Sound Cue layout should look like Figure 6–5.
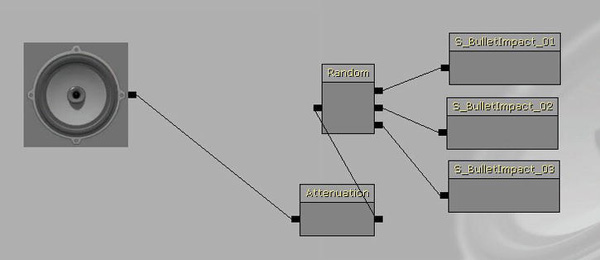
Figure 6–5. Sound Cue S_BulletImpact_01_Cue
This Sound Cue uses attenuation and randomness to produce the final sound from three possible sound effects. The final sound output will be affected by both attenuation and random selection. What this means is that final sound will be played from a random selection of sounds and will decrease in volume as the listener moves farther away from it.
The random properties are shown in Figure 6–6.
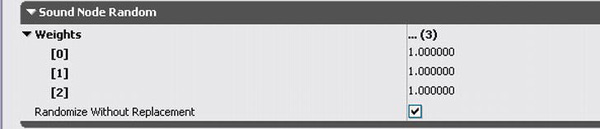
Figure 6–6. Random Property
The Weights property allows you to set the probability that each sound would be selected. Here each is set to 1.0 which means that each sound effect has an equal chance of being selected for output.
Modulator
The purpose of the Modulator node is to change the volume and/or pitch of the sound data being played. This can be a quick and easy way to tweak a sound once it has been sampled.
Search for the Sound Cue A_Effort_EnigmaMean_Death_Cue by typing that term in the search box. Right-click the asset in the preview pane and bring it up in the Sound Cue Editor. The Sound Cue structure should look like Figure 6–7.

Figure 6–7. Sound Cue A_Effort_EnigmaMean_Death_Cue
This Sound Cue uses a combination of attenuation, modulation, and randomness in order to produce the final sound. The modulation properties are shown in Figure 6–8.

Figure 6–8. Modulation property
The Modulation node is used to pick a random pitch and volume within a range. The range values are:
- Pitch Min—The minimum value for a random pitch.
- Pitch Max—The maximum value for a random pitch.
- Volume Min—The minimum value for a random volume.
- Volume Max—The maximum value for the random volume.
For example, you could set the Pitch Min and Pitch Max values to 5.0 and the Volume Min and Volume Max values to 2.0 to increase the pitch of the sound sample 5 times normal value and increase the volume of the sound sample to twice the normal value.
Adding Sound Cues Using the Unreal Editor
You can add Sound Cues directly to levels using the Unreal Editor. For example to put a fire sound that loops, select the Vehicle_Damage_FireLoop_Cue that was mentioned earlier. Right-click on an empty space just in front of the cube in the default level and select Add Ambient Sound to add this Sound Cue to the level. Run the level in the Mobile Previewer and walk toward and away from the cube to hear the sound increase in volume as you get closer to the sound source and decrease in volume as you walk away. To add this Sound Cue to the level see Figure 6–9. Adding Sound Cues via this method is good for stationary environmental sounds such as insects, and the sound of an ocean near the beach.
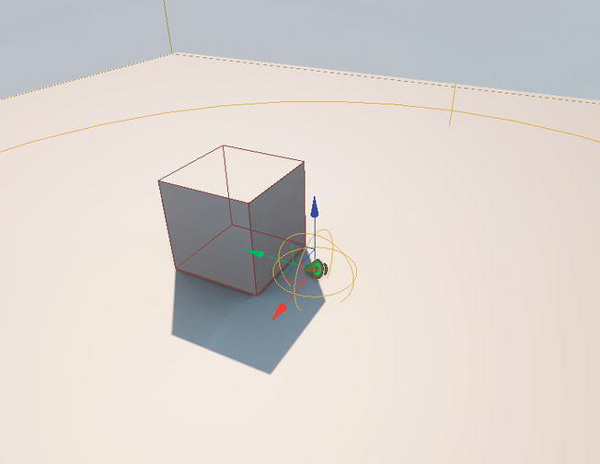
Figure 6–9. Adding a Sound Cue via the Unreal Editor
Adding Sound Cues Dynamically using UnrealScript
If a sound is not stationary and/or needs to be generated when an action in the game occurs then it should be created dynamically using UnrealScript.
In order for an UnrealScript class to play a Sound Cue it must be derived from the Actor class which contains the PlaySound() function. The PlaySound() function is defined in the Actor class as follows:
PlaySound(SoundCue InSoundCue,

 optional bool bNotReplicated,

 optional bool bNoRepToOwner,

 optional bool bStopWhenOwnerDestroyed,

 optional vector SoundLocation,

 optional bool bNoRepToRelevant);
The important parameters that are relevant to our needs are the parameters InSoundCue and bStopWhenOwnerDestroyed.
InSoundCue is the reference to the Sound Cue to play and bStopWhenOwnerDestroyed allows you to stop playing the Sound Cue when the owner playing it is destroyed.
Adding Sound Cues Using Kismet
If the sound needs to be attached to a Kismet related action such as the opening of a door or a gate then an easy way to provide sound effects is through Kismet.
Bring up the Kismet panel by clicking on the K icon in the top row of icons on the Unreal Editor. Right-click on an empty area of the Kismet panel and select New Action ![]() Sound
Sound ![]() Play Sound to create a new Play Sound node. See Figure 6–10.
Play Sound to create a new Play Sound node. See Figure 6–10.
To set a sound cue to be played when this node is activated click on the node to bring up its properties and enter the name of the Sound Cue in the Play Sound field. An easy way to do this is to select a Sound Cue in the Content Browser and then click the arrow to the right of the Play Sound field to have the name of the selected Sound Cue put into the field.
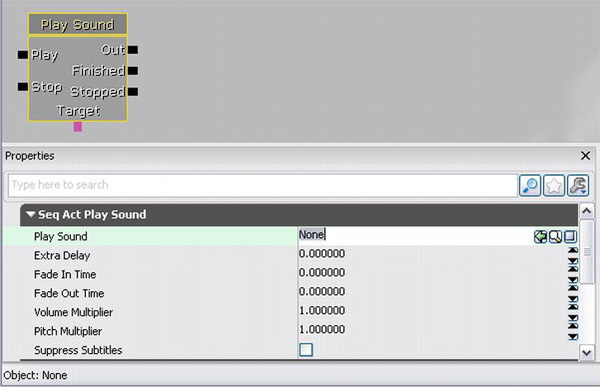
Figure 6–10. The Play Sound node and properties in Kismet
Hands-On Example: Adding Sound Cues to a Weapon
In this example, we will begin a larger project for the next chapter. We will create a new weapon class and projectile class that incorporate Sound Cues. Remember all classes that are derived from the Actor class, which is most classes, are able to produce sounds via the PlaySound() function defined in the Actor class and is accessible to derived or extended classes. Both the Weapon and Projectile classes are derived from the Actor class. We choose the Projectile class to add the sounds into because this is where the projectiles are actually initialized and explosions of the projectiles are handled. This is designed to illustrate how to incorporate Sound Cues into a real world UnrealScript example and demonstrate how to use Sound Cues dynamically.
Creating the Weapon
First you need to create a new directory for this project. Create a new directory called ExampleCh6 under your default UDK installation directory at C:UDKUDK-2011-06DevelopmentSrc. The exact base directory will depend on which version of the UDK you are using. The above base directory is set for the June 2011 UDK version.
Create another directory called Classes under the directory you just created. You should store all the UnrealScript files for this project under the Classes directory.
Next, you need to create a new class called JazzWeaponSound and save it to the Classes directory under the filename JazzWeaponSound.uc. See Listing 6–1.
NOTE: Remember that all UnrealScript files must be named after the class in them with a .uc extension and placed in a Classes directory under a main project directory.
Listing 6–1. JazzWeaponSound Class
class JazzWeaponSound extends Weapon;


defaultproperties

{

 Begin Object Class=SkeletalMeshComponent Name=FirstPersonMesh

 SkeletalMesh=SkeletalMesh'KismetGame_Assets.Anims.SK_JazzGun'

 End Object

 Mesh=FirstPersonMesh

 Components.Add(FirstPersonMesh);


 Begin Object Class=SkeletalMeshComponent Name=PickupMesh

 SkeletalMesh=SkeletalMesh'KismetGame_Assets.Anims.SK_JazzGun'

 End Object

 DroppedPickupMesh=PickupMesh

 PickupFactoryMesh=PickupMesh


 WeaponFireTypes(0)=EWFT_Projectile

 WeaponFireTypes(1)=EWFT_NONE


 WeaponProjectiles(0)=class'JazzBulletSound'

 WeaponProjectiles(1)=class'JazzBulletSound'


 FiringStatesArray(0)=WeaponFiring

 FireInterval(0)=0.25

 Spread(0)=0

}
The important code is highlighted in bold print. The rest of code should look familiar from our coverage of weapons in Chapter 3.
We specify a new JazzBulletSound class for our projectile. It is in this class that we will add sounds associated with our bullets.
Creating the Projectile
Next, we need to create the JazzBulletSound class that is derived from the Projectile class. See Listing 6–2.
Listing 6–2. JazzBulletSound class
class JazzBulletSound extends Projectile;


var SoundCue FireSound;

var bool ImpactSoundPlayed;


simulated singular event Touch(Actor Other, PrimitiveComponent OtherComp, vector HitLocation, vector HitNormal)

{

 Other.TakeDamage(33, InstigatorController, HitLocation, -HitNormal, None);

}


simulated function Explode(vector HitLocation, vector HitNormal)

{

 if (!ImpactSOundPlayed)

 {

 PlaySound(ImpactSound);

 ImpactSoundPlayed = true;

 }

}


function Init( Vector Direction )

{

 local vector NewDir;


 NewDir = Normal(Vector(InstigatorController.Pawn.Rotation));

 Velocity = Speed * NewDir;


 PlaySound(SpawnSound);

 PlaySound(FireSound, , , true,,);

}


defaultproperties

{

 Begin Object Class=StaticMeshComponent Name=Bullet

 StaticMesh=StaticMesh'EngineMeshes.Sphere'

 Scale3D=(X=0.050000,Y=0.050000,Z=0.05000)

 End Object

 Components.Add(Bullet)


 Begin Object Class=ParticleSystemComponent Name=BulletTrail

 Template=ParticleSystem'Castle_Assets.FX.P_FX_Fire_SubUV_01'

 End Object

 Components.Add(BulletTrail)


 MaxSpeed=+05000.000000

 Speed=+05000.000000


 FireSound = SoundCue'A_Vehicle_Generic.Vehicle.Vehicle_Damage_FireLoop_Cue'
 ImpactSound = SoundCue'KismetGame_Assets.Sounds.S_BulletImpact_01_Cue'

 SpawnSound = SoundCue'A_Pickups_Powerups.PowerUps.A_Powerup_UDamage_SpawnCue'


 ImpactSoundPlayed = false

}
In this class we add sound effects for the impact of the projectile (ImpactSound), the firing of the weapon (SpawnSound) and the sound of the flames (FireSound) that are attached to the projectile via particle emitter.
The Sound Cues are set in the defaultproperties block and played back through the PlaySound() function.
This code will be incorporated in a hands-on example in the next chapter. In the mean time you can preview the sound effects by searching for these Sound Cues in the Content Browser in the Unreal Editor and double-clicking on them to play them.
Kismet, Matinee and Moving Objects
Kismet is the graphical version of UnrealScript. Kismet in combination with Unreal Matinee does an excellent job in controlling the movement of objects like platforms and the opening and closing of gates. Moving platforms that can move characters in the game world are created with InterpActors. Objects called triggers can be used to initiate the movement of closed gates or doors so that they become open.
Kismet is used to trigger the movement of platforms and gates and Unreal Matinee defines the exact movement that the platform, gate, or door should follow. Matinee uses a keyframe method of animation where you set certain frames that indicate the object's position in the world at certain times and then the Matinee will generate all the positions for the frames in between the keyframes. In this section we show you:
- How to use Kismet and Matinee to create a moving platform.
- How to create a moving gate that opens when your pawn touches a trigger.
NOTE: There is also more information concerning Kismet and Matinee discussed back in Chapter 2.
Hands-On Example: Using Kismet to create a Moving Platform
In this hands-on example we will create a moving platform that can move the player's pawn from the ground level to the top of the cube of the default level.
- Bring up the Unreal Editor.
- Search for the static mesh SM_Gate_02 in the search box in the Content Browser. Make sure to mark the Static Meshes checkbox.
- Select this mesh in the Preview Pane, and double-click on it to load it into the UDK system and bring it up into the Mesh Viewer.
- Put your cursor over an empty area in front of the cube in the default level.
- Right-click and select Add InterpActor or simply drag and drop the gate into the level where you want it.
- Rotate and move the gate mesh so that it is right in front of the cube and oriented as in Figure 6–11. Hit the spacebar while you have the gate selected to cycle between transformation, rotation, and scaling widgets.
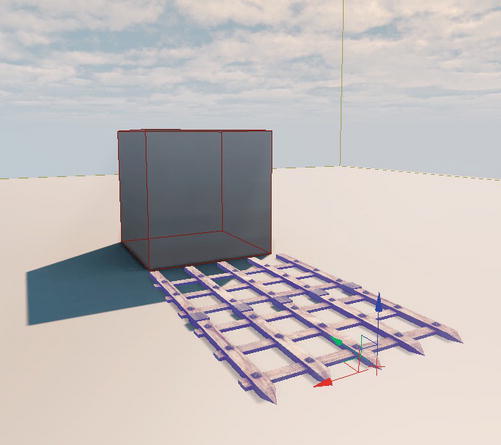
Figure 6–11. Gate Mesh platform
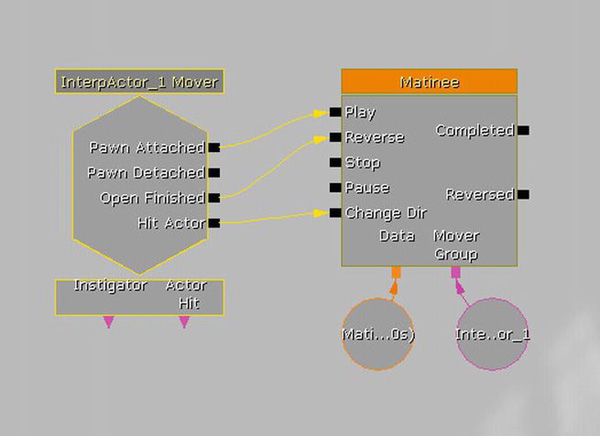
- With the gate still selected open Kismet. Right-click and select New Event Using InterpActor
 Mover. This creates a new set of Kismet nodes as shown in Figure 6–12.
- Double-click on the Matinee node to bring up Matinee. See Figure 6–13.
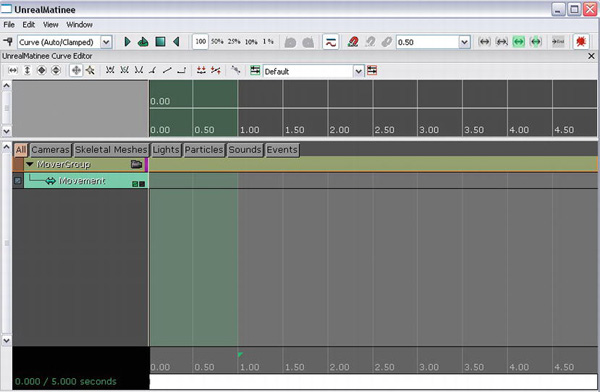
Figure 6–13. Matinee node for our gate platform
- Scroll the white bar at the bottom of the Unreal Matinee so that you see the ending red marker. See Figure 6–14.
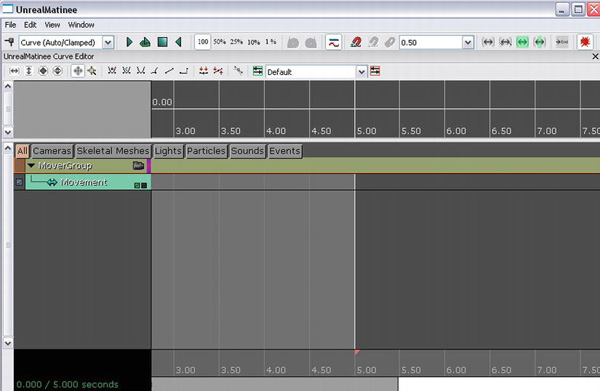
Figure 6–14. Red marker that denotes the end of the Matinee sequence
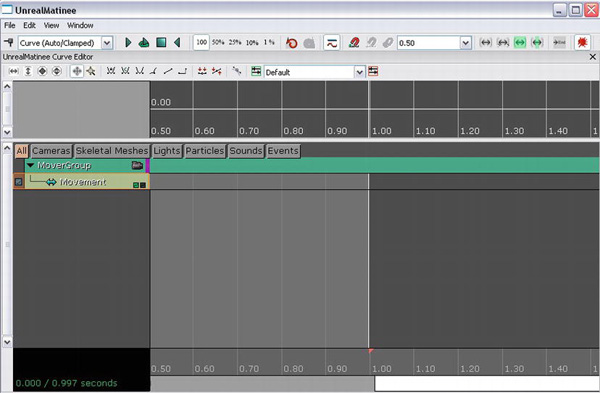
- Move Red Marker which denotes the end of sequence from the 5.00 second mark to the 1 second mark. This shortens the time for the total animation to 1 second. See Figure 6–15.
- Slide the bar back to the front of the Matinee Sequence and make sure the black selection marker at the bottom area above the white bar is at the 0 seconds mark and hit the Enter key to mark the starting keyframe. A red outlined triangle should appear marking the new key frame. See Figure 6–16.
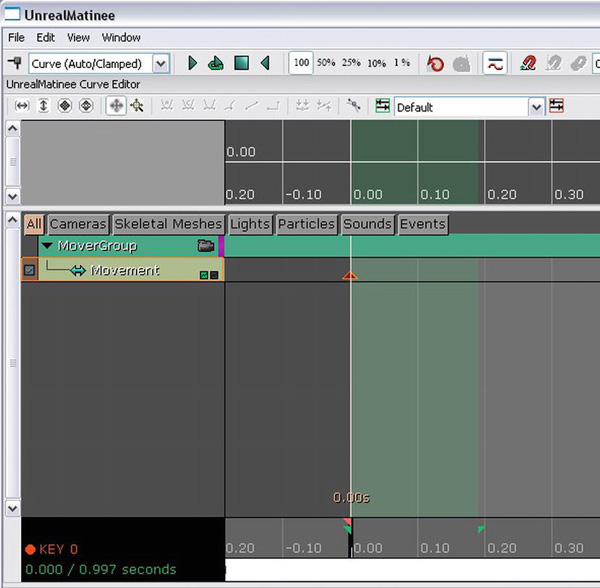
Figure 6–16. Starting the first key frame with the gate at the default ground level.
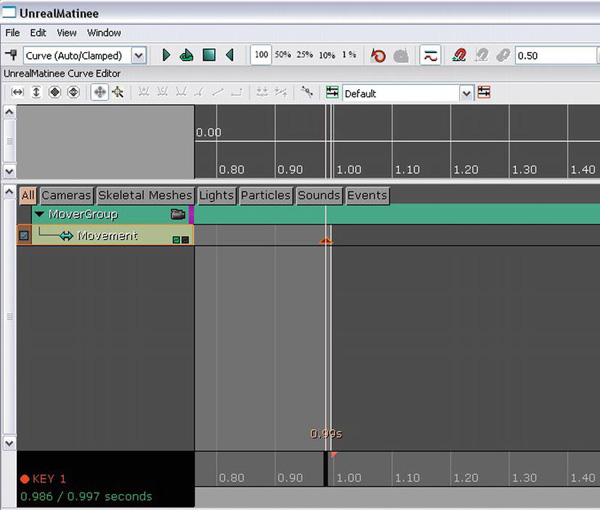
- Slide the long black selection marker at the bottom of the keyframe panel to around the 1.0 second mark and hit the Enter key. A new keyframe is now being generated. See Figure 6–17.
- Now, move the gate up using the transformation widget so that it is level with the top of the cube. Since we are recording this keyframe the gate should have lines to indicate the change in position from the last keyframe. See Figure 6–18.
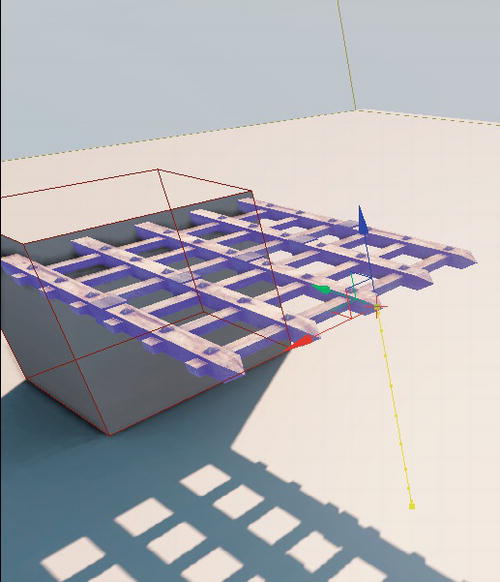
Figure 6–18. Changing the position of the gate for the final keyframe
- Close the Matinee Window.
- Double-click on the gate to bring up its properties. Under the Collision category set the CollisionType to COLLIDE_Blockall. See Figure 6–19.
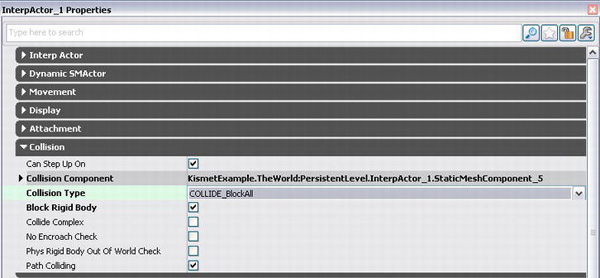
Figure 6–19. Initializing the new moving gate platform
Everything should now be set up so that you can have your pawn walk on the gate and have it move up. Select a game type from a previous chapter (such as Chapter 3) that allows you to see your pawn in the third person. A good choice would be the ExampleCh31Game game type.
Run the game on the mobile previewer. You should now be able to walk your pawn over the gate and the gate will automatically move up to the top of the cube. See Figure 6–20.
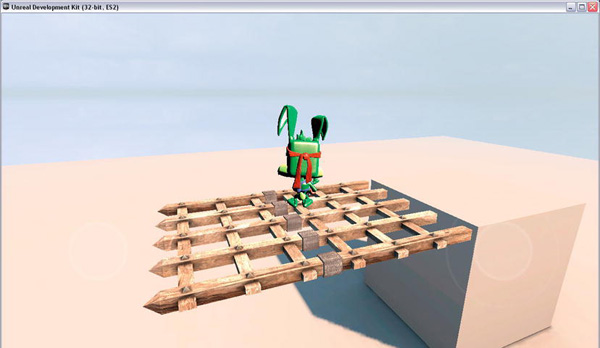
Figure 6–20. A working platform from a gate static mesh
Hands-on Example: Using Kismet to create Locked Gates
In this example we will create a gate that can be opened by the player touching a trigger.
- Bring up the Unreal Editor.
- Click on the cube in the default level, right-click and select Copy.
- Put your cursor over an empty area in the level next to the cube, right-click and select Paste Here to paste a copy of this cube into the level.
- In the Content Browser search for the same gate that you did for the last example. Select this mesh in the Preview Pane. Double-click on it to load it into the UDK and bring it up into the Mesh Viewer.
- Right-click on the space between the blocks and select Add InterpActor to add the gate to the level as an InterpActor.
- Position the gate between the blocks.
- Right-click somewhere to the left or right of your gate and select Add Actor Add Trigger. This will create a new Trigger object to be used to open your gate. You can also put a static mesh at the trigger's location as a reminder of where the trigger is if you want to. A good mesh for this is a barrel mesh such as
Sm_Barrel_01orRemadePhysBarrel. Type one of these names into the search box to bring it up in the preview panel. You can select one of these and drag and drop it into your level. See Figure 6–21.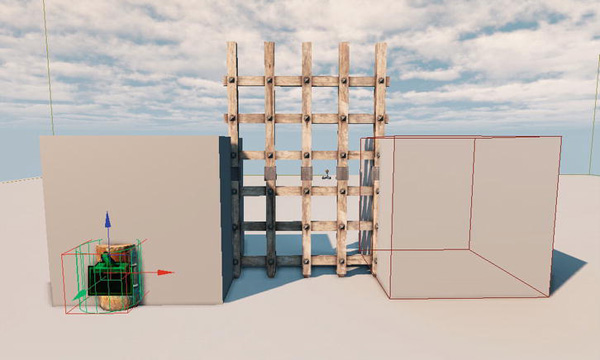
Figure 6–21. Gate with trigger
- Select the trigger and open Kismet.
- Right-click on an empty space in the Kismet panel and select New Event Using Trigger Touch to create a new Kismet Trigger Touch Node.
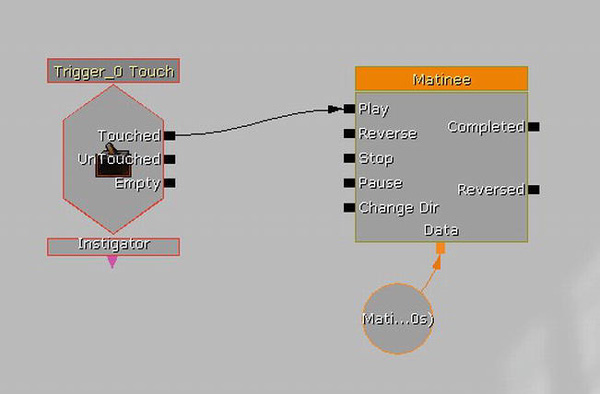
- Right-click on an empty space in the Kismet panel and select New Matinee to create a new Matinee Node. Create a link between the Touched output on the trigger and the Play input on the Matinee by clicking on the Touched output and dragging your mouse to connect the wire to the Play input. See Figure 6–22.
- Make sure you have the gate selected. Double-click on the Matinee node to bring up Matinee.
- Right-click on the main Matinee sequence panel and select Add New Empty Group. Add this new group by clicking the OK button on the dialog that pops up.
- With your mouse on this new group right-click and select Add New Movement Track.
- Click on the Movement track you just created. Make sure the long black sequence marker is at the 0.0 seconds mark and press the Enter key to start the keyframe for the starting position of the gate. See Figure 6–23.
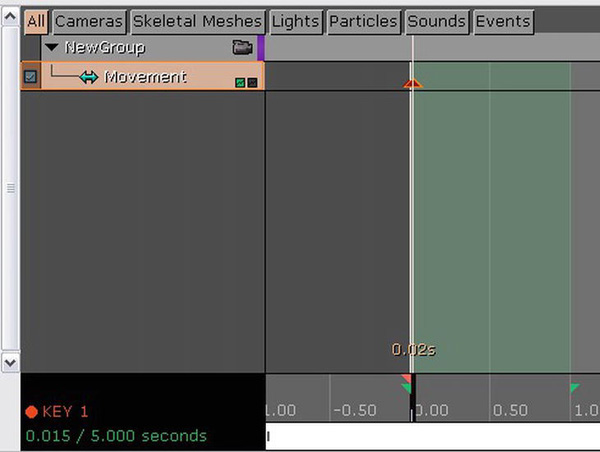
Figure 6–23. Creating the keyframe for the gate's initial position.
- Next, we need to create a new keyframe for the gate's final position. Move the long black sequence marker to around the 5.0 marker. Hit the Enter key to create a new keyframe at this time. See Figure 6–24.
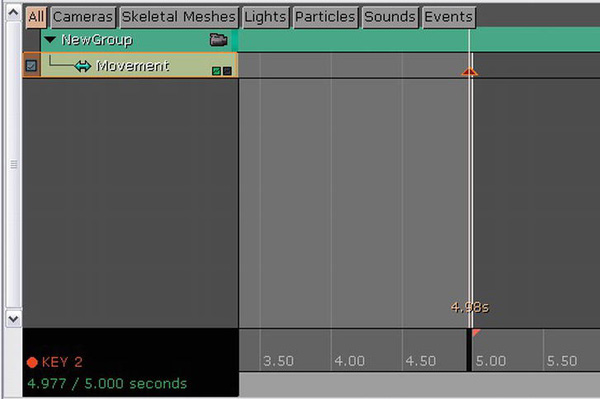
Figure 6–24. Creating the keyframe for the gate's final position
- Next, move the gate using the transformation widget completely to one side as shown in Figure 6–25.

Figure 6–25. Moving the gate to its final position
- Close Matinee.
- Change the game type to one that has the player's pawn visible.
- Next, double-click on the gate to bring up its properties. Under the Collision category change the Collision Type property to COLLIDE_BlockALL. This blocks your pawn from moving through the gate when it is closed. Save the level.
- Finally, run your game on the mobile previewer. When you touch the trigger the gate should start sliding open. See Figure 6–26.
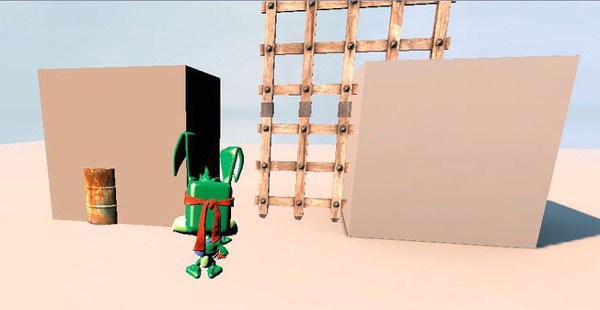
Figure 6–26. Opening the gate by touching the trigger
- Bring up the Kismet panel. Right-click on an empty area and select New Action Sound Play Sound to create a Play Sound node.
- In the Content Browser, search for Elevator01_StartCue and select the Sound Cue asset when it comes up.
- Go back to the Kismet panel and click on the Play Sound Node to bring up its properties. Under the Play Sound property click on the arrow to the right of the field to place the currently selected Sound Cue in this field.
- Repeat steps 21 through 23 for the Sound Cue Elevator01_StopCue. You should now have two Play Sound nodes.
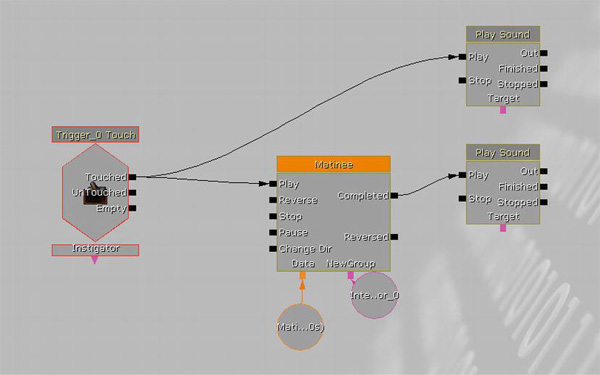
- Connect the Play Sound nodes as indicated in Figure 6–27. Connect the node with the StartCue sound to the trigger node and the node with the Stop Cue sound to the Matinee node.
- Now try out the gate again using the Mobile Previewer. This time there should be a sound effect when the gate is first opened and another sound effect when the gate is fully opened.
UDK Heads Up Display
The last topic we cover in this chapter is the HUD in preparation for the topic that comes in the next chapter, which is gameplay. In term of the player's environment the HUD is probably the most apparent since it is right in the player's face literally. A HUD can be a basic one that displays the player's statistics or much more complex such as in a vehicle simulation that includes graphics that represent the vehicle's controls and the interior of the vehicle itself.
The Heads Up Display or HUD contains information that may be of interest to the player such as the number of lives left, current health, or score. The HUD can be drawn using Scaleform or the Canvas class. Scaleform refers to the Scaleform Gfx system that enables Adobe Flash based HUDs to run on the UDK.
Creating code that is compatible with Scaleform requires tools outside the UDK and requires the extra work of setting up scenes in Adobe Flash and graphics in programs like Adobe Photoshop. For these reasons only the Canvas method of HUD creation will be used in this book.
Overview of the HUD
For developing iOS games for the mobile platform you should create a custom HUD class that derives from UDKHud as follows:
class ExtendedHUD extends UDKHud;
The main function that you need to override in your custom HUD class to draw your own items is the DrawHUD() function. An example structure of a DrawHUD() function in a derived class that adds to the HUD is as follows:
function DrawHUD()

{

 super.DrawHUD();

 // Put your custom code here that draws to the HUD

}
In the class where you define the type of game to be played you need to set your HUDType in the defaultproperties to your new custom HUD class.
defaultproperties

{

 PlayerControllerClass=class'ExampleCh6.ExampleCh6PC'

 DefaultPawnClass=class'ExampleCh6.Jazz3Pawn'

 HUDType=class'ExampleCh6.ExtendedHUD'


 bRestartLevel=false

 bWaitingToStartMatch=true

 bDelayedStart=false

}
Displaying Text on the HUD
In order to draw text as well as do such things as set the color of the text, and the position of the cursor that draws the text on the HUD you use the Canvas object.
The Canvas object is created from the Canvas class which is a built-in class in the UDK that contains functions that allow the user to draw on the screen.
In the HUD class which is the base class for the HUD there is a variable called Canvas that can be used to draw text and graphics on our HUD.
Var Canvas Canvas;
The following is a list of key functions in the Canvas class. The examples show you how to use these functions from within the HUD class.
DrawText()—To draw text on the screen use theDrawText()function.Canvas.DrawText("Hello World");SetDrawColor()—You can set the color of the text by calling theSetDrawColor()function. The input parameters R, G, B refer to the colors Red, Green, and Blue. These three values are used to define the color of the text that will be drawn. The values range from 0-255.Canvas.SetDrawColor(R, G, B);SetPos()—You can set the position of the cursor that draws the text on the HUD by calling theSetPos()functionCanvas.SetPos(X, Y);TextSize()—Gets the horizontal and vertical size of the input text as it would appear on the screen in screen pixels and returns it in the last two parameters. TheTextLabelvariable holds the text in string format. The last two variables hold the numerical values of the size of the text inTextLabelin the X (horizontal) and Y (vertical) directions.Canvas.TextSize(TextLabel, TextSizeX, TextSizeY);
Displaying Textures on the HUD
You can draw textures to the HUD by using the DrawTextureBlended() function.
Canvas.DrawTextureBlended(DefaultTexture1, 1, BLEND_Masked);
The first parameter is a reference to the actual texture. The second parameter is the scale factor that will be applied to the horizontal and vertical lengths of the texture. The third parameter is the blend mode, with several options.
- Choose
BLEND_Opaqueto put the texture on the HUD without any alterations of the colors. - Choose
BLEND_Additiveto add the colors of the texture and the background color already on the HUD to create a final color that will be placed on the HUD. - Select
BLEND_Maskedto put the texture on the HUD without the black pixels.
Hands-on Example: Adding a Basic Heads Up Display
In this example we will create the basic custom HUD that we will use in the larger example that we will create later in the next chapter. Create a new file for this class in your Classes directory under the project directory called ExtendedHUD.uc and put in the following code. See Listing 6–3.
Listing 6–3. Custom HUD class
class ExtendedHUD extends UDKHud;


var Texture DefaultTexture1;

var Texture DefaultTexture2;
var Texture DefaultTexture3;

var Texture DefaultTexture4;

var Texture DefaultTexture5;


struct HUDInfo

{

 var string Label;

 var Vector2D TextLocation;

 var Color TextColor;

 var Vector2D Scale;

};


// HUD

var HUDInfo HUDHealth;

var HUDInfo HUDLives;

var HUDInfo HUDGameOver;

var HUDInfo HUDScore;


simulated function PostBeginPlay()

{

 Super.PostBeginPlay();


 HUDHealth.Label = "Health:";

 HUDHealth.TextLocation.x = 1100;

 HUDHealth.TextLocation.y = 50;

 HUDHealth.TextColor.R = 0;

 HUDHealth.TextColor.G = 0;

 HUDHealth.TextColor.B = 255;

 HUDHealth.Scale.X = 2;

 HUDHealth.Scale.Y = 4;


 HUDLives.Label = "Lives:";

 HUDLives.TextLocation.x = 600;

 HUDLives.TextLocation.y = 50;

 HUDLives.TextColor.R = 0;

 HUDLives.TextColor.G = 255;

 HUDLives.TextColor.B = 0;

 HUDLives.Scale.X = 2;

 HUDLives.Scale.Y = 4;


 HUDGameOver.Label = "GAME OVER";

 HUDGameOver.TextLocation.x = 400;

 HUDGameOver.TextLocation.y = 300;

 HUDGameOver.TextColor.R = 255;

 HUDGameOver.TextColor.G = 0;

 HUDGameOver.TextColor.B = 255;

 HUDGameOver.Scale.X = 7;

 HUDGameOver.Scale.Y = 7;


 HUDScore.Label = "Score:";

 HUDScore.TextLocation.x = 0;

 HUDScore.TextLocation.y = 50;

 HUDScore.TextColor.R = 255;

 HUDScore.TextColor.G = 0;

 HUDScore.TextColor.B = 0;

 HUDScore.Scale.X = 2;

 HUDScore.Scale.Y = 4;
}


function DrawHUDItem(HUDInfo Info, coerce string Value)

{

 local Vector2D TextSize;


 Canvas.SetDrawColor(Info.TextColor.R, Info.TextColor.G, Info.TextColor.B);

 Canvas.SetPos(Info.TextLocation.X, Info.TextLocation.Y);

 Canvas.DrawText(Info.Label, ,Info.Scale.X, Info.Scale.Y);

 Canvas.TextSize(Info.Label, TextSize.X, TextSize.Y);

 Canvas.SetPos(Info.TextLocation.X + (TextSize.X * Info.Scale.X), Info.TextLocation.Y);

 Canvas.DrawText(Value, , Info.Scale.X, Info.Scale.Y);

}


function DrawHUD()

{

 local int Lives;


 super.DrawHUD();


 /*

 // Blend Modes = BLEND_Opaque, BLEND_Additive, and BLEND_Modulate modes

 Canvas.SetPos(0,0);

 Canvas.DrawTextureBlended(DefaultTexture1, 1, BLEND_Opaque);


 Canvas.SetPos(150,0);

 Canvas.DrawTextureBlended(DefaultTexture2, 1, BLEND_Additive);


 Canvas.SetPos(300,0);

 Canvas.DrawTextureBlended(DefaultTexture3, 1, BLEND_Masked);


 Canvas.SetPos(450,0);

 Canvas.DrawTextureBlended(DefaultTexture4, 1, BLEND_Masked);


 Canvas.SetPos(600,0);

 Canvas.DrawTextureBlended(DefaultTexture5, 1, BLEND_Masked);

 */

 Canvas.Font = class'Engine'.static.GetLargeFont();


 // Score

 DrawHUDItem(HUDScore,ExampleCh6PC(PlayerOwner).Score);


 // Lives

 Lives = Jazz3Pawn(PlayerOwner.Pawn).Lives;

 DrawHUDItem(HUDLives, Lives);


 // Health

 DrawHUDItem(HUDHealth, PlayerOwner.Pawn.Health);


 // Game Over

 if (ExampleCh6PC(PlayerOwner).GameOVer)

 {

 DrawHUDItem(HUDGameOver, "");

 }

}

defaultProperties

{
 DefaultTexture1= Texture2D'EditorResources.Ambientcreatures' // Yellow Chick 32 by 32

 DefaultTexture2= Texture2D'EditorResources.Ammo' // Ammo Icon 32 by 32

 DefaultTexture3= Texture2D'EditorResources.LookTarget' // Target 32 by 32

 DefaultTexture4= Texture2D'EditorMaterials.Tick' // Green Check 32 by 32

 DefaultTexture5= Texture2D'EditorMaterials.GreyCheck' // Grey Check 32 by 32

}
The key function in this class is the DrawHUDItem() function that draws the actual text on the HUD based on a HUDInfo entry along with the input value for that entry.
The HUD displays the player's score, lives left, and health. This custom HUD class also provides examples of how to draw various textures to the HUD in the commented out section. The preview of the HUD as part of the larger game play example that is created later in the next chapter is shown in Figure 6–28.
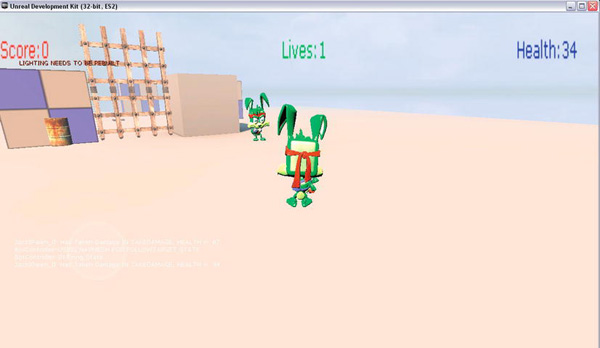
Figure 6–28. Preview of the HUD for next chapter's gameplay example
Summary
In this chapter we covered Sound Cues, the Sound Cue Editor that is used to create Sound Cues from sound data, how to use Sound Cues from within the Unreal Editor, from within UnrealScript in real-time during gameplay, and from within Kismet. Next, we discussed how to use Kismet and Matinee to control the movement of platforms and locked gates, as well as how to add sounds to the opening of a gate. We then covered the Unreal Heads Up Display and showed you how to create a custom HUD in UnrealScript.