Chapter 9
Navigation Controllers and Table Views
In the previous chapter, you mastered the basics of working with table views. In this chapter, you'll get a whole lot more practice, because we're going to explore navigation controllers.
Table views and navigation controllers work hand in hand. Strictly speaking, a navigation controller doesn't need a table view in order to do its thing. As a practical matter, however, when you implement a navigation controller, you almost always implement at least one table, and usually several, because the strength of the navigation controller lies in the ease with which it handles complex hierarchical data. On the iPhone's small screen, hierarchical data is best presented using a succession of table views.
In this chapter, we're going to build an application progressively, just as we did with the Pickers application back in Chapter 7. We'll get the navigation controller and the first view controller working, and then we'll start adding more controllers and layers to the hierarchy. Each view controller we create will reinforce some aspect of table use or configuration:
- How to drill down from table views into child tables
- How to drill down from table views into content views, where detailed data can be viewed and even edited
- How to use a table list to allow the user to select from multiple values
- How to use edit mode to allow rows to be deleted from a table view
That's a lot, isn't it? Well, let's get started with an introduction to navigation controllers.
Navigation Controller Basics
The main tool you'll use to build hierarchical applications is UINavigationController. UINavigationController is similar to UITabBarController in that it manages, and swaps in and out, multiple content views. The main difference between the two is that UINavigationController is implemented as a stack, which makes it well suited to working with hierarchies.
Do you already know everything there is to know about stacks? Scan through the following subsection, and we'll meet you at the beginning of the next subsection, “A Stack of Controllers.” If you're new to stacks, continue reading. Fortunately, stacks are a pretty easy concept to grasp.
Stacky Goodness
A stack is a commonly used data structure that works on the principle of last in, first out. Believe it or not, a Pez dispenser is a great example of a stack. Ever try to load one? According to the little instruction sheet that comes with each and every Pez dispenser, there are a few easy steps. First, unwrap the pack of Pez candy. Second, open the dispenser by tipping its head straight back. Third, grab the stack (notice the clever way we inserted the word "stack" in there!) of candy, holding it firmly between your pointer finger and thumb, and insert the column into the open dispenser. Fourth, pick up all the little pieces of candy that flew all over the place because these instructions just never work.
OK, so far this example has not been particularly useful. But what happens next is. As you pick up the pieces and jam them, one at a time, into the dispenser, you are working with a stack. Remember that we said a stack was last in, first out? That also means first in, last out. The first piece of Pez you push into the dispenser will be the last piece that pops out. The last piece of Pez you push in will be the first piece you pop out. A computer stack follows the same rules:
- When you add an object to a stack, it's called a push. You push an object onto the stack.
- The first object you push onto the stack is called the base of the stack.
- The last object you pushed onto the stack is called the top of the stack (at least until it is replaced by the next object you push onto the stack).
- When you remove an object from the stack, it's called a pop. When you pop an object off the stack, it's always the last one you pushed onto the stack. Conversely, the first object you push onto the stack will always be the last one you pop off the stack.
A Stack of Controllers
A navigation controller maintains a stack of view controllers. Any kind of view controller is fair game for the stack. When you design your navigation controller, you'll need to specify the very first view the user sees. As we've discussed in previous chapters, that view is called the root view controller, or just root controller, and is the base of the navigation controller's stack of view controllers. As the user selects the next view to display, a new view controller is pushed onto the stack, and the view it controls appears. We refer to these new view controllers as subcontrollers. As you'll see, this chapter's application, Nav, is made up of a navigation controller and six subcontrollers.
Take a look at Figure 9–1. Notice the navigation button in the upper-left corner of the current view. The navigation button is similar to a web browser's back button. When the user taps that button, the current view controller is popped off the stack, and the previous view becomes the current view.
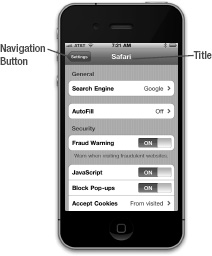
Figure 9–1. The Settings application uses a navigation controller. In the upper left is the navigation button used to pop the current view controller off the stock, returning you to the previous level of the hierarchy. The title of the current content view controller is also displayed.
We love this design pattern. It allows us to build complex hierarchical applications iteratively. We don't need to know the entire hierarchy to get things up and running. Each controller only needs to know about its child controllers so it can push the appropriate new controller object onto the stack when the user makes a selection. You can build up a large application from many small pieces this way, which is exactly what we're going to do in this chapter.
The navigation controller is really the heart and soul of many iPhone apps, but when it comes to iPad apps, the navigation controller plays a more marginal role. A typical example of this is the Mail app, which features a hierarchical navigation controller to let the user navigate among all their mail servers, folders, and messages. In the iPad version of Mail, the navigation controller never fills the screen, but appears either as a sidebar or a temporary popover window. We'll dig into that usage a little later, when we cover iPad-specific GUI functionality in Chapter 11.
Nav, a Hierarchical Application in Six Parts
The application we're about to build will show you how to do most of the common tasks associated with displaying a hierarchy of data. When the application launches, you'll be presented with a list of options (see Figure 9–2).
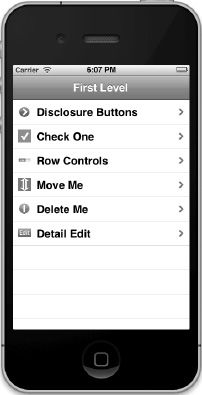
Figure 9–2. This chapter application's top-level view. Note the accessory icons on the right side of the view. This particular type of accessory icon is called a disclosure indicator. It tells the user that touching that row drills down to another table view.
Each of the rows in this top-level view represents a different view controller that will be pushed onto the navigation controller's stack when that row is selected. The icons on the right side of each row are called accessory icons. This particular accessory icon (the gray arrow) is called a disclosure indicator, because it lets the user know that touching that row drills down to another table view.
Meet the Subcontrollers
Before we start building the Nav application, let's take a quick look at each of the views displayed by our six subcontrollers.
The Disclosure Button View
Touching the first row of the table shown in Figure 9–2 will bring up the child view shown in Figure 9–3.
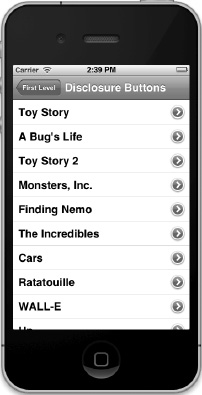
Figure 9–3. The first of the Nav application's six subcontrollers implements a table in which each row contains a detail disclosure button.
The accessory icon to the right of each row in Figure 9–3 is a bit different. Each of these icons is known as a detail disclosure button. Tapping the detail disclosure button should allow the user to view, and perhaps edit, more detailed information about the current row.
Unlike the disclosure indicator, the detail disclosure button is not just an icon—it's a control that the user can tap. This means that you can have two different options available for a given row: one action triggered when the user selects the row and another action triggered when the user taps the disclosure button.
A good example of the proper use of the detail disclosure button is found in the iPhone's Phone application. Selecting a person's row from the Favorites tab places a call to the person whose row you touched, but selecting the disclosure button next to a name takes you to detailed contact information. The YouTube application offers another great example. Selecting a row plays a video, but tapping the detail disclosure button takes you to more detailed information about the video. In the Contacts application, the list of contacts does not feature detail disclosure buttons, even though selecting a row does take you to a detail view. Since there is only one option available for each row in the Contacts application, no accessory icon is displayed.
Here's a recap of when to use disclosure indicators and detail disclosure buttons:
- If you want to offer a single choice for a row tap, don't use an accessory icon if a row tap will only lead to a more detailed view of that row.
- Mark the row with a disclosure indicator (gray arrow) if a row tap will lead to a new view (not a detail view).
- If you want to offer two choices for a row, mark the row with a detail disclosure button. This allows the user to tap on the row for a new view or the disclosure button for more details.
The Checklist View
The second of our application's six subcontrollers is shown in Figure 9–4. This is the view that appears when you select Check One in Figure 9–2.

Figure 9–4. The second of the Nav application's six subcontrollers allows you to select one row from many.
This view comes in handy when you want to present a list from which only one item can be selected. This approach is to iOS what radio buttons are to Mac OS X. These lists use a check mark to mark the currently selected row.
The Rows Control View
The third of our application's six subcontrollers is shown in Figure 9–5. This view features a tappable button in each row's accessory view. The accessory view is the far-right part of the table view cell that usually holds the accessory icon, but it can be used for other things. When we get to this part of our application, you'll see how to create controls in the accessory view.
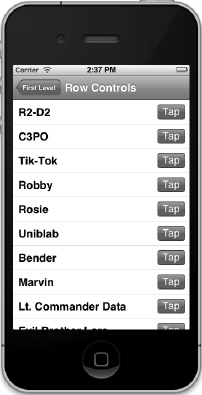
Figure 9–5. The third of the Nav application's six subcontrollers adds a button to the accessory view of each table view cell.
The Movable Rows View
The fourth of our application's six subcontrollers is shown in Figure 9–6. In this view, we'll let the user rearrange the order of the rows in a list by having the table entereditmode(more on this when we get to it in code later in this chapter).

Figure 9–6. The fourth of the Nav application's six subcontrollers lets the user rearrange rows in a list by touching and dragging the move icon. Recognize the rhyme?
The Deletable Rows View
The fifth of our application's six subcontrollers is shown in Figure 9–7. In this view, we're going to demonstrate another use of edit mode by allowing the user to delete rows from our table.
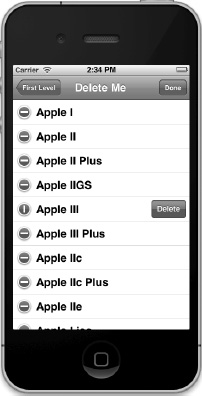
Figure 9–7. The fifth of the Nav application's six subcontrollers implements edit mode to allow the user to delete items from the table.
The Editable Detail View
The sixth and last of our application's subcontrollers is shown in Figure 9–8. It shows an editable detail view using a grouped table. This technique for detail views is used widely by the applications that ship on the iPhone.
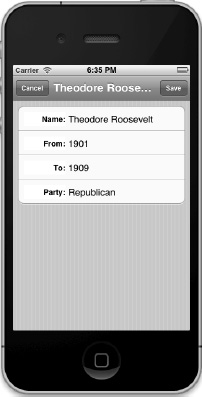
Figure 9–8. The sixth and last of the Nav application's subcontrollers implements an editable detail view using a grouped table.
We have so very much to do. Let's get started!
The Nav Application's Skeleton
Xcode offers a perfectly good template for creating navigation-based applications, and you will likely use it much of the time when you need to create hierarchical applications. However, we're not going to use that template today. Instead, we'll construct our navigation-based application from the ground up so you get a feel for how everything fits together. It's not really much different from the way we built the tab bar controller in Chapter 7, so you shouldn't have any problems keeping up.
In Xcode, press ![]()
![]() N to create a new project, select Empty Application from the iOS Application template list, and then click Next to continue. Set Nav as the Product Name, com.apress as the Company Identifier, and BID as the Class Prefix. Make sure that Use Core Data and Include Unit Tests are not checked, that Use Automatic Reference Counting is checked, and that Device Family is set to iPhone.
N to create a new project, select Empty Application from the iOS Application template list, and then click Next to continue. Set Nav as the Product Name, com.apress as the Company Identifier, and BID as the Class Prefix. Make sure that Use Core Data and Include Unit Tests are not checked, that Use Automatic Reference Counting is checked, and that Device Family is set to iPhone.
As you'll see if you select the project navigator and open the Nav folder, this template gives you an application delegate and not much else. At this point, there are no view controllers or navigation controllers.
To make this app run, we'll need to add a navigation controller, which includes a navigation bar. We'll also need to add a series of views and view controllers for the navigation bar to show. The first of these views is the top-level view shown in Figure 9–2.
Each row in that top-level view is tied to a child view controller, as shown in Figures 9–3 through 9–8. Don't worry about the specifics. You'll see how those connections work as you make your way through the chapter.
Creating the Top-Level View Controller
In this chapter, we're going to subclass UITableViewController instead of UIViewController for our table views. When we subclass UITableViewController, we inherit some nice functionality from that class that will create a table view with no need for a nib file. We can provide a table view in a nib, as we did in the previous chapter, but if we don't, UITableViewController will create a table view automatically. This table view will take up the entire space available and will connect the appropriate outlets in our controller class, making our controller class the delegate and data source for that table. When all you need for a specific controller is a table, subclassing UITableViewController is the way to go.
We'll create one class called BIDFirstLevelController that represents the first level in the navigation hierarchy. That's the table that contains one row for each of the second-level table views. Those second-level table views will each be represented by the BIDSecondLevelViewController class. You'll see how all this works as you make your way through the chapter.
In your project window, select the Nav folder in the project navigator, and then press ![]() N or select File
N or select File ![]() New
New ![]() New File…. When the new file assistant comes up, select Cocoa Touch, select Objective-C class, and then click Next. On the next screen, enter BIDFirstLevelController in the Class field, and type UITableViewController in the Subclass of field. As always, be sure to check your spelling carefully before you click Next. Then make sure the Nav folder or group is selected in the file browser, Group, and Target controls before clicking Create.
New File…. When the new file assistant comes up, select Cocoa Touch, select Objective-C class, and then click Next. On the next screen, enter BIDFirstLevelController in the Class field, and type UITableViewController in the Subclass of field. As always, be sure to check your spelling carefully before you click Next. Then make sure the Nav folder or group is selected in the file browser, Group, and Target controls before clicking Create.
You may have noticed an entry named UIViewController in the file template selector. That option provides you with a number of empty “stub” methods as a starting point to build a view controller, and even lets you pick a subclass of UIViewController, such as UITableViewController, with even more empty methods just waiting for you to plug in additional functionality. When creating your own applications, feel free to use those templates. We didn't use any of the view controller templates here, so we wouldn't need to spend time sorting through all the unneeded template methods, working out where to insert or delete code. By creating a plain Objective-C object, and simply setting its superclass to UITableViewController, we get a smaller, more manageable file.
Once the files have been created, single-click BIDFirstLevelController.h, and take a look at it.
#import <UIKit/UIKit.h>


@interface BIDFirstLevelController : UITableViewController


@end
Since the class we chose to subclass from is a UIKit class, Xcode handily imported UIKit instead of just Foundation. The two files we just created contain the controller class for the top-level view, as shown in Figure 9–2. Our next step is to set up our navigation controller.
Setting Up the Navigation Controller
Our goal here is to edit the application delegate to add our navigation controller's view to the application window.
Let's start by editing BIDAppDelegate.h to add a property, navController, to point to our navigation controller:
#import <UIKit/UIKit.h>


@interface BIDAppDelegate : UIResponder<UIApplicationDelegate>


@property (strong, nonatomic) UIWindow *window;

@property (strong, nonatomic) UINavigationController *navController;

@end
Next, we need to hop over to the implementation file, where we'll import a header for the view controller class we just created and add the @synthesize statement for navController. In the application:didFinishLaunchingWithOptions: method, we'll create navController, set it up with the initial view controller that it's going to display, and add its view as a subview of our application's window so that it is shown to the user. We'll explain each of those steps in a moment. For now, select BIDAppDelegate.m, and make the following changes:
#import "BIDAppDelegate.h"

#import "BIDFirstLevelController.h"


@implementation BIDAppDelegate


@synthesize window = _window;

@synthesize navController;


#pragma mark -

#pragma mark Application lifecycle


- (BOOL)application:(UIApplication *)application

        didFinishLaunchingWithOptions:(NSDictionary *)launchOptions {
    self.window = [[UIWindow alloc] initWithFrame:[[UIScreen mainScreen] bounds]];

    // Override point for customization after application launch


    BIDFirstLevelController *first = [[BIDFirstLevelController alloc]

        initWithStyle:UITableViewStylePlain];

    self.navController = [[UINavigationController alloc]

        initWithRootViewController:first];

    [self.window addSubview:navController.view];


    self.window.backgroundColor = [UIColor whiteColor];

  [self.window makeKeyAndVisible];


    return YES;

}

.

.

.


@end
The lines we added to the application:didFinishLaunchingWithOptions: method deserve some attention. The first thing we did was to create an instance of BIDFirstLevelController.
    BIDFirstLevelController *first = [[BIDFirstLevelController alloc]

        initWithStyle:UITableViewStylePlain];
Since BIDFirstLevelController is a subclass of UITableViewController, it can use the methods defined there, including the handy initWithStyle: method, which lets you create a controller whose table view will be either plain or grouped (whichever you choose), without the need for a nib file. Many iOS applications are built around table views whose appearance is dictated entirely by the cells they contain, and don't need any nib customization for the table views themselves. Therefore, using the initWithStyle: method is a common shortcut for instantiating table view controllers without much ado.
Next, we created an instance of the navigation controller.
    self.navController = [[UINavigationController alloc]

        initWithRootViewController:first];
Here, we see that UINavigationController, like UITableViewController, has its own special initializer. Here, the initWithRootViewController: method lets us pass in the top-level controller that the navigation control should use to display its initial content—in this case, the BIDFirstLevelController referenced by the first variable.
Finally, we added navController's view to our window in order to display it.
[self.window addSubview:navController.view];
It's worth taking a moment to think about this. What exactly is the view we're passing with the addSubview: method? It's a composite view provided by the navigation controller, which contains a combination of two things: the navigation bar at the top of the screen (which usually contains some sort of title and often a back button of some kind on the left), and the content of whatever the navigation controller's current view controller wants to display. In our case, the lower part of the display will be filled with the table view associated with the BIDFirstLevelController instance we created a few lines ago.
You'll learn more about how to control what the navigation controller shows in the navigation bar as we go forward. You'll also gain an understanding of how the navigation controller shifts focus from one subordinate view controller to another. For now, we've laid enough groundwork here that we can start defining what our own custom view controllers are going to do.
Now, we need a list of rows for our BIDFirstLevelController to display. In the previous chapter, we used simple arrays of strings to populate our table rows. In this application, the first-level view controller will manage a list of its subcontrollers, which we will be building throughout the chapter.
When we were designing this application, we decided that we wanted our first-level view controller to display an icon to the left of each of its subcontroller names. Instead of adding a UIImage property to every subcontroller, we'll create a subclass of UITableViewController that has a UIImage property to hold the row icon. We will then subclass this new class instead of subclassing UITableViewController directly. As a result, all of our subclasses will get that UIImage property for free, which will make our code much cleaner.
NOTE: We will never actually create an instance of our new UITableViewController subclass. It exists solely to let us add a common item to the rest of the controllers we're going to write. In many languages, we would declare this as an abstract class, but Objective-C doesn't include any syntax to support abstract classes. We can make classes that aren't intended to be instantiated, but the Objective-C compiler won't actually prevent us from writing code that creates instances of such a class, the way that the compilers for many other languages might. Objective-C is much more permissive than most other popular languages, and this can be a little hard to get used to.
Single-click the Nav folder in Xcode, and then press ![]() N to bring up the new file assistant. Select CocoaTouch from the left pane, select Objective-Cclass, and click Next. On the next screen, name the new class BIDSecondLevelViewController, andenter UITableViewController for Subclass of. Then click Next again, and go on and save the class files as usual. Once the new files are created, select BIDSecondLevelViewController.h, and make the following changes:
N to bring up the new file assistant. Select CocoaTouch from the left pane, select Objective-Cclass, and click Next. On the next screen, name the new class BIDSecondLevelViewController, andenter UITableViewController for Subclass of. Then click Next again, and go on and save the class files as usual. Once the new files are created, select BIDSecondLevelViewController.h, and make the following changes:
#import <UIKit/UIKit.h>


@interface BIDSecondLevelViewController : UITableViewController


@property (strong, nonatomic) UIImage *rowImage;

@end
Over in BIDSecondLevelViewController.m, add the following line of code:
#import "BIDSecondLevelViewController.h"


@implementation BIDSecondLevelViewController

@synthesize rowImage;

@end
Any controller class that we want to implement as a second-level controller—in other words, any controller that the user can navigate to directly from the first table shown in our application—should subclass BIDSecondLevelViewController instead of UITableViewController. Because we're subclassing BIDSecondLevelViewController, all of those classes will have a property they can use to store a row image, and we can write our code in BIDFirstLevelController before we've actually written any concrete second-level controller classes by using BIDSecondLevelViewController as a placeholder.
Let's implement our BIDFirstLevelController class now. Be sure to save the changes you made to BIDSecondLevelViewController. Then make these changes to BIDFirstLevelController.h:
#import <UIKit/UIKit.h>


@interface BIDFirstLevelController : UITableViewController

@property (strong, nonatomic) NSArray *controllers;

@end
The array we just added will hold the instances of the second-level view controllers. We'll use it to feed data to our table.
Add the following code to BIDFirstLevelController.m, and then come on back and gossip with us, 'K?
#import "BIDFirstLevelController.h"

#import "BIDSecondLevelViewController.h"


@implementation BIDFirstLevelController

@synthesize controllers;


- (void)viewDidLoad {

    [super viewDidLoad];

    self.title = @"First Level";

    NSMutableArray *array = [[NSMutableArray alloc] init];

    self.controllers = array;

}


- (void)viewDidUnload {

   [super viewDidUnload];

   self.controllers = nil;

}


#pragma mark -

#pragma mark Table Data Source Methods

- (NSInteger)tableView:(UITableView *)tableView

 numberOfRowsInSection:(NSInteger)section {

    return [self.controllers count];

}
- (UITableViewCell *)tableView:(UITableView *)tableView

         cellForRowAtIndexPath:(NSIndexPath *)indexPath {


    static NSString *FirstLevelCell= @"FirstLevelCell";

    UITableViewCell *cell = [tableView dequeueReusableCellWithIdentifier:

                             FirstLevelCell];

    if (cell == nil) {

        cell = [[UITableViewCell alloc]

                initWithStyle:UITableViewCellStyleDefault

                reuseIdentifier: FirstLevelCell];

    }

    // Configure the cell

    NSUInteger row = [indexPath row];

    BIDSecondLevelViewController *controller =

        [controllers objectAtIndex:row];

    cell.textLabel.text = controller.title;

    cell.imageView.image = controller.rowImage;

    cell.accessoryType = UITableViewCellAccessoryDisclosureIndicator;

    return cell;

}


#pragma mark -

#pragma mark Table View Delegate Methods

- (void)tableView:(UITableView *)tableView

        didSelectRowAtIndexPath:(NSIndexPath *)indexPath {

    NSUInteger row = [indexPath row];

    BIDSecondLevelViewController *nextController = [self.controllers

                                                 objectAtIndex:row];

    [self.navigationController pushViewController:nextController

                                         animated:YES];

}


@end
First, notice that we've imported that new BIDSecondLevelViewController.h header file. Doing that lets us use the BIDSecondLevelViewController class in our code so that the compiler will know about the rowImage property.
Next comes the viewDidLoad method. The first thing we do is set self.title. A navigation controller knows what to display in the title of its navigation bar by asking the currently active controller for its title. Therefore, it's important to set the title for all controller instances in a navigation-based application, so the users know where they are at all times.
We then create a mutable array and assign it to the controllers property we declared earlier. Later, when we're ready to add rows to our table, we will add view controllers to this array, and they will show up in the table automatically. Selecting any row will automatically cause the corresponding controller's view to be presented to the user.
TIP: Did you notice that our controllers property is declared as an NSArray, but that we're creating an NSMutableArray? It's perfectly acceptable to assign a subclass to a property like this. In this case, we use the mutable array in viewDidLoad to make it easier to add new controllers in an iterative fashion, but we leave the property declared as an immutable array as a message to other code that it shouldn't be modifying this array.
The final piece of the viewDidLoad method is the call to [super viewDidLoad]. We do this because we are subclassing UITableViewController. You should always call [super viewDidLoad] when you override the viewDidLoad method, because there's no way to know if your parent class does something important in its own viewDidLoad method.
The tableView:numberOfRowsInSection: method here is identical to ones you've seen before. It simply returns the count from our array of controllers. The tableView:cellForRowAtIndexPath: method is also very similar to ones we've written in the past. It gets a dequeued cell, or creates a new one if none exists, and then grabs the controller object from the array corresponding to the row being asked about. It then sets the cell's textLabel and image properties using the title and rowImage from that controller. Note that in this case, since we are using one of UITableViewCell's built-in styles instead of laying out a subclass of our own in a nib file, we have no nib file to register with the table view, and therefore can't rely on the dequeue... method returning anything. So, we need to include the check for nil and the resulting cell-creation code, as you've seen before.
Notice that we are assuming the object retrieved from the array is an instance of BIDSecondLevelViewController and are assigning the controller's rowImage property to a UIImage. This step will make more sense when we declare and add the first concrete second-level controller to the array.
The last method we added is the most important one here, and it's the only functionality that's truly new. You've seen the tableView:didSelectRowAtIndexPath: method before—it's the one that is called after a user taps a row. If tapping a row needs to trigger a drill-down, this is how we do it. First, we get the row from indexPath.
NSUInteger row = [indexPath row];
Next, we grab the correct controller from our array that corresponds to that row.
    BIDSecondLevelViewController *nextController =

        [self.controllers objectAtIndex:row];
Then we use our navigationController property, which points to our application's navigation controller, to push the next controller—the one we pulled from our array—onto the navigation controller's stack.
     [self.navigationController pushViewController:nextController

                                          animated:YES];
That's really all there is to it. Each controller in the hierarchy needs to know only about its children. When a row is selected, the active controller is responsible for getting or creating a new subcontroller, setting its properties if necessary (it's not necessary here), and then pushing that new subcontroller onto the navigation controller's stack. Once you've done that, everything else is handled automatically by the navigation controller.
At this point, the application skeleton is complete. Save all your files, and build and run the app. If all is well, the application should launch, and a navigation bar with the title First Level should appear. Since our array is currently empty, no rows will display at this point (see Figure 9–9).
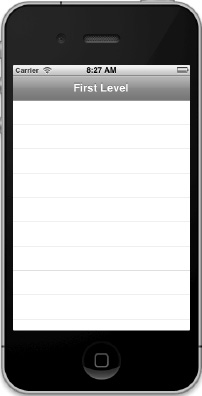
Figure 9–9. The application skeleton in action
Adding the Images to the Project
Now, we're ready to start developing the second-level views. Before we do that, go grab the folder of image icons from the 09 Nav source code archive directory. You'll find a folder called Images with eight .png images: six that will act as row images and an additional two that we'll use to make a button look nice later in the chapter.
In the project navigator, make sure you can see the Nav folder. Then drag the Images folder from the Finder to that Nav folder (not the Nav target just above the Nav folder) to add the images to the project.
First Subcontroller: The Disclosure Button View
Let's implement the first of our second-level view controllers. To do that, we'll need to create a subclass of BIDSecondLevelViewController.
In the project navigator, select the Nav folder and press ![]() N to bring up the new file assistant. Select Cocoa Touch in the left pane, and then select Objective-C class and click Next. On the following screen, name the class BIDDisclosureButtonController and enter BIDSecondLevelViewController for Subclass of. Remember to check your spelling! This class will manage the table of movie names that will be displayed when the user clicks the Disclosure Buttons item from the top-level view (see Figure 9–3).
N to bring up the new file assistant. Select Cocoa Touch in the left pane, and then select Objective-C class and click Next. On the following screen, name the class BIDDisclosureButtonController and enter BIDSecondLevelViewController for Subclass of. Remember to check your spelling! This class will manage the table of movie names that will be displayed when the user clicks the Disclosure Buttons item from the top-level view (see Figure 9–3).
Creating the Detail View
When the user clicks any movie title, the application will drill down into another view that will report which row was selected. So, we also need to create a detail view for the user to drill down to. Repeat the steps we just took to create another Objective-C class called BIDDisclosureDetailController, this time using UIViewController as the superclass. Again, be sure to check your spelling.
NOTE: Just a reminder: BIDDisclosureButtonController keeps track of the table of movie names, while BIDDisclosureDetailController manages the next level down, which is the detail view that is pushed on the navigation stack when a specific movie is selected.
The detail view will hold just a single label that we can set. It won't be editable; we'll just use it to show how to pass values into a child controller. Because this controller will not be responsible for a table view, we also need a nib file to go along with the controller class. Before we create the nib, let's quickly add the outlet for the label. Make the following changes to BIDDisclosureDetailController.h:
#import <UIKit/UIKit.h>


@interface BIDDisclosureDetailController : UIViewController


@property (strong, nonatomic) IBOutlet UILabel *label;

@property (copy, nonatomic) NSString *message;

@end
Why, pray tell, are we adding both a label and a string? Remember the concept of lazy loading? Well, view controllers use lazy loading behind the scenes as well. When we create our controller, it won't load its nib file until it is actually displayed. When the controller is pushed onto the navigation controller's stack, we can't count on there being a label to set. If the nib file has not been loaded, label will just be a pointer set to nil. But it's OK. Instead, we'll set message to the value we want, and in the viewWillAppear: method, we'll set label based on the value in message.
Why are we using viewWillAppear: to do our updating instead of using viewDidLoad, as we've done in the past? The problem is that viewDidLoad is called only the first time the controller's view is loaded. But in our case, we are reusing the BIDDisclosureDetailController's view. No matter which fine Pixar flick you pick, when you tap the disclosure button, the detail message appears in the same BIDDisclosureDetailController view. If we used viewDidLoad to manage our updates, that view would be updated only the first time the BIDDisclosureDetailController view appeared. When we picked our second fine Pixar flick, we would still see the detail message from the first fine Pixar flick (try saying that ten times fast)—not good. Since viewWillAppear: is called every time a view is about to be drawn, we'll be fine using it for our updating.
Going back to the property declarations, you may notice that the message property is declared using the copy keyword instead of strong. What's up with that? Why should we be copying strings willy-nilly? The reason is the potential existence of mutable strings.
Imagine we had declared the property using strong, and an outside piece of code passed in an instance of NSMutableString to set the value of the message property. This is something that often happens when you're dealing with strings entered by the user in a user interface object. If that original caller later decides to change the content of that string, the BIDDisclosureDetailController instance will end up in an inconsistent state, where the value of message and the value displayed in the text field aren't the same! Using copy eliminates that risk, since calling copy on any NSString (including subclasses that are mutable) always gives us an immutable copy. Also, we don't need to worry about the performance impact too much. As it turns out, sending copy to any immutable string instance doesn't actually copy the string. Instead, it returns the same string object, after increasing its reference count. In effect, calling copy on an immutable string is the same as calling retain, which is what ARC might do behind the scenes anytime you set a strong property. So, it works out just fine for everyone, since the object can never change.
Add the following code to BIDDisclosureDetailController.m:
#import "BIDDisclosureDetailController.h"


@implementation BIDDisclosureDetailController

@synthesize label;

@synthesize message;


- (void)viewWillAppear:(BOOL)animated {

    label.text = message;

    [super viewWillAppear:animated];

}


- (void)viewDidUnload {

   self.label = nil;

   self.message = nil;

   [super viewDidUnload];

}


@end
That's all pretty straightforward, right? Now, let's create the nib to go along with this source code. Be sure you've saved your source changes.
Select the Nav folder in the project navigator, and press ![]() N to create another new file. This time, select User Interface from the iOS section on the left pane and View from the upper right. Thenclick Next. On the next screen, set Device Family to iPhone. Move to the next screen, and name this file BIDDisclosureDetail.xib. This file will implement the view seen when the user taps one of the movie buttons.
N to create another new file. This time, select User Interface from the iOS section on the left pane and View from the upper right. Thenclick Next. On the next screen, set Device Family to iPhone. Move to the next screen, and name this file BIDDisclosureDetail.xib. This file will implement the view seen when the user taps one of the movie buttons.
Select BIDDisclosureDetail.xib in the project navigator to open the file for editing. Once it's open, single-click File's Owner, and press ![]()
![]() 3 to bring up the identity inspector. Change the underlying class to BIDDisclosureDetailController. Now control-drag from the File's Owner icon to the View icon, and select the view outlet to establish a link from the controller to its view.
3 to bring up the identity inspector. Change the underlying class to BIDDisclosureDetailController. Now control-drag from the File's Owner icon to the View icon, and select the view outlet to establish a link from the controller to its view.
Drag a Label from the library, and place it on the View window, centering the label both vertically and horizontally. It doesn't need to be perfectly centered. Resize the label so it stretches from the left blue guideline to the right blue guideline, and then use the attributes inspector (![]()
![]() 4) to change the text alignment to centered. Control-drag from File's Owner to the label, and select the label outlet. Save your changes.
4) to change the text alignment to centered. Control-drag from File's Owner to the label, and select the label outlet. Save your changes.
Modifying the Disclosure Button Controller
For this example, our table of movies will base its data on rows from an array, so we will declare an NSArray named list to serve that purpose. We also need to declare a property to hold one instance of our child controller, which will point to an instance of the BIDDisclosureDetailController class we just built. We could allocate a new instance of that controller class every time the user taps a detail disclosure button, but it's more efficient to create one and then keep reusing it. Make the following changes to BIDDisclosureButtonController.h:
#import "BIDSecondLevelViewController.h"


@interface BIDDisclosureButtonController : BIDSecondLevelViewController

@property (strong, nonatomic) NSArray *list;

@end
Now we get to the juicy part. Add the following code to BIDDisclosureButtonController.m. We'll talk about what's going on afterward.
#import "BIDDisclosureButtonController.h"

#import "BIDAppDelegate.h"

#import "BIDDisclosureDetailController.h"


@interface BIDDisclosureButtonController ()

@property (strong, nonatomic) BIDDisclosureDetailController *childController;

@end


@implementation BIDDisclosureButtonController


@synthesize list;

@synthesize childController;
- (void)viewDidLoad {

    [super viewDidLoad];

    NSArray *array = [[NSArray alloc] initWithObjects:@"Toy Story",

                      @"A Bug's Life", @"Toy Story 2", @"Monsters, Inc.",

                      @"Finding Nemo", @"The Incredibles", @"Cars",

                      @"Ratatouille", @"WALL-E", @"Up", @"Toy Story 3",

                      @"Cars 2", @"Brave", nil];

    self.list = array;

}


- (void)viewDidUnload {

   [super viewDidUnload];

   self.list = nil;

   self.childController = nil;

}


#pragma mark -

#pragma mark Table Data Source Methods

- (NSInteger)tableView:(UITableView *)tableView

 numberOfRowsInSection:(NSInteger)section {

    return [list count];

}


- (UITableViewCell *)tableView:(UITableView *)tableView

         cellForRowAtIndexPath:(NSIndexPath *)indexPath {


    static NSString * DisclosureButtonCellIdentifier =

    @"DisclosureButtonCellIdentifier";


    UITableViewCell *cell = [tableView dequeueReusableCellWithIdentifier:

                             DisclosureButtonCellIdentifier];

    if (cell == nil) {

        cell = [[UITableViewCell alloc]

                initWithStyle:UITableViewCellStyleDefault

                reuseIdentifier: DisclosureButtonCellIdentifier];

    }

    NSUInteger row = [indexPath row];

    NSString *rowString = [list objectAtIndex:row];

    cell.textLabel.text = rowString;

    cell.accessoryType = UITableViewCellAccessoryDetailDisclosureButton;

    return cell;

}


#pragma mark -

#pragma mark Table Delegate Methods

- (void)tableView:(UITableView *)tableView

didSelectRowAtIndexPath:(NSIndexPath *)indexPath {

    UIAlertView *alert = [[UIAlertView alloc] initWithTitle:

          @"Hey, do you see the disclosure button?"

          message:@"If you're trying to drill down, touch that instead"

          delegate:nil

          cancelButtonTitle:@"Won't happen again"

          otherButtonTitles:nil];
    [alert show];

}


- (void)tableView:(UITableView *)tableView

accessoryButtonTappedForRowWithIndexPath:(NSIndexPath *)indexPath {

    if (childController == nil) {

        childController = [[BIDDisclosureDetailController alloc]

                           initWithNibName:@"BIDDisclosureDetail" bundle:nil];

    }

    childController.title = @"Disclosure Button Pressed";

    NSUInteger row = [indexPath row];

    NSString *selectedMovie = [list objectAtIndex:row];

    NSString *detailMessage = [[NSString alloc]

             initWithFormat:@"You pressed the disclosure button for %@.",

             selectedMovie];

    childController.message = detailMessage;

    childController.title = selectedMovie;

    [self.navigationController pushViewController:childController

                                         animated:YES];

}


@end
Right near the top of that big chunk, you may have noticed the following @interface declaration, just where you may have expected an @implementation section to start instead:
@interface BIDDisclosureButtonController ()

@property (strong, nonatomic) BIDDisclosureDetailController *childController;

@end
This kind of category declaration, where the parentheses are empty rather than containing the name of the category you're declaring, is called a class extension. This is a handy place to declare properties and methods that will be in the main @implementation section containing your class, but that you don't want to show up in the public header file.
A class extension is a good place to put a property for the childController. We are using this property internally in our class and don't want to expose it to others, so we don't advertise its existence by declaring it in the header.
By now, you should be fairly comfortable with pretty much everything up to and including the three data source methods we just wrote. Let's look at the two delegate methods we added, which you haven't seen before.
The first method, tableView:didSelectRowAtIndexPath:, is called when the row is selected. It puts up a polite little alert telling the user to tap the disclosure button instead of selecting the row. If the user actually taps the detail disclosure button, the other one of our new delegate methods, tableView:accessoryButtonTappedForRowWithIndexPath:, is called.
The first thing we do in tableView:accessoryButtonTappedForRowWithIndexPath: is check the childController instance variable to see if it's nil. If it is, we have not yet allocated and initialized a new instance of BIDDetailDisclosureController, so we do that next.
    if (childController == nil)

        childController = [[BIDDisclosureDetailController alloc]

                           initWithNibName:@"BIDDisclosureDetail" bundle:nil];
This gives us a new controller that we can push onto the navigation stack, just as we did earlier in BIDFirstLevelController. Before we push it onto the stack, though, we need to give it some text to display.
childController.title = @"Disclosure Button Pressed";
In this case, we set message to reflect the row whose disclosure button was tapped. We also set the new view's title based on the selected row.
    NSUInteger row = [indexPath row];

    NSString *selectedMovie = [list objectAtIndex:row];

    NSString *detailMessage = [[NSString alloc]

             initWithFormat:@"You pressed the disclosure button for %@.",

             selectedMovie];

    childController.message = detailMessage;

    childController.title = selectedMovie;
Finally, we push the detail view controller onto the navigation stack.
    [self.navigationController pushViewController:childController

                                         animated:YES];
And, with that, our first second-level controller is complete, as is our detail controller. The only remaining task is to create an instance of our second-level controller and add it to BIDFirstLevelController's controllers.
Adding a Disclosure Button Controller Instance
Select BIDFirstLevelController.m. Up at the top of the file, we'll need to add one line of code to import the header file for our new class. Insert this line directly above the @implementation declaration:
#import "BIDDisclosureButtonController.h"
Then insert the following code in the viewDidLoad method:
- (void)viewDidLoad {

    [super viewDidLoad];

    self.title = @"First Level";

    NSMutableArray *array = [[NSMutableArray alloc] init];


    // Disclosure Button

    BIDDisclosureButtonController *disclosureButtonController =

        [[BIDDisclosureButtonController alloc]

        initWithStyle:UITableViewStylePlain];

    disclosureButtonController.title = @"Disclosure Buttons";

    disclosureButtonController.rowImage = [UIImage

        imageNamed:@"disclosureButtonControllerIcon.png"];

    [array addObject:disclosureButtonController];
    self.controllers = array;

}
All that we're doing is creating a new instance of BIDDisclosureButtonController. We specify UITableViewStylePlain to indicate that we want a normal table, not a grouped table. Next, we set the title and the image to one of the .png files we added to our project, add the controller to the array, and release the controller.
Save your changes, and try building. If everything went as planned, your project should compile and then launch in the simulator. When it comes up, there should be just a single row (see Figure 9–10).
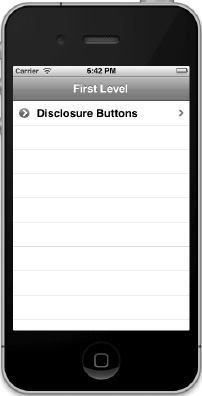
Figure 9–10. Our application after adding the first of six second-level controllers
If you touch the one row, it will take you down to the BIDDisclosureButtonController table view we just implemented (see Figure 9–11).

Figure 9–11. The Disclosure Buttons view
Notice that the title that we set for our controller is now displayed in the navigation bar, and the title of the view controller we were previously using (First Level) is contained in a navigation button. Tapping that button will take you back up to the first level. Select any row in this table, and you will get a gentle reminder that the detail disclosure button is there for drilling down (see Figure 9–12).
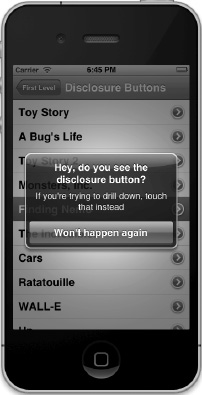
Figure 9–12. Selecting the row does not drill down when there is a detail disclosure button visible.
If you touch the detail disclosure button itself, you drill down into the BIDDisclosureDetailController view (see Figure 9–13). This view shows information that we passed into it. Even though this is a simple example, the same basic technique is used anytime you show a detail view.

Notice that when you drill down to the detail view, the title again changes, as does the back button, which now takes you to the previous view instead of the root view.
That finishes up the first view controller. Do you see now how the design Apple used here with the navigation controller makes it possible to build your application in small chunks? That's pretty cool, isn't it?
Second Subcontroller: The Checklist
The next second-level view we're going to implement is another table view. But this time, we'll use the accessory icon to let the user select one and only one item from the list. We'll use the accessory icon to place a check mark next to the currently selected row, and we'll change the selection when the user touches another row.
Since this view is a table view and it has no detail view, we don't need a new nib, but we do need to create another subclass of BIDSecondLevelViewController. Select the Nav folder in the project navigator in Xcode, and then select File ![]() New
New ![]() New File. . . or press
New File. . . or press ![]() N. Select Cocoa Touch on the left, Objective-C class on the right, and click Next. Then name your new class BIDCheckListController, enter BIDSecondLevelViewController for Subclass of, and click the Next button. On the final screen, make sure the Nav folder, Group, and Target are selected (just as you've done for the other classes in this project).
N. Select Cocoa Touch on the left, Objective-C class on the right, and click Next. Then name your new class BIDCheckListController, enter BIDSecondLevelViewController for Subclass of, and click the Next button. On the final screen, make sure the Nav folder, Group, and Target are selected (just as you've done for the other classes in this project).
Creating the Checklist View
To present a checklist, we need a way to keep track of which row is currently selected. We'll declare an NSIndexPath property to track the last row selected. Single-click BIDCheckListController.h, and make the following changes:
#import "BIDSecondLevelViewController.h"


@interface BIDCheckListController : BIDSecondLevelViewController


@property (strong, nonatomic) NSArray *list;

@property (strong, nonatomic) NSIndexPath *lastIndexPath;

@end
Then switch over to BIDCheckListController.m, and add the following code:
#import "BIDCheckListController.h"


@implementation BIDCheckListController

@synthesize list;

@synthesize lastIndexPath;


- (void)viewDidLoad {

    [super viewDidLoad];

    NSArray *array = [[NSArray alloc] initWithObjects:@"Who Hash",

       @"Bubba Gump Shrimp Étouffée", @"Who Pudding", @"Scooby Snacks",

       @"Everlasting Gobstopper", @"Green Eggs and Ham", @"Soylent Green",

       @"Hard Tack", @"Lembas Bread", @"Roast Beast", @"Blancmange", nil];

    self.list = array;

}


- (void)viewDidUnload {

    [super viewDidUnload];

    self.list = nil;

    self.lastIndexPath = nil;

}


#pragma mark -

#pragma mark Table Data Source Methods

- (NSInteger)tableView:(UITableView *)tableView

 numberOfRowsInSection:(NSInteger)section {

    return [list count];

}


- (UITableViewCell *)tableView:(UITableView *)tableView

         cellForRowAtIndexPath:(NSIndexPath *)indexPath {

    static NSString *CheckMarkCellIdentifier = @"CheckMarkCellIdentifier";


    UITableViewCell *cell = [tableView dequeueReusableCellWithIdentifier:

                             CheckMarkCellIdentifier];

    if (cell == nil) {

        cell = [[UITableViewCell alloc]

            initWithStyle:UITableViewCellStyleDefault

            reuseIdentifier:CheckMarkCellIdentifier];
    }

    NSUInteger row = [indexPath row];

    NSUInteger oldRow = [lastIndexPath row];

    cell.textLabel.text = [list objectAtIndex:row];

    cell.accessoryType = (row == oldRow && lastIndexPath != nil) ?

    UITableViewCellAccessoryCheckmark : UITableViewCellAccessoryNone;


    return cell;

}


#pragma mark -

#pragma mark Table Delegate Methods

- (void)tableView:(UITableView *)tableView

didSelectRowAtIndexPath:(NSIndexPath *)indexPath {

    int newRow = [indexPath row];

    int oldRow = (lastIndexPath != nil) ? [lastIndexPath row] : -1;


    if (newRow != oldRow) {

        UITableViewCell *newCell = [tableView cellForRowAtIndexPath:

                                    indexPath];

        newCell.accessoryType = UITableViewCellAccessoryCheckmark;


        UITableViewCell *oldCell = [tableView cellForRowAtIndexPath:

                                    lastIndexPath];

        oldCell.accessoryType = UITableViewCellAccessoryNone;

        lastIndexPath = indexPath;

    }

    [tableView deselectRowAtIndexPath:indexPath animated:YES];

}


@end
Let's start with the tableView:cellForRowAtIndexPath: method, which has a few new things worth noticing. The first several lines should be familiar to you.
    static NSString *CheckMarkCellIdentifier = @"CheckMarkCellIdentifier";


    UITableViewCell *cell = [tableView dequeueReusableCellWithIdentifier:

        CheckMarkCellIdentifier];

    if (cell == nil) {

        cell = [[UITableViewCell alloc]

                initWithStyle:UITableViewCellStyleDefault

                reuseIdentifier:CheckMarkCellIdentifier];

    }
Next is where things get interesting. First, we extract the row from this cell and from the current selection.
    NSUInteger row = [indexPath row];

    NSUInteger oldRow = [lastIndexPath row];
We grab the value for this row from our array and assign it to the cell's title.
cell.textLabel.text = [list objectAtIndex:row];
Then we set the accessory to show either a check mark or nothing, depending on whether the two rows are the same. In other words, if the table is requesting a cell for a row that is the currently selected row, we set the accessory icon to be a check mark; otherwise, we set it to be nothing. Notice that we also check lastIndexPath to make sure it's not nil. We do this because a nillastIndexPath indicates no selection. However, calling the row method on a nil object will return a 0, which is a valid row, but we don't want to put a check mark on row 0 when, in reality, there is no selection.
    cell.accessoryType = (row == oldRow && lastIndexPath != nil) ?

      UITableViewCellAccessoryCheckmark : UITableViewCellAccessoryNone;
Now skip down to the last method. You've seen the tableView:didSelectRowAtIndexPath: method before, but we're doing something new here. We grab not only the row that was just selected, but also the row that was previously selected.
    int newRow = [indexPath row];

    int oldRow = [lastIndexPath row];
We do this so if the new row and the old row are the same, we don't bother making any changes.
if (newRow != oldRow) {
Next, we grab the cell that was just selected and assign a check mark as its accessory icon.
        UITableViewCell *newCell = [tableView

            cellForRowAtIndexPath:indexPath];

        newCell.accessoryType = UITableViewCellAccessoryCheckmark;
We then grab the previously selected cell, and we set its accessory icon to none.
        UITableViewCell *oldCell = [tableView cellForRowAtIndexPath:

            lastIndexPath];

        oldCell.accessoryType = UITableViewCellAccessoryNone;
After that, we store the index path that was just selected in lastIndexPath, so we'll have it the next time a row is selected.
        lastIndexPath = indexPath;

    }
When we're finished, we tell the table view to deselect the row that was just selected, because we don't want the row to stay highlighted. We've already marked the row with a check mark, so leaving it blue would just be a distraction.
    [tableView deselectRowAtIndexPath:indexPath animated:YES];

}
Adding a Checklist Controller Instance
Our next task is to add an instance of this controller to BIDFirstLevelController's controllers array. Start off by importing the new header file, adding this line just after all the other #import statements at the top of the file:
#import "BIDCheckListController.h"
Then create an instance of BIDCheckListController by adding the following code to the viewDidLoad method in BIDFirstLevelController.m:
- (void)viewDidLoad {

    [super viewDidLoad];

    self.title = @"First Level";

    NSMutableArray *array = [[NSMutableArray alloc] init];


    // Disclosure Button

    BIDDisclosureButtonController *BIDDisclosureButtonController =

        [[BIDDisclosureButtonController alloc]

        initWithStyle:UITableViewStylePlain];

    BIDDisclosureButtonController.title = @"Disclosure Buttons";

    BIDDisclosureButtonController.rowImage = [UIImage imageNamed:

        @"BIDDisclosureButtonControllerIcon.png"];

    [array addObject:BIDDisclosureButtonController];


    // Checklist

    BIDCheckListController *checkListController = [[BIDCheckListController alloc]

        initWithStyle:UITableViewStylePlain];

    checkListController.title = @"Check One";

    checkListController.rowImage = [UIImage imageNamed:

        @"checkmarkControllerIcon.png"];

    [array addObject:checkListController];


    self.controllers = array;

}
Well, what are you waiting for? Save your changes, compile, and run. If everything went smoothly, the application launched again in the simulator, and there was much rejoicing. This time there will be two rows (see Figure 9–14).
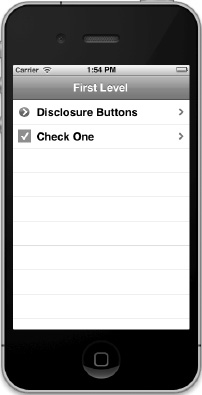
Figure 9–14. Two second-level controllers and two rows. What a coincidence!
If you touch the Check One row, it will take you down to the view controller we just implemented (see Figure 9–15). When it first comes up, no rows will be selected and no check marks will be visible. If you tap a row, a check mark will appear. If you then tap a different row, the check mark will switch to the new row. Huzzah!
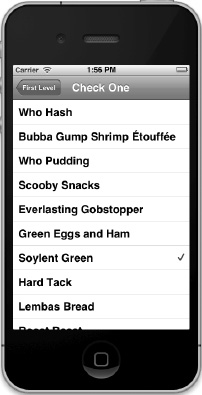
Figure 9–15. The checklist view. Note that only a single item can be checked at a time. Soylent Green, anyone?
Third Subcontroller: Controls on Table Rows
In the previous chapter, we showed you how to add subviews to a table view cell to customize its appearance. However, we didn't put any active controls into the content view; it had only labels. Now let's see how to add controls to a table view cell.
In our example, we'll add a button to each row, but the same technique will work with most controls. We'll add the control to the accessory view, which is the area on the right side of each row where you found the accessory icons covered earlier in the chapter.
To add another row to our BIDFirstLevelController's table, we need another second-level controller. You know the drill: select the Nav folder in the project navigator, and then press ![]() N or select File
N or select File ![]() New
New ![]() New File. . .. Select Cocoa Touch, select Objective-C class, and click Next. Name the class BIDRowControlsController, and enter BIDSecondLevelViewController for Subclass of. Save the file in the Nav folder, with Nav selected for both Target and Group, as usual. Just as with the previous subcontroller, this controller can be completely implemented with a single table view; no nib file is necessary.
New File. . .. Select Cocoa Touch, select Objective-C class, and click Next. Name the class BIDRowControlsController, and enter BIDSecondLevelViewController for Subclass of. Save the file in the Nav folder, with Nav selected for both Target and Group, as usual. Just as with the previous subcontroller, this controller can be completely implemented with a single table view; no nib file is necessary.
Creating the Row Controls View
Single-click BIDRowControlsController.h, and make the following changes:
#import "BIDSecondLevelViewController.h"


@interface BIDRowControlsController : BIDSecondLevelViewController


@property (strong, nonatomic) NSArray *list;

- (IBAction)buttonTapped:(id)sender;

@end
Not much there, huh? We change the parent class and create an array to hold our table data. Then we define a property for that array and declare an action method that will be called when the row buttons are pressed.
NOTE: Strictly speaking, we don't need to declare the buttonTapped: method an action method by specifying IBAction, since we won't be triggering it from controls in a nib file. Since it is an action method and will be called by a control, however, it's still a good idea to use the IBAction keyword, since it signals our intent to future readers of this code.
Switch over to BIDRowControlsController.m, and make the following changes:
#import "BIDRowControlsController.h"


@implementation BIDRowControlsController

@synthesize list;


- (IBAction)buttonTapped:(id)sender {

    UIButton *senderButton = (UIButton *)sender;

    UITableViewCell *buttonCell =

        (UITableViewCell *)[senderButton superview];

    NSUInteger buttonRow = [[self.tableView

        indexPathForCell:buttonCell] row];

    NSString *buttonTitle = [list objectAtIndex:buttonRow];

    UIAlertView *alert = [[UIAlertView alloc]

                     initWithTitle:@"You tapped the button"

                     message:[NSString stringWithFormat:

                         @"You tapped the button for %@", buttonTitle]

                     delegate:nil

                     cancelButtonTitle:@"OK"

                     otherButtonTitles:nil];

    [alert show];

}


- (void)viewDidLoad {

    [super viewDidLoad];

    NSArray *array = [[NSArray alloc] initWithObjects:@"R2-D2",

           @"C3PO", @"Tik-Tok", @"Robby", @"Rosie", @"Uniblab",

           @"Bender", @"Marvin", @"Lt. Commander Data",

           @"Evil Brother Lore", @"Optimus Prime", @"Tobor", @"HAL",
           @"Orgasmatron", nil];

    self.list = array;

}


- (void)viewDidUnload {

    [super viewDidUnload];

    self.list = nil;

}


#pragma mark -

#pragma mark Table Data Source Methods

- (NSInteger)tableView:(UITableView *)tableView

        numberOfRowsInSection:(NSInteger)section {

    return [list count];

}


- (UITableViewCell *)tableView:(UITableView *)tableView

         cellForRowAtIndexPath:(NSIndexPath *)indexPath {

    static NSString *ControlRowIdentifier = @"ControlRowIdentifier";


    UITableViewCell *cell = [tableView

        dequeueReusableCellWithIdentifier:ControlRowIdentifier];

    if (cell == nil) {

        cell = [[UITableViewCell alloc]

                     initWithStyle:UITableViewCellStyleDefault

                     reuseIdentifier:ControlRowIdentifier];

        UIImage *buttonUpImage = [UIImage imageNamed:@"button_up.png"];

        UIImage *buttonDownImage = [UIImage imageNamed:@"button_down.png"];

        UIButton *button = [UIButton buttonWithType:UIButtonTypeCustom];

        button.frame = CGRectMake(0.0, 0.0, buttonUpImage.size.width,

            buttonUpImage.size.height);

        [button setBackgroundImage:buttonUpImage

            forState:UIControlStateNormal];

        [button setBackgroundImage:buttonDownImage

           forState:UIControlStateHighlighted];

        [button setTitle:@"Tap" forState:UIControlStateNormal];

        [button addTarget:self action:@selector(buttonTapped:)

           forControlEvents:UIControlEventTouchUpInside];

        cell.accessoryView = button;

    }

    NSUInteger row = [indexPath row];

    NSString *rowTitle = [list objectAtIndex:row];

    cell.textLabel.text = rowTitle;


    return cell;

}


#pragma mark -

#pragma mark Table Delegate Methods

- (void)tableView:(UITableView *)tableView

        didSelectRowAtIndexPath:(NSIndexPath *)indexPath {

    NSUInteger row = [indexPath row];

    NSString *rowTitle = [list objectAtIndex:row];

    UIAlertView *alert = [[UIAlertView alloc]
                           initWithTitle:@"You tapped the row."

                           message:[NSString

                           stringWithFormat:@"You tapped %@.", rowTitle]

                           delegate:nil

                           cancelButtonTitle:@"OK"

                           otherButtonTitles:nil];

    [alert show];

    [tableView deselectRowAtIndexPath:indexPath animated:YES];

}


@end
Let's begin with our new action method. The first thing we do is declare a new UIButton variable and set it to sender. This is just so we don't need to cast sender multiple times throughout our method.
UIButton *senderButton = (UIButton *)sender;
Next, we get the button's superview, which is the table view cell for the row it's in, and we use that to determine the row that was pressed and to retrieve the title for that row.
    UITableViewCell *buttonCell =

        (UITableViewCell *)[senderButton superview];

    NSUInteger buttonRow = [[self.tableView

        indexPathForCell:buttonCell] row];

    NSString *buttonTitle = [list objectAtIndex:buttonRow];
Then we show an alert, saying that the user pressed the button.
    UIAlertView *alert = [[UIAlertView alloc]

                     initWithTitle:@"You tapped the button"

                     message:[NSString stringWithFormat:

                         @"You tapped the button for %@", buttonTitle]

                     delegate:nil

                     cancelButtonTitle:@"OK"

                     otherButtonTitles:nil];

    [alert show];
Everything from there to tableView:cellForRowAtIndexPath: should be familiar to you, so skip down to that method, which is where we set up the table view cell with the button. The method starts as usual. We declare an identifier and then use it to request a reusable cell.
    static NSString *ControlRowIdentifier = @"ControlRowIdentifier";

    UITableViewCell *cell = [tableView

        dequeueReusableCellWithIdentifier:ControlRowIdentifier];
If there are no reusable cells, we create one.
    if (cell == nil) {

        cell = [[UITableViewCell alloc]

                     initWithStyle:UITableViewCellStyleDefault

                     reuseIdentifier:ControlRowIdentifier];
To create the button, we load in two of the images that were in the Images folder you imported earlier. One will represent the button in the normal state; the other will represent the button in its highlighted state—in other words, when the button is being tapped.
        UIImage *buttonUpImage = [UIImage imageNamed:@"button_up.png"];

        UIImage *buttonDownImage = [UIImage imageNamed:@"button_down.png"];
Next, we create a button. Because the buttonType property of UIButton is declared read-only, we need to create the button using the factory method buttonWithType:. If we created it using alloc and init, we wouldn't be able to change the button's type to UIButtonTypeCustom, which we need to do in order to use the custom button images.
UIButton *button = [UIButton buttonWithType:UIButtonTypeCustom];
Next, we set the button's size to match the images, assign the images for the two states, and give the button a title.
        button.frame = CGRectMake(0.0, 0.0, buttonUpImage.size.width,

            buttonUpImage.size.height);

        [button setBackgroundImage:buttonUpImage

            forState:UIControlStateNormal];

        [button setBackgroundImage:buttonDownImage

            forState:UIControlStateHighlighted];

        [button setTitle:@"Tap" forState:UIControlStateNormal];
Finally, we tell the button to call our action method on the touch up inside event and assign it to the cell's accessory view.
        [button addTarget:self action:@selector(buttonTapped:)

            forControlEvents:UIControlEventTouchUpInside];

        cell.accessoryView = button;
Everything else in the tableView:cellForRowAtIndexPath: method is just as we've done it in the past.
The last method we implemented is tableView:didSelectRowAtIndexPath:, which is the delegate method that is called after the user selects a row. All we do here is find out which row was selected and grab the appropriate title from our array.
    NSUInteger row = [indexPath row];

    NSString *rowTitle = [list objectAtIndex:row];
Then we create another alert to inform the user that arow was tapped, but not the button.
    UIAlertView *alert = [[UIAlertView alloc]

                           initWithTitle:@"You tapped the row."

                           message:[NSString

                           stringWithFormat:@"You tapped %@.", rowTitle]

                           delegate:nil

                           cancelButtonTitle:@"OK"

                           otherButtonTitles:nil];

    [alert show];

    [tableView deselectRowAtIndexPath:indexPath animated:YES];
Adding a Rows Control Controller Instance
Now, all we need to do is add this controller to the array in BIDFirstLevelController. Single-click BIDFirstLevelController.m, and import the header file for the BIDRowControlsController class by adding the following line of code just before the @implementation line:
#import "BIDRowControlsController.h"
Then move on and add the following code to viewDidLoad:
- (void)viewDidLoad {

    [super viewDidLoad];

    self.title = @"Root Level";

    NSMutableArray *array = [[NSMutableArray alloc] init];


    // Disclosure Button

    BIDDisclosureButtonController *BIDDisclosureButtonController =

        [[BIDDisclosureButtonController alloc]

       initWithStyle:UITableViewStylePlain];

    BIDDisclosureButtonController.title = @"Disclosure Buttons";

    BIDDisclosureButtonController.rowImage = [UIImage

        imageNamed:@"BIDDisclosureButtonControllerIcon.png"];

    [array addObject:BIDDisclosureButtonController];

    [BIDDisclosureButtonController release];


    // Checklist

    BIDCheckListController *checkListController = [[BIDCheckListController alloc]

              initWithStyle:UITableViewStylePlain];

    checkListController.title = @"Check One";

    checkListController.rowImage = [UIImage

        imageNamed:@"checkmarkControllerIcon.png"];

    [array addObject:checkListController];

    [checkListController release];


    // Table Row Controls

    BIDRowControlsController *rowControlsController =

        [[BIDRowControlsController alloc]

        initWithStyle:UITableViewStylePlain];

    rowControlsController.title = @"Row Controls";

    rowControlsController.rowImage = [UIImage imageNamed:

        @"rowControlsIcon.png"];

    [array addObject:rowControlsController];


    self.controllers = array;

}
Save everything, and compile it. This time, you should see yet another row when your application launches (see Figure 9–16).
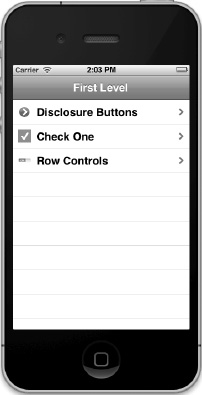
Figure 9–16. The Row Controls controller added to the root level controller
If you tap this new row, it will take you down to a new list where every row has a button control on the right side of the row. Tapping either the button or the row will show an alert telling you which one you tapped (see Figure 9–17).

Figure 9–17. The table with buttons in the accessory view
Tapping a row anywhere but on its switch will display an alert telling you whether the switch for that row is turned on or off.
At this point, you should be getting pretty comfortable with how this all works, so let's try a slightly more difficult case, shall we? Next, we'll take a look at how to allow the user to reorder the rows in a table.
NOTE: How are you doing? Hanging in there? We know this chapter is a bit of a marathon, with a lot of stuff to absorb. At this point, you've already accomplished a lot. Why not take a break, and grab a Fresca and a pastel de Belém? We'll do the same. Come back when you're refreshed and ready to move on.
Fourth Subcontroller: Movable Rows
Moving and deleting rows, as well as inserting rows at a specific spot in the table, are tasks that can be implemented fairly easily. All three are implemented by turning on something called editing mode, which is done using the setEditing:animated: method on the table view.
The setEditing:animated: method takes two Boolean values. The first indicates whether you are turning on or off editing mode, and the second indicates whether the table should animate the transition. If you set editing to the mode it's already in (in other words, turning it on when it's already on or off when it's already off), the transition will not be animated, regardless of what you specify in the second parameter.
Once editing mode is turned on, a number of new delegate methods come into play. The table view uses them to ask if a certain row can be moved or edited, and again to notify you if the user actually does move or edit a specific row. It sounds more complex than it is. Let's see it in action in our movable row controller.
Because we don't need to display a detail view, this view controller can be implemented without a nib and with just a single controller class. Select the Nav folder in the project navigator in Xcode, and then press ![]() N or select File
N or select File ![]() New
New ![]() New File…. Select Cocoa Touch, select Objective-C class, and click Next. Then enter BIDMoveMeController as the class name, and enter BIDSecondLevelViewController in the Subclass of control. Click Next again, and save the class files as usual.
New File…. Select Cocoa Touch, select Objective-C class, and click Next. Then enter BIDMoveMeController as the class name, and enter BIDSecondLevelViewController in the Subclass of control. Click Next again, and save the class files as usual.
Creating the Movable Row View
In our header file, we need two things. First, we need a mutable array to hold our data and keep track of the order of the rows. It must be mutable because we need to be able to move items around as we are notified of moves. We also need an action method to toggle edit mode on and off. The action method will be called by a navigation bar button that we will create.
Single-click BIDMoveMeController.h, and make the following changes:
#import "BIDSecondLevelViewController.h"


@interface BIDMoveMeController : BIDSecondLevelViewController


@property (strong, nonatomic) NSMutableArray *list;

- (IBAction)toggleMove;

@end
Now, switch over to BIDMoveMeController.m, and add the following code:
#import "BIDMoveMeController.h"


@implementation BIDMoveMeController

@synthesize list;


- (IBAction)toggleMove{

    [self.tableView setEditing:!self.tableView.editing animated:YES];


    if (self.tableView.editing)

        [self.navigationItem.rightBarButtonItem setTitle:@"Done"];

    else

        [self.navigationItem.rightBarButtonItem setTitle:@"Move"];

}
- (void)viewDidLoad {

    [super viewDidLoad];

    if (list == nil) {

        NSMutableArray *array = [[NSMutableArray alloc] initWithObjects:

                    @"Eeny", @"Meeny", @"Miney", @"Moe", @"Catch", @"A",

                    @"Tiger", @"By", @"The", @"Toe", nil];

        self.list = array;

    }


    UIBarButtonItem *moveButton = [[UIBarButtonItem alloc]

                                   initWithTitle:@"Move"

                                   style:UIBarButtonItemStyleBordered

                                   target:self

                                   action:@selector(toggleMove)];

    self.navigationItem.rightBarButtonItem = moveButton;

}


#pragma mark -

#pragma mark Table Data Source Methods

- (NSInteger)tableView:(UITableView *)tableView

        numberOfRowsInSection:(NSInteger)section {

    return [list count];

}


- (UITableViewCell *)tableView:(UITableView *)tableView

         cellForRowAtIndexPath:(NSIndexPath *)indexPath {


    static NSString *MoveMeCellIdentifier = @"MoveMeCellIdentifier";

    UITableViewCell *cell = [tableView

        dequeueReusableCellWithIdentifier:MoveMeCellIdentifier];

    if (cell == nil) {

        cell = [[UITableViewCell alloc]

                  initWithStyle:UITableViewCellStyleDefault

                  reuseIdentifier:MoveMeCellIdentifier];

        cell.showsReorderControl = YES;

    }

    NSUInteger row = [indexPath row];

    cell.textLabel.text = [list objectAtIndex:row];


    return cell;

}


- (UITableViewCellEditingStyle)tableView:(UITableView *)tableView

           editingStyleForRowAtIndexPath:(NSIndexPath *)indexPath {

    return UITableViewCellEditingStyleNone;

}


- (BOOL)tableView:(UITableView *)tableView

        canMoveRowAtIndexPath:(NSIndexPath *)indexPath {

    return YES;

}


- (void)tableView:(UITableView *)tableView
    moveRowAtIndexPath:(NSIndexPath *)fromIndexPath

    toIndexPath:(NSIndexPath *)toIndexPath {

    NSUInteger fromRow = [fromIndexPath row];

    NSUInteger toRow = [toIndexPath row];


    id object = [list objectAtIndex:fromRow];

    [list removeObjectAtIndex:fromRow];

    [list insertObject:object atIndex:toRow];

}


@end
Let's take this one step at a time. The first code we added is the implementation of our action method.
- (IBAction)toggleMove{

    [self.tableView setEditing:!self.tableView.editing animated:YES];


    if (self.tableView.editing)

        [self.navigationItem.rightBarButtonItem setTitle:@"Done"];

    else

        [self.navigationItem.rightBarButtonItem setTitle:@"Move"];

}
All that we're doing here is toggling edit mode and then setting the button's title to an appropriate value. Easy enough, right?
The next method we touched is viewDidLoad. The first part of that method doesn't do anything you haven't seen before. It checks to see if list is nil, and if it is (meaning this is the first time this method has been called), it creates a mutable array filled with values, so our table has some data to show. After that, though, there is something new.
    UIBarButtonItem *moveButton = [[UIBarButtonItem alloc]

              initWithTitle:@"Move"

              style:UIBarButtonItemStyleBordered

              target:self

              action:@selector(toggleMove)];

    self.navigationItem.rightBarButtonItem = moveButton;
Here, we're creating a button bar item, which is a button that will sit on the navigation bar. We give it a title of Move and specify a constant, UIBarButtonItemStyleBordered, to indicate that we want a standard bordered bar button. The last two arguments, target and action, tell the button what to do when it is tapped. By passing self as the target and giving it a selector to the toggleMove method as the action, we are telling the button to call our toggleMove method whenever the button is tapped. As a result, any time the user taps this button, editing mode will be toggled. After we create the button, we add it to the right side of the navigation bar, and then release it.
Unlike most view controllers we create, this one does not have a viewDidUnload method. That's intentional. We have no outlets, and if we were to flush our list array, we would lose any reordering that the user had done when the view is flushed, which we don't want to happen. Therefore, since we have nothing to do in the viewDidUnload method, we don't bother to override it.
Now, skip down to the tableView:cellForRowAtIndexPath: method we just added. Did you notice the following new line of code?
cell.showsReorderControl = YES;
Standard accessory icons can be specified by setting the accessoryType property of the cell. But the reorder control is not a standard accessory icon. It's a special case that's shown only when the table is in edit mode. To enable the reorder control, we need to set a property on the cell itself. Note, though, that setting this property to YES doesn't actually display the reorder control until the table is put into edit mode. Everything else in this method is stuff we've done before.
The next new method is short but important. In our table view, we want to be able to reorder the rows, but we don't want the user to be able to delete or insert rows. As a result, we implement the method tableView:editingStyleForRowAtIndexPath:. This method allows the table view to ask if a specific row can be deleted or if a new row can be inserted at a specific spot. By returning UITableViewCellEditingStyleNone for each row, we are indicating that we don't support inserts or deletes for any row.
Next comes the method tableView:canMoveRowAtIndexPath:. This method is called for each row, and it gives you the chance to disallow the movement of specific rows. If you return NO from this method for any row, the reorder control will not be shown for that row, and the user will be unable to move it from its current position. We want to allow full reordering, so we just return YES for every row.
The last method, tableView:moveRowAtIndexPath:fromIndexPath:, is the one that will actually be called when the user moves a row. The two parameters besides tableView are both NSIndexPath instances that identify the row that was moved and the row's new position. The table view has already moved the rows in the table, so the user is seeing the correct display, but we need to update our data model to keep the two in sync and avoid causing display problems.
First, we retrieve the row that needs to be moved. Then we retrieve the row's new position.
    NSUInteger fromRow = [fromIndexPath row];

    NSUInteger toRow = [toIndexPath row];
We now need to remove the specified object from the array and reinsert it at its new location.
    id object = [list objectAtIndex:fromRow];

    [list removeObjectAtIndex:fromRow];
After we've removed it, we need to reinsert it into the specified new location.
[list insertObject:object atIndex:toRow];
Well, there you have it. We've implemented a table that allows reordering of rows.
Adding a Move Me Controller Instance
Now, we just need to add an instance of this new class to BIDFirstLevelController's array of controllers. You're probably comfortable doing this by now, but we'll walk you through it just to keep you company.
In BIDFirstLevelController.m, import the new view's header file by adding the following line of code just before the @implementation declaration:
#import "BIDMoveMeController.h"
Now, add the following code to the viewDidLoad method in the same file:
- (void)viewDidLoad {

    [super viewDidLoad];

    self.title = @"First Level";

    NSMutableArray *array = [[NSMutableArray alloc] init];


    // Disclosure Button

    BIDDisclosureButtonController *BIDDisclosureButtonController =

        [[BIDDisclosureButtonController alloc]

        initWithStyle:UITableViewStylePlain];

    BIDDisclosureButtonController.title = @"Disclosure Buttons";

    BIDDisclosureButtonController.rowImage = [UIImage

        imageNamed:@"BIDDisclosureButtonControllerIcon.png"];

    [array addObject:BIDDisclosureButtonController];


    // Checklist

    BIDCheckListController *checkListController = [[BIDCheckListController alloc]

        initWithStyle:UITableViewStylePlain];

    checkListController.title = @"Check One";

    checkListController.rowImage = [UIImage

        imageNamed:@"checkmarkControllerIcon.png"];

    [array addObject:checkListController];


    // Table Row Controls

    BIDRowControlsController *rowControlsController =

        [[BIDRowControlsController alloc]

        initWithStyle:UITableViewStylePlain];

    rowControlsController.title = @"Row Controls";

    rowControlsController.rowImage = [UIImage imageNamed:

        @"rowControlsIcon.png"];

    [array addObject:rowControlsController];


    // Move Me

    BIDMoveMeController *moveMeController = [[BIDMoveMeController alloc]

          initWithStyle:UITableViewStylePlain];

    moveMeController.title = @"Move Me";

    moveMeController.rowImage = [UIImage imageNamed:@"moveMeIcon.png"];

    [array addObject:moveMeController];


    self.controllers = array;

}
OK, let's go ahead and compile this bad boy and see what shakes out. If everything went smoothly, our application will launch in the simulator with (count 'em) four rows in the root-level table(see Figure 9–18). If you click the new one, called Move Me, you'll go to a table whose rows make up a familiar childhood choosing rhyme (see Figure 9–6).
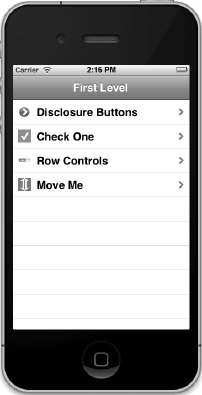
Figure 9–18. The Move Me row has been added to our table.
To reorder the rows, click the Move button in the upper-right corner, and the reorder controls should appear. If you tap a row's reorder control and then drag, the row should move as you drag, as in Figure 9–6. Once you are happy with the row's new position, release the drag. The row should settle into its new position nicely. You can even navigate back up to the top level and come back down, and your rows will be right where you left them. If you quit and return, they will be restored to their original order, but don't worry; in a few chapters, we'll show you how to save and restore data on a more permanent basis.
NOTE: If you find you have a bit of trouble making contact with the move control, don't panic. This gesture actually requires a little patience. Try holding the mouse button clicked (if you're in the simulator) or your finger pressed on the control (if you're on a device) a bit longer before moving it, in order to make the drag-to-reorder gesture work.
Now let's move on to the fifth subcontroller, which demonstrates another use of edit mode. This time, we'll allow the user to delete our precious rows. Gasp!
Fifth Subcontroller: Deletable Rows
Letting users delete rows isn't really significantly harder than letting them move rows. Let's take a look at that process.
Instead of creating an array from a hard-coded list of objects, we're going to load a property list file this time, just to save some typing. You can grab the file called computers.plist out of the 09 Nav folder in the projects archive that accompanies this book and add it to the Nav folder of your Xcode project.
Select the Nav folder in the project navigator, and then press ![]() N or select File
N or select File ![]() New
New ![]() New File…. Select Cocoa Touch, select Objective-C class, and click Next. Name your new class BIDDeleteMeController, and enter BIDSecondLevelViewController for Subclass of.
New File…. Select Cocoa Touch, select Objective-C class, and click Next. Name your new class BIDDeleteMeController, and enter BIDSecondLevelViewController for Subclass of.
Creating the Deletable Rows View
The changes we're going to make to BIDDeleteMeController.h should look familiar, as they're nearly identical to the ones we made in the movable rows view controller we just built. Go ahead and make these changes now:
#import "BIDSecondLevelViewController.h"


@interface BIDDeleteMeController : BIDSecondLevelViewController


@property (strong, nonatomic) NSMutableArray *list;

- (IBAction)toggleEdit:(id)sender;

@end
No surprises here, right? We declare a mutable array to hold our data and an action method to toggle edit mode.
In the previous controller, we used edit mode to let the users reorder rows. In this version, edit mode will be used to let them delete rows. You can actually combine both in the same table if you like. We separated them so the concepts would be a bit easier to follow, but the delete and reorder operations do play nicely together.
A row that can be reordered will display the reorder icon anytime that the table is in edit mode. When you tap the red, circular icon on the left side of the row (see Figure 9–7), the Delete button will pop up, obscuring the reorder icon, but only temporarily.
Switch over to BIDDeleteMeController.m, and add the following code:
#import "BIDDeleteMeController.h"


@implementation BIDDeleteMeController

@synthesize list;


- (IBAction)toggleEdit:(id)sender {
    [self.tableView setEditing:!self.tableView.editing animated:YES];


    if (self.tableView.editing)

        [self.navigationItem.rightBarButtonItem setTitle:@"Done"];

    else

        [self.navigationItem.rightBarButtonItem setTitle:@"Delete"];

}


- (void)viewDidLoad {

    [super viewDidLoad];

    if (list == nil){

        NSString *path = [[NSBundle mainBundle]

            pathForResource:@"computers" ofType:@"plist"];

        NSMutableArray *array = [[NSMutableArray alloc]

                                 initWithContentsOfFile:path];

        self.list = array;

    }

    UIBarButtonItem *editButton = [[UIBarButtonItem alloc]

                                   initWithTitle:@"Delete"

                                   style:UIBarButtonItemStyleBordered

                                   target:self

                                   action:@selector(toggleEdit:)];

    self.navigationItem.rightBarButtonItem = editButton;

}


#pragma mark -

#pragma mark Table Data Source Methods

- (NSInteger)tableView:(UITableView *)tableView

numberOfRowsInSection:(NSInteger)section {

    return [list count];

}


- (UITableViewCell *)tableView:(UITableView *)tableView

         cellForRowAtIndexPath:(NSIndexPath *)indexPath {

    static NSString *DeleteMeCellIdentifier = @"DeleteMeCellIdentifier";


    UITableViewCell *cell = [tableView dequeueReusableCellWithIdentifier:

                             DeleteMeCellIdentifier];


    if (cell == nil) {

        cell = [[UITableViewCell alloc]

            initWithStyle:UITableViewCellStyleDefault

            reuseIdentifier:DeleteMeCellIdentifier];

    }

    NSInteger row = [indexPath row];

    cell.textLabel.text = [self.list objectAtIndex:row];

    return cell;

}


#pragma mark -

#pragma mark Table View Data Source Methods

- (void)tableView:(UITableView *)tableView

    commitEditingStyle:(UITableViewCellEditingStyle)editingStyle

    forRowAtIndexPath:(NSIndexPath *)indexPath {
    NSUInteger row = [indexPath row];

    [self.list removeObjectAtIndex:row];

    [tableView deleteRowsAtIndexPaths:[NSArray arrayWithObject:indexPath]

                     withRowAnimation:UITableViewRowAnimationAutomatic];

}


@end
Here, the new action method, toggleEdit:, is pretty much the same as our previous version. It sets edit mode to on if it's currently off and vice versa, and then sets the button's title as appropriate. The viewDidLoad method is also similar to the one from the previous view controller and, again, we do not have a viewDidUnload method because we have no outlets and we want to preserve changes made to our mutable array in edit mode. The only difference is that we're loading our array from a property list rather than feeding it a hard-coded list of strings. The property list we're using is a flat array of strings containing a variety of computer model names that might be a bit familiar. We also assign the name Delete to the edit button, to make the button's effect obvious to the user.
The two data source methods contain nothing new, but the last method in the class is something you've never seen before, so let's take a closer look at it.
- (void)tableView:(UITableView *)tableView

    commitEditingStyle:(UITableViewCellEditingStyle)editingStyle

    forRowAtIndexPath:(NSIndexPath *)indexPath {
This method is called by the table view when the user has made an edit, which means a deletion or an insertion. The first argument is the table view on which a row was edited. The second parameter, editingStyle, is a constant that tells us what kind of edit just happened. Currently, three editing styles are defined:
UITableViewCellEditingStyleNone: We used this style in the previous controller to indicate that a row can't be edited. The optionUITableViewCellEditingStyleNonewill never be passed into this method, because it is used to indicate that editing is not allowed for this row.UITableViewCellEditingStyleDelete: This is the default option. We ignore this parameter, because the default editing style for rows is the delete style, so we know that every time this method is called, it will be requesting a delete. You can use this parameter to allow both inserts and deletes within a single table.UITableViewCellEditingStyleInsert: This is generally used when you need to let the user insert rows at a specific spot in a list. In a list whose order is maintained by the system, such as an alphabetical list of names, the user will usually tap a toolbar or navigation bar button to ask the system to create a new object in a detail view. Once the user is finished specifying the new object, the system will place in the appropriate row.
The last parameter, indexPath, tells us which row is being edited. For a delete, this index path represents the row to be deleted. For an insert, it represents the index where the new row should be inserted.
NOTE: We won't be covering the use of inserts, but the insert functionality works in fundamentally the same way as the delete functionality we are about to implement. The only difference is that instead of deleting the specified row from your data model, you need to create a new object and insert it at the specified spot.
In our method, we first retrieve the row that is being edited from indexPath.
NSUInteger row = [indexPath row];
Then we remove the object from the mutable array we created earlier.
[self.list removeObjectAtIndex:row];
Finally, we tell the table to delete the row, specifying the constant UITableViewRowAnimationAutomatic, which sets the animation so that the row disappears as either the rows below or the rows above appear to slide over it. The table view will decide the direction of the sliding animation on its own, depending on which row is being deleted.
    [tableView deleteRowsAtIndexPaths:[NSArray arrayWithObject:indexPath]

        withRowAnimation:UITableViewRowAnimationAutomatic];

}
NOTE: Several types of animation are available for table views. You can look up UITableViewRowAnimation in Xcode's document browser to see what other animations are available.
And that's all she wrote, folks. That's the whole enchilada for this class.
Adding a Delete Me Controller Instance
Now, let's add an instance of the new controller to our root view controller and try it out. In BIDFirstLevelController.m, we first need to import our new controller class's header file, so add the following line of code directly before the @implementation declaration:
#import "BIDDeleteMeController.h"
Next, add the following code to the viewDidLoad method:
- (void)viewDidLoad {

    [super viewDidLoad];

    self.title = @"First Level";

    NSMutableArray *array = [[NSMutableArray alloc] init];


    // Disclosure Button

    BIDDisclosureButtonController *disclosureButtonController =
        [[BIDDisclosureButtonController alloc]

        initWithStyle:UITableViewStylePlain];

    disclosureButtonController.title = @"Disclosure Buttons";

    disclosureButtonController.rowImage = [UIImage imageNamed:

        @"disclosureButtonControllerIcon.png"];

    [array addObject:disclosureButtonController];


    // Checklist

    BIDCheckListController *checkListController = [[BIDCheckListController alloc]

        initWithStyle:UITableViewStylePlain];

    checkListController.title = @"Check One";

    checkListController.rowImage = [UIImage imageNamed:

        @"checkmarkControllerIcon.png"];

    [array addObject:checkListController];


    // Table Row Controls

    RowControlsController *rowControlsController =

        [[RowControlsController alloc]

        initWithStyle:UITableViewStylePlain];

    rowControlsController.title = @"Row Controls";

    rowControlsController.rowImage = [UIImage imageNamed:

        @"rowControlsIcon.png"];

    [array addObject:rowControlsController];


    // Move Me

    BIDMoveMeController *moveMeController = [[BIDMoveMeController alloc]

        initWithStyle:UITableViewStylePlain];

    moveMeController.title = @"Move Me";

    moveMeController.rowImage = [UIImage imageNamed:@"moveMeIcon.png"];

    [array addObject:moveMeController];


    // Delete Me

    BIDDeleteMeController *deleteMeController = [[BIDDeleteMeController alloc]

        initWithStyle:UITableViewStylePlain];

    deleteMeController.title = @"Delete Me";

    deleteMeController.rowImage = [UIImage imageNamed:@"deleteMeIcon.png"];

    [array addObject:deleteMeController];


    self.controllers = array;

}
Save everything, compile, and let her rip. When the simulator comes up, the root level will now have—can you guess?—five rows. If you select the new DeleteMe row, you'll be presented with a list of computer models (see Figure 9–19). How many of these have you owned?
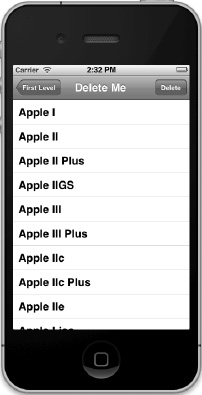
Figure 9–19. The Delete Me view when it first launches. Recognize any of these computers?
Notice that we again have a button on the right side of the navigation bar, this time labeled Delete. If you tap that, the table enters edit mode, which looks like Figure 9–20.
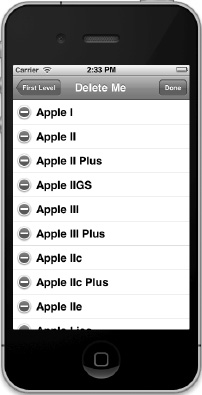
Figure 9–20. The Delete Me view in edit mode
Next to each editable row is a little icon that looks a little like a Do Not Enter street sign. If you tap the icon, it rotates sideways, and a button labeled Delete appears (see Figure 9–7). Tapping that button will cause its row to be deleted, both from the underlying model as well as from the table, using the animation style we specified.
When you implement edit mode to allow deletions, you get additional functionality for free. Swipe your finger horizontally across a row. Look at that! The Delete button comes up for just that row, just as in the Mail application.
We're coming around the bend, now, and the finish line is in sight, albeit still a little ways in the distance. If you're still with us, give yourself a pat on the back, or have someone do it for you. This is a long, tough chapter.
Sixth Subcontroller: An Editable Detail Pane
The next concept we're going to explore is how to implement a reusable editable detail view. You may notice as you look through the various applications that come on your iPhone that many of them, including the Contacts application, implement their detail views as a grouped table (see Figure 9–21).
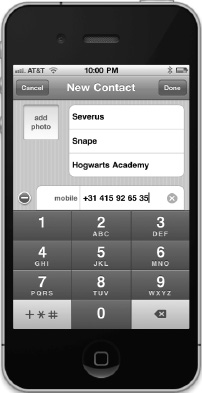
Figure 9–21. An example of a grouped table view being used to present an editable table view
Let's look at how to do this now. Before we begin, we need some data to show, and we need more than just a list of strings. In the previous two chapters, when we needed more complex data, such as with the multiline table in Chapter 8 or the ZIP codes picker in Chapter 7, we used an NSArray to hold a bunch of NSDictionary instances filled with our data. That works fine and is very flexible, but it's a little hard to work with. For this table's data, let's create a custom Objective-C data object to hold the individual instances that will be displayed in the list.
Creating the Data Model Object
The property list we'll be using in this section of the application contains data about the US presidents: each president's name, his party, the year he took office, and the year he left office. Let's create the class to hold that data.
Once again, single-click the Nav folder in Xcode to select it, and then press ![]() N to bring up the new file assistant. Select Cocoa Touch from the left pane, Objective-C class from the right pane, and click Next. Then name the new class BIDPresident, and select NSObject for Subclass of.
N to bring up the new file assistant. Select Cocoa Touch from the left pane, Objective-C class from the right pane, and click Next. Then name the new class BIDPresident, and select NSObject for Subclass of.
Click BIDPresident.h, and make the following changes:
#import <Foundation/Foundation.h>
#define kPresidentNumberKey            @"President"

#define kPresidentNameKey              @"Name"

#define kPresidentFromKey              @"FromYear"

#define kPresidentToKey                @"ToYear"

#define kPresidentPartyKey             @"Party"


@interface BIDPresident : NSObject

@interface BIDPresident : NSObject <NSCoding>


@property int number;

@property (nonatomic, copy) NSString *name;

@property (nonatomic, copy) NSString *fromYear;

@property (nonatomic, copy) NSString *toYear;

@property (nonatomic, copy) NSString *party;

@end
The five constants will be used to identify the fields when they are read from the file system. Conforming this class to the NSCoding protocol is what allows this object to be written to and created from files. The rest of the new stuff we've added to this header file is there to implement the properties needed to hold our data. Switch over to BIDPresident.m, and make these changes:
#import "BIDPresident.h"


@implementation BIDPresident

@synthesize number;

@synthesize name;

@synthesize fromYear;

@synthesize toYear;

@synthesize party;


#pragma mark -

#pragma mark NSCoding

- (void)encodeWithCoder:(NSCoder *)coder {

    [coder encodeInt:self.number forKey:kPresidentNumberKey];

    [coder encodeObject:self.name forKey:kPresidentNameKey];

    [coder encodeObject:self.fromYear forKey:kPresidentFromKey];

    [coder encodeObject:self.toYear forKey:kPresidentToKey];

    [coder encodeObject:self.party forKey:kPresidentPartyKey];

}


- (id)initWithCoder:(NSCoder *)coder {

    if (self = [super init]) {

        number = [coder decodeIntForKey:kPresidentNumberKey];

        name = [coder decodeObjectForKey:kPresidentNameKey];

        fromYear = [coder decodeObjectForKey:kPresidentFromKey];

        toYear = [coder decodeObjectForKey:kPresidentToKey];

        party = [coder decodeObjectForKey:kPresidentPartyKey];

    }

    return self;

}


@end
Don't worry too much about the encodeWithCoder: and initWithCoder: methods. We'll be covering those in more detail in Chapter 13. All you need to know for now is that these two methods are part of the NSCoding protocol, which can be used to save objects to disk and load them back in. The encodeWithCoder: method encodes our object to be saved. initWithCoder: is used to create new objects from the saved file. These methods will allow us to create BIDPresident objects from a property list archive file. Everything else in this class should be fairly self-explanatory.
We've provided you with a property list file that contains data for all the US presidents and can be used to create new instances of the BIDPresident object we just wrote. We will be using this in the next section, so you don't need to type in a whole bunch of data. Grab the Presidents.plist file from the 09 Nav folder in the project archive, and add it to the Nav folder of your project.
Now, we're ready to write our two controller classes.
Creating the Detail View List Controller
For this part of the application, we're going to need two new controllers: one that will show the list to be edited, and another to view and edit the details of the item selected in that list. Since both of these view controllers will be based on tables, we won't need to create any nib files, but we will need two separate controller classes. Let's create the files for both classes now and then implement them.
Select the Nav folder in the project navigator, and then press ![]() N or select File
N or select File ![]() New
New ![]() New File…. Select Cocoa Touch, select Objective-C class, and click Next. Name the new class BIDPresidentsViewController, and enter BIDSecondLevelViewController for Subclass of. Be sure to check your spelling.
New File…. Select Cocoa Touch, select Objective-C class, and click Next. Name the new class BIDPresidentsViewController, and enter BIDSecondLevelViewController for Subclass of. Be sure to check your spelling.
Repeat the same process a second time using the name BIDPresidentDetailController, but that time use UITableViewController in the Subclass of field.
NOTE: In case you were wondering, BIDPresidentDetailController is singular (as opposed to BIDPresidentsDetailController) because it deals with the details of a single president. Yes, we actually had a fistfight about that little detail, but one intense paintball session later, we are friends again.
Let's create the view controller that shows the list of presidents first. Single-click BIDPresidentsViewController.h, and make the following changes:
#import "BIDSecondLevelViewController.h"


@interface BIDPresidentsViewController : BIDSecondLevelViewController


@property (strong, nonatomic) NSMutableArray *list;

@end
Then switch over to BIDPresidentsViewController.m and make the following changes:
#import "BIDPresidentsViewController.h"

#import "BIDPresidentDetailController.h"

#import "BIDPresident.h"


@implementation BIDPresidentsViewController

@synthesize list;


- (void)viewDidLoad {

    [super viewDidLoad];

    NSString *path = [[NSBundle mainBundle] pathForResource:@"Presidents"

                                                     ofType:@"plist"];

    NSData *data;

    NSKeyedUnarchiver *unarchiver;


    data = [[NSData alloc] initWithContentsOfFile:path];

    unarchiver = [[NSKeyedUnarchiver alloc] initForReadingWithData:data];

    NSMutableArray *array = [unarchiver decodeObjectForKey:@"Presidents"];

    self.list = array;

    [unarchiver finishDecoding];

}


- (void)viewWillAppear:(BOOL)animated {

    [super viewWillAppear:animated];

    [self.tableView reloadData];

}


#pragma mark -

#pragma mark Table Data Source Methods

- (NSInteger)tableView:(UITableView *)tableView

 numberOfRowsInSection:(NSInteger)section {

    return [list count];

}


- (UITableViewCell *)tableView:(UITableView *)tableView

         cellForRowAtIndexPath:(NSIndexPath *)indexPath {


    static NSString *PresidentListCellIdentifier =

        @"PresidentListCellIdentifier";


    UITableViewCell *cell = [tableView

        dequeueReusableCellWithIdentifier:PresidentListCellIdentifier];

    if (cell == nil) {

        cell = [[UITableViewCell alloc]

            initWithStyle:UITableViewCellStyleSubtitle

            reuseIdentifier:PresidentListCellIdentifier];

    }

    NSUInteger row = [indexPath row];

    BIDPresident *thePres = [self.list objectAtIndex:row];

    cell.textLabel.text = thePres.name;

    cell.detailTextLabel.text = [NSString stringWithFormat:@"%@ - %@",

        thePres.fromYear, thePres.toYear];

    return cell;

}
#pragma mark -

#pragma mark Table Delegate Methods

- (void)tableView:(UITableView *)tableView

didSelectRowAtIndexPath:(NSIndexPath *)indexPath {

    NSUInteger row = [indexPath row];

    BIDPresident *prez = [self.list objectAtIndex:row];


    BIDPresidentDetailController *childController =

    [[BIDPresidentDetailController alloc] initWithStyle:UITableViewStyleGrouped];


    childController.title = prez.name;

    childController.president = prez;


    [self.navigationController pushViewController:childController

        animated:YES];

}


@end
Most of the code you just entered is stuff you've seen before. One new thing is in the viewDidLoad method, where we used an NSKeyedUnarchiver method to create an array full of instances of the BIDPresident class from our property list file. It's not important that you understand exactly what's going on there, as long as you know that we're loading an array full of Presidents.
First, we get the path for the property file.
    NSString *path = [[NSBundle mainBundle] pathForResource:@"Presidents"

        ofType:@"plist"];
Next, we declare a data object that will temporarily hold the encoded archive and an NSKeyedUnarchiver, which we'll use to actually restore the objects from the archive.
    NSData *data;

    NSKeyedUnarchiver *unarchiver;
We load the property list into data, and then use data to initialize unarchiver.
    data = [[NSData alloc] initWithContentsOfFile:path];

    unarchiver = [[NSKeyedUnarchiver alloc] initForReadingWithData:data];
Now, we decode an array from the archive. The key @"Presidents" is the same value that was used to create this archive.
NSMutableArray *array = [unarchiver decodeObjectForKey:@"Presidents"];
We then assign this decoded array to our list property, and finalize the decoding process.
    self.list = array;

    [unarchiver finishDecoding];
We also need to tell our tableView to reload its data in the viewWillAppear: method. If the user changes something in the detail view, we need to make sure that the parent view shows that new data. Rather than testing for a change, we force the parent view to reload its data and redraw each time it appears.
- (void)viewWillAppear:(BOOL)animated {

    [super viewWillAppear:animated];

    [self.tableView reloadData];

}
There's one other change from the last time we created a detail view. It's in the last method, tableView:didSelectRowAtIndexPath:. When we created the Disclosure Button view, we reused the same child controller every time and just changed its values. That's relatively easy to do when you have a nib with outlets. When you're using a table view to implement your detail view, the methods that fire the first time and the ones that fire subsequent times are different. Also, the table cells that are used to display and change the data are reused. The combination of these two details means your code can get very complex if you're trying to make it behave exactly the same way every time and to make sure that you are able to keep track of all the changes. Therefore, it's well worth the bit of additional overhead from allocating and releasing new controller objects to reduce the complexity of our controller class.
Let's look at the detail controller, because that's where the bulk of the new stuff is this time. This new controller is pushed onto the navigation stack when the user taps one of the rows in the BIDPresidentsViewController table to allow data entry for that president. Let's implement the detail view now.
Creating the Detail View Controller
Please fasten your seatbelts, ladies and gentlemen. We're expecting a little turbulence ahead. Air sickness bags are located in the seat pocket in front of you.
This next controller is just a little on the gnarly side, but we'll get through it safely. Please remain seated. Single-click BIDPresidentDetailController.h, and make the following changes:
#import <UIKit/UIKit.h>


@class BIDPresident;

#define kNumberOfEditableRows         4

#define kNameRowIndex                 0

#define kFromYearRowIndex             1

#define kToYearRowIndex               2

#define kPartyIndex                   3


#define kLabelTag                     4096


@interface BIDPresidentDetailController : UITableViewController

         <UITextFieldDelegate>


@property (strong, nonatomic) BIDPresident *president;

@property (strong, nonatomic) NSArray *fieldLabels;

@property (strong, nonatomic) NSMutableDictionary *tempValues;

@property (strong, nonatomic) UITextField *currentTextField;


- (IBAction)cancel:(id)sender;

- (IBAction)save:(id)sender;
- (IBAction)textFieldDone:(id)sender;

@end
What the heck is going on here? This is new. In all our previous table view examples, each table row corresponded to a single row in an array. The array provided all the data the table needed. For example, our table of Pixar movies was driven by an array of strings, each string containing the title of a single Pixar movie.
Our presidents example features two different tables. One is a list of president names, and it is driven by an array with one president per row. The second table implements a detail view of a selected president. Since this table has a fixed number of fields, instead of using an array to supply data to this table, we define a series of constants we will use in our table data source methods. These constants define the number of editable fields, along with the index value for the row that will hold each of those properties.
There's also a constant called kLabelTag that we'll use to retrieve the UILabel from the cell so that we can set the label correctly for the row. Shouldn't there be another tag for the UITextField? Normally, yes, but we will need to use the tag property of the text field for another purpose. We'll use another slightly less convenient mechanism to retrieve the text field when we need to set its value. Don't worry if that seems confusing; everything should become clear when we actually write the code.
You should notice that this class conforms to three protocols this time: the table data source and delegate protocols (which this class inherits because it's a subclass of UITableViewController) and a new one, UITextFieldDelegate. By conforming to UITextFieldDelegate, we'll be notified when a user makes a change to a text field so that we can save the field's value. This application doesn't have enough rows for the table to ever need to scroll, but in many applications, a text field could scroll off the screen, and perhaps be deallocated or reused. If the text field is lost, the value stored in it is lost, so saving the value when the user makes a change is the way to go.
Down a little further, we declare a pointer to a BIDPresident object. This is the object that we will actually be editing using this view, and it's set in the tableView:didSelectRowAtIndexPath: of our parent controller based on the row selected there. When the user taps the row for Thomas Jefferson, for example, the BIDPresidentsViewController will create an instance of the BIDPresidentDetailController. The BIDPresidentsViewController will then set the president property of that instance to the object that represents Thomas Jefferson, and push the newly created instance of BIDPresidentDetailController onto the navigation stack.
The second instance variable, fieldLabels, is an array that holds a list of labels that correspond to the constants kNameRowIndex, kFromYearRowIndex, kToYearRowIndex, and kPartyIndex. For example, kNameRowIndex is defined as 0. So, the label for the row that shows the president's name is stored at index 0 in the fieldLabels array. You'll see this in action when we get to it in code.
Next, we define a mutable dictionary, tempValues, that will hold values from fields the user changes. We don't want to make the changes directly to the president object because if the user selects the Cancel button, we need the original data so we can go back to it. Instead, we will store any value that is changed in our new mutable dictionary, tempValues. For example, if the user edited the Name: field and then tapped the Party: field to start editing that one, the BIDPresidentDetailController would be notified at that time that the Name: field had been edited, because it is the text field's delegate.
When the BIDPresidentDetailController is notified of the change, it stores the new value in the dictionary using the name of the property it represents as the key. In our example, we would store a change to the Name: field using the key @"name". That way, regardless of whether users save or cancel, we have the data we need to handle it. If the users cancel, we just discard this dictionary; if they save, we copy the changed values over to president.
Next up is a pointer to a UITextField, named currentTextField. The moment the users click in one of the BIDPresidentDetailController text fields, currentTextField is set to point to that text field. Why do we need this text field pointer? We have an interesting timing problem, and currentTextField is the solution.
Users can take one of two basic paths to finish editing a text field. First, they can touch another control or text field that becomes first responder. In this case, the text field that was being edited loses first responder status, and the delegate method textFieldDidEndEditing: is called. textFieldDidEndEditing: takes the new value of the text field and stores it in tempValues.
The second way that users can finish editing a text field is by tapping the Save or Cancel button. When they do this, the save: or cancel: action method is called. In both methods, the BIDPresidentDetailController view must be popped off the stack, since both the save and cancel actions end the editing session. This presents a problem. The save: and cancel: action methods do not have a simple way of finding the just-edited text field to save the data.
The delegate method textFieldDidEndEditing: does have access to the text field, since the text field is passed in as a parameter. That's where currentTextField comes in. The cancel: action method ignores currentTextField, since the user did not want to save changes, so the changes can be lost without causing any problems. But the save: method does care about those changes and needs a way to save them.
Since currentTextField is maintained as a pointer to the current text field being edited, save: uses that pointer to copy the value in the text field to tempValues. Now, save: can do its job and pop the BIDPresidentDetailController view off the stack, which will bring our list of presidents back to the top of the stack. When the view is popped off the stack, the text field and its value are lost. But since we've saved that sucker already, all is cool.
Single-click BIDPresidentDetailController.m, and make the following changes:
#import "BIDPresidentDetailController.h"

#import "BIDPresident.h"


@implementation BIDPresidentDetailController

@synthesize president;

@synthesize fieldLabels;
@synthesize tempValues;

@synthesize currentTextField;


- (IBAction)cancel:(id)sender {

    [self.navigationController popViewControllerAnimated:YES];

}


- (IBAction)save:(id)sender {

    if (currentTextField != nil) {

        NSNumber *tagAsNum= [NSNumber numberWithInt:currentTextField.tag];

        [tempValues setObject:currentTextField.text forKey:tagAsNum];

    }

    for (NSNumber *key in [tempValues allKeys]) {

        switch ([key intValue]) {

            case kNameRowIndex:

                president.name = [tempValues objectForKey:key];

                break;

            case kFromYearRowIndex:

                president.fromYear = [tempValues objectForKey:key];

                break;

            case kToYearRowIndex:

                president.toYear = [tempValues objectForKey:key];

                break;

            case kPartyIndex:

                president.party = [tempValues objectForKey:key];

            default:

                break;

        }

    }

    [self.navigationController popViewControllerAnimated:YES];


    NSArray *allControllers = self.navigationController.viewControllers;

    UITableViewController *parent = [allControllers lastObject];

    [parent.tableView reloadData];

}


- (IBAction)textFieldDone:(id)sender {

    [sender resignFirstResponder];

}


#pragma mark -

- (void)viewDidLoad {

    [super viewDidLoad];

    NSArray *array = [[NSArray alloc] initWithObjects:@"Name:", @"From:",

                      @"To:", @"Party:", nil];

    self.fieldLabels = array;


    UIBarButtonItem *cancelButton = [[UIBarButtonItem alloc]

                                     initWithTitle:@"Cancel"

                                     style:UIBarButtonItemStylePlain

                                     target:self

                                     action:@selector(cancel:)];

    self.navigationItem.leftBarButtonItem = cancelButton;
    UIBarButtonItem *saveButton = [[UIBarButtonItem alloc]

                                   initWithTitle:@"Save"

                                   style:UIBarButtonItemStyleDone

                                   target:self

                                   action:@selector(save:)];

    self.navigationItem.rightBarButtonItem = saveButton;


    NSMutableDictionary *dict = [[NSMutableDictionary alloc] init];

    self.tempValues = dict;

}


#pragma mark -

#pragma mark Table Data Source Methods

- (NSInteger)tableView:(UITableView *)tableView

 numberOfRowsInSection:(NSInteger)section {

    return kNumberOfEditableRows;

}


- (UITableViewCell *)tableView:(UITableView *)tableView

         cellForRowAtIndexPath:(NSIndexPath *)indexPath {

    static NSString *PresidentCellIdentifier = @"PresidentCellIdentifier";


    UITableViewCell *cell = [tableView dequeueReusableCellWithIdentifier:

                             PresidentCellIdentifier];

    if (cell == nil) {


        cell = [[UITableViewCell alloc]

            initWithStyle:UITableViewCellStyleDefault

            reuseIdentifier:PresidentCellIdentifier];

        UILabel *label = [[UILabel alloc] initWithFrame:

                      CGRectMake(10, 10, 75, 25)];

        label.textAlignment = UITextAlignmentRight;

        label.tag = kLabelTag;

        label.font = [UIFont boldSystemFontOfSize:14];

        [cell.contentView addSubview:label];


        UITextField *textField = [[UITextField alloc] initWithFrame:

                                  CGRectMake(90, 12, 200, 25)];

        textField.clearsOnBeginEditing = NO;

        [textField setDelegate:self];

        textField.returnKeyType = UIReturnKeyDone;

        [textField addTarget:self

                      action:@selector(textFieldDone:)

            forControlEvents:UIControlEventEditingDidEndOnExit];

        [cell.contentView addSubview:textField];

    }

    NSUInteger row = [indexPath row];


    UILabel *label = (UILabel *)[cell viewWithTag:kLabelTag];

    UITextField *textField = nil;

    for (UIView *oneView in cell.contentView.subviews) {

        if ([oneView isMemberOfClass:[UITextField class]])

            textField = (UITextField *)oneView;

    }
    label.text = [fieldLabels objectAtIndex:row];

    NSNumber *rowAsNum = [NSNumber numberWithInt:row];

    switch (row) {

        case kNameRowIndex:

            if ([[tempValues allKeys] containsObject:rowAsNum])

                textField.text = [tempValues objectForKey:rowAsNum];

            else

                textField.text = president.name;

            break;

        case kFromYearRowIndex:

            if ([[tempValues allKeys] containsObject:rowAsNum])

                textField.text = [tempValues objectForKey:rowAsNum];

            else

                textField.text = president.fromYear;

             break;

        case kToYearRowIndex:

             if ([[tempValues allKeys] containsObject:rowAsNum])

                 textField.text = [tempValues objectForKey:rowAsNum];

             else

                 textField.text = president.toYear;

             break;

        case kPartyIndex:

        if ([[tempValues allKeys] containsObject:rowAsNum])

            textField.text = [tempValues objectForKey:rowAsNum];

        else

            textField.text = president.party;

        default:

            break;

    }

    if (currentTextField == textField) {

        currentTextField = nil;

    }

    textField.tag = row;

    return cell;

}


#pragma mark -

#pragma mark Table Delegate Methods

- (NSIndexPath *)tableView:(UITableView *)tableView

  willSelectRowAtIndexPath:(NSIndexPath *)indexPath {

    return nil;

}


#pragma mark Text Field Delegate Methods

- (void)textFieldDidBeginEditing:(UITextField *)textField {

    self.currentTextField = textField;

}


- (void)textFieldDidEndEditing:(UITextField *)textField {

    NSNumber *tagAsNum = [NSNumber numberWithInt:textField.tag];

    [tempValues setObject:textField.text forKey:tagAsNum];

}


@end
The first new method is our cancel: action method. This is called, appropriately enough, when the user taps the Cancelbutton. When the Cancel button is tapped, the current view will be popped off the stack, and the previous view will rise to the top of the stack. Ordinarily, that job would be handled by the navigation controller, but a little later in the code, we're going to manually set the left bar button item. This means we're replacing the button that the navigation controller uses for that purpose. We can pop the current view off the stack by getting a reference to the navigation controller and telling it to do just that.
- (IBAction)cancel:(id)sender {

    [self.navigationController popViewControllerAnimated:YES];

}
The next method is save:, which is called when the user taps the Save button. When the Save button is tapped, the values that the user has entered have already been stored in the tempValues dictionary, unless the keyboard is still visible and the cursor is still in one of the text fields. In that case, there may be changes to that text field that have not yet been put into our tempValues dictionary. To account for this, the first thing the save: method does is check to see if there is a text field that is currently being edited. Whenever the user starts editing a text field, we store a pointer to that text field in currentTextField. If currentTextField is not nil, we grab its value and stick it in tempValues.
    if (currentTextField != nil) {

        NSNumber *tfKey= [NSNumber numberWithInt:currentTextField.tag];

        [tempValues setObject:currentTextField.text forKey:tfKey];

    }
We then use fast enumeration to step through all the key values in the dictionary, using the row numbers as keys. We can't store raw datatypes like int in an NSDictionary, so we create NSNumber objects based on the row number and use those instead. We use intValue to turn the number represented by key back into an int, and then use a switch on that value using the constants we defined earlier and assign the appropriate value from the tempValues array back to the designated field on our president object.
    for (NSNumber *key in [tempValues allKeys]) {

        switch ([key intValue]) {

            case kNameRowIndex:

                president.name = [tempValues objectForKey:key];

                break;

            case kFromYearRowIndex:

                president.fromYear = [tempValues objectForKey:key];

                break;

            case kToYearRowIndex:

                president.toYear = [tempValues objectForKey:key];

                break;

            case kPartyIndex:

                president.party = [tempValues objectForKey:key];

            default:

                break;

        }

    }
Now, our president object has been updated, and we need to move up a level in the view hierarchy. Tapping a Save or Done button on a detail view should generally bring the user back up to the previous level, so we grab our application delegate and use its navController outlet to pop ourselves off the navigation stack, sending the user back up to the list of presidents:
[self.navigationController popViewControllerAnimated:YES];
There's one other thing we need to do here: tell our parent view's table to reload its data. Because one of the fields that the user can edit is the name field, which is displayed in the BIDPresidentsViewController table, if we don't have that table reload its data, it will continue to show the old value.
    UINavigationController *navController = [delegate navController];

    NSArray *allControllers = navController.viewControllers;

    UITableViewController *parent = [allControllers lastObject];

    [parent.tableView reloadData];
The third action method will be called when the user taps the Done button on the keyboard. Without this method, the keyboard won't retract when the user taps Done. This approach isn't strictly necessary in our application, since the four rows that can be edited here fit in the area above the keyboard. That said, you'll need this method if you add a row or in a future application that requires more screen real estate. It's a good idea to keep the behavior consistent from application to application, even if doing so is not critical to your application's functionality.
-(IBAction)textFieldDone:(id)sender {

    [sender resignFirstResponder];

}
The viewDidLoad method doesn't contain anything too surprising. We create the array of field names and assign it the fieldLabels property.
    NSArray *array = [[NSArray alloc] initWithObjects:@"Name:",

            @"From:", @"To:", @"Party:", nil];

    self.fieldLabels = array;
Next, we create two buttons and add them to the navigation bar. We put the Cancel button in the left bar button item spot, which supplants the navigation button put there automatically. We put the Save button in the right spot and assign it the style UIBarButtonItemStyleDone. This style was specifically designed for this occasion—as a button users tap when they are happy with their changes and ready to leave the view. A button with this style will be blue instead of gray, and it usually will carry a label of Save or Done.
    UIBarButtonItem *cancelButton = [[UIBarButtonItem alloc]

              initWithTitle:@"Cancel"

              style:UIBarButtonItemStylePlain

              target:self

              action:@selector(cancel:)];

    self.navigationItem.leftBarButtonItem = cancelButton;


    UIBarButtonItem *saveButton = [[UIBarButtonItem alloc]

              initWithTitle:@"Save"

              style:UIBarButtonItemStyleDone
              target:self

              action:@selector(save:)];

    self.navigationItem.rightBarButtonItem = saveButton;
Finally, we create a new mutable dictionary and assign it to tempValues so that we have a place to stick the changed values. If we made the changes directly to the president object, we would have no easy way to roll back to the original data if the user tapped Cancel.
    NSMutableDictionary *dict = [[NSMutableDictionary alloc] init];

    self.tempValues = dict;
We can skip over the first data source method, as there is nothing new under the sun there. We do need to stop and chat about tableView:cellForRowAtIndexPath:, however, because there are a few gotchas there. The first part of the method is exactly like every other tableView:cellForRowAtIndexPath: method we've written.
- (UITableViewCell *)tableView:(UITableView *)tableView

    cellForRowAtIndexPath:(NSIndexPath *)indexPath {

    static NSString *PresidentCellIdentifier = @"PresidentCellIdentifier";


    UITableViewCell *cell = [tableView dequeueReusableCellWithIdentifier:

        PresidentCellIdentifier];

    if (cell == nil) {

        cell = [[UITableViewCell alloc] initWithFrame:CGRectZero

                     reuseIdentifier:PresidentCellIdentifier];
When we create a new cell, we create a label, make it right-aligned and bold, and assign it a tag so that we can retrieve it again later. Next, we add it to the cell's contentView and release it.
        UILabel *label = [[UILabel alloc] initWithFrame:

            CGRectMake(10, 10, 75, 25)];

        label.textAlignment = UITextAlignmentRight;

        label.tag = kLabelTag;

        label.font = [UIFont boldSystemFontOfSize:14];

        [cell.contentView addSubview:label];
After that, we create a new text field. The user actually types in this field. We set it so it does not clear the current value when editing, so we don't lose the existing data, and we set self as the text field's delegate. By setting the text field's delegate to self, we can get notified by the text field when certain events occur by implementing appropriate methods from the UITextFieldDelegate protocol. As you'll see soon, we've implemented two text field delegate methods in this class. Those methods will be called by the text fields on all rows when the user begins and ends editing the text they contain. We also set the keyboard's return key type, which is how we specify the text for the key in the bottom right of the keyboard. The default value is Return, but since we have only single-line fields, we want the key to say Done instead, so we pass UIReturnKeyDone.
        UITextField *textField = [[UITextField alloc] initWithFrame:

            CGRectMake(90, 12, 200, 25)];

        textField.clearsOnBeginEditing = NO;

              [textField setDelegate:self];

        textField.returnKeyType = UIReturnKeyDone;
After that, we tell the text field to call our textFieldDone: method on the Did End on Exit event. This is exactly the same thing as dragging from the Did End on Exit event in the connections inspector in Interface Builder to File's Owner and selecting an action method. Since we don't have a nib file, we must do it programmatically, but the result is the same.
When we're finished configuring the text field, we add it to the cell's content view. Notice, however, that we did not set a tag before we added it to that view.
         [textField addTarget:self

                       action:@selector(textFieldDone:)

                       forControlEvents:UIControlEventEditingDidEndOnExit];

         [cell.contentView addSubview:textField];

   }
At this point, we know that we have either a brand-new cell or a reused cell, but we don't know which. The first thing we do is figure out which row this darn cell is going to represent.
NSUInteger row = [indexPath row];
Next, we need to get a reference to the label and the text field from inside this cell. The label is easy; we just use the tag we assigned to it to retrieve it from cell.
UILabel *label = (UILabel *)[cell viewWithTag:kLabelTag];
The text field, however, isn't going to be quite as easy, because we need the tag in order to tell our text field delegates which text field is calling them. So, we're going to rely on the fact that there's only one text field that is a subview of our cell's contentView. We'll use fast enumeration to work through all of its subviews, and when we find a text field, we assign it to the pointer we declared a moment earlier. When the loop is finished, the textField pointer should be pointing to the one and only text field contained in this cell.
    UITextField *textField = nil;


    for (UIView *oneView in cell.contentView.subviews) {

        if ([oneView isMemberOfClass:[UITextField class]])

            textField = (UITextField *)oneView;

    }
Now that we have pointers to both the label and the text field, we can assign them the correct values based on which field from the president object this row represents. Once again, the label gets its value from the fieldLabels array.
label.text = [fieldLabels objectAtIndex:row];
To assign the value to the text field, we need to first check to see if there is a value in the tempValues dictionary corresponding to this row. If there is, we assign it to the text field. If there isn't any corresponding value in tempValues, we know there have been no changes entered for this field, so we assign this field the corresponding value from president.
    NSNumber *rowAsNum = [NSNumber numberWithInt:row];

    switch (row) {

            case kNameRowIndex:

                if ([[tempValues allKeys] containsObject:rowAsNum])
                    textField.text = [tempValues objectForKey:rowAsNum];

                else

                    textField.text = president.name;

                break;

            case kFromYearRowIndex:

                if ([[tempValues allKeys] containsObject:rowAsNum])

                    textField.text = [tempValues objectForKey:rowAsNum];

                else

                    textField.text = president.fromYear;

                break;

            case kToYearRowIndex:

                if ([[tempValues allKeys] containsObject:rowAsNum])

                    textField.text = [tempValues objectForKey:rowAsNum];

                else

                    textField.text = president.toYear;

                break;

            case kPartyIndex:

                if ([[tempValues allKeys] containsObject:rowAsNum])

                    textField.text = [tempValues objectForKey:rowAsNum];

                else

                    textField.text = president.party;

            default:

                break;

    }
If the field we're using is the one that is currently being edited, that's an indication that the value we're holding in currentTextField is no longer valid, so we set currentTextField to nil. If the text field did get released or reused, our text field delegate would have been called, and the correct value would already be in the tempValues dictionary.
    if (currentTextField == textField) {

        currentTextField = nil;

    }
Next, we set the text field's tag to the row it represents, which will allow us to know which field is calling our text field delegate methods. And finally, we return the cell.
    textField.tag = row;

    return cell;

}
We do implement one table delegate method this time, which is tableView:willSelectRowAtIndexPath:. Remember that this method is called before a row is selected and gives us a chance to disallow the row selection. In this view, we never want a row to appear selected. We need to know that the user selected a row so we can place a check mark next to it, but we don't want the row to actually be highlighted. Don't worry. A row doesn't need to be selected for a text field on that row to be editable, so this method just keeps the row from staying highlighted after it is touched.
- (NSIndexPath *)tableView:(UITableView *)tableView

   willSelectRowAtIndexPath:(NSIndexPath *)indexPath {

    return nil;

}
All that's left now are the two text field delegate methods. The first one we implement, textFieldDidBeginEditing:, is called whenever a text field for which we are the delegate becomes first responder. So, if the user taps a field and the keyboard pops up, we get notified. In this method, we store a pointer to the field currently being edited so that we have a way to get to the last changes made before the Save button was tapped.
- (void)textFieldDidBeginEditing:(UITextField *)textField {

    self.currentTextField = textField;

}
The last method we wrote is called when the user stops editing a text field by tapping a different text field or pressing the Done button, or when another field became the first responder, which will happen, for example, when the user navigates back up to the list of presidents. Here, we save the value from that field in the tempValues dictionary so that we will have the changes if the user taps the Save button to confirm the changes.
- (void)textFieldDidEndEditing:(UITextField *)textField {

    NSNumber *tagAsNum = [NSNumber numberWithInt:textField.tag];

    [tempValues setObject:textField.text forKey:tagAsNum];

}
And that's it. We're finished with these two view controllers.
Adding an Editable Detail View Controller Instance
Now, all we need to do is add an instance of this class to the top-level view controller. You know how to do this by now. Single-click BIDFirstLevelController.m.
First, import the header from the new second-level view by adding the following line of code directly before the @implementation declaration:
#import "BIDPresidentsViewController.h"
Then add the following code to the viewDidLoad method:
- (void)viewDidLoad {

    [super viewDidLoad];

    self.title = @"Top Level";

    NSMutableArray *array = [[NSMutableArray alloc] init];


    // Disclosure Button

    BIDDisclosureButtonController *BIDDisclosureButtonController =

        [[BIDDisclosureButtonController alloc]

              initWithStyle:UITableViewStylePlain];

    BIDDisclosureButtonController.title = @"Disclosure Buttons";

    BIDDisclosureButtonController.rowImage = [UIImage

        imageNamed:@"BIDDisclosureButtonControllerIcon.png"];

    [array addObject:BIDDisclosureButtonController];


    // Checklist

    BIDCheckListController *checkListController = [[BIDCheckListController alloc]

        initWithStyle:UITableViewStylePlain];

    checkListController.title = @"Check One";

    checkListController.rowImage = [UIImage

       imageNamed:@"checkmarkControllerIcon.png"];
    [array addObject:checkListController];


    // Table Row Controls

    RowControlsController *rowControlsController =

        [[RowControlsController alloc]

        initWithStyle:UITableViewStylePlain];

    rowControlsController.title = @"Row Controls";

    rowControlsController.rowImage =

        [UIImage imageNamed:@"rowControlsIcon.png"];

    [array addObject:rowControlsController];


    // Move Me

    BIDMoveMeController *moveMeController = [[BIDMoveMeController alloc]

        initWithStyle:UITableViewStylePlain];

    moveMeController.title = @"Move Me";

    moveMeController.rowImage = [UIImage imageNamed:@"moveMeIcon.png"];

    [array addObject:moveMeController];

    [moveMeController release];


    // Delete Me

    BIDDeleteMeController *deleteMeController = [[BIDDeleteMeController alloc]

              initWithStyle:UITableViewStylePlain];

    deleteMeController.title = @"Delete Me";

    deleteMeController.rowImage = [UIImage imageNamed:@"deleteMeIcon.png"];

    [array addObject:deleteMeController];


    // BIDPresident View/Edit

    BIDPresidentsViewController *presidentsViewController =

        [[BIDPresidentsViewController alloc]

        initWithStyle:UITableViewStylePlain];

    presidentsViewController.title = @"Detail Edit";

    presidentsViewController.rowImage = [UIImage imageNamed:

        @"detailEditIcon.png"];

    [array addObject:presidentsViewController];


    self.controllers = array;

}
Save everything, sigh deeply, hold your breath, and then build that sucker. If everything is in order, the simulator will launch, and a sixth and final row will appear, just like the one in Figure 9–2. If you click the new row, you'll be taken to a list of US presidents (see Figure 9–22).
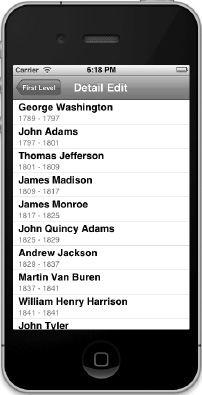
Figure 9–22. Our sixth and final subcontroller presents a list of US presidents. Tap one of the presidents, and you'll be taken to a detail view (or a secret service agent will wrestle you to the ground).
Tapping any of the rows will take you down to the detail view that we just built (see Figure 9–8), and you'll be able to edit the values. If you select the Done button in the keyboard, the keyboard should retract. Tap one of the editable values, and the keyboard will reappear. Make some changes and tap Cancel, and the application will pop back to the list of presidents. If you revisit the president you just canceled out of, your changes will be gone. On the other hand, if you make some changes and tap Save, your changes will be reflected in the parent table, and when you come back into the detail view, the new values will still be there.
But There's One More Thing. . .
There's one more bit of polish we need to add to make our application behave the way it should. In the version we just built, the keyboard incorporates a Done button that, when tapped, makes the keyboard retract. That behavior is proper if there are other controls on the view that the user might need to access. Since every row on this table view is a text field, however, we need a slightly different solution. The keyboard should feature a Return button instead of a Done button. When tapped, that button should take the user to the next row's text field.
In order to accomplish this, our first step is to replace the Done button with a Return button. We can do this by deleting a single line of code from BIDPresidentDetailController.m. In the tableView:cellForRowAtIndexPath: method, delete the following line of code:
- (UITableViewCell *)tableView:(UITableView *)tableView

       cellForRowAtIndexPath:(NSIndexPath *)indexPath {

    static NSString *PresidentCellIdentifier = @"PresidentCellIdentifier";

    UITableViewCell *cell = [tableView dequeueReusableCellWithIdentifier:

        PresidentCellIdentifier];

    if (cell == nil) {


        cell = [[UITableViewCell alloc] initWithFrame:CGRectZero

                     reuseIdentifier:PresidentCellIdentifier];

        UILabel *label = [[UILabel alloc] initWithFrame:

            CGRectMake(10, 10, 75, 25)];

        label.textAlignment = UITextAlignmentRight;

        label.tag = kLabelTag;

        label.font = [UIFont boldSystemFontOfSize:14];

        [cell.contentView addSubview:label];


        UITextField *textField = [[UITextField alloc] initWithFrame:

           CGRectMake(90, 12, 200, 25)];

        textField.clearsOnBeginEditing = NO;

        [textField setDelegate:self];

        textField.returnKeyType = UIReturnKeyDone;

        [textField addTarget:self

                     action:@selector(textFieldDone:)

                     forControlEvents:UIControlEventEditingDidEndOnExit];

        [cell.contentView addSubview:textField];

    }

    NSUInteger row = [indexPath row];

...
The next step isn't quite as straightforward. In our textFieldDone: method, instead of simply telling sender to resign first responder status, we need to somehow figure out what the next field should be and tell that field to become the first responder. Replace your current version of textFieldDone: with the following new version, and then we'll chat about how it works.
- (IBAction)textFieldDone:(id)sender {

    UITableViewCell *cell =

        (UITableViewCell *)[[sender superview] superview];

    UITableView *table = (UITableView *)[cell superview];

    NSIndexPath *textFieldIndexPath = [table indexPathForCell:cell];

    NSUInteger row = [textFieldIndexPath row];

    row++;

    if (row >= kNumberOfEditableRows) {

        row = 0;

    }

    NSIndexPath *newPath = [NSIndexPath indexPathForRow:row inSection:0];

    UITableViewCell *nextCell = [self.tableView

        cellForRowAtIndexPath:newPath];

    UITextField *nextField = nil;

    for (UIView *oneView in nextCell.contentView.subviews) {
        if ([oneView isMemberOfClass:[UITextField class]])

            nextField = (UITextField *)oneView;

    }

    [nextField becomeFirstResponder];

}
Unfortunately, cells don't know which row they represent. The table view, however, does know which row a given cell is currently representing. So, we get a reference to the table view cell. We know that the text field that is triggering this action method is a subview of the table cell view's content view, so we just need to get sender's superview'ssuperview (now say that ten times fast).
If that sounded confusing, think of it this way: In this case, sender is the text field being edited. Our sender's superview is the content view that groups the text field and its label. And sender's superview'ssuperview is the cell that encompasses that content view.
    UITableViewCell *cell = (UITableViewCell *)[[(UIView *)sender

         superview] superview];
We also need access to the cell's enclosing table view, which is easy enough, since it's the superview of the cell.
UITableView *table = (UITableView *)[cell superview];
We then ask the table which row the cell represents. The response is an NSIndexPath, and we get the row from that.
    NSIndexPath *textFieldIndexPath = [table indexPathForCell:cell];

    NSUInteger row = [textFieldIndexPath row];
Next, we increment row by one, which represents the next row in the table. If incrementing the row number puts us beyond the last one, we reset row to 0.
    row++;

    if (row >= kNumberOfEditableRows) {

        row = 0;

    }
Then we build a new NSIndexPath to represent the next row, and use that index path to get a reference to the cell currently representing the next row.
    NSIndexPath *newPath = [NSIndexPath indexPathForRow:row inSection:0];

    UITableViewCell *nextCell = [self.tableView

         cellForRowAtIndexPath:newPath];
Note that instead of using alloc and init methods to create the NSIndexPath, we're using a special factory method that exists just for the purpose of creating an index path that points out a row in a UITableView. The normal way of creating an NSIndexPath otherwise involves first creating a C array, and then passing it to the initWithIndexes:length: method along with the length of the array. What we're doing here is much more straightforward.
For the text field, we're already using tag for another purpose, so we need to loop through the subviews of the cell's content view to find the text field rather than using tag to retrieve it.
    UITextField *nextField = nil;

    for (UIView *oneView in nextCell.contentView.subviews) {

        if ([oneView isMemberOfClass:[UITextField class]])

            nextField = (UITextField *)oneView;

   }
Finally, we can tell that new text field to become the first responder.
[nextField becomeFirstResponder];
Now, compile and run. This time, when you drill down to the detail view, tapping the Return button will take you to the next field in the table, which will make entering data much easier for your users.
Breaking the Tape
This chapter was a marathon, and if you're still standing, you should feel pretty darn good about yourself. Dwelling on these mystical table view and navigation controller objects is important because they are the backbone of a great many iOS applications, and their complexity can definitely get you into trouble if you don't truly understand them.
As you start building your own tables, check back to this chapter and the previous one, and don't be afraid of Apple's documentation, either. Table views are extraordinarily complex, and we could never cover every conceivable permutation, but you should now have a very good set of table view building blocks you can use as you design and build your own applications. As always, feel free to reuse this code in your own applications. It's a gift from us to you. Enjoy!
In the next chapter, we're going to introduce you to Storyboards, one of the biggest new features iOS 5 brings to developers. That's right, the Storyboards concept isn't really an end-user feature, but rather a set of enhancements to Xcode and new APIs in UIKit, which allow developers to design the structure of a complex navigation-based application in a whole new way. Storyboards will make your job much easier and even more fun!