Chapter 14
Hey! You! Get onto iCloud!
One of the biggest new features touted with the announcement of iOS 5 is Apple's new iCloud service, which provides cloud storage services for iOS 5 devices, as well as for computers running Mac OS X and Microsoft Windows. Most iOS users will probably encounter the iCloud device backup option immediately when setting up a new device or upgrading an old device to iOS 5, and will quickly discover the advantages of automatic backup that doesn't even require the use of a computer.
Computerless backup is a great feature, but it only scratches the surface of what iCloud can do. What may be even a bigger feature of iCloud is that it provides app developers with a mechanism for transparently saving data to Apple's cloud servers with very little effort. You can make your apps save data to iCloud, and have that data automatically transfer to any other devices that are registered to the same iCloud user. Users may create a document on their iPad, and later view the same document on their iPhone without any intervening steps; the document just appears.
A system process takes care of making sure the user has a valid iCloud login and manages the file transfers, so you don't need to worry about networks or authentication. Apart from a small amount of app configuration, just a few small changes to your methods for saving files and locating available files will get you well on your way to having an iCloud-backed app.
One key component of the iCloud filing system is the UIDocument class, which is also new to iOS 5. UIDocument takes a portion of the work out of creating a document-based app, by handling some of the common aspects of reading and writing files. That way, you can spend more of your time focusing on the unique features of your app, instead of building the same plumbing for every app you create.
Whether you're using iCloud or not, UIDocument provides some powerful tools for managing document files in iOS. To demonstrate these features, the first portion of this chapter is dedicated to creating TinyPix, a simple document-based app that saves files to local storage. This is an approach that can work well for all kinds of iOS-based apps.
Later in this chapter, we'll show you how to iCloud-enable TinyPix. For that to work, you'll need to have one or more iCloud-connected iOS devices at hand. You'll also need a paid iOS developer account so that you can install on devices, because apps running in the simulator don't have access to iCloud services.
Managing Document Storage with UIDocument
Anyone who has used a desktop computer for anything besides just surfing the Web has probably worked with a document-based application. From TextEdit to Microsoft Word to GarageBand to Xcode, any piece of software that lets you deal with multiple collections of data, saving each collection to a separate file, could be considered a document-based application. Often, there's a one-to-one correspondence between an on-screen window and the document it contains, but sometimes (such as in Xcode), a single window can display multiple files that are all related in some way.
On iOS devices, we don't have the luxury of multiple windows, but plenty of apps can still benefit from a document-based approach. Now iOS developers have a little boost in making it work thanks to the UIDocument class, which takes care of the most common aspects of document file storage. You won't need to deal with files directly (just URLs), and all the necessary reading and writing happen on a background thread, so your app can remain responsive even while file access is occurring. It also automatically saves edited documents periodically and whenever the app is suspended (such as when the device is shut down, the home button is pressed, and so on), so there's no need for any sort of save button. All of this helps make your apps behave the way users expect their iOS apps to behave.
Building TinyPix
We're going to build an app called TinyPix that lets you edit simple 8 × 8 images, in glorious 1-bit color (see Figure 14–1)! For the user's convenience, each picture is blown up to the full-screen size for editing. And, of course, we'll be using UIDocument to represent the data for each image.
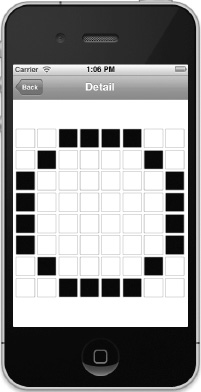
Figure 14–1. Editing an extremely low-resolution icon in TinyPix
Start off by creating a new project in Xcode. From the iOS Application section, select the Master-Detail Application template, and then click Next. Name this new app TinyPix, set the Device Family popup to iPhone, and make sure the Use Storyboard checkbox is checked. Then click Next again, and choose the location to save your project.
In Xcode's project navigator, you'll see that your project contains files for BIDAppDelegate, BIDMasterViewController, and BIDDetailViewController, as well as the MainStoryboard.storyboard file. We'll make changes to most of these files to some extent, and we will create a few new classes along the way as well.
Creating BIDTinyPixDocument
The first new class we're going to create is the document class that will contain the data for each TinyPix image that's loaded from file storage. Select the TinyPix folder in Xcode, and press ![]() N to create a new file. From the iOS Cocoa Touch section, select Objective-C class, and click Next. Enter BIDTinyPixDocument in the Class field, enter UIDocument in the Subclass of field, and click Next. Then click Create to create the files.
N to create a new file. From the iOS Cocoa Touch section, select Objective-C class, and click Next. Enter BIDTinyPixDocument in the Class field, enter UIDocument in the Subclass of field, and click Next. Then click Create to create the files.
Let's think about the public API of this class before we get into its implementation details. This class is going to represent an 8 × 8 grid of pixels, where each pixel consists of a single on or off value. So, let's give it a method that takes a pair of grid and column indexes and returns a BOOL value. Let's also provide a method to set a specific state at a specified grid and column and, as a convenience, another method that simply toggles the state at a particular place.
Select BIDTinyPixDocument.h to edit the new class's header. Add the following bold lines:
#import <UIKit/UIKit.h>


@interface BIDTinyPixDocument : UIDocument


// row and column range from 0 to 7

- (BOOL)stateAtRow:(NSUInteger)row column:(NSUInteger)column;

- (void)setState:(BOOL)state atRow:(NSUInteger)row column:(NSUInteger)column;

- (void)toggleStateAtRow:(NSUInteger)row column:(NSUInteger)column;


@end
Now switch over to BIDTinyPixDocument.m, where we'll implement storage for our 8 × 8 grid, the methods defined in our public API, and the required UIDocument methods that will enable loading and saving our documents.
Let's start by defining the storage for our 8 × 8 bitmap data. We'll hold this data in an instance of NSMutableData, which lets us work directly with an array of byte data that is still contained inside an object, so that the usual Cocoa memory management will take care of freeing the memory when we're finished with it. Add this class extension and property synthesis to make it happen:
#import "BIDTinyPixDocument.h"


@interface BIDTinyPixDocument ()

@property (strong, nonatomic) NSMutableData *bitmap;

@end


@implementation BIDTinyPixDocument

@synthesize bitmap;


@end
The UIDocument class has a designated initializer that all subclasses should use. This is where we'll create our initial bitmap. In true bitmap style, we're going to minimize memory usage by using a single byte to contain each row. Each bit in the byte represents the on/off value of a column index within that row. In total, our document contains just 8 bytes.
NOTE: This section contains a small amount of bitwise operations, as well as some C pointer and array manipulation. This is all pretty mundane for C developers, but if you don't have much C experience, it may seem puzzling or even impenetrable. In that case, feel free to simply copy and use the code provided (it works just fine). If you want to really understand what's going on, you may want to dig deeper into C itself, perhaps by adding a copy of Learn C on the Mac by Dave Mark (Apress, 2009) to your bookshelf.
Add this method to our document's implementation, placing it directly above the @end at the bottom of the file:
- (id)initWithFileURL:(NSURL *)url {

    self = [super initWithFileURL:url];

    if (self) {

        unsigned char startPattern[] = {

            0x01,

            0x02,

            0x04,

            0x08,

            0x10,

            0x20,

            0x40,

            0x80

        };


        self.bitmap = [NSMutableData dataWithBytes:startPattern length:8];

    }

    return self;

}
This starts off each bitmap with a simple diagonal pattern stretching from one corner to another.
Now, it's time to implement the methods that make up the public API we defined in the header. Let's tackle the method for reading the state of a single bit first. This simply grabs the relevant byte from our array of bytes, then does a bit shift and an AND operation to determine if the specified bit was set, and returns YES or NO accordingly. Add this method above the @end:
- (BOOL)stateAtRow:(NSUInteger)row column:(NSUInteger)column {

    const char *bitmapBytes = [bitmap bytes];

    char rowByte = bitmapBytes[row];

    char result = (1 << column) & rowByte;

    if (result != 0)

        return YES;

    else

        return NO;

}
Next comes the inverse: a method that sets the value specified at a given row and column. Here, we once again grab a pointer to the relevant byte for the specified row and do a bit shift. But this time, instead of using the shifted bit to examine the contents of the row, we use it to either set or unset a bit in the row. Add this method above the @end:
- (void)setState:(BOOL)state atRow:(NSUInteger)row column:(NSUInteger)column {

    char *bitmapBytes = [bitmap mutableBytes];

    char *rowByte = &bitmapBytes[row];


    if (state)

        *rowByte = *rowByte | (1 << column);

    else

        *rowByte = *rowByte & ~(1 << column);

}
Now, let's add the convenience method, which lets outside code simply toggle a single cell. Add this method above the @end:
- (void)toggleStateAtRow:(NSUInteger)row column:(NSUInteger)column {

    BOOL state = [self stateAtRow:row column:column];

    [self setState:!state atRow:row column:column];

}
Our document class requires two final pieces before it fits into the puzzle of a document-based app: methods for reading and writing. As we mentioned earlier, you don't need to deal with files directly. You don't even need to worry about the URL that was passed into the initWithFileURL: method earlier. All that'you need to do is implement one method that transforms the document's data structure into an NSData object, ready for saving, and another that takes a freshly loaded NSData object and pulls the object's data structure out of it. Since our document's internal structure is already contained in an NSMutableData object, which is a subclass of NSData, these implementations are pleasingly simple. Add these two methods above the @end:
- (id)contentsForType:(NSString *)typeName error:(NSError **)outError {

    NSLog(@"saving document to URL %@", self.fileURL);

    return [bitmap copy];

}


- (BOOL)loadFromContents:(id)contents ofType:(NSString *)typeName

        error:(NSError **)outError {

    NSLog(@"loading document from URL %@", self.fileURL);

    self.bitmap = [contents mutableCopy];

    return true;

}
The first of these methods, contentsForType:error:, is called whenever our document is about to be saved to storage. It simply returns an immutable copy of our bitmap data, which the system will take care of storing later.
The second method, loadFromContents:ofType:error:, is called whenever the system has just loaded data from storage and wants to provide this data to an instance of our document class. Here, we just grab a mutable copy of the data that has been passed in. We've included some logging statements, just so you can see what's happening in the Xcode log later on.
Each of these methods allows you to do some things that we're ignoring in this app. They both provide a typeName parameter, which you could use to distinguish between different types of data storage that your document can load from or save to. They also have an outError parameter, which you could use to specify that an error occurred while copying data to or from your document's in-memory data structure. In our case, however, what we're doing is so simple that these aren't important concerns.
That's all we need for our document class. Sticking to MVC principles, our document sits squarely in the model camp, knowing nothing about how it's displayed. And thanks to the UIDocument superclass, the document is even shielded from most of the details about how it's stored.
Code Master
Now that we have our document class ready to go, it's time to address the first view that a user sees when running our app: the list of existing TinyPix documents, which is taken care of by the BIDMasterViewController class. We need to let this class know how to grab the list of available documents, create and name a new document, and let the user choose an existing document. When a document is created or chosen, it's then passed along to the detail controller for display.
Start off by selecting BIDMasterViewController.h, where we'll make a few changes. We're going to use an alert panel later on to let the user name a new document, so we want to declare that this class implements the relevant delegate protocol.
We'll also include a segmented control in our GUI, which will allow the user to choose the color that will be used to display the TinyPix pixels. Though this is not a particularly useful feature in and of itself, it will help demonstrate the iCloud mechanism, as the highlight color setting makes its way from the device on which you set it to another of your connected devices running the same app. The first version of the app will use the color as a per-device setting. Later in the chapter, we'll add the code to make the color setting propagate through iCloud to the user's other devices.
To implement the color segmented control, we'll add an outlet and an action to our code as well. Make these changes to BIDMasterViewController.h:
#import <UIKit/UIKit.h>


@interface BIDMasterViewController : UITableViewController

@property (weak, nonatomic) IBOutlet UISegmentedControl *colorControl;

- (IBAction)chooseColor:(id)sender;


@end
Now, switch over to BIDMasterViewController.m. We're going to start by importing the header for our document class, adding some private properties and methods (for later use) in a class extension, and synthesizing accessors for the new properties we just added.
#import "BIDMasterViewController.h"

#import "BIDTinyPixDocument.h"
@interface BIDMasterViewController () <UIAlertViewDelegate>

@property (strong, nonatomic) NSArray *documentFilenames;

@property (strong, nonatomic) BIDTinyPixDocument *chosenDocument;

- (NSURL *)urlForFilename:(NSString *)filename;

- (void)reloadFiles;

@end


@implementation BIDMasterViewController

@synthesize colorControl;

@synthesize documentFilenames;

@synthesize chosenDocument;

.

.

.
Let's take care of those private methods right away. The first of these takes a file name, combines it with the file path of the app's Documents directory, and returns a URL pointing to that specific file. The Documents directory is a special location that iOS sets aside, one for each app installed on an iOS device. You can use it to store documents created by your app, and rest assured that those documents will be automatically included whenever users back up their iOS device, whether it's to iTunes or iCloud.
Add this method to our implementation, placing it directly above the @end at the bottom of the file:
- (NSURL *)urlForFilename:(NSString *)filename {

    NSArray *paths = NSSearchPathForDirectoriesInDomains(NSDocumentDirectory,

        NSUserDomainMask, YES);

    NSString *documentDirectory = [paths objectAtIndex:0];

    NSString *filePath = [documentDirectory stringByAppendingPathComponent:filename];

    NSURL *url = [NSURL fileURLWithPath:filePath];

    return url;

}
The second private method is a bit longer. It also uses the Documents directory, this time to search for files representing existing documents. The method takes the files it finds and sorts them by creation date, so that the user will see the list of documents sorted “blog-style,”with the newest items first. The document file names are stashed away in the documentFilenames property, and then the table view (which we admittedly haven't yet dealt with) is reloaded. Add this method above the @end:
- (void)reloadFiles {

    NSArray *paths = NSSearchPathForDirectoriesInDomains(NSDocumentDirectory,

        NSUserDomainMask, YES);

    NSString *path = [paths objectAtIndex:0];

    NSFileManager *fm = [NSFileManager defaultManager];


    NSError *dirError;

    NSArray *files = [fm contentsOfDirectoryAtPath:path error:&dirError];

    if (!files) {

        NSLog(@"Encountered error while trying to list files in directory %@: %@",

            path, dirError);

    }
    NSLog(@"found files: %@", files);


    files = [files sortedArrayUsingComparator:

             ^NSComparisonResult(id filename1, id filename2) {

        NSDictionary *attr1 = [fm attributesOfItemAtPath:

                               [path stringByAppendingPathComponent:filename1]

                                                   error:nil];

        NSDictionary *attr2 = [fm attributesOfItemAtPath:

                               [path stringByAppendingPathComponent:filename2]

                                                   error:nil];

        return [[attr2 objectForKey:NSFileCreationDate] compare:

                [attr1 objectForKey:NSFileCreationDate]];

    }];

    self.documentFilenames = files;

    [self.tableView reloadData];

}
Now, let's deal with our dear old friends, the table view data source methods. These should be pretty familiar to you by now. Add the following three methods above the @end:
- (NSInteger)numberOfSectionsInTableView:(UITableView *)tableView {

    return 1;

}


- (NSInteger)tableView:(UITableView *)tableView

        numberOfRowsInSection:(NSInteger)section {

    return [self.documentFilenames count];

}


- (UITableViewCell *)tableView:(UITableView *)tableView

        cellForRowAtIndexPath:(NSIndexPath *)indexPath {

    UITableViewCell *cell = [tableView dequeueReusableCellWithIdentifier:@"FileCell"];


    NSString *path = [self.documentFilenames objectAtIndex:indexPath.row];

    cell.textLabel.text = path.lastPathComponent.stringByDeletingPathExtension;

    return cell;

}
These methods are based on the contents of the array stored in the documentFilenames property. The tableView:cellForForAtIndexPath: method relies on the existence of a cell attached to the table view with "FileCell" set as its identifier, so we must be sure to set that up in the storyboard a little later.
If not for the fact that we haven't touched our storyboard yet, the code we have now would almost be something we could run and see in action, but with no preexisting TinyPix documents, we would have nothing to display in our table view. And so far, we don't have any way to create new documents either. Also, we have not yet dealt with the color-selection control we're going to add. So, let's do a bit more work before we try to run our app.
The user's choice of highlight color will be stored in NSUserDefaults for later retrieval. Here's the action method that will do that by passing along the segmented control's chosen index. Add this method above the @end:
- (IBAction)chooseColor:(id)sender {

    NSInteger selectedColorIndex = [(UISegmentedControl *)sender selectedSegmentIndex];

    NSUserDefaults *prefs = [NSUserDefaults standardUserDefaults];

    [prefs setInteger:selectedColorIndex forKey:@"selectedColorIndex"];

}
We realize that we haven't yet set this up in the storyboard, but we'll get there!
We also need to add the following few lines to the viewWillAppear: method, to make sure that the segmented control in our app's GUI will show the current value from NSUserDefaults as soon as it's about to be displayed:
- (void)viewWillAppear:(BOOL)animated

{

    [super viewWillAppear:animated];

    NSUserDefaults *prefs = [NSUserDefaults standardUserDefaults];

    NSInteger selectedColorIndex = [prefs integerForKey:@"selectedColorIndex"];

    self.colorControl.selectedSegmentIndex = selectedColorIndex;

}
Now, let's set up a few things in our viewDidLoad method. We'll start off by adding a button to the right side of the navigation bar. The user will press this button to create a new TinyPix document. We finish off by calling the reloadFiles method that we implemented earlier. Make this change to viewDidLoad:
- (void)viewDidLoad

{

    [super viewDidLoad];

    // Do any additional setup after loading the view, typically from a nib.


    UIBarButtonItem *addButton = [[UIBarButtonItem alloc]

        initWithBarButtonSystemItem:UIBarButtonSystemItemAdd

        target:self

        action:@selector(insertNewObject)];

    self.navigationItem.rightBarButtonItem = addButton;


    [self reloadFiles];

}
You may have noticed that when we created the UIBarButtonItem in this method, we told it to call the insertNewObject method when it's pressed. We haven't written that method yet, so let's do so now. Add this method above the @end:
- (void)insertNewObject {

    // get the name

    UIAlertView *alert =

    [[UIAlertView alloc] initWithTitle:@"Filename"

                               message:@"Enter a name for your new TinyPix document."

                              delegate:self

                     cancelButtonTitle:@"Cancel"

                     otherButtonTitles:@"Create", nil];

    alert.alertViewStyle = UIAlertViewStylePlainTextInput;

    [alert show];

}
This method creates an alert panel that includes a text-input field and displays it. The responsibility of creating a new item instead falls to the delegate method that the alert view calls when it's finished, which we'll also address now. Add this method above the @end:
- (void)alertView:(UIAlertView *)alertView

        didDismissWithButtonIndex:(NSInteger)buttonIndex {

    if (buttonIndex == 1) {

        NSString *filename = [NSString stringWithFormat:@"%@.tinypix",

                              [alertView textFieldAtIndex:0].text];

        NSURL *saveUrl = [self urlForFilename:filename];

        self.chosenDocument = [[BIDTinyPixDocument alloc] initWithFileURL:saveUrl];

        [chosenDocument saveToURL:saveUrl

                 forSaveOperation:UIDocumentSaveForCreating

                completionHandler:^(BOOL success) {

            if (success) {

                NSLog(@"save OK");

                [self reloadFiles];

                [self performSegueWithIdentifier:@"masterToDetail" sender:self];

            } else {

                NSLog(@"failed to save!");

            }

        }];

    }

}
This method starts out simply enough. It checks the value of buttonIndex to see which button was pressed (a 0 indicates that the user pressed the Cancel button). It then creates a file name based on the user's entry, a URL based on that file name (using the urlForFilename: method we wrote earlier), and a new BIDTinyPixDocument instance using that URL.
What comes next is a little more subtle. It's important to understand here that just creating a new document with a given URL doesn't create the file. In fact, at the time that the initWithFileURL: is called, the document doesn't yet know if the given URL refers to an existing file or to a new file that needs to be created. We need to tell it what to do. In this case, we tell it to save a new file at the given URL with this code:
        [chosenDocument saveToURL:saveUrl

                 forSaveOperation:UIDocumentSaveForCreating

                completionHandler:^(BOOL success) {

.

.

.

        }];
Of interest is the purpose and usage of the block that is passed in as the last argument. This method, which we're calling saveToURL:forSaveOperation:completionHandler:, doesn't have a return value to tell us how it all worked out. In fact, the method returns immediately after it's called, long before the file is actually saved. Instead, it starts the file-saving work, and later, when it's done, calls the block that we gave it, using the success parameter to let us know whether it succeeded. To make it all work as smoothly as possible, the file-saving work is actually performed on a background thread. The block we pass in, however, is called on the main thread, so we can safely use any facilities that require the main thread, such as UIKit. With that in mind, take a look again at what happens inside that block:
            if (success) {

                NSLog(@"save OK");

                [self reloadFiles];

                [self performSegueWithIdentifier:@"masterToDetail" sender:self];

            } else {

                NSLog(@"failed to save!");

            }
This is the content of the block we passed in to the file-saving method, and it's called later after the file operation is completed. We check to see if it succeeded; if so, we do an immediate file reload, and then initiate a segue to another view controller. This is an aspect of segues that we didn't cover in Chapter 10, but it's pretty straightforward.
The idea is that a segue in a storyboard file can have an identifier, just like a table view cell, and you can use that identifier to trigger a segue programmatically. In this case, we'll just need to remember to configure that segue in the storyboard when we get to it. But before we do that, let's add the last method this class needs, to take care of that segue. Insert this method above the @end:
- (void)prepareForSegue:(UIStoryboardSegue *)segue sender:(id)sender {

    if (sender == self) {

        // if sender == self, a new document has just been created,

        // and chosenDocument is already set.


        UIViewController *destination = segue.destinationViewController;

        if ([destination respondsToSelector:@selector(setDetailItem:)]) {

            [destination setValue:self.chosenDocument forKey:@"detailItem"];

        }

    } else {

        // find the chosen document from the tableview

        NSIndexPath *indexPath = [self.tableView indexPathForSelectedRow];

        NSString *filename = [documentFilenames objectAtIndex:indexPath.row];

        NSURL *docUrl = [self urlForFilename:filename];

        self.chosenDocument = [[BIDTinyPixDocument alloc] initWithFileURL:docUrl];

        [self.chosenDocument openWithCompletionHandler:^(BOOL success) {

            if (success) {

                NSLog(@"load OK");

                UIViewController *destination = segue.destinationViewController;

                if ([destination respondsToSelector:@selector(setDetailItem:)]) {

                    [destination setValue:self.chosenDocument forKey:@"detailItem"];

                }

            } else {

                NSLog(@"failed to load!");

            }

        }];

    }

}
This method has two clear paths of execution, determined by the condition at the top. Remember from our discussion of storyboards in Chapter 10 that this method is called on a view controller whenever a new controller is about to be pushed onto the navigation stack. The sender parameter points out the object that initiated the segue, and we use that to figure out just what to do here. If the segue is initiated by the programmatic method call we performed in the alert view delegate method, then sender will be equal to self. In that case, we know that the chosenDocument property is already set, and we simply pass its value off to the destination view controller.
Otherwise, we know we're responding to the user touching a row in the table view, and that's where things get a little more complicated. That's the time to construct a URL (much as we did when creating a document), create a new instance of our document class, and try to open the file. You'll see that the method we call to open the file, openWithCompletionHandler:, works similarly to the save method we used earlier. We pass it a block that it will save for later execution. Just as with the file-saving method, the loading occurs in the background, and this block will be executed on the main thread when it's complete. At that point, if the loading succeeded, we pass the document along to the detail view controller.
Note that both of these methods use the key-value coding technique that we've used a few times before (such as in Chapter 10), letting us set the detailItem property of the segue's destination controller, even though we don't include its header. This will work out just fine for us, since BIDDetailViewController—the detail view controller class created as part of the Xcode project—happens to include a property called detailItem right out of the box.
With the amount of code we now have in place, it's high time we configure the storyboard so that we can run our app and make something happen. Save your code and continue.
Initial Storyboarding
Select MainStoryboard.storyboard in the Xcode project navigator, and take a look at what's already there. You'll find scenes for the navigation controller, the master view controller, and the detail view controller (see Figure 14–2). You can ignore the navigation controller entirely, since all our work will be with the other two.
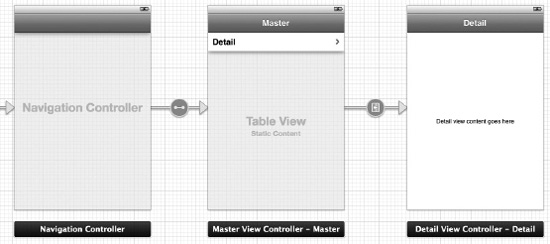
Figure 14–2. The TinyPix storyboard, showing the navigation controller, master view controller, and detail view controller
Let's start by dealing with the master view controller scene. This is where the table view showing the list of all our TinyPix documents is configured. By default, this scene's table view is configured to use static cells instead of dynamic cells (see Chapter 10 if you need a refresher on the difference between these two cell types). We want our table view to get its contents from the data source methods we implemented, so select the table view. You can do this in the dock by first finding the item named Master View Controller – Master, and then opening its disclosure triangle and selecting the Table View item just below it. With the table view selected, open the attributes inspector and set the Content popup to Dynamic Prototypes.
This change actually deletes the preexisting segue that connected a table view cell to the detail view controller. Re-create that segue by first selecting the Table View Cell within the Table View. Next, control-drag from the cell to the detail view controller, and select Push from the storyboard segues menu that pops up.
Now, select that same prototype table view cell you just dragged from, and use the attributes inspector to set its Style to Basic and its Identifier to FileCell. This will let the data source code we wrote earlier access the table view cell.
We also need to create the segue that we're triggering in our code. Do this by control-dragging from the master detail view controller's icon (an orange circle at the bottom of its scene or the Master View Controller - Master icon in the dock) over to the detail view controller, and selecting Push from the storyboard segues menu.
You'll now see two segues that seem to connect the two scenes. By selecting each of them, you can tell where they're coming from. Selecting one segue highlights the whole master scene; selecting the second one highlights just the table view cell. Select the segue that highlights the whole scene, and use the attributes inspector to set its Identifier to masterToDetail.
The final touch needed for the master view controller scene is to let the user pick which color will be used to represent an “on” point in the detail view. Instead of implementing some kind of comprehensive color picker, we're just going to add a segmented control that will let the user pick from a set of predefined colors.
Find a Segmented Control in the object library, drag it out, and place it in the navigation bar at the top of the master view (see Figure 14–3).
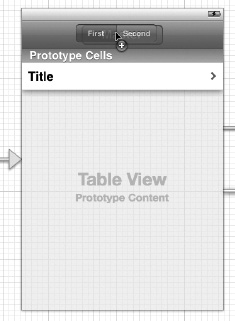
Figure 14–3. The TinyPix storyboard, showing the master view controller with a segmented control being dropped on the controller's navigation bar
Make sure the segmented control is selected, and open the attributes inspector. In the Segmented Control section at the top of the inspector, use the stepper control to change the number of Segments from 2 to 3. Then double-click the title of each segment in turn, changing them to Black, Red, and Green, respectively.
Next, control-drag from the segmented control to the icon representing the master controller (the orange circle below the controller or the dock icon labeled Master View Controller – Master), and select the chooseColor: method. Then control-drag from the master controller back to the segmented control, and select the colorControl outlet.
We've finally reached a point where we can run the app and see all our hard work brought to life! Run your app. You'll see it start up and display an empty table view with a segmented control at the top and a plus button in the upper-right corner (see Figure 14–4).
Hit the plus button, and the app will ask you to name the new document. Give it a name, tap Create, and you'll see the app transition to the detail display, which is, well, under construction right now. All the default implementation of the detail view controller does is display the description of its detailItem in a label. Of course, there's more information in the console pane. It's not much, but it's something!
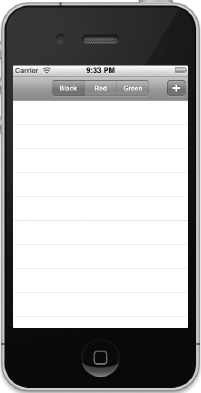
Figure 14–4. The TinyPix app when it first appears. Click the plus icon to add a new document. You'll be prompted to name your new TinyPix document. At the moment, all the detail view does is display the document name in a label.
Tap the back button to return to the master list, where you'll see the item you added. Go ahead and create one or two more items to see that they're correctly added to the list. Then head back to Xcode, because we've got more work to do!
Creating BIDTinyPixView
Our next order of business is the creation of a view class to display our grid and let the user edit it. Select the TinyPix folder in the project navigator, and press ?N to create a new file. In the iOS Cocoa Touch section, select Objective-C class, and click Next. Name the new class BIDTinyPixView, and choose UIView in the Subclass of popup. Click Next, verify that the save location is OK, and click Create.
NOTE: The implemention of our view class includes some drawing and touch handling that we haven't covered yet. Rather than bog down this chapter with too many details about these topics, we're just going to quickly show you the code. We'll cover details about drawing in Chapter 16 and responding to touches and drags in Chapter 17.
Select BIDTinyPixView.h, and make the following changes:
#import <UIKit/UIKit.h>

#import "BIDTinyPixDocument.h"


@interface BIDTinyPixView : UIView


@property (strong, nonatomic) BIDTinyPixDocument *document;

@property (strong, nonatomic) UIColor *highlightColor;


@end
All we're doing here is adding a couple of properties so that the controller can pass along the document, as well as set the color used for the “on” squares in our grid.
Now, switch over to BIDTinyPixView.m, where we have some more substantial work ahead of us. Start by adding this class extension and synthesizing all our properties at the top of the file:
#import "BIDTinyPixView.h"


typedef struct {

    NSUInteger row;

    NSUInteger column;

} GridIndex;


@interface BIDTinyPixView ()

@property (assign, nonatomic) CGSize blockSize;

@property (assign, nonatomic) CGSize gapSize;

@property (assign, nonatomic) GridIndex selectedBlockIndex;

- (void)initProperties;

- (void)drawBlockAtRow:(NSUInteger)row column:(NSUInteger)column;

- (GridIndex)touchedGridIndexFromTouches:(NSSet *)touches;

- (void)toggleSelectedBlock;

@end


@implementation BIDTinyPixView


@synthesize document;

@synthesize highlightColor;


@synthesize blockSize;

@synthesize gapSize;

@synthesize selectedBlockIndex;

.

.

.
Here, we defined a C struct called GridIndex as a handy way to deal with row/column pairs. We also defined a class extension with some properties and private methods that we'll need to use later, and synthesized all our properties inside the implementation.
The default empty UIView subclass contains an initWithFrame: method, which is really the default initializer for the UIView class. However, since this class is going to be loaded from a storyboard, it will instead be initialized using the initWithCoder: method. We'll implement both of these, making each call a third method that initializes our properties. Make this change to initWithFrame: and add the code just below it:
- (id)initWithFrame:(CGRect)frame

{

    self = [super initWithFrame:frame];

    if (self) {

        // Initialization code

        [self initProperties];


    }

    return self;

}


- (id)initWithCoder:(NSCoder *)aDecoder {

    self = [super initWithCoder:aDecoder];

    if (self) {

        [self initProperties];

    }

    return self;

}


- (void)initProperties {

    blockSize = CGSizeMake(34, 34);

    gapSize = CGSizeMake(5, 5);

    selectedBlockIndex.row = NSNotFound;

    selectedBlockIndex.column = NSNotFound;

    highlightColor = [UIColor blackColor];

}
The blockSize and gapSize values are specifically tuned to a view that's 310 pixels across. If we wanted to be extra clever here, we could have defined them dynamically based on the view's actual frame, but this is the simplest approach that works for our case, so we're sticking with it!
Now, let's take a look at the drawing routines. We override the standard UIView drawRect: method, and use that to simply walk through all the blocks in our grid, and call another method for each block. Add the following bold code, and don't forget to remove the comment marks around the drawRect: method:
/*

// Only override drawRect: if you perform custom drawing.

// An empty implementation adversely affects performance during animation.

- (void)drawRect:(CGRect)rect

{

    // Drawing code

    if (!document) return;
    for (NSUInteger row = 0; row < 8; row++) {

        for (NSUInteger column = 0; column < 8; column++) {

            [self drawBlockAtRow:row column:column];

        }

    }


}

*/


- (void)drawBlockAtRow:(NSUInteger)row column:(NSUInteger)column {

    CGFloat startX = (blockSize.width + gapSize.width) * (7 - column) + 1;

    CGFloat startY = (blockSize.height + gapSize.height) * row + 1;

    CGRect blockFrame = CGRectMake(startX, startY, blockSize.width, blockSize.height);

    UIColor *color = [document stateAtRow:row column:column] ?

        self.highlightColor : [UIColor whiteColor];

    [color setFill];

    [[UIColor lightGrayColor] setStroke];

    UIBezierPath *path = [UIBezierPath bezierPathWithRect:blockFrame];

    [path fill];

    [path stroke];

}
Finally, we add a set of methods that respond to touch events by the user. Both touchesBegan:withEvent: and touchesMoved:withEvent: are standard methods that every UIView subclass can implement in order to capture touch events that happen within the view's frame. These two methods make use of other methods we defined in the class extension to calculate a grid location based on a touch location, and to toggle a specific value in the document. Add these four methods at the bottom of the file, just above the @end:
- (GridIndex)touchedGridIndexFromTouches:(NSSet *)touches {

    GridIndex result;

    UITouch *touch = [touches anyObject];

    CGPoint location = [touch locationInView:self];

    result.column = 8 - (location.x * 8.0 / self.bounds.size.width);

    result.row = location.y * 8.0 / self.bounds.size.height;

    return result;

}


- (void)toggleSelectedBlock {

    [document toggleStateAtRow:selectedBlockIndex.row column:selectedBlockIndex.column];

    [[document.undoManager prepareWithInvocationTarget:document]

     toggleStateAtRow:selectedBlockIndex.row column:selectedBlockIndex.column];

    [self setNeedsDisplay];

}


- (void)touchesBegan:(NSSet *)touches withEvent:(UIEvent *)event {
    self.selectedBlockIndex = [self touchedGridIndexFromTouches:touches];

    [self toggleSelectedBlock];

}


- (void)touchesMoved:(NSSet *)touches withEvent:(UIEvent *)event {

    GridIndex touched = [self touchedGridIndexFromTouches:touches];

    if (touched.row != selectedBlockIndex.row

        || touched.column != selectedBlockIndex.column) {

        selectedBlockIndex = touched;

        [self toggleSelectedBlock];

    }

}
Sharp-eyed readers may have noticed that the toggleSelectedBlock method does something a bit special. After calling the document's toggleStateAtRow:column: method, it does something more. Let's take another look:
- (void)toggleSelectedBlock {

    [document toggleStateAtRow:selectedBlockIndex.row column:selectedBlockIndex.column];

    [[document.undoManager prepareWithInvocationTarget:document]

        toggleStateAtRow:selectedBlockIndex.row column:selectedBlockIndex.column];

    [self setNeedsDisplay];

}
The call to document.undoManager returns an instance of NSUndoManager. We haven't dealt with this directly anywhere else in this book, but NSUndoManager is the structural underpinning for the undo/redo functionality in both iOS and Mac OS X. The idea is that anytime the user performs an action in the GUI, you use NSUndoManager to leave a sort of breadcrumb by “recording” a method call that will undo what the user just did. NSUndoManager will store that method call on a special undo stack, which can be used to backtrack through a document's state whenever the user activates the system's undo functionality.
The way it works is that the prepareWithInvocationTarget: method returns a special kind of proxy object that you can send any message to, and the message will be packed up with the target and pushed onto the undo stack. So, while it may look like you're calling toggleStateAtRow:column: twice in a row, the second time it's not being called, but instead is just being queued up for later potential use. This kind of spectacularly dynamic behavior is an area where Objective-C really stands out in comparison to static languages such as C++, where techniques such as letting one object act as a proxy to another or packing up a method invocation for later use have no language support and are nearly impossible (and therefore many tasks such as building undo support can be quite tedious).
So, why are we doing this? We haven't been giving any thought to undo/redo issues up to this point, so why now? The reason is that registering an undoable action with the document's undoManager marks the document as “dirty,” and ensures that it will be saved automatically at some point in the next few seconds. The fact that the user's actions are also undoable is just icing on the cake, at least in this application. In an app with a more complex document structure, allowing document-wide undo support can be hugely beneficial.
Save your changes. Now that our view class is ready to go, let's head back to the storyboard to configure the GUI for the detail view.
Storyboard Detailing
Select MainStoryboard.storyboard, find the detail scene, and take a look at what's there right now.
All the GUI contains is a label (“Detail view content goes here”), which is the one that contained the document's description when you ran the app earlier. That label isn't particularly useful, so select the label in the detail view controller and press the delete key to remove it.
Use the object library to find a View, and drag it into the detail view. Interface Builder will help you line it up so that it fills the entire area. After dropping it there, use the size inspector to set both its width and height to 310. Finally, drag the view and use the guidelines to center it in its container (see Figure 14–5).
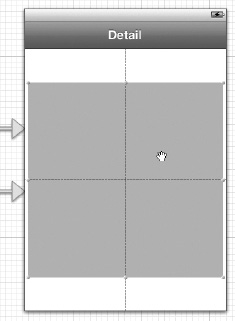
Figure 14–5. We replaced the label in the detail view with another view, 310 × 310 pixels, centered in its containing view.
Switch over to the identity inspector so we can change this UIView instance into an instance of our custom class. In the Custom Class section at the top of the inspector, select the Class popup list and choose BIDTinyPixView.
Now, we need to wire up the custom view to our detail view controller. We haven't prepared an outlet for our custom view yet, but that's OK, since Xcode 4's drag-to-code will do that for us.
Activate the assistant editor. A text editor should slide into place alongside the GUI editor, displaying the contents of BIDDetailViewController.h. If it's showing you anything else, use the jump bar at the top of the text editor to make BIDDetailViewController.h come into view.
To make the connection, control-drag from the Tiny Pix View to the code, releasing the drag just above the @end line. In the popup window that appears, make sure that Connection is set to Outlet, name the new outlet pixView, and click the Connect button.
You should see that making those connections has added this line to BIDDetailViewController.h:
@property (weak, nonatomic) IBOutlet BIDTinyPixView *pixView;
One thing it didn't add, however, is a header import for our custom view. Let's take care of that by adding this line toward the top of BIDDetailViewController.h:
#import <UIKit/UIKit.h>

#import "BIDTinyPixView.h"


@interface BIDDetailViewController : UIViewController

.

.

.
Next, switch over to BIDDetailViewController.m, and you'll see that Xcode also added this method synthesizer toward the top of the file:
@synthesize pixView = _pixView;
Xcode also added a line to the top of viewDidUnload:
- (void)viewDidUnload

{

    [self setPixView:nil];

    [super viewDidUnload];

    // Release any retained subviews of the main view.

    // e.g. self.myOutlet = nil;

}
From this start, this class already has a class extension that declares a private method. Let's add a property to BIDDetailViewController.m, to keep track of which color the user has chosen:
.

.

.

@interface BIDDetailViewController ()

@property (assign, nonatomic) NSUInteger selectedColorIndex;

- (void)configureView;

@end

.

.

.
Next, we'll implement the getter and setter for this property. We'll use the synthesized getter, but write our own setter so that whenever this value is set (which will happen when the user taps the segmented control), we set the highlight color in our custom view.
.

.

.

@synthesize pixView = _pixView;

@synthesize selectedColorIndex;


- (void)setSelectedColorIndex:(NSUInteger)i {

    if (selectedColorIndex == i) return;


    selectedColorIndex = i;

    switch (selectedColorIndex) {

        case 0:

            self.pixView.highlightColor = [UIColor blackColor];

            break;

        case 1:

            self.pixView.highlightColor = [UIColor redColor];

            break;

        case 2:

            self.pixView.highlightColor = [UIColor greenColor];

            break;

        default:

            break;

    }

    [self.pixView setNeedsDisplay];

}


.

.

.
Now, let's modify the configureView method. This isn't a standard UIViewController method. It's just a private method that the project template included in this class as a convenient spot to put code that needs to update the view after anything changes. Since we're not using the description label, we delete the line that sets that. Then we add a bit of code to pass the chosen document along to our custom view, and tell it to redraw itself by calling setNeedsDisplay.
- (void)configureView

{

    // Update the user interface for the detail item.


    if (self.detailItem) {

        self.detailDescriptionLabel.text = [self.detailItem description];

        self.pixView.document = self.detailItem;

        [self.pixView setNeedsDisplay];


    }

    NSUserDefaults *prefs = [NSUserDefaults standardUserDefaults];

    self.selectedColorIndex = [prefs integerForKey:@"selectedColorIndex"];


}
We ended this method by pulling the color choice out of NSUserDefaults. We set our own selectedColorIndex property. That, in turn, will call the setter we defined earlier, which will pass the chosen color to our custom view.
While we're on the subject of dealing with color choices, scroll down to the bottom and fill in the implementation for the chooseColor: method:
- (IBAction)chooseColor:(id)sender {

    NSInteger selectedColorIndex = [(UISegmentedControl *)sender

                                    selectedSegmentIndex];

    NSUserDefaults *prefs = [NSUserDefaults standardUserDefaults];

    [prefs setInteger:selectedColorIndex forKey:@"selectedColorIndex"];

}
We're nearly finished with this class, but we need to make one more change. Remember when we mentioned the autosaving that takes place when a document is notified that some editing has occurred, triggered by registering an undoable action? The save normally happens within about ten seconds after the edit occurs. Like the other saving and loading procedures we described earlier in this chapter, it happens in a background thread, so that normally the user won't even notice. However, that works only as long as the document is still around.
With our current setup, there's a risk that when the user hits the back button to go back to the master list, the document instance will be deallocated without any save operation occurring, and the user's latest changes will be lost. To make sure this doesn't happen, we need to add some code to the viewWillDisappear: method to close the document as soon as the user navigates away from the detail view. Closing a document causes it to be automatically saved, and again, the saving occurs on a background thread. In this particular case, we don't need to do anything when the save is done, so we pass in nil instead of a block.
Make this change to viewWillDisappear::
- (void)viewWillDisappear:(BOOL)animated

{

    [super viewWillDisappear:animated];

    UIDocument *doc = self.detailItem;

    [doc closeWithCompletionHandler:nil];


}
And with that, this version of our first truly document-based app is ready to try out! Fire it up, and bask in the glory. You can create new documents, edit them, flip back to the list, and then select another document (or the same document), and it all just works. If you open the Xcode console while doing this, you'll see some output each time a document is loaded or saved. Using the autosaving system, you don't have direct control over just when saves occur (except for when closing a document), but it can be interesting to watch the logs just to get a feel for when they happen.
Adding iCloud Support
You now have a fully working document-based app, but we're not going to stop here. We promised you iCloud support in this chapter, and it's time to deliver!
Modifying TinyPix to work with iCloud is pretty straightforward. Considering all that's happening behind the scenes, this requires a surprisingly small number of changes. We'll need to make some revisions to the method that loads the list of available files and the method that specifies the URL for loading a new file, but that's about it.
Apart from the code changes, we will also need to deal with some additional administrative details. Apple allows an app to save to iCloud only if it contains an embedded provisioning profile that is configured to allow iCloud usage. This means that to add the iCloud support to our app, you must have a paid iOS developer membership and have installed your developer certificate. It also works only with actual devices, not the simulator, so you'll need to have at least one iOS device registered with iCloud to run the new iCloud-backed TinyPix. With two devices, you'll have even more fun, as you can see how changes made on one device propagate to the other.
Creating a Provisioning Profile
First, you need to create an iCloud-enabled provisioning profile for TinyPix. Go to http://developer.apple.com and log in to your developer account. Then find your way to the iOS provisioning portal. Apple changes the layout of the developer areas now and then, so we're not going into great detail about how the web site looks. Instead, we'll just describe the basic steps you'll need to take.
Go to the App IDs section, and create a new app ID based on the identifier you used when creating TinyPix. You can see this identifier by selecting the top-level TinyPix item in Xcode's project navigator, selecting the Summary tab, and looking in the iOS Application Target section in the Identifier field. If you've been using com.apress as the base for your application identifiers, the identifier for TinyPix will be com.apress.TinyPix. You get the idea.
In the current version of the portal, we set the common name to TinyPix AppID, left the popup menu set to Use Team ID, and entered com.apress.TinyPix as the Bundle Identifier. Then we clicked Submit.
After creating your app ID, you'll see it appear in a table showing various characteristics of each app ID. Under iCloud, you should see a yellow dot and the word Configurable. Click the Configure link next to that, and on the next page, click to enable the Enable for iCloud checkbox. Then click Done to go back to your list of app IDs.
Now, switch to the provisioning section and create a new provisioning profile specific to that app ID. The Provisioning section is just below the App IDs section. Click the New Profile button, and enter a Profile Name of TinyPixAppPP. If you don't already have one, you'll need to create a development certificate. In that case, click the Development Certificate link, and follow the instructions on that page. Once you have your development certificate set up, select TinyPix AppID as your App ID. Finally, select the devices on which you want your app to run.
When you're ready, download the new provisioning profile to your Mac, and double-click it to install it in Xcode. In the TinyPix project window, select the top-level TinyPix object, select the TinyPix project itself (as opposed to the TinyPix build target), and then select the Build Settings tab. Scroll down to the Code Signing section, where you'll find an item called Code Signing Identity. That contains an item called Debug, in which you'll find an item labeled Any iOS SDK. Click the light-green popup in that row, and choose the developer certificate name listed under TinyPixAppPP.
NOTE: Dealing with certificates and provisioning profiles is a pain in the neck, but it seems to be a necessary evil in our little corner of the programming world. If it's any consolation, as random as the current tool work flow seems, it's actually a lot better than it was just a couple of years ago. If this trend continues, perhaps in a few years, we'll reach a point where configuring provisioning profiles will be as straightforward as creating a new project. We're not holding our collective breath, but we're keeping our fingers crossed. You might find it useful to work through the provisioning specifics with a friend who's been through the process before, and take copious notes!
The other bit of new configuration is, thankfully, quite a bit simpler. We need to enable iCloud entitlements for this project, so that it can make use of the iCloud capability baked into the provisioning profile.
Enabling iCloud Entitlements
With the top-level TinyPix item selected in the project navigator, select the TinyPix target from the list of projects and targets shown just to the right of the navigator. Switch to the Summary tab, and scroll down to the Entitlements section, which is currently empty. Click the Enable Entitlements checkbox at the top of this section, and you'll see that Xcode populates the remaining fields for you. It specifies an Entitlements File named TinyPix, and fills in your application identifier in the three other sections.
You're finished! Your app now has the necessary permissions to access iCloud from your code. The rest is a simple matter of programming.
How to Query
Select BIDMasterViewController.m so we can start making changes for iCloud. The biggest change is going to be the way we look for available documents. In the first version of TinyPix, we used NSFileManager to see what's available on the local file system. This time, we're going to do things a little differently. Here, we will fire up a special sort of query to look for documents.
Start by adding a pair of properties: one to hold a pointer to an ongoing query and the other to hold the list of all the documents the query finds.
@interface BIDMasterViewController ()

@property (strong, nonatomic) NSArray *documentFilenames;

@property (strong, nonatomic) BIDTinyPixDocument *chosenDocument;

@property (strong, nonatomic) NSMetadataQuery *query;

@property (strong, nonatomic) NSMutableArray *documentURLs;>

- (NSURL *)urlForFilename:(NSString *)filename;

- (void)reloadFiles;

@end
@implementation BIDMasterViewController

@synthesize documentFilenames;

@synthesize chosenDocument;

@synthesize query;

@synthesize documentURLs;
Now for the new file-listing method. Remove the entire reloadFiles method, and replace it with this:
- (void)reloadFiles {

    NSFileManager *fileManager = [NSFileManager defaultManager];

    // passing nil is OK here, matches first entitlement

    NSURL *cloudURL = [fileManager URLForUbiquityContainerIdentifier:nil];

    NSLog(@"got cloudURL %@", cloudURL);  // returns nil in simulator


    self.query = [[NSMetadataQuery alloc] init];

    query.predicate = [NSPredicate predicateWithFormat:@"%K like '*.tinypix'",

                       NSMetadataItemFSNameKey];

    query.searchScopes = [NSArray arrayWithObject:

                          NSMetadataQueryUbiquitousDocumentsScope];

    [[NSNotificationCenter defaultCenter]

     addObserver:self

     selector:@selector(updateUbiquitousDocuments:)

     name:NSMetadataQueryDidFinishGatheringNotification

     object:nil];

    [[NSNotificationCenter defaultCenter]

     addObserver:self

     selector:@selector(updateUbiquitousDocuments:)

     name:NSMetadataQueryDidUpdateNotification

     object:nil];

    [query startQuery];

}
There are some new things here that are definitely worth mentioning. The first is seen in this line:
NSURL *cloudURL = [fileManager URLForUbiquityContainerIdentifier:nil];
That's a mouthful, for sure. Ubiquity? What are we talking about here? When it comes to iCloud, a lot of Apple's terminology for identifying resources in iCloud storage includes words like “ubiquity” and “ubiquitous,” to indicate that something is omnipresent—accessible from any device using the same iCloud login credentials.
In this case, we're asking the file manager to give us a base URL that will let us access the iCloud directory associated with a particular container identifier. A container identifier is normally a string containing your company's unique bundle seed ID and the application identifier, and is used to pick one of the iCloud entitlements contained within your app. Passing nil here is a shortcut that just means “give me the first one in the list.” Since our app contains only one item in that list (created in the previous section), that shortcut suits our needs perfectly.
After that, we create and configure an instance of NSMetadataQuery:
    self.query = [[NSMetadataQuery alloc] init];

    query.predicate = [NSPredicate predicateWithFormat:@"%K like '*.tinypix'",

                       NSMetadataItemFSNameKey];

    query.searchScopes = [NSArray arrayWithObject:

                          NSMetadataQueryUbiquitousDocumentsScope];
This class was originally written for use with the Spotlight search facility on Mac OS X, but it's now doing extra duty as a way to let iOS apps search iCloud directories. We give the query a predicate, which limits its search results to include only those with the correct sort of file name, and we give it a search scope that limits it to look just within the Documents folder in the app's iCloud storage. Then we set up some notifications to let us know when the query is complete, and fire up the query.
Now, we need to implement the method that those notifications call when the query is done. Add this method just below the reloadFiles method:
- (void)updateUbiquitousDocuments:(NSNotification *)notification {

    self.documentURLs = [NSMutableArray array];

    self.documentFilenames = [NSMutableArray array];


    NSLog(@"updateUbiquitousDocuments, results = %@", self.query.results);

    NSArray *results = [self.query.results sortedArrayUsingComparator:

        ^NSComparisonResult(id obj1, id obj2) {

        NSMetadataItem *item1 = obj1;

        NSMetadataItem *item2 = obj2;

        return [[item2 valueForAttribute:NSMetadataItemFSCreationDateKey] compare:

                [item1 valueForAttribute:NSMetadataItemFSCreationDateKey]];

    }];


    for (NSMetadataItem *item in results) {

        NSURL *url = [item valueForAttribute:NSMetadataItemURLKey];

        [self.documentURLs addObject:url];

        [(NSMutableArray *)documentFilenames addObject:[url lastPathComponent]];

    }


    [self.tableView reloadData];

}
The query's results contain a list of NSMetadataItem objects, from which we can get items like file URLs and creation dates. We use this to sort the items by date, and then grab all the URLs for later use.
Save Where?
The next change is to the urlForFilename: method, which once again is completely different. Here, we're using a ubiquitous URL to create a full path URL for a given file name. We insert "Documents" in the generated path as well, to make sure we're using the app's Documents directory. Delete the old method, and replace it with this new one:
- (NSURL *)urlForFilename:(NSString *)filename {

    // be sure to insert "Documents" into the path
    NSURL *baseURL = [[NSFileManager defaultManager]

                      URLForUbiquityContainerIdentifier:nil];

    NSURL *pathURL = [baseURL URLByAppendingPathComponent:@"Documents"];

    NSURL *destinationURL = [pathURL URLByAppendingPathComponent:filename];

    return destinationURL;

}
Now, build and run your app on an actual iOS device (not the simulator). If you've run the previous version of the app on that device, you'll find that any TinyPix masterpieces you created earlier are now nowhere to be seen. This new version ignores the local Documents directory for the app, and relies completely on iCloud. However, you should be able to create new documents, and find that they stick around after quitting and restarting the app. Moreover, you can even delete the TinyPix app from your device entirely, run it again from Xcode, and find that all your iCloud-saved documents are available at once. If you have an additional iOS device configured with the same iCloud user, use Xcode to run the app on that device, and you'll see all the same documents appear there as well! It's pretty sweet.
Storing Preferences on iCloud
We can “cloudify” one more piece of functionality with just a bit of effort. iOS 5 includes a new class called NSUbiquitousKeyValueStore, which works a lot like an NSDictionary (or NSUserDefaults, for that matter), but whose keys and values are stored in the cloud. This is great for application preferences, login tokens, and anything else that doesn't belong in a document but could be useful when shared among all of a user's devices.
In TinyPix, we'll use this feature to store the user's preferred highlight color. That way, instead of needing to be configured on each device, the user sets the color once, and it shows up everywhere.
Select BIDMasterViewController.m so we can make a couple of small changes. First, find chooseColor:, and make the following changes:
- (IBAction)chooseColor:(id)sender {

    NSInteger selectedColorIndex = [(UISegmentedControl *)sender selectedSegmentIndex];

    NSUserDefaults *prefs = [NSUserDefaults standardUserDefaults];

    [prefs setInteger:selectedColorIndex forKey:@"selectedColorIndex"];

    NSUbiquitousKeyValueStore *prefs = [NSUbiquitousKeyValueStore defaultStore];

    [prefs setLongLong:selectedColorIndex forKey:@"selectedColorIndex"];


}
Here, we grab a slightly different object instead of NSUserDefaults. This new class doesn't have a setInteger: method, so we use setLongLong: instead, which will do the same thing.
Then find the viewWillAppear: method, and change it as shown here:
- (void)viewWillAppear:(BOOL)animated

{

    [super viewWillAppear:animated];

    NSUserDefaults *prefs = [NSUserDefaults standardUserDefaults];

    NSInteger selectedColorIndex = [prefs integerForKey:@"selectedColorIndex"];
    NSUbiquitousKeyValueStore *prefs = [NSUbiquitousKeyValueStore defaultStore];

    NSInteger selectedColorIndex = [prefs longLongForKey:@"selectedColorIndex"];

    self.colorControl.selectedSegmentIndex = selectedColorIndex;

}
We also need to make a change to the detail display, so that it will pick up the color from the correct place. Select BIDDetailViewController.m, find the configureView method, and change its last few lines as shown here:
    NSUserDefaults *prefs = [NSUserDefaults standardUserDefaults];

    self.selectedColorIndex = [prefs integerForKey:@"selectedColorIndex"];

    NSUbiquitousKeyValueStore *prefs = [NSUbiquitousKeyValueStore defaultStore];

    self.selectedColorIndex = [prefs longLongForKey:@"selectedColorIndex"];
That's it! You can now run the app on multiple devices configured for the same iCloud user, and will see that setting the color on one device results in the new color appearing on the other device the next time a document is opened there. Piece of cake!
What We Didn't Cover
We now have the basics of an iCloud-enabled, document-based application up and running, but there are a few more issues that you may want to consider. We're not going to cover these topics in this book, but if you're serious about making a great iCloud-based app, you'll want to think about these areas:
- Documents stored in iCloud are prone to conflicts. What happens if you edit the same TinyPix file on several devices at once? Fortunately, Apple has already thought of this, and provides some ways to deal with these conflicts in your app. It's up to you to decide if you want to ignore conflicts, try to fix them automatically, or ask the user to help sort out the problem. For full details, search for “resolving document version conflicts” in the Xcode documentation viewer.
- Apple recommends that you design your application to work in a completely offline mode in case the user isn't using iCloud for some reason. It also recommends that you provide a way for a user to move files between iCloud storage and local storage. Sadly, Apple doesn't provide or suggest any standard GUI for helping a user manage this, and current apps that provide this functionality, such as Apple's iWork apps, don't seem to handle it in a particularly user-friendly way. See Apple's “Managing the Life Cycle of a Document” in the Xcode documentation for more on this.
- Apple supports using iCloud for Core Data storage, and even provides a class called
UIManagedDocumentthat you can subclass if you want to make that work. See theUIManagedDocumentclass reference for more information, or take a look at More iOS 5 Development: Further Explorations of the iOS SDK, (http://apress.com/book/view/1430232528) by Dave Mark, Alex Horowitz, Kevin Kim, and Jeff LaMarche (Apress, 2012) for a hands-on guide to building an iCloud-backed Core Data app.
What's up next? In Chapter 15, we'll take you through the process of having your apps work properly in a multithreaded, multitasking environment.