
Our Hello World application was a good introduction to iPhone development using Cocoa Touch, but it was missing a crucial capability: the ability to interact with the user. Without that, our application is severely limited in terms of what it can accomplish.
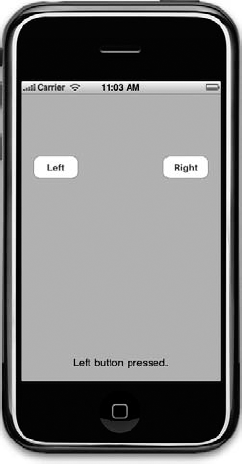
In this chapter, we're going to write a slightly more complex application, one with two buttons as well as a label (see Figure 3-1). When the user taps either of the buttons, the label's text changes. This may seem like a rather simplistic example, but it demonstrates the key concepts you'll need to master the use of controls in your iPhone applications.
Before diving in, a tiny bit of theory is in order. The designers of Cocoa Touch were guided by a concept called Model-View-Controller (or MVC), which is a very logical way of dividing up the code that makes up a GUI-based application. These days, almost all object-oriented frameworks pay a certain amount of homage to MVC, but few are as true to the MVC model as Cocoa Touch.
The MVC model divides up all functionality into three distinct categories:
Model: The classes that hold your application's data
View: Made up of the windows, controls, and other elements that the user can see and interact with
Controller: Binds the model and view together and is the application logic that decides how to handle the user's inputs
The goal in MVC is to make the objects that implement these three types of code as distinct from one another as possible. Any object you write should be readily identifiable as belonging in one of the three categories, with little or no functionality within it that could be classified within either of the other two. An object that implements a button, for example, shouldn't contain code to process data when that button is tapped, and code that implements a bank account shouldn't contain code to draw a table to display its transactions.
MVC helps ensure maximum reusability. A class that implements a generic button can be used in any application. A class that implements a button that does some particular calculation when it is clicked can be used only in the application for which it was originally written.
When you write Cocoa Touch applications, you will primarily create your view components using Interface Builder, although you will sometimes also modify your interface from code, or you might subclass existing views and controls.
Your model will be created by crafting Objective-C classes designed to hold your application's data or by building a data model using Core Data, which you'll learn about in Chapter 11. We won't be creating any model objects in this chapter's application because we have no need to store or preserve data, but we will introduce model objects as our applications get more complex in future chapters.
Your controller component will typically be composed of classes that you create and that are specific to your application. Controllers can be completely custom classes (NSObject subclasses), but more often, they will be subclasses of one of several existing generic controller classes from the UIKit framework such as UIViewController, which you'll see in a moment. By subclassing one of these existing classes, you will get a lot of functionality for free and won't have to spend time recoding the wheel, so to speak.
As we get deeper into Cocoa Touch, you will quickly start to see how the classes of the UIKit framework follow the principles of MVC. If you keep this concept in the back of your head as you develop, you will end up creating cleaner, more easily maintained code.
It's time to create our Xcode project. We're going to use the same template that we used in the previous chapter: View-based Application. We'll start using some of the other templates before too long, but by starting with the simple template again, it'll be easier for you to see how the view and controller objects work together in an iPhone application. Go ahead and create your project, saving it under the name Button Fun. If you have any trouble creating your project, refer to the preceding chapter for the proper steps.
You probably remember that the project template created some classes for us. You'll find those same classes in your new project, although the names will be a little different because some class names are based on the project name.
A little later in this chapter, we're going to design a view (or user interface) for our application using Interface Builder, just as we did in the previous chapter. Before we do that, we're going to look at and make some changes to the source code files that were created for us. Yes, Virginia, we're actually going to write some code in this chapter.
Before we make any changes, let's look at the files that were created for us. In the project window, expand the Classes folder to reveal the four files within (see Figure 3-2).
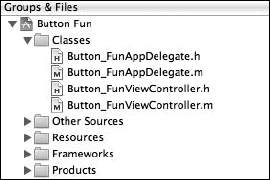
These four files implement two classes, each of which contains a .m and .h file. The application we are creating in this chapter has only one view, and the controller class that is responsible for managing that one view is called Button_FunViewController. The Button_Fun part of the name comes from our project name, and the ViewController part of the name means this class is, well, a view controller. Click Button_FunViewController.h in the Groups & Files pane, and take a look at the contents of the file:
#import <UIKit/UIKit.h>

@interface Button_FunViewController : UIViewController {
}

@end
Not much to it, is there? This is a subclass of UIViewController, which is one of those generic controller classes we mentioned earlier. It is part of the UIKit and gives us a bunch of functionality for free. Xcode doesn't know what our application-specific functionality is going to be, but it does know we're going to have some, so it has created this class to hold that functionality.
Take a look back at Figure 3-1. Our program consists of two buttons and a text label that reflects which button was tapped. We'll create all three of these elements in Interface Builder. Since we're also going to be writing code, there must be some way for our code to interact with the elements we create in Interface Builder, right?
Absolutely right. Our controller class can refer to objects in the nib by using a special kind of instance variable called an outlet. Think of an outlet as a pointer that points to an object within the nib. For example, suppose you created a text label in Interface Builder and wanted to change the label's text from within your code. By declaring an outlet and connecting that outlet to the label object, you could use the outlet from within your code to change the text displayed by the label. You'll see how to do just that in a bit.
Going in the opposite direction, interface objects in our nib file can be set up to trigger special methods in our controller class. These special methods are known as action methods. For example, you can tell Interface Builder that when the user touches up (pulls a finger off the screen) within a button, a specific action method within your code should be called.
As we've already said, Button Fun will feature two buttons and a label.
In our code, we'll create an outlet that points to the label, and this outlet will allow us to change the text of that label. We'll also create a method named buttonPressed: that will fire whenever one of the two buttons is tapped. buttonPressed: will set the label's text to let the user know which button was tapped.
We'll use Interface Builder to create the buttons and label, and then we'll do some clicking and dragging to connect the label to our label outlet and our buttons to our buttonPressed: action.
But before we get to our code, here's a bit more detail on outlets and actions.
Outlets are instance variables that are declared using the keyword IBOutlet. A declaration of an outlet in your controller's header file might look like this:
@property (nonatomic, retain) IBOutlet UIButton *myButton;
The IBOutlet keyword is defined like this:
#ifndef IBOutlet
#define IBOutlet
#endif
Confused? IBOutlet does absolutely nothing as far as the compiler is concerned. Its sole purpose is to act as a hint to tell Interface Builder that this is an instance variable that we're going to connect to an object in a nib. Any instance variable that you create and want to connect to an object in a nib file must be preceded by the IBOutlet keyword. When you open Interface Builder, it will scan your project header files for occurrences of this keyword and will allow you to make connections from your code to the nib based on these (and only these) variables. In a few minutes, you'll see how to actually make the connection between an outlet and a user interface object in Interface Builder.
Actions are methods that are part of your controller class. They are also declared with a special keyword, IBAction, which tells Interface Builder that this method is an action and can be triggered by a control. Typically, the declaration for an action method will look like this:
- (IBAction)doSomething:(id)sender;
The actual name of the method can be anything you want, but it must have a return type of IBAction, which is the same as declaring a return type of void. This is another way of saying that action methods do not return a value. Usually, the action method will take one argument, and it's typically defined as id and given a name of sender. The control that triggers your action will use the sender argument to pass a reference to itself. So, for example, if your action method was called as the result of a button tap, the argument sender would contain a reference to the specific button that was tapped.
As you'll see in a bit, our program will use that sender argument to set the label to the text "left" or "right," depending on which button was tapped. If you don't need to know which control called your method, you can also define action methods without a sender parameter. This would look like so:
- (IBAction)doSomething;
It won't hurt anything if you declare an action method with a sender argument and then ignore sender. You will likely see a lot of sample code that does just that, because historically action methods in Cocoa had to accept sender whether they used it or not.
Now that you know what outlets and actions are, let's go ahead and add one of each to our controller class. We need an outlet so we can change the label's text. Since we won't be changing the buttons, we don't need an outlet for them.
We'll also declare a single action method that will be called by both buttons. While many action methods are specific to a single control, it's possible to use a single action to handle input from multiple controls, which is what we're going to do here. Our action will grab the button's name from its sender argument and use the label outlet to embed that button name in the label's text. You'll see how this is done in a moment.
Note
Because Xcode creates files for us to use that already contain some of the code we need, we will often be inserting code into an existing file. When you see code listings like the one for Button_FunViewController.h, any code that is in a normal typeface is existing code that should already be in the file. Code that is listed in bold is new code that you need to type.
Go ahead and add the following code to Button_FunViewController.h:
#import <UIKit/UIKit.h>

@interface Button_FunViewController : UIViewController {
    UILabel *statusText;
}
@property (nonatomic, retain) IBOutlet UILabel *statusText;
- (IBAction)buttonPressed:(id)sender;
@end
If you have worked with Objective-C 2.0, you're probably familiar with the @property declaration, but if you aren't, that line of code might look a little intimidating. Fear not: Objective-C properties are really quite simple. Let's take a quick detour to talk about them, since they are relatively new and we will use them extensively in this book. Even if you are already a master of the property, please do read on, because there is a bit of Cocoa Touch—specific information that you'll definitely find useful.
Before the property was added to Objective-C, programmers traditionally defined pairs of methods to set and retrieve the values for each of a class's instance variables. These methods are called accessors and mutators (or, if you prefer, getters and setters) and might look something like this:
- (id) foo {
    return foo;
}
- (void) setFoo: (id) aFoo {
    if (aFoo != foo) {
        [aFoo retain];
        [foo release];
        foo = aFoo;
    }
}
Although this approach is still perfectly valid, the @property declaration allows you to say goodbye to the tedious process of creating accessor and mutator methods, if you want. The @property declarations we just typed, combined with another declaration in the implementation file (@synthesize), which you'll see in a moment, will tell the compiler to create the getter and setter methods at compile time. You do still have to declare the underlying instance variables as we did here, but you do not need to define the accessor or mutator.
In our declaration, the @property keyword is followed by some optional attributes, wrapped in parentheses. These further define how the accessors and mutators will be created by the compiler. The two you see here will be used often when defining properties in iPhone applications:
@property (nonatomic, retain) UILabel *statusText;
The first of these attributes, retain, tells the compiler to send a retain message to any object that we assign to this property. This will keep the instance variable underlying our property from being flushed from memory while we're still using it. This is necessary because the default behavior (assign) is intended for use with garbage collection, a feature of Objective-C 2.0 that isn't currently available on iPhone. As a result, if you define a property that is an object (as opposed to a raw datatype like int), you should generally specify retain in the optional attributes. When declaring a property for an int, float, or other raw datatype, you do not need to specify any optional attributes.
The second of our optional attributes, nonatomic, changes the way that the accessor and mutator methods are generated. Without getting too technical, let's just say that, by default, these methods are created with some additional code that is helpful when writing multithreaded programs. That additional overhead, though small, is unnecessary when declaring a pointer to a user interface object, so we declare nonatomic to save a bit of overhead. There will be times where you don't want to specify nonatomic for a property, but as a general rule, most of the time you will specify nonatomic when writing iPhone applications.
Objective-C 2.0 has another nice feature that we'll be using along with properties. It introduced the use of dot notation to the language. Traditionally, to use an accessor method, you would send a message to the object, like this:
myVar = [someObject foo];
This approach still works just fine. But when you've defined a property, you also have the option of using dot notation, similar to that used in Java, C++, and C#, like so:
myVar = someObject.foo;
Those two statements are identical as far as the compiler is concerned; use whichever one makes you happy. Dot notation also works with mutators. The statement shown here:
someObject.foo = myVar;
is functionally identical to the following:
[someObject setFoo:myVar];
We are done with our controller class header file for the time being, so save it and single-click the class's implementation file, Button_FunViewController.m. The file should look like this:
#import "Button_FunViewController.h"

@implementation Button_FunViewController

/*
// The designated initializer. Override to perform setup
// that is required before the view is loaded.
- (id)initWithNibName:(NSString *)nibNameOrNil bundle:
        (NSBundle *)nibBundleOrNil {
    if (self=[super initWithNibName:nibNameOrNil bundle:nibBundleOrNil]) {
        // Custom initialization
    }
    return self;
}
*/

/*
// Implement loadView to create a view hierarchy programmatically,
// without using a nib.
- (void)loadView {
}
*/

/*
// Implement viewDidLoad to do additional setup after loading the view,
// typically from a nib.
- (void)viewDidLoad {
[super viewDidLoad];
}
*/
/*
// Override to allow orientations other than the default portrait
// orientation.
- (BOOL)shouldAutorotateToInterfaceOrientation:
(UIInterfaceOrientation)interfaceOrientation {
// Return YES for supported orientations
return (interfaceOrientation == UIInterfaceOrientationPortrait);
}
*/
- (void)didReceiveMemoryWarning {
// Releases the view if it doesn't have a superview.
[super didReceiveMemoryWarning];
// Release any cached data, images, etc that aren't in use.
}
- (void)viewDidUnload {
// Release any retained subviews of the main view.
// e.g. self.myOutlet = nil;
}
- (void)dealloc {
[super dealloc];
}
@endApple has anticipated some of the methods that we are likely to override and has included method stubs in the implementation file. Some of them are commented out and can be either uncommented or deleted as appropriate. The ones that aren't commented out are either used by the template or are so commonly used that they were included to save us time. We won't need any of the commented-out methods for this application, so go ahead and delete them, which will shorten up the code and make it easier to follow as we insert new code into this file.
Once you've deleted the commented-out methods, add the following code. When you're done, meet us back here, and we'll talk about what we did:
#import "Button_FunViewController.h" @implementation Button_FunViewController@synthesize statusText;- (IBAction)buttonPressed:(id)sender {NSString *title = [sender titleForState:UIControlStateNormal];NSString *newText = [[NSString alloc] initWithFormat:@"%@ button pressed.", title];statusText.text = newText;[newText release];}- (void)didReceiveMemoryWarning { [super didReceiveMemoryWarning]; // Releases the view if it // doesn't have a superview // Release anything that's not essential, such as cached data } - (void)viewDidUnload { // Release any retained subviews of the main view. // e.g. self.myOutlet = nil;self.statusText = nil;} - (void)dealloc {[statusText release];[super dealloc]; } @end
OK, let's look at the newly added code. First, we added this:
@synthesize statusText;
This is how we tell the compiler to automatically create the accessor and mutator methods for us. By virtue of this line of code, there are now two "invisible" methods in our class: statusText and setStatusText:. We didn't write them, but they are there nonetheless, waiting for us to use them.
The next bit of newly added code is the implementation of our action method that will get called when either button is tapped:
-(IBAction)buttonPressed: (id)sender {
   NSString *title = [sender titleForState:UIControlStateNormal];
   NSString *newText = [[NSString alloc] initWithFormat:
                         @"%@ button pressed.", title];
statusText.text = newText; [newText release]; }
Remember that the parameter passed into an action method is the control or object that invoked it. So, in our application, sender will always point to the button that was tapped. This is a very handy mechanism, because it allows us to have one action method handle the input from multiple controls, which is exactly what we're doing here: both buttons call this method, and we tell them apart by looking at sender. The first line of code in this method grabs the tapped button's title from sender.
NSString *title = [sender titleForState:UIControlStateNormal];
Note
We had to provide a control state when we requested the button's title. The four possible states are normal, which represents the control when it's active but not currently being used; highlighted, which represents the control when it is in the process of being tapped or otherwise used; disabled, which is the state of a button that is not enabled and can't be used; and selected, which is a state that only certain controls have and which indicates that the control is currently selected. UIControlStateNormal represents a control's normal state and is the one you will use the vast majority of the time. If values for the other states are not specified, those states will have the same value as the normal state.
The next thing we do is create a new string based on that title:
NSString *newText = [[NSString alloc] initWithFormat:
                      @"%@ button pressed.", title];
This new string will append the text "button pressed." to the name of the button. So if we tapped a button with a title of "Left," this new string would equal "Left button pressed."
Finally, we set the text of our label to this new string:
statusText.text = newText;
We're using dot notation here to set the label's text, but we could have also used [statusText setText:newText]; instead. Finally, we release the string:
[newText release];
The importance of releasing objects when you're done with them cannot be overstated. iPhone is a very resource-constrained device, and even a small number of memory leaks can cause your program to crash. It's also worth pointing out that we didn't do this:
NSString *newText = [NSString stringWithFormat:
                     @"%@ button pressed.", title];
This code would work exactly the same as the code we used. Class methods like this one are called convenience or factory methods, and they return an autoreleased object. Following the general memory rule that "if you didn't allocate it or retain it, don't release it," these autoreleased objects don't have to be released unless you specifically retain them, and using them often results in code that's a little shorter and more readable.
But, there is a cost associated with these convenience methods because they use the autorelease pool. The memory allocated for an autoreleased object will stay allocated for some period of time after we're done with it. On Mac OS X, with swap files and relatively large amounts of physical memory, the cost of using autoreleased objects is nominal, but on iPhone, these objects can have a detrimental effect on your application's memory footprint. It is OK to use autorelease, but try to use it only when you really need to, not just to save typing a line or two of code.
Next, we added a single line of code to the existing viewDidUnload: method:
self.statusText = nil;
Don't worry too much about this line of code for now; we'll explain why this line of code is needed in the next chapter. For now, just remember that you need to set any outlets your class has to nil in viewDidUnload.
Tip
If you're a bit fuzzy on objective-C memory management, you really should review the memory management "contract" at http://developer.apple.com/documentation/Cocoa/Conceptual/MemoryMgmt/Articles/mmRules.html. Even a small number of memory leaks can wreak havoc in an iPhone application.
The last thing we did was to release the outlet in our dealloc method:
[statusText release];
Releasing this item might seem strange. You might be thinking, since we didn't instantiate it, we shouldn't be responsible for releasing it. If you have worked with older versions of Cocoa and Objective-C, you're probably thinking this is just plain wrong. However, because we implemented properties for each of these outlets and specified retain in that property's attributes, releasing it is correct and necessary. Interface Builder will use our generated mutator method when assigning the outlets, and that mutator will retain the object that is assigned to it, so it's important to release the outlet here to avoid leaking memory.
Before moving on, make sure you've saved this file, and then go ahead and build the project by pressing
The other two files under the Classes folder implement our application delegate. Cocoa Touch makes extensive use of delegates, which are classes that take responsibility for doing certain things on behalf of another object. The application delegate lets us do things at certain predefined times on behalf of the UIApplication class. Every iPhone application has one and only one instance of UIApplication, which is responsible for the application's run loop and handles application-level functionality such as routing input to the appropriate controller class.
UIApplication is a standard part of the UIKit, and it does its job mostly behind the scenes, so you don't have to worry about it for the most part. At certain well-defined times during an application's execution, however, UIApplication will call specific delegate methods, if there is a delegate and if it implements that method. For example, if you have code that needs to fire just before your program quits, you would implement the method applicationWillTerminate: in your application delegate and put your termination code there. This type of delegation allows our application to implement common application-wide behavior without having to subclass UIApplication or, indeed, to even know anything about its inner workings.
Click Button_FunAppDelegate.h in the Groups & Files pane, and look at the application delegate's header file. It should look like this:
#import <UIKit/UIKit.h>

@class Button_FunViewController;

@interface Button_FunAppDelegate : NSObject <UIApplicationDelegate> {
    UIWindow *window;
    Button_FunViewController *viewController;
}

@property (nonatomic, retain) IBOutlet UIWindow *window;
@property (nonatomic, retain) IBOutlet Button_FunViewController
    *viewController;

@end
We don't need to make any changes to this file, and after implementing our controller class, most everything here should look familiar to you. One thing worth pointing out is this line of code:
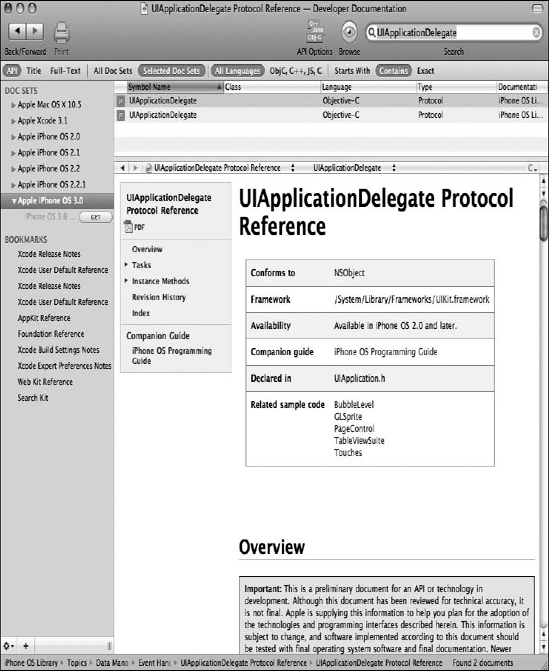
@interface Button_FunAppDelegate : NSObject <UIApplicationDelegate> {Do you see that value between the angle brackets? This indicates that this class conforms to a protocol called UIApplicationDelegate. Hold down the option key, and move your cursor so that it is over the word UIApplicationDelegate. Your cursor should turn into crosshairs; when it does, double-click. This will open the documentation browser and show you the documentation for the UIApplicationDelegate protocol (see Figure 3-3). This same trick works with class, protocol, and category names, as well as method names displayed in the editor pane. Just option–double-click a word, and it will search for that word in the documentation browser.
Knowing how to quickly look up things in the documentation is definitely worthwhile, but looking at the definition of this protocol is perhaps more important. Here's where you'll find what methods the application delegate can implement and when those methods will get called. It's probably worth your time to read over the descriptions of these methods.
Note
If you've worked with Objective-C before but not with Objective-C 2.0, you should be aware that protocols can now specify optional methods. UIApplicationDelegate contains many optional methods, and you do not need to implement any of the optional methods in your application delegate unless you have a reason.
Click Button_FunAppDelegate.m, and look at the implementation of the application delegate. It should look like this:
#import "Button_FunAppDelegate.h"
#import "Button_FunViewController.h"

@implementation Button_FunAppDelegate

@synthesize window;
@synthesize viewController;


- (void)applicationDidFinishLaunching:(UIApplication *)application {
// Override point for customization after app launch
[window addSubview:viewController.view];
[window makeKeyAndVisible];
}
- (void)dealloc {
[viewController release];
[window release];
[super dealloc];
}
@endRight in the middle of the file, you can see that our application delegate has implemented one of the protocol's methods: applicationDidFinishLaunching:, which, as you can probably guess, fires as soon as the application has finished all the setup work and is ready to start interacting with the user.
Our delegate version of applicationDidFinishLaunching: adds our view controller's view as a subview to the application's main window and makes the window visible, which is how the view we are going to design gets shown to the user. You don't need to do anything to make this happen; it's all part of the code generated by the template we used to build this project.
We just wanted to give you a bit of background on application delegates and see how this all ties together.
So far, we've looked at the four files in our project's Classes tab (two .m files, two .h files). In previous chapters, we've had experience with two of the three files in our project's Resources tab. We looked at the equivalent of Button_Fun-Info.plist when we added our icon to the project, and we looked at the equivalent of Button_FunViewController.xib when we added our "Hello, World!" label.
There's one other file in the Resources tab that we want to talk about. The file MainWindow.xib is what causes your application's delegate, main window, and view controller instances to get created at runtime. Remember, this file is provided as part of the project template. You don't need to change or do anything here. This is just a chance to see what's going on behind the scenes, to get a glimpse of the big picture.
Expand the Resources folder in Xcode's Groups & Files pane, and double-click MainWindow.xib. Once Interface Builder opens, take a look at the nib's main window—the one labeled MainWindow.xib, which should look like Figure 3-4.
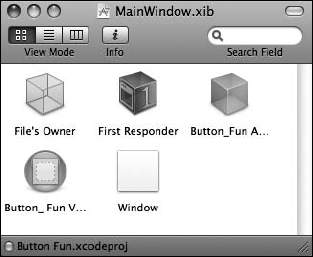
You should recognize the first two icons in this window from Chapter 2. As a reminder, every icon in a nib window after the first two represents an object that will get instantiated when the nib file loads. Let's take a look at the third, fourth, and fifth icons.
Note
Long names get truncated in the nib file's main window in the default view, as you can see in Figure 3-4. If you hold your cursor over one of these icons for a few seconds, a tooltip will pop up to show you the full name of the item. Note also that the names shown in the main window do not necessarily indicate the underlying class of the object. The default name for a new instance usually will clue you in to the underlying class, but these names can be, and often are, changed.
The third icon is an instance of Button_FunAppDelegate. The fourth icon is an instance of Button_FunViewController. And, finally, the fifth icon is our application's one and only window (an instance of UIWindow). These three icons indicate that once the nib file is loaded, our application will have one instance of the application delegate, Button_FunAppDelegate; one instance of our view controller, Button_FunViewController; and one instance of UIWindow (the class that represents the application's one and only window). As you can see, Interface Builder can do much more than just create interface elements. It allows you to create instances of other classes as well. This is an incredibly powerful feature. Every line of code that you don't write is a line of code you don't have to debug or maintain. Right here, we're creating three object instances at launch time without having to write a single line of code.
OK, that's all there is to see here, folks; move along. Be sure to close this nib file on the way out. And if you are prompted to save, just say "no," because you shouldn't have changed anything.
Now that you have a handle on the files that make up our project and the concepts that bring them all together, let's turn our attention to Interface Builder and the process of constructing our interface.
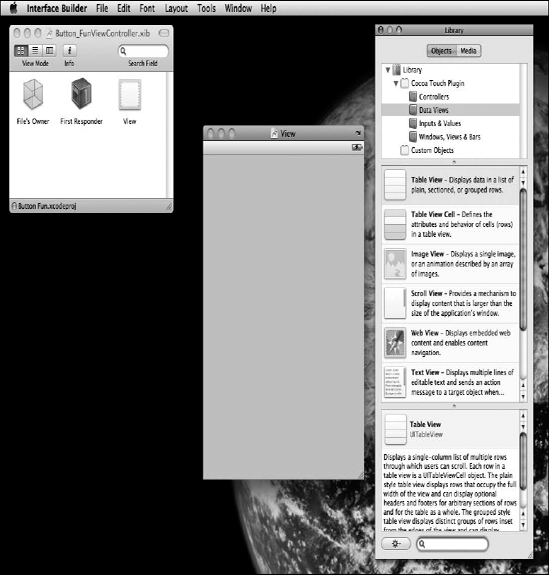
In Xcode, double-click Button_FunViewController.xib in the Groups & Files pane. The nib file should open in Interface Builder. Make sure the library is visible. If it's not, you can show it by selecting Library from the Tools menu. You also need to make sure that the nib's View window is open. If it's not, double-click the icon called View in the nib's main window (see Figure 3-5).
Now we're ready to design our interface. Drag a label from the library over to the view window, just as you did in the previous chapter. Place the label toward the bottom of the view, so the label lines up with the left and bottom blue guidelines (see Figure 3-6). Next, expand the label so the right side lines up with the guideline on the right side of the window.

Note
The little blue guidelines are there to help you stick to the Apple Human Interface Guidelines (usually referred to as "the HIG"). Yep, just like it does for Mac OS X, Apple provides the iPhone Human Interface Guidelines for designing iPhone applications. The HIG tells you how you should—and shouldn't—design your user interface. You really should read it, because it contains valuable information that every iPhone developer needs to know. You'll find it at http://developer.apple.com/iphone/library/documentation/UserExperience/Conceptual/MobileHIG/.
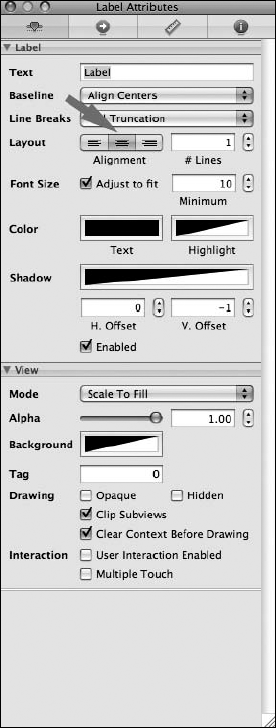
After you've placed the label at the bottom of the view, click it to select it, and press
Now, double-click the label, and delete the existing text. We don't want any text to display until a button has been tapped.
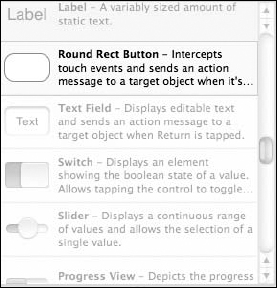
Next, we're going to drag two Round Rect Buttons from the library (see Figure 3-8) to our view.
Place the two buttons next to each other, roughly in the middle of the view. The exact placement doesn't matter. Double-click the button that you placed on the left. Doing this will allow the button's title to be edited, so go ahead and change its text to read "Left." Next, double-click the button on the right, and change its text to read "Right." When you're done, your view should look something like the one shown in Figure 3-9.

We now have all the pieces of our interface. All that's left is to make the various connections that will allow these pieces to work together.
The first step is to make a connection from File's Owner to the label in the View window. Why File's Owner?
When an instance of UIViewController or one of its subclasses is instantiated, it can be told to initialize itself from a nib. In the template we've used, the Button_FunViewController class will be loaded from the nib file Button_FunViewController.xib. We don't have to do anything to make that happen; it's part of the project template we chose. In future chapters, you'll see exactly how that process works. Since the MainWindow.xib file contains an icon that represents Button_FunViewController, an instance of Button_FunViewController will get created automagically when our application launches. When that happens, that instance will automatically load Button_FunViewController.xib into memory and become its file's owner.
Earlier in the chapter, we added an outlet to Button_FunViewController, which is this nib's owner. We can now make a connection between that outlet and the label using the File's Owner icon. Let's look at how we do that.
Note
It's OK if you don't fully understand the nib loading process yet. It's complicated, and we'll be talking about it and seeing it in action in several of the later chapters. For now, just remember that your controller class is the file's owner for the nib file of the same name.
Hold down the control key; click the File's Owner icon in the main nib window; and keep the mouse button down. Drag away from the File's Owner icon toward the View window. A blue guideline should appear. Keep dragging until your cursor is over the label in the View window. Even though you won't be able to see the label, it will magically appear once you are over it (see Figure 3-10).

With the cursor still over the label, let go of the mouse button, and a small gray menu like the one shown in Figure 3-11 should pop up.
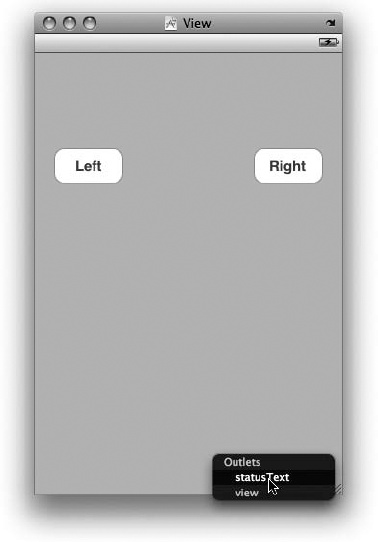
Select statusText from the gray menu.
By control-dragging from File's Owner to an interface object, you are telling Interface Builder that you want to connect one of the File's Owner's outlets to this object when the nib file is loaded. In this case, the file's owner is the class Button_FunViewController, and the Button_FunViewController outlet we are interested in is statusText. When we control-dragged from File's Owner to the label object and selected statusText from the pop-up menu that appeared, we told Interface Builder to have Button_FunViewController's statusText outlet point to the label, so any time we refer to statusText in our code, we will be dealing with this label. Cool, eh?
The only thing left to do is to identify which actions these buttons trigger and under what circumstances they trigger them. If you're familiar with Cocoa programming for Mac OS X, you're probably getting ready to control-drag from the buttons over to the File's Owner icon. And, to be honest, that will work, but it's not the best way to do it.
iPhone is different from Mac OS X, and here's one of the places where that difference becomes apparent. On the Mac, a control can be associated with just one action, and that action is typically triggered when that control is used. There are some exceptions to this, but by and large, a control triggers its corresponding action method when the mouse button is released if the cursor is still inside the bounds of that control.
Controls in Cocoa Touch offer a lot more possibilities, so instead of click-dragging from the control, it's best to get in the habit of using the connections inspector, which we can get to by pressing
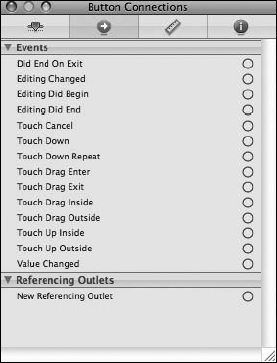
Under the heading Events, you'll see a whole list of events that can potentially trigger an action. If you like, you can associate different actions with different events. For example, you might use Touch Up Inside to trigger one action, while Touch Drag Inside triggers a different action. Our situation is relatively simple and straightforward. When the user taps our button, we want it to call our buttonPressed: method. The first question is which of the events in Figure 3-12 do we use?
The answer, which may not be obvious at first, is Touch Up Inside. When the user's finger lifts up from the screen, if the last place it touched before lifting was inside the button, the user triggers a touch up inside. Think about what happens in most of your iPhone applications if you touch the screen and change your mind. You move your finger off the button before lifting up, right? We should give our users the same ability. If our user's finger is still on the button when it's lifted off the screen, then we can safely assume that the button tap is intended.
Now that we know the event we want to trigger our action, how do we associate the event with a specific action method?
See that little circle in the inspector to the right of Touch Up Inside? Click in that circle and drag away with the mouse button still pressed; there's no need to hold down the control key this time. You should get a gray connection line, just as you did when we were connecting outlets earlier. Drag this line over to the File's Owner icon, and when the little gray menu pops up, select buttonPressed:. Remember, the File's Owner icon represents the class whose nib we are editing. In this case, File's Owner represents our application's sole instance of the Button_FunViewController class. When we drag from the button's event to the File's Owner icon, we are telling Interface Builder to call the selected method when the specified event occurs. So when the user touches up inside the button, the Button_FunViewController class's buttonPressed: method will be called.
Do this same sequence with the other button and then save. Now, any time the user taps one of these buttons, our buttonPressed: method will get called.
Save the nib file; then head back to Xcode and take your application for a spin. Select Build and Run from the Build menu. Your code should compile, and your application should come up in the iPhone Simulator. When you tap the left button, the text "Left button pressed." should appear, as it does in Figure 3-1. If you then tap the right button, the label will change to say "Right button pressed."
This chapter's simple application introduced you to MVC, creating and connecting outlets and actions, implementing view controllers, and using application delegates. You learned how to trigger action methods when a button is tapped and saw how to change the text of a label at runtime. Although a simple application, the basic concepts we used to build it are the same concepts that underlie the use of all controls on the iPhone, not just buttons. In fact, the way we used buttons and labels in this chapter is pretty much the way that we will implement and interact with most of the standard controls on the iPhone.
It's very important that you understand everything we did in this chapter and why we did it. If you don't, go back and redo the parts that you don't fully understand. This is important stuff! If you don't make sure you understand everything now, you will only get more confused as we get into creating more complex interfaces later on in this book.
In the next chapter, we'll take a look at some of the other standard iPhone controls. You'll also learn how to use alerts to notify the user of important happenings and how to indicate that the user needs to make a choice before proceeding by using action sheets. When you feel you're ready to proceed, give yourself a pat on the back for being such an awesome student, and head on over to the next chapter.