
As you're probably well aware, it has become something of a tradition to call the first project in any book on prographiamming "Hello, World!" We considered breaking this tradition but were scared that the tiki gods would inflict some painful retribution on us for such a gross breach of etiquette. So, let's do it by the book, shall we?
In this chapter, we're going use Xcode and Interface Builder to create a small iPhone application to display the text "Hello, World!" on its screen. We'll look at what's involved in creating an iPhone application project in Xcode, work through the specifics of using Interface Builder to design our application's user interface, and then run our application on the iPhone simulator. After that, we'll give our application an icon and a unique identifier to make it feel more like a real iPhone application.
We've got a lot to do here, so let's get going.
By now, you should have Xcode and the iPhone SDK installed on your machine. You should also download the book projects archive from the book web site. Here's a link:
http://www.iphonedevbook.com/forum/
The book forums are a great place to download the latest book source code, get your questions answered, and meet up with like-minded people.
As to the book project archive, even though you have the complete set of project files at your disposal, we think you'll get more out of the book if you create each project by hand instead of simply running the version you downloaded. The biggest reason for this is the familiarity and expertise you'll gain in working with the various tools we use throughout the book if you roll your own projects. There's just no substitute for actually clicking and dragging out buttons and sliders and scrolling through source code to make changes as we move from one version of a program to another.
That said, our first project is in the 02 Hello World folder. If you'll be creating your own projects, create a new 02 Hello World folder and follow along.
Launch Xcode, which is located in /Developer/Applications. If this is your first time using Xcode, don't worry; we'll walk you through the process of creating a new project. If you're already an old hand, just skim ahead.
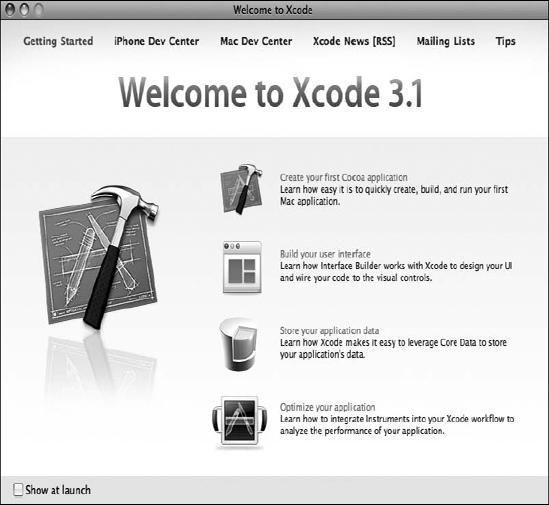
When you first launch Xcode, you'll be presented with a welcome screen like the one shown in Figure 2-1. The welcome screen contains useful links to iPhone and Mac OS X technical documentation, tutorial videos, news, sample code, and lots more. All of this information is available on Apple's developer web site and within Xcode's documentation browser, so if you'd rather not see this screen in the future, just uncheck the Show at launch checkbox before closing it. If you feel like poking through the information here for a few minutes, by all means, go right ahead. When you're done, close the window, and we'll proceed.
Note
If you have an iPhone or iPod touch connected to your machine, you might see a message when you first launch Xcode asking whether you want to use that device for development. Alternatively, a window titled Organizer, designed to list the devices you'll be working with, might appear. For now, click the Ignore button or, in the case of the Organizer window, close the window. If you choose to join the paid iPhone Developer Program, you will gain access to a program portal that will tell you how to use your iPhone or iPod touch for development and testing.
Create a new project by selecting New Project... from the File menu, or by pressing
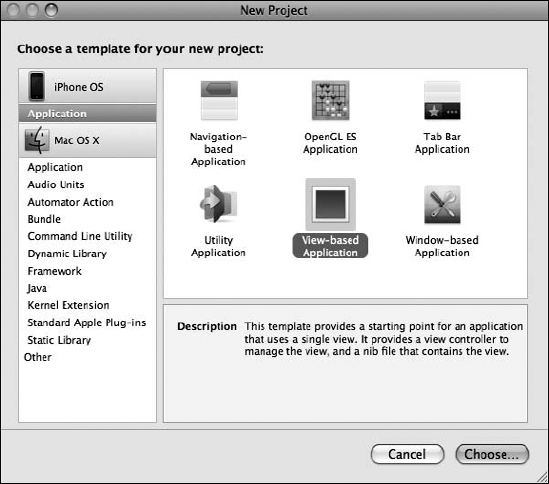
Figure 2.2. The New Project assistant, which lets you select from various file templates when creating a new file
As you can see in Figure 2-2, the pane on the left side of the window is divided into two main sections: iPhone OS and Mac OS X. You'll notice that there are a number of project template categories available for Mac OS X, but only one category (at least at the time of this writing) for the iPhone: Application.
As we did in Figure 2-2, select Application from under the iPhone heading, and you'll be shown a number of icons in the upper-right pane, each of which represents a separate project template that can be used as a starting point for your iPhone applications. The icon labeled View-based Application is the simplest template and the one we'll be using for the first several chapters. The others provide you with additional code and/or resources needed to create common iPhone application interfaces and contain stuff we're not ready to look at yet, but don't worry, we'll get to them later.
For this first project, click the View-based Application icon (that icon is selected in Figure 2-2) and then click the button labeled Choose.
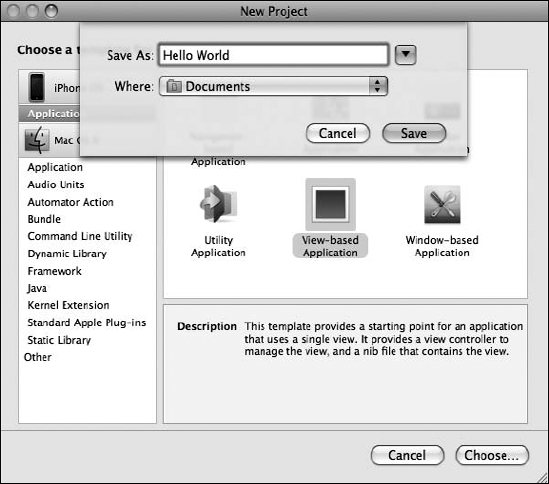
Once you've selected your project template, you'll be asked to save your new project using the standard save sheet (see Figure 2-3). Type Hello World for the project name, and save it wherever you want it stored. The Document folder is not a bad place, but you might want to create a dedicated folder for your Xcode projects.
After you dismiss the save sheet, Xcode will create and then open your project, and a new project window will appear that looks like Figure 2-4. We find that the project window, when first created, is a little small for our tastes, so we usually expand the window to take up more of the screen. There's a lot of information crammed into this window, and it's where you will be spending a lot of your iPhone development time.
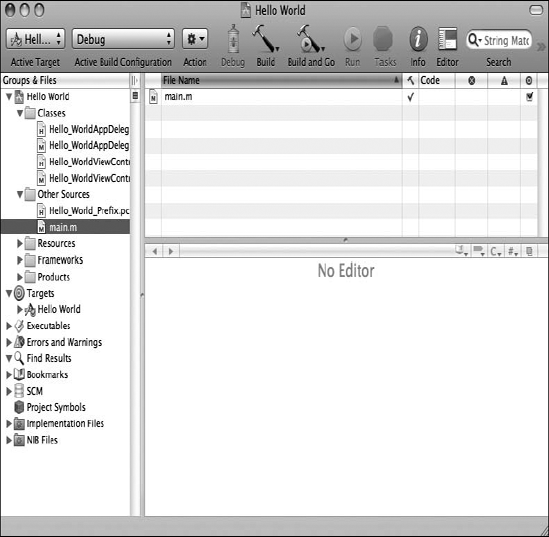
Your project window features a toolbar across the top, which gives you ready access to a lot of commonly used commands. Below the toolbar, the window is divided into three main sections, or panes.
The pane that runs down the left side of the window is called the Groups & Files pane. All of the resources that make up your project are grouped here, as are a number of relevant project settings. Just as in the Finder, clicking the little triangle to the left of an item expands that item to show available subitems. Click the triangle again to hide the subitems.
The top-right pane is called the Detail View (or just Detail pane) and shows you detailed information about items selected in the Groups & Files pane. The lower-right pane is called the Editor pane. If you select a single file in either the Groups & Files or Detail pane and Xcode knows how to display that kind of file, the contents of the file will be displayed in the Editor pane. Editable files, such as source code, can also be edited here. In fact, this is where you will be writing and editing your application's source code.
Now that we have the terminology out of the way, take a look at the Groups & Files pane. The first item in the list should bear the same name as your project, in this case, Hello World. This item is the gathering point for the source code and the other resources specific to your project. For the time being, don't worry about the items in the Groups & Files pane except those under Hello World.
Take a look at Figure 2-4. Note that the disclosure triangle to the left of Hello World is open, and there are five subfolders: Classes, Other Sources, Resources, Frameworks, and Products. Let's briefly talk about what each subfolder is used for:
Classes is where you will spend much of your time. This is where most of the code that you write will go, since this is where all Objective-C classes rightfully belong. You are free to create subfolders under the Classes folder to help organize your code. We'll be using this folder starting in the next chapter.
Other Sources contains source code files that aren't Objective-C classes. Typically, you won't spend a lot of time in the Other Sources folder. When you create a new iPhone application project, there are two files in this folder:
Hello_World_Prefix.pch: The extension .pch stands for "precompiled header." This is a list of header files from external frameworks that are used by our project. Xcode will precompile the headers contained in this file, which will reduce the amount of time it takes to compile your project whenever you select Build or Build and Go. It will be a while before you have to worry about this, because the most commonly used header files are already included for you.
main.m: This is where your application's
main()method is. You normally won't need to edit or change this file.
Resources contains noncode files that will be included as part of your application. This is where you will include files such as your application's icon image and other images, sound files, movie files, text files, or property lists that your program may need while it's running. Remember, since your application runs in its own sandbox, you will have to include any files you need here, because you won't be able to access files located elsewhere on the iPhone except through sanctioned APIs, such as the ones that provide access to the iPhone's photo library and address book. There should be three items in this folder:
Hello_WorldViewController.xib: This file contains information used by the program Interface Builder, which we'll take for a spin a bit later in this chapter.
MainWindow.xib: This is your application's main Interface Builder (or "nib") file. In a simple application like the one we're building in this chapter, there's often no need to touch this file. In later chapters, when we design more complex interfaces, we will work with this file and look at it in more depth.
Hello_World-Info.plist: This is a property list that contains information about our application. We'll look at this file a little bit later in the chapter too.
Frameworks are a special kind of library that can contain code as well as resources such as image and sound files. Any framework or library that you add to this folder will be linked in to your application, and your code will be able to use objects, functions, and resources contained in that framework or library. The most commonly needed frameworks and libraries are linked in to our project by default, so most of the time, we will not need to do anything with this folder. Less commonly used libraries and frameworks, however, are not included by default, and you will see how to link to them into an application later in this book.
Products contains the application that this project produces when it is compiled. If you expand Products, you'll see an item called Hello World.app. This is the application that this particular project creates. Hello World.app is this project's only product. Right now, Hello World.app is listed in red, which means that the file cannot be found, which makes sense, since we haven't compiled our project yet! Highlighting a file's name in red is Xcode's way of telling us that it can't find the underlying physical file.
Note
The "folders" in the Groups & Files pane do not necessarily correspond to folders in your Mac's file system. These are logical groupings within Xcode to help you keep everything organized and to make it faster and easier to find what you're looking for while working on your application. If you look into your project's folder on your hard drive, you'll notice that while there is a Classes folder, there is no folder called Other Sources or Resources. Often, the items contained in those two project folders are stored right in the project's root directory, but you can store them anywhere, even outside of your project folder if you want. The hierarchy inside Xcode is completely independent of the file system hierarchy. Moving a file out of the Classes folder in Xcode, for example, will not change the file's location on your hard drive.
Now that you're familiar with the basics of Xcode, let's take a look at the other half of the dynamic duo used in iPhone software development: Interface Builder, commonly referred to as IB.
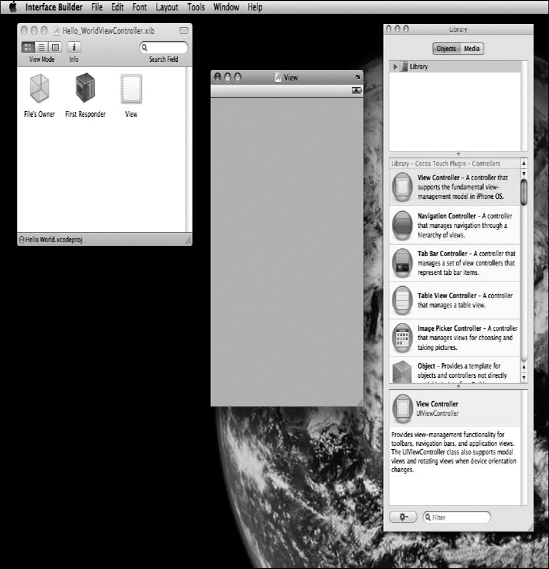
In your project window's Groups & Files list, expand the Resources group, and then double-click the file Hello_WorldViewController.xib. This will open that file in Interface Builder. If this is your first time using Interface Builder, a window grouping similar to that shown in Figure 2-5 should appear. If you've used Interface Builder before, the windows will be where you left them the last time you used it.
Note
Interface Builder has a long history; it has been around since 1988 and has been used to develop applications for NextSTEP, OpenSTEP, Mac OS X, and now iPhone. Interface Builder supports two file types: an older format that uses the extension .nib and a newer format that utilizes the extension .xib. The iPhone project templates all use .xib files by default, but until very recently, all Interface Builder files had the extension .nib, and as a result, most developers took to calling Interface Builder files nib files. Interface Builder files are commonly called nib files regardless of whether the extension actually used for the file is .xib or .nib. In fact, Apple actually uses the terms nib and nib file throughout its documentation.
The window labeled Hello_WorldViewController.xib (the upper-left window in Figure 2-5) is the nib's main window. It is your home base and starting point in this particular nib file. With the exception of the first two icons (File's Owner and First Responder), every icon in this window represents a single instance of an Objective-C class that will be created automatically for you when this nib file is loaded.
Want to create an instance of a button? You could, of course, create the button by writing code. But more commonly, you will use Interface Builder to create the button and specify its attributes (shape, size, label, etc.).
The Hello_WorldViewController.xib file we are looking at right now gets loaded automatically when your application launches—for the moment, don't worry about how—so it is an excellent place to create the objects that make up your user interface.
For example, to add a button to your application, you'll need to instantiate an object of type UIButton. You can do this in code by typing a line like this:
UIButton *myButton = [[UIButton alloc] initWithFrame:aRect];
In Interface Builder, you can accomplish the same exact thing by dragging a button from a palette of interface objects onto your application's main window. Interface Builder makes it easy to set the button's attributes, and since the button will be saved in the nib file, the button will be automatically instantiated when your application starts up. You'll see how this works in a minute.
Take a look at Figure 2-5. As we mentioned earlier, the window labeled Hello_WorldViewController.xib (the upper-left window) is the nib file's main window. Every nib file starts off with the same two icons, File's Owner and First Responder. They are created automatically and cannot be deleted. From that, you can probably guess that they are important, and they are.
File's Owner will always be the first icon in any nib file and represents the object that loaded the nib file from disk. In other words, File's Owner is the object that "owns" this copy of the nib file. If this is a bit confusing, don't worry; it's not important at the moment. When it does become important later, we'll go over it again.
The second icon in this and any other nib file is called First Responder. We'll talk more about responders later in the book, but in very basic terms, the first responder is the object with which the user is currently interacting. If, for example, the user is currently entering data into a text field, that field is the current first responder. The first responder changes as the user interacts with the interface, and the First Responder icon gives you a convenient way to communicate with whatever control or view is the current first responder without having to write code to determine which control or view that might be. Again, we'll talk about this much more later, so don't worry if this concept is a bit fuzzy right now.
Every other icon in this window, other than these first two special cases, represents an object instance that will be created when the nib file loads. In our case, as you can see in Figure 2-5, there is a third icon called View.
The View icon represents an instance of the UIView class. A UIView object is an area that a user can see and interact with. In this application, we will have only one view, so this icon represents everything that the user can see in our application. Later, we'll build more complex applications that have more than one view, but for now, just think of this as what the users can see when they're using your application.
Note
Technically speaking, our application will actually have more than one view. All user interface elements that can be displayed on the screen, including buttons, text fields, and labels, are all subclasses of UIView. When you see the term view used in this book, however, we will generally be referring only to actual instances of UIView, and this application has only one of those.
If you go back to Figure 2-5, you'll notice two other windows open besides the main window. Look at the window that has the word View in the title bar. That window is the graphical representation of that third icon in the nib's main window. If you close this window and then double-click the View icon in the nib file's main window, this window will open again. This is where you can design your user interface graphically. Let's do that now.
The rightmost window shown in Figure 2-5 is the library, which you can see in more detail in Figure 2-6. This is where you will find all the stock Cocoa Touch objects that Interface Builder supports. Dragging an item from the library to a nib file window will add an instance of that class to your application. If you close the library window, you can get it to reappear by selecting Tools
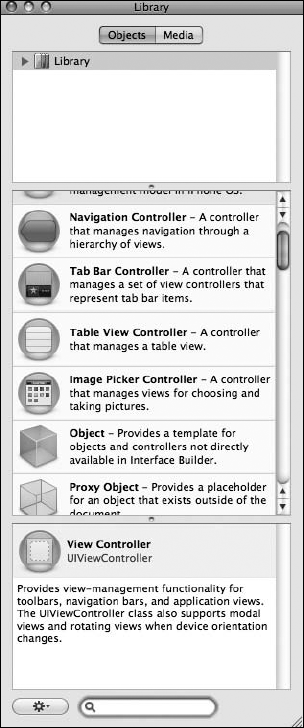
Figure 2.6. The Library palette, where you'll find stock objects from the UIKit that are available for use in Interface Builder
UIKit fulfills the same role in Cocoa Touch as AppKit does in Cocoa. The two frameworks are similar conceptually, but because of differences in the platforms, there are obviously many differences between them. On the other hand, the Foundation framework classes, such as NSString and NSArray, are shared between Cocoa and Cocoa Touch.
Scroll through the list of objects in the library until you find one called Label (see Figure 2-7).
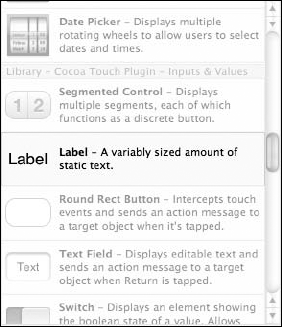
A label represents a bit of text that can be displayed on the iPhone's screen but can't be directly edited by the user. In a moment, we're going to add a label to our view.
Because user interface objects are hierarchical, we'll be adding our label as a subview to our main view (the view named View). Interface Builder is smart. If an object does not accept subviews, you will not be able to drag other objects onto it.
Dragging a label from the library to the view called View will add an instance of UILabel as a subview of our application's main view. Got that?
Tip
Having trouble finding the Label in that long list of library objects? No problem! Click in the search field at the bottom of the library (or, as a shortcut, press
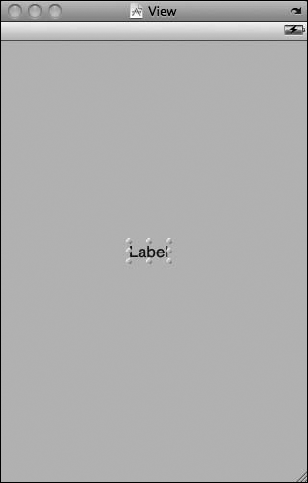
Drag a Label from the library into the View window. The view should look something like Figure 2-8 when you're done.
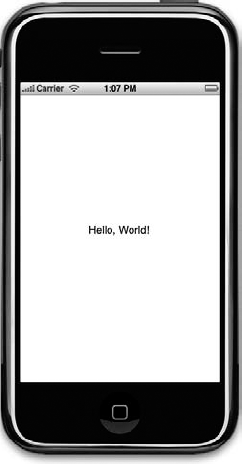
Let's edit the label so it says something profound. Double-click the label you just created, and type the text Hello, World!. Next, drag the label to wherever you want it to appear on the screen.
Guess what? Once we save, we're finished. Select File
In Xcode, select Build
When you are finished admiring your handiwork, be sure to quit the simulator. Xcode, Interface Builder, and the simulator are all separate applications.
Warning
If your iPhone is connected to your Mac when you build and run, things might not go quite as planned. In a nutshell, in order to be able to build and run your applications on your iPhone, you have to sign up and pay for one of Apple's iPhone developer programs and then go through the process of configuring Xcode appropriately. When you join the program, Apple will send you the information you'll need to get this done. In the meantime, most of the programs in this book will run just fine using the iPhone simulator. If your iPhone is plugged in, before you select Build and Run, select Project
Wait a second! That's it? But, we didn't write any code.
That's right. Pretty neat, huh?
But what if we had wanted to change some of the properties of the label, like the text size or color? We'd have to write code to do that, right?
Nope.
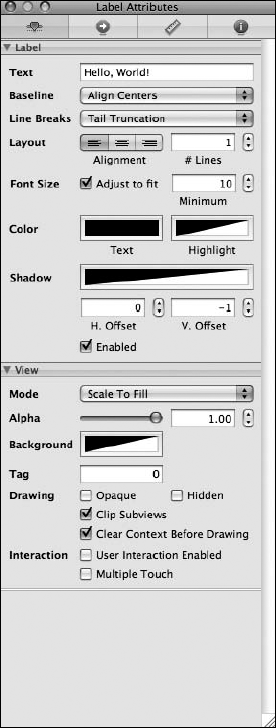
Head back to Interface Builder and single-click the Hello World label so that it is selected. Now press
From the inspector, you can change things like the font size, color, and drop shadow—just lots of stuff. The inspector is context sensitive. If you select a text field, you will be shown the editable attributes of a text field. If you select a button, you will be shown the editable attributes of a button, and so on.
Go ahead and change the label's appearance to your heart's delight, and then save, go back to Xcode, and select Build and Run again. The changes you made should show up in your application, once again without writing any code. By letting you design your interface graphically, Interface Builder frees you up to spend time writing the code that is specific to your application instead of spending time writing tedious code to construct your user interface.
Note
Most modern application development environments have some tool that lets you build your user interface graphically. One distinction between Interface Builder and many of these other tools is that Interface Builder does not generate any code that has to be maintained. Instead, Interface Builder creates Objective-C objects, just as you would do in code, and then serializes those objects into the nib file so that they can be loaded directly into memory at runtime. This avoids many of the problems associated with code generation and is, overall, a more powerful approach.
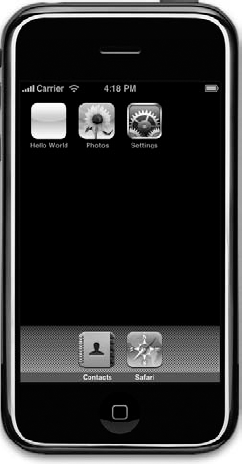
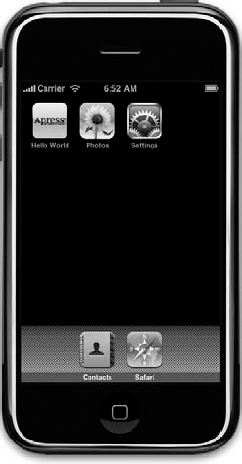
Before we leave this chapter, let's just put a last little bit of spit and polish on our application to make it feel a little more like an authentic iPhone application. First, run your project. When the simulator window appears, click the iPhone's home button, the black button with the white square at the very bottom of the window. That will bring you back to the iPhone home screen (see Figure 2-11). Notice anything a bit, well, boring?
Take a look at the Hello World icon at the top of the screen. Yeah, that icon will never do, will it? To fix it, you need to create an icon and save it as a portable network graphic (.png) file. It needs to be 57 × 57 pixels in size. Do not try to match the style of the buttons that are already on the phone; your iPhone will automatically round the edges and give it that nice glassy appearance. Just create a normal flat, square image. We have provided an icon image in the project's archive (within the 02 Hello World folder) that you can use if you don't want to create your own.
Note
For your application's icon, you have to use a .png image, but you should actually use this format for all images you add to your iPhone projects. Even though most common image formats will display correctly, you should use .png files unless you have a compelling reason to use another format. Xcode automatically optimizes .png images at build time to make them the fastest and most efficient image type for use in iPhone applications.
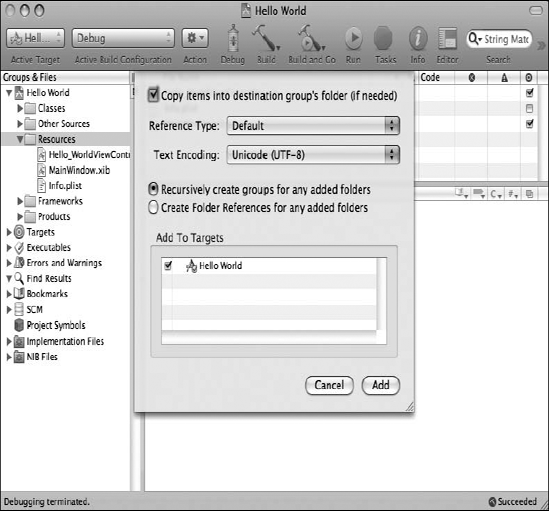
After you've designed your application icon, drag the .png file from the Finder to the Resources folder in Xcode, as shown in Figure 2-12, or select the Resources folder in Xcode, choose Project
Once you've done this, Xcode will prompt you for some specifics (see Figure 2-13). You can choose to have Xcode copy the file into your project directory, or you can just add it to your project as a reference to the original file. Generally, it's a good idea to copy resources into your Xcode project unless the file is shared with other projects.
When you add any common kind of file to your project, Xcode knows what to do with it, and as a result, this image file will now get compiled into our application automatically without doing anything further.
What we've done so far is incorporate the icon.png image into the project, which will result in the image getting built into our application bundle. The next thing we need to do is to specify that this particular image should be used as our application's icon.
In your Xcode project window's Groups & Files pane, expand the Resources folder, if it isn't already, and then single-click the Hello_World-Info.plist file. This is a property list file that contains some general information about our application including, among other things, the name of the icon file.
When you select Hello_World-Info.plist, the property list will appear in the editing pane (see Figure 2-14). Within the property list, find a row with the label Icon file in the left column. The corresponding right column in that same row should be empty. Double-click the empty cell, and type in the name of the .png file you just added to your project.
Note
If you ignored the Icon file entry in the plist, your icon will likely show up anyway. Huh? Why's that? By default, if no icon file name is provided, the SDK looks for a resource named icon.png and uses that. Just thought you'd like to know!
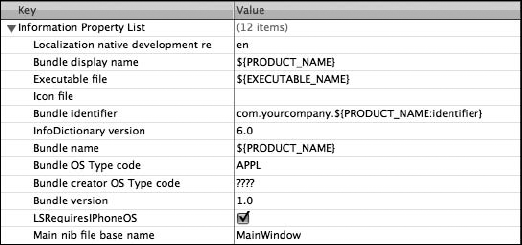
Before we compile and run, take a look at the other rows in Hello_World-Info.plist. While most of these settings are fine as they are, one in particular requires our attention, the setting named Bundle identifier. This is a unique identifier for your application and should always be set. If you're just going to run your application on the iPhone simulator, the standard naming convention for bundle identifiers is to use one of the top-level Internet domains such as com or org followed by a period, then the name of your company or organization followed by another period, and finally the name of your application. If you want to run your application on an actual iPhone, creating your application's bundle identifier is a little more involved process that you can read about in the iPhone Program Portal if you choose to pay to join the iPhone SDK Program. Since we're here, why don't we double-click the word yourcompany in the existing bundle identifier and change that to apress. The value at the end of the string is a special code that will get replaced with your application's name when your application is built. This allows you to tie your application's bundle identifier to its name.
Once that change is made, compile and run. When the simulator has finished launching, press the button with the white square to go home, and check out your snazzy new icon. Ours is shown in Figure 2-15.
Note
If you want to clear out old applications from the iPhone simulator's home screen, you can simply delete the folder called iPhone Simulator from the Application Support folder contained in your home directory's Library folder.
Pat yourself on the back. Although it may not seem like you accomplished all that much in this chapter, we actually covered a lot of ground. You learned about the iPhone project templates, created an application, saw how to use Interface Builder, and learned how to set your application icon and bundle identifier.
Hello World, however, is a strictly one-way application: we show some information to the user, but we never get any input from them. When you're ready to see how we go about getting input from the user of an iPhone and taking actions based on that input, take a deep breath and turn the page.