
In our next chapter, we're going to build a hierarchical navigation-based application similar to the Mail application that ships on the iPhone. Our application will allow the user to drill down into nested lists of data and edit that data. But, before we can do that, you need to master the concept of table views. And that's the goal of this chapter.
Table views are the most common mechanism used to display lists of data to the user. They are highly configurable objects that can be made to look practically any way you want them to. Mail uses table views to show lists of accounts, folders, and messages, but table views are not just limited to the display of textual data. Table views are also used in the YouTube, Settings, and iPod applications, even though these applications all have very different appearances (see Figure 8-1).
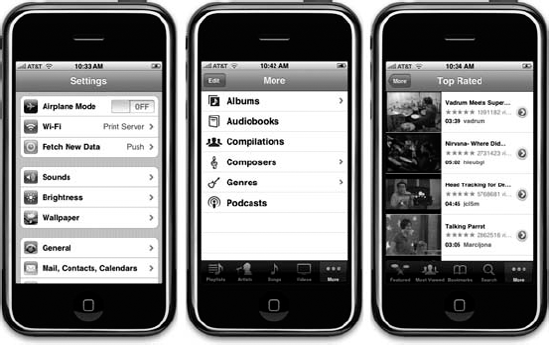
Figure 8.1. Though they all look different, the Settings, iPod, and YouTube applications all use table views to display their data.
Tables display lists of data. Each item in a table's list is a row. iPhone tables can have an unlimited number of rows, constrained only by the amount of available memory. iPhone tables can be only one column wide.
A table view is the view object that displays a table's data and is an instance of the class UITableView. Each visible row of the table is implemented by the class UITableViewCell. So a table view is the object that displays the visible part of a table, and a table view cell is responsible for displaying a single row of the table (see Figure 8-2).
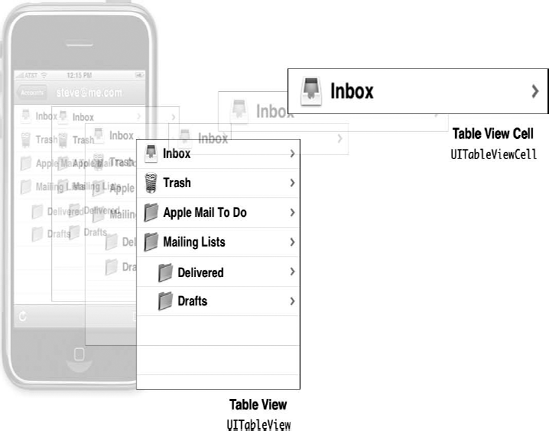
Figure 8.2. Each table view is an instance of UITableView, and each visible row is an instance of UITableViewCell.
Table views are not responsible for storing your table's data. They store only enough data to draw the rows that are currently visible. Table views get their configuration data from an object that conforms to the UITableViewDelegate protocol and their row data from an object that conforms to the UITableViewDataSource protocol. You'll see how all this works when we get into our sample programs later in the chapter.
As mentioned, all tables are implemented as a single column. But the YouTube application, shown on the right side of Figure 8-1, does have the appearance of having at least two columns, perhaps even three if you count the icons. But no, each row in the table is represented by a single UITableViewCell. Each UITableViewCell object can be configured with an image, some text, and an optional accessory icon, which is a small icon on the right side that we'll cover in detail in the next chapter.
You can put even more data in a cell if you need to. There are two basic ways to do this. One is to add subviews to UITableViewCell; the other is by creating a subclass of UITableViewCell. You can lay the table view cell out in any way you like and include any subviews that you want. So the single column limitation is far less limiting than it probably sounds at first. If this is confusing, don't worry; we'll show you both of these techniques later in this chapter.
Table views come in two basic styles. One style is called grouped. Each group in a grouped table is a set of rows embedded in a rounded rectangle, as shown in the leftmost picture in Figure 8-3. Note that a grouped table can consist of a single group.
The other style is called plain (in a few places, it's also referred to as indexed when an index is used). Plain is the default style. Any table that doesn't feature rounded rectangles is a plain table view.
If your datasource provides the necessary information, the table view will let the user navigate your list using an index that is displayed down the right-hand side. Figure 8-3 shows a grouped table, a plain table without an index, and a plain table with an index (an indexed table).
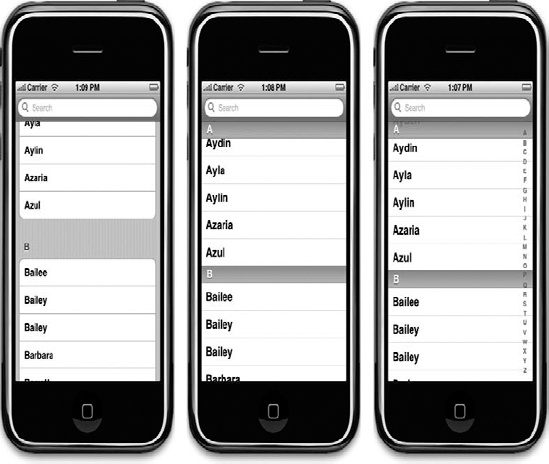
Figure 8.3. The same table view displayed as a grouped table (left); a plain table without an index, (middle); and an plain table with an index, also called an indexed table (right)
Each division of your table is known to your datasource as a section. In a grouped table, each group is a section (see Figure 8-4). In an indexed table, each indexed grouping of data is a section. For example, in the indexed tables shown in Figure 8-3, all the names beginning with "A" would be one section, those beginning with "B" another, and so on.
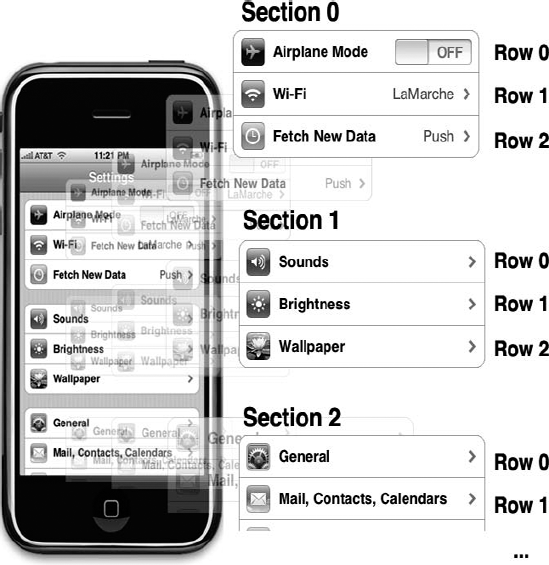
Sections have two primary purposes. In a grouped table, each section represents one group. In an indexed table, each section corresponds to one index entry. So, if you wanted to display a list indexed alphabetically with an index entry for every letter, for example, you would have 26 sections, each containing all the values that begin with a particular letter.
Warning
It is technically possible to create a grouped table with an index. Even though it's possible, you should not provide an index for a grouped table view. The iPhone Human Interface Guidelines specifically state that grouped tables should not provide indexes.
We'll create both types of tables in this chapter.
Let's look at the simplest possible example of a table view to get a feel for how it works. In this example, we're just going to display a list of text values.
Create a new project in Xcode. For this chapter, we're going back to the view-based application template, so select that one, and call your project Simple Table.
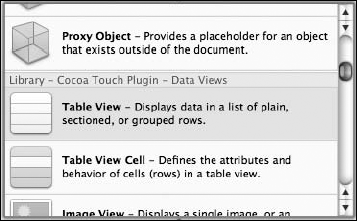
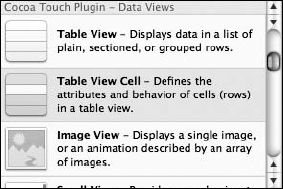
Expand the Resources folder and the Classes folder. This is such a simple application that we're not even going to need any outlets or actions, so double-click Simple_TableViewController.xib to open the file in Interface Builder. The View window should already be open, so just look in the library for a Table View (see Figure 8-5) and drag that over to the View window.
The table view should automatically size itself to the height and width of the view (see Figure 8-6). This is exactly what we want. Table views are designed to take up the entire width of the screen and as much of the height as isn't taken up by your application's navigation bars, tool bars, or tab bars.
After dropping the table view onto the View window, it should still be selected. If it's not, single-click it to select it, and press
Next stop is our controller class's header file. Single-click Simple_TableViewController.h, and add the following code:
#import <UIKit/UIKit.h>

@interface Simple_TableViewController : UIViewController
     <UITableViewDelegate, UITableViewDataSource>
{
    NSArray *listData;
}
@property (nonatomic, retain) NSArray *listData;
@end
All we're doing here is conforming our class to the two protocols that are needed for it to act as the delegate and datasource for the table view and then declaring an array that will hold the data to be displayed.
Switch over to Simple_TableViewController.m, and add the following code at the beginning of the file:
#import "Simple_TableViewController.h" @implementation Simple_TableViewController@synthesize listData;- (void)viewDidLoad {NSArray *array = [[NSArray alloc] initWithObjects:@"Sleepy", @"Sneezy",@"Bashful", @"Happy", @"Doc", @"Grumpy", @"Dopey", @"Thorin",@"Dorin", @"Nori", @"Ori", @"Balin", @"Dwalin", @"Fili", @"Kili",@"Oin", @"Gloin", @"Bifur", @"Bofur", @"Bombur", nil];self.listData = array;[array release];[super viewDidLoad];}...
Next, add the following lines of code to the existing viewDidUnload and dealloc methods:
...
- (void)viewDidUnload {
    // Release any retained subviews of the main view.
    // e.g. self.myOutlet = nil;
    self.listData = nil;
    [super viewDidUnload];
}
- (void)dealloc {
[listData release];
[super dealloc];
}
...Finally, add the following code at the end of the file:
...#pragma mark -#pragma mark Table View Data Source Methods- (NSInteger)tableView:(UITableView *)tableViewnumberOfRowsInSection:(NSInteger)section {return [self.listData count];}- (UITableViewCell *)tableView:(UITableView *)tableViewcellForRowAtIndexPath:(NSIndexPath *)indexPath {static NSString *SimpleTableIdentifier = @"SimpleTableIdentifier";UITableViewCell *cell = [tableView dequeueReusableCellWithIdentifier:SimpleTableIdentifier];if (cell == nil) {cell = [[[UITableViewCell alloc]initWithStyle:UITableViewCellStyleDefaultreuseIdentifier:SimpleTableIdentifier] autorelease];}NSUInteger row = [indexPath row];cell.textLabel.text = [listData objectAtIndex:row];return cell;}@end
We added three methods to the controller. You should be very comfortable with the first one, viewDidLoad, since we've done similar things in the past. We're simply creating an array of data to pass to the table. In a real application, this array would likely come from another source, such as a text file, property list, or URL.
If you scroll down to the end, you can see we added two datasource methods. The first one, tableView:numberOfRowsInSection:, is used by the table to ask how many rows are in a particular section. As you might expect, the default number of sections is one, and this method will be called to get the number of rows in the one section that makes up the list. We just return the number of items in our array.
The next method probably requires a little explanation, so let's look at it more closely:
- (UITableViewCell *)tableView:(UITableView *)tableView
       cellForRowAtIndexPath:(NSIndexPath *)indexPath {
This method is called by the table view when it needs to draw one of its rows. You'll notice that the second argument to this method is an NSIndexPath instance. This is the mechanism that table views use to wrap the section and row into a single object. To get the row or the section out of an NSIndexPath, you just call either its row method or its section method, both of which return an int.
The first parameter, tableView, is a reference to the table doing the asking. This allows us to create classes that act as a datasource for multiple tables.
Next, we declare a static string instance.
static NSString *SimpleTableIdentifier = @"SimpleTableIdentifier";
This string will be used as a key to represent a single kind of table cell. We'll be using only one kind of cell in this table, so we define a single identifier. A table view can display only a few rows at a time on iPhone's small screen, but the table itself can conceivably hold considerably more. Remember that each row in the table is represented by an instance of UITableViewCell, which is a subclass of UIView, which means each row can contain subviews. With a large table, this could represent a huge amount of overhead if the table were to try and keep one table view cell instance for every row in the table regardless of whether that row was currently being displayed. Fortunately, tables don't work that way.
Instead, as table view cells scroll off the screen, they are placed into a queue of cells available to be reused. If the system runs low on memory, the table view will get rid of the cells in the queue, but as long as it's got some available memory for them, it will hold on to them in case you want to use them again.
Every time a table view cell rolls off the screen, there's a pretty good chance that another one just rolled onto the screen on the other side. If that new row can just reuse one of the cells that has already rolled off the screen, the system can avoid the overhead associated with constantly creating and releasing those views. To take advantage of this mechanism, we'll ask the table view to give us one of its dequeued cells of the type we want. Note that we're making use of the NSString identifier we declared earlier. In effect, we're asking for a reusable cell of type SimpleTableIdentifier:
UITableViewCell *cell = [tableView dequeueReusableCellWithIdentifier:
    SimpleTableIdentifier];
Now, it's completely possible that the table view won't have any spare cells, so we check cell after the call to see whether it's nil. If it is, we manually create a new table view cell using that identifier string. At some point, we'll inevitably reuse one of the cells we create here, so we need to make sure it has the correct type.
if (cell == nil) {
    cell = [[[UITableViewCell alloc]
         initWithStyle:UITableViewCellStyleDefault
         reuseIdentifier: SimpleTableIdentifier] autorelease];
}
We now have a table view cell that we can return for the table view to use. All we need to do now is place whatever information we want displayed in this cell. Displaying text in a row of a table is a very common task, so the table view cell provides a UILabel property called textLabel that we can set in order to display strings. To do that, all we have to do is get the right string out of our listData array and use it to set the cell's textLabel.
Note
Are you curious about what UITableViewCellStyleDefault does? Hold onto that thought for just a few minutes, and we'll show you!
To get the correct value, however, we need to know which row the table view is asking for. We get that information out of the indexPath variable, like so:
NSUInteger row = [indexPath row];
We use the row number of the table to get the corresponding string from the array, assign it to the cell's textLabel.text property, and then return the cell.
cell.textLabel.text = [listData objectAtIndex:row];
return cell;
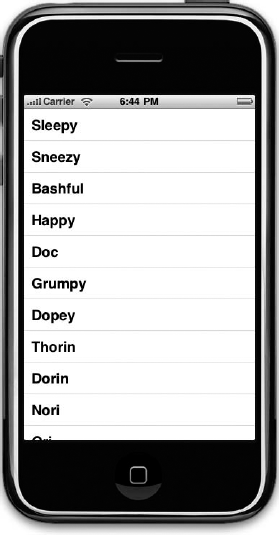
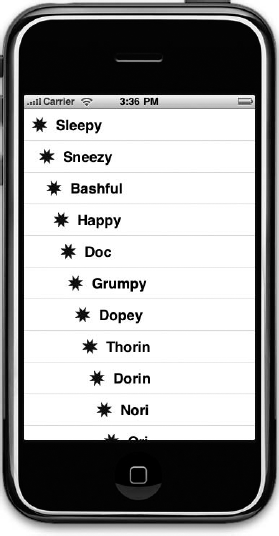
}That wasn't so bad, was it? Compile and run your application and you should see the array values displayed in a table view (see Figure 8-7).
Note
Using cell.textLabel.text will work only when working in the iPhone SDK 3.0 and later. In prior versions, you would use cell.text instead.
It'd be nice if we could add an image to each row. Guess we'd have to create a subclass of UITableViewCell or add subviews in order to do that, huh? Actually, no, not if you can live with the image being on the left-hand side of each row. The default table view cell can handle that situation just fine. Let's check it out.
In the 08 Simple Table folder, in the project archive, grab the file called star.png, and add it to your project's Resources folder. star.png is a small icon we prepared just for this project.
Next, let's get to the code. In the file Simple_TableViewController.m, add the following code to the tableView:cellForRowAtIndexPath: method:
- (UITableViewCell *)tableView:(UITableView *)tableView
         cellForRowAtIndexPath:(NSIndexPath *)indexPath {

    static NSString *SimpleTableIdentifier = @" SimpleTableIdentifier ";
UITableViewCell *cell = [tableView dequeueReusableCellWithIdentifier:
SimpleTableIdentifier];
if (cell == nil) {
cell = [[[UITableViewCell alloc] initWithFrame:CGRectZero
reuseIdentifier: SimpleTableIdentifier] autorelease];
}
UIImage *image = [UIImage imageNamed:@"star.png"];
cell.imageView.image = image;
NSUInteger row = [indexPath row];
cell.textLabel.text = [listData objectAtIndex:row];
return cell;
}
@endYep, that's it. Each cell has an imageView property. Each imageView has an image property, as well as a highlightedImage property. The image appears to the left of the cell's text and is replaced by the highlightedImage, if one is provided, when the cell is selected.
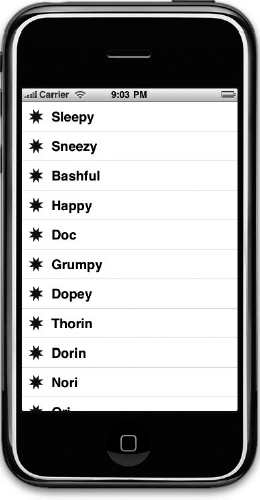
We just set the cell's imageView.image property to whatever image we want to display. If you compile and run your application now, you should get a list with a bunch of nice little star icons to the left of each row (see Figure 8-8). Of course, if we wanted to, we could have included a different image for each row in the table. Or, with very little effort, we could have used one icon for all of Mr. Disney's dwarves and a different one for Mr. Tolkein's.
If you like, make a copy of star.png, colorize it a bit, add it to the project, load it with imageNamed:, and use it to set imageView.highlightedImage. Now, if you click a cell, your new image will be drawn. If you don't feel like coloring, use the star2.png icon we provided in the project archive.
Note
It's okay to use imageNamed: in this way. UIImage uses a caching mechanism based on the filename, so it won't load a new image property each time, but instead will use the already cached version.
Versions of the iPhone SDK prior to SDK 3.0 were limited to a single cell style, the one shown in Figure 8-8. With the release of SDK 3.0, Apple added a bit more variety to the standard table cell design.
For starters, Apple introduced the concept of a cell style. Cell styles make use of three different cell elements:
Image: If an image is part of the specified style, the image is displayed to the left of the cell's text.
Text Label: This is the cell's primary text. In the style we used earlier,
UITableViewCellStyleDefault, the text label is the only text shown in the cell.Detail Text Label: This is the cell's secondary text, usually used as an explanatory note or label. We'll show an example of a style that uses detail text in a moment.
To see what these new style additions look like, add the following code to tableView:cellForRowAtIndexPath: in Simple_TableViewController.m:
- (UITableViewCell *)tableView:(UITableView *)tableView
         cellForRowAtIndexPath:(NSIndexPath *)indexPath {

    static NSString *SimpleTableIdentifier = @"SimpleTableIdentifier";

    UITableViewCell *cell = [tableView dequeueReusableCellWithIdentifier:
                             SimpleTableIdentifier];
    if (cell == nil) {
        cell = [[[UITableViewCell alloc]
            initWithStyle:UITableViewCellStyleDefault
            reuseIdentifier: SimpleTableIdentifier] autorelease];
    }

    UIImage *image = [UIImage imageNamed:@"star.png"];
    cell.image = image;

    NSUInteger row = [indexPath row];
    cell.textLabel.text = [listData objectAtIndex:row];

    if (row < 7)
        cell.detailTextLabel.text = @"Mr. Disney";
    else
        cell.detailTextLabel.text = @"Mr. Tolkein";

    return cell;
}
All we've done here is set the cell's detail text. We use the string @"Mr. Disney" for the first seven rows and @"Mr. Tolkein" for the rest. When you run this code, each cell will look like just the same as it did before (see Figure 8-9). That's because we are using the style UITableViewCellStyleDefault, which does not make use of the detail text.
Now, change UITableViewCellStyleDefault to UITableViewCellStyleSubtitle and run again. With the subtitle style, both text elements are shown, one below the other (Figure 8-10).
Figure 8.10. The subtitle style shows the detail text in smaller, gray letters below the text label.
Change UITableViewCellStyleSubtitle to UITableViewCellStyleValue1 and then build and run. This style doesn't use the cell's image, but places the text label and detail text label on the same line on opposite sides of the cell (Figure 8-11).
Figure 8.11. The Style Value 1 will place the text label on the left side in black letters, the detail text right-justified on the right side in blue letters, but doesn't show the cell's image.
One last time, let's change UITableViewCellStyleValue1 to UITableViewCellStyleValue2. This format is often used to display information along with a descriptive label. It also doesn't show the cell's icon, but places the detail text label to the left of the text label. In this layout, the detail text label acts as a label describing the type of data held in the text label.
Figure 8.12. The Style Value 2 places the detail text label in blue letters to the left of the text label.
Now that you've seen the cell styles that are available, go ahead and change back to using UITableViewCellStyleDefault before continuing on. Later, you'll see how to customize the appearance of your table. But before decide to do that, make sure you consider the available styles to see whether one of them will suit your needs.
You may have noticed that we made our controller both the datasource and delegate for this table view, but up to now, we haven't actually implemented any of the methods from UITableViewDelegate. Unlike picker views, simpler table views don't require a delegate to do their thing. The datasource provides all the data needed to draw the table. The purpose of the delegate is to configure the appearance of the table view and to handle certain user interactions. Let's take a look at a few of the configuration options now. We'll look at more in the next chapter.
The delegate can be used to specify that some rows should be indented. In the file Simple_TableViewController.m, add the following method to your code, just above the @end declaration:
#pragma mark -
#pragma mark Table Delegate Methods

- (NSInteger)tableView:(UITableView *)tableView
   indentationLevelForRowAtIndexPath:(NSIndexPath *)indexPath {
       NSUInteger row = [indexPath row];
   return row;
}
This method sets the indent level for each row to its row number, so row 0 will have an indent level of 0, row 1 will have an indent level of 1, and so on. An indent level is simply an integer that tells the table view to move that row a little to the right. The higher the number, the further to the right the row will be indented. You might use this technique, for example, to indicate that one row is subordinate to another row, as Mail does when representing subfolders.
When we run the application again, you can see that each row is now drawn a little further to the right than the last one (see Figure 8-13).
The table's delegate can use two methods to determine if the user has selected a particular row. One method gets called before the row gets selected and can be used to prevent the row from being selected or can even change which row gets selected. Let's implement that method and specify that the first row is not selectable. Add the following method to the end of Simple_TableViewController.m, just before the @end declaration:
-(NSIndexPath *)tableView:(UITableView *)tableView
      willSelectRowAtIndexPath:(NSIndexPath *)indexPath {
    NSUInteger row = [indexPath row];
if (row == 0)
return nil;
return indexPath;
}This method gets passed indexPath, which represents the item that's about to get selected. Our code looks at which row is about to be selected. If the row is the first row, which is always index zero, then it returns nil, which indicates that no row should actually be selected. Otherwise, it returns indexPath, which is how we indicate that it's OK for the selection to proceed.
Before you compile and run, let's also implement the delegate method that gets called after a row has been selected, which is typically where you'll actually handle the selection. This is where you take whatever action is appropriate when the user selects a row. In the next chapter, we'll use this method to handle the drill-downs, but in this chapter, we'll just throw up an alert to show that the row was selected. Add the following method to the bottom of Simple_TableViewController.m, just before the @end declaration again.
- (void)tableView:(UITableView *)tableView
       didSelectRowAtIndexPath:(NSIndexPath *)indexPath {
    NSUInteger row = [indexPath row];
    NSString *rowValue = [listData objectAtIndex:row];

    NSString *message = [[NSString alloc] initWithFormat:
        @"You selected %@", rowValue];
    UIAlertView *alert = [[UIAlertView alloc]
        initWithTitle:@"Row Selected!"
              message:message
             delegate:nil
    cancelButtonTitle:@"Yes I Did"
    otherButtonTitles:nil];
    [alert show];

    [message release];
    [alert release];
    [tableView deselectRowAtIndexPath:indexPath animated:YES];
}
Once you've added this method, compile and run and take it for a spin. See whether you can select the first row (you shouldn't be able to), and then select one of the other rows. The selected row should highlight, and then your alert should pop up telling you which row you selected while the selected row fades in the background (see Figure 8-14).
Note that you can also modify the index path before you pass it back, which would cause a different row and/or section to be selected. You won't do that very often, as you should have a very good reason for changing the user's selection on them. In the vast majority of cases, when you use this method, you will either return indexPath unmodified to allow the selection, or else nil to or disallow it.

Let's say that we want to change the size of the font being used in the table view. In most situations, you shouldn't override the default font; it's what users expect to see. But there are valid reasons to do this at times. Add the following line of code to your tableView:cellForRowAtIndexPath: method and then compile and run:
- (UITableViewCell *)tableView:(UITableView *)tableView
         cellForRowAtIndexPath:(NSIndexPath *)indexPath
{
static NSString *SimpleTableIdentifier = @"SimpleTableIdentifier";
UITableViewCell *cell = [tableView dequeueReusableCellWithIdentifier:
SimpleTableIdentifier];
if (cell == nil) {
cell = [[[UITableViewCell alloc]
initWithStyle:UITableViewCellStyleDefault
reuseIdentifier: SimpleTableIdentifier] autorelease];
}
UIImage *image = [UIImage imageNamed:@"star.png"];
cell.image = image;
NSUInteger row = [indexPath row];
cell.textLabel.text = [listData objectAtIndex:row];
cell.textLabel.font = [UIFont boldSystemFontOfSize:50];
if (row < 7)
cell.detailTextLabel.text = @"Mr. Disney";
else
cell.detailTextLabel.text = @"Mr. Tolkein";
return cell;
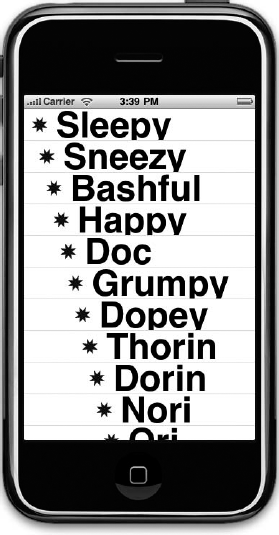
}When you run the application now, the values in your list get drawn really large, but they don't exactly fit in the row (see Figure 8-15).
Well, here comes the table view delegate to the rescue! The table view delegate can specify the height of the table rows. In fact, it can specify unique values for each row if you need to. Go ahead and add this method to your controller class, just before @end:
- (CGFloat)tableView:(UITableView *)tableView
heightForRowAtIndexPath:(NSIndexPath *)indexPath {
return 70;
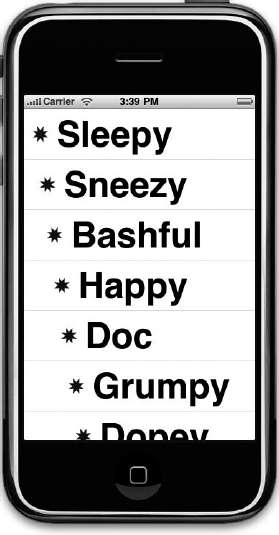
}We've just told the table view to set the row height for all rows to 70 pixels tall. Compile and run, and your table's rows should be much taller now (see Figure 8-16).
You can do a lot with table views right out of the box, but often, you will want to format the data for each row in ways that simply aren't supported by UITableViewCell directly. In those cases, there are two basic approaches, one that involves adding subviews to UITableViewCell and a second that involves creating a subclass of UITableViewCell. Let's look at both techniques.
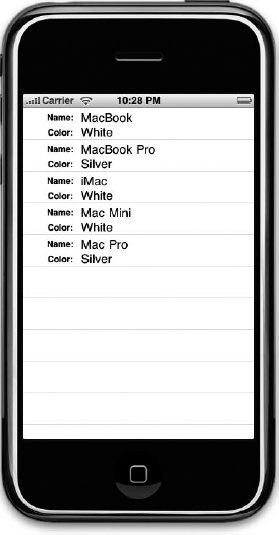
To show how to use custom cells, we're going to create a new application with another table view. In each row, we'll display two lines of information along with two labels (see Figure 8-17). Our application will display the name and color of a series of potentially familiar computer models, and we'll display both of those pieces of information in the same table cell by adding subviews to the table view cell.
Although the four provided table view cell styles offer a fair amount of flexibility, there will still be situations where you need more flexibility than those built-in styles allow. We're going to create a project that adds subviews to the table view cell in order to work around that limitation, enabling us to display two lines of data in each cell.
Create a new Xcode project using the view-based application template. Name the project Cells. Double-click CellsViewController.xib to open the nib file in Interface Builder. Add a Table View to the main view, and set its delegate and datasource to File's Owner as we did in the previous section. Save the nib, and come back to Xcode. You can refer to the "Building the View" section earlier in the chapter for the exact steps if you need to.
Single-click CellsViewController.h, and add the following code:
#import <UIKit/UIKit.h>#define kNameValueTag 1#define kColorValueTag 2@interface CellsViewController : UIViewController<UITableViewDataSource, UITableViewDelegate>{NSArray *computers;}@property (nonatomic, retain) NSArray *computers;@end
The first thing that you'll notice here is that we have defined two constants. We're going to use these in a few moments to assign tags to some of the subviews that we'll be adding to the table view cell. We're going to add four subviews to the cell, and two of those need to be changed for every row. In order to do that, we need some mechanism that will allow us to retrieve the two fields from the cell when we go to update that cell with a particular row's data. If we set unique tag values for each label that we'll need to use again, we'll be able to retrieve them from the table view cell and set their value.
In our controller, we need to set up some data to use, and then implement the table datasource methods to feed that data to the table. Single-click CellsViewController.m, and add the following code at the beginning of the file:
#import "CellsViewController.h" @implementation CellsViewController@synthesize computers;- (void)viewDidLoad {NSDictionary *row1 = [[NSDictionary alloc] initWithObjectsAndKeys:@"MacBook", @"Name", @"White", @"Color", nil];NSDictionary *row2 = [[NSDictionary alloc] initWithObjectsAndKeys:@"MacBook Pro", @"Name", @"Silver", @"Color", nil];NSDictionary *row3 = [[NSDictionary alloc] initWithObjectsAndKeys:@"iMac", @"Name", @"White", @"Color", nil];NSDictionary *row4 = [[NSDictionary alloc] initWithObjectsAndKeys:@"Mac Mini", @"Name", @"White", @"Color", nil];NSDictionary *row5 = [[NSDictionary alloc] initWithObjectsAndKeys:@"Mac Pro", @"Name", @"Silver", @"Color", nil];NSArray *array = [[NSArray alloc] initWithObjects:row1, row2,row3, row4, row5, nil];self.computers = array;[row1 release];[row2 release];[row3 release];[row4 release];[row5 release];[array release];}...
Of course, we need to be good memory citizens, so make the following changes to the existing dealloc and viewDidUnload methods:
...
- (void)viewDidUnload {
    // Release any retained subviews of the main view.
    // e.g. self.myOutlet = nil;
    self.computers = nil;
}
- (void)dealloc {
    [computers release];
    [super dealloc];
}
...
and add this code at the end of the file, above the @end declaration:
...#pragma mark -#pragma mark Table Data Source Methods- (NSInteger)tableView:(UITableView *)tableViewnumberOfRowsInSection:(NSInteger)section {return [self.computers count];}-(UITableViewCell *)tableView:(UITableView *)tableViewcellForRowAtIndexPath:(NSIndexPath *)indexPath {static NSString *CellTableIdentifier = @"CellTableIdentifier ";UITableViewCell *cell = [tableView dequeueReusableCellWithIdentifier:CellTableIdentifier];if (cell == nil) {cell = [[[UITableViewCell alloc]initWithStyle:UITableViewCellStyleDefaultreuseIdentifier:CellTableIdentifier] autorelease];CGRect nameLabelRect = CGRectMake(0, 5, 70, 15);UILabel *nameLabel = [[UILabel alloc] initWithFrame:nameLabelRect];nameLabel.textAlignment = UITextAlignmentRight;nameLabel.text = @"Name:";nameLabel.font = [UIFont boldSystemFontOfSize:12];[cell.contentView addSubview: nameLabel];[nameLabel release];CGRect colorLabelRect = CGRectMake(0, 26, 70, 15);UILabel *colorLabel = [[UILabel alloc] initWithFrame:colorLabelRect];colorLabel.textAlignment = UITextAlignmentRight;colorLabel.text = @"Color:";colorLabel.font = [UIFont boldSystemFontOfSize:12];[cell.contentView addSubview: colorLabel];[colorLabel release];
CGRect nameValueRect = CGRectMake(80, 5, 200, 15);UILabel *nameValue = [[UILabel alloc] initWithFrame:nameValueRect];nameValue.tag = kNameValueTag;[cell.contentView addSubview:nameValue];[nameValue release];CGRect colorValueRect = CGRectMake(80, 25, 200, 15);UILabel *colorValue = [[UILabel alloc] initWithFrame:colorValueRect];colorValue.tag = kColorValueTag;[cell.contentView addSubview:colorValue];[colorValue release];}NSUInteger row = [indexPath row];NSDictionary *rowData = [self.computers objectAtIndex:row];UILabel *name = (UILabel *)[cell.contentView viewWithTag:kNameValueTag];name.text = [rowData objectForKey:@"Name"];UILabel *color = (UILabel *)[cell.contentView viewWithTag:kColorValueTag];color.text = [rowData objectForKey:@"Color"];return cell;}@end
The viewDidLoad method this time creates a bunch of dictionaries. Each dictionary contains the name and color information for one row in the table. The name for that row is held in the dictionary under the key Name, and the color is held under the key Color. We stick all the dictionaries into a single array, which is our data for this table.
Let's focus on tableView:cellForRowWithIndexPath:, since that's where we're really getting into some new stuff. The first two lines of code are just like our earlier versions. We create an identifier and ask the table to dequeue a table view cell if it has one.
If the table doesn't have any cells available for reuse, we have to create a new cell. When we do this, we also need to create and add the subviews that we'll be using to implement our two-line-per-row table. Let's look at that code a little more closely. First, we create a cell. This is, essentially, the same technique as before. We specify the default style, although the style actually won't matter, because we'll be adding our own subviews to display our data rather than using the provided ones.
cell = [[[UITableViewCell alloc]
    initWithStyle:UITableViewCellStyleDefault
    reuseIdentifier:CellTableIdentifier] autorelease];
After that, we create four UILabels and add them to the table view cell. The table view cell already has a UIView subview called contentView, which it uses to group all of its subviews, much the way we grouped those two switches inside of a UIView back in Chapter 4. As a result, we don't add the labels as subviews directly to the table view cell, but rather to its contentView.
[cell.contentView addSubview:colorValue];
Two of these labels contain static text. The label nameLabel contains the text Name: and the label colorLabel contains the text Color:. Those are just static labels that we won't change. The other two labels, however, will be used to display our row-specific data. Remember, we need some way of retrieving these fields later on, so we assign values to both of them. For example, we assign the constant kNameValueTag into nameValue's tag field:
nameValue.tag = kNameValueTag;
In a moment, we'll use that tag to retrieve the correct label from the cell.
Once we're done creating our new cell, we use the indexPath argument that was passed in to determine which row the table is requesting a cell for and then use that row value to grab the correct dictionary for the requested row. Remember that that dictionary has two key/value pairs, one with name and another with color.
NSUInteger row = [indexPath row];
NSDictionary *rowData = [self.computers objectAtIndex:row];
Remember those tags we set before? Well, here, we use them to retrieve the label whose value we need to set.
UILabel *name = (UILabel *)[cell.contentView viewWithTag:kNameValueTag];
Once we have that label, we just set its text to one of the values we pull from the dictionary that represents this row.
name.text = [rowData objectForKey:@"Name"];
Compile and run your application, and you should get rows with two lines of data in it, just as in Figure 8-17. Being able to add views to the table view provides a lot more flexibility than using the standard table view cell alone, but it can get a little tedious creating, positioning, and adding all the subviews programmatically. Gosh, it sure would be nice if we could design the table view cell in Interface Builder, wouldn't it?
Well, we're in luck. It just so happens that you can use Interface Builder to design your table cell views. We're going to re-create that same two-line interface we just built in code using Interface Builder. To do this, we'll create a subclass of UITableViewCell and a new nib file that will contain the table view cell. Then, when we need a table view cell to represent a row, instead of adding subviews to a standard table view cell, we'll just load in our subclass from the nib file and use two outlets we'll add to set the name and color. Make sense? Let's do it.
Right-click (or control-click) on the Classes folder in Xcode and select New File... from the Add submenu that comes up, or just press
Once that file is created, right-click the Resources folder in Xcode, and select Add
Now that we have all the new files we need, let's go ahead and create our new subclass of UITableViewCell.
We're going to use outlets in our subclass to make it easier to set the value that needs to change for each row. We could use tags again and avoid creating a subclass altogether, but by doing it this way, our code will be much more concise and easy to read, because we'll be able to set the labels on each row's cell just by setting properties, like so:
cell.nameLabel = @"Foo";
Single-click CustomCell.h, and add the following code:
#import <UIKit/UIKit.h>

@interface CustomCell : UITableViewCell {
    UILabel *nameLabel;
    UILabel *colorLabel;
}
@property (nonatomic, retain) IBOutlet UILabel *nameLabel;
@property (nonatomic, retain) IBOutlet UILabel *colorLabel;
@endgt;
That's all we need to do here, so let's switch over to CustomCell.m and add two more lines:
#import "CustomCell.h" @implementation CustomCell@synthesize nameLabel;@synthesize colorLabel;- (id)initWithFrame:(CGRect)frame reuseIdentifier:(NSString *)reuseIdentifier { if (self = [super initWithFrame:frame reuseIdentifier:reuseIdentifier]) { // Initialization code } return self; } - (void)setSelected:(BOOL)selected animated:(BOOL)animated { [super setSelected:selected animated:animated]; // Configure the view for the selected state } - (void)dealloc {[nameLabel release];[colorLabel release];[super dealloc]; } @end
Make sure you save both of those, and we're done with our custom subclass.
Next, double-click CustomCell.xib to open the file in Interface Builder. There are only two icons in this nib's main window: File's Owner and First Responder. Look in the library for a Table View Cell (see Figure 8-18), and drag one of those over to your nib's main window.
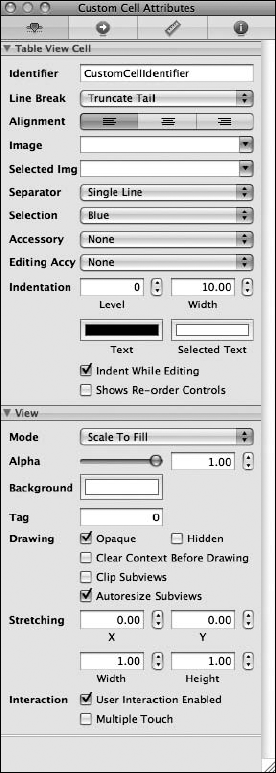
Make sure the table view cell is selected, and press
After that, press
Finally, press
Remember, even though UITableViewCell is a subclass of UIView, it uses a content view to hold and group its subviews. Double-click the Custom Cell icon, which will open a new window. You'll notice a gray dashed rounded rectangle labeled Content View (see Figure 8-20). That's Interface Builder's way of telling you that you should add something, so look in the library for a View, and drag that onto the Custom Cell window.
When you release the view, it will be the wrong size for our window. Let's fix this. With the new view selected, go to the size inspector. Change View's size and position to match the Custom Cell by setting x to 0, y to 0, w to 320, and h to 65.
Now we're all set. We have a canvas we can use to design our table view cell in Interface Builder. Let's do this.

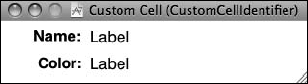
Drag four labels over from the library to the Custom Cell window, and place and rename them as shown in Figure 8-21. To make the Name: and Color: fields bold, select them, and press
Now, control-drag from the Custom Cell icon to the top-right label on the view, assigning it to the outlet nameLabel. Then, control-drag again from the Custom Cell icon to the lower right label, assigning it to the colorLabel outlet.
Note
Although the blue margins are useful in this context for positioning labels against the left and the right, because the cells will be drawn with a separator against it, the top and bottom guides cannot be relied on here. We ended up putting the top labels a little higher than the guides suggested, and the bottom labels a little lower to get everything to look right when the program is run.
You might be wondering why we're not doing anything with the File's Owner icon. The reason is that we just don't need to. We're using this table cell to display data, but all the interaction with the user is going to go through the table view, so it doesn't need its own controller class. We're really just using the nib as a sort of template so we can design our table cells visually.
Save the nib; close it; and let's go back to Xcode.
To use the cell we designed, we have to make some pretty drastic changes to the tableView:cellForRowAtIndexPath: method in CellsViewController.m. Delete the one you currently have, and replace it with this new version:
- (UITableViewCell *)tableView:(UITableView *)tableView
          cellForRowAtIndexPath:(NSIndexPath *)indexPath {
        static NSString *CustomCellIdentifier = @"CustomCellIdentifier ";

    CustomCell *cell = (CustomCell *)[tableView
        dequeueReusableCellWithIdentifier: CustomCellIdentifier];
    if (cell == nil) {
        NSArray *nib = [[NSBundle mainBundle] loadNibNamed:@"CustomCell"
                                              owner:self options:nil];
        for (id oneObject in nib)
            if ([oneObject isKindOfClass:[CustomCell class]])
                cell = (CustomCell *)oneObject;
    }
    NSUInteger row = [indexPath row];
    NSDictionary *rowData = [self.computers objectAtIndex:row];
    cell.colorLabel.text = [rowData objectForKey:@"Color"];
    cell.nameLabel.text = [rowData objectForKey:@"Name"];
    return cell;
}
While you're mucking around in CellsViewController.m, go ahead and add this line near the top:
#import "CustomCell.h"
Because we've designed the table view cell in a nib file, if there are no reusable cells, we simply load one from the nib. When we load the nib, we get an array that contains all the objects in the nib. The objects and order of those objects is undocumented and has changed in the past, so rather than rely on the table view cell being at a specific index in the nib, we'll loop through all the objects in the nib and look for an instance of our CustomCell class.
There's one other addition we have to make. Because we change the height of our table view cell from the default value, we have to inform the table view of that fact; otherwise, it won't leave enough space for the cell to display properly. We do that by adding this delegate method to CellsViewController.m, just before the @end:
- (CGFloat)tableView:(UITableView *)tableView
    heightForRowAtIndexPath:(NSIndexPath *)indexPath {
    return kTableViewRowHeight;
}
Unfortunately, we can't get this value from the cell because this delegate method may be called before the cell exists, so we have to hard-code the value. Add this constant definition to the top of CellsViewController.h, and delete the tag constants, which are no longer needed.
#define kTableViewRowHeight 66
That's it. Build and run. Now your two line table cells are based on your mad Interface Builder design skillz.
Our next project will explore another fundamental aspect of tables. We're still going to use a single table view—no hierarchies yet—but we're going to divide data into sections. Create a new Xcode project using the view-based application template again, this time calling it Sections.
Open the Classes and Resources folders, and double-click SectionsViewController.xib to open the file in Interface Builder. Drop a table view onto the View window, as we did before. Then press
Next, make sure the table view is selected, and press
This project needs a fair amount of data to do its thing. To save you a few hours worth of typing, we've provided another property list for your tabling pleasure. Grab the file named sortednames.plist from the 08 Sections folder in the projects archive that came with this book, and add it to your project's Resources folder.
Once it's added to your project, single-click sortednames.plist just to get a sense of what it looks like (see Figure 8-23). It's a property list that contains a dictionary, with one entry for each letter of the alphabet. Underneath each letter is a list of names that start with that letter.
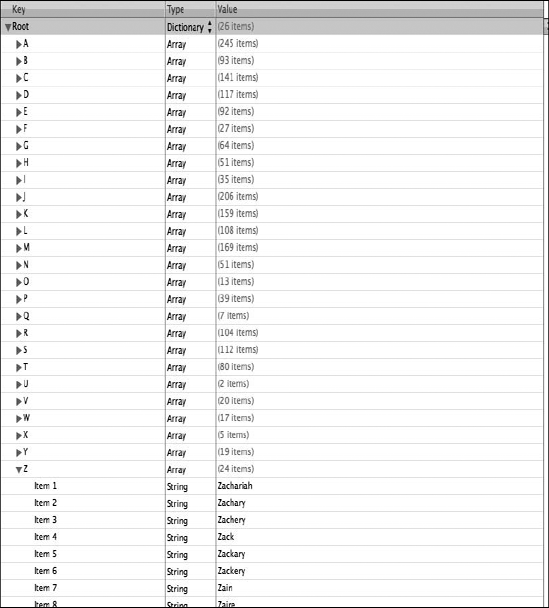
We'll use the data from this property list to feed the table view, creating a section for each letter.
Single-click the SectionsViewController.h file, and add both an NSDictionary and an NSArray instance variable and corresponding property declarations. The dictionary will hold all of our data. The array will hold the sections sorted in alphabetical order. We also need to conform the class to the UITableViewDataSource and UITableViewDelegate protocols:
#import <UIKit/UIKit.h>

@interface SectionsViewController : UIViewController
    <UITableViewDataSource, UITableViewDelegate>
{
    NSDictionary *names;
    NSArray *keys;
}
@property (nonatomic, retain) NSDictionary *names;@property (nonatomic, retain) NSArray *keys;@end
Now, switch over to SectionsViewController.m, and add the following code to the beginning of that file:
#import "SectionsViewController.h" @implementation SectionsViewController@synthesize names;@synthesize keys;- (void)viewDidLoad {NSString *path = [[NSBundle mainBundle] pathForResource:@"sortednames"ofType:@"plist"];NSDictionary *dict = [[NSDictionary alloc]initWithContentsOfFile:path];self.names = dict;[dict release];NSArray *array = [[names allKeys] sortedArrayUsingSelector:@selector(compare:)];self.keys = array;}...
Insert the following lines of code in the existing dealloc and viewDidUnload methods:
...
- (void)viewDidUnload {
    // Release any retained subviews of the main view.
    // e.g. self.myOutlet = nil;
    self.names = nil;
    self.keys = nil;
}
- (void)dealloc {
    [names release];
    [keys release];
    [super dealloc];
}
...
And add the following code at the end of the file, just above the @end declaration:
...#pragma mark -#pragma mark Table View Data Source Methods- (NSInteger)numberOfSectionsInTableView:(UITableView *)tableView {
return [keys count];}- (NSInteger)tableView:(UITableView *)tableViewnumberOfRowsInSection:(NSInteger)section {NSString *key = [keys objectAtIndex:section];NSArray *nameSection = [names objectForKey:key];return [nameSection count];}- (UITableViewCell *)tableView:(UITableView *)tableViewcellForRowAtIndexPath:(NSIndexPath *)indexPath {NSUInteger section = [indexPath section];NSUInteger row = [indexPath row];NSString *key = [keys objectAtIndex:section];NSArray *nameSection = [names objectForKey:key];static NSString *SectionsTableIdentifier = @"SectionsTableIdentifier";UITableViewCell *cell = [tableView dequeueReusableCellWithIdentifier:SectionsTableIdentifier;if (cell == nil) {cell = [[[UITableViewCell alloc]initWithStyle:UITableViewCellStyleDefaultreuseIdentifier:SectionsTableIdentifier] autorelease];}cell.textLabel.text = [nameSection objectAtIndex:row];return cell;}- (NSString *)tableView:(UITableView *)tableViewtitleForHeaderInSection:(NSInteger)section {NSString *key = [keys objectAtIndex:section];return key;}@end
Most of this isn't too different from what you've seen before. In the viewDidLoad method, we created an NSDictionary instance from the property list we added to our project and assigned it to names. After that, we grabbed all the keys from that dictionary and sorted them to give us an ordered NSArray with all the key values in the dictionary in alphabetical order. Remember, the NSDictionary uses the letters of the alphabet as its keys, so this array will have 26 letters, in order from "A" to "Z," and we'll use that array to help us keep track of the sections.
Scroll down to the datasource methods. The first one we added to our class specifies the number of sections. We didn't implement this method last time because we were happy with the default setting of 1. This time, we're telling the table view that we have one section for each key in our dictionary.
- (NSInteger)numberOfSectionsInTableView:(UITableView *)tableView {
    return [keys count];
}
The next method calculates the number of rows in a specific section. Last time, we had only one section, so we just returned the number of rows we had in our array. This time, we have to break it down per section. We can do that by retrieving the array that corresponds to the section in question and returning the count from that array.
- (NSInteger)tableView:(UITableView *)tableView
    numberOfRowsInSection:(NSInteger)section {
    NSString *key = [keys objectAtIndex:section];
    NSArray *nameSection = [names objectForKey:key];
    return [nameSection count];
}
In our tableView:cellForRowAtIndexPath: method, we have to extract both the section and row from the index path and use that to determine which value to use. The section will tell us which array to pull out of the names dictionary, and then we can use the row to figure out which value from that array to use. Everything else in that method is basically the same as the version in the Simple Table application.
The method tableView:titleForHeaderInSection allows you to specify an optional header value for each section, and we simply return the letter for this group.
- (NSString *)tableView:(UITableView *)tableView
titleForHeaderInSection:(NSInteger)section {
NSString *key = [keys objectAtIndex:section];
return key;
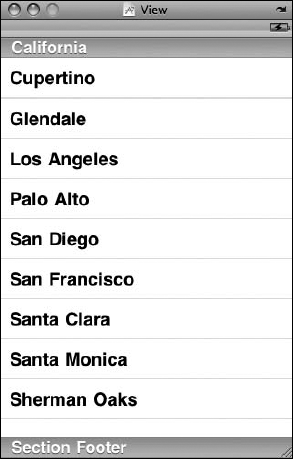
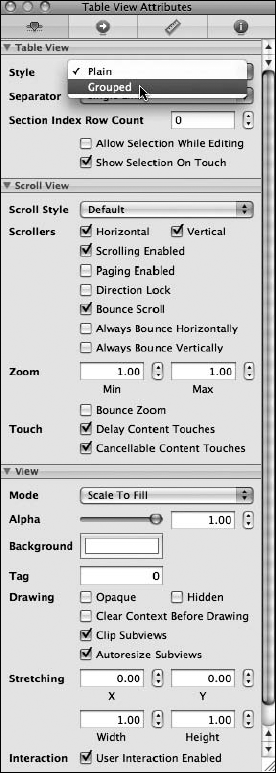
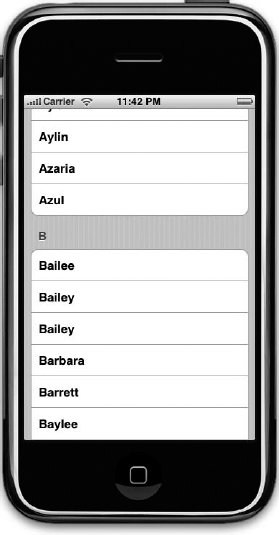
}Why don't you compile and run the project and revel in its grooviness? Remember that we changed the table's Style to Grouped, so we ended up with a grouped table with 26 sections, which should look like Figure 8-24.
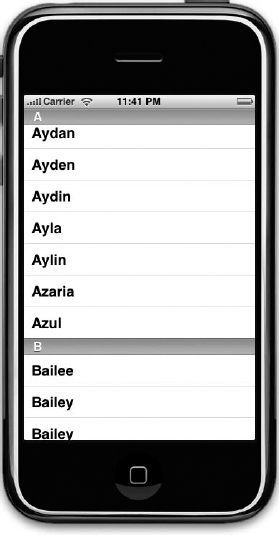
As a contrast, let's change our table view back to the indexed style and see what an indexed table view with multiple sections looks like. Double-click SectionViewController.xib to open the file in Interface Builder. Select the table view, and use the attributes inspector to change the view back to Plain. Save, and go back to Xcode to build and run it—same data, different grooviness (see Figure 8-25).
One problem with our current table is the sheer number of rows. There are two thousand names in this list. Your finger will get awfully tired looking for Zachariah or Zebediah, not to mention Zojirishu.
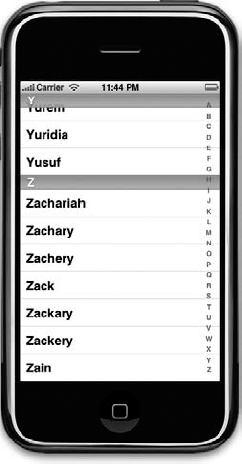
One solution to this problem is to add an index down the right side of the table view. Now that we've set our table view style back to indexed, that's actually relatively easy to do. Add the following method to the bottom of SectionsViewController.m, just above the @end:
- (NSArray *)sectionIndexTitlesForTableView:(UITableView *)tableView {
    return keys;
}
Yep, that's it. In this method, the delegate is asking for an array of the values to display in the index. You must have more than one section in your table view to use the index, and the entries in this array must correspond to those sections. The returned array must have the same number of entries as you have sections, and the values must correspond to the appropriate section. In other words, the first item in this array will take the user to the first section, which is section 0.
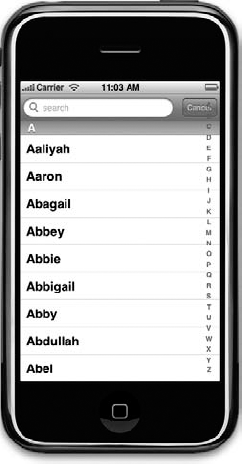
Compile and run again, and you'll have yourself a nice index (see Figure 8-26).
The index is helpful, but even so, we still have an awful lot of names here. If we want to see whether the name Arabella is in the list, foample, we're still going to have to scroll for a while even after using the index. It'd be nice if we could let the user pare down the list by specifying a search term, wouldn't it? That'd be darn user friendly. Well, it's a little bit of extra work, but it's not too bad. We're going to implement a standard iPhone search bar, like the one shown in Figure 8-27.
Before we set about doing this, we need to put some thought into how it's going to work. Currently, we have a dictionary that holds a bunch of arrays, one for each letter of the alphabet. The dictionary is immutable, which means we can't add or delete values from it, and so are the arrays that it holds. We also have to retain the ability to get back to the original dataset when the user hits cancel or erases their search term.
What we can do is to create two dictionaries: an immutable dictionary to hold the full dataset and a mutable copy that we can remove rows from. The delegate and datasources will read from the mutable dictionary, and when the search criteria change or the search is cancelled, we can refresh the mutable dictionary from the immutable one. Sounds like a plan. Let's do it.
Warning
This next project is a bit advanced and may cause a distinct burning sensation if taken too quickly. If some of these concepts give you a headache, retrieve your copy of Learn Objective-C (Mark Dalrymple and Scott Knaster, Apress 2009) and review the bits about categories and mutability.
There's one problem. NSDictionary conforms to the NSMutableCopying protocol, which returns an NSMutableDictionary, but that method creates what's called a "shallow" copy. This means that when you call the mutableCopy method, it will create a new NSMutableDictionary object that has all the objects that the original dictionary had. They won't be copies; they will be the same actual objects. This would be fine if, say, we were dealing with a dictionary storing strings, because removing a value from the copy wouldn't do anything to the original. Since we have a dictionary full of arrays, however, if we were to remove objects from the arrays in the copy, we'd also be removing them from the arrays in the original, because both the copies and the original point to the same objects.
In order to deal with this properly, we need to be able to make a deep mutable copy of a dictionary full of arrays. That's not too hard to do, but where should we put this functionality?
If you said, "in a category," then great, now you're thinking with portals! If you didn't, don't worry, it takes a while to get used to this language. Categories, in case you've forgotten, allow you to add additional methods to existing objects without subclassing them. Categories are frequently overlooked by folks new to Objective-C, because they're a feature most other languages don't have.
With categories, we can add a method to NSDictionary to do a deep copy, returning an NSMutableDictionary with the same data but not containing the same actual objects.
In your project window, select the Classes folder, and press
Tip
A faster way to create the two files needed for the category is to select the NSObject subclass template and then delete the file contents. This option will give you both the header and implementation file, saving you one step.
Put the following code in NSDictionary-MutableDeepCopy.h:
#import <Foundation/Foundation.h>

@interface NSDictionary(MutableDeepCopy)
- (NSMutableDictionary *)mutableDeepCopy;
@end
Flip over to NSDictionary-MutableDeepCopy.m, and add the implementation:
#import "NSDictionary-MutableDeepCopy.h"

@implementation NSDictionary (MutableDeepCopy)
- (NSMutableDictionary *) mutableDeepCopy {
    NSMutableDictionary *ret = [[NSMutableDictionary alloc]
        initWithCapacity:[self count]];
    NSArray *keys = [self allKeys];
    for (id key in keys) {
        id oneValue = [self valueForKey:key];
        id oneCopy = nil;

        if ([oneValue respondsToSelector:@selector(mutableDeepCopy)])
            oneCopy = [oneValue mutableDeepCopy];
        else if ([oneValue respondsToSelector:@selector(mutableCopy)])
        oneCopy = [oneValue mutableCopy];
        if (oneCopy == nil)
            oneCopy = [oneValue copy];
        [ret setValue:oneCopy forKey:key];
    }
    return ret;
}
@end
This method creates a new mutable dictionary and then loops through all the keys of the original dictionary, making mutable copies of each array it encounters. Since this method will behave just as if it were part of NSDictionary, any reference to self is a reference to the dictionary that this method is being called on. The method first attempts to make a deep mutable copy, and if the object doesn't respond to the mutableDeepCopy message, it tries to make a mutable copy. If the object doesn't respond to the mutableCopy message, it falls back on making a regular copy to ensure that all the objects contained in the dictionary do get copied. By doing it this way, if we were to have a dictionary containing dictionaries (or other objects that supported deep mutable copies), the contained ones would also get deep copied.
For a few of you, this might be the first time you've seen this syntax in Objective-C:
for (id key in keys)
There's a new feature of Objective-C 2.0, called fast enumeration. Fast enumeration is a language-level replacement for NSEnumerator, which you'll find covered in Learn Objective C. It allows you to quickly iterate through a collection, such as an NSArray, without the hassle of creating additional objects or loop variables.
All of the delivered Cocoa collection classes, including NSDictionary, NSArray, and NSSet support fast enumeration, and you should use this syntax any time you need to iterate over a collection. It will ensure you get the most efficient loop possible.
You may have noticed that it looks like we have a memory leak here. We allocate and initialize ret, but we never release it. That's OK. Because our method has "copy" in its name, it follows the same memory rules as the copyWithZone: method, which are supposed to return an object with a retain count of 1.
If we include the NSDictionary-MutableDeepCopy.h header file in one of our other classes, we'll be able to call mutableDeepCopy on any NSDictionary object we like. Let's take advantage of that now.
Next, we need to add some outlets to our controller class header file. We'll need an outlet for the table view. Up until now, we haven't needed a pointer to the table view outside of the datasource methods, but we're going to need one now, since we'll need to tell the table to reload itself based on the result of the search.
We're also going to need an outlet to a search bar, which is a control used for, well, searching. In addition to those two outlets, we're also going to need an additional dictionary. The existing dictionary and array are both immutable objects, and we need to change both of them to the corresponding mutable version, so the NSArray becomes an NSMutableArray and the NSDictionary becomes an NSMutableDictionary.
We won't need any new action methods in our controller, but we will need a couple of new methods. For now, just declare them, and we'll talk about them in detail once we enter the code.
We'll also need to conform our class to the UISearchBarDelegate protocol. We'll need to become the search bar's delegate in addition to being the table view's delegate.
Make the following changes to SectionsViewController.h:
#import <UIKit/UIKit.h> @interface SectionsViewController : UIViewController<UITableViewDataSource, UITableViewDelegate, UISearchBarDelegate>{UITableView *table;UISearchBar *search;NSDictionary *allNames;NSMutableDictionary *names;NSMutableArray *keys;
}@property (nonatomic, retain) IBOutlet UITableView *table;@property (nonatomic, retain) IBOutlet UISearchBar *search;@property (nonatomic, retain) NSDictionary *allNames;@property (nonatomic, retain) NSMutableDictionary *names;@property (nonatomic, retain) NSMutableArray *keys;- (void)resetSearch;- (void)handleSearchForTerm:(NSString *)searchTerm;@end
Here's what we just did. The outlet table will point to our table view; the outlet search will point to the search bar; the dictionary allNames will hold the full data set; the dictionary names will hold the data set that matches the current search criteria; and keys will hold the index values and section names. If you're clear on everything, let's now modify our view in Interface Builder.
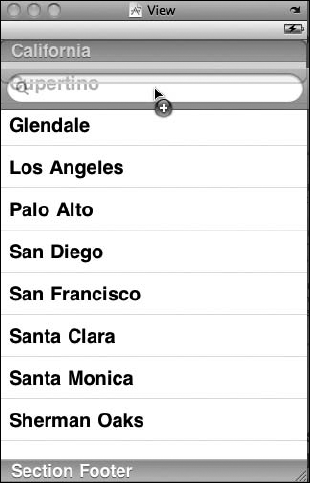
Double-click SectionsViewController.xib to open the file in Interface Builder. Next, grab a Search Bar from the library (see Figure 8-28), and add it to the top of the table view.

You're trying to drop it into the table view's header section, a special part of the table view that lies before the first section. In Interface Builder, the way to do this is to drop the search bar at the top of the view. Before you let go of the mouse button, you should see a rounded blue rectangle at the top of the view (Figure 8-29). That's your indication that if you drop the search bar now, it will go into the table header. Let go of the mouse button to drop the search bar once you see that blue rectangle.
Now control-drag from the File's Owner icon to the table view, and select the table outlet. Repeat with the search bar, and select the search outlet. Single-click the search bar, and go to the attributes inspector by pressing
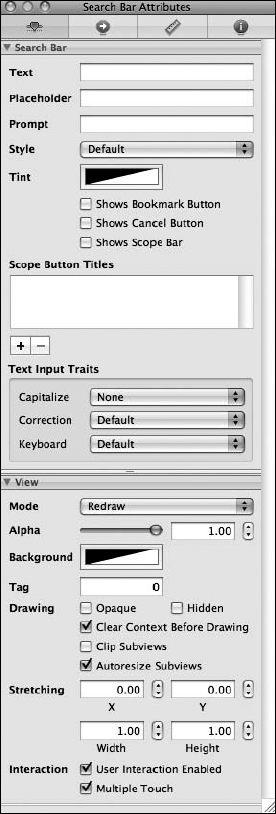
Type search in the Placeholder field. The word "search" will appear, very lightly, in the search field. Check the box that says Shows Cancel Button. A Cancel button will appear to the right of the search field. The user can tap this button to cancel the search. Under the Text Input Traits, set the popup button labeled Correction to No to indicate that the search bar should not try and correct the user's spelling.
Switch to the connections inspector by pressing
That should be everything we need here, so make sure to save, and let's head back to Xcode.
The changes to accommodate the search bar are fairly drastic. Make the following changes to SectionsViewController.m, and then come on back so we can walk through the changes.
#import "SectionsViewController.h"#import "NSDictionary-MutableDeepCopy.h"@implementation SectionsViewController @synthesize names; @synthesize keys;@synthesize table;@synthesize search;@synthesize allNames;#pragma mark -#pragma mark Custom Methods- (void)resetSearch {NSMutableDictionary *allNamesCopy = [self.allNames mutableDeepCopy];self.names = allNamesCopy;[allNamesCopy release];NSMutableArray *keyArray = [[NSMutableArray alloc] init];[keyArray addObjectsFromArray:[[self.allNames allKeys]sortedArrayUsingSelector:@selector(compare:)]];self.keys = keyArray;[keyArray release];}- (void)handleSearchForTerm:(NSString *)searchTerm {NSMutableArray *sectionsToRemove = [[NSMutableArray alloc] init];[self resetSearch];for (NSString *key in self.keys) {NSMutableArray *array = [names valueForKey:key];NSMutableArray *toRemove = [[NSMutableArray alloc] init];for (NSString *name in array) {if ([name rangeOfString:searchTermoptions:NSCaseInsensitiveSearch].location == NSNotFound)[toRemove addObject:name];}if ([array count] == [toRemove count])[sectionsToRemove addObject:key];[array removeObjectsInArray:toRemove];[toRemove release];}[self.keys removeObjectsInArray:sectionsToRemove];
[sectionsToRemove release];[table reloadData];}- (void)viewDidLoad { NSString *path = [[NSBundle mainBundle] pathForResource:@"sortednames" ofType:@"plist"]; NSDictionary *dict = [[NSDictionary alloc] initWithContentsOfFile:path];self.allNames = dict;[dict release];[self resetSearch];[table reloadData];[table setContentOffset:CGPointMake(0.0, 44.0) animated:NO];} - (void)didReceiveMemoryWarning {; [super didReceiveMemoryWarning]; // Releases the view if it doesn't have a superview // Release anything that's not essential, such as cached data } - (void)viewDidUnload { // Release any retained subviews of the main view. // e.g. self.myOutlet = nil;self.table = nil;self.search = nil;self.allNames = nil;self.names = nil; self.keys = nil; } - (void)dealloc {[table release];[search release];[allNames release];[keys release]; [names release]; [super dealloc]; }

#pragma mark -
#pragma mark Table View Data Source Methods
- (NSInteger)numberOfSectionsInTableView:(UITableView *)tableView {

return ([keys count] > 0) ? [keys count] : 1;
}
- (NSInteger)tableView:(UITableView *)aTableView
numberOfRowsInSection:(NSInteger)section {
if ([keys count] == 0)
return 0;
NSString *key = [keys objectAtIndex:section];
NSArray *nameSection = [names objectForKey:key];
return [nameSection count];
}
- (UITableViewCell *)tableView:(UITableView *)aTableView
cellForRowAtIndexPath:(NSIndexPath *)indexPath {
NSUInteger section = [indexPath section];
NSUInteger row = [indexPath row];
NSString *key = [keys objectAtIndex:section];
NSArray *nameSection = [names objectForKey:key];
static NSString *sectionsTableIdentifier = @"sectionsTableIdentifier";
UITableViewCell *cell = [aTableView dequeueReusableCellWithIdentifier:
sectionsTableIdentifier];
if (cell == nil) {
cell = [[[UITableViewCell alloc] initWithFrame:CGRectZero
reuseIdentifier: sectionsTableIdentifier] autorelease];
}
cell.text = [nameSection objectAtIndex:row];
return cell;
}
- (NSString *)tableView:(UITableView *)tableView
titleForHeaderInSection:(NSInteger)section {
if ([keys count] == 0)
return nil;
NSString *key = [keys objectAtIndex:section];
return key;
}
- (NSArray *)sectionIndexTitlesForTableView:(UITableView *)tableView {
return keys;}#pragma mark -#pragma mark Table View Delegate Methods- (NSIndexPath *)tableView:(UITableView *)tableViewwillSelectRowAtIndexPath:(NSIndexPath *)indexPath {[search resignFirstResponder];return indexPath;}#pragma mark -#pragma mark Search Bar Delegate Methods- (void)searchBarSearchButtonClicked:(UISearchBar *)searchBar {NSString *searchTerm = [searchBar text];[self handleSearchForTerm:searchTerm];}- (void)searchBar:(UISearchBar *)searchBartextDidChange:(NSString *)searchTerm {if ([searchTerm length] == 0) {[self resetSearch];[table reloadData];return;}[self handleSearchForTerm:searchTerm];}- (void)searchBarCancelButtonClicked:(UISearchBar *)searchBar {search.text = @"";[self resetSearch];[table reloadData];[searchBar resignFirstResponder];}@end
Wow, are you still with us after all that typing? Let's break it down and see what we just did. We'll start with the two new methods we added. Here's the first one:
- (void)resetSearch {
self.names = [self.allNames mutableDeepCopy];
NSMutableArray *keyArray = [[NSMutableArray alloc] init];
[keyArray addObjectsFromArray:[[self.allNames allKeys]
sortedArrayUsingSelector:@selector(compare:)]];
self.keys = keyArray;
[keyArray release];
}This method will get called any time the search is cancelled or the search term changes. All it does is create a mutable copy of allNames, assign it to names, and then refresh the keys array so it includes all the letters of the alphabet. We have to refresh the keys array because, if a search eliminates all values from a section, we need to get rid of that section too. Otherwise, the screen gets filled up with headers and empty sections, and it doesn't look good. We also don't want to provide an index to something that doesn't exist, so as we cull the names based on the search terms, we also cull the empty sections.
The other new method is the actual search:
- (void)handleSearchForTerm:(NSString *)searchTerm {
NSMutableArray *sectionsToRemove = [[NSMutableArray alloc] init];
[self resetSearch];
for (NSString *key in self.keys) {
NSMutableArray *array = [names valueForKey:key];
NSMutableArray *toRemove = [[NSMutableArray alloc] init];
for (NSString *name in array) {
if ([name rangeOfString:searchTerm
options:NSCaseInsensitiveSearch].location == NSNotFound)
[toRemove addObject:name];
}
if ([array count] == [toRemove count])
[sectionsToRemove addObject:key];
[array removeObjectsInArray:toRemove];
[toRemove release];
}
[self.keys removeObjectsInArray:sectionsToRemove];
[sectionsToRemove release];
[table reloadData];
}Although we'll kick off the search in the search bar delegate methods, we pulled handleSearchForTerm: into its own method, since we're going to need to use the exact same functionality in two different delegate methods. By embedding the search in the handleSearchForTerm: method, we consolidate the functionality into a single place so it's easier to maintain and then just call this new method as required.
Since this is the real meat (or tofu, if you prefer) of this section, let's break this method down into smaller chunks. First, we create an array that's going to hold the empty sections as we find them. We use this array to remove those empty sections later, because it is not safe to remove objects from a collection while iterating that collection. Since we are using fast enumeration, attempting to do that will raise an exception. So, since we won't be able to remove keys while we're iterating through them, we store the sections to be removed in an array, and after we're all done enumerating, we remove all the objects at once. After allocating the array, we reset the search.
NSMutableArray *sectionsToRemove = [[NSMutableArray alloc] init]; [self resetSearch];
Next, we enumerate through all the keys in the newly restored keys array.
for (NSString *key in self.keys) {Each time through the loop, we grab the array of names that corresponds to the current key and create another array to hold the values we need to remove from the names array. Remember, we're removing names and sections, so we have to keep track of which keys are empty as well as which names don't match the search criteria.
NSMutableArray *array = [names valueForKey:key]; NSMutableArray *toRemove = [[NSMutableArray alloc] init];
Next, we iterate through all the names in the current array. So, if we're currently working through the key of "A," this loop will enumerate through all the names that begin with "A."
for (NSString *name in array) {Inside this loop, we use one of NSString's methods that returns the location of a substring within a string. We specify an option of NSCaseInsensitiveSearch to tell it we don't care about the search term's case. In other words, "A" is the same as "a." The value returned by this method is an NSRange struct with two members, location and length. If the search term was not found, the location will be set to NSNotFound, so we just check for that. If the NSRange that is returned contains NSNotFound, we add the name to the array of objects to be removed later.
if ([name rangeOfString:searchTerm
options:NSCaseInsensitiveSearch].location == NSNotFound)
[toRemove addObject:name];
}After we've looped through all the names for a given letter, we check to see whether the array of names to be removed is the same length as the array of names. If it is, we know this section is now empty, and we add it to the array of keys to be removed later.
if ([array count] == [toRemove count])
[sectionsToRemove addObject:key];Next, we actually remove the nonmatching names from this section's arrays and then release the array we used to keep track of the names. It's very important to avoid using convenience methods inside of loops like this as much as possible, because they will put something into the autorelease pool every time through the loop. However, the autorelease pool can't get flushed until we're all done with our loop.
[array removeObjectsInArray:toRemove];
[toRemove release];
}Finally, we remove the empty sections, release the array used to keep track of the empty sections, and tell the table to reload its data.
[self.keys removeObjectsInArray:sectionsToRemove];
[sectionsToRemove release];
[table reloadData];
}Down in viewDidLoad, we made a few changes. First of all, we now load the property list into the allNames dictionary instead of the names dictionary and delete the code that load the keys array because that is now done in the resetSearch method. We then call the resetSearch method, which populates the names mutable dictionary and the keys array for us. After that, we call reloadData on our tableView. In the normal flow of the program, reloadData will get called before the user ever sees the table, so most of the time it's not necessary to call it in viewDidLoad:. However, in order for the line after it, setContentOffset:animated: to work, we need to make sure that the table is all set up before we do that, and the way we do that is to call reloadData on the table.
[table reloadData]; [table setContentOffset:CGPointMake(0.0, 44.0) animated:NO];
So, what does setContentOffset:animated: do? Well, it does exactly what it sounds like. It offsets the contents of the table, in our case, by 44 pixels, the height of the search bar. This causes the search bar to be scrolled off the top when the table first comes up.
If you skip down to the datasource methods, you'll see we made a few minor changes there. Because the names dictionary and keys array are still being used to feed the datasource, these methods are basically the same as they were before. We did have to account for the facts that table views always have a minimum of one section and yet the search could potentially exclude all names from all sections. So, we added a little code to check for the situation where all sections were removed, and in those cases, we feed the table view a single section with no rows and a blank name. This avoids any problems and doesn't give any incorrect feedback to the user.
Below the datasource methods, we've added a single delegate method. If the user clicks a row while using the search bar, we want the keyboard to go away. We accomplish this by implementing tableView:willSelectRowAtIndexPath: and telling the search bar to resign first responder status, which will cause the keyboard to retract. Next, we return indexPath unchanged. We could also have done this in tableView:didSelectRowAtIndexPath:, but because we're doing it here, the keyboard retracts a tiny bit sooner.
- (NSIndexPath *)tableView:(UITableView *)tableView
willSelectRowAtIndexPath:(NSIndexPath *)indexPath {
[search resignFirstResponder];
return indexPath;
}The search bar has a number of methods that it calls on its delegate. When the user taps return or the search key on the keyboard, searchBarSearchButtonClicked: will be called. Our version of this method grabs the search term from the search bar and calls our search method, which will remove the nonmatching names from names and the empty sections from keys.
- (void)searchBarSearchButtonClicked:(UISearchBar *)searchBar {
NSString *searchTerm = [searchBar text];
[self handleSearchForTerm:searchTerm];
}The searchBarSearchButtonClicked: method should be implemented any time you use a search bar. We also implement another search bar delegate method in addition to that one, but the next requires a bit of caution. This next method implements a live search. Every time the search term changes, regardless of whether the user has selected the search button or tapped return, we redo the search. This behavior is very user friendly, as the users can see the results change while typing. If users pare the list down far enough on the third character, they can stop typing and select the row they want.
You can easily hamstring the performance of your application implementing live search, especially if you're displaying images or have a complex data model. In this case, with 2,000 strings and no images or accessory icons, things actually work pretty well, even on a first-generation iPhone or iPod touch.
Do not assume that snappy performance in the simulator translates to snappy performance on your device. If you're going to implement a live search like this, you need to test extensively on actual hardware to make sure your application stays responsive. When in doubt, don't use it. Your users will likely be perfectly happy tapping the search button.
Now that you've been adequately warned, here's how you handle a live search. You implement the search bar delegate method searchBar:textDidChange: like so:
- (void)searchBar:(UISearchBar *)searchBar
textDidChange:(NSString *)searchTerm {
if ([searchTerm length] == 0) {
[self resetSearch];
[table reloadData];
return;
}
[self handleSearchForTerm:searchTerm];
}Notice that we check for an empty string. If the string is empty, we know all names are going to match it, so we simply reset the search and reload the data, without bothering to enumerate over all the names.
Last, we implement a method that allows us to get notified when the user clicks the Cancel button on the search bar:
- (void)searchBarCancelButtonClicked:(UISearchBar *)searchBar {
search.text = @"";
[self resetSearch];
[table reloadData];
[searchBar resignFirstResponder];
}When the user clicks Cancel, we set the search term to an empty string, reset the search, and reload the data so that all names are showing. We also tell the search bar to yield first responder status so that the keyboard drops away and the user can resume working with the table view.
If you haven't done so already, fire it up and try out the search functionality. Remember, the search bar is scrolled just off the top of the screen, so drag down to bring it into view. Click in the search field and start typing. The name list should trim to match the text you type. It works, right?
But, there's one thing that's not quite right. The index is overlapping the Cancel button (Figure 8-31).
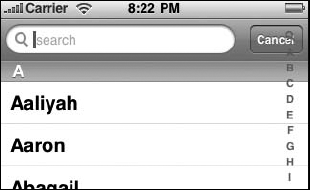
Figure 8.31. The way things are working now, the search bar cancel button is overlapped by the index.
It's a subtle thing, but iPhone users often notice subtle things. How does Apple deal with this problem in the Contacts application? They make the index disappear when you tap the search bar. We can do that. First, let's add an instance variable to keep track of whether the user is currently using the search bar. Add the following to SectionsViewController.h:
@interface SectionsViewController : UIViewController
<UITableViewDataSource, UITableViewDelegate, UISearchBarDelegate>
{
UITableView *table;
UISearchBar *search;
NSDictionary *allNames;
NSMutableDictionary *names;
NSMutableArray *keys;
BOOL isSearching;
}

@property (nonatomic, retain) IBOutlet UITableView *table;
@property (nonatomic, retain) IBOutlet UISearchBar *search;
@property (nonatomic, retain) NSDictionary *allNames;
@property (nonatomic, retain) NSMutableDictionary *names;
@property (nonatomic, retain) NSMutableArray *keys;
- (void)resetSearch;
- (void)handleSearchForTerm:(NSString *)searchTerm;
@endThen we need to modify sectionIndexTitlesForTableView: method to return nil if the user is searching:
- (NSArray *)sectionIndexTitlesForTableView:(UITableView *)tableView {
    if (isSearching)
        return nil;

    return keys;
}
We need to implement a new delegate method to set isSearching to YES when searching begins. Add the following method to SectionsViewController.m:
- (void)searchBarTextDidBeginEditing:(UISearchBar *)searchBar {isSearching = YES;[table reloadData];}
This method gets called when the search bar is tapped. In it, we set isSearching to YES, then we tell the table to reload itself, which causes the index to disappear. We also have to remember to set isSearching to NO when the user is done searching. There are two ways that can happen: the user can press the Cancel button, or they can tap a row in the table. Therefore, we have to add code to the searchBarCancelButtonClicked: method:
- (void)searchBarCancelButtonClicked:(UISearchBar *)searchBar {
    isSearching = NO;
    search.text = @"";
    [self resetSearch];
    [table reloadData];
    [searchBar resignFirstResponder];
}
and also to the tableView:willSelectRowAtIndexPath: method:
- (NSIndexPath *)tableView:(UITableView *)tableView
  willSelectRowAtIndexPath:(NSIndexPath *)indexPath {
    [search resignFirstResponder];
    isSearching = NO;
    search.text = @"";
    [tableView reloadData];
    return indexPath;
}
Now, try it again, and when you tap the search bar, the index will disappear until you're done searching.
Because we offset the tableview's content, the search bar is not visible when the application first launches, but a quick flick down brings the search bar into view so it can be used. It is also acceptable to put a search bar above rather than in the table view so that it's always visible, but this eats up valuable screen real estate. Having the search bar scroll with the table uses the iPhone's small screen more efficiently, and the user can always get to the search bar quickly by tapping in the status bar at the top of the screen. But, not everybody knows that tapping in the status bar takes you to the top of the current table. What would be ideal, would be if we could put a magnifying glass at the top of the index the way that the Contacts application does (Figure 8-32).
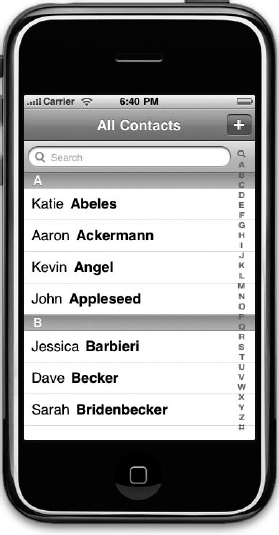
Figure 8.32. The Contacts application has a magnifying glass icon in the index that takes you to the search bar. Prior to SDK 3, this was not available to other applications, but now it is.
Well, guess what? We can. One of the new features in iPhone SDK 3 is the ability to put a magnifying glass in a table index. Let's do that now for our application. There are only three steps involved in this. First, we have to add a special value to our keys array to indicate we want the magnifying glass, we have to prevent the iPhone from printing a section header in the table for that special value, and we need to tell the table to scroll to the top when that item is selected. Let's tackle them in order.
To add the special value to our keys array, all we have to do is add one line of code to the resetSearch method:
- (void)resetSearch {
    self.names = [self.allNames mutableDeepCopy];
    NSMutableArray *keyArray = [[NSMutableArray alloc] init];
    [keyArray addObject:UITableViewIndexSearch];
[keyArray addObjectsFromArray:[[self.allNames allKeys]
sortedArrayUsingSelector:@selector(compare:)]];
self.keys = keyArray;
[keyArray release];
}Now, we need to suppress that value from coming up as a section title. We do that, by adding a check in the existing tableView:titleForHeaderInSection: method, and return nil when it asks for the title for the special search section:
- (NSString *)tableView:(UITableView *)tableView
titleForHeaderInSection:(NSInteger)section {
    if ([keys count] == 0)
        return nil;

    NSString *key = [keys objectAtIndex:section];
    if (key == UITableViewIndexSearch)
        return nil;
    return key;
}Finally, we have to tell the tableview what to do when the user taps on the magnifying glass in the index. When the user taps the magnifying class, the delegate method tableView:sectionForSectionIndexTitle:atIndex: gets called, if it is implemented.
Add this method to the bottom of SectionsViewController.m, just above the @end:
- (NSInteger)tableView:(UITableView *)tableView
sectionForSectionIndexTitle:(NSString *)title
               atIndex:(NSInteger)index {
    NSString *key = [keys objectAtIndex:index];
    if (key == UITableViewIndexSearch) {
        [tableView setContentOffset:CGPointZero animated:NO];
        return NSNotFound;
    }
    else return index;
}
To tell it to go to the search box, we have to do two things. First, we have to get rid of the content offset we added earlier, and then we have to return NSNotFound. When the tableview gets this response, it knows to scroll up to the top, so now that we've removed the offset, it will scroll to the search bar rather than to the top section.
And there you have it—live searching in an iPhone table, with a magnifying glass in the index!
SDK 3 added even more cool search stuff. Interested? Go to the documentation browser and do a search for UISearchDisplay to read up on UISearchDisplayController and UISearchDisplayDelegate. You'll likely find this much easier to understand once you've made your way through Chapter 9.
Well, how are you doing? This was a pretty hefty chapter, and you've learned a ton! You should have a very solid understanding of the way flat tables work. You should understand how to customize tables and table view cells as well as how to configure table views. You also know how to implement a search bar, which is a vital tool in any iPhone application that presents large volumes of data. Make sure you understand everything we did in this chapter, because we're going to build on it.
We're going to continue working with table views in the next chapter, and you're going to learn how to use them to present hierarchical data. You'll see how to create content views that allow the user to edit data selected in a table view, as well as how to present checklists in tables, embed controls in table rows, and delete rows.