
So far, we've focused on the controller and view aspects of the Model-View-Controller paradigm. Although several of our applications have read data out of the application bundle, none of our applications has saved their data to any form of persistent storage, persistent storage being any form of nonvolatile storage that survives a restart of the computer or device. With the exception of Application Settings, so far, every sample application either did not store data or used volatile or nonpersistent storage. Every time one of our sample applications launched, it appeared with exactly the same data it had the first time you launched it.
This approach has worked for us up to this point. But in the real world, your applications will need to persist data so that when users make changes, those changes are stored and are there when they launch the program again. A number of different mechanisms are available for persisting data on the iPhone. If you've programmed in Cocoa for Mac OS X, you've likely used some or all of these techniques.
In this chapter, we're going to look at four different mechanisms for persisting data to the iPhone's file system: using property lists, object archives (or archiving), the iPhone's embedded relational database called SQLite3, and Apple's provided persistence tool called Core Data. We will write example applications that use all four approaches.
Note
Property lists, object archives, SQLite3, and Core Data are not the only ways you can persist data on an iPhone. They are just the most common and easiest. You always have the option of using traditional C I/O calls like fopen() to read and write data. You can also use Cocoa's low-level file management tools. In almost every case, doing so will result in a lot more coding effort and is rarely necessary, but those tools are there if you need them.
All four of this chapter's data-persistence mechanisms share an important common element, your application's /Documents folder. Every application gets its own /Documents folder, and applications are only allowed to read and write from their own /Documents directory.
To give you some context, let's take a look at what an application looks like on the iPhone. Open a Finder window, and navigate to your home directory. Within that, drill down into Library/Application Support/iPhoneSimulator/User/. At this point, you should see five subfolders, one of which is named Applications (see Figure 11-1).
Note
If you've installed multiple versions of the SDK, you may see a few additional folders with names like Library.previousInstall. That's perfectly normal.
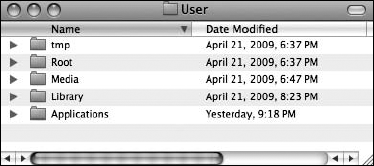
Although this listing represents the simulator, the file structure is similar to what's on the actual device. As is probably obvious, the Applications folder is where the iPhone stores its applications. If you open the Applications folder, you'll see a bunch of folders and files with names that are long strings of characters. These names are generated automatically by Xcode. Each of these folders contains one application and its supporting folders.
Scattered among those application directories, you may spy the occasional .sb file. The .sb files contain settings that the simulator uses to launch the program that shares the same name. You should never need to touch those. If you open one of the application subdirectories, however, you should see something that looks a little more familiar. In there, you'll find one of the iPhone applications you've built, along with three support folders: Documents, Library, and tmp. Your application stores its data in Documents, with the exception of NSUserDefaults-based preference settings, which get stored in the Library/Preferences folder. The tmp directory offers a place where your application can store temporary files. Files written into /tmp will not be backed up by iTunes when your iPhone syncs, but your application does need to take responsibility for deleting the files in /tmp once they are no longer needed to avoid filling up the file system.
Since our application is in a folder with a seemingly random name, how do we retrieve the full path to the Documents directory so that we can read and write our files? It's actually quite easy. The C function NSSearchPathForDirectoriesInDomain() will locate various directories for you. This is a Foundation function, so it is shared with Cocoa for Mac OS X. Many of its available options are designed for OS X and won't return any values on the iPhone, either because those locations don't exist on the iPhone (e.g., the Downloads folder) or because your application doesn't have rights to access the location due to the iPhone's sandboxing mechanism.
Here's some code to retrieve the path to the Documents directory:
NSArray *paths = NSSearchPathForDirectoriesInDomains(NSDocumentDirectory,
    NSUserDomainMask, YES);
NSString *documentsDirectory = [paths objectAtIndex:0];
The constant NSDocumentDirectory says we are looking for the path to the Documents directory. The second constant, NSUserDomainMask, indicates that we want to restrict our search to our application's sandbox. In Mac OS X, this same constant is used to indicate that we want the function to look in the user's home directory, which explains its somewhat odd name.
Though an array of matching paths is returned, we can count on our Documents directory residing at index 0 in the array. Why? We know that only one directory meets the criteria we've specified since each application has only one Documents directory. We can create a filename, for reading or writing purposes, by appending another string onto the end of the path we just retrieved. We'll use an NSString method designed for just that purpose called stringByAppendingPathComponent:, like so:
NSString *filename = [documentsDirectory
    stringByAppendingPathComponent:@"theFile.txt"];
After this call, filename would contain the full path to a file called theFile.txt in our application's Documents directory, and we can use filename to create, read, and write from that file.
Getting a reference to your application's temporary directory is even easier than getting a reference to the Documents directory. The Foundation function called NSTemporaryDirectory() will return a string containing the full path to your application's temporary directory. To create a filename for a file that will get stored in the temporary directory, we first find the temporary directory:
NSString *tempPath = NSTemporaryDirectory();
Then, we create a path to a file in that directory by appending a filename to that path, like this:
NSString *tempFile = [tempPath
stringByAppendingPathComponent:@"tempFile.txt"];As a reminder, in this chapter, we're going to look at four different approaches to data persistence. All four approaches make use of your iPhone's file system.
In the case of SQLite3, you'll create a single SQLite3 database file and let SQLite3 worry about storing and retrieving your data. In its simplest form, Core Data takes care of all the file system management for you. With the other two persistence mechanisms, property lists and archiving, you need to put some thought into whether you are going to store your data in a single file or in multiple files.
Using a single file is the easiest approach, and with many applications, it is a perfectly acceptable one. You start off by creating a root object, usually an NSArray or NSDictionary, though your root object can also be based on a custom class when using archiving. Next, you populate your root object with all the program data that needs to be persisted. Whenever you need to save, your code rewrites the entire contents of that root object to a single file. When your application launches, it reads the entire contents of that file into memory, and when it quits, it writes out the entire contents. This is the approach we'll use in this chapter.
The downside of using a single file is that you have to load all of your application's data into memory, and you have to write all of it to the file system for even the smallest changes. If your application isn't likely to manage more than a few megabytes of data, this approach is probably fine, and its simplicity will certainly make your life easier.
The multiple file approach is definitely more complicated. As an example, you might write an e-mail application that stored each e-mail message in its own file. There are obvious advantages to this method. It allows the application to load only data that the user has requested (another form of lazy loading), and when the user makes a change, only the files that changed have to be saved. This method also gives you the opportunity to free up memory when you receive a low-memory notification, since any memory that is being used to store data that the user is not currently looking at can be flushed and simply reloaded from the file system the next time it's needed. The downside of multiple-file persistence is that it adds a fair amount of complexity to your application. For now, we'll stick with single-file persistence.
Let's get into the specifics of each of our persistence methods: property lists, object archives, SQLite3, and Core Data. We'll explore each of these in turn and build an application that uses each mechanism to save some data to the iPhone's file system. We'll start with property lists.
Several of our applications have made use of property lists, most recently when we used a property list to specify our application preferences. Property lists are convenient, because they can be edited manually using Xcode or the Property List Editor application, and both NSDictionary and NSArray instances can be written to and created from property lists as long as the dictionary or array contains only specific serializable objects. A serialized object has been converted into a stream of bytes so it can be stored in a file or transferred over a network. Although any object can be made serializable, only certain objects can be placed into a collection class, such as an NSDictionary or NSArray, and then stored to a property list using the collection classes' writeToFile:atomically: method. The Objective-C classes that can be serialized this way are
NSArrayNSMutableArrayNSDictionaryNSMutableDictionaryNSDataNSMutableDataNSStringNSMutableStringNSNumberNSDate
If you can build your data model from just these objects, you can use property lists to easily save and load your data. In fact, we've used this mechanism in many of the sample applications to provide you with data.
If you're going to use property lists to persist your application data, you'll use either an NSArray or an NSDictionary to hold the data that needs to be persisted. Assuming that all of the objects that you put into the NSArray or NSDictionary are serializable objects from the preceding list, you can write a property list by calling the writeToFile:atomically: method on the dictionary or array instance, like so:
[myArray writeToFile:@"/some/file/location/output.plist" atomically:YES];
Note
In case you were wondering, the atomically parameter tells the method to write the data to an auxiliary file, not to the specified location. Once it has successfully written the file, it will then copy that auxiliary file to the location specified by the first parameter. This is a safer way to write a file, because if the application crashes during the save, the existing file, if there was one, will not be corrupted. It adds a tiny bit of overhead, but in most situations, it's worth the cost.
One problem with the property list approach is that custom objects cannot be serialized into property lists. You also can't use other delivered classes from Cocoa Touch that aren't specified in the previous list of serializable objects, which means that classes like NSURL, UIImage and UIColor cannot be used directly.
Not being able to serialize these objects also means that you can't easily create derived or calculated properties (e.g., a property that is the sum of two other properties), and some of your code that really should be contained in model classes has to be moved to your controller classes. Again, these restrictions are OK for simple data models and simple applications. Most of the time, however, your application will be much easier to maintain if you create dedicated model classes.
However, simple property lists can still be useful in complex applications. They are a great way to include static data in your application. For example, when your application includes a picker, often the best way to include the list of items to go in your picker is to create a property list file and include it in your project's Resources folder, which will cause it to get compiled into your application.
Let's a build a simple application that uses property lists to store its data.
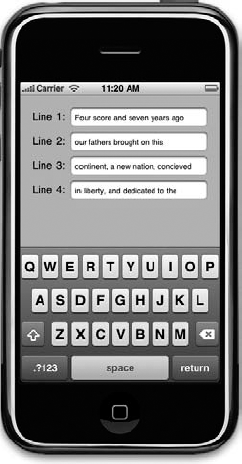
We're going to build a program that lets you enter data into four text fields, saves those fields to a property list file when the application quits, and then reloads the data back from that property list file the next time the application launches (see Figure 11-2).
Note
In this chapter's applications, we won't be taking the time to set up all the user interface niceties that we have in the past. Tapping the return key, for example, will neither dismiss the keyboard nor take you to the next field. If you want to add that polish to the application, doing so would be good practice, but it's not really material to this chapter's topic, so we won't be walking you through it.
In Xcode, create a new project using the view-based application template, and save the project with the name Persistence. This project contains all the files that we'll need to build our application, so we can dive right into things. In a minute, we're going to build a view with four text fields. Let's create the outlets we need before we go to Interface Builder. Expand the Classes folder. Then, single-click the PersistenceViewController.h file, and make the following changes:
#import <UIKit/UIKit.h>#define kFilename @"data.plist"@interface PersistenceViewController : UIViewController {UITextField *field1;UITextField *field2;UITextField *field3;UITextField *field4;}@property (nonatomic, retain) IBOutlet UITextField *field1;@property (nonatomic, retain) IBOutlet UITextField *field2;@property (nonatomic, retain) IBOutlet UITextField *field3;
@property (nonatomic, retain) IBOutlet UITextField *field4;- (NSString *)dataFilePath;- (void)applicationWillTerminate:(NSNotification *)notification;@end
In addition to defining four text field outlets, we've also defined a constant for the filename we're going to use, as well as two additional methods. One method, dataFilePath, will create and return the full pathname to our data file by concatenating kFilename onto the path for the Documents directory. The other method, applicationWillTerminate:, which we'll discuss in a minute, will get called when our application quits and will save data to the property list file.
Next, expand the Resources folder, and double-click PersistenceViewController.xib to open the file in Interface Builder.
Once Interface Builder comes up, the View window should open as well. If it doesn't, double-click the View icon to open it. Drag a Text Field from the library, and place it against the top-right blue guide line. Expand it to the left so that it reaches about two-thirds of the way across the window, and then press
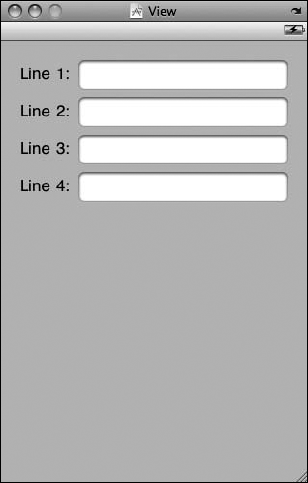
Next, hold down the option key, and drag the text box downward, which will create a copy of it. Repeat this step two more times so that you have four text fields. Now, drag four labels to the window, and use Figure 11-3 as a placement and design guide. Notice that we've placed the text fields at the top of our view so that there is room for the keyboard.
Once you have all four text fields and labels placed, control-drag from the File's Owner icon to each of the four text fields. Connect the topmost text field to the outlet called field1, the next one to field2, the third to field3, and the bottom one to field4. When you have all four text fields connected to outlets, save, close PersistenceViewController.xib, and go back to Xcode.
Single-click PersistenceViewController.m, and add the following code at the beginning of the file:
#import "PersistenceViewController.h" @implementation PersistenceViewController@synthesize field1;@synthesize field2;@synthesize field3;@synthesize field4;- (NSString *)dataFilePath {NSArray *paths = NSSearchPathForDirectoriesInDomains(NSDocumentDirectory, NSUserDomainMask, YES);NSString *DocumentsDirectory = [paths objectAtIndex:0];return [DocumentsDirectory stringByAppendingPathComponent:kFilename];}- (void)applicationWillTerminate:(NSNotification *)notification {NSMutableArray *array = [[NSMutableArray alloc] init];[array addObject:field1.text];[array addObject:field2.text];[array addObject:field3.text];[array addObject:field4.text];[array writeToFile:[self dataFilePath] atomically:YES];[array release];}#pragma mark -- (void)viewDidLoad {NSString *filePath = [self dataFilePath];if ([[NSFileManager defaultManager] fileExistsAtPath:filePath]) {NSArray *array = [[NSArray alloc] initWithContentsOfFile:filePath];field1.text = [array objectAtIndex:0];field2.text = [array objectAtIndex:1];field3.text = [array objectAtIndex:2];field4.text = [array objectAtIndex:3];[array release];}UIApplication *app = [UIApplication sharedApplication];[[NSNotificationCenter defaultCenter] addObserver:selfselector:@selector(applicationWillTerminate:)name:UIApplicationWillTerminateNotificationobject:app];[super viewDidLoad];}...
Also, insert the following code into the existing dealloc and viewDidUnload methods:
...
- (void)viewDidUnload {
        // Release any retained subviews of the main view.
    // e.g. self.myOutlet = nil;
    self.field1 = nil;
    self.field2 = nil;
    self.field3 = nil;
    self.field4 = nil;
    [super viewDidUnload];
}
- (void)dealloc {
    [field1 release];
    [field2 release];
    [field3 release];
    [field4 release];
    [super dealloc];
}
...
The first method we added, dataFilePath, returns the full pathname of our data file by finding the Documents directory and appending kFilename to it. This method will be called from any code that needs to load or save data.
- (NSString *)dataFilePath {
    NSArray *paths = NSSearchPathForDirectoriesInDomains(
        NSDocumentDirectory, NSUserDomainMask, YES);
    NSString *DocumentsDirectory = [paths objectAtIndex:0];
    return [DocumentsDirectory stringByAppendingPathComponent:kFilename];
}
The second new method is called applicationWillTerminate:. Notice that it takes a pointer to an NSNotification as an argument. applicationWillTerminate: is a notification method, and all notifications take a single NSNotification instance as their argument.
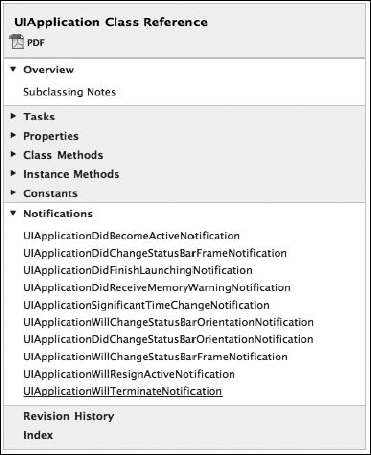
A notification is a lightweight mechanism that objects can use to communicate with each other. Any object can define one or more notifications that it will publish to the application's notification center, which is a singleton object that exists only to pass these notifications between objects. Notifications are usually indications that some event occurred, and objects that publish notifications include a list of notifications in their documentation. For example, if you look at Figure 11-4, you can see that the UIApplication class publishes a number of notifications.
The purpose of most notifications is usually pretty obvious from their names, but the documentation contains further information if you find one whose purpose is unclear. Our application needs to save its data before the application quits, so we are interested in the notification called UIApplicationWillTerminateNotification. In a minute, when we write our viewDidLoad method, we will subscribe to that notification and tell the notification center to call this method when that notification happens:
- (void)applicationWillTerminate:(NSNotification *)notification {
NSMutableArray *array = [[NSMutableArray alloc] init];
[array addObject:field1.text];
[array addObject:field2.text];
[array addObject:field3.text];
[array addObject:field4.text];
[array writeToFile:[self dataFilePath] atomically:YES];
[array release];
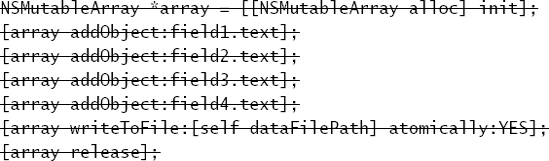
}The method itself is fairly simple. We create a mutable array, add the text from each of the four fields to the array, and then write the contents of that array out to a property list file. That's all there is to saving our data using property lists.
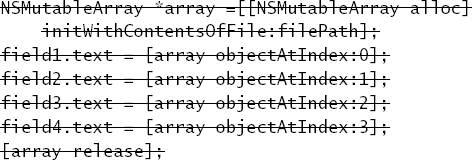
In the viewDidLoad method, we do a few more things. The first thing we do is check to see if a data file already exists. If there isn't one, we don't want to bother trying to load it. If the file does exist, we instantiate an array with the contents of that file and then copy the objects from that array to our four text fields. Because arrays are ordered lists, by copying them in the same order as we saved them, we are always sure to get the right values in the right fields.
- (void)viewDidLoad {
    NSString *filePath = [self dataFilePath];
    if ([[NSFileManager defaultManager] fileExistsAtPath:filePath]) {
        NSArray *array = [[NSArray alloc] initWithContentsOfFile:filePath];
        field1.text = [array objectAtIndex:0];
        field2.text = [array objectAtIndex:1];
        field3.text = [array objectAtIndex:2];
        field4.text = [array objectAtIndex:3];
        [array release];
 }
After we load the data from the property list, we get a reference to our application instance and use that to subscribe to the UIApplicationWillTerminateNotification, using the default NSNotificationCenter instance and a method called addObserver:selector:name:object:. We pass an observer of self, which means that our PersistenceViewController is the object that needs to get notified. For selector, we pass a selector to the applicationWillTerminate: method we wrote a minute ago, telling the notification center to call that method when the notification is published. The third parameter, name:, is the name of the notification that we're interested in receiving, and the final parameter, object:, is the object we're interested in getting the notification from. If we pass nil for the final parameter, we would then get notified any time any method posted the UIApplicationWillTerminateNotification.
UIApplication *app = [UIApplication sharedApplication];
[[NSNotificationCenter defaultCenter] addObserver:self
          selector:@selector(applicationWillTerminate:)
          name:UIApplicationWillTerminateNotification
    object:app];
After subscribing to the notification, we just give our superclass a chance to respond to viewDidLoad, and we're done.
[super viewDidLoad];
}
That wasn't too bad, was it? When our main view is finished loading, we look for a property list file. If it exists, we copy data from it into our text fields. Next, we register to be notified when the application terminates. When the application does terminate, we gather up the values from our four text fields, stick them in a mutable array, and write that mutable array out to a property list.
Why don't you compile and run the application? It should build and then launch in the simulator. Once it comes up, you should be able to type into any of the four text fields. When you've typed something in them, press the home button (the circular button with the rounded square in it at the bottom of the simulator window). It's very important that you press the home button. If you just quit the simulator, that's the equivalent of force quitting your application, and you will never receive the notification that the application is terminating, and your data will never get saved.
Property list serialization is pretty cool and very easy to use, but it's a little limiting, since only a small selection of objects can be stored in property lists. Let's look at a little more robust approach.
In the last part of Chapter 9, when we built the Presidents data model object, you saw an example of the process of loading archived data using NSCoder. In the Cocoa world, the term "archiving" refers to another form of serialization, but it's a more generic type that any object can implement. Any object specifically written to hold data (model objects) should support archiving. The technique of archiving model objects lets you easily write complex objects to a file and then read them back in. As long as every property you implement in your class is either a scalar like int or float or else is an instance of a class that conforms to the NSCoding protocol, you can archive your objects completely. Since most Foundation and Cocoa Touch classes capable of storing data do conform to NSCoding (though there are a few noteworthy exceptions like UIImage) archiving is actually relatively easy to implement for most classes.
Although not strictly required to make archiving work, another protocol should be implemented along with NSCoding—the NSCopying protocol, which is a protocol that allows your object to be copied. Being able to copy an object gives you a lot more flexibility when using data model objects. For example, in the Presidents application in Chapter 9, instead of that complex code we had to write to store changes the user made so we could handle both the Cancel and Save buttons, we could have made a copy of the president object and stored the changes in that copy. If the user tapped Save, we'd just copy the changed version over to replace the original version.
The NSCoding protocol declares two methods, both required. One encodes your object into an archive; the other one creates a new object by decoding an archive. Both methods are passed an instance of NSCoder, which you work with very much like NSUserDefaults from the previous chapter. You can encode and decode both objects and native datatypes like ints and floats using key-value coding.
A method to encode an object might look like this:
- (void)encodeWithCoder:(NSCoder *)encoder {
    [encoder encodeObject:foo forKey:kFooKey];
    [encoder encodeObject:bar forKey:kBarKey];
    [encoder encodeInt:someInt forKey:kSomeIntKey];
    [encoder encodeFloat:someFloat forKey:kSomeFloatKey]
}
To support archiving in our object, we have to encode each of our instance variables into encoder using the appropriate encoding method, so we need to implement a method that initializes an object from an NSCoder, allowing us to restore an object that was previously archived. If you are subclassing a class that also conforms to NSCoding, you also need to make sure you call encodeWithCoder: on your superclass, meaning your method would look like this instead:
- (void)encodeWithCoder:(NSCoder *)encoder {
    [encoder encodeObject:foo forKey:kFooKey];
    [encoder encodeObject:bar forKey:kBarKey];
    [encoder encodeInt:someInt forKey:kSomeIntKey];
    [encoder encodeFloat:someFloat forKey:kSomeFloatKey]
    [super encodeWithCoder:encoder];
}
Implementing the initWithCoder: method is slightly more complex than encodeWithcoder:. If you are subclassing NSObject directly, or subclassing some other class that doesn't conform to NSCoding, your method would look something like the following:
- (id)initWithCoder:(NSCoder *)decoder {
    if (self = [super init]) {
        self.foo = [decoder decodeObjectForKey:kFooKey];
        self.bar = [decoder decodeObjectForKey:kBarKey];
        self.someInt = [decoder decodeIntForKey:kSomeIntKey];
        self.someFloat = [decoder decodeFloatForKey:kAgeKey];
    }
    return self;
}
The method initializes an object instance using [super init], and if that's successful, it sets its properties by decoding values from the passed-in instance of NSCoder. When implementing NSCoding for a class with a superclass that also conforms to NSCoding, the initWithCoder: method needs to look slightly different. Instead of calling init on super, it has to call initWithCoder:, like so:
- (id)initWithCoder:(NSCoder *)decoder {
    if (self = [super initWithCoder:decoder]) {
        self.foo = [decoder decodeObjectForKey:kFooKey];
        self.bar = [decoder decodeObjectForKey:kBarKey];
        self.someInt = [decoder decodeIntForKey:kSomeIntKey];
        self.someFloat = [decoder decodeFloatForKey:kAgeKey];
    }
    return self;
}
And that's basically it. As long as you implement these two methods to encode and decode all of your object's properties, your object is archivable and can be written to and read from archives.
As we mentioned a few minutes ago, conforming to NSCopying is a very good idea for any data model objects as well. NSCopying has one method, called copyWithZone:, and it allows objects to be copied. Implementing NSCopying is very similar to implementing initWithCoder:. You just need to create a new instance of the same class and then set all of that new instance's properties to the same values as this objects properties. Here's what a copyWithZone: method might look like:
- (id)copyWithZone:(NSZone *)zone {
    MyClass *copy = [[[self class] allocWithZone:zone] init];
    copy.foo = [self.foo copyWithZone:zone];
    copy.bar = [self.bar copyWithZone:zone];
    copy.someInt = self.someInt;
    copy.someFloat = self.someFloat;
    return copy;
}
Notice that we do not release or autorelease the new object we created. Copied objects are implicitly retained and should therefore be released or autoreleased in the code that called copy or copyWithZone:.
Note
Don't worry too much about the NSZone parameter. This pointer is to a struct that is used by the system to manage memory. Only in rare circumstances did developers ever need to worry about zones or create their own, and nowadays, it's almost unheard of to have multiple zones. Calling copy on an object is exactly the same as calling copyWithZone: using the default zone, which is almost always what you want.
Creating an archive from an object or objects that conforms to NSCoding is relatively easy. First, we create an instance of NSMutableData to hold the encoded data and then create an NSKeyedArchiver instance to archive objects into that NSMutableData instance:
NSMutableData *data = [[NSMutableData alloc] init];
NSKeyedArchiver *archiver = [[NSKeyedArchiver alloc]
    initForWritingWithMutableData:data];
After creating both of those, we then use key-value coding to archive any objects we wish to include in the archive, like this:
[archiver encodeObject:myObject forKey:@"keyValueString"];
Once we've encoded all the objects we want to include, we just tell the archiver we're done, write the NSMutableData instance to the file system, and do memory cleanup on our objects.
[archiver finishEncoding];
BOOL success = [data writeToFile:@"/path/to/archive" atomically:YES];
[archiver release];
[data release];
If anything went wrong while writing the file, success will be set to NO. If success is YES, the data was successfully written to the specified file. Any objects created from this archive will be exact copies of the objects that were last written into the file.
To reconstitute objects from the archive, we go through a similar process. We create an NSData instance from the archive file and create an NSKeyedUnarchiver to decode the data:
NSData *data = [[NSData alloc] initWithContentsOfFile:path];
NSKeyedUnarchiver *unarchiver = [[NSKeyedUnarchiver alloc]
    initForReadingWithData:data];
After that, we read our objects from the unarchiver using the same key that we used to archive the object:
self.object = [unarchiver decodeObjectForKey:@"keyValueString"];
Note
The object returned by decodeObjectForKey: is autoreleased, so if we need to keep it around beyond the current method, we need to retain it. Assigning it to a property declared with the retain keyword usually handles this for you, but if you're not assigning it to a property and need the object to stick around past the end of the current event loop, then you need to explicitly send it a retain message.
Finally, we tell the archiver we are done and do our memory cleanup:
[unarchiver finishDecoding];
[unarchiver release];
[data release];
If you're feeling a little overwhelmed by archiving, don't worry; it's actually fairly straightforward. We're going to retrofit our Persistence application to use archiving, so you'll get to see it in action. Once you've done it a few times, archiving will become second nature, as all you're really doing is storing and retrieving your object's properties using key-value coding.
Let's retrofit the Persistence application so it uses archiving instead of property lists. We're going to be making some fairly significant changes to the Persistence source code, so you might want to make a copy of your project before continuing.
Once you're ready to proceed and have the Persistence project open in Xcode, single-click the Classes folder and press
#import <UIKit/UIKit.h>#define kField1Key @"Field1"#define kField2Key @"Field2"#define kField3Key @"Field3"#define kField4Key @"Field4"
@interface FourLines : NSObject <NSCoding, NSCopying> {
    NSString *field1;
    NSString *field2;
    NSString *field3;
    NSString *field4;
}
@property (nonatomic, retain) NSString *field1;
@property (nonatomic, retain) NSString *field2;
@property (nonatomic, retain) NSString *field3;
@property (nonatomic, retain) NSString *field4;
@end
This is a very straightforward data model class with four string properties. Notice that we've conformed the class to the NSCoding and NSCopying protocols. Now, switch over to FourLines.m, and add the following code.
#import "FourLines.h" @implementation FourLines@synthesize field1;@synthesize field2;@synthesize field3;@synthesize field4;#pragma mark NSCoding- (void)encodeWithCoder:(NSCoder *)encoder {[encoder encodeObject:field1 forKey:kField1Key];[encoder encodeObject:field2 forKey:kField2Key];[encoder encodeObject:field3 forKey:kField3Key];[encoder encodeObject:field4 forKey:kField4Key];}- (id)initWithCoder:(NSCoder *)decoder {if (self = [super init]) {self.field1 = [decoder decodeObjectForKey:kField1Key];self.field2 = [decoder decodeObjectForKey:kField2Key];self.field3 = [decoder decodeObjectForKey:kField3Key];self.field4 = [decoder decodeObjectForKey:kField4Key];}return self;}#pragma mark -#pragma mark NSCopying- (id)copyWithZone:(NSZone *)zone {FourLines *copy = [[[self class] allocWithZone: zone] init];copy.field1 = [[self.field1 copyWithZone:zone] autorelease];copy.field2 = [[self.field2 copyWithZone:zone] autorelease];copy.field3 = [[self.field3 copyWithZone:zone] autorelease];copy.field4 = [[self.field4 copyWithZone:zone] autorelease];
return copy;}@end
We just implemented all the methods necessary to conform to NSCoding and NSCopying. We encode all four of our properties in encodeWithCoder: and decode all four of them using the same four key values in initWithCoder:. In copyWithZone:, we create a new FourLines object and copy all four strings to it. See? It's not hard at all.
Now that we have an archivable data object, let's use it to persist our application data. Single click PersistenceViewController.h, and make the following changes:
#import <UIKit/UIKit.h>#define kFilename @"archive"#define kDataKey @"Data"@interface PersistenceViewController : UIViewController { UITextField *field1; UITextField *field2; UITextField *field3; UITextField *field4; } @property (nonatomic, retain) IBOutlet UITextField *field1; @property (nonatomic, retain) IBOutlet UITextField *field2; @property (nonatomic, retain) IBOutlet UITextField *field3; @property (nonatomic, retain) IBOutlet UITextField *field4; - (NSString *)dataFilePath; - (void)applicationWillTerminate:(NSNotification *)notification; @end
All we're doing here is specifying a new filename so that our program doesn't try to load the old property list in as an archive. We've also defined a new constant that will be the key value we use to encode and decode our object.
Let's switch over the PersistenceViewController.m, and make the following changes:
#import "PersistenceViewController.h"
#import "FourLines.h"

@implementation PersistenceViewController
@synthesize field1;
@synthesize field2;
@synthesize field3;
@synthesize field4;
- (NSString *)dataFilePath {
NSArray *paths = NSSearchPathForDirectoriesInDomains(
NSDocumentDirectory, NSUserDomainMask, YES);
NSString *DocumentsDirectory = [paths objectAtIndex:0];
return [DocumentsDirectory stringByAppendingPathComponent:kFilename];
}
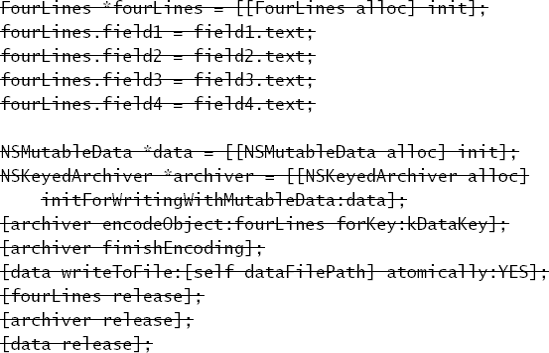
- (void)applicationWillTerminate:(NSNotification *)notification {
FourLines *fourLines = [[FourLines alloc] init];
fourLines.field1 = field1.text;
fourLines.field2 = field2.text;
fourLines.field3 = field3.text;
fourLines.field4 = field4.text;
NSMutableData *data = [[NSMutableData alloc] init];
NSKeyedArchiver *archiver = [[NSKeyedArchiver alloc]
initForWritingWithMutableData:data];
[archiver encodeObject:fourLines forKey:kDataKey];
[archiver finishEncoding];
[data writeToFile:[self dataFilePath] atomically:YES];
[fourLines release];
[archiver release];
[data release];
}
#pragma mark -
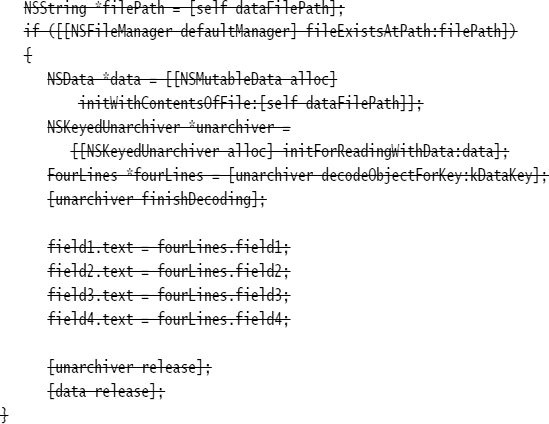
- (void)viewDidLoad {
NSString *filePath = [self dataFilePath];
if ([[NSFileManager defaultManager] fileExistsAtPath:filePath]) {
NSData *data = [[NSMutableData alloc]initWithContentsOfFile:[self dataFilePath]];NSKeyedUnarchiver *unarchiver = [[NSKeyedUnarchiver alloc]initForReadingWithData:data];FourLines *fourLines = [unarchiver decodeObjectForKey:kDataKey];[unarchiver finishDecoding];field1.text = fourLines.field1;field2.text = fourLines.field2;field3.text = fourLines.field3;field4.text = fourLines.field4;[unarchiver release];[data release];} UIApplication *app = [UIApplication sharedApplication]; [[NSNotificationCenter defaultCenter] addObserver:self selector:@selector(applicationWillTerminate:) name:UIApplicationWillTerminateNotification object:app]; [super viewDidLoad]; } ...
Not very much has changed, really, and this new version takes several more lines of code to implement than property list serialization, so you might be wondering if there really is an advantage to using archiving over just serializing property lists. For this application, the answer is simple: there really isn't. But, think back to the last example in Chapter 9 where we were letting the user edit a list of presidents, and each president had four different fields that could be edited. To handle archiving that list of presidents with a property list would involve iterating through the list of presidents, creating an NSDictionary instance for each president, copying the value from each of their fields over to the NSDictionary instance, and adding that instance to another array, which could then be written to a property list file. That is, of course, assuming that we restricted ourselves to using only serializable properties. If we didn't, using property list serialization wouldn't even be an option without doing a lot of conversion work.
On the other hand, if we had an array of archivable objects, such as the FourLines class that we just built, we could archive the entire array by archiving the array instance itself. Collection classes like NSArray, when archived, archive all of the objects they contain. As long as every object you put into an array or dictionary conforms to NSCoding, you can archive the array or dictionary and restore it, and all the objects that were in it when you archived it will be in the restored array or dictionary. In other words, this approach scales beautifully (in terms of code size, at least), because no matter how many objects you add, the work to write those objects to disk (assuming you're using single-file persistence) is exactly the same. With property lists, the amount of work increases with every object you add.
The third persistence option we're going to discuss is the iPhone's embedded SQL database called SQLite3. SQLite3 is very efficient at storing and retrieving large amounts of data. It's also capable of doing complex aggregations on your data, with much faster results than you'd get doing the same thing using objects. For example, if your application needed to calculate the sum of a particular field across all the objects in your application, or if you needed the sum from just the objects that meet certain criteria, SQLite3 would allow you to do that without loading every object into memory. Getting aggregations from SQLite3 is several orders of magnitude faster than loading all the objects into memory and summing up their values. Being a full-fledged embedded database, SQLite3 contains tools to make it even faster by, for example, creating table indexes that can speed up your queries.
Tip
There are two schools of thought about the pronunciation of "SQL" and "SQLite." Most official documentation says to pronounce "SQL" as "Ess-Queue-Ell" and "SQLite" as "Ess-Queue-Ell-Light." Many people pronounce them, respectively, as "Sequel" and "Sequel Light."
SQLite3 uses the Structured Query Language (SQL). SQL is the standard language used to interact with relational databases, and it is a language with its own syntax and a lot of subtleties that are way beyond the scope of this book. Whole books have been written on the syntax of SQL (dozens of them, in fact), as well as on SQLite itself. So, if you don't already know SQL and you want to use SQLite3 in your application, you're going to have a little work ahead of you. We'll show you how to set up and interact with the SQLite database from your iPhone applications, and you'll see some of the basics of the syntax in this chapter. But to really make the most of SQLite3, you're going to need to do some additional research and exploration.
If you're completely new to SQL, you might want to find out more about SQLite3 and the SQL language before continuing on with this chapter. A couple of good starting points are the Introduction to the SQLite3 C API at http://www.sqlite.org/cintro.html and the SQLite SQL Language Guide at http://www.sqlite.org/lang.html.
Relational databases, including SQLite3, and object-oriented programming languages use fundamentally different approaches to storing and organizing data. The approaches are different enough that numerous techniques and many libraries and tools for converting between the two have arisen. These different techniques are collectively called object-relational mapping (ORM). There are currently several ORM tools available for Cocoa Touch. In fact, we'll look at one ORM solution provided by Apple called Core Data in the next section. In this chapter, we're going to focus on the basics, including setting up SQLite3, creating a table to hold your data, and saving data to and retrieving values from the database. Obviously, in the real world, such a simple application wouldn't warrant the investment in SQLite3. But its simplicity is exactly what makes it a good learning example.
Before you can use SQLite3, you have to open the database. The command that's used to do that, sqlite3_open(), will open an existing database, or if none exists at the specified location, it will create a new one. Here's what the code to open a new database might look like:
sqlite3 *database;
int result = sqlite3_open("/path/to/database/file", &database);
If result is equal to the constant SQLITE_OK, then the database was successfully opened. One thing you should note here is that the path to the database file has to be passed in as a C string, not as an NSString. SQLite3 was written in portable C, not Objective-C, and it has no idea what an NSString is. Fortunately, there is an NSString method that generates a C-string from an NSString instance:
char *stringPath = [pathString UTF8String];
When you're all done with an SQLite3 database, you close the database by calling
sqlite3_close(database);
Databases store all their data in tables. You can create a new table by crafting an SQL CREATE statement and passing it in to an open database using the function sqlite3_exec, like so:
char * errorMsg; const char *createSQL = "CREATE TABLE IF NOT EXISTS PEOPLE(ID INTEGER PRIMARY KEY AUTOINCREMENT, FIELD_DATA TEXT)"; int result = sqlite3_exec (database, createSQL, NULL, NULL, &errorMsg;);
As you did before, you need to check result for SQLITE_OK to make sure your command ran successfully. If it didn't, errorMsg will contain a description of the problem that occurred. The function sqlite3_exec is used to run any command against SQLite3 that doesn't return data. It's used for updates, inserts, and deletes. Retrieving data from the database is little more involved. You first have to prepare the statement by feeding it your SQL SELECT command:
NSString *query = @"SELECT ID, FIELD_DATA FROM FIELDS ORDER BY ROW";
sqlite3_stmt *statement;
int result = (sqlite3_prepare_v2( database, [query UTF8String],
    −1, &statement, nil);
Note
All of the SQLite3 functions that take strings require an old-fashioned C string. In the create example, we created and passed a C string, but in this example, we created an NSString and derived a C string by using one of NSString's methods called UTF8String. Either method is acceptable. If you need to do manipulation on the string, using NSString or NSMutableString will be easier, but converting from NSString to a C string incurs a tiny bit of extra overhead.
If result equals SQLITE_OK, your statement was successfully prepared, and you can start stepping through the result set. Here is an example of stepping through a result set and retrieving an int and an NSString from the database:
while (sqlite3_step(statement) == SQLITE_ROW) {
    int rowNum = sqlite3_column_int(statement, 0);
    char *rowData = (char *)sqlite3_column_text(statement, 1);
    NSString *fieldValue = [[NSString alloc] initWithUTF8String:rowData];
    // Do something with the data here
    [fieldValue release];
}
sqlite3_finalize(statement);Although it's possible to construct SQL strings to insert values, it is common practice to use something called bind variables when inserting into a database. Handling strings correctly, making sure they don't have invalid characters and that quotes are handled property can be quite a chore. With bind variables, those issues are taken care of for us. To insert a value using a bind variable, you create your SQL statement as normal but put a question mark into the SQL string. Each question mark represents one variable that has to be bound before the statement can be executed. Then you prepare the SQL statement, bind a value to each of the variables, and then execute the command.
Here's an example that prepares a SQL statement with two bind variables, binds an int to the first variable and a string to the second variable, and then executes and finalizes the statement:
char *sql = "insert into foo values (?, ?);";
    sqlite3_stmt *stmt;
    if (sqlite3_prepare_v2(database, sql, −1, &stmt, nil) == SQLITE_OK) {
sqlite3_bind_int(stmt, 1, 235);
sqlite3_bind_text(stmt, 2, "Bar", −1, NULL);
}
if (sqlite3_step(stmt) != SQLITE_DONE)
NSLog(@"This should be real error checking!");
sqlite3_finalize(stmt);There are multiple bind statements available depending on the datatype you wish to use. The first parameter to any bind function, regardless of which datatype it is for, is a pointer to the sqlite3_stmt used previously in the sqlite3_prepare_v2() call. The second parameter is the index of the variable that you're binding to. This is a one-indexed value, meaning that the first question mark in the SQL statement has index 1, and each one after it is one higher than the one to its left. The third parameter is always the value that should be substituted for the question mark. Most bind functions only take three parameters. A few, such as those for binding text and binary data, have two additional parameters. The first is the length of the data being passed in the third parameter. In the case of C strings, you can pass −1 instead of the string's length, and the function will use the entire string. In all other cases, you have to tell it the length of the data being passed int. The final parameter is an optional function callback in case you need to do any memory cleanup after the statement is executed. Typically, such a function would be used to free memory allocated using malloc().
The syntax that follows the bind statements may seem a little odd, since we're doing an insert. When using bind variables, the same syntax is used for both queries and updates. If the SQL string had a SQL query, rather than an update, we would need to call sqlite3_step() called multiple times, until it returns SQLITE_DONE. Since this was an update, we call it only once.
We've covered the basics, so let's see how this would work in practice. We're going to retrofit our Persistence application one more time, this time storing its data using SQLite3. We're going to use a single table and store the field values in four different rows of that table. We'll give each row a row number that corresponds to its field, so for example, the value from field1 will get stored in the table with a row number of 1. Let's get started.
SQLite 3 is accessed through a procedural API that provides interfaces to a number of C function calls. To use this API, we'll need to link our application to a dynamic library called libsqlite3.dylib, located in /usr/lib on both Mac OS X and iPhone.
The process of linking a dynamic library into your project is exactly the same as that of linking in a framework.
Go back to Xcode, and open the Persistence project, if it's not still open. Select Frameworks in the Groups & Files pane. Next, select Add to Project... from the Project menu now. Then, navigate to /Developer/Platforms/iPhoneSimulator.platform/Developer/SDKs/iPhoneSimulatorX.Y.sdk/usr/lib, and find the file called libsqlite3.dylib. Note that X.Y in iPhoneSimulatorX.Y stands for the major and minor release number of the SDK you are currently using. For example, if you are using SDK 3.0, you'd look for iPhoneSumulator3.0.
When you are prompted, make sure to uncheck the box labeled Copy items into destination group's folder (if needed). Also, make sure you change Reference Type to Relative to Current SDK. Note that there may be several other entries in that directory that start with libsqlite3. Be sure you select libsqlite3.dylib. It is an alias that always points to the latest version of the SQLite3 library.
Tip
You can link directly to /usr/lib/libsqlite3.dylib if you choose a Reference Type of Absolute Path. This location is a lot easier to remember, but absolute paths are more fragile and often discouraged. Relative paths are safer and less likely to break in future versions, although in the case of libsqlite3.dylib, it's probably safe to link with an absolute path.
Next, make the following changes to PersistenceViewController.h:
#import <UIKit/UIKit.h>#import "/usr/include/sqlite3.h"#define kFilename @"data.sqlite3"@interface PersistenceViewController : UIViewController { UITextField *field1; UITextField *field2; UITextField *field3; UITextField *field4;sqlite3 *database;} @property (nonatomic, retain) IBOutlet UITextField *field1; @property (nonatomic, retain) IBOutlet UITextField *field2; @property (nonatomic, retain) IBOutlet UITextField *field3; @property (nonatomic, retain) IBOutlet UITextField *field4; - (NSString *)dataFilePath; - (void)applicationWillTerminate:(NSNotification *)notification; @end
Once again, we change the filename so that we won't be using the same file that we used in the previous version and so that the file properly reflects the type of data it holds. We also declare an instance variable, database, which will point to our application's database.
Switch over to PersistenceViewController.m, and make the following changes:
#import "PersistenceViewController.h"
#import "FourLines.h"

@implementation PersistenceViewController
@synthesize field1;
@synthesize field2;
@synthesize field3;
@synthesize field4;

- (NSString *)dataFilePath {
    NSArray *paths = NSSearchPathForDirectoriesInDomains(
        NSDocumentDirectory, NSUserDomainMask, YES);
    NSString *DocumentsDirectory = [paths objectAtIndex:0];
    return [DocumentsDirectory stringByAppendingPathComponent:kFilename];
}
- (void)applicationWillTerminate:(NSNotification *)notification {

 for (int i = 1; i <= 4; i++) {
     NSString *fieldName = [[NSString alloc]
                                       initWithFormat:@"field%d", i];
     UITextField *field = [self valueForKey:fieldName];
     [fieldName release];

     char *errorMsg;
     char *update = "INSERT OR REPLACE INTO FIELDS (ROW, FIELD_DATA)
VALUES (?, ?);";
sqlite3_stmt *stmt;if (sqlite3_prepare_v2(database, update, −1, &stmt, nil)== SQLITE_OK) {sqlite3_bind_int(stmt, 1, i);sqlite3_bind_text(stmt, 2, [field.text UTF8String], −1, NULL);}if (sqlite3_step(stmt) != SQLITE_DONE)NSAssert1(0, @"Error updating table: %s", errorMsg);sqlite3_finalize(stmt);}sqlite3_close(database);} #pragma mark - - (void)viewDidLoad {if (sqlite3_open([[self dataFilePath] UTF8String], &database)!= SQLITE_OK) {sqlite3_close(database);NSAssert(0, @"Failed to open database");}char *errorMsg;NSString *createSQL = @"CREATE TABLE IF NOT EXISTS FIELDS(ROW INTEGER PRIMARY KEY, FIELD_DATA TEXT);";if (sqlite3_exec (database, [createSQL UTF8String],NULL, NULL, &errorMsg) != SQLITE_OK) {sqlite3_close(database);NSAssert1(0, @"Error creating table: %s", errorMsg);}
NSString *query = @"SELECT ROW, FIELD_DATA FROM FIELDS ORDER BY ROW";sqlite3_stmt *statement;if (sqlite3_prepare_v2(database, [query UTF8String],−1, &statement, nil) == SQLITE_OK) {while (sqlite3_step(statement) == SQLITE_ROW) {int row = sqlite3_column_int(statement, 0);char *rowData = (char *)sqlite3_column_text(statement, 1);NSString *fieldName = [[NSString alloc]initWithFormat:@"field%d", row];NSString *fieldValue = [[NSString alloc]initWithUTF8String:rowData];UITextField *field = [self valueForKey:fieldName];field.text = fieldValue;[fieldName release];[fieldValue release];}sqlite3_finalize(statement);}UIApplication *app = [UIApplication sharedApplication]; [[NSNotificationCenter defaultCenter] addObserver:self selector:@selector(applicationWillTerminate:) name:UIApplicationWillTerminateNotification object:app]; [super viewDidLoad]; } ...
Let's take a look at these changes. Hmm?
The first changes we made are in the applicationWillTerminate: method, where we need to save our application data. Because the data in the database is stored in a table, our application's data will look something like Table 11-1 when stored.
Table 11.1. Data Stored in the FIELDS Table of the Database
ROW | FIELD_DATA |
|---|---|
1 | Four score and seven years ago |
2 | our fathers brought forth on this |
3 | continent, a new nation, conceived |
4 | in Liberty, and dedicated to the |
To save the data, we loop through all four fields and issue a separate command to update each row of the database. Here's our loop, and the first thing we do in the loop is craft a field name so we can retrieve the correct text field outlet. Remember, valueForKey: allows you to retrieve a property based on its name. We also declare a pointer to be used for the error message if we encounter an error.
for (int i = 1; i <= 4; i++)
{
    NSString *fieldName = [[NSString alloc]
        initWithFormat:@"field%d", i];
    UITextField *field = [self valueForKey:fieldName];

    char *errorMsg;
We craft an INSERT OR REPLACE SQL statement with two bind variables. The first represents the row that's being stored; the second is for the actual string value to be stored. By using INSERT OR REPLACE instead of the more standard INSERT, we don't have to worry about whether a row already exists or not.
char *update = "INSERT OR REPLACE INTO FIELDS (ROW, FIELD_DATA)VALUES (?, ?);";
Next, we declare a pointer to a statement, then prepare our statement with the bind variables, and bind values to both of the bind variables:
sqlite3_stmt *stmt;
if (sqlite3_prepare_v2(database, update, −1, &stmt, nil)
== SQLITE_OK) {
sqlite3_bind_int(stmt, 1, i);
sqlite3_bind_text(stmt, 2, [field.text UTF8String], −1, NULL);
}Then we call sqlite3_step to execute the update, check to make sure it worked, and then finalize the statement and close the database:
if (sqlite3_step(stmt) != SQLITE_DONE)
NSAssert1(0, @"Error updating table: %s", errorMsg);
sqlite3_finalize(stmt);
}
sqlite3_close(database);This statement will insert our data into the database if it's not already there, or it will update the existing row whose row number matches if there already is one:
NSString *update = [[NSString alloc] initWithFormat:
@"INSERT OR REPLACE INTO FIELDS (ROW, FIELD_DATA)
VALUES (%d, '%@'),", i, field.text];Next, we execute the SQL INSERT OR REPLACE against our database:
char *errorMsg;
char *update = "INSERT OR REPLACE INTO FIELDS (ROW, FIELD_DATA)
VALUES (?, ?);";sqlite3_stmt *stmt;
if (sqlite3_prepare_v2(database, update, −1, &stmt, nil)
== SQLITE_OK) {
sqlite3_bind_int(stmt, 1, i);
sqlite3_bind_text(stmt, 2, [field.text UTF8String], −1, NULL);
}
if (sqlite3_step(stmt) != SQLITE_DONE)
NSAssert1(0, @"Error updating table: %s", errorMsg);
sqlite3_finalize(stmt);Notice that we've used an assertion here if we encountered an error. We use assertions rather than exceptions or manual error checking, because this condition should only happen if we, the developers, make a mistake. Using this assertion macro will help us debug our code, and it can be stripped out of our final application. If an error condition is one that a user might reasonably experience, you should probably use some other form of error checking.
Once we're done with the loop, we close the database, and we're finished with this method's changes:
sqlite3_close(database);
The only other new code is in the viewDidLoad method. The first thing we do is open the database. If we hit a problem opening the database, we close it and raise an assertion:
if (sqlite3_open([[self dataFilePath] UTF8String], &database)
    != SQLITE_OK) {
    sqlite3_close(database);
    NSAssert(0, @"Failed to open database");
 }
Next, we have to make sure that we have a table to hold our data. We can use SQL CREATE TABLE to do that. By specifying IF NOT EXISTS, we prevent the database from overwriting existing data. If there is already a table with the same name, this command quietly exits without doing anything, so it's safe to call every time our application launches without explicitly checking to see if a table exists.
char *errorMsg;
    NSString *createSQL = @"CREATE TABLE IF NOT EXISTS FIELDS
        (ROW INTEGER PRIMARY KEY, FIELD_DATA TEXT);";
    if (sqlite3_exec (database, [createSQL UTF8String], NULL, NULL,
        &errorMsg) != SQLITE_OK) {
        sqlite3_close(database);
        NSAssert1(0, @"Error creating table: %s", errorMsg);
    }
Finally, we need to load our data. We do this using a SQL SELECT statement. In this simple example, we create a SQL SELECT that requests all the rows from the database and ask SQLite3 to prepare our SELECT. We also tell SQLite3 to order the rows by the row number so that we always get them back in the same order. Absent this, SQLite3 will return the rows in the order in which they are stored internally.
NSString *query = @"SELECT ROW, FIELD_DATA FROM FIELDS ORDER BY ROW";
    sqlite3_stmt *statement;
    if (sqlite3_prepare_v2( database, [query UTF8String],
        −1, &statement, nil) == SQLITE_OK) {
Then, we step through each of the returned rows:
while (sqlite3_step(statement) == SQLITE_ROW) {We grab the row number and store it in an int, and then we grab the field data as a C string:
int row = sqlite3_column_int(statement, 0);
    char *rowData = (char *)sqlite3_column_text(statement, 1);
Next, we create a field name based on the row number (e.g., field1 for row 1), convert the C string to an NSString, and use that to set the appropriate field with the value retrieved from the database:
NSString *fieldName = [[NSString alloc]
        initWithFormat:@"field%d", row];
    NSString *fieldValue = [[NSString alloc]
        initWithUTF8String:rowData];
    UITextField *field = [self valueForKey:fieldName];
    field.text = fieldValue;
Finally, we do some memory cleanup, and we're all done:
[fieldName release];
        [fieldValue release];
     }
 }
Why don't you compile and run and try it out? Enter some data, and press the iPhone simulator's home button. Then, relaunch the Persistence application, and on launch, that data should be right where you left it. As far as the user is concerned, there's absolutely no difference between the four different versions of this application, but each version uses a very different persistence mechanism.
When we wrote the first edition of this book, we included a section in the first chapter listing the things that were available in Cocoa that weren't yet available in Cocoa Touch. One of the more noteworthy absences from the iPhone SDK prior to 3.0 was Core Data, Apple's tool for designing data models visually. When Apple confirmed that iPhone SDK 3 would have full support for Core Data, there was much rejoicing in the iPhone developer community.
Core Data is a robust, full-featured persistence tool, and a full discussion of it is beyond the scope of this chapter. We will, however, show you how to use Core Data to re-create the same persistence you've seen in our Persistence application. For a more comprehensive coverage of Core Data, check out More iPhone 3 Development by Dave Mark and Jeff LaMarche (Apress, 2009), which devotes several chapters to Core Data.
In Xcode, create a new project. This time, select the Window-based Application template, but don't click the Choose... button just yet. If you look in the lower-right pane of the new project assistant, you should see a checkbox labeled Use Core Data for storage (see Figure 11-5). There's a certain amount of complexity involved in adding Core Data to an existing project, so Apple has kindly provided this option with some application project templates to do much of the work for you.
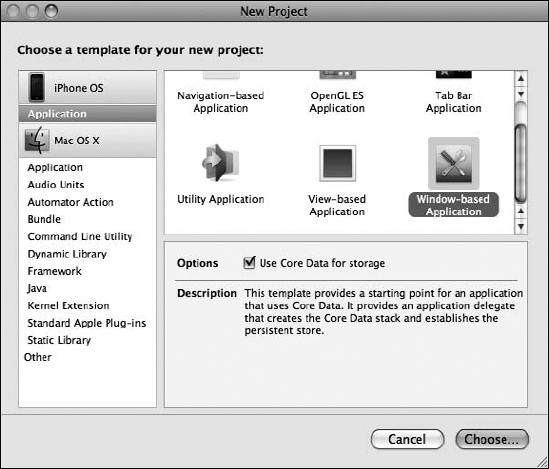
Figure 11.5. Some project templates, including Window-based Application, offer the option to use Core Data.
Check that checkbox, and then click the Choose... button. When prompted, enter a project name of Core Data Persistence. Before we move on to our code, let's take a look at the project window. There's some new stuff here you've not seen before. Expand both the Classes and Resources folders (see Figure 11-6).
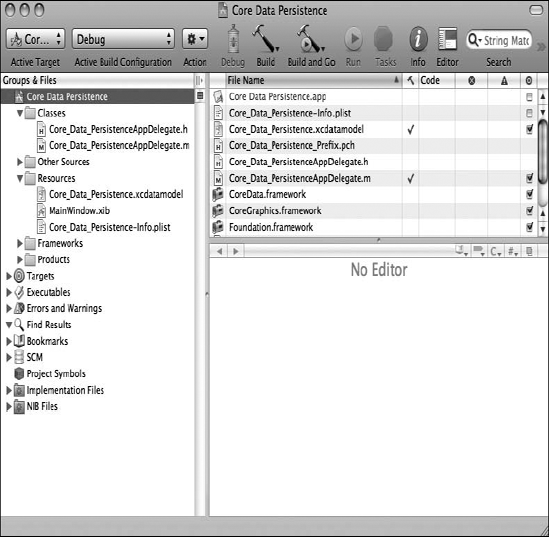
Of course, we have a bunch of files you're already familiar with: an application delegate, a MainWindow.xib, and an info property list. But, there's another file in the Resources folder called Core_Data_Persistence.xcdatamodel. That is our data model. Core Data lets us design our data models visually, without writing code. Single-click that file now, and you will be presented with the data model editor (see Figure 11-7). You may want to expand your Xcode window and hide the detail pane (

The traditional way to create data models in Cocoa is to create subclasses of NSObject and conform them to NSCoding and NSCopying so that they can be archived, as we did earlier in this chapter. Core Data uses a fundamentally different approach. Instead of classes, you create entities here in the data model editor, and then in your code, create managed objects from those entities.
Tip
The terms "entity" and "managed object" can be a little confusing, since both refer to data model objects. The term "entity" refers to the description of an object while "managed object" is used to refer to actual concrete instances of that entity created at runtime. So, in the data model editor, you create entities, but in your code, you will create and retrieve managed objects. The distinction between entities and managed objects is similar to the distinction between a class and instances of that class.
An entity is made up of properties. There are four types of properties: attributes, relationships, fetched properties, and fetch requests.
An attribute serves the same function in a core data entity as an instance variable does in an objective-C class. They both hold the data.
As the name implies, a relationship defines the relationship between entities. For example, suppose you wanted to define a Person entity. You might start by defining a few attributes, like hairColor, eyeColor, height, and weight. You might define address attributes, like state and ZIP code, or you might embed those in a separate, HomeAddress entity. Using this latter approach, you'd then want to create a relationship between a Person and a HomeAddress.
Relationships can be to one and to many. The relationship from a Person to a HomeAddress is probably "to one," since most people only have a single home address. The relationship from HomeAddress to Person might be "to many," since there may be more than one Person living at that HomeAddress.
A fetched property is an alternative to a relationship. The main difference between them is in the way they affect loading. For example, if a Person has a relationship with a HomeAddress, when the Person is loaded, the HomeAddress will be loaded, too. Alternatively, if a Person references HomeAddress as a fetched property, when the Person is loaded, HomeAddress is not loaded, at least not until HomeAddress is accessed. Can you say "lazy loading"?
A fetch request is a predefined query. For example, you might say, "Give me every Person whose eyeColor is blue."
Typically, attributes, relationships, and fetched properties are defined using Xcode's data model editor. Fetch requests can be just as easily defined in the data model editor or in your code.
In our Core Data Persistence application, we'll build a simple entity so you can get a sense of how this all works together. For more detail on Core Data, check out the extensive coverage in More iPhone 3 Development.
In your code, instead of using accessors and mutators, you will use key-value coding to set properties or retrieve their existing values. Key-value coding may sound intimidating, but it's something you've already used quite a bit in this book. Every time we've used NSDictionary, for example, we were using key-value coding because every object in a dictionary is stored under a unique key value. The key-value coding used by Core Data is a bit more complex than that used by NSDictionary, but the basic concept is the same.
When working with a managed object, the key you will use to set or retrieve a property's value is the name of the attribute you wish to set. So, to retrieve the value stored in the attribute called name from a managed object, you would call:
NSString *name = [myManagedObject valueForKey:@"name"];
Similarly, to set a new value for a managed object's property, you would do this:
[myManagedObject setValue:@"Martha Stewart" forKey:@"name"];
So, where do these managed objects live? They live in something called a persistent store, which is sometimes also referred to as a backing store. Persistent stores can take several different forms. By default, a Core Data application implements a backing store as an SQLite database stored in the application's documents directory. Even though your data is stored via SQLite, classes in the Core Data framework do all the work associated with loading and saving your data. If you use Core Data, you won't need to write any SQL statements. You just work with objects, and Core Data figures out what it needs to do behind the scenes. In addition to SQLite, backing stores can also be implemented as binary flat files. There's also a third option to create an in-memory store, which you might use if writing a caching mechanism, but it doesn't save data beyond the end of the current session. In almost all situations, you should just leave it as the default and use SQLite as your persistent store.
Although most applications will have only one persistent store, it is possible to have multiple persistent stores within the same application. If you're curious about how the backing store is created and configured, you can look right in your Xcode project at the file Core_Data_PersistenceAppDelegate.m. The Xcode project template, we chose provided us with all the code needed to set up a single persistent store for our application.
Other than creating it (which is handled for us in our application delegate), we generally won't work with our persistent store directly, but rather will use something called a managed object context, often just referred to as a context. The context intermediates access to the persistent store and maintains information about what properties have changed since the last time an object was saved. The context also registers all changes with the undo manager, meaning that you always have the ability to undo a single change or roll back all the way to the last time data was saved. You can have multiple contexts pointing to the same persistent store, though most iPhone applications will only use one. You can find out more about using multiple contexts and the undo manager in More iPhone 3 Development as well.
Many core data calls require an NSManagedObjectContext as a parameter, or have to be executed against a context. With the exception of very complicated, multithreaded iPhone applications, you can just use the managedObjectContext property from your application delegate, which is a default context that gets created for you automatically, also courtesy of the Xcode project template.
Note
You may notice that, in addition to a managed object context and a persistent store coordinator, the provided application delegate also contains an instance of NSManagedObjectModel. This class is responsible for loading and representing, at runtime, the data model you will create using the data model editor in Xcode. You generally won't have to interact directly with that class. This class is used behind the scenes by the other Core Data classes so they can identify what entities and properties you've defined in your data model. As long as you create your data model using the provided file, there's no need to worry about this class at all.
Creating a new instance of a managed object is pretty easy, though not quite as straightforward as creating a normal object instance using alloc and init. Instead, you use a factory method on a class called NSEntityDescription. Instances of this class represent a single entity in memory. Remember: entities are like classes. They are a description of an object, and define what properties a particular entity has.
To create a new object, we do this:
theLine = [NSEntityDescription
    insertNewObjectForEntityForName:@"EntityName"
             inManagedObjectContext:context];
The method is called insertNewObjectForEntityForName:inManagedObjectContext: because, in addition to creating the object, it inserts the newly create object into the context and then returns that object autoreleased. After this call, the object exists in the context but is not yet part of the persistent store. The object will get added to the persistent store the next time the managed object context's save: method is called.
To retrieve managed objects from the persistent store, you create a fetch request and provide that request with an NSEntityDescription that specifies the entity of the object or objects you wish to retrieve. Here is an example that creates a fetch request:
NSFetchRequest *request = [[NSFetchRequest alloc] init];
NSEntityDescription *entityDescr = [NSEntityDescription
    entityForName:@"EntityName" inManagedObjectContext:context];
[request setEntity:entityDescr];
Optionally, you can also specify criteria for a fetch request using the NSPredicate class. A predicate is similar to the SQL where clause and allows you to define the criteria used to determine the results of your fetch request.
Note
Learn Objective-C on the Mac by Mark Dalrymple and Scott Knaster (Apress, 2008) has an entire chapter devoted to the use of NSPredicate.
Here is a simple example of a predicate:
NSPredicate *pred = [NSPredicate predicateWithFormat:@"(name = %@)",
    nameString];
[request setPredicate: pred];
The predicate created by the first line of code would tell a fetch request that, instead of retrieving all managed objects for the specified entity, retrieves just those where the name property is set to the value currently stored in the nameString variable. So, if nameString were an NSString that held the value @"Bob", we would be telling the fetch request to only bring back managed objects that have a name property set to "Bob". This is a simple example, but predicates can be considerably more complex and can use Boolean logic to specify the precise criteria you might need in most any situation.
After you've created your fetch request, provided it with an entity description, and optionally given it a predicate, you execute the fetch request using an instance method on NSManagedObjectContext:
NSError *error;
NSArray *objects = [context executeFetchRequest:request error:&error];
if (objects == nil) {
    // handle error
}
executeFetchRequest:error: will load the specified objects from the persistent store and return them in an array. If an error is encountered, you will get a nil array, and the error pointer you provided will point to an NSError object that describes the specific problem. If there was no error, you will get a valid array, though it may not have any objects in it, since it is possible that there are none that meet the specified criteria. From this point on, any changes you make to the managed objects returned in that array will be tracked by the managed object context you executed the request against and saved when you send that context a save: message.
Let's take Core Data for a spin now.
Let's return our attention to Xcode and create our data model. Single-click Persistence_Core_Data.xcdatamodel to open Xcode's data model editor. The upper-left pane of the data model editor is called the entity pane because it lists all the entities that are currently in your data model. It's an empty list now, because we haven't created any yet (see Figure 11-8).
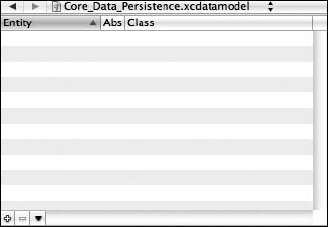
Figure 11.8. The upper left-pane of the data model editor is the entity pane. Clicking the plus icon in the lower left corner adds an entity
Remedy that by clicking the plus icon in the lower-left corner of the entity pane, which will create and select an entity titled Entity. If you look in the bottom pane of the data model editor, you'll notice that it's no longer empty (see Figure 11-9)! As you build your data model using the top three panes (collectively called the browser view), a graphical representation of your data model is shown in the bottom portion of the screen, which is called the diagram view. If you prefer working graphically, you can actually build your entire model in the diagram view. Right-clicking the background of the diagram view will bring up a contextual menu that will allow you to add entities and change the diagram view's appearance. Right-clicking an entity will bring up a menu that allows you to add properties to the selected entity. We're going to stick with the browser view in this chapter because it's easier to explain, but when you're creating your own data models, feel free to work in the diagram view if that approach suits you better.

Figure 11.9. Xcode's data model editor's diagram view shows an editable graphical representation of your data model.
The upper-right pane of the data model editor is called the detail pane. Part of the reason we had you close Xcode's detail pane a minute ago was to avoid confusion caused by having two unrelated detail panes. Throughout the rest of the chapter, when we refer to the detail pane, we'll be referring to the data model editor's detail pane (see Figure 11-10), not Xcode's detail pane. The data model editor's detail pane allows you to edit the currently selected entity or property.
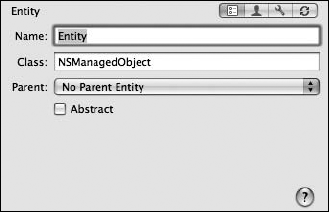
At the moment, the detail pain shows information about the entity we just added. Change the Name field from Entity to Line. You can ignore the other fields in the detail pane for now. Those other fields will come into play when creating more complex data models, like those discussed in More iPhone 3 Development.
The data model editor's upper-middle pane is the property pane (see Figure 11-11). As its name implies, the property pane allows you to add new properties to your entity.
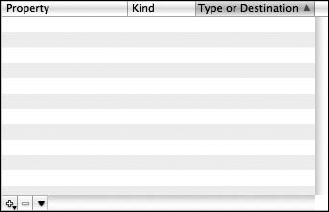
Figure 11.11. The property pane in Xcode's data model editor. This is where you can add properties to the currently selected entity.
Notice that plus sign in the lower-left corner of the property pane features a little black triangle. If you click the triangle and hold the mouse button down, a pop-up menu will appear, allowing you to add an attribute, fetched property, relationship, or fetch request to your entity (see Figure 11-12).
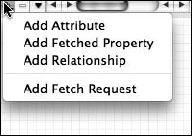
Select Add Attribute from the menu that popped up. A new attribute creatively named newAttribute should have just been added to your properties pane and selected. In the detail pane, change the new attribute's name from newAttribute to lineNum and change its Type from Undefined to Integer 16, which turns this attribute into one that will hold an integer value. We will be using this attribute to identify which of the four fields the managed object holds data for. Since we only have four options, we selected the smallest integer type available.
There are three checkboxes below the Name field. The leftmost one, Optional, should currently be selected. Click it to deselect it; we don't want this attribute to be optional. A line that doesn't correspond to a label on our interface is useless. Don't worry about the other two checkboxes for now. Transient attributes are used to store nonstandard objects for which there is no predefined attribute type. Selecting the Indexed checkbox will cause an index in the underlying SQL database to get created on the field that holds this attribute's data.
Click the plus-icon, and select Add Attribute again, this time creating an attribute with the name lineText and changing its Type to String. This attribute will hold the actual data from the text field. Leave the Optional checkbox checked for this one; it is altogether possible that the user won't enter a value for a given field.
When you changed the Type to String, you'll notice that additional options came up that would let you set a default value or limit the length of the string. We won't be using any of those options for this application, but it's nice to know they're there.
Guess what? Your data model is done. That's all there is to it. Core Data lets you point and click your way to an application data model. Let's finish building the application so we can see how to use our data model from our code.
Because we selected the window-based application template, we weren't provided with a view controller. So single-click the Classes folder, and press
Single-click PersistenceViewController.h, and make the following changes, which should look very familiar to you:
#import <UIKit/UIKit.h>

@interface PersistenceViewController : UIViewController {
    UITextField *line1;
    UITextField *line2;
    UITextField *line3;
    UITextField *line4;
}
@property (nonatomic, retain) IBOutlet UITextField *line1;
@property (nonatomic, retain) IBOutlet UITextField *line2;
@property (nonatomic, retain) IBOutlet UITextField *line3;
@property (nonatomic, retain) IBOutlet UITextField *line4;
@end
Save, and double-click PersistenceViewController.xib to open Interface Builder. Design the view, and connect the outlets by following the instructions from earlier in this chapter in the "Designing the Persistence Application View" section. Once you're done, save the nib file, and go back to Xcode.
In PersistenceViewController.m, insert the following code at the top of the file:
#import "PersistenceViewController.h"#import "Core_Data_PersistenceAppDelegate.h"@implementation PersistenceViewController@synthesize line1;@synthesize line2;@synthesize line3;@synthesize line4;- (void)applicationWillTerminate:(NSNotification *)notification {Core_Data_PersistenceAppDelegate *appDelegate =[[UIApplication sharedApplication] delegate];NSManagedObjectContext *context = [appDelegate managedObjectContext];NSError *error;for (int i = 1; i <= 4; i++) {NSString *fieldName = [NSString stringWithFormat:@"line%d", i];UITextField *theField = [self valueForKey:fieldName];NSFetchRequest *request = [[NSFetchRequest alloc] init];NSEntityDescription *entityDescription = [NSEntityDescriptionentityForName:@"Line"inManagedObjectContext:context];[request setEntity:entityDescription];NSPredicate *pred = [NSPredicatepredicateWithFormat:@"(lineNum = %d)", i];[request setPredicate:pred];NSManagedObject *theLine = nil;NSArray *objects = [context executeFetchRequest:requesterror:&error];if (objects == nil) {NSLog(@"There was an error!");// Do whatever error handling is appropriate}if ([objects count] > 0)theLine = [objects objectAtIndex:0];elsetheLine = [NSEntityDescription
insertNewObjectForEntityForName:@"Line"inManagedObjectContext:context];[theLine setValue:[NSNumber numberWithInt:i] forKey:@"lineNum"];[theLine setValue:theField.text forKey:@"lineText"];[request release];}[context save:&error];}- (void)viewDidLoad {Core_Data_PersistenceAppDelegate *appDelegate =[[UIApplication sharedApplication] delegate];NSManagedObjectContext *context = [appDelegate managedObjectContext];NSEntityDescription *entityDescription = [NSEntityDescriptionentityForName:@"Line"inManagedObjectContext:context];NSFetchRequest *request = [[NSFetchRequest alloc] init];[request setEntity:entityDescription];NSError *error;NSArray *objects = [context executeFetchRequest:request error:&error];if (objects == nil) {NSLog(@"There was an error!");// Do whatever error handling is appropriate}for (NSManagedObject *oneObject in objects) {NSNumber *lineNum = [oneObject valueForKey:@"lineNum"];NSString *lineText = [oneObject valueForKey:@"lineText"];NSString *fieldName = [NSStringstringWithFormat:@"line%@", lineNum];UITextField *theField = [self valueForKey:fieldName];theField.text = lineText;}[request release];UIApplication *app = [UIApplication sharedApplication];[[NSNotificationCenter defaultCenter] addObserver:selfselector:@selector(applicationWillTerminate:)name:UIApplicationWillTerminateNotificationobject:app];[super viewDidLoad];}...
Then, insert the following code into the existing dealloc and viewDidUnload methods:
...
- (void)viewDidUnload {
        // Release any retained subviews of the main view.
    // e.g. self.myOutlet = nil;
    self.line1 = nil;
    self.line2 = nil;
    self.line3 = nil;
    self.line4 = nil;
    [super viewDidUnload];
}

- (void)dealloc {
    [line1 release];
    [line2 release];
    [line3 release];
    [line4 release];
    [super dealloc];
}
...
Let's look at applicationWillTerminate: first. The first thing we do in that method is to get a reference to our application delegate, which we then use to get the managed object context that was created for us.
Core_Data_PersistenceAppDelegate *appDelegate =
    [[UIApplication sharedApplication] delegate];
NSManagedObjectContext *context = [appDelegate managedObjectContext];
After that, we go into a loop that executes four times, one for each label.
for (int i = 1; i <= 4; i++) {We construct the name of one of the four fields by appending i to the word "line" and use that to get a reference to the correct field using valueForKey:.
NSString *fieldName = [NSString stringWithFormat:@"line%d", i];
UITextField *theField = [self valueForKey:fieldName];
Next, we create our fetch request:
NSFetchRequest *request = [[NSFetchRequest alloc] init];
After that, we create an entity description that describes the Line entity we designed earlier in the data model editor and that uses the context we retrieved from the application delegate. Once we create it, we feed it to the fetch request, so the request knows what type of entity to look for.
NSEntityDescription *entityDescription = [NSEntityDescription
             entityForName:@"Line"
    inManagedObjectContext:context];
[request setEntity:entityDescription];
Next, we need to find out if there's already a managed object in the persistent store that corresponds to this field, so we create a predicate that identifies the right object for the field:
NSPredicate *pred = [NSPredicate
    predicateWithFormat:@"(lineNum = %d)", i];
[request setPredicate:pred];
After that, we declare a pointer to an NSManagedObject and set it to nil. We do this because we don't know yet if we're going to load a managed object from the persistent store or create a new one. We also declare an NSError that the system will use to notify us of the specific nature of the problem if we get back a nil array.
NSManagedObject *theLine = nil;
NSError *error;
Next, we execute the fetch request against the context:
NSArray *objects = [context executeFetchRequest:request
    error:&error];
Then, we check to make sure that objects is not nil. If it is nil, then there was an error and we should do whatever error checking is appropriate for our application. For this simple application, we're just logging the error and moving on.
if (objects == nil) {
    NSLog(@"There was an error!");
    // Do whatever error handling is appropriate
}
After that, we look to see if an object was returned that matched our criteria, and if there is one, we load it. If there isn't one, we create a new managed object to hold this field's text.
if ([objects count] > 0)
    theLine = [objects objectAtIndex:0];
else
    theLine = [NSEntityDescription
        insertNewObjectForEntityForName:@"Line"
                 inManagedObjectContext:context];
Then, we use key-value coding to set the line number and text for this managed object:
[theLine setValue:[NSNumber numberWithInt:i] forKey:@"lineNum"];
    [theLine setValue:theField.text forKey:@"lineText"];
    [request release];
}
Finally, once we're done looping, we tell the context to save its changes:
[context save:&error];
}
Now, let's look at the viewDidLoad method, which needs to see if there is any existing data in the persistent store and, if there is, load the data in and populate the fields with it. We start out the same way as the last method, by getting a reference to the application delegate and using that to get a pointer to our application's default context:
Core_Data_PersistenceAppDelegate *appDelegate =
    [[UIApplication sharedApplication] delegate];
NSManagedObjectContext *context = [appDelegate managedObjectContext];
Next, we create an entity description that describes our entity:
NSEntityDescription *entityDescription = [NSEntityDescription
             entityForName:@"Line"
    inManagedObjectContext:context];
The next order of business is to create a fetch request and pass it the entity description so it knows what type of objects to retrieve:
NSFetchRequest *request = [[NSFetchRequest alloc] init];
[request setEntity:entityDescription];
Since we want to retrieve all Line objects in the persistent store, we do not create a predicate. By executing a request without a predicate, we're telling the context to give us every Line object in the store.
NSError *error;
NSArray *objects = [context executeFetchRequest:request error:&error];
We make sure we got a valid array back, and log it if we didn't.
if (objects == nil) {
    NSLog(@"There was an error!");
    // Do whatever error handling is appropriate
}
Next, we use fast enumeration to loop through the array of retrieved managed objects, pull out the lineNum and lineText values from it, and use that information to update one of the text fields on our user interface.
for (NSManagedObject *oneObject in objects) {
    NSNumber *lineNum = [oneObject valueForKey:@"lineNum"];
    NSString *lineText = [oneObject valueForKey:@"lineText"];

    NSString *fieldName = [NSString stringWithFormat:@"line%@",
        lineNum];
    UITextField *theField = [self valueForKey:fieldName];
    theField.text = lineText;
}
[request release];
Then, just like with all the other applications in this chapter, we register to be notified when the application is about to terminate so we can save any changes the user has made to the data:
UIApplication *app = [UIApplication sharedApplication];
[[NSNotificationCenter defaultCenter] addObserver:self
    selector:@selector(applicationWillTerminate:)
        name:UIApplicationWillTerminateNotification
      object:app];
[super viewDidLoad];Because we used the window-based application template instead of the view-based application template, we have one more step we need to take before our fancy new Core Data application will work: We need to create an instance of PersistenceViewController to act as our application's root controller and add its view as a subview of our application's main window. Let's do that now.
The first thing we need is an outlet to the view controller in our application delegate. Single-click Core_Data_PersistenceAppDelegate.h, and make the following changes to declare that outlet:
@class PersistenceViewController;@interface Core_Data_PersistenceAppDelegate : NSObject <UIApplicationDelegate> { NSManagedObjectModel *managedObjectModel; NSManagedObjectContext *managedObjectContext; NSPersistentStoreCoordinator *persistentStoreCoordinator; UIWindow *window;PersistenceViewController *rootController;}
- (IBAction)saveAction:sender;

@property (nonatomic, retain, readonly) NSManagedObjectModel
    *managedObjectModel;
@property (nonatomic, retain, readonly) NSManagedObjectContext
*managedObjectContext;
@property (nonatomic, retain, readonly) NSPersistentStoreCoordinator
*persistentStoreCoordinator;

@property (nonatomic, readonly) NSString *applicationDocumentsDirectory;

@property (nonatomic, retain) IBOutlet UIWindow *window;
@property (nonatomic, retain) IBOutlet PersistenceViewController
    *rootController;

@end
To make the root controller's view a subview of the application's window so that the user can interact with it, single-click Core_Data_PersistenceAppDelegate.m, and make the following changes at the top of that file:
#import "Core_Data_PersistenceAppDelegate.h"#import "PersistenceViewController.h"@implementation Core_Data_PersistenceAppDelegate @synthesize window;@synthesize rootController;#pragma mark - #pragma mark Application lifecycle - (void)applicationDidFinishLaunching:(UIApplication *)application { // Override point for customization after app launch[window addSubview:rootController.view];[window makeKeyAndVisible]; } ...
Finally, we need to go back to Interface Builder to create the instance of our root controller and connect it to that outlet we just created. Double-click MainWindow.xib to launch Interface Builder. Once it's finished launching, drag a View Controller from the library, and drop it onto the nib's main window, the one titled MainWindow.xib. The new view controller's icon should still be selected (if it's not, just single-click the icon called View Controller). Press
That's it; we're done. Build and run to make sure it works. The Core Data version of your application should behave exactly the same as the previous versions.
And that's all there is to it. It may seem that Core Data entails a lot of work and, for a simple application like this, doesn't offer much of an advantage. But in more complex applications, Core Data can substantially decrease the amount of time you spend designing and writing your data model.
You should now have a solid handle on four different ways of preserving your application data between sessions—five ways if you include the user defaults that you learned how to use in the previous chapter. We built an application that persisted data using property lists and modified the application to save its data using object archives. We then made a change and used the iPhone's built-in SQLite3 mechanism to save the application data. Finally, we rebuilt the same application using Core Data. These mechanisms are the basic building blocks for saving and loading data in almost all iPhone applications.
Ready for more? Time to drag out your crayons, because in the next chapter, you're going to learn how to draw. Cool!