
By now, it should come as no surprise to you that the iPhone has a built-in camera (which the current iPod touch unfortunately lacks) and a nifty application called Photos to help you manage all those awesome pictures you've taken. What you may not know is that your programs can use the built-in camera to take pictures and that your programs can also allow the user to select pictures from among the photos already on the iPhone.
Because of the way iPhone applications are sandboxed, applications ordinarily can't get to photographs or other data that lives outside of their own sandboxes. Fortunately, both the camera and the image library are made available to your application by way of an image picker. As the name implies, an image picker is a mechanism that lets you select an image from a specified source. Typically, an image picker will use a list of images as its source (see the picture on the left of Figure 16-1). You can, however, specify that the picker use the camera as its source (see the picture on the right of Figure 16-1).

The image picker interface is implemented by way of a modal controller class called UIImagePickerController. You create an instance of this class, specify a delegate (as if you didn't see that coming), specify its image source, and then launch it modally. The image picker will then take control of the iPhone to let the user either select a picture from an existing set of images or take a new picture with the camera. Once the user takes or selects the image, you can allow an opportunity to do some basic editing, such as scaling or cropping, on the selected image. Assuming the user doesn't press cancel, the image the user takes or selects from the library will be delivered to your delegate.
Regardless of whether an image is selected or canceled, your delegate has the responsibility to dismiss the UIImagePickerController so that the user can return to your application.
Creating a UIImagePickerController is extremely straightforward. You just allocate and initialize an instance the way you would with most classes. There is one catch, however. Not every device that runs the iPhone OS has a camera. The iPod touch is the first example of this, but more such devices may roll off Apple's assembly lines in the future. Before you create an instance of UIImagePickerController, you need to check to see whether the device your program is currently running on supports the image source you want to use. For example, before letting the user take a picture with the camera, you should make sure the program is running on a device that has a camera. You can check that by using a class method on UIImagePickerController, like this:
if ([UIImagePickerController isSourceTypeAvailable:
    UIImagePickerControllerSourceTypePhotoLibrary]) {
In this example, we're passing UIImagePickerControllerSourceTypePhotoLibrary to indicate that we want to let the user pick one of the images out of the library of existing photographs. The method isSourceTypeAvailable: will return YES if the specified source is currently available. There are two other values you can specify, in addition to UIImagePickerControllerSourceTypePhotoLibrary:
UIImagePickerControllerSourceTypeCameraspecifies that the user will take a picture using the built-in camera. That image will be returned to your delegate.UIImagePickerControllerSourceTypeSavedPhotosAlbumspecifies that the user will select the image from the library of existing photographs but that the selection will be limited to the most recent camera roll. This option will run on an iPod touch but does not do anything useful.
After making sure that the device your program is running on supports the image source you want to use, launching the image picker is relatively easy:
UIImagePickerController *picker = [[UIImagePickerController alloc] init];
picker.delegate = self;
picker.sourceType = UIImagePickerControllerSourceTypePhotoLibrary;
[self presentModalViewController:picker animated:YES];
[picker release];
After we've created and configured the UIImagePickerController, we use a method that our class inherited from UIView called presentModalViewController:animated: to present the image picker to the user.
Tip
The presentModalViewController:animated: method is not limited to just presenting image pickers; you can present any view controller to the user, modally, by calling this method on the view controller for a currently visible view.
The object that you want to be notified when the user has finished using the image picker interface needs to conform to the UIImagePickerControllerDelegate protocol, which defines two methods, imagePickerController:didFinishPickingImage:editingInfo: and imagePickerControllerDidCancel:.
The first of these methods, imagePickerController:didFinishPickingImage:editingInfo:, gets called when the user has successfully taken a photo or selected one from the photo library. The first argument is a pointer to the UIImagePickerController that you created earlier. The second argument is a UIImage instance containing the actual photo the user selected. The last argument is an NSDictionary instance that will be passed in if you enabled editing and the user cropped or scaled the image. That dictionary will contain the original, unedited image stored under the key UIImagePickerControllerOriginalImage. Here's an example delegate method that retrieves the original image:
- (void)imagePickerController:(UIImagePickerController *)picker
        didFinishPickingImage:(UIImage *)image
        editingInfo:(NSDictionary *)editingInfo {

    UIImage *selectedImage = image;
    UIImage *originalImage = [editingInfo objectForKey:
    UIImagePickerControllerOriginalImage];

    // do something with selectedImage and originalImage

    [picker dismissModalViewControllerAnimated:YES];
}
The editingInfo dictionary will also tell you which portion of the entire image was chosen during editing by way of an NSValue object stored under the key UIImagePickerControllerCropRect. You can convert this string into a CGRect like so:
NSValue *cropRect = [editingInfo
        objectForKey:UIImagePickerControllerCropRect];
    CGRect theRect = [cropRect CGRectValue];
After this conversion, theRect will specify the portion of the original image that was selected during the editing process. If you do not need this information, you can just ignore it.
Warning
If the image returned to your delegate comes from the camera, that image will not get stored in the photo library. It is your application's responsibility to save the image if necessary.
The other delegate method, imagePickerControllerDidCancel:, gets called if the user decides to cancel the process without taking or selecting a picture. When the image picker calls this delegate method, it's just notifying you that the user is finished with the picker and did not choose an image.
Both of the methods in the UIImagePickerControllerDelegate protocol are marked as optional, but they really aren't, and here is why: modal views like the image picker have to be told to dismiss themselves. As a result, even if you don't need to take any application-specific actions when the user cancels an image picker, you still need to dismiss the picker. At a bare minimum, your imagePickerControllerDidCancel: method will need to look like this in order for your program to function correctly:
- (void)imagePickerControllerDidCancel:(UIImagePickerController *)picker {

    [picker dismissModalViewControllerAnimated:YES];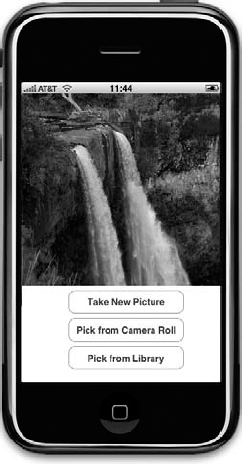
}In this chapter, we're going to build an application that lets the user take a picture with the camera or select one from their photo library and then display the selected picture in an image view (see Figure 16-2). If the user is on a device without a camera, we will hide the Take Picture button and the Pick from Library button and only allow selection from the photo library.
Create a new project in Xcode using the view-based application template, naming the application Camera. We'll need a couple of outlets in this application. We need one to point to the image view so that we can update it with the image returned from the image picker, and we'll also need outlets to point to the Take New Picture button and the Select from Camera Roll button, so we can hide both of these buttons if the device doesn't have a camera. We also need two action methods, one that will be used for both the Take New Picture and Select from Camera Roll buttons and a separate one for letting the user select an existing picture from the photo library. Expand the Classes and Resources folders so that you can get to all the relevant files.
Single-click CameraViewController.h, and make the following changes:
#import <UIKit/UIKit.h>

@interface CameraViewController : UIViewController
       <UIImagePickerControllerDelegate, UINavigationControllerDelegate> {
    UIImageView *imageView;
    UIButton *takePictureButton;
    UIButton *selectFromCameraRollButton;
}
@property (nonatomic, retain) IBOutlet UIImageView *imageView;
@property (nonatomic, retain) IBOutlet UIButton *takePictureButton;
@property (nonatomic, retain) IBOutlet UIButton
    *selectFromCameraRollButton;
- (IBAction)getCameraPicture:(id)sender;
- (IBAction)selectExistingPicture;
@end
The first thing you might notice is that we've actually conformed our class to two different protocols: UIImagePickerControllerDelegate and UINavigationControllerDelegate. Because UIImagePickerController is a subclass of UINavigationController, we have to conform our class to both of these protocols. The methods in UINavigationControllerDelegate are both optional, and we don't need either of them to use the image picker, but we need to conform to the protocol or the compiler will give us a warning. Everything else here is pretty straightforward, so save it. Now, double-click CameraViewController.xib to open the file in Interface Builder.
Drag three Round Rect Buttons from the library over to the window labeled View. Place them one above the next. Double-click the top one, and give it a title of Take New Picture. Double-click the middle one, and give it a title of Pick from Camera Roll. Then double-click the bottom button, and give it a title of Pick from Library. Next, drag an Image View from the library, and place it above the buttons. Expand it to take the entire space of the view above the buttons, as shown in Figure 16-2.
Now, control-drag from the File's Owner icon to the image view, and select the imageView outlet. Drag again from File's Owner to the Take New Picture button, and select the takePictureButton outlet. Finally, drag from File's Owner to the Pick from Camera Roll button, and select the selectFromCameraRollButton outlet.
Next, select the Take New Picture button, and press
Single-click CameraViewController.m, and make the following changes at the beginning of the file:
#import "CameraViewController.h" @implementation CameraViewController@synthesize imageView;@synthesize takePictureButton;@synthesize selectFromCameraRollButton;- (void)viewDidLoad {if (![UIImagePickerController isSourceTypeAvailable:UIImagePickerControllerSourceTypeCamera]) {takePictureButton.hidden = YES;selectFromCameraRollButton.hidden = YES;}}...
Next, insert the following lines of code into the existing viewDidUnload and dealloc methods:
...
- (void)viewDidUnload {
    // Release any retained subviews of the main view.
    // e.g. self.myOutlet = nil;
    self.imageView = nil;
    self.takePictureButton = nil;
    self.selectFromCameraRollButton = nil;
    [super viewDidUnload];
}

- (void)dealloc {
    [imageView release];
    [takePictureButton release];
    [selectFromCameraRollButton release];
    [super dealloc];
}
...
Now insert the following methods at the end of the file:
...#pragma mark -- (IBAction)getCameraPicture:(id)sender {UIImagePickerController *picker =[[UIImagePickerController alloc] init];picker.delegate = self;picker.allowsImageEditing = YES;picker.sourceType = (sender == takePictureButton) ?UIImagePickerControllerSourceTypeCamera :UIImagePickerControllerSourceTypeSavedPhotosAlbum;[self presentModalViewController:picker animated:YES];[picker release];}- (IBAction)selectExistingPicture {if ([UIImagePickerController isSourceTypeAvailable:UIImagePickerControllerSourceTypePhotoLibrary]) {UIImagePickerController *picker =[[UIImagePickerController alloc] init];picker.delegate = self;picker.sourceType = UIImagePickerControllerSourceTypePhotoLibrary;[self presentModalViewController:picker animated:YES];[picker release];}else {UIAlertView *alert = [[UIAlertView alloc]initWithTitle:@"Error accessing photo library"message:@"Device does not support a photo library"delegate:nilcancelButtonTitle:@"Drat!"otherButtonTitles:nil];[alert show];[alert release];}}#pragma mark -- (void)imagePickerController:(UIImagePickerController *)pickerdidFinishPickingImage:(UIImage *)imageeditingInfo:(NSDictionary *)editingInfo {imageView.image = image;[picker dismissModalViewControllerAnimated:YES];}
- (void)imagePickerControllerDidCancel:(UIImagePickerController *)picker {[picker dismissModalViewControllerAnimated:YES];}@end
The first method we wrote was viewDidLoad:, and all we do there is check to see whether we're running on a device that has a camera:
if (![UIImagePickerController isSourceTypeAvailable:
          UIImagePickerControllerSourceTypeCamera]){
If we're running a device without a camera, we hide the two camera-dependent buttons:
takePictureButton.hidden = YES;
     selectFromCameraRollButton.hidden = YES;
}
In our first action method, getCameraPicture:, we allocate and initialize a UIImagePickerController instance:
UIImagePickerController *picker =
    [[UIImagePickerController alloc] init];
We then assign self as the image picker's delegate and specify that the user is allowed to edit the image after taking it:
picker.delegate = self;
picker.allowsImageEditing = YES;
Next, we set the sourceType based on which button was pressed. If the user tapped the Take New Picture button, we tell the picker to allow use of the camera. If the user tapped the Pick from Camera Roll button, we use UIImagePickerControllerSourceTypeSavedPhotosAlbum, which, on a device with a camera, lets the user choose from the current camera roll.
picker.sourceType = (sender == takePictureButton) ?
            UIImagePickerControllerSourceTypeCamera :
            UIImagePickerControllerSourceTypeSavedPhotosAlbum;
Finally, we present the image picker modally and release the instance:
[self presentModalViewController:picker animated:YES];
[picker release];
We didn't bother to check again to see whether this device supports the camera, because we know that the buttons that trigger this action method will not be visible if it doesn't. This method should never get called on a device that doesn't have a camera.
Our second action method is similar to the first one. This is where we allow the user to select an image from a photo library. If the photo library exists, we create an image picker with a sourceType of UIImagePickerControllerSourceTypePhotoLibrary.
if ([UIImagePickerController isSourceTypeAvailable:
    UIImagePickerControllerSourceTypePhotoLibrary]) {
    UIImagePickerController *picker =
            [[UIImagePickerController alloc] init];
    picker.delegate = self;
    picker.sourceType = UIImagePickerControllerSourceTypePhotoLibrary;
    [self presentModalViewController:picker animated:YES];
    [picker release];
}
If the device doesn't have a photo library, we show an error alert. Note that having an empty photo library is not the same as having no photo library. All current iPhone OS devices support a photo library, so this code should never fire, but it's a good idea to code defensively like this, since showing an alert is much kinder than crashing unexpectedly.
else {
    UIAlertView *alert = [[UIAlertView alloc]
    initWithTitle:@"Error accessing photo library"
          message:@"Device does not support a photo library"
         delegate:nil
    cancelButtonTitle:@"Drat!"
    otherButtonTitles:nil];
        [alert show];
        [alert release];
    }
Next up are our two delegate methods. Let's look first at imagePickerController:didFinishPickingImage:editingInfo, which gets called when the user is done using the image picker. This same method will get called when the user has selected a picture, regardless of which source type was used. All we do in this method is set our imageView to display the returned image:
imageView.image = image;
After that, we tell the picker to dismiss itself so that the user is returned to our application view:
[picker dismissModalViewControllerAnimated:YES];
This last step of dismissing the modal view controller is repeated in imagePickerControllerDidCancel:. We don't need to do anything else if the user cancels, but we do need the image picker to go away, or the image picker will just sit there getting in the way of our application's view.
That's all we need to do. We don't even need to link in any additional libraries this time. Compile and run. If you're running on the simulator, you won't have the option to take a new picture. If you have the opportunity to run on a real device, go ahead and try it. You should be able to take a new picture and zoom in and out of the picture using the pinch gestures (see Figure 16-3).

Figure 16.3. If you set allowsEditing to YES, the user will be able to zoom and crop images before returning to our application.
If you zoom in before hitting the Use Photo button, the image that gets returned to our application in the delegate method will be the cropped image.
Believe it or not, that's all there is to letting your users take pictures with the iPhone's camera so that the pictures can be used by your application. You can even let the user do a small amount of editing on that image if you so choose.
In the next chapter, we're going to look at reaching a larger audience for your iPhone applications by making them oh so easy to translate into other languages. Êtes-vous prêt? Tournez la page et allez directement. Allez, allez!