Besides displaying data or letting users input data, the second most important purpose of a user interface is to allow users to control an app. At the simplest level, users can use buttons where each button represents a single command. Of course if you want to display multiple options, displaying multiple buttons on the screen can get crowded.
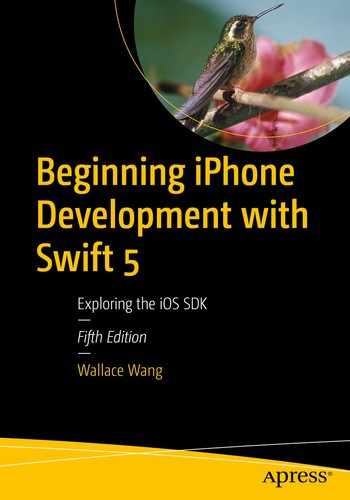
Comparing the visual appearance of a button, switch, and segmented control
Understanding Events
User interface objects that represent commands, such as buttons, switches, and segmented controls, respond to events. The simplest event occurs when the user taps or touches inside an object. A more complicated event might occur when the user drags or slides a finger inside an object.
All types of user interface objects can respond to events such as when the user taps on an object such as a button. The combination of an object plus an event defines an IBAction method. If you want an object to respond to two different events, you’ll need to create two different IBAction methods for that particular object.
Touch Up Inside – A tap inside the bounds of an object with the finger lifting up
Touch Up Outside – A tap outside the bounds of an object
Touch Down – A tap inside the bounds of an object
Touch Down Repeat – Two or more taps inside the bounds of an object
Touch Drag Enter – Where a finger touches outside the object and slides over the object
Touch Drag Exit – Where a finger touches inside an object and slides away from it
Touch Drag Inside – Where a finger slides inside an object
Touch Drag Outside – Where a finger slides just outside an object
Value Changed – Where manipulating an object changes its stored value such as with a slider
Editing Changed – When text changes inside a text field
Editing Did Begin – When a finger taps inside a text field
Editing Did End – When a finger taps outside a text field
By choosing which events a particular object can respond to, you can allow the user to interact with user interface objects in different and unique ways. In most cases, user interface objects only need to respond to the most likely event such as Touch Up Inside, which detects when the user taps an object.
Using Buttons
In the Attributes Inspector pane
By double-clicking the button
Through Swift code
- 1.
Create a new iOS project using the Single View App template (see Chapter 1) and name this new project ControlApp. This creates a single view for the user interface.
- 2.
Click the Main.storyboard file in the Navigator pane. Xcode displays the single view.
- 3.
Click the Library icon to open the Object Library window.
- 4.
Drag and drop a button anywhere on the view. By default, the title on a button displays “Title”.
- 5.
Choose View ➤ Inspectors ➤ Show Attributes Inspector.
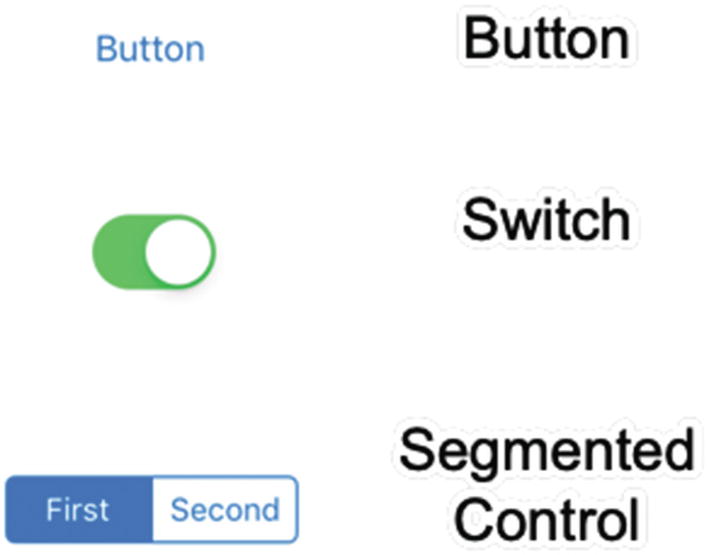
- 6.Click in the Title text field as shown in Figure 10-2, delete the existing text (“Title”), and type Cancel. Then press ENTER. Notice that Xcode now displays the word “Cancel” on the button.
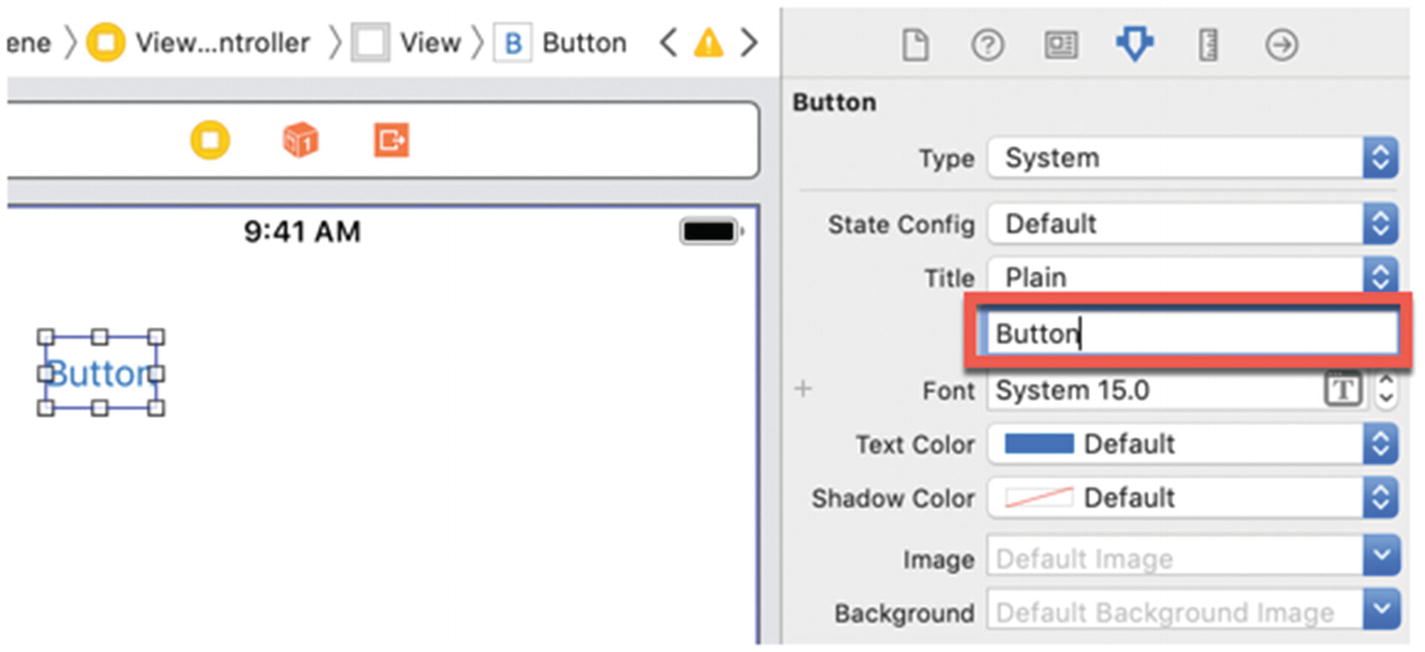 Figure 10-2
Changing the title of a button in the Attributes Inspector
- 7.
Double-click the button to select the title.
- 8.
Type Done and press ENTER. Notice that now the button displays Done.
- 9.
Choose Editor ➤ Resolve Auto Layout Issues ➤ Set to Suggested Constraints. Xcode adds constraints to your button.
- 10.
Choose View ➤ Assistant Editor ➤ Show Assistant Editor. Xcode displays the Main.storyboard and ViewController.swift file side by side.
- 11.
Move the mouse pointer over the button, hold down the Control key, and Ctrl-drag from the image view to the ViewController.swift file underneath the “class ViewController” line.
- 12.
Release the Control key and the left mouse button. A popup window appears.
- 13.
Click in the Name text field, type buttonObject, and click the Connect button. Xcode creates an IBOutlet variable as follows:
@IBOutlet var buttonObject: UIButton! - 14.
Move the mouse pointer over the button, hold down the Control key, and Ctrl-drag from the image view to the ViewController.swift file above the last curly bracket at the bottom of the file.
- 15.Release the Control key and the left mouse button. A popup window appears. Notice that the Event popup menu already chooses the Touch Up Inside event by default as shown in Figure 10-3.
 Figure 10-3
The Event popup menu displays Touch Up Inside by default for buttons
- 16.
Click in the Name text field, type touchInside, click in the Type popup menu and choose UIButton, and click the Connect button. Xcode creates an IBAction method.
- 17.Edit this touchInside IBAction method as follows:@IBAction func touchInside(_ sender: UIButton) {buttonObject.setTitle("New", for: UIControl.State.normal)}
This IBAction runs every time the user taps on the button, and the Swift code changes the button title to “New”. By using setTitle, your Swift code can change a button’s title while your app runs.
The entire ViewController.swift file should look like this:import UIKitclass ViewController: UIViewController {@IBOutlet var buttonObject: UIButton!override func viewDidLoad() {super.viewDidLoad()// Do any additional setup after loading the view, typically from a nib.}@IBAction func touchInside(_ sender: UIButton) {buttonObject.setTitle("New", for: UIControl.State.normal)}} - 18.
Click the Run button or choose Product ➤ Run. The Simulator screen appears. Notice that the button title currently displays Done.
- 19.
Click the button. Notice that the button title now changes to “New”.
- 20.
Choose Simulator ➤ Quit Simulator to return to Xcode.
Using a Switch
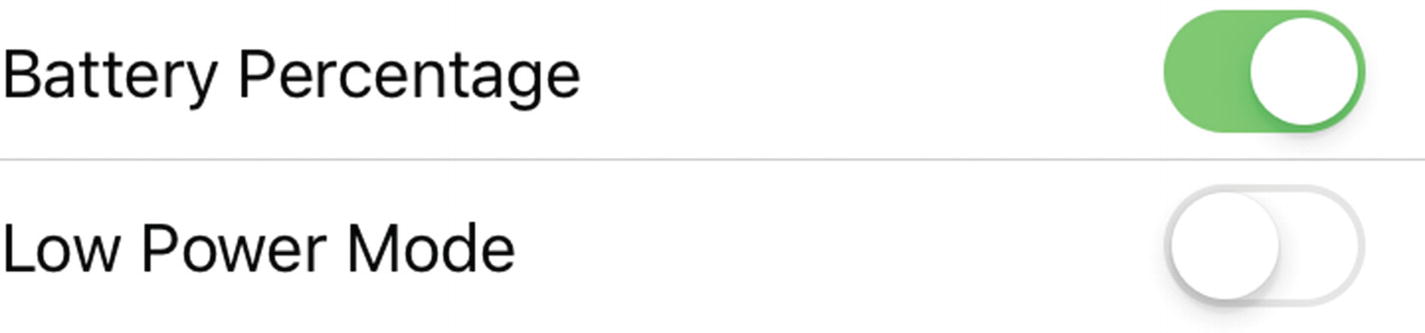
Switches are often used to turn settings on or off
isOn – Determines if a switch has a value of true (on) or false (off)
onTintColor – Determines the color to display when a switch’s isOn property is true (on)
tintColor – Determines the color to display when a switch’s isOn property is false (off)
- 1.
Make sure your ControlApp project is loaded in Xcode.
- 2.
Click the Main.storyboard file in the Navigator pane. Xcode displays the single view.
- 3.
Click the Library icon to open the Object Library window.
- 4.
Drag and drop a label and a switch on the view.
- 5.
Hold down the SHIFT key and click the switch and label to select both of them.
- 6.
Choose Editor ➤ Resolve Auto Layout Issues ➤ Reset to Suggested Constraints at the top half of the submenu. This adds constraints to switch and label.
- 7.
Choose View ➤ Assistant Editor ➤ Show Assistant Editor, or click the Assistant Editor icon. Xcode displays the Main.storyboard and ViewController.swift file side by side.
- 8.
Move the mouse pointer over the label, hold down the Control key, and Ctrl-drag from the label to the ViewController.swift file underneath the IBOutlet line.
- 9.
Release the Control key and the left mouse button. A popup window appears.
- 10.
Click in the Name text field, type labelSwitch, and click the Connect button. Xcode creates an IBOutlet variable as follows:
@IBOutlet var labelSwitch: UILabel!
- 11.
Move the mouse pointer over the switch, hold down the Control key, and Ctrl-drag from the button to the ViewController.swift file underneath the IBOutlet line.
- 12.
Release the Control key and the left mouse button. A popup window appears.
- 13.
Click in the Name text field, type switchObject, and click the Connect button. Xcode creates an IBOutlet variable as follows:
@IBOutlet var switchObject: UISwitch!
- 14.
Move the mouse pointer over the switch, hold down the Control key, and Ctrl-drag just above the last curly bracket at the bottom of the ViewController.swift file.
- 15.
Release the Control key and the left mouse button. A popup window appears.
- 16.Click in the Name text field, type switchChanged, click in the Type popup menu and choose UISwitch, and click the Connect button. Xcode creates an IBAction method as follows:@IBAction func switchChanged(_ sender: UISwitch) {}
- 17.Edit the switchChanged IBAction method as follows:@IBAction func switchChanged(_ sender: UISwitch) {if switchObject.isOn {labelSwitch.text = "On"} else {labelSwitch.text = "Off"}}
- 18.Edit the touchInside IBAction method as follows:@IBAction func touchInside(_ sender: UIButton) {buttonObject.setTitle("New", for: UIControl.State.normal)switchObject.onTintColor = UIColor.redswitchObject.tintColor = UIColor.blue}The touchInside IBAction changes the color of the switch. Each time you tap on the switch, it changes from on to off (or vice versa), displays the text “On” or “Off” in the labelSwitch object, and displays different on and off colors. The entire ViewController.swift file should look like this:import UIKitclass ViewController: UIViewController {@IBOutlet var buttonObject: UIButton!@IBOutlet var labelSwitch: UILabel!@IBOutlet var switchObject: UISwitch!override func viewDidLoad() {super.viewDidLoad()// Do any additional setup after loading the view, typically from a nib.}@IBAction func touchInside(_ sender: UIButton) {buttonObject.setTitle("New", for: UIControl.State.normal)switchObject.onTintColor = UIColor.redswitchObject.tintColor = UIColor.blue}@IBAction func switchChanged(_ sender: UISwitch) {if switchObject.isOn {labelSwitch.text = "On"} else {labelSwitch.text = "Off"}}}
- 19.
Choose View ➤ Standard Editor ➤ Show Standard Editor, or click the Standard Editor icon in the upper right corner of the Xcode window.
- 20.
Click the Run button or choose Product ➤ Run. The Simulator window appears.
- 21.Click the switch. Notice that each time you click the switch, it changes its appearance from on and off and displays “On” or “Off” in the label nearby as shown in Figure 10-5.
 Figure 10-5
The label displays whether a switch is on or off
- 22.
Click the button. This runs the Swift code in the touchInside IBAction method, which changes the colors of the switch.
- 23.
Click the switch. Notice that each time you click the switch, you can see the colors red and blue appear instead of the default colors.
- 24.
Chose Simulator ➤ Quit Simulator to return to Xcode.
Using a Segmented Control
A button is fine for displaying a single command, but when you need to display multiple commands, then multiple buttons can make a user interface appear cluttered. When you need to display multiple buttons in a limited amount of space, you can use a segmented control.
A segmented control can contain two or more segments where each segment acts like an individual button. You can define the number of segments through the Attributes Inspector pane, but you can also later add more segments using Swift code.
Segments – Defines the number of segments (buttons) in a segmented control
Segment – A popup menu that lets you choose which segment to modify
Title – Defines the text that appears on the segment defined by the Segment popup menu
Image – Defines an image to appear on the segment defined by the Segment popup menu
Selected – A check box that defines which segment appears selected (highlighted) where only one segment in an entire segmented control can be selected
Modifying a segmented control in the Attributes Inspector
Every segmented control identifies its different segments by an index number where the segment on the far left is at index 0, the next segment to the right is at index 1, and so on. Xcode automatically assigns an index number to each segment based on the position of that segment. You can use the segment index number to identify which segment the user taps.
- 1.
Click the Main.storyboard file in the Navigator pane. Xcode displays the storyboard user interface.
- 2.
Click the Library icon to display the Object Library window.
- 3.
Drag and drop a segmented control anywhere onto the view.
- 4.
Choose Editor ➤ Resolve Auto Layout Issues ➤ Reset to Suggested Constraints on the top half of the submenu. Xcode adds constraints to the segmented control.
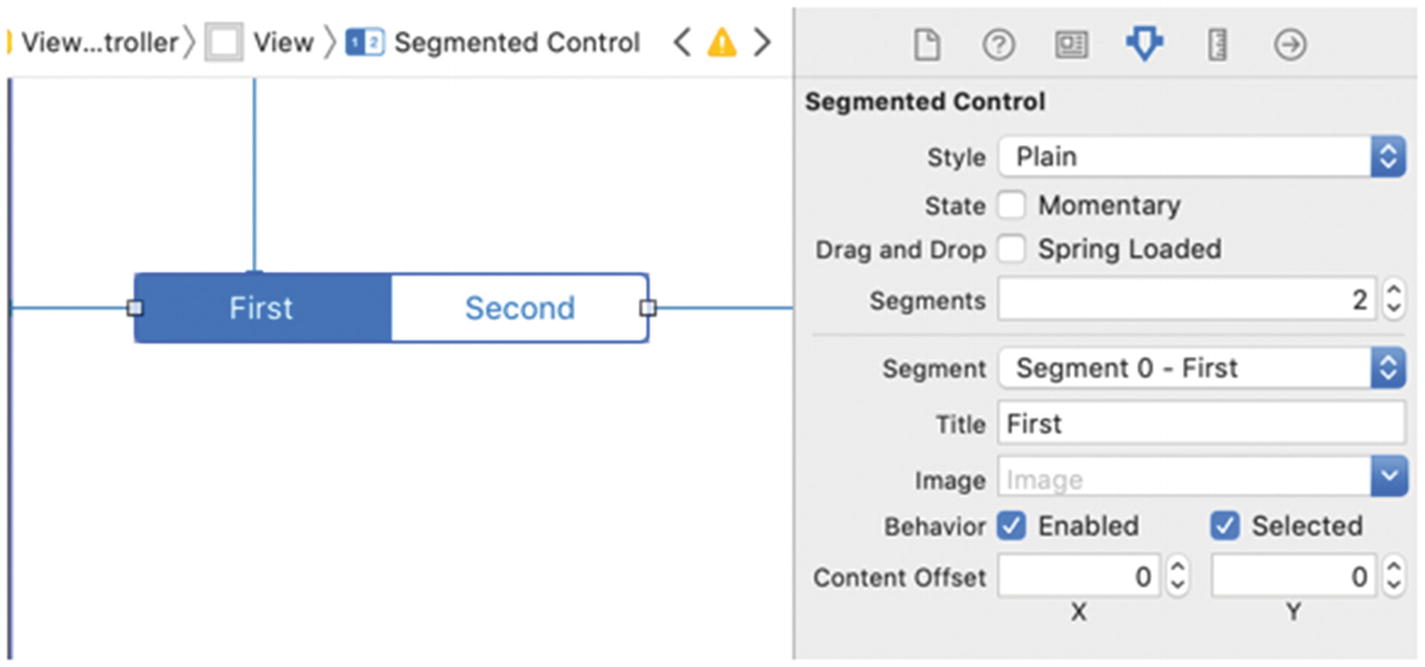
- 5.Double-click the segment labeled “First” on the left of the segmented control. Xcode highlights the title on the segment as shown in Figure 10-7.
 Figure 10-7
Double-clicking directly a segmented control title lets you edit that title
- 6.
Type One and press ENTER to replace the First label. Double-clicking directly an object that displays text is one way to modify the text. A second way is to use the Attributes Inspector pane.
- 7.
Choose View ➤ Inspectors ➤ Show Attributes Inspector, or click the Attributes Inspector icon in the upper right corner of the Xcode window.
- 8.Click in the Segment popup menu and choose Segment 1 – Second. The Title text field displays the current title for the chosen segment as shown in Figure 10-8.
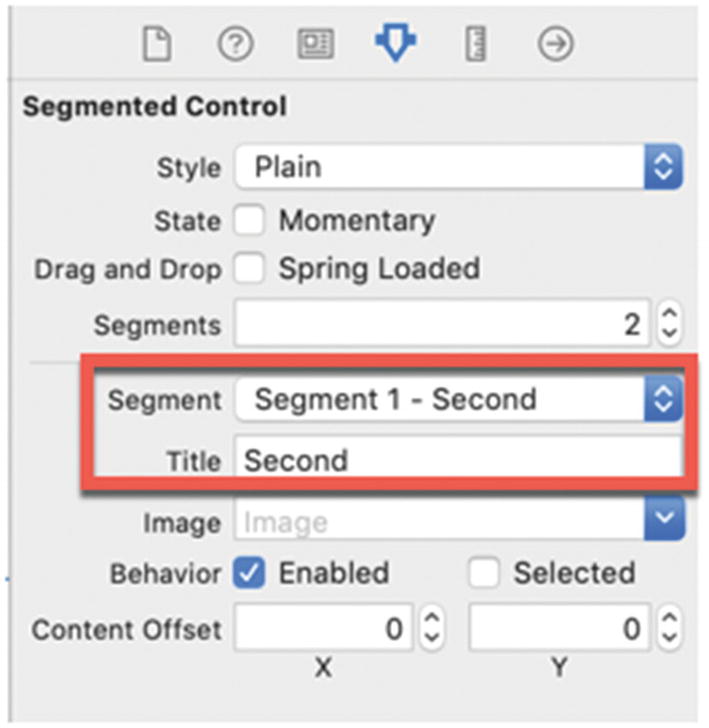 Figure 10-8
Changing a segment title in the Attributes Inspector pane
- 9.
Click in the Title text field and change the text to Two. Then press ENTER. Notice that you can change the title on each segment either by double-clicking directly the title or by changing the Title text field of the segment.
- 10.
Choose View ➤ Assistant Editor ➤ Show Assistant Editor, or click the Assistant Editor icon. Xcode displays the Main.storyboard and ViewController.swift file side by side.
- 11.
Move the mouse pointer over the segmented control, hold down the Control key, and Ctrl-drag from the segmented control to the ViewController.swift file underneath the IBOutlet line.
- 12.
Release the Control key and the left mouse button. A popup window appears.
- 13.
Click in the Name text field, type segmentedControl, and click the Connect button. Xcode creates an IBOutlet variable as follows:
@IBOutlet var segmentedControl: UISegmentedControl!
- 14.
Move the mouse pointer over the segmented control, hold down the Control key, and Ctrl-drag from the segmented control to the ViewController.swift file above the last curly bracket at the bottom of the file.
- 15.
Release the Control key and the left mouse button. A popup window appears.
- 16.
Click in the Name text field, type segmentedControlTapped, and click the Connect button. Xcode creates an IBAction method.
- 17.Modify this segmentedControlTapped IBAction method as follows:@IBAction func segmentedControlTapped(_ sender: UISegmentedControl) {switch segmentedControl.selectedSegmentIndex {case 0:labelSwitch.text = "One"case 1:labelSwitch.text = "Two"default:labelSwitch.text = "Three"}}
This segmentedControlTapped IBAction method uses the .selectedSegmentIndex property to identify which segment the user tapped. Then a switch statement determines which segment the user tapped (based on its index number) and displays One, Two, or Three in the label to identify which segment the user tapped.
- 18.Edit the viewDidLoad method as follows:override func viewDidLoad() {super.viewDidLoad()segmentedControl.insertSegment(withTitle: "Three", at: 2, animated: true)segmentedControl.setWidth(50, forSegmentAt: 0)segmentedControl.setWidth(50, forSegmentAt: 1)segmentedControl.setWidth(50, forSegmentAt: 2)// Do any additional setup after loading the view, typically from a nib.}This Swift code adds a third segment to the existing segmented control and it sets the width of each segment in the segmented control. The entire ViewController.swift file should look like this:import UIKitclass ViewController: UIViewController {@IBOutlet var buttonObject: UIButton!@IBOutlet var labelSwitch: UILabel!@IBOutlet var switchObject: UISwitch!@IBOutlet var segmentedControl: UISegmentedControl!override func viewDidLoad() {super.viewDidLoad()segmentedControl.insertSegment(withTitle: "Three", at: 2, animated: true)segmentedControl.setWidth(50, forSegmentAt: 0)segmentedControl.setWidth(50, forSegmentAt: 1)segmentedControl.setWidth(50, forSegmentAt: 2)// Do any additional setup after loading the view, typically from a nib.}@IBAction func touchInside(_ sender: UIButton) {buttonObject.setTitle("New", for: UIControl.State.normal)switchObject.onTintColor = UIColor.redswitchObject.tintColor = UIColor.blue}@IBAction func switchChanged(_ sender: UISwitch) {if switchObject.isOn {labelSwitch.text = "On"} else {labelSwitch.text = "Off"}}@IBAction func segmentedControlTapped(_ sender: UISegmentedControl) {switch segmentedControl.selectedSegmentIndex {case 0:labelSwitch.text = "One"case 1:labelSwitch.text = "Two"default:labelSwitch.text = "Three"}}}
- 19.
Click the Run button or choose Product ➤ Run. The Simulator window appears.
- 20.
Click the second or third segment in the segmented control. Notice that the segment you clicked now appears highlighted and the label displays the name of the segment you clicked such as “Two” or “Three”.
- 21.
Click any segment. Notice that each time you click a different segment, that segment appears highlighted and the label displays different text.
- 22.
Choose Simulator ➤ Quit Simulator to return to Xcode.
Connecting Multiple Objects to the Same IBAction Method
Most of the time when you use objects to interact with the user such as buttons, switches, or segmented controls, you create a separate IBAction method for each object. However, it’s possible to connect two or more objects to the same IBAction method.
First, you need to create an IBAction method with one object such as a button. Then you can connect another object to that existing IBAction method. That way both objects can respond to the same IBAction method. This can be useful because instead of writing two or more separate IBAction methods that do mostly the same thing, you can write a single IBAction method that responds slightly differently based on which object the user tapped.
When connecting two or more objects to the same IBAction method, you need to decide if you only want identical objects (such as buttons) to connect to the same IBAction method or whether you want to allow different objects (such as a button and an image view) to connect to the same IBAction method.
Choosing the type of object an IBAction method can respond to
Any type of object can connect to an IBAction method where the sender is defined as Any.

The Tag property can be modified in the Attributes Inspector pane
By default, every object has a Tag value of 0, but you can change this so each object has a distinct value such as 1, 24, or 894. By identifying the Tag value, an IBAction method can determine which object to respond to.
- 1.
Create a new iOS project using the Single View App template (see Chapter 1) and name this new project IBActionApp. This creates a single view for the user interface.
- 2.
Click the Main.storyboard file in the Navigator pane. Xcode displays the single view.
- 3.
Click the Library icon to open the Object Library window.
- 4.
Drag and drop two buttons and a label anywhere on the view.
- 5.
Choose Editor ➤ Resolve Auto Layout Issues ➤ Reset to Suggested Constraints on the bottom half of the submenu. This will add constraints to the two buttons and label on the user interface.
- 6.
Click one button to select it.
- 7.
Choose View ➤ Inspectors ➤ Show Attributes Inspector, or click the Attributes Inspector icon in the upper right corner of the Xcode window.
- 8.
Click in the Title text field, type First, and press ENTER.
- 9.
Click in the Tag text field, type 1, and press ENTER.
- 10.
Click the second button to select it.
- 11.
Click in the Title text field, type Second, and press ENTER.
- 12.
Click in the Tag text field, type 2, and press ENTER.
- 13.
Choose View ➤ Assistant Editor ➤ Show Assistant Editor, or click the Assistant Editor icon. Xcode displays the Main.storyboard and ViewController.swift file side by side.
- 14.
Move the mouse pointer over the label, hold down the Control key, and Ctrl-drag from the label to the ViewController.swift file underneath the IBOutlet line.
- 15.
Release the Control key and the left mouse button. A popup window appears.
- 16.Click in the Name text field, type labelResult, and click the Connect button. Xcode creates an IBOutlet variable as follows:@IBOutlet var labelResult: UILabel!
- 17.
Move the mouse pointer over the button titled “First”, hold down the Control key, and Ctrl-drag from the button to the ViewController.swift file above the last curly bracket in the ViewController.swift file.
- 18.
Release the Control key and the left mouse button. A popup window appears.
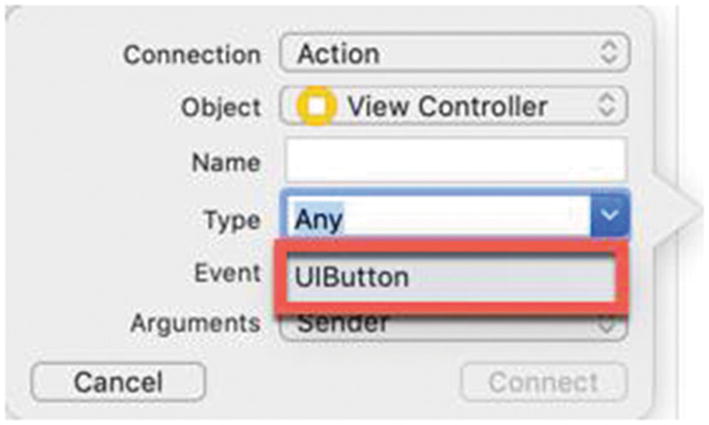
- 19.Click in the Name text field, type buttonTapped, make sure the Type popup menu displays Any, and click the Connect button. Xcode creates an IBAction method as follows:@IBAction func buttonTapped(_ sender: Any) {}
- 20.Move the mouse pointer over the button titled “Second”, hold down the Control key, and Ctrl-drag from the button to the buttonTapped IBAction method until the entire IBAction method appears highlighted as shown in Figure 10-11.
 Figure 10-11
Connecting a second object to an existing IBAction method
- 21.
Release the Control key and left mouse button.
- 22.Move the mouse pointer over the circle in the left margin of the buttonTapped IBAction method. Xcode highlights the two buttons to verify that both buttons are connected to the buttonTapped IBAction method as shown in Figure 10-12.
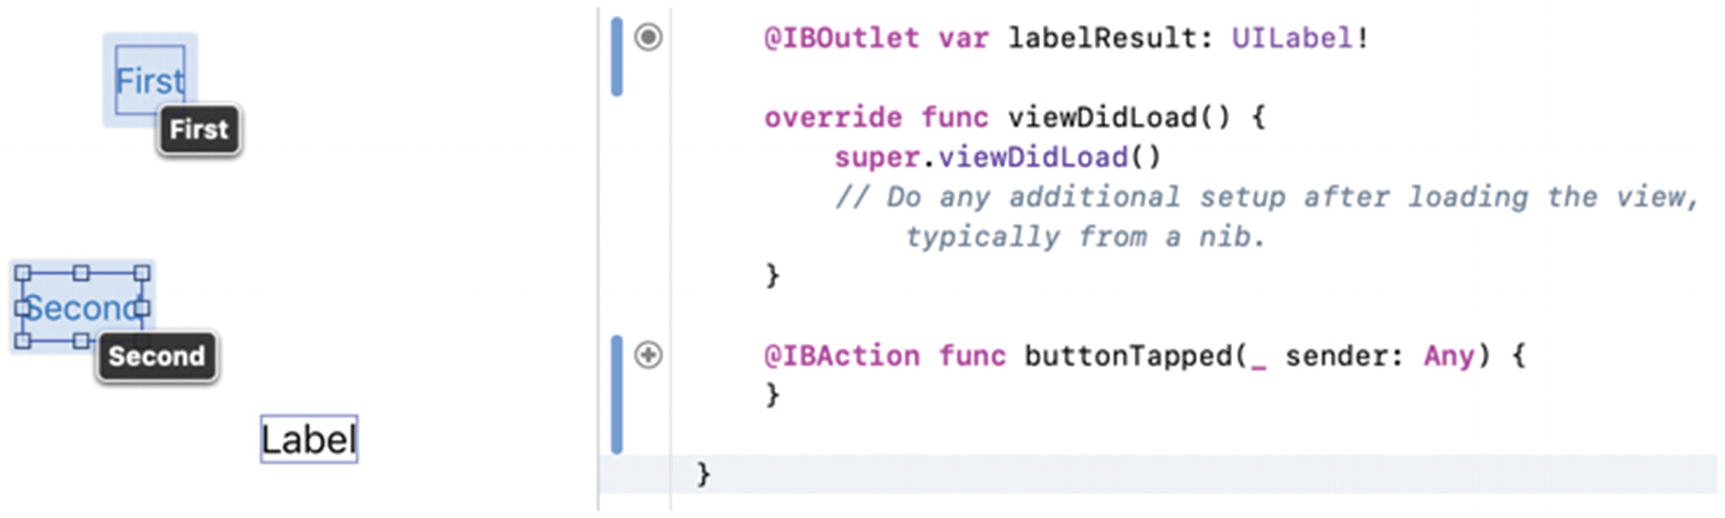 Figure 10-12
Verifying all objects connected to a single IBAction method
- 23.Modify the buttonTapped IBAction method as follows:@IBAction func buttonTapped(_ sender: Any) {switch (sender as AnyObject).tag {case 1:labelResult.text = "Button 1"case 2:labelResult.text = "Button 2"default:labelResult.text = "Default"}}
- 24.Modify the viewDidLoad method as follows:override func viewDidLoad() {super.viewDidLoad()labelResult.frame.size.width = 120// Do any additional setup after loading the view, typically from a nib.}The entire ViewController.swift file should look like this:import UIKitclass ViewController: UIViewController {@IBOutlet var labelResult: UILabel!override func viewDidLoad() {super.viewDidLoad()labelResult.frame.size.width = 120// Do any additional setup after loading the view, typically from a nib.}@IBAction func buttonTapped(_ sender: Any) {switch (sender as AnyObject).tag {case 1:labelResult.text = "Button 1"case 2:labelResult.text = "Button 2"default:labelResult.text = "Default"}}}
- 25.
Click the Run button or choose Product ➤ Run. The Simulator screen appears.
- 26.
Click the button titled “First”. Notice that the label displays “Button 1”.
- 27.
Click the button titled “Second”. Notice that the label displays “Button 2”.
- 28.
Chose Simulator ➤ Quit Simulator to return to Xcode.
In the preceding example, two buttons connect to the same IBAction method, but because the IBAction type is Any, you could connect any objects to this IBAction method. In most cases, it’s better to restrict an IBAction method to specific types of objects such as UIButton.
Besides reducing the risk that an unintended object could connect to an IBAction method, restricting an IBAction method to a specific object type also lets you access that specific object’s properties. For example, an IBAction method linked only to UIButtons will then be able to access all the properties that a UIButton object contains such as titleLabel.text.
Before we link the two existing buttons to a new IBAction method, we need to break the connection between the current IBAction method in the Connections Inspector pane. After we break the connection between an IBOutlet and an IBAction method, we can delete the actual IBOutlet or IBAction method in the .swift file.
Note
Just deleting an IBOutlet variable or IBAction method will not break its link to an object on the user interface. You must break the actual link in the Connections Inspector pane. If you fail to break the link in the Connections Inspector pane, running your app will not work and Xcode will display an error message.
- 1.
Make sure the IBActionApp project is loaded in Xcode.
- 2.
Click the Main.storyboard file in the Navigator pane.
- 3.
Click the button titled “First” to select it.
- 4.Choose View ➤ Inspectors ➤ Show Connections Inspector, or click the Connections Inspector icon in the upper right corner of the Xcode window. The Connections Inspector pane appears, showing all IBOutlets and IBAction methods linked to the selected object. In Figure 10-13, the selected button is linked to an IBAction method called buttonTapped, which responds to the Touch Up Inside event.
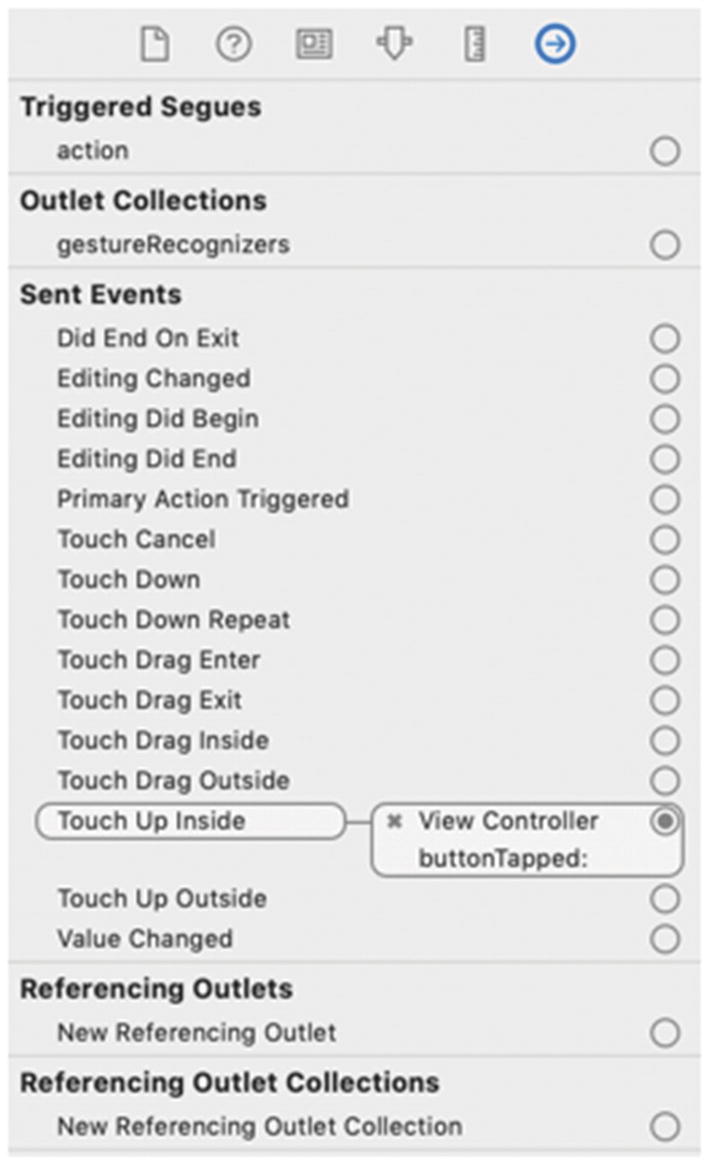 Figure 10-13
The Connections Inspector pane displays all links to IBOutlets and IBAction methods
- 5.
Click the Close icon (X) that appears to the left of View Controller buttonTapped. This breaks the link between the selected button and the buttonTapped IBAction method stored in the ViewController.swift file.
- 6.
Click the button titled “Second” to select it.
- 7.
Click the Close icon (X) that appears to the left of View Controller buttonTapped. This breaks the link between the second button and the buttonTapped IBAction method stored in the ViewController.swift file.
- 8.
Choose View ➤ Assistant Editor ➤ Show Assistant Editor, or click the Assistant Editor icon. Xcode displays the Main.storyboard and ViewController.swift file side by side.
- 9.
Move the mouse pointer over the button titled “First”, hold down the Control key, and Ctrl-drag the mouse above the last curly bracket at the bottom of the ViewController.swift file.
- 10.
Release the Control key and the left mouse button. A popup window appears.
- 11.Click in the Name text field, type buttonRespond, click the Type popup menu to choose UIButton, and click the Connect button. Xcode creates an IBAction method as follows:@IBAction func buttonRespond(_ sender: UIButton) {}
- 12.Move the mouse pointer over the button titled “First”, hold down the Control key, and Ctrl-drag the mouse over the buttonRespond IBAction method to highlight it as shown in Figure 10-14 .
 Figure 10-14
Connecting a button to an existing IBAction method
- 13.
Release the Control key and the left mouse button.
- 14.Edit the buttonRespond IBAction method as follows:@IBAction func buttonRespond(_ sender: UIButton) {switch sender.tag {case 1:labelResult.text = sender.titleLabel?.textcase 2:labelResult.text = sender.titleLabel?.textdefault:labelResult.text = "Default"}}The entire ViewController.swift file should look like this:import UIKitclass ViewController: UIViewController {@IBOutlet var labelResult: UILabel!override func viewDidLoad() {super.viewDidLoad()labelResult.frame.size.width = 120// Do any additional setup after loading the view, typically from a nib.}@IBAction func buttonTapped(_ sender: Any) {switch (sender as AnyObject).tag {case 1:labelResult.text = "Button 1"case 2:labelResult.text = "Button 2"default:labelResult.text = "Default"}}@IBAction func buttonRespond(_ sender: UIButton) {switch sender.tag {case 1:labelResult.text = sender.titleLabel?.textcase 2:labelResult.text = sender.titleLabel?.textdefault:labelResult.text = "Default"}}}
- 15.
Click the Run button or choose Product ➤ Run. The Simulator screen appears.
- 16.
Click the button titled “First”. Notice that the label displays “First”.
- 17.
Click the button titled “Second”. Notice that the label displays “Second”.
- 18.
Chose Simulator ➤ Quit Simulator to return to Xcode.
Summary
Buttons, switches, and segmented controls offer ways for users to control an app. By using the Inspector pane or Swift code, you can modify buttons, switches, and segmented controls to customize them for your particular app.
Buttons represent a single command. Switches let users choose exactly two settings, on (true) and off (false). Segmented controls act like multiple buttons but take up less space than multiple buttons.
Typically you link a button, switch, or segmented control to a single IBAction method. However, you can connect two or more objects to a single IBAction method. When creating an IBAction method, you can allow any type of object to connect to it or you can define that only a specific type of object (such as a UIButton) can connect to the IBAction method. If you define that only a specific type of object can connect to an IBAction method, then you’ll be able to access properties of that object.
Once you connect an object to an IBOutlet or IBAction method, you can always break that connection later. You must break that connection in the Connections Inspector pane. If you fail to break a connection and later delete an IBOutlet or IBAction method, then Xcode will give an error message if you try to run the app.