Almost every app needs to display and accept data from the user. The simplest way to display data is through a label, but sometimes you need to display data and give the user a way to respond. In that case, you need to use an alert controller.
An alert controller typically displays a message and one or more buttons
Besides displaying data, user interfaces also need to let people input data. If that data is text, then you can use a text field to let the user type anything in that text field such as a name or telephone number. A text field is perfect for accepting any type of data, but when you need to offer the user a list of valid choices, you’ll want to use a picker instead.
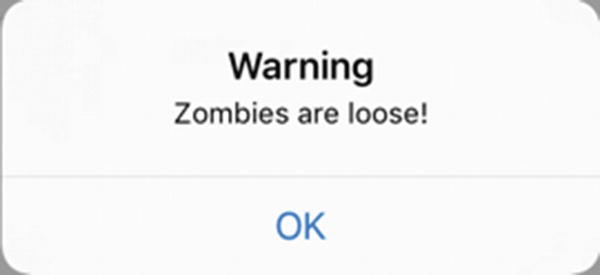
Date Picker – Displays dates and times as shown in Figure 12-2
- Picker View – Displays a spinning wheel of different options
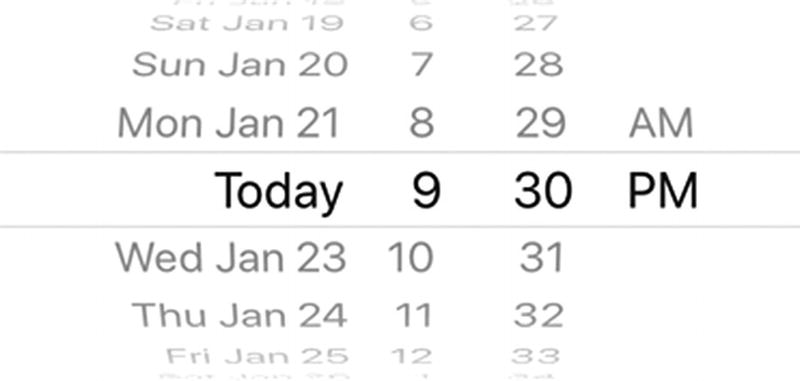 Figure 12-2
A Date Picker makes it easy for users to choose dates and times
A picker contains a limited number of options on one or more wheels that the user can spin around to select a particular option. The available number of options can be as small as two (such as the AM and PM option for choosing a time), but typically the available options are greater than two. Pickers insure that the user can never choose a non-valid option such as typing a number for a name or typing a city incorrectly.
Using an Alert Controller
Every user interface needs to display data back to the user. In some cases, this data can be displayed just in a label, but sometimes you need to make sure the user sees certain information. In those situations, you should use an alert controller.
Title – Text that appears at the top of the alert controller, often in bold and a large font size
Message – Text that appears underneath the title in a smaller font size

A title typically consists of a single word or short phrase that explains the purpose of the alert controller such as displaying “Warning” or “Log In”.
To dismiss an alert controller, an alert controller always needs at least one button. However, an alert controller can display two or more buttons to give user a choice. Besides displaying buttons, alert controllers can also text fields to allow users to enter data as well.
You can create an alert controller solely by writing Swift code. First, you must create the alert controller that defines a title, message, and style. Second, you must define an alert action for each button or text field you want to display on the alert controller. Third, you must actually present that alert controller on the user interface.
- 1.
Create a new iOS project using the Single View App template (see Chapter 1) and name this new project AlertControllerApp. This creates a single view for the user interface.
- 2.
Click the Main.storyboard file in the Navigator pane. Xcode displays the single view.
- 3.
Click the Library icon to open the Object Library window.
- 4.
Drag and drop a button anywhere on the view.
- 5.
Choose Editor ➤ Resolve Auto Layout Issues ➤ Reset to Suggested Constraints. Xcode adds constraints to the button.
- 6.
Choose View ➤ Assistant Editor ➤ Show Assistant Editor. Xcode displays the Main.storyboard and ViewController.swift file side by side.
- 7.
Move the mouse pointer over the button, hold down the Control key, and Ctrl-drag from the image view to the ViewController.swift file above the last curly bracket at the bottom of the file.
- 8.
Release the Control key and the left mouse button. A popup window appears.
- 9.
Click in the Name text field, type buttonTapped, click the Type popup menu and choose UIButton, and click the Connect button. Xcode creates an IBAction method.
- 10.Edit this buttonTapped IBAction method as follows:@IBAction func buttonTapped(_ sender: UIButton) {let alert = UIAlertController(title: "Warning", message: "Zombies are loose!", preferredStyle: .alert)let okAction = UIAlertAction(title: "OK", style: .default, handler: { action -> Void in//Just dismiss the action sheet})alert.addAction(okAction)self.present(alert, animated: true, completion: nil)}
- 11.
Click the Run button or choose Product ➤ Run. The Simulator screen appears.
- 12.
Click the button. Notice that the alert controller appears in the middle of the screen because the preferredStyle were .alert. (If the preferredStyle property were .actionSheet, then the alert controller would appear at the bottom of the screen.)
- 13.
Tap the OK button on the alert controller to make it go away.
- 14.
Choose Simulator ➤ Quit Simulator to return to Xcode.
Change the title and message properties to display different text and run the app again to see how it changes the appearance of the alert controller. Also change the preferredStyle property from .alert to .actionSheet to see how it affects the appearance of the alert controller as well.
Displaying and Responding to Multiple Buttons
The simplest alert controller displays a single button that allows the user to dismiss it. However, you may want to give the user more than one option to choose and then respond differently depending on which button the user taps.
For each button you want to display on an alert controller, you need to add a UIAlertAction. When the user taps a button on an alert controller, the alert controller goes away. If you want the button to do more, then you need to call a separate function that does some action.
- 1.
Create a new iOS project using the Single View App template (see Chapter 1) and name this new project AlertControllerButtonsApp. This creates a single view for the user interface.
- 2.
Click the Main.storyboard file in the Navigator pane. Xcode displays the single view.
- 3.
Click the Library icon to open the Object Library window.
- 4.
Drag and drop a button and a label anywhere on the view.
- 5.
Choose Editor ➤ Resolve Auto Layout Issues ➤ Reset to Suggested Constraints on the bottom half of the submenu. Xcode adds constraints to the button and label.
- 6.
Choose View ➤ Assistant Editor ➤ Show Assistant Editor. Xcode displays the Main.storyboard and ViewController.swift file side by side.
- 7.
Move the mouse pointer over the label, hold down the Control key, and Ctrl-drag from the image view to the ViewController.swift file under the “class ViewController” line.
- 8.
Release the Control key and the left mouse button. A popup window appears.
- 9.Click in the Name text field, type labelResult , and click the Connect button. Xcode creates an IBOutlet variable as follows:@IBOutlet var labelResult: UILabel!
- 10.
Move the mouse pointer over the button, hold down the Control key, and Ctrl-drag from the image view to the ViewController.swift file above the last curly bracket at the bottom of the file.
- 11.
Release the Control key and the left mouse button. A popup window appears.
- 12.
Click in the Name text field, type buttonTapped, click in the Type popup menu and choose UIButton, and click the Connect button. Xcode creates an IBAction method.
- 13.
Choose View ➤ Standard Editor ➤ Show Standard Editor, or click the Standard Editor icon in the upper right corner of the Xcode window.
- 14.
Click the ViewController.swift file in the Navigator pane.
- 15.Modify the viewDidLoad method as follows:override func viewDidLoad() {super.viewDidLoad()labelResult.numberOfLines = 0// Do any additional setup after loading the view, typically from a nib.}
Setting the numberOfLines property of the label to 0 allows it to expand in width no matter the size of text stored in it. If this numberOfLines property is left at its default value of 1, then the label will not resize automatically and risks cutting text off if the text is longer than the width of the label.
- 16.Edit this buttonTapped IBAction method as follows:@IBAction func buttonTapped(_ sender: UIButton) {let alert = UIAlertController(title: "Warning", message: "Zombies are loose!", preferredStyle: .alert)let okAction = UIAlertAction(title: "OK", style: .default, handler: { action -> Void inself.labelResult.text = "OK"})let cancelAction = UIAlertAction(title: "Cancel", style: .cancel, handler: { action -> Void inself.labelResult.text = "Cancel"})let destroyAction = UIAlertAction(title: "Destroy", style: .destructive, handler: { action -> Void inself.labelResult.text = "Destroy"})alert.addAction(okAction)alert.addAction(cancelAction)alert.addAction(destroyAction)self.present(alert, animated: true, completion: nil)}The code to define each UIAlertAction simply changes the text displayed in the label. If you need each button to perform more complicated tasks, you can put the name of one or more functions in the handler. Then you’ll need to create those functions such as:let destroyAction = UIAlertAction(title: "Destroy", style: .destructive, handler: { action -> Void inself.labelResult.text = "Destroy"self.callFunctionOne()self.callFunctionTwo()})func callFunctionOne(){// Code here}func callFunctionTwo(){// Code here}The entire ViewController.swift file should look like this:import UIKitclass ViewController: UIViewController {@IBOutlet var labelResult: UILabel!override func viewDidLoad() {super.viewDidLoad()labelResult.numberOfLines = 0// Do any additional setup after loading the view, typically from a nib.}@IBAction func buttonTapped(_ sender: UIButton) {let alert = UIAlertController(title: "Warning", message: "Zombies are loose!", preferredStyle: .alert)let okAction = UIAlertAction(title: "OK", style: .default, handler: { action -> Void inself.labelResult.text = "OK"})let cancelAction = UIAlertAction(title: "Cancel", style: .cancel, handler: { action -> Void inself.labelResult.text = "Cancel"})let destroyAction = UIAlertAction(title: "Destroy", style: .destructive, handler: { action -> Void inself.labelResult.text = "Destroy"})alert.addAction(okAction)alert.addAction(cancelAction)alert.addAction(destroyAction)self.present(alert, animated: true, completion: nil)}}
- 17.
Click the Run button or choose Product ➤ Run. The Simulator screen appears.
- 18.Click the button. The alert controller appears as shown in Figure 12-4.
 Figure 12-4
The alert controller displaying three types of buttons, .default, .destructive, and .cancel
- 19.
Click the OK button, which appears using the .default style. Notice that the label now displays “OK” and dismisses the alert controller.
- 20.
Click the Destroy button, which appears using the .destructive style. Notice that the label now displays “Destroy” and dismisses the alert controller.
- 21.
Click the Cancel button, which appears using the .cancel style. Notice that the label now displays “Cancel” and dismisses the alert controller.
- 22.
Choose Simulator ➤ Quit Simulator to return to Xcode.
Displaying a Text Field on an Alert Controller
Buttons let an alert controller accept choices from the user. Based on those choices, your code can then respond. However, sometimes you might want to display a text field on an alert controller to allow the user to type in data. Then you’ll need to store this data.
Note
You can only add text fields on an alert controller that appears in the .alert preferredStyle. You cannot display text fields on an alert controller that appears as the .actionSheet preferredStyle.
When you add a text field to an alert controller, you can modify that text field like any text field such as defining a background color or font. In addition, you must also create a constant to store the contents of that text field so the rest of your app can access whatever data the user typed into the text field on the alert controller.
- 1.
Create a new iOS project using the Single View App template (see Chapter 1) and name this new project AlertControllerTextFieldApp. This creates a single view for the user interface.
- 2.
Click the Main.storyboard file in the Navigator pane. Xcode displays the single view.
- 3.
Click the Library icon to open the Object Library window.
- 4.
Drag and drop a button and a label anywhere on the view.
- 5.
Choose Editor ➤ Resolve Auto Layout Issues ➤ Reset to Suggested Constraints on the bottom half of the submenu. Xcode adds constraints to the button and label.
- 6.
Choose View ➤ Assistant Editor ➤ Show Assistant Editor. Xcode displays the Main.storyboard and ViewController.swift file side by side.
- 7.
Move the mouse pointer over the label, hold down the Control key, and Ctrl-drag from the image view to the ViewController.swift file under the “class ViewController” line.
- 8.
Release the Control key and the left mouse button. A popup window appears.
- 9.Click in the Name text field, type labelResult, and click the Connect button. Xcode creates an IBOutlet variable as follows:@IBOutlet var labelResult: UILabel!
- 10.
Move the mouse pointer over the button, hold down the Control key, and Ctrl-drag from the image view to the ViewController.swift file above the last curly bracket at the bottom of the file.
- 11.
Release the Control key and the left mouse button. A popup window appears.
- 12.
Click in the Name text field, type buttonTapped , click in the Type popup menu and choose UIButton, and click the Connect button. Xcode creates an IBAction method.
- 13.
Choose View ➤ Standard Editor ➤ Show Standard Editor, or click the Standard Editor icon in the upper right corner of the Xcode window.
- 14.
Click the ViewController.swift file in the Navigator pane.
- 15.Modify the viewDidLoad method as follows:override func viewDidLoad() {super.viewDidLoad()labelResult.numberOfLines = 0// Do any additional setup after loading the view, typically from a nib.}
Setting the numberOfLines property of the label to 0 allows it to expand in width no matter the size of text stored in it. If this numberOfLines property is left at its default value of 1, then the label will not resize automatically and risks cutting text off if the text is longer than the width of the label.
- 16.Add the following to the buttonTapped IBAction method as follows:let alert = UIAlertController(title: "Log In", message: "Enter Password", preferredStyle: .alert)alert.addTextField(configurationHandler: {(textField) intextField.placeholder = "Password here"textField.isSecureTextEntry = true})
The first line creates an alert controller that displays the title “Log In” and underneath the message “Enter Password”. Because we want to display a text field on the alert controller, the alert controller’s preferredStyle must be .alert.
The second line adds a text field to the alert controller and configures the text field to display “Password here” as placeholder text and also sets its isSecureTextEntry property to true which hides the characters as the user types them in the text field. Any code listed here simply customized the text field.
- 17.Add the following to the buttonTapped IBAction method as follows:let okAction = UIAlertAction(title: "OK", style: .default, handler: { action -> Void inlet savedText = alert.textFields![0] as UITextFieldself.labelResult.text = savedText.text})alert.addAction(okAction)self.present(alert, animated: true, completion: nil)
The first line defines a button with the title “OK” and a .default style. Inside the handler section of the code, this line defines a constant called savedText, which represents the first text field (note the index value of 0) on the alert controller. If you add more than one text field to an alert controller, you’ll need to define additional constants to represent those other text fields. Finally, this line stores the text from the text field (savedText) and displays it in the labelResult IBOutlet that’s linked to the label on the user interface.
The second line adds the button to the alert controller and the third line presents or displays the alert controller.
The entire ViewController.swift file should look like this:import UIKitclass ViewController: UIViewController {@IBOutlet var labelResult: UILabel!override func viewDidLoad() {super.viewDidLoad()labelResult.numberOfLines = 0// Do any additional setup after loading the view, typically from a nib.}@IBAction func buttonTapped(_ sender: UIButton) {let alert = UIAlertController(title: "Log In", message: "Enter Password", preferredStyle: .alert)alert.addTextField(configurationHandler: {(textField) intextField.placeholder = "Password here"textField.isSecureTextEntry = true})let okAction = UIAlertAction(title: "OK", style: .default, handler: { action -> Void inlet savedText = alert.textFields![0] as UITextFieldself.labelResult.text = savedText.text})alert.addAction(okAction)self.present(alert, animated: true, completion: nil)}} - 18.
Click the Run button or choose Product ➤ Run. The Simulator screen appears.
- 19.Click the button. The alert controller appears as shown in Figure 12-5.
 Figure 12-5
An alert controller displaying a text field and a button
- 20.
Type some text in the text field on the alert controller. Notice that as you type, the text field masks the characters because its isSecureTextEntry property is set to true.
- 21.
Click the OK button. Notice that whatever text you typed into the text field now appears in the label.
- 22.
Choose Simulator ➤ Quit Simulator to return to Xcode.
Using a Date Picker
When an app needs the user to input a date and/or a time, it’s best to use the Date Picker to provide a list of valid options. By spinning different wheels on a Date Picker, users can pick days, dates, and times without typing a thing.
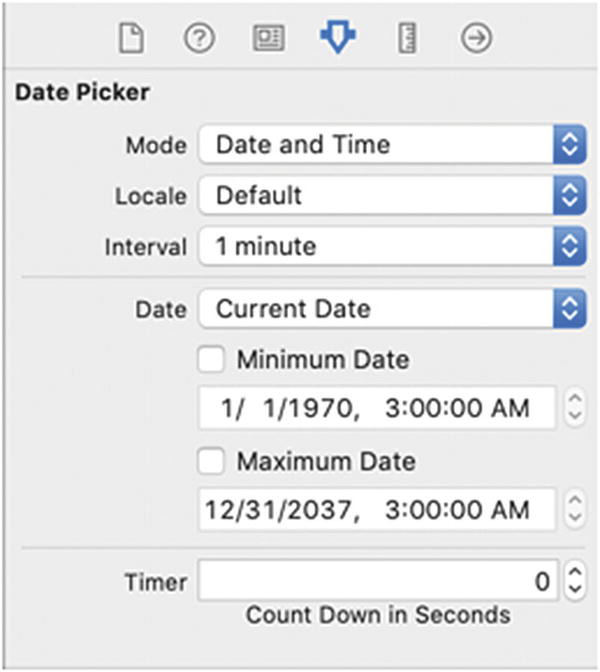
The Attributes Inspector pane lets you customize a Date Picker
Mode – Defines the Date Picker to display Time, Date, Time and Date, or Count Down Timer as shown in Figure 12-7
Locale – Overrides the system default locale property that defines the local language such as American English or Australian English
Interval – Defines the time interval in minutes from 1 minute up to 30 minutes
Date – Defines the date to display initially
Minimum Date – Defines the minimum date allowed
Maximum Date – Defines the maximum date allowed
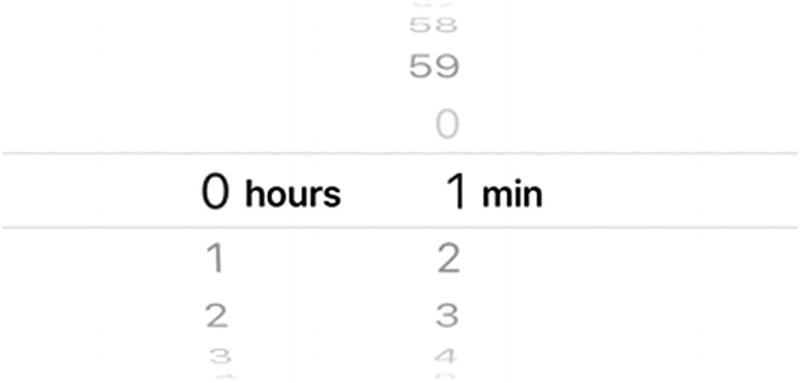
Changing the Mode of a Date Picker to a Count Down Timer
.none – Does not display the date or time
.short – Displays dates in this format “11/23/19” and times in this format “3:48 PM”
.medium – Displays dates in this format “Nov 23, 2019” and times in this format “3:48:21 PM”
.long – Displays dates in this format “November 23, 2019” and times in this format “3:48:21 PM EST”
.full – Displays dates in this format “Saturday, November 23, 2019 AD” and times in this format “3:48 PM Eastern Standard Time”
In the following example, we’ll see how to retrieve the value displayed in a Date Picker in two different ways. First, we’ll retrieve the Date Picker value any time the user changes the Date Picker. Second, we’ll retrieve the Date Picker value and display it on an alert controller.
- 1.
Create a new iOS project using the Single View App template (see Chapter 1) and name this new project DatePickerApp. This creates a single view for the user interface.
- 2.
Click the Main.storyboard file in the Navigator pane. Xcode displays the single view.
- 3.
Click the Library icon to open the Object Library window.
- 4.Drag and drop a button and a Date Picker anywhere on the view as shown in Figure 12-8.
 Figure 12-8
The Date Picker in the Object Library window
- 5.
Choose Editor ➤ Resolve Auto Layout Issues ➤ Set to Suggested Constraints. Xcode adds constraints to your button and Date Picker.
- 6.
Choose View ➤ Assistant Editor ➤ Show Assistant Editor. Xcode displays the Main.storyboard and ViewController.swift file side by side.
- 7.
Move the mouse pointer over the Date Picker, hold down the Control key, and Ctrl-drag from the Date Picker to the ViewController.swift file underneath the “class ViewController” line.
- 8.
Release the Control key and the left mouse button. A popup window appears.
- 9.Click in the Name text field, type myDatePicker, and click the Connect button. Xcode creates an IBOutlet variable as follows:@IBOutlet var myDatePicker: UIDatePicker!
- 10.Underneath the IBOutlet add the following line to define a date formatter:let dateFormatter: DateFormatter = DateFormatter()
- 11.Edit the viewDidLoad method as follows:override func viewDidLoad() {super.viewDidLoad()dateFormatter.dateStyle = .shortdateFormatter.timeStyle = .short// Do any additional setup after loading the view, typically from a nib.}
These lines of code define the .dateStyle and .timeStyle properties to .short. You can experiment by changing these values to .medium, .long, and .full to see how it defines the date and time differently.
- 12.Underneath the viewDidLoad method, add the following function which will accept a string and display it in an alert controller:func ShowAlert(dateTime : String) {let alert = UIAlertController(title: "Selected Date and Time", message: "(dateTime)", preferredStyle: .alert)let okAction = UIAlertAction(title: "OK", style: .default, handler: { action -> Void in//Just dismiss the action sheet})alert.addAction(okAction)self.present(alert, animated: true, completion: nil)}
- 13.
Move the mouse pointer over the button, hold down the Control key, and Ctrl-drag from the button to the ViewController.swift file above the last curly bracket at the bottom of the file.
- 14.
Release the Control key and the left mouse button. A popup window appears.
- 15.
Click in the Name text field, type getCurrentDateTime, click in the Type popup menu and choose UIButton, and click the Connect button. Xcode creates an IBAction method.
- 16.Edit this getCurrentDateTime IBAction method as follows:@IBAction func getCurrentDateTime(_ sender: UIButton) {let selectedDate: String = dateFormatter.string(from: myDatePicker.date)ShowAlert(dateTime: selectedDate)}
This IBAction method retrieves the value of the myDatePicker IBOutlet (that represents the Date Picker) and converts this date and time into a string that gets stored in the selectedDate constant. Then it passes this selectedDate constant to the Show Alert function to display it on the alert controller.
- 17.
Move the mouse pointer over the Date Picker, hold down the Control key, and Ctrl-drag from the Date Picker to the ViewController.swift file above the last curly bracket at the bottom of the file.
- 18.
Release the Control key and the left mouse button. A popup window appears.
- 19.
Click in the Name text field, type dateChanged, click in the Type popup menu and choose UIDatePicker, and click the Connect button. Xcode creates an IBAction method.
- 20.Edit this dateChanged IBAction method as follows:@IBAction func dateChanged(_ sender: UIDatePicker) {let selectedDate: String = dateFormatter.string(from: sender.date)ShowAlert(dateTime: selectedDate)}
This dateChanged IBAction method runs every time the user changes the date or time in the Date Picker. It retrieves the .date property from the Date Picker and converts it into a string, which it stores in the selectedDate constant. Then it passes this selectedDate constant into the Show Alert function that displays it on an alert controller.
The entire ViewController.swift file should look like this:import UIKitclass ViewController: UIViewController {@IBOutlet var myDatePicker: UIDatePicker!let dateFormatter: DateFormatter = DateFormatter()override func viewDidLoad() {super.viewDidLoad()dateFormatter.dateStyle = .shortdateFormatter.timeStyle = .short// Do any additional setup after loading the view, typically from a nib.}func ShowAlert(dateTime : String) {let alert = UIAlertController(title: "Selected Date and Time", message: "(dateTime)", preferredStyle: .alert)let okAction = UIAlertAction(title: "OK", style: .default, handler: { action -> Void in//Just dismiss the action sheet})alert.addAction(okAction)self.present(alert, animated: true, completion: nil)}@IBAction func dateChanged(_ sender: UIDatePicker) {let selectedDate: String = dateFormatter.string(from: sender.date)ShowAlert(dateTime: selectedDate)}@IBAction func getCurrentDateTime(_ sender: UIButton) {let selectedDate: String = dateFormatter.string(from: myDatePicker.date)ShowAlert(dateTime: selectedDate)}} - 21.
Click the Run button or choose Product ➤ Run. The Simulator screen appears.
- 22.
Click the button. An alert controller appears, displaying the current date and time displayed in the Date Picker.
- 23.
Click the button to dismiss the alert controller.
- 24.
Change the date or time in the Date Picker. Notice another alert controller appears, displaying the modified date/time displayed in the Date Picker.
- 25.
Click the button to dismiss the alert controller.
- 26.
Choose Simulator ➤ Quit Simulator to return to Xcode.
Go back to step 11 and change the .dateStyle and .timeStyle properties from .short to .medium, .long, or .full and see how this affects the way dates and times appear. If you change the .dateStyle or .timeStyle to .none, then the date or time displayed in the Date Picker will be ignored.
Creating a Custom Picker
The Date Picker is fine for letting the user choose dates and times, but many times you want to offer users a limited range of options that are not dates or times. In these situations, you need to use the standard picker object and also create the data to display in the picker.
To use a picker, you must define a delegate and data source. The delegate defines the file that contains functions that define how many columns of data to display (such as a day and month), the total number of options to display in the picker, and which data the user chose in the picker.
The data source defines the file that contains the data to display in the picker. This data can be an array or a database.
- 1.
Create a new iOS project using the Single View App template (see Chapter 1) and name this new project PickerApp. This creates a single view for the user interface.
- 2.
Click the Main.storyboard file in the Navigator pane. Xcode displays the single view.
- 3.
Click the Library icon to open the Object Library window.
- 4.Drag and drop a button and a Picker View anywhere on the view as shown in Figure 12-9.
 Figure 12-9
The Picker View in the Object Library window
- 5.
Choose Editor ➤ Resolve Auto Layout Issues ➤ Set to Suggested Constraints in the bottom half of the submenu. Xcode adds constraints to your button and Picker View.
- 6.
Choose View ➤ Assistant Editor ➤ Show Assistant Editor. Xcode displays the Main.storyboard and ViewController.swift file side by side.
- 7.Edit the class ViewController line as follows:class ViewController: UIViewController, UIPickerViewDataSource, UIPickerViewDelegate {
This makes the ViewController.swift file the Picker View’s data source and delegate.
- 8.
Move the mouse pointer over the Picker View, hold down the Control key, and Ctrl-drag from the Picker View to the ViewController.swift file underneath the “class ViewController” line.
- 9.
Release the Control key and the left mouse button. A popup window appears.
- 10.Click in the Name text field, type myPicker, and click the Connect button. Xcode creates an IBOutlet variable as follows:@IBOutlet var myPicker: UIDatePicker!
- 11.Underneath the IBOutlet add the following line to define a variable to hold an array of strings:var pickerData: [String] = [String]()
- 12.Edit the viewDidLoad method as follows:override func viewDidLoad() {super.viewDidLoad()myPicker.delegate = selfmyPicker.dataSource = selfpickerData = ["cat", "dog", "hamster", "lizard", "parrot", "goldfish"]// Do any additional setup after loading the view, typically from a nib.}
These lines of code declare the ViewController.swift file to be both the delegate and data source for the Picker View. Then it defines an array of strings to store in the pickerData variable.
- 13.Underneath the viewDidLoad method, add the following function to define how many components will appear in the Picker View. Since we’re only displaying a single wheel of options, the number of components is just one:func numberOfComponents(in pickerView: UIPickerView) -> Int {return 1}
- 14.Add another function underneath to define how many items will appear in the Picker View. This number can be found by using the .count method on the pickerData array:func pickerView(_ pickerView: UIPickerView, numberOfRowsInComponent component: Int) -> Int {return pickerData.count}
- 15.Add a third function underneath to display data in the Picker View:func pickerView(_ pickerView: UIPickerView, titleForRow row: Int, forComponent component:Int) -> String? {return pickerData[row]}
- 16.
Move the mouse pointer over the button, hold down the Control key, and Ctrl-drag from the button to the ViewController.swift file above the last curly bracket at the bottom of the file.
- 17.
Release the Control key and the left mouse button. A popup window appears.
- 18.
Click in the Name text field, type buttonTapped , click in the Type popup menu and choose UIButton, and click the Connect button. Xcode creates an IBAction method.
- 19.Edit this buttonTapped IBAction method as follows:@IBAction func buttonTapped(_ sender: UIButton) {let pickerIndex = myPicker.selectedRow(inComponent: 0)let alert = UIAlertController(title: "Your Choice", message: "(pickerData[pickerIndex])", preferredStyle: .alert)let okAction = UIAlertAction(title: "OK", style: .default, handler: { action -> Void in//Just dismiss the action sheet})alert.addAction(okAction)self.present(alert, animated: true, completion: nil)}
The first line in the buttonTapped IBAction method retrieves the index number of the choice currently displayed in the Picker View where the first item has an index of 0, the second item has an index of 1, and so on. Then it uses this index value to determine which item in the pickerData array to display in an alert controller.
The entire ViewController.swift file should look like this:import UIKitclass ViewController: UIViewController, UIPickerViewDataSource, UIPickerViewDelegate {@IBOutlet var myPicker: UIPickerView!var pickerData: [String] = [String]()override func viewDidLoad() {super.viewDidLoad()myPicker.delegate = selfmyPicker.dataSource = selfpickerData = ["cat", "dog", "hamster", "lizard", "parrot", "goldfish"]// Do any additional setup after loading the view, typically from a nib.}func numberOfComponents(in pickerView: UIPickerView) -> Int {return 1}func pickerView(_ pickerView: UIPickerView, numberOfRowsInComponent component: Int) -> Int {return pickerData.count}func pickerView(_ pickerView: UIPickerView, titleForRow row: Int, forComponent component:Int) -> String? {return pickerData[row]}@IBAction func buttonTapped(_ sender: UIButton) {let pickerIndex = myPicker.selectedRow(inComponent: 0)let alert = UIAlertController(title: "Your Choice", message: "(pickerData[pickerIndex])", preferredStyle: .alert)let okAction = UIAlertAction(title: "OK", style: .default, handler: { action -> Void in//Just dismiss the action sheet})alert.addAction(okAction)self.present(alert, animated: true, completion: nil)}} - 20.Click the Run button or choose Product ➤ Run. The Simulator screen appears as shown in Figure 12-10.
 Figure 12-10
The Picker View on the app
- 21.
Spin the Picker View and choose an option.
- 22.
Click the button. An alert controller appears, displaying the option you chose in the Picker View.
- 23.
Click the button to dismiss the alert controller.
- 24.
Repeat steps 20–22 and choose a different option in the Picker View.
- 25.
Choose Simulator ➤ Quit Simulator to return to Xcode.
Displaying a Multiple-Component Picker View
If you look at the Date Picker, it displays separate wheels or components for the day, hour, minute, and whether it’s AM or PM. The simple Picker View we created in the previous example just displayed a single wheel or component listing different types of pets.
For each component you want to display in a Picker View, you need to define a separate data source. Then you need to define how many total components you want the Picker View to display (such as two or three) along with displaying all components and storing the data in each component.
- 1.
Create a new iOS project using the Single View App template (see Chapter 1) and name this new project ThreePickerApp. This creates a single view for the user interface.
- 2.
Click the Main.storyboard file in the Navigator pane. Xcode displays the single view.
- 3.
Click the Library icon to open the Object Library window.
- 4.
Drag and drop a button and a Picker View anywhere on the view (see Figure 12-9).
- 5.
Choose Editor ➤ Resolve Auto Layout Issues ➤ Set to Suggested Constraints in the bottom half of the submenu. Xcode adds constraints to your button and Picker View.
- 6.Edit the class ViewController line as follows:class ViewController: UIViewController, UIPickerViewDataSource, UIPickerViewDelegate {
This makes the ViewController.swift file the Picker View’s data source and delegate.
- 7.
Choose View ➤ Assistant Editor ➤ Show Assistant Editor. Xcode displays the Main.storyboard and ViewController.swift file side by side.
- 8.
Move the mouse pointer over the Picker View, hold down the Control key, and Ctrl-drag from the Picker View to the ViewController.swift file underneath the “class ViewController” line.
- 9.
Release the Control key and the left mouse button. A popup window appears.
- 10.Click in the Name text field, type myPicker, and click the Connect button. Xcode creates an IBOutlet variable as follows:@IBOutlet var myPicker: UIDatePicker!
- 11.Underneath the IBOutlet add the following three lines to define three variables to hold an array of strings:var componentOne: [String] = [String]()var componentTwo: [String] = [String]()var componentThree: [String] = [String]()
- 12.Edit the viewDidLoad method as follows:override func viewDidLoad() {super.viewDidLoad()myPicker.delegate = selfmyPicker.dataSource = selfcomponentOne = ["cat", "dog", "hamster", "lizard", "parrot", "goldfish"]componentTwo = ["house", "apartment", "condo", "RV"]componentThree = ["indoor", "outdoor"]// Do any additional setup after loading the view, typically from a nib.}
These lines of code declare the ViewController.swift file to be both the delegate and data source for the Picker View. Then it defines three arrays of strings that will appear in each component of the Picker View.
- 13.Underneath the viewDidLoad method, add the following function to define how many components will appear in the Picker View. Since we’re only displaying a single wheel of options, the number of components is just one:func numberOfComponents(in pickerView: UIPickerView) -> Int {return 3}
- 14.Add another function underneath to define how many items will appear in the Picker View. This number can be found by using the .count method on the three different arrays, so we need a switch statement to define how many elements appear in each component. The first component will display different pets (“hamster”), the second component will display different homes (“apartment”), and the third component will display different locations (“indoor”):func pickerView(_ pickerView: UIPickerView, numberOfRowsInComponent component: Int) -> Int {switch component {case 0: return componentOne.countcase 1: return componentTwo.countdefault: return componentThree.count}}
- 15.Add a third function underneath to display data in the Picker View where the first component (0) displays pets, the second component (1) displays homes, and the third component (2) displays locations:func pickerView(_ pickerView: UIPickerView, titleForRow row: Int, forComponent component:Int) -> String? {switch component {case 0: return componentOne[row]case 1: return componentTwo[row]default: return componentThree[row]}}
- 16.
Move the mouse pointer over the button, hold down the Control key, and Ctrl-drag from the button to the ViewController.swift file above the last curly bracket at the bottom of the file.
- 17.
Release the Control key and the left mouse button. A popup window appears.
- 18.
Click in the Name text field, type buttonTapped, click in the Type popup menu and choose UIButton, and click the Connect button. Xcode creates an IBAction method.
- 19.Edit this buttonTapped IBAction method as follows:@IBAction func buttonTapped(_ sender: UIButton) {let petIndex = myPicker.selectedRow(inComponent: 0)let homeIndex = myPicker.selectedRow(inComponent: 1)let placeIndex = myPicker.selectedRow(inComponent: 2)let alert = UIAlertController(title: "Your Choice", message: "(componentOne[petIndex]) (componentTwo[homeIndex]) (componentThree[placeIndex])", preferredStyle: .alert)let okAction = UIAlertAction(title: "OK", style: .default, handler: { action -> Void in//Just dismiss the action sheet})alert.addAction(okAction)self.present(alert, animated: true, completion: nil)}
The three lines in the buttonTapped IBAction method retrieves the index number of the choice currently displayed in the Picker View where the first item has an index of 0, the second item has an index of 1, and so on. Then it uses this index value to determine which item in the three different arrays to display in an alert controller.
The entire ViewController.swift file should look like this:import UIKitclass ViewController: UIViewController, UIPickerViewDataSource, UIPickerViewDelegate {@IBOutlet var myPicker: UIPickerView!var componentOne: [String] = [String]()var componentTwo: [String] = [String]()var componentThree: [String] = [String]()override func viewDidLoad() {super.viewDidLoad()myPicker.delegate = selfmyPicker.dataSource = selfcomponentOne = ["cat", "dog", "hamster", "lizard", "parrot", "goldfish"]componentTwo = ["house", "apartment", "condo", "RV"]componentThree = ["indoor", "outdoor"]// Do any additional setup after loading the view, typically from a nib.}func numberOfComponents(in pickerView: UIPickerView) -> Int {return 3}func pickerView(_ pickerView: UIPickerView, numberOfRowsInComponent component: Int) -> Int {switch component {case 0: return componentOne.countcase 1: return componentTwo.countdefault: return componentThree.count}}func pickerView(_ pickerView: UIPickerView, titleForRow row: Int, forComponent component:Int) -> String? {switch component {case 0: return componentOne[row]case 1: return componentTwo[row]default: return componentThree[row]}}@IBAction func buttonTapped(_ sender: UIButton) {let petIndex = myPicker.selectedRow(inComponent: 0)let homeIndex = myPicker.selectedRow(inComponent: 1)let placeIndex = myPicker.selectedRow(inComponent: 2)let alert = UIAlertController(title: "Your Choice", message: "(componentOne[petIndex]) (componentTwo[homeIndex]) (componentThree[placeIndex])", preferredStyle: .alert)let okAction = UIAlertAction(title: "OK", style: .default, handler: { action -> Void in//Just dismiss the action sheet})alert.addAction(okAction)self.present(alert, animated: true, completion: nil)}} - 20.Click the Run button or choose Product ➤ Run. The Simulator screen appears as shown in Figure 12-11.
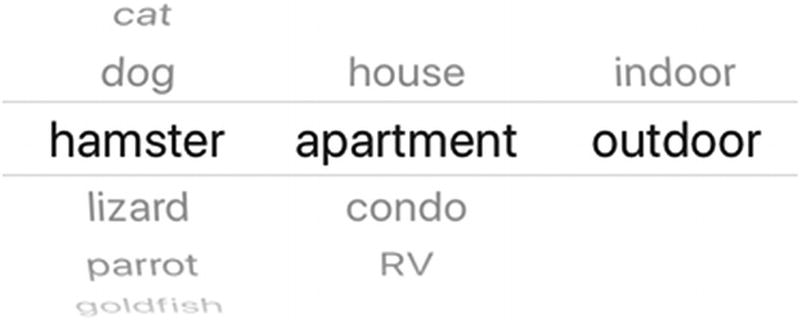 Figure 12-11
A Picker View with three components
- 21.
Spin the Picker View and choose an option from each wheel or component such as hamster, apartment, outdoor.
- 22.
Click the button. An alert controller appears, displaying all the options you chose in the Picker View.
- 23.
Click the button to dismiss the alert controller.
- 24.
Repeat steps 20–22 and choose different options in the Picker View
- 25.
Choose Simulator ➤ Quit Simulator to return to Xcode.
Summary
Alerts display information either in the middle of the screen (.alert) or at the bottom of the screen (.actionSheet). An alert can display a title and a message in a smaller font underneath, along with at least one button to dismiss the alert. However, an alert can display multiple buttons and even a text field as well.
Depending on which button a user taps, the app can respond differently. If an alert displays a text field, you can customize the text field’s appearance and behavior and store the contents of the text field to use or manipulate later. Alerts interrupt the user by displaying important information that the user needs to know right away.
When your app needs to give users a limited range of options, you can use a Date Picker or a Picker View. A Date Picker lets the user choose different dates and times. You can define the format of the date and time retrieved to be short or long, depending on how you want this information displayed. A Picker View lets you define the type of choices to appear and display multiple components or wheels so users can select multiple options.
Use alerts when you need to display information to the user and get immediate feedback. Use a Date Picker or a Picker View when you need to restrict a user’s choices to a limited range of valid options.