One unique way to display the contents of two or more View Controllers is through a Page View Controller, which lets users swipe left and right. Each swipe displays a different View Controller like swiping through pages in an e-book.
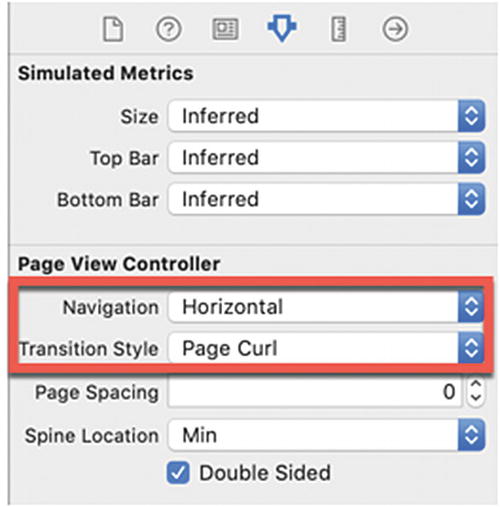
Navigation – Defines whether the user needs to swipe horizontally or vertically to display the next or previous view
Transition style – Defines whether views curl like pages in a book (page curl) or whether they simply slide in place (scroll)
Modifying the behavior of a Page Controller
After customizing the behavior of the Page Controller, the next step is to create multiple View Controllers that are completely separate from the storyboard (not connected to any existing storyboard scenes through segues). To make these View Controllers appear within a Page Controller, each View Controller needs a unique Storyboard ID that you can define within the Identity Inspector pane.
A single UIPageViewController class file to connect to the Page Controller
A UIViewController class file to connect to each View Controller you want to appear inside the Page Controller
Once you’ve added a Page Controller to your storyboard and multiple View Controllers that are not connected to any part of the storyboard through segues, you can then write Swift code to load the multiple View Controllers.
Adding and Customizing a Page Controller
- 1.
Create a new iOS project using the Single View App template (see Chapter 1) and name this new project PageControllerApp. This creates a single view for the user interface.
- 2.
Click the Main.storyboard file in the Navigator pane. Xcode displays the single view.
- 3.
Click the Library icon to open the Object Library window.
- 4.Drag and drop a Page Controller from the Object Library window to the storyboard as shown in Figure 19-2.
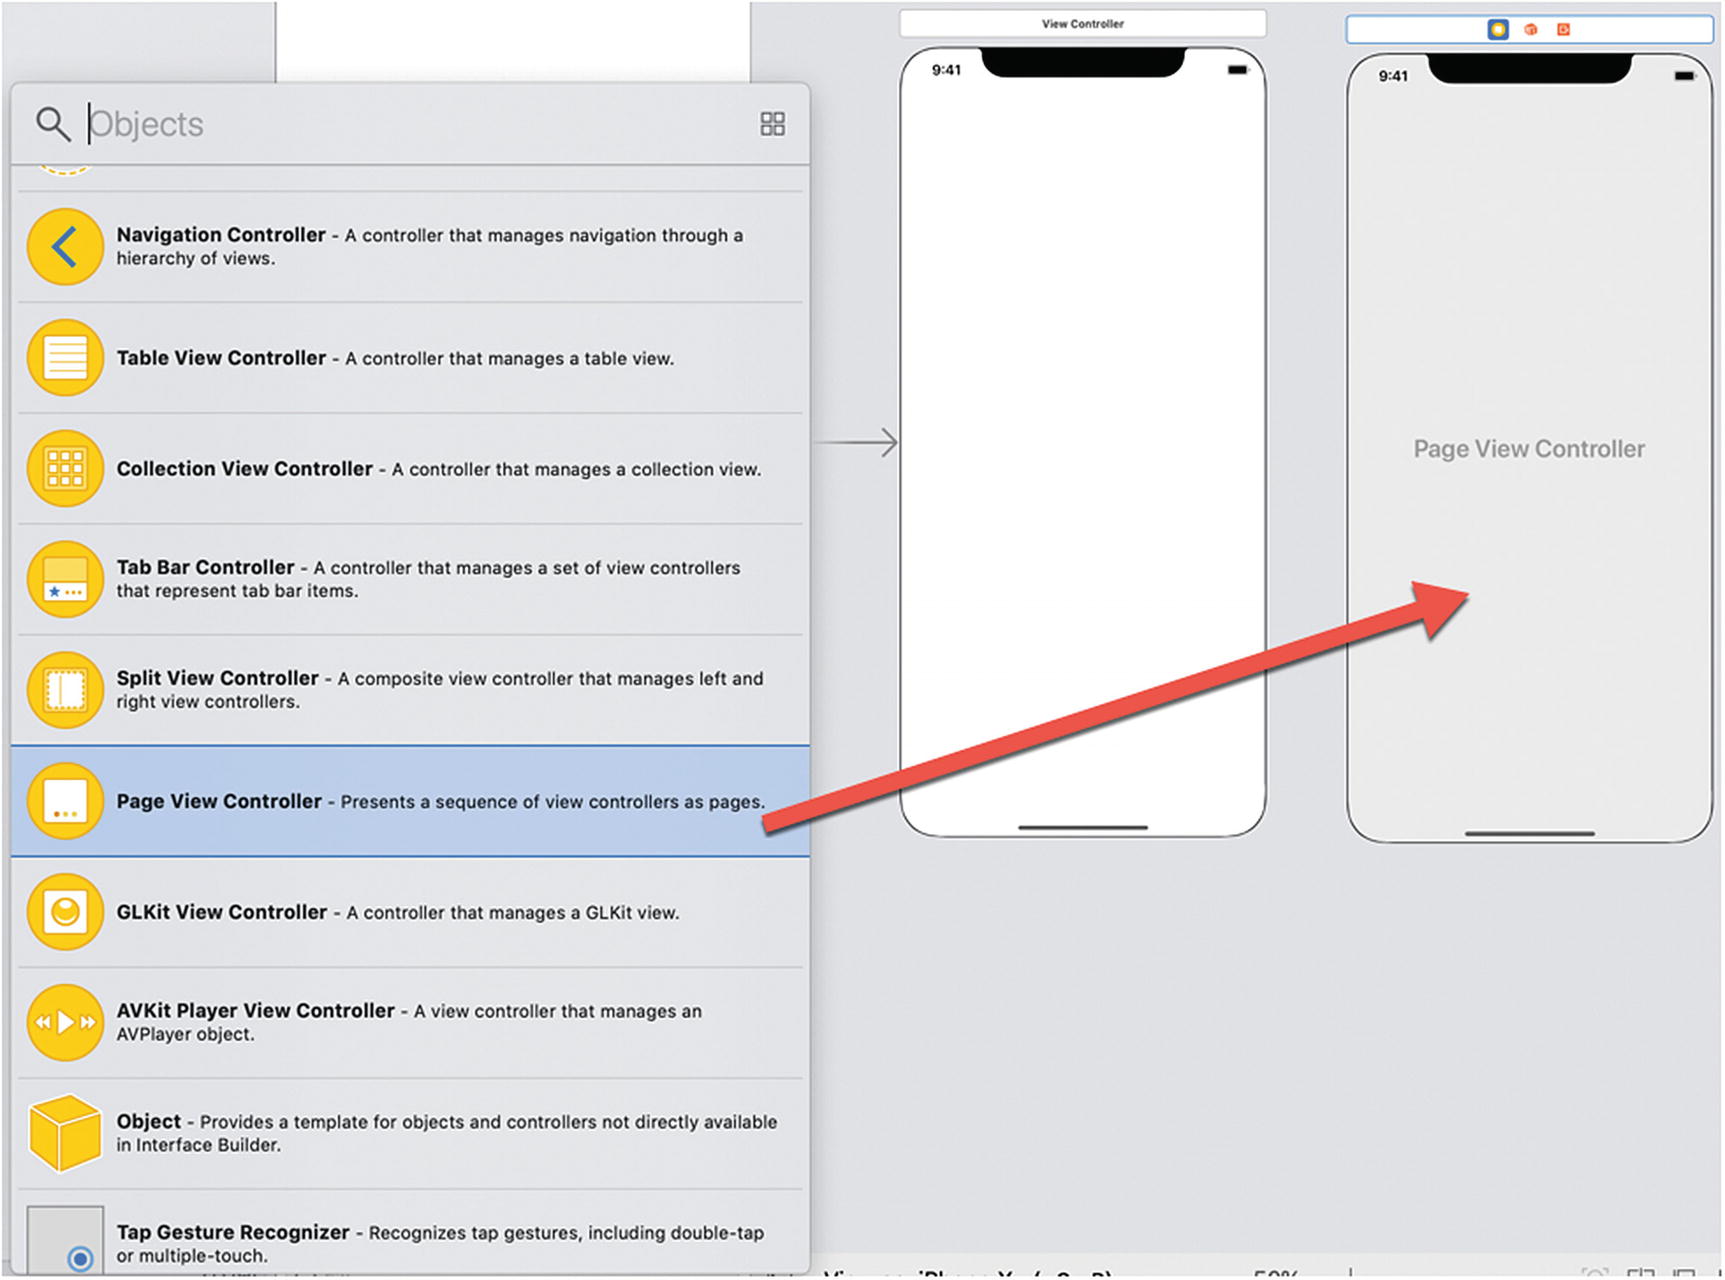 Figure 19-2
Dragging and dropping a Page Controller onto the storyboard
- 5.
Click the Page View Controller icon at the top of the Page Controller (or on the Page View Controller in the Document Outline).
- 6.
Choose View ➤ Inspectors ➤ Show Attributes Inspector, or click the Attributes Inspector icon in the upper right corner of the Xcode window.
- 7.
Click in the Navigation popup menu and choose Horizontal.
- 8.
Click in the Transition Style popup menu and choose Page Curl.
- 9.
Select the “Is Initial View Controller” check box. Xcode now displays an arrow on the left side of the Page Controller in the storyboard.
Adding View Controllers
A unique Storyboard ID (any arbitrary text)
A connection to a .swift UIViewController file
To make it obvious when we’re viewing different View Controllers, we also need to change the background color of each View Controller, but in a real app, each View Controller would display different information such as text, pictures, or user interface designs.
- 1.
Make sure the PageControllerApp is loaded into Xcode.
- 2.Click View under View Controller Scene in the Document Outline to select it as shown in Figure 19-3.
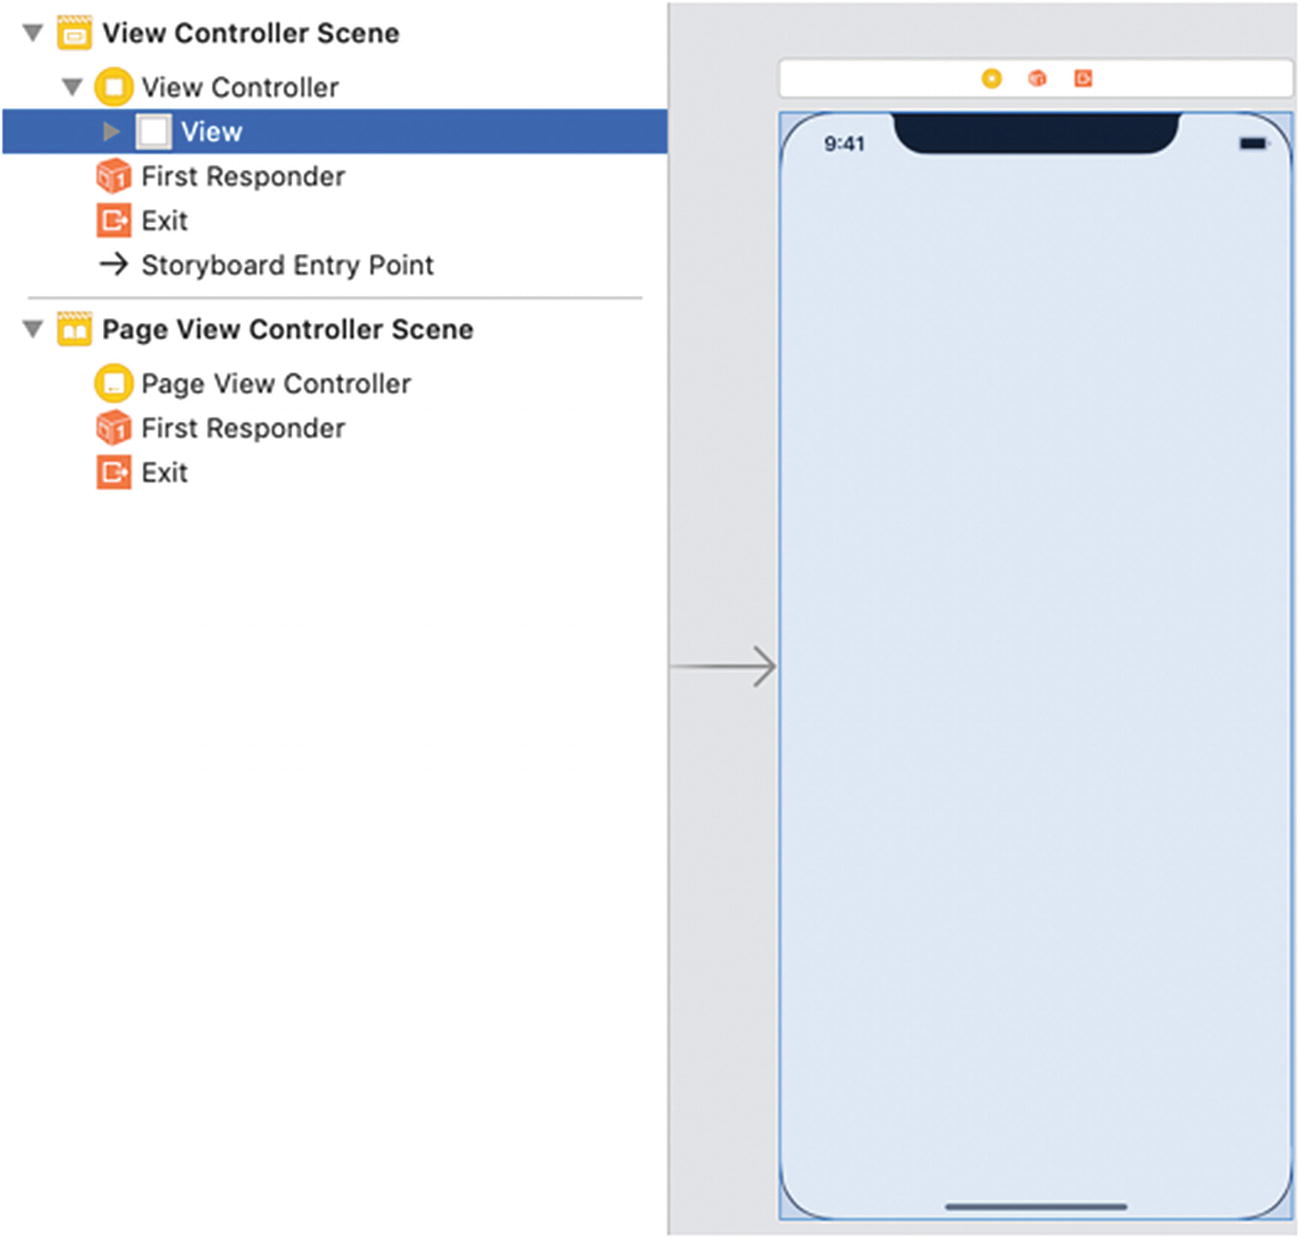 Figure 19-3
Selecting the view on the View Controller
- 3.
Choose View ➤ Inspectors ➤ Show Attributes Inspector, or click the Attributes Inspector icon in the upper right corner of the Xcode window.
- 4.
Click the Background popup menu and choose a color such as yellow. We want to display different colors on all View Controllers displayed by the Page Controller so it’s obvious we’re looking at a different View Controller.
- 5.
Click the View Controller in the Document Outline or click the View Controller icon above the View Controller.
- 6.
Choose View ➤ Inspectors ➤ Show Identity Inspector, or click the Identity Inspector icon in the upper right corner of the Xcode window.
- 7.Click in the Storyboard ID text field, type page01, and press ENTER as shown in Figure 19-4.
 Figure 19-4
Each View Controller needs a unique Storyboard ID in the Identity Inspector pane
- 8.
Choose File ➤ New ➤ File. A dialog appears, displaying different templates.
- 9.
Choose Cocoa Touch Class under the iOS category and then click the Next button. Another window appears letting you choose a name for your file.
- 10.
Click in the Class text field and type SecondViewController. (Make sure the Subclass of popup menu displays UIViewController.)
- 11.
Click the Next button and then the Create button. Xcode displays the SecondViewController.swift file in the Navigator pane.
- 12.Repeat steps 8–11 except name this .swift file as ThirdViewController. The Navigator pane should now display the ViewController.swift, SecondViewController.swift, and ThirdViewController.swift files as shown in Figure 19-5. (You can rearrange the files in the Navigator pane if you wish.)
 Figure 19-5
Creating three separate View Controller .swift files
- 13.
Click the Library icon to open the Object Library window and drag and drop a View Controller from the Object Library window to the storyboard. The storyboard should now contain a Page Controller and two View Controllers.
- 14.
Click the View Controller in the Document Outline or click the View Controller icon above the View Controller.
- 15.
Choose View ➤ Inspectors ➤ Show Identity Inspector, or click the Identity Inspector icon in the upper right corner of the Xcode window.
- 16.
Click in the Class popup menu and choose SecondViewController.
- 17.Click in the Storyboard ID text field, type page02, and press ENTER as shown in Figure 19-6.
 Figure 19-6
Connecting the second View Controller to a .swift class file and giving it a Storyboard ID
- 18.
Click the View of the second View Controller in the Document Outline, or click in the middle of the second View Controller.
- 19.
Choose View ➤ Inspectors ➤ Show Attributes Inspector, or click the Attributes Inspector icon in the upper right corner of the Xcode window.
- 20.
Click in the Background popup menu and choose a color such as orange.
- 21.
Click the Library icon to open the Object Library window and drag and drop a View Controller from the Object Library window to the storyboard. The storyboard should now contain a Page Controller and three View Controllers.
- 22.
Click the View Controller in the Document Outline or click the View Controller icon above the View Controller.
- 23.
Choose View ➤ Inspectors ➤ Show Identity Inspector, or click the Identity Inspector icon in the upper right corner of the Xcode window.
- 24.
Click in the Class popup menu and choose ThirdViewController.
- 25.
Click in the Storyboard ID text field, type page03, and press ENTER.
- 26.
Click the View of the third View Controller in the Document Outline, or click in the middle of the third View Controller.
- 27.
Choose View ➤ Inspectors ➤ Show Attributes Inspector, or click the Attributes Inspector icon in the upper right corner of the Xcode window.
- 28.Click the Background popup menu and choose a color such as cyan. The storyboard should contain a Page Controller and three View Controllers where each View Controller has a different background color as shown in Figure 19-7.
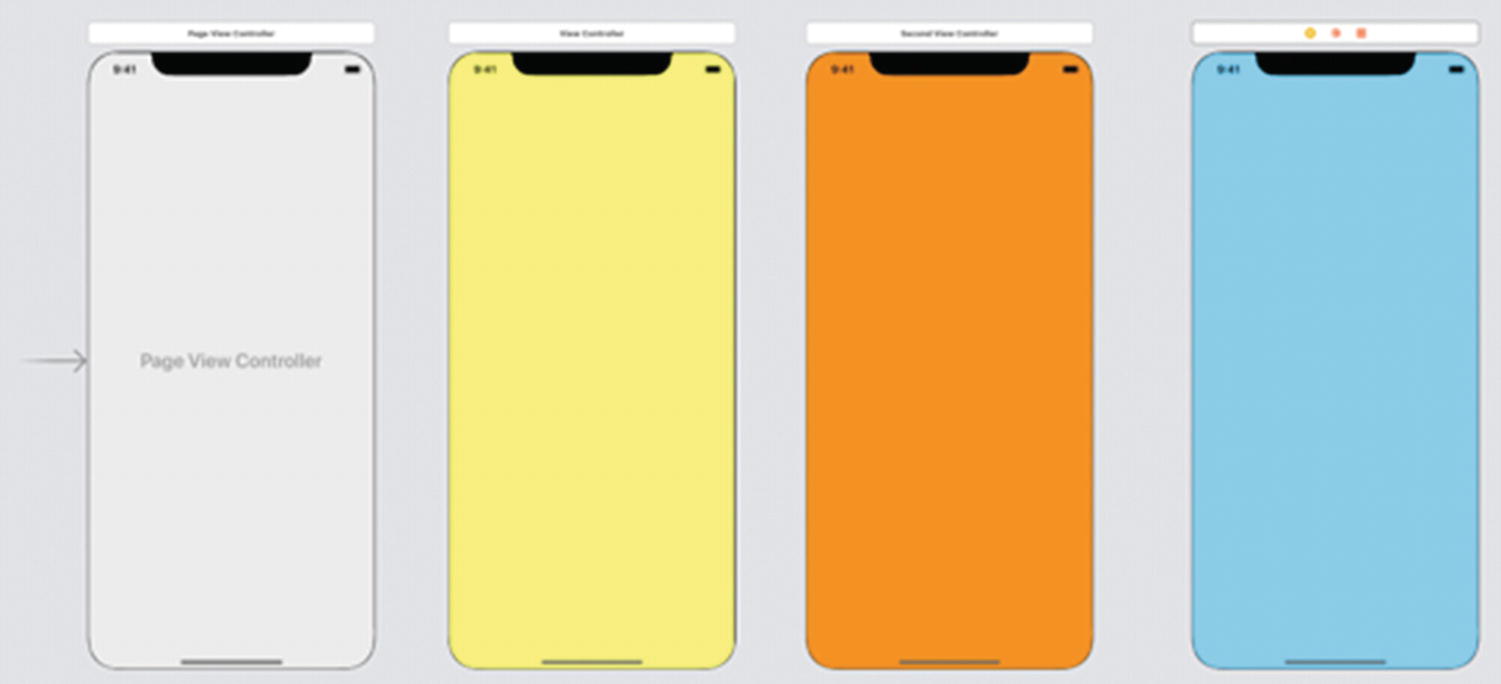 Figure 19-7
The storyboard with one Page Controller and three View Controllers
Making View Controllers Appear in a Page Controller
Define an array to hold all the View Controllers to display inside the Page Controller.
Write a viewControllerBefore method to define which View Controller to display when the user swipes to open the previous view.
Write a viewControllerAfter method to define which View Controller to display when the user swipes to open the next view.
- 1.
Make sure the PageControllerApp is loaded into Xcode.
- 2.
Choose File ➤ New ➤ File. A dialog appears displaying different templates available.
- 3.
Click Cocoa Touch Class under the iOS category and click the Next button. Another window appears, asking for a class name and subclass type.
- 4.
Click in the Class text field and type PageViewController.
- 5.Click in the Subclass of popup menu and choose UIPageViewController as shown in Figure 19-8.
 Figure 19-8
Creating a UIPageViewController .swift class file
- 6.
Click the Next button and then click the Create button. Xcode displays the PageViewController.swift file in the Navigator pane.
- 7.
Click the Main.storyboard file in the Navigator pane. Xcode displays the storyboard.
- 8.Click Page View Controller in the Document Outline, or click the Page View Controller icon at the top of the Page Controller as shown in Figure 19-9.
 Figure 19-9
Selecting the Page View Controller
- 9.
Choose View ➤ Inspectors ➤ Show Identity Inspector, or click the Identity Inspector icon at the top right corner of the Xcode window.
- 10.Click in the Class popup menu and choose PageViewController as shown in Figure 19-10.
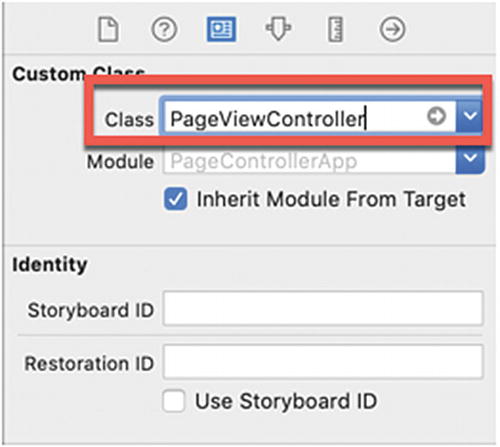 Figure 19-10
Connecting the Page Controller to the PageViewController.swift file
- 11.
Click the PageViewController.swift file in the Navigator pane.
- 12.Edit the class PageViewController line as follows:class PageViewController: UIPageViewController, UIPageViewControllerDataSource {
- 13.Under the class PageViewController line, add the following line that declares an array of UIViewControllers:var controllerArray: [UIViewController]? = nil
- 14.Modify the viewDidLoad method as follows:override func viewDidLoad() {super.viewDidLoad()dataSource = selflet storyBoard = UIStoryboard(name: "Main", bundle: nil)let firstVC = storyBoard.instantiateViewController(withIdentifier: "page01")let secondVC = storyBoard.instantiateViewController(withIdentifier: "page02")let thirdVC = storyBoard.instantiateViewController(withIdentifier: "page03")controllerArray = [firstVC, secondVC, thirdVC]self.setViewControllers([controllerArray![0]], direction: UIPageViewController.NavigationDirection.forward, animated: true, completion: nil)}
The first line defines the PageViewController.swift file as the data source for the Page Controller. The next line creates a storyboard constant named “Main”. The next three lines define constants (firstVC, secondVC, and thirdVC) to represent each View Controller to appear inside the Page Controller. Notice that each View Controller uses the Storyboard ID of each View Controller to identify it such as “page01” or “page03”.
Next, we store all of these View Controllers into the controllerArray. Finally, we set this array of View Controllers inside the Page Controller.
- 15.Add the following function to define the View Controller to appear when the user displays the previous View Controller:func pageViewController(_ pageViewController: UIPageViewController, viewControllerBefore viewController: UIViewController) -> UIViewController? {guard let vcIndex = controllerArray!.firstIndex(of: viewController) else {return nil}let preIndex = vcIndex - 1guard preIndex >= 0 else {return controllerArray!.last // loops back to end}guard controllerArray!.count > preIndex else {return nil}return controllerArray![preIndex]}
The first guard statement checks to make sure that the controller array contains valid View Controllers. Then it creates a preIndex constant to represent the previous View Controller. As long as the value of preIndex is greater than 0, the Page Controller can display the previous View Controller in the array. The moment the value of preIndex equals 0 or less, then the next View Controller displayed is the last one. This creates an infinite loop so the first View Controller displayed links to the last View Controller in the array.
The last guard statement makes sure that the total number of View Controllers in the array is greater than the value of preIndex. Finally this function returns the previous View Controller in the array.
- 16.Add the following function to define the View Controller to appear when the user displays the next View Controller:func pageViewController(_ pageViewController: UIPageViewController, viewControllerAfter viewController: UIViewController) -> UIViewController? {guard let vcIndex = controllerArray!.firstIndex(of: viewController) else {return nil}let nextIndex = vcIndex + 1guard controllerArray!.count != nextIndex else {return controllerArray!.first // loops back to beginning}guard controllerArray!.count > nextIndex else {return nil}return controllerArray![nextIndex]}The entire PageViewController.swift file should look like this:import UIKitclass PageViewController: UIPageViewController, UIPageViewControllerDataSource {var controllerArray: [UIViewController]? = niloverride func viewDidLoad() {super.viewDidLoad()dataSource = selflet storyBoard = UIStoryboard(name: "Main", bundle: nil)let firstVC = storyBoard.instantiateViewController(withIdentifier: "page01")let secondVC = storyBoard.instantiateViewController(withIdentifier: "page02")let thirdVC = storyBoard.instantiateViewController(withIdentifier: "page03")controllerArray = [firstVC, secondVC, thirdVC]self.setViewControllers([controllerArray![0]], direction: UIPageViewController.NavigationDirection.forward, animated: true, completion: nil)// Do any additional setup after loading the view.}func pageViewController(_ pageViewController: UIPageViewController, viewControllerBefore viewController: UIViewController) -> UIViewController? {guard let vcIndex = controllerArray!.firstIndex(of: viewController) else {return nil}let preIndex = vcIndex - 1guard preIndex >= 0 else {return controllerArray!.last // loops back to end}guard controllerArray!.count > preIndex else {return nil}return controllerArray![preIndex]}func pageViewController(_ pageViewController: UIPageViewController, viewControllerAfter viewController: UIViewController) -> UIViewController? {guard let vcIndex = controllerArray!.firstIndex(of: viewController) else {return nil}let nextIndex = vcIndex + 1guard controllerArray!.count != nextIndex else {return controllerArray!.first // loops back to beginning}guard controllerArray!.count > nextIndex else {return nil}return controllerArray![nextIndex]}}
- 17.
Click the Run button or choose Product ➤ Run. The Simulator window appears showing the first View Controller.
- 18.Drag the mouse from the bottom right corner to the left. Notice that the page curl transition makes the View Controller appear like a physical page as shown in Figure 19-11.
 Figure 19-11
The page curl transition style makes the transition between View Controllers look like a physical page turning
- 19.
Continue swiping left and right. Notice that when you reach the last View Controller, swiping to the left reveals the first View Controller. When you reach the first View Controller, swiping to the left reveals the last View Controller.
- 20.
Choose Simulator ➤ Quit Simulator to return to Xcode.
Summary
The Page Controller offers another way to display multiple View Controllers in sequential order. By using a page curl transition style, swiping can make each View Controller look like a physical page turning at the corner. To use a Page Controller, you must drag and drop a Page Controller from the Object Library window onto your app’s storyboard.
After adding a Page Controller to a storyboard, you need to add View Controllers to your storyboard. Each View Controller needs a unique Storyboard ID (any arbitrary text). In addition, each View Controller needs to be connected to a .swift UIViewController class file.
Finally, you need to create a .swift UIPageViewController class file and connect this to the Page Controller. Inside this .swift UIPageViewController, you need to write Swift code to create an array of View Controllers, identifying all View Controllers by their unique Storyboard ID.
Inside the UIPageViewController class file, you need to write two methods to define which view to display before and after the currently displayed View Controller.
By using a Page Controller, you can create interesting visual effects that create the illusion of turning physical pages in a printed book.